前些日子在刷 X 的时候看到这么一条帖子:

Compose Foundation 引入了一套全新的实验性 Style API。嗯?这是什么东西?Compose 整新活了?
从我们接触 Compose 的第一天起,就知道 Modifier 系统在 Compose 里面的重要性。开发者可以通过链式调用 background()、padding()、clickable()、layout()、 drawWithContent() 等修饰符,来控制 UI 元素测量、布局、绘制以及事件分发阶段的具体行为,可以说 Modifier 系统就是 Compose 里基石一般的存在,灵活且强大。
纵使 Modifier 强大,但面对复杂交互状态、样式复用、性能优化以及组件封装,它也存在着一些局限性。 例如,如果想让按钮在按下时变色,我们必须手动追踪状态、创建动画值,并根据条件应用不同的修饰符。新的 Style API 旨在通过提供一种声明式的方法来定义依赖于状态的 UI 样式,并支持自动动画,从而解决这一痛点。
本质上,Style API 的核心目的是提供一种一致的方式来定制 Composable 组件的样式,将"样式定义"与"组件逻辑"分离。可以说是一次对定义交互式、有状态 UI 外观新范式的探索。
有了它,我们甚至都不再需要
background()、padding()这些 Modifier 了:
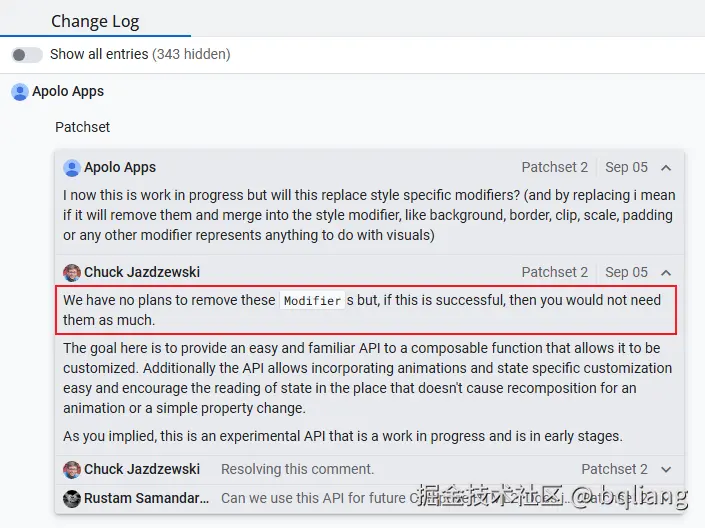
废话先不多说,先上例子,考虑一下如果要实现一个按钮,鼠标悬停的时候会动画改变其颜色,利用 Modifier 我们会这么写:
kotlin
@Composable
fun InteractiveButton(onClick: () -> Unit) {
  val interactionSource = remember { MutableInteractionSource() }
  val isPressed by interactionSource.collectIsPressedAsState()
  val isHovered by interactionSource.collectIsHoveredAsState()

  // 逻辑分散,样式和其依赖的状态糅杂在一起
  // 有点像 JS 和 CSS 混在一个文件的味道
  val backgroundColor by animateColorAsState(
    targetValue = when {
      isPressed -> Color.Red
      isHovered -> Color.Yellow
      else -> Color.Green
    }
  )

  Box(
    modifier = Modifier
      .clickable(interactionSource = interactionSource, indication = null) { onClick() }
      .background(backgroundColor)
      .size(150.dp)
  )
}
我们必须自己手动管理状态。得创建一个 MutableInteractionSource,收集它的 isPressed、isHovered 状态,然后用 animateColorAsState() 根据状态来处理颜色变化。这些状态逻辑散落在 Composable 函数体中,与 UI 声明混合在一起。
如果用新的 Styles API,可以这么写:
kotlin
@Composable
fun ClickableStyleableBox(
  onClick: () -> Unit,
  modifier: Modifier = Modifier,
  style: Style = Style,
) {
  val interactionSource = remember { MutableInteractionSource() }
  val styleState = remember { MutableStyleState(interactionSource) }
  Box(
    modifier =
      modifier
      .clickable(interactionSource = interactionSource, onClick = onClick)
      .styleable(styleState, style)
  )
}

@Composable
fun InteractiveButton(onClick: () -> Unit) {
  ClickableStyleableBox(
    onClick = onClick,
    // 依赖状态的 UI 逻辑内聚在 Style 定义中
    // "JS" 和 "CSS" 分离了
    style = {
      background(Color.Green)
      size(150.dp)

      hovered {
        animate { background(Color.Yellow) }
      }

      pressed {
        animate { background(Color.Red) }
      }
    }
  )
}
一眼看上去,代码还变多了 😂 但细品下来,新的写法语义确实更清晰。
Style 对象具备状态感知能力,你只需要在样式里声明"按下时长什么样",系统会自动帮你处理监听和状态更新 。它将"状态"和对应的"外观"封装在了一起,抽离了散落在组件代码中的"状态逻辑"。
再说直白一点,Style API 本质上是将"样式"从 Modifier 模式中抽象出来,成为一种可以独立定义、组合和复用的一等公民。
我们先从 styleable() 这个 Modifier 开始看:
kotlin
// StyleModifier.kt
fun Modifier.styleable(styleState: StyleState? = null, style: Style)接收两个参数,Style 也就是我们描述 UI 的部分(可理解为纯 CSS),先大致上知道可以这么写就行:
kotlin
val style = Style { // this: StyleScope
  background(Color.Green)
  size(150.dp)
  hovered { animate { background(Color.Yellow) } }
}
StyleState
我们只是描述了"当处于悬停状态时,颜色动画改变至黄色"。但是它内部是怎么知道我的组件是否处于哪种状态呢?
所以我们还得传递一个 StyleState 参数,由它告诉组件目前处于什么状态。
如果你的 UI 描述不依赖任何的状态,
StyleState也可以传 null(默认值)。无论处于何种状态,UI 都长一个样子,那状态也就没必要了,合理。
kotlin
val interactionSource = remember { MutableInteractionSource() }
val styleState = remember { MutableStyleState(interactionSource) }
因为通过 InteractionSource 可以获取悬停状态,把它传给 StyleState,StyleState 就自动拥有了感知悬停状态的能力(还能感知按压 Press、拖动 Drag、聚焦 Focus 状态)。
当然,如果不需要这些状态,在创建 StyleState 的时候也可以不传 InteractionSource,直接传 null,然后手动控制状态:
kotlin
val styleState = remember { MutableStyleState(null) }
// 手动控制其他状态
styleState.isSelected = false
StyleState 目前内置支持以下状态:
kotlin
// StyleState.kt
sealed class StyleState {
  abstract val isEnabled: Boolean
  abstract val isFocused: Boolean
  abstract val isHovered: Boolean
  abstract val isPressed: Boolean
  abstract val isSelected: Boolean
  abstract val isChecked: Boolean
  abstract val triStateToggle: ToggleableState

  abstract operator fun <T> get(key: StyleStateKey<T>): T

  internal abstract suspend fun processInteractions(interactions: InteractionSource)

  internal abstract val interactionSource: InteractionSource?
}
Style & StyleScope
现在再回头看 Style,它本质上是一个函数式接口,提供了一个 StyleScope 接收者供开发者配置属性 。
kotlin
// Style.kt
fun interface Style {
  fun StyleScope.applyStyle()

  companion object : Style {
    @Suppress("MissingJvmstatic") override fun StyleScope.applyStyle() {}
  }
}
val s = Style { size(1.dp) } 这种写法创建了一个 Style 的匿名对象,lambda 实现了 applyStyle() 方法。
注意 Style 接口里有一个伴生对象,继承自
Style接口本身,这是一个空的 Style 对象,一般用于函数参数的默认值,这种设计和 Modifier 一样。
kotlin
val style = Style {
  size(100.dp)
}

// 等价于

val style : Style  = object : Style {
  override fun StyleScope.applyStyle() {
    size(100.dp)
  }
}
applyStyle() 方法带有 StyleScope 上下文,我们在 Lambda 里调用的 size()、background() 等方法都是 StyleScope 接口里的方法:
kotlin
// StyleScope.kt
sealed interface StyleScope : CompositionLocalAccessorScope, Density {
  // UI 依赖的状态
  val state: StyleState

  fun contentPadding(value: Dp)
  fun externalPadding(value: Dp)
  fun border(width: Dp, color: Color)
  fun width(value: Dp)
  fun height(value: Dp)
  fun size(value: Dp)
  fun background(color: Color)
  fun alpha(@FloatRange(from = 0.0, to = 1.0) value: Float)
  fun scale(@FloatRange(from = 0.0) value: Float)
  fun translation(offset: Offset)

  fun animate(value: Style)
  fun animate(spec: AnimationSpec<Float>, value: Style)

  fun textStyle(value: TextStyle)
  fun fontSize(value: TextUnit) // Long value class
  fun fontWeight(value: FontWeight) // Int enum, 9 values, 4 bits
  fun lineHeight(value: TextUnit) // long value class
  fun contentColor(value: Color)
  // ...
}
StyleScope涵盖了几乎所有的基础 UI 修饰能力:
- 布局与尺寸:contentPadding, externalPadding, width, height, size ...。
- 绘制与外观:background, foreground, border, shape, dropShadow, innerShadow ...
- 变换与图层:alpha, scale, translation, rotation, clip, zIndex ...
- 文本样式:textStyle, contentColor, fontSize, fontWeight, fontFamily ...
StyleScope 属于 CompositionLocalAccessorScope 和 Density 的子接口,这意味着在 Style { ... } 这个 Lambda 内部,天生具备了处理屏幕密度转换和访问 CompositionLocal 的能力,我们可以直接把依赖主题颜色、依赖屏幕密度的 UI 逻辑全部"塞"进 Style { ... } 里。
-
继承
Density:随时随地的尺寸转换 在配置某些底层绘制属性(例如阴影效果 dropShadow 的偏移量)时,通常需要用到具体的像素值或依赖屏幕密度的计算,以前还得在 Composable 函数里通过LocalDensity.current绕一圈,现在在 Style 块内部可以直接进行 dp、sp 和像素 px 之间的转换了。 -
继承
CompositionLocalAccessorScope:无性能损耗的主题读取Style 定义了自己的状态观察作用域。我们可以在样式定义中使用大量基于主题的值,而不需要将这些读取操作放在外层的 Composable 函数中,这可以一定程度上减少外层 Composable 的重组,它只会触发节点样式的重新解析,并只引发最小化的底层失效(例如,只是背景色变了,则只触发重绘 Draw 的 Invalidations,跳过 Layout)。
Style 的合并
🤔,Modifier 能用 then 合并成 CombinedModifier,那 Style 能合并吗?当然能:
kotlin
// Style.kt
internal class CombinedStyle(vararg val styles: Style) : Style {
    override fun StyleScope.applyStyle() {
        for (style in styles) {
            with(style) { applyStyle() }
        }
    }

    // ...
}
CombinedStyle 继承自 Style,接收任意个 Style 对象存储为顺序数组,把它们的 applyStyle() 方法通通汇聚起来,就这么简单。
当然 Compose 团队也做了些优化,比如:
- 两个 Style 合并可使用中缀函数
then,和 Modifier 一样。 - 若合并的两个 Style 中任一个是空 Style,那么直接返回另一个。
- 如果合并的两个 Style 中包含
CombinedStyle,则把里面的 Style "掏"出来,防止层级过深。 - ...
kotlin
// Style.kt

/**
   * Merges this style with another. The style to the right on `then` will
   * overwrite properties set by the style to the left.
   */
infix fun Style.then(other: Style): Style = Style(this, other)

fun Style(style1: Style, style2: Style): Style =
  when {
    style1 === Style -> style2
    style2 === Style -> style1
    style1 is CombinedStyle && style2 is CombinedStyle -> Style(*style1.styles, *style2.styles)
    style1 is CombinedStyle -> Style(*style1.styles, style2)
    style2 is CombinedStyle -> Style(style1, *style2.styles)
    else -> CombinedStyle(style1, style2)
  }

fun Style(vararg styles: Style): Style =
  if (styles.fastAny { it === Style }) {
    val count = styles.fastCount { it !== Style }
    when (count) {
      0 -> Style
      1 -> styles.fastFirst { it !== Style }
      else -> {
        val result = arrayOfNulls<Style>(count)
        var current = 0
        styles.fastForEach {
          if (it !== Style) {
            result[current++] = it
          }
        }
        CombinedStyle(*(result as Array<Style>))
      }
    }
  } else {
    CombinedStyle(*styles)
  }
then() 方法里的注释明确提到,右边的 Style 样式会覆盖左边的,这就和 Modifier 有点区别了,我们都知道 Modifier 是链式结构
kotlin
Modifier.background(RED).background(BLUE)因为 Modifier 是链式结构,每个Modifier 节点都被添加到链条中,彼此间属于叠加关系,不会覆盖。绘制的时候,红色和蓝色都会被绘制出来,只不过蓝色把红色盖住了。
那 Style 呢?
kotlin
val style1 = Style {
    background(Color.Red)
}

val style2 = Style {
    background(Color.Blue)
}

val mergeStyle = style1 then style2
已知合并后,其实就是创建了一个 CombinedStyle(style1, style2)
在这个 CombinedStyle 的 applyStyle() 方法里,会先后调用 style1 和 style2 的 applyStyle() 方法,也就是说,最后的 mergeStyle 相当于:
kotlin
val mergeStyle = Style {
    background(Color.Red)
    background(Color.Blue)
}
要探讨后一个 background() 为什么会覆盖前面的,我们得看看 background() 内部干了什么。它只是 StyleScope 接口里的方法:
kotlin
// StyleScope.kt
sealed interface StyleScope : CompositionLocalAccessorScope, Density {
    fun background(color: Color)
}
其唯一实现是 ResolvedStyle:
kotlin
// ResolvedStyle.kt
internal class ResolvedStyle internal constructor() : StyleScope, InspectableValue {
  @JvmField internal var flags: Int = 0
  // ...
  // draw properties
  internal var backgroundColor: Color = Color.Transparent // 内部状态变量
  internal var backgroundBrush: Brush? = null

  override fun background(color: Color) {
    flags = flags or DrawFlag // 标记"绘制属性"发生了变化
    backgroundColor = color   // 【关键点】:直接赋值覆盖
    backgroundBrush = null    // 互斥逻辑:设了颜色就清空笔刷
  }
}
因为 ResolvedStyle 只是一个用来保存属性值的普通类,而不是像 Modifier 那样构建节点链表,所以对同一个变量的二次赋值必然会覆盖前者。
那么,为什么 Style 要设计成"覆盖"而 Modifier 设计为"链式"呢?
简单来说:
- Modifier 修饰符 是"装饰者模式"(Decorator Pattern),它是多层叠加系统,每层都可以独立生效(如 clip、shadow 等)
- Style 样式是"构建者模式"(Builder Pattern),它是统一配置对象,后面的覆盖前面的(类似 CSS 的级联规则。
由于 Modifier 是分层的,无论是内边距还是外边距,一个 padding() 修饰符就足够了,但是 Style 是扁平的,内边距和外边距是要分来设置的:
kotlin
val style = Style {
  contentPadding(8.dp)
  externalPadding(12.dp)
}
ResolvedStyle
既然提到了 ResolvedStyle,我们也顺便看看它,它是 Style API 的核心引擎,可以把它理解为 "样式配置单" 或者 "属性累加器"。
其作用主要包括:
- 收集属性
它实现了 StyleScope 接口,作为 Lambda (Style { ... }) 的接收者(Receiver)。就像一个篮子,收集用户在 Lambda 里定义的所有配置(padding, color, border 等) 。
- 扁平化状态
将复杂的样式层级拍平成一个简单的对象。不管合并了多少个 Style,最终都只生成一个ResolvedStyle 实例。这比 Modifier 链更轻量,因为 Modifier 链越长,生成的 Node 对象越多,遍历开销越大。
- 计算差异
通过 位掩码 和 分类对比,快速过滤、精准定位变化范围 ,避免不必要的重绘和测量。能精确地通知 Modifier:"只有颜色变了,不要去动布局"。
kotlin
// ResolvedStyle.kt
internal fun diff(other: ResolvedStyle, filterFlags: Int = 0.inv()): Int {
  // 快速筛选出属性类别的增减
  // 如:旧样式没有设置背景(DrawFlag=0),新样式设置了背景(DrawFlag=1)
  var change = flags xor other.flags
  // 计算双方都设置了的属性类别
  val checkFor = flags and other.flags and filterFlags

  // ...
  // 如果双方都包含 DrawFlag(绘制属性)
  if (checkFor and DrawFlag != 0) {
    if (
      borderWidth != other.borderWidth ||
        backgroundBrush != other.backgroundBrush ||
        // ... 逐一对比所有绘制相关字段
    ) {
      // 确认绘制真的变了
      change = change or DrawFlag
    }
  }

  // DrawFlag: 涉及绘制(如 background, border)
  // InnerLayoutFlag: 涉及内部布局(如 contentPadding)
  // OuterLayoutFlag: 涉及外部布局(如 width, height, externalPadding)
  // LayerFlag: 涉及图层变换(如 alpha, scale, rotation)
  // TextLayoutFlag / TextDrawFlag: 涉及文字的布局和绘制

  // ...
  return change
}
自定义 State
开发者是可以自定义状态的,在 MutableStyleState 类里面有一个 customStates,类型为 Map<StyleStateKey<*>, Any>,显然它就是自定义状态容器:
kotlin
// StyleState.kt
class MutableStyleState
@RememberInComposition
constructor(override val interactionSource: InteractionSource?) : StyleState() {
  internal var customStates = mutableStateMapOf<StyleStateKey<*>, Any>()
  // ...
}
我们想要存取自定义状态,得先有一个 StyleStateKey 作为钥匙🔑:
kotlin
// 创建一个 StyleStateKey
val playingStateKey = StyleStateKey(defaultValue = false)

@Composable
fun SimplePlayer(
  player: Player,
  modifier: Modifier = Modifier,
  style: Style = Style,
) {
  val styleState = remember { MutableStyleState(null) }

  RetainedEffect(player) {
    val listener = object : Player.Listener {
      override fun onIsPlayingChanged(isPlaying: Boolean) {
        // 设置状态的值
        styleState[playingStateKey] = isPlaying
      }
    }
    player.addListener(listener)

    onRetire {
      player.removeListener(listener)
    }
  }

  PlayerSurface(
    player,
    modifier = modifier
      .fillMaxSize()
      .styleable(styleState, style),
  )
}
在这里,我们写了一个播放器 UI 组件,我打算给他配置一个 playing 的 UI 状态,首先创建一个 StyleStateKey 实例,然后监听 Player 的状态,把状态更新到 StyleState 里边:只要调用 MutableStyleState 的 set() 方法即可,上面的 styleState[...] = ... 是 Kotlin 语法糖 🍬。
外部可以根据播放状态来描述 UI,譬如当处于播放状态时,显示绿色边框:
kotlin
SimplePlayer(player) { // this: StyleScope
  playing {
    borderColor(Color.Green)
  }
}
那么我们肯定还需要一个 playing() 函数,它只能在 StyleScope 里被调用(别的地方调用也没意义),接收一个 Style 参数作为状态激活时的样式:
kotlin
fun StyleScope.playing(value: Style) {
  ???
}
那么问题来了,怎么才能在状态激活时应用样式呢?
在前面我们知道 customStates 的 Value 类型是 Any,既然状态可以是任意类型,我们肯定得有一个判断规则,它通过读取 state,返回一个 Boolean 来决定是否应用样式。
我不会写,还不会抄吗?来看看自带的 hovered() 方法:
kotlin
// StyleState.kt
fun StyleScope.hovered(value: Style) {
  state(StyleStateKey.Hovered, value) { _: StyleStateKey<Boolean>, state: StyleState ->
    state.isHovered
  }
}
可以看到它是转发调用了 StyleScope 接口里的 state() 方法:
kotlin
// StyleScope.kt
sealed interface StyleScope : ... {
  fun <T> state(
    key: StyleStateKey<T>,
    value: Style,
    active: (key: StyleStateKey<T>, state: StyleState) -> Boolean,
  )
}
它接收 StyleStateKey 和 Style,重点是第三个函数参数,接收 StyleStateKey 和 StyleState,返回 Boolean 激活状态,如果是则应用样式,否则不应用。
因为我们的 playing 状态本身就是 Boolean,所以我们直接通过 Key 取出来返回即可:
kotlin
fun StyleScope.playerPlaying(value: Style) {
  state(playingStateKey, value) { key, state ->
      state[key]
  }
}
state() 函数的实现是在 ResolvedStyle 里,有兴趣可以自行挖掘,这里就不再深究:
kotlin
// ResolvedStyle.kt
internal class ResolvedStyle ... {
  ...

  override fun <T> state(
    key: StyleStateKey<T>,
    value: Style,
    active: (key: StyleStateKey<T>, state: StyleState) -> Boolean,
  ) {
    group(key.hashCode(), active(key, state), value)
  }

  private fun group(key: Int, active: Boolean, style: Style) {
    if (active) {
      group(key) { with(style) { applyStyle() } }
    } else {
      skippedGroup()
    }
  }
}
内置状态
如果你仔细看,会发现内置预定义状态 (如 Pressed, Hovered, Focused ...)并不像 customStates 一样使用 Map 数据结构来存储,而是使用一个 Int:predefinedState
kotlin
// StyleState.kt
private const val PressedStateMask = 1 shl 0
private const val HoveredStateMask = 1 shl 1
...
private const val EnabledStateMask = 1 shl 4
...

class MutableStyleState
@RememberInComposition
constructor(override val interactionSource: InteractionSource?) : StyleState() {

  internal var predefinedState: Int by mutableIntStateOf(EnabledStateMask)

  override var isEnabled: Boolean
  get() = predefinedState and EnabledStateMask != 0
  set(value) {
    predefinedState = updateFromMask(predefinedState, EnabledStateMask, value)
  }
    ...
}

private inline fun updateFromMask(predefinedState: Int, mask: Int, include: Boolean): Int =
  (predefinedState and mask.inv()) or if (include) mask else 0
一个 32 位的整型(Int),通过位运算可以同时记录 32 个布尔(或少量枚举)状态 。Compose 团队将最常用、最高频交互的状态(如 Pressed, Hovered, Focused ...)全部塞进这一个 Int 里面 。
内存占用低;读写速度快(CPU 位运算);且状态改变时,Compose 快照系统的追踪开销降到了最低。
前面我们还翻了 hovered() 函数,它也是转发调用的 StyleScope.state(...) 函数,那么系统是如何在统一的 API 下,区分读取 Map 还是读取 Int 位的呢?
kotlin
// StyleState.kt
fun StyleScope.hovered(value: Style) {
  state(StyleStateKey.Hovered, value) { _: StyleStateKey<Boolean>, state: StyleState ->
    state.isHovered
  }
}
答案就在 StyleStateKey,其默认实现是是从 Map 读取状态的:
kotlin
// StyleState.kt
open class StyleStateKey<T>(internal val defaultValue: T) {

  internal open fun getValueFrom(state: MutableStyleState): T {
    return state.getCustomValue(this)
  }

  internal open fun setValueTo(value: T, state: MutableStyleState) {
    state.setCustomValue(this, value)
  }
}


class MutableStyleState
@RememberInComposition
constructor(override val interactionSource: InteractionSource?) : StyleState() {
  ...
  internal fun <T> getCustomValue(key: StyleStateKey<T>): T =
  customStates.getOrElse(key) { key.defaultValue } as T

  internal fun <T> setCustomValue(key: StyleStateKey<T>, value: T) {
    customStates[key] = value as Any
  }
}
但是内置预定义状态使用的是 BooleanPredefinedKey(StyleStateKey 的子类),它重写了 getValueFrom() 和 setValueTo(),使其从 Int 中读写状态。
kotlin
open class StyleStateKey<T>(internal val defaultValue: T) {
  companion object {

    val Pressed: StyleStateKey<Boolean> = BooleanPredefinedKey(PressedStateMask)
  }
}

internal class BooleanPredefinedKey(val mask: Int, defaultValue: Boolean = false) :
  StyleStateKey<Boolean>(defaultValue), PredefinedKey {
    override fun getValueFrom(state: MutableStyleState): Boolean =
      state.predefinedState and mask != 0

    override fun setValueTo(value: Boolean, state: MutableStyleState) {
      state.predefinedState = updateFromMask(mask, state.predefinedState, value)
    }
}
声明式动画
Style API 提供了一种高度声明式的动画机制,开发者只需定义目标状态,底层的 StyleAnimations 及其状态机会自动接管补间动画的插值和生命周期管理,而这一切都不需要触发 Composable 的重组。
kotlin
style = {
  background(Color.Blue)
  size(150.dp)

  hovered {
    animate {
      background(Color.Yellow)
      scale(1.1f)
    }
  }

  pressed {
    animate(spec = tween(500)) {
      background(Color.Red)
      scale(0.95f)
    }
  }
}
不需要手动创建 Animatable 实例并启动协程,只需将样式的变动包装在 animate { ... } Lambda 中即可。简直不要 too simple!
动画的切入点:animate 函数做了什么?
当我们在 hovered {} 或 pressed {} 块中调用 animate {} 时,实际上是调用了 StyleScope.animate() 函数:
kotlin
// StyleScope.kt
sealed interface StyleScope : CompositionLocalAccessorScope, Density {
  fun animate(toSpec: AnimationSpec<Float>, fromSpec: AnimationSpec<Float>, value: Style)
}
而 StyleScope 的唯一实现是 ResolvedStyle,那我们看看 ResolvedStyle.animate() 方法干了啥:
kotlin
// ResolvedStyle.kt
internal class ResolvedStyle internal constructor() : StyleScope, InspectableValue {
  override fun animate(
    toSpec: AnimationSpec<Float>,
    fromSpec: AnimationSpec<Float>,
    value: Style,
  ) {
    // 标记当前样式具有动画属性
    flags = flags or AnimatedFlag
    group(AnimateGroup) {
      if (animating) { // 处于【插值应用】阶段,直接解析并应用目标样式
        apply(value)
      } else { // 处于【解析收集】阶段,将该动画块交给 StyleAnimations 处理
        val node = node!!
        // 延迟初始化 StyleAnimations
        val animations =
          node.animations ?: StyleAnimations(node).also { node.animations = it }
          // 记录该动画块
        animations.record(currentCompositeHash, value, toSpec, fromSpec)
      }
    }
  }
}
代码执行到了 animate {} 进行解析,此时并不会立刻改变 UI,它提取 currentCompositeHash 作为唯一标识 Key(用于在多次重组或状态变更时识别同一个动画块),把目标 Style 和动画规格(Spec)交给了 StyleAnimations 类去记录 。
核心大管家:StyleAnimations 与 Entry
StyleAnimations 是驱动整个组件样式动画的引擎,负责管理所有正在运行的样式过渡动画,它内部维护了一个 Entry 数组,每个 animate {} 块在底层都会被映射为一个 Entry:
kotlin
// StyleAnimations.kt
internal class StyleAnimations(val node: StyleOuterNode) {

  inner class Entry(
    val key: Int,
    var style: Style,
    var toSpec: AnimationSpec<Float>,
    var fromSpec: AnimationSpec<Float>,
  ) {
    // 底层依然是 Animatable,但被封装起来了
    // 所有的动画本质上都只是一个 0f 到 1f 的进度值
    val anim = Animatable(0f)
    // 用于存放解析后的目标样式
    val styleScope = ResolvedStyle()

    // 状态机:Untouched, Unchanged, Inserted, Removing
    // 标记该动画块的生命周期状态
    var state: Int = FlagInserted
    var job: Job? = null

    fun animateIn(coroutineScope: CoroutineScope) {
      job?.cancel()
      job = coroutineScope.launch { anim.animateTo(1f, animationSpec = toSpec) }
    }
    fun animateOut(coroutineScope: CoroutineScope) { ... }
  }

  private var values: Array<Entry?> = arrayOfNulls(2)
}
状态机的四个核心状态 (state):
FlagInserted(已插入): 动画代码块刚被执行到,表示需要执行"进入动画" (animateIn)。FlagUnchanged(未改变): 上次记录了,这次又记录了,说明状态依然保持激活,动画继续运行或保持完成状态。FlagUntouched(未触碰): 在新一轮的解析中,这个Entry没有被record调用。这意味着比如用户的鼠标移出了按钮,导致hovered块内的animate代码未被执行。此时代表需要触发"退出动画" (animateOut)。FlagRemoving(移除中): 正在执行退出动画,等anim归零后将其彻底清理。
kotlin
// StyleAnimations.kt
private const val FlagUntouched = 1 // 未触碰:本轮解析没遇到这个动画(说明条件不满足了,准备执行退出动画)
private const val FlagUnchanged = 2 // 未改变:上一轮在,这一轮还在(动画正在进行或已完成,保持现状)
private const val FlagInserted = 3  // 新插入:上一轮不在,这一轮新出现的(准备执行进场动画)
private const val FlagRemoving = 4  // 移除中:条件已不满足,但正在执行退出动画(动画播完后才真正销毁)
Diff 流程:preResolve -> record -> postResolve
当组件的状态(比如 isPressed)发生改变时,会触发 StyleOuterNode 重新解析样式。整个过程分为三步:
第一步:准备阶段 (preResolve)
在重新解析前,将当前已有的动画标记为 FlagUntouched(未触碰):
kotlin
// StyleAnimations.kt
internal class StyleAnimations(val node: StyleOuterNode) {
  ...
  fun preResolve() {
    forEach {
      it.state =
      when (it.state) {
        FlagUnchanged -> FlagUntouched
        FlagInserted -> FlagUntouched
        else -> it.state
      }
    }
  }
}
第二步:收集阶段 (record)
紧接着开始执行用户的 Style {} 定义。此时 isPressed == true,代码会走进 pressed { animate { ... } } 中,触发前文提到的 record 方法:
kotlin
// StyleAnimations.kt
internal class StyleAnimations(val node: StyleOuterNode) {
  fun record(
    key: Int,
    style: Style,
    toSpec: AnimationSpec<Float>,
    fromSpec: AnimationSpec<Float>,
  ) {
    val animation = find(key)
    if (animation != null) {
      animation.style = style // 更新可能变动的样式
      val state = animation.state
      // Key exists, update value and state
      // Update diff state: If it was untouched before, mark as written.
      // If it was already written or added during this block, keep that state.

      // 如果本次解析读到了这个动画,而且状态是 FlagUntouched
      // 说明它之前就存在(preResolve 被重置为 FlagUntouched)
      if (state == FlagUntouched) {
        animation.state = FlagUnchanged // 标记为"维持不变的"
      } else if (state == FlagRemoving) {
        // 如果原本正在退场,但突然又按下了,将其拉回进场状态
        animation.state = FlagInserted
      }
    } else {
      // 如果没找到,说明是刚按下的,插入新 Entry
      // ... (扩容逻辑)
      ensureCapacity(size + 1)
      val insertIndex = size
      values[insertIndex] = Entry(key, style, toSpec, fromSpec)
      size++
    }
  }
}
第三步:分发动画阶段 (postResolve)
kotlin
// StyleAnimations.kt
internal class StyleAnimations(val node: StyleOuterNode) {
  fun postResolve(...) : Int {
    var changedFlags = 0
    forEach {
      if (it.state == FlagInserted) {
        // 是新插入的,启动 0f -> 1f 的动画
        it.styleScope.resolve(it.style, node, density, true)
        changedFlags = changedFlags or it.styleScope.flags
        if (triggerAnimations) it.animateIn(node.node.coroutineScope)
        else it.snapIn(node.node.coroutineScope)
      } else if (it.state == FlagUntouched) {
        // 如果一轮解析下来它还是 Untouched,说明条件已不满足,进入退场逻辑
        it.state = FlagRemoving // 设置状态为"正在退出"
        it.styleScope.clear()
        it.styleScope.resolve(it.style, node, density, true)
        changedFlags = changedFlags or it.styleScope.flags
        if (triggerAnimations) it.animateOut(node.node.coroutineScope)
        else it.snapOut(node.node.coroutineScope)
      }
    }
    return changedFlags
  }
}
流程图
让我们通过一个完整的时间线,来看看这套机制是怎么运转的。假设有如下代码:
kotlin
Style {
  pressed {
    animate { background(Color.Red) } // 动画 A
  }
}
场景 1:用户第一次按下按钮 (pressed = true)
- 引擎开始解析
Style代码。 - 因为
pressed == true,代码进入animate块,调用record()。 - 引擎在缓存里找这个动画
val animation = find(key),没找到。 - 走
else分支:创建一个新Entry,状态默认为FlagInserted。 - 解析结束 (
postResolve):引擎看到它是FlagInserted,触发进场动画animateIn()。
场景 2:用户保持按下状态,但其他属性导致了重新解析
- 准备阶段 (
preResolve) :在解析前,会把所有活着的动画(之前的FlagInserted或FlagUnchanged)全部重置为FlagUntouched。- 潜台词:我要开始新一轮检查了,你们现在都是"嫌疑人(未触碰)",待会儿如果代码没执行到你们,你们就要被干掉。
- 执行阶段 :因为用户还按着,代码再次进入了
pressed {}和animate {}块,调用record()。
kotlin
// StyleAnimations.kt

val animation = find(key) // 找到了!上一次按下的那个动画
if (state == FlagUntouched) {
    animation.state = FlagUnchanged // 关键操作!
}
既然代码执行到了这里,说明 pressed 依然是 true,这个动画依然有效。所以我们要把它身上的 FlagUntouched (未触碰) 撕下来,贴上 FlagUnchanged (维持不变) 的标签。
- 结算阶段 (
postResolve) :解析结束。引擎巡视一圈,发现动画是FlagUnchanged,说明它"安全"了,继续保持原样,什么都不用做。
场景 3:用户松开手指 (pressed = false)
- 准备阶段 (
preResolve)**:老规矩,把动画状态重置为FlagUntouched。 - 执行阶段 :因为
pressed == false,代码进不去pressed {}里面了。 - 判断阶段 :
record()根本没有被调用。这个动画依然孤零零地带着FlagUntouched的标签。 - 结算阶段 (
**postResolve**):
kotlin
// StyleAnimations.kt

} else if (it.state == FlagUntouched) {
    it.state = FlagRemoving // 把它标记为正在移除
    ...
    // 触发退场动画!
    if (triggerAnimations) it.animateOut(node.node.coroutineScope)
    else it.snapOut(node.node.coroutineScope)
}
引擎发现这个动画到最后还是 Untouched,这就意味着在刚才那轮执行中,条件不满足了,于是触发退场逻辑。
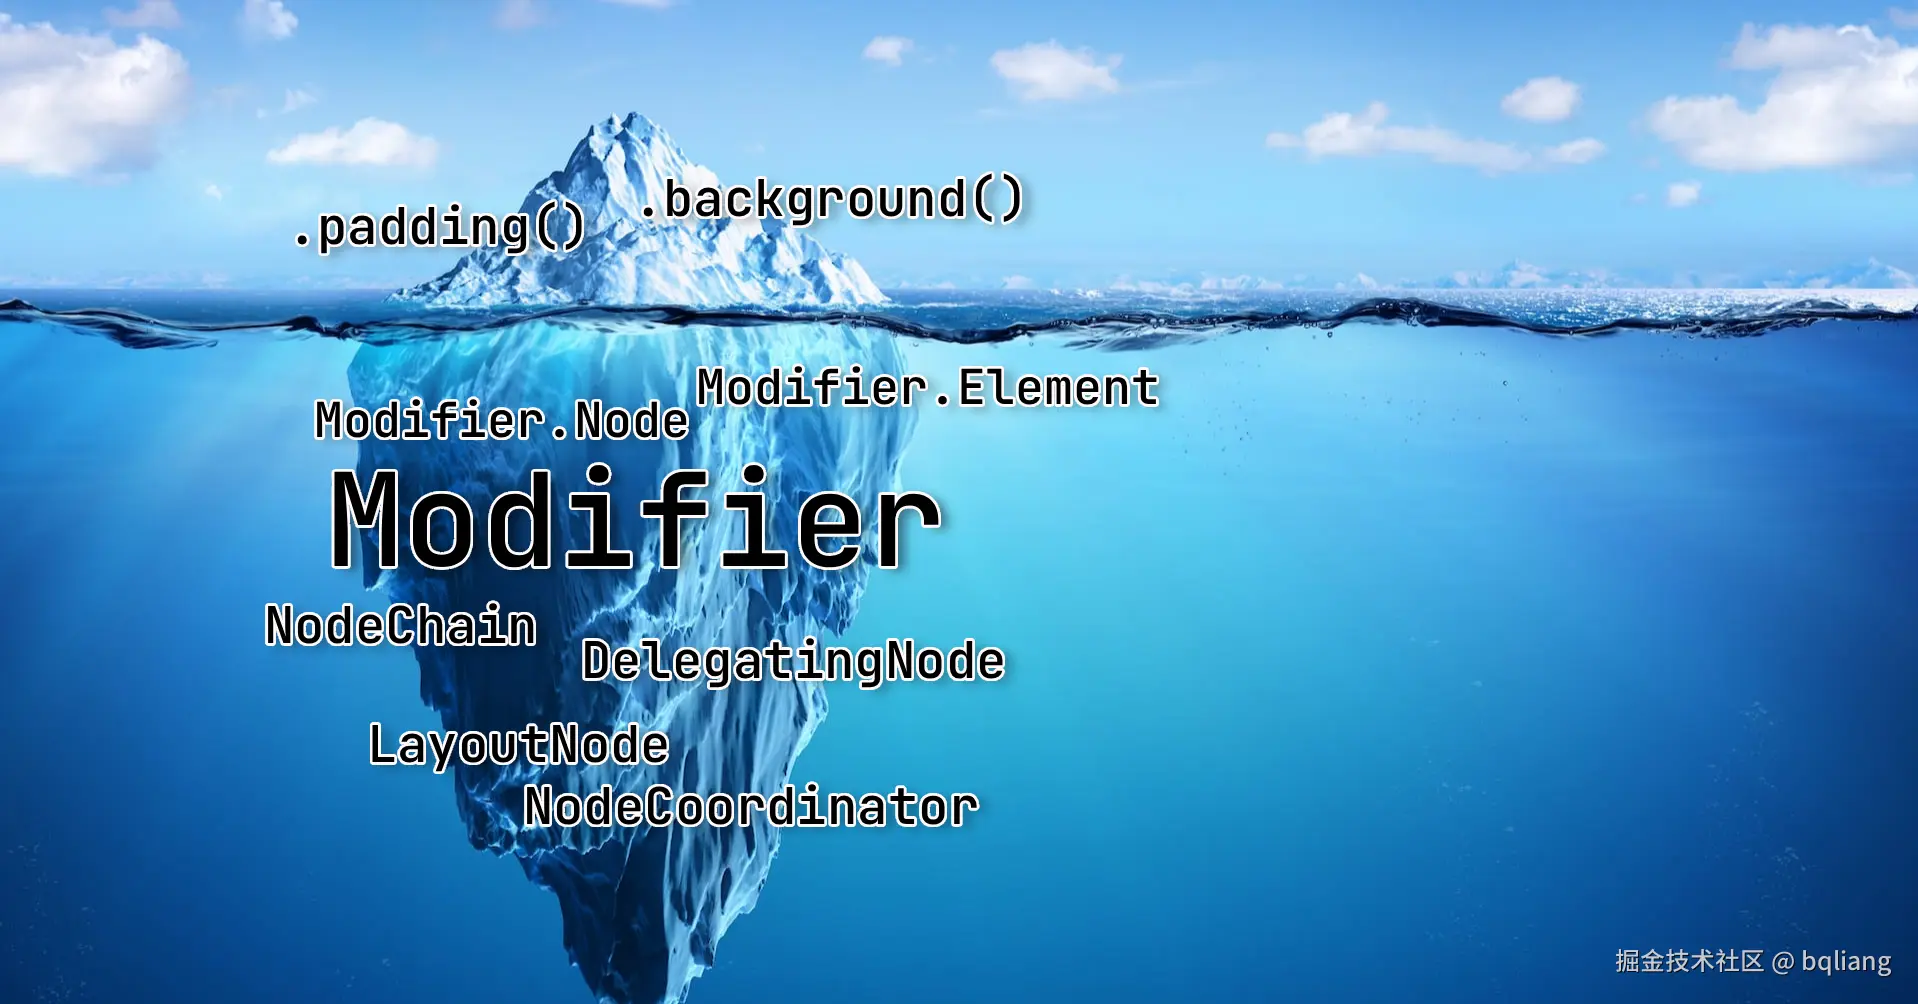
双 Node 的 styleable Modifier
文章的开头提到,一旦这套 Style API 成熟起来,便不再需要 background()、size()、padding() ... 这些修饰符了,不明所以的人还以为 Style API 是来取代 Modifier 的,但其实不然,它的最终落地还是得依靠 Modifier.styleable(),它能"取代"background()、size()、padding() ... 这些上层修饰符倒是不假,但不是取代 Modifier 系统本身。Modifier 系统是极其庞大复杂的,我们日常使用的修饰符只是其中的冰山一角。
styleable 修饰符是 新 Style DSL(声明式样式)与传统 Modifier 体系(底层渲染树)之间的"核心连接桥梁"。相较于其他修饰符,它的特别之处在于"双 Node 设计"。要理解为什么 styleable() 要用双 Node,我们需要先了解什么是 Modifier.Node。
在 Compose 早期(1.5 版本之前),带状态的 Modifier 通常使用 composed { ... } 实现,这会导致在重组时产生较大的性能开销。 为了解决这个问题,Compose 引入了 Modifier.Node 架构。
- Modifier 链只是轻量级的数据结构(元素的描述)。
- Modifier.Node 才是真正在 UI 树上存活的、具有生命周期和状态的"实体"节点。
绝大多数基础 Modifier 都是单 Node 的。 比如调用 Modifier.padding().background(),底层会生成两个独立的 Node:一个是负责布局的 PaddingNode,另一个是负责绘制的 BackgroundNode。它们在 UI 树上按照调用顺序依次排列。
为什么 styleable 需要双 Node 设计?
来看看 styleable 的源码入口:
kotlin
// StyleModifier.kt
fun Modifier.styleable(styleState: StyleState? = null, style: Style): Modifier =
  if (style === Style) this
  else this then StyleElement(styleState, style) then StyleInnerElement
如你所见,只要你应用了 styleable,它就会在 Modifier 链上强行塞入两个 Element,进而生成两个 Node:StyleOuterNode 和 StyleInnerNode。
根本原因:Compose 的盒子模型与顺序强相关,而 Style 对象是"全包圆" (打包在一起,不分先后)的。
在传统 Compose 中,顺序决定了表现:
Modifier.padding(10.dp).background(Color.Blue):先内缩 10dp,再画蓝色背景。(结果:蓝色背景变小了)。Modifier.background(Color.Blue).padding(10.dp):先画蓝色背景,再内缩给子组件留空间。(结果:蓝色背景在外,内容在内)。
但在新的 Style API 中,你是在一个闭包里同时定义了外边距、背景、内边距:
kotlin
Style {
  externalPadding(10.dp) // 外边距 (Margin)
  background(Color.Blue) // 背景色
  contentPadding(20.dp)  // 内边距 (Padding)
}
由于这些属性都封装在一个 ResolvedStyle 对象里,单个 LayoutModifierNode 无法在一次测量 (Measure) 阶段既处理外边距,又处理内边距,还能把背景刚好画在两者之间。
在 StyleInnerNode 的源码注释中有这么一段话:
The style modifier currently requires two modifier nodes in order to make all of the different styles work properly. More specifically, two LayoutModifierNodes are required. The "outer" modifier implements almost everything, except for padding. In order for padding, drawing, etc. to work properly, we need this inner modifier to add the "padding".
翻译:style modifier 目前需要两个 node 才能正常工作。更准确地说,需要两个 LayoutModifierNode。Outer 实现了除了 padding 之外的几乎所有东西。为了让内边距和绘制正常工作,我们需要 Inner 来专门添加 padding。
双 Node 的分工协作:
StyleOuterNode(外层): 负责测量width、height、externalPadding(外边距),并负责绘制 (draw) 背景、边框、阴影。StyleInnerNode(内层): 只负责一件事情,就是contentPadding(内边距)。它接收到 Outer 传来的空间后,往内缩一圈,然后再去测量真正的子组件Measurable。 通过这种"三明治"结构(Outer -> 绘制层 -> Inner),完美还原了类似 CSS 的 Standard Box Model。
StyleOuterNode 的超强接口组合
StyleOuterNode 几乎实现了 Compose UI 底层能提供的所有能力。
kotlin
// StyleModifier.kt
internal class StyleOuterNode(styleState: StyleState?, style: Style) :
    DelegatingNode(),
    LayoutModifierNode,
    DrawModifierNode,
    TraversableNode,
    CompositionLocalConsumerModifierNode,
    ObserverModifierNode,
    CompositionLocalAccessorScope,
    TextStyleProviderNode { ... }
我们逐一拆解这些接口赋予了 Style 什么"超能力":
LayoutModifierNode&DrawModifierNode:- 作用 :赋予它参与布局测量 (
measure/layout) 和渲染画面 (draw) 的能力。 - 源码体现 :内部重写了
MeasureScope.measure来计算宽高和偏移量,重写了ContentDrawScope.draw来绘制backgroundColor、shape、border等。
- 作用 :赋予它参与布局测量 (
ObserverModifierNode:- 作用:赋予它监听状态变量读取的能力,实现无重组刷新。
- 源码体现 :在解析样式时,使用了
observeReads { next.resolve(...) }。如果你的Style里读取了一个mutableStateOf,当这个 State 改变时,节点会自动收到onObservedReadsChanged()回调,仅仅触发自己的重绘或重新布局,而不会引发包含它的 Composable 发生重组。
CompositionLocalAccessorScope&CompositionLocalConsumerModifierNode:- 作用 :让
Style内部能够直接读取当前环境的全局变量(如主题色、屏幕密度等)。 - 源码体现 :提供了
CompositionLocal<T>.currentValue的支持,所以你可以在 Style 闭包里直接写类似LocalContentColor.current这样的代码。
- 作用 :让
TraversableNode&TextStyleProviderNode:- 作用:这是实现文本样式继承 (Inherited Text Style) 的关键!它允许节点在 UI 树上寻找自己的祖先或后代。
- 源码体现 :
StyleOuterNode实现了computeInheritedTextStyle。当底层的文本组件(如TextStringSimpleNode)需要知道自己的字体颜色时,它会通过traverseAncestors(OuterNodeKey)一层层往上找所有的StyleOuterNode,把它们定义的字体、颜色合并继承下来。这打破了 Compose 以前文本样式只能通过显式参数或 Local 传递的限制。
总结
styleable 使用双 Node (StyleOuterNode + StyleInnerNode) 的设计,是因为它需要将原本散落的 Modifier 链式调用(背景、尺寸、内外边距)抽象成一个高内聚的 Style 对象。
为了在底层的渲染管线中维持正确的"外边距 -> 绘制 -> 内边距"先后顺序,必须用两个布局节点将绘制夹在中间。而作为主力的 StyleOuterNode,则通过实现一篮子核心 Node 接口,一肩挑起了布局、绘制、状态监听、动画驱动和上下文继承的所有重任,可谓是大明的严世藩。

通过这种精巧的"内外护法"配合,Style API 既让开发者享受到了类似 CSS 那样不关心顺序、所见即所得的声明式写法,又完美兼容了 Compose 底层严格依赖顺序的盒子模型。
结语
实验性的 Styles API 为 Jetpack Compose 引入了一种定义交互式、有状态 UI 外观的全新范式。我们不再需要手动去维护散落各处的 InteractionSource、派生状态以及复杂的动画值,这套新 API 成功地将样式逻辑收敛到了高内聚、声明式的代码块中。
在设计上,核心的 Style 函数式接口将视觉属性封装为在 StyleScope 作用域下运行的 Lambda 表达式。在这个作用域内,开发者可以全盘掌控包括尺寸和内边距(布局)、背景和边框(绘制)、缩放和旋转(变换)以及文本排版等各种属性。同时,配合 StyleState 接口暴露的诸如 pressed(按下)、hovered(悬停)、focused(聚焦)、selected(选中)等交互状态,开发者能够轻松实现条件样式,彻底告别繁琐的状态管理。
更令人惊喜的是其"全自动"的动画系统。只需将样式变更包裹在 animate { ... } 块中,系统就能在不同状态间实现平滑的插值过渡,还可以通过传入 AnimationSpec 来深度定制动画曲线。在底层,这一切都交由 StyleAnimations 引擎来默默接管,包括动画条目的生命周期追踪、插值计算以及并发动画的处理。
在底层架构的实现上,styleable 修饰符采用了"双 Node"架构,巧妙地将外层修改(如背景、边框、变换)与内层修改(内容内边距)分离开来,完美兼容了严格依赖顺序的盒子模型。而作为核心数据载体的 ResolvedStyle 类,内部虽然存储了大约 50 个属性,但通过基于位掩码的优化机制,实现了极高的内存效率和极速的差异检测(Diff)。这种精细的失效机制确保了:仅仅修改颜色只会触发重绘(Draw),修改尺寸才会触发重新布局(Layout),完美绕过了性能昂贵的重组。
尽管 Styles API 目前仍处于实验阶段,未来 API 签名也可能会发生变动,但它无疑为 Compose 指明了一个极具潜力的演进方向:将重交互的样式收敛为声明式定义,并交由底层框架进行全自动的极致优化。 随着这套 API 的日趋成熟,是极有可能从根本上颠覆我们在 Compose 中编写和封装状态化 UI 组件的方式的。
文章的主要内容到这里已经结束了。
因为 Styles API 还未正式发布,写这篇文章时,我用的是 androidx 的 snapshot 版本,这里顺便记录一下这个过程,和主体内容无关,不感兴趣的读者可以略过退出了,如果能留下点赞那就更好了 🌹
如何使用 AndroidX 库 Snapshot 版本
第一步:确认该 Commit 是否已合并 (Merged)
commit 提交:Introduce an experimental Style API
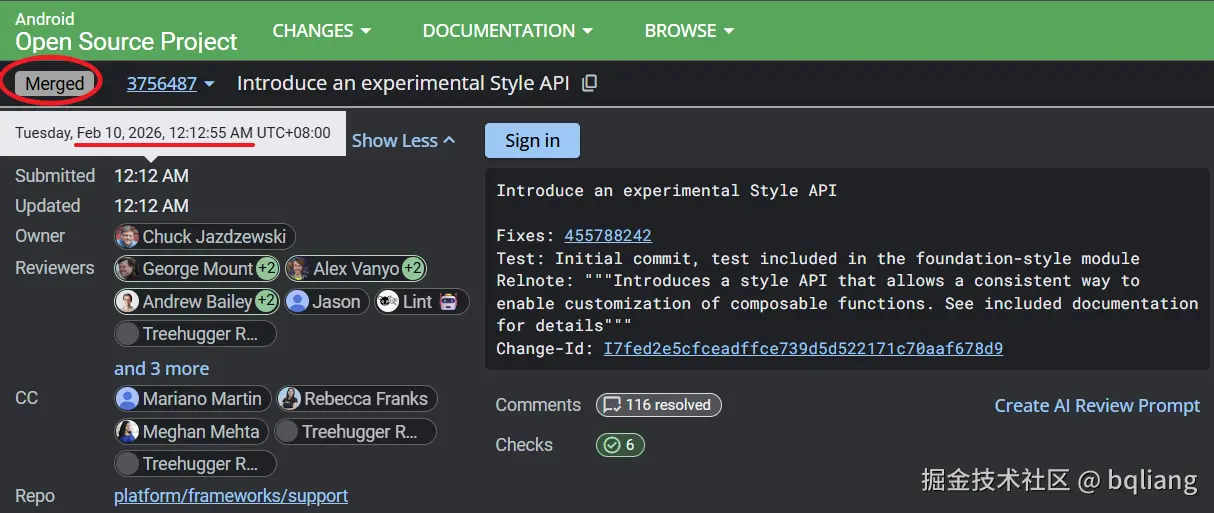
- 如果是 Merged (已合并):说明代码已经进入主分支,可以通过 Snapshot 仓库使用。
- 如果是 Open (进行中) 或 Abandoned (已废弃):说明代码还没进主线,无法通过官方 Snapshot 仓库直接引用。这种情况下,只能将 AndroidX 源码拉取到本地,Cherry-pick 该改动并自行编译(这就复杂了,通常不推荐)。
第二步:找到包含该 Commit 的 Build ID
假设 Commit 已经合并了,我们需要找到一个在该 Commit 合并之后生成的构建 ID (Build ID)。
上面 Gerrit 页面上的 "Submitted" 的时间戳是 2026 年 2月 10 日 00:12 (凌晨) ,我们要找到一个在该时间点后的构建的 ID。
打开 Android 官方持续集成的构建列表:ci.android.com/builds/bran...
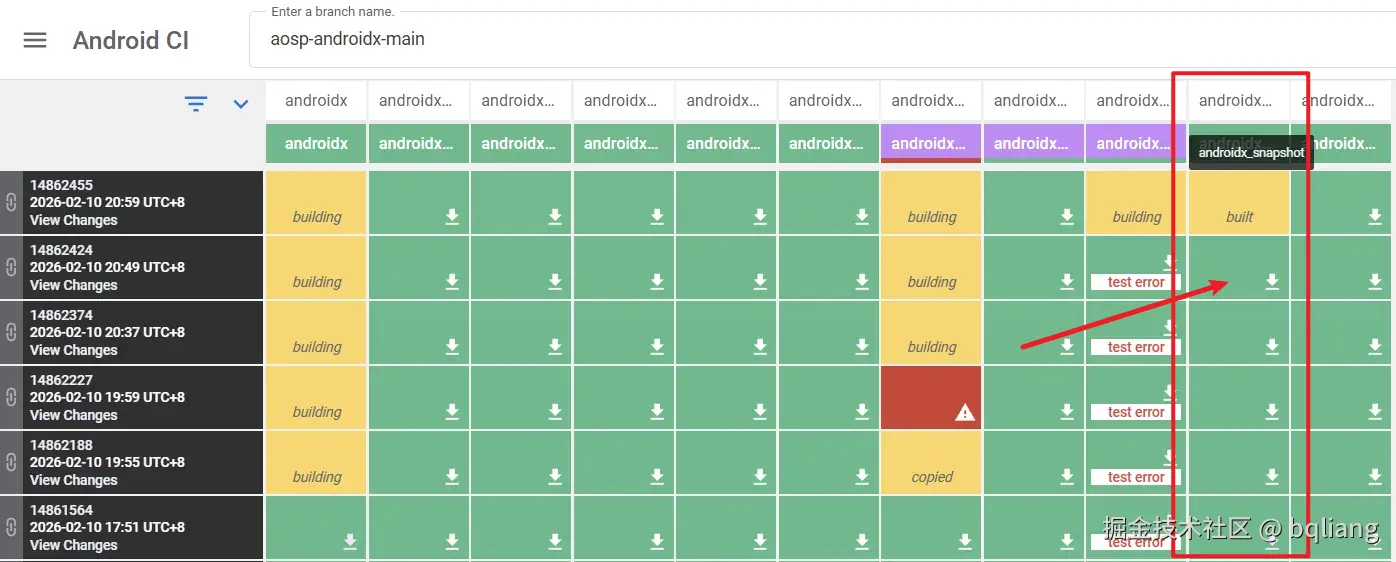
倒数第二列就是 android_snapshot,找到这一列的第一个绿色格子。
在左边可以看到 build id 是 14862424,时间是 2026 年 2 月 10 日 20:49,显然是晚于 commit 合并的时候,说明构建已经包含了我们想要的代码:

绿色格子的右下角有一个下载 icon,点击它可以跳转查看本次构建的产物(View artifacts),
页面长这个样子:

因为 Styles API 是属于 androidx.compose.foundation:foundation 库,我们得找出这个库构建出来的具体版本是什么:

可以看到版本是 1.11.0-SNAPSHOT
第三步:添加仓库地址
我们先把 build id 复制下来,打开 androidx.dev

按指南添加仓库地址,把 build id 换成前面找到的那个数字:
diff
// settings.gradle.kts
pluginManagement {
    repositories {
        google()
        gradlePluginPortal()
        mavenCentral()
+       maven {
+           url = uri("https://androidx.dev/snapshots/builds/[buildId]/artifacts/repository")
+       }
    }
}

dependencyResolutionManagement {
    repositories {
        google()
        mavenCentral()
+       maven {
+           url = uri("https://androidx.dev/snapshots/builds/[buildId]/artifacts/repository")
+       }
    }
}
接下来就是引入 Snapshot 版本的具体 aar 了:
diff
dependencies {
+   implementation("androidx.compose.foundation:foundation:1.11.0-SNAPSHOT")
}
到这里准备工作就搞定了,Gradle Sync!
顺便说一下,androidx.dev 网站的右上角可以直接找到所有的 build id 列表