背景
在以下三篇文章中,我们探讨了 如何实现 @Before/@After 注解的替代品 的问题。
- 浅解 JUnit 4 第十二篇:如何实现一个 @Before 注解的替代品?(上)
- 浅解 JUnit 4 第十三篇:如何实现一个 @Before 注解的替代品?(下)
- 浅解 JUnit 4 第十四篇:如何实现一个 @After 注解的替代品?
那么推而广之,我们能否在测试方法 运行前后 做些事情呢?比如统一计算测试方法的运行耗时,统一输出某些日志,统一分配/释放某些资源。本文会探讨这个问题。
要点
-
Statement 可以封装"运行测试方法"的逻辑,通过使用层层包装的 Statement 对象,我们可以实现各种对测试方法的 前置/后置/前置+后置 处理
-
通过实现 TestRule 接口(或者实现 MethodRule 接口),我们就可以自由控制测试方法 执行前/执行后/执行前+执行后 的逻辑
-
StarSectRule (这个类是我自己写的)作为 TestRule 接口的实现类,其
apply(Statement base, Description description)方法会返回一个 Statement 对象,这个 Statement 对象的evaluate()方法的执行逻辑是 ⬇️- 首先 输出星宿派的一个口号
- 其次 调用
base变量的evaluate()方法 - 最后 输出星宿派的一个口号
正文
杜撰的场景
为了让代码有趣一点,我们杜撰一个场景。假如《天龙八部》里的星宿派的某个弟子需要写点单元测试,这位弟子想到如果能在测试方法运行前后都输出 星宿老仙 法力無邊 这个口号就好了。现在我们需要帮助这位弟子。
生活嘛,总得自己找点乐子,场景虽然是胡编乱造的,但是本文展示的代码真的可以运行。
项目结构
text.
├── pom.xml
└── src
    ├── main
    │   └── java
    │       └── org
    │           └── example
    │               └── SimpleAdder.java
    └── test
        └── java
            └── org
                └── study
                    ├── rules
                    │   └── StarSectRule.java
                    └── SimpleAdderTest.java
SimpleAdder.java 的代码如下 ⬇️
java
package org.example;

public class SimpleAdder {

    public int add(int a, int b) {
        return a + b;
    }
}
StarSectRule.java 的代码如下 ⬇️
java
package org.study.rules;

import org.junit.rules.TestRule;
import org.junit.runner.Description;
import org.junit.runners.model.Statement;

/**
 * A {@link TestRule} that is designed for Star Sect members.
 * 专门给星宿派弟子用的 {@link TestRule}
 */
public class StarSectRule implements TestRule {

    @Override
    public Statement apply(Statement base, Description description) {
        return new Statement() {
            @Override
            public void evaluate() throws Throwable {
                System.out.println("[測試前] 星宿老仙 法力無邊");
                base.evaluate();
                System.out.println("[測試後] 星宿老仙 法力無邊");
            }
        };
    }
}
SimpleAdderTest.java 的代码如下 ⬇️
java
package org.study;

import org.example.SimpleAdder;
import org.junit.*;
import org.junit.rules.TestRule;
import org.junit.runner.JUnitCore;
import org.junit.runner.Result;
import org.junit.runner.notification.Failure;
import org.study.rules.StarSectRule;

public class SimpleAdderTest {

    private final SimpleAdder adder = new SimpleAdder();

    @Rule
    public TestRule buildTestRule() {
        return new StarSectRule();
    }

    @Test
    public void testAdd() {
        int a = 1;
        int b = 2;
        int expectedResult = a + b;
        Assert.assertEquals(expectedResult, adder.add(a, b));
        System.out.printf("adder.add(%s, %s) = %s + %s = %s%n", a, b, a, b, expectedResult);
    }

    public static void main(String[] args) {
        Result result = JUnitCore.runClasses(SimpleAdderTest.class);
        for (Failure failure : result.getFailures()) {
            System.out.println(failure);
        }
    }
}
pom.xml 文件的内容如下 ⬇️
xml
<?xml version="1.0" encoding="UTF-8"?>
<project xmlns="http://maven.apache.org/POM/4.0.0"
         xmlns:xsi="http://www.w3.org/2001/XMLSchema-instance"
         xsi:schemaLocation="http://maven.apache.org/POM/4.0.0 http://maven.apache.org/xsd/maven-4.0.0.xsd">
    <modelVersion>4.0.0</modelVersion>

    <groupId>org.example</groupId>
    <artifactId>junit-study</artifactId>
    <version>1.0-SNAPSHOT</version>

    <properties>
        <maven.compiler.source>25</maven.compiler.source>
        <maven.compiler.target>25</maven.compiler.target>
        <project.build.sourceEncoding>UTF-8</project.build.sourceEncoding>
    </properties>
    <dependencies>
        <dependency>
            <groupId>junit</groupId>
            <artifactId>junit</artifactId>
            <version>4.13.2</version>
            <scope>test</scope>
        </dependency>
    </dependencies>

</project>
运行结果
运行 SimpleAdderTest 中的 main 方法,应该可以看到如下的结果 ⬇️
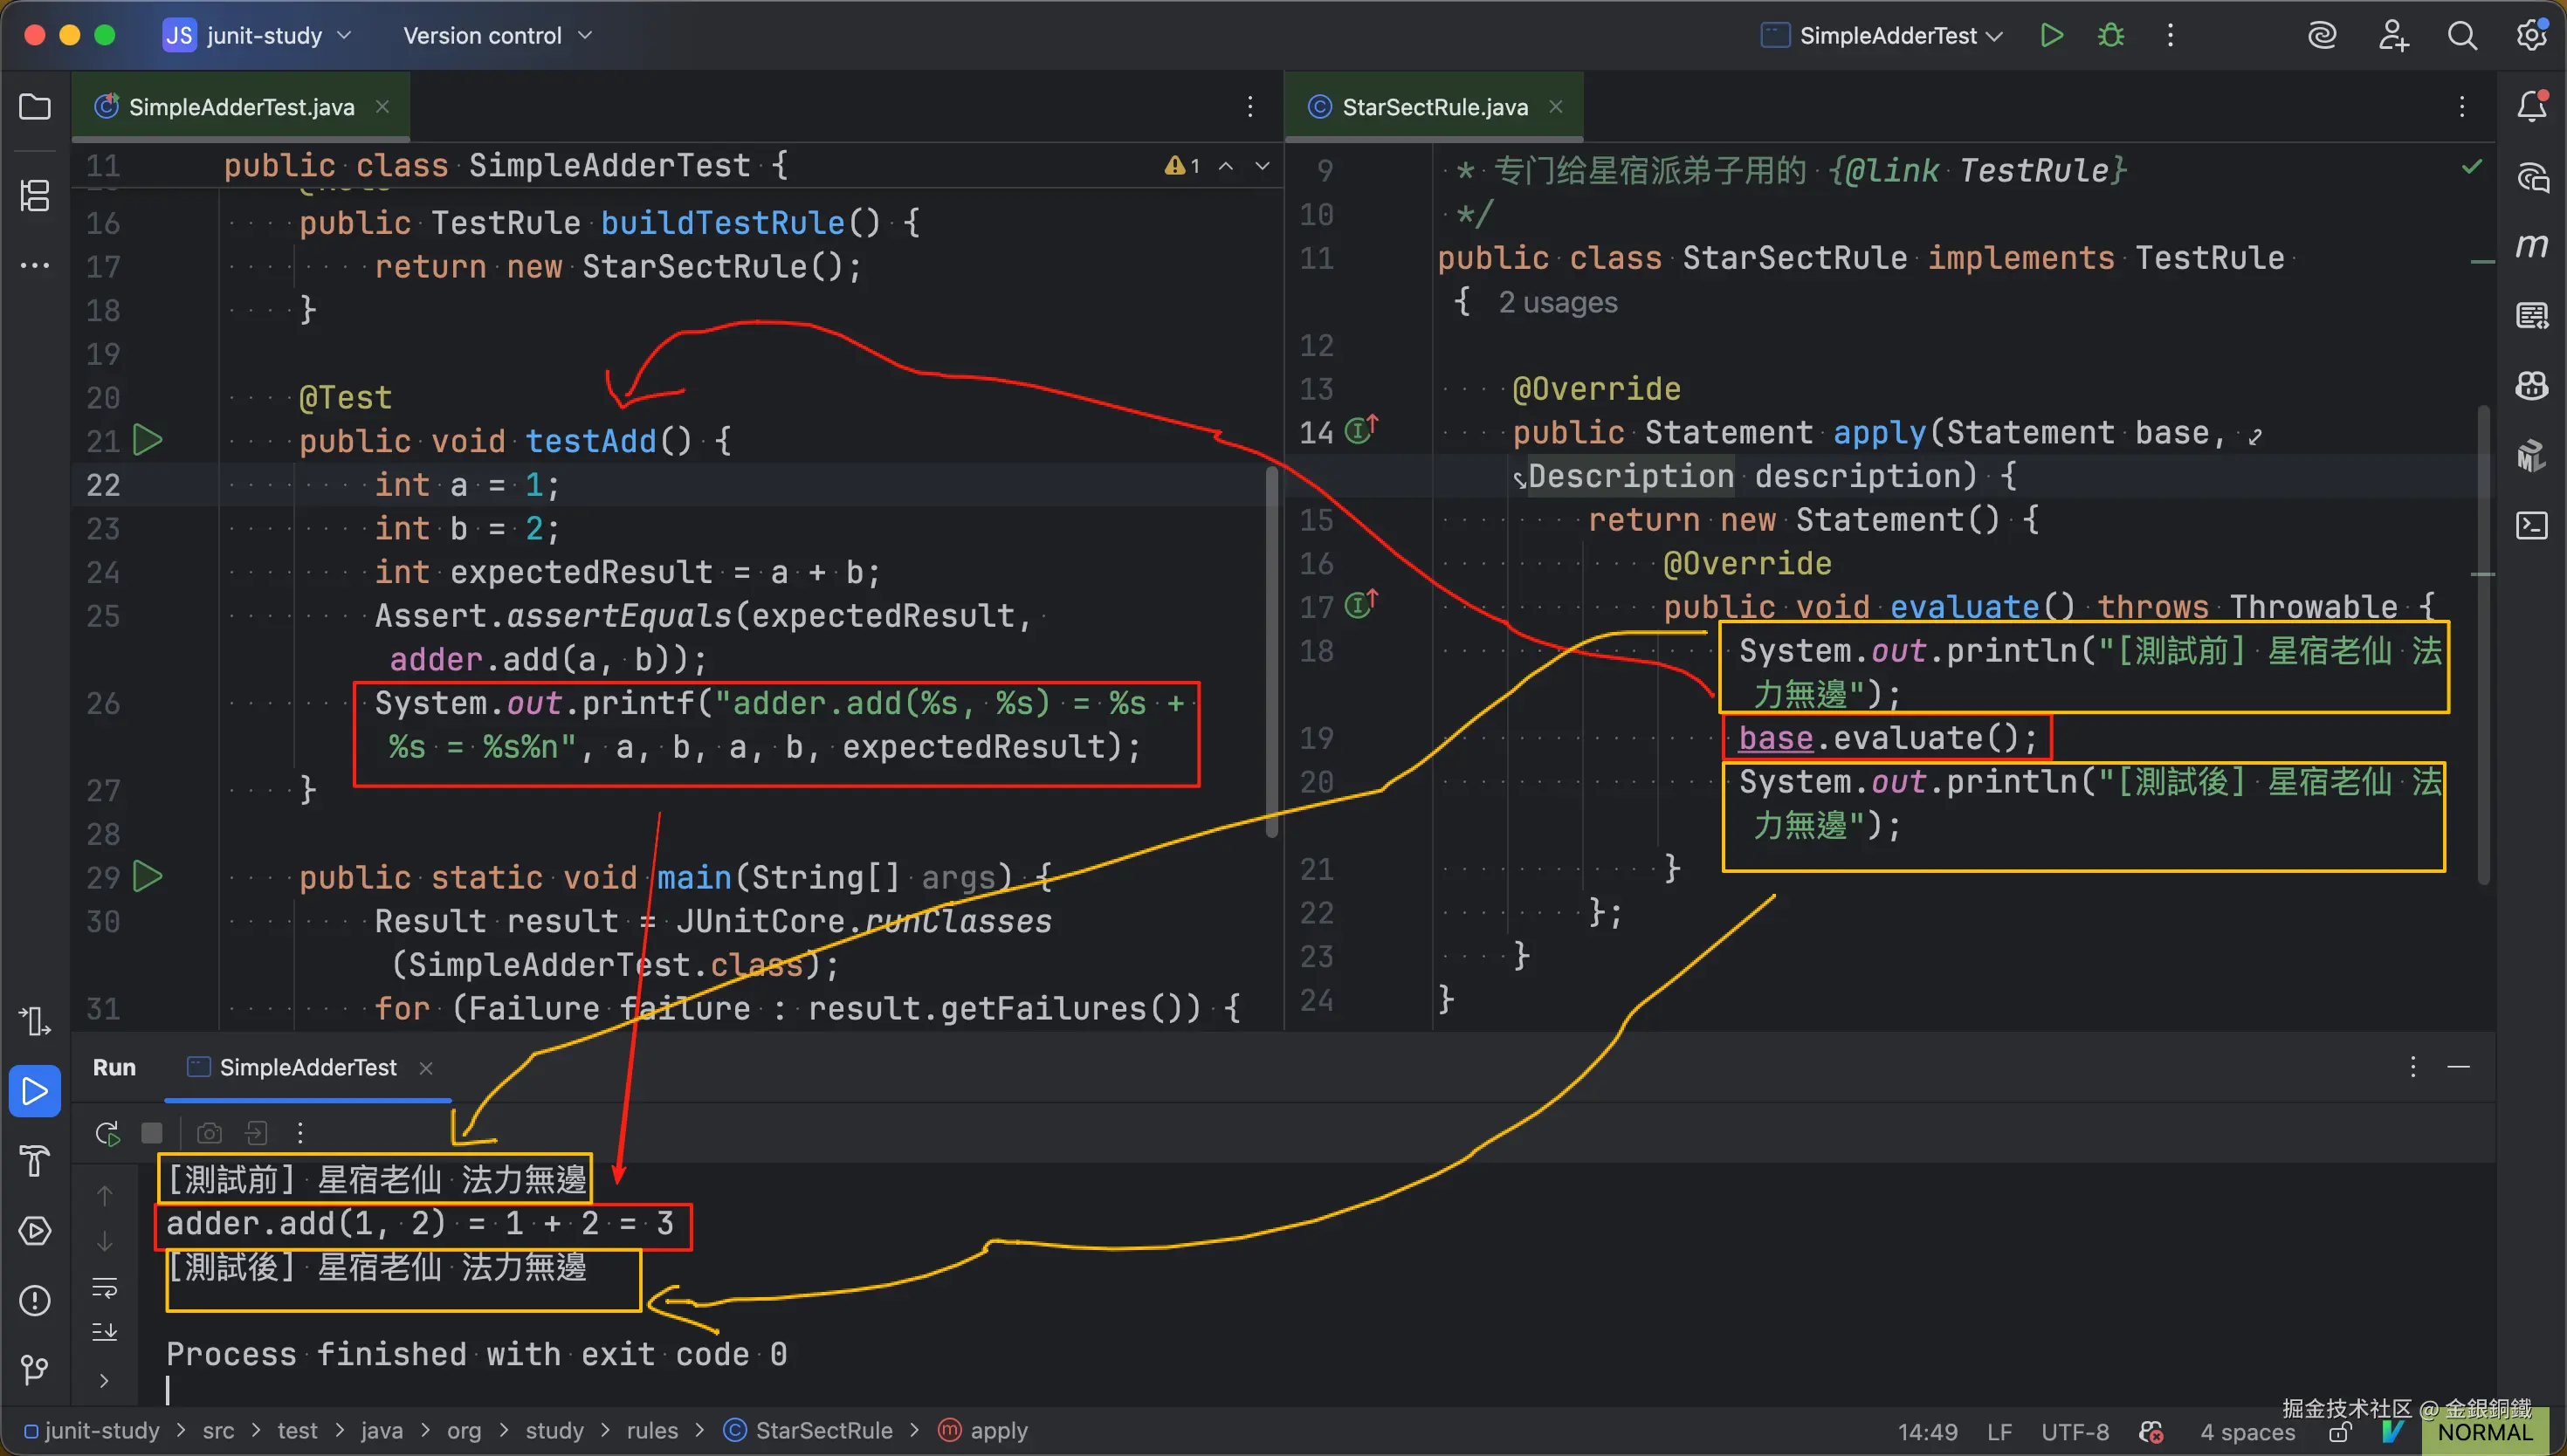
其中 红色框 的内容和 testAdd() 方法有关,黄色框 的内容和 前置/后置 处理有关。这样星宿派弟子的任务就完成了 😂
简单的分析
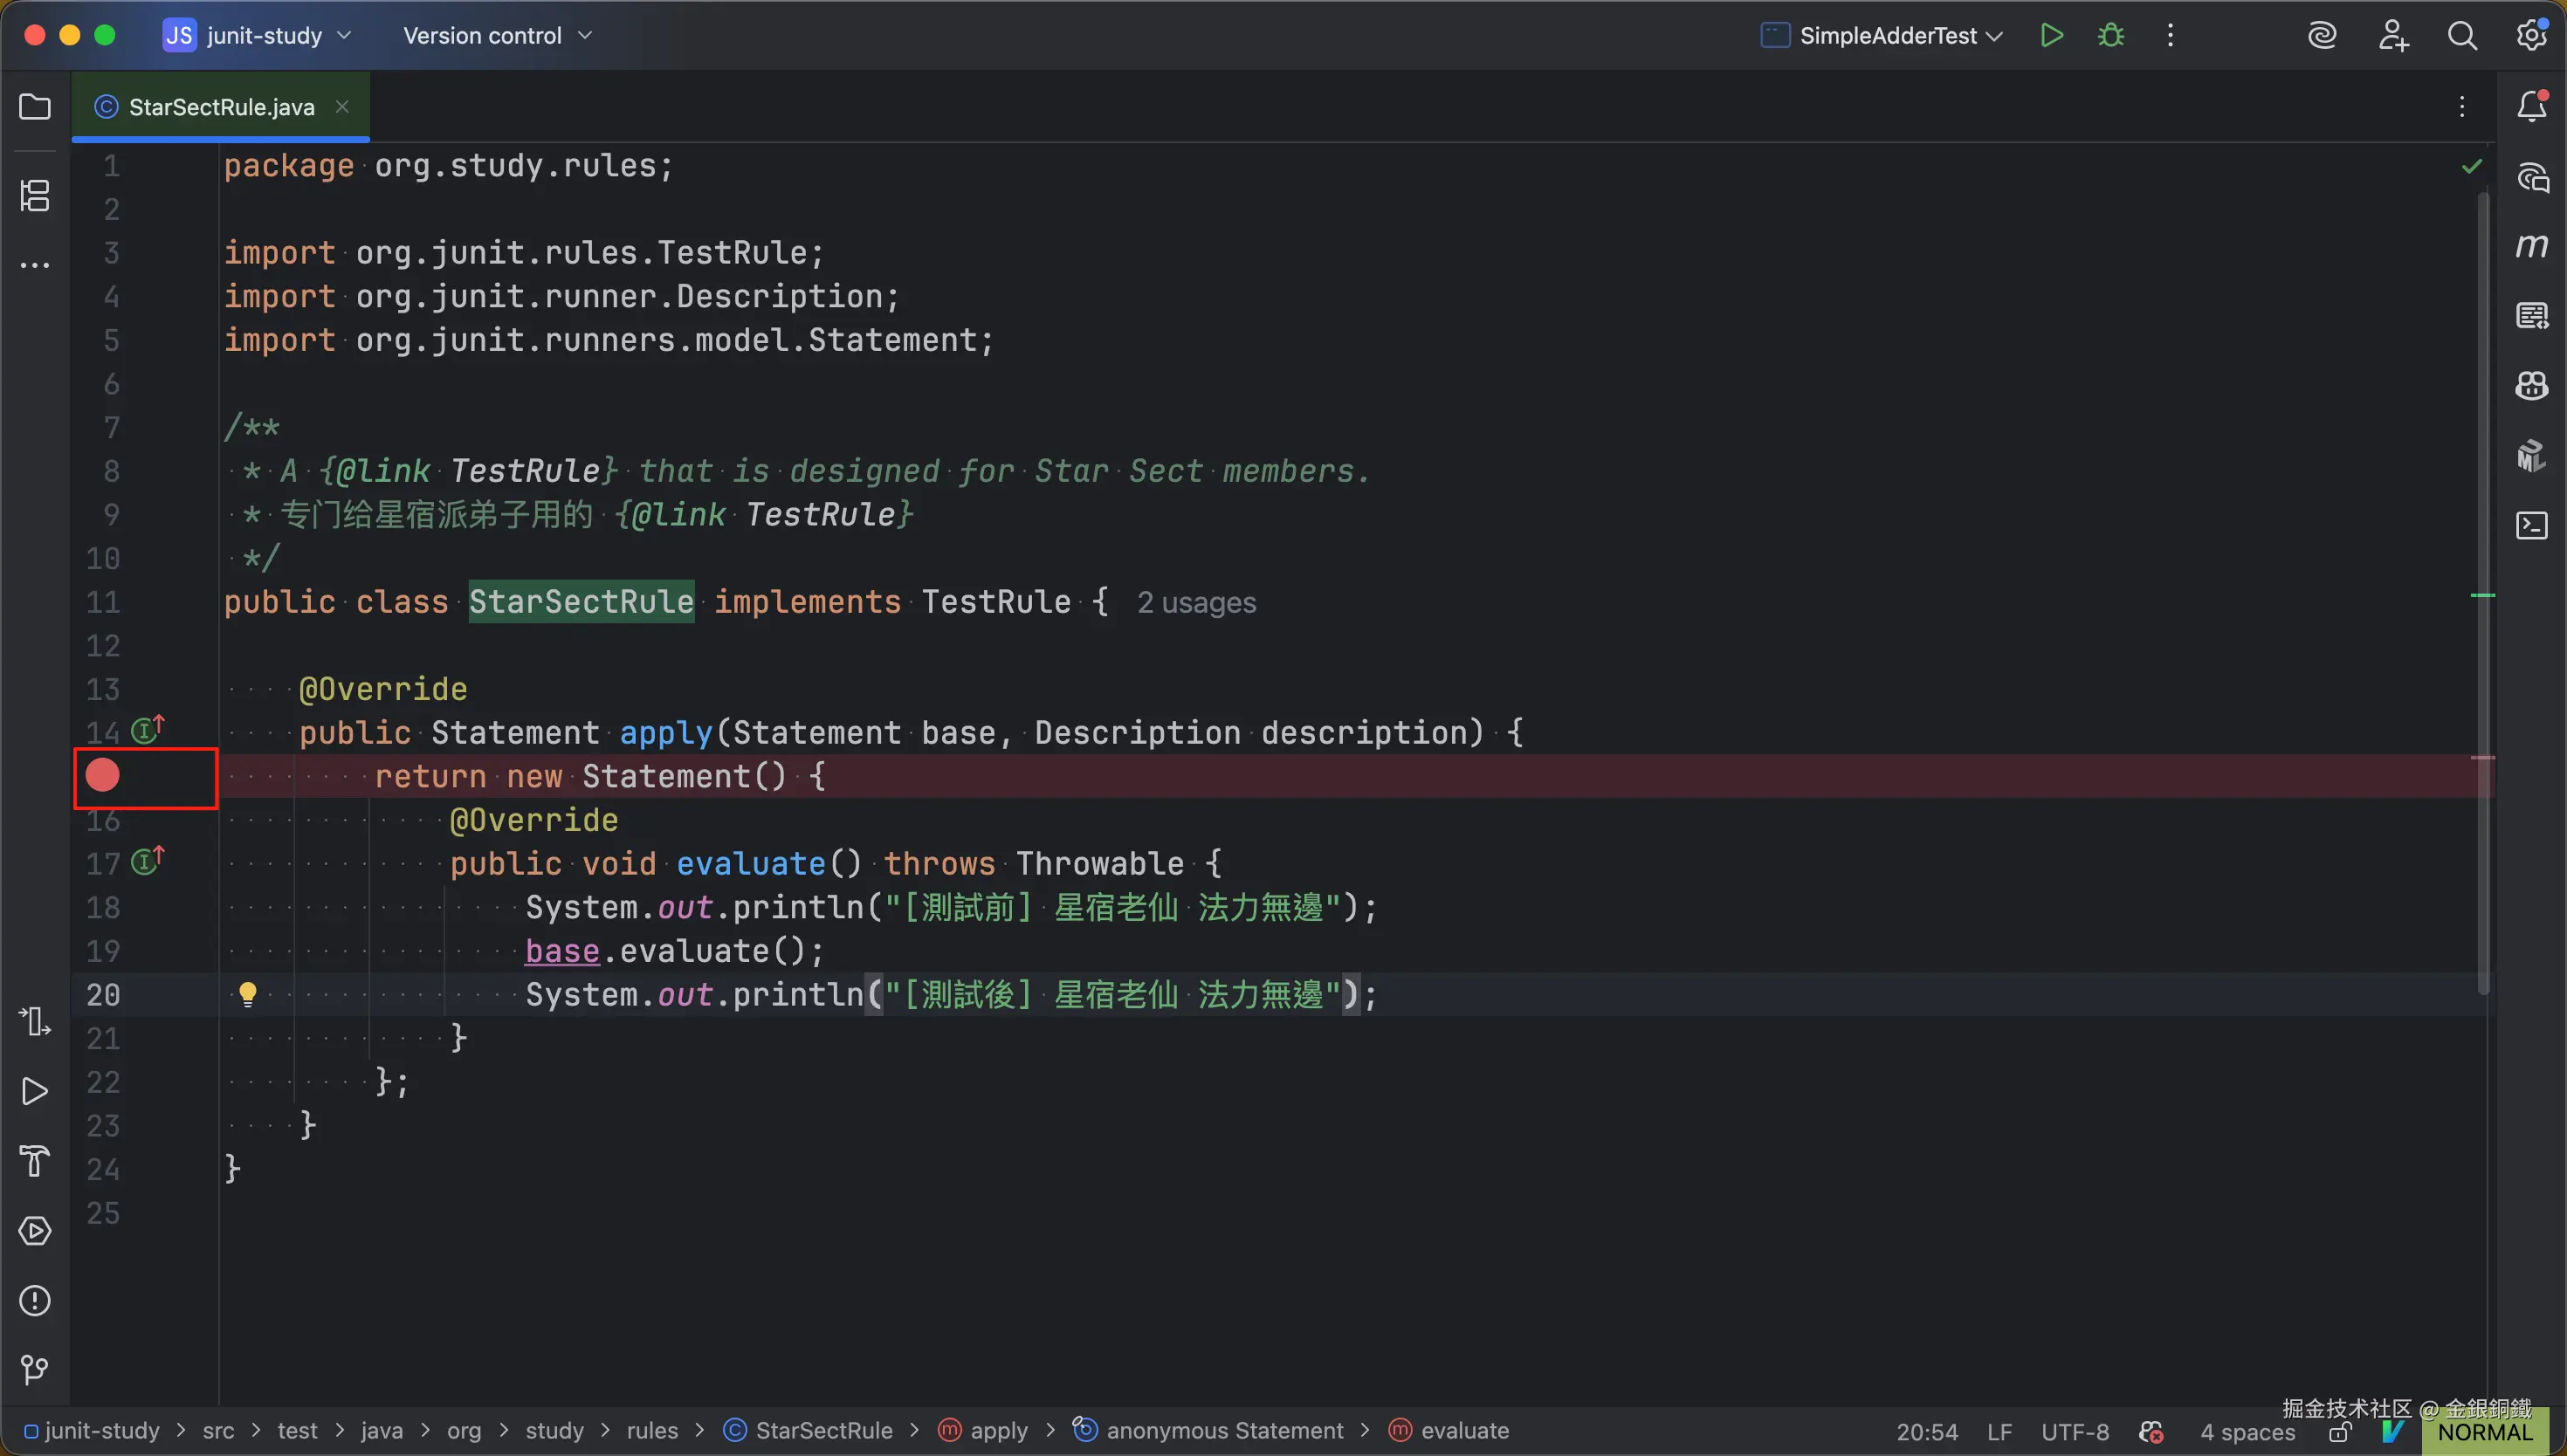
我们在 org.study.rules.StarSectRule 类的 apply(Statement, Description) 方法里打一个断点(断点的位置如下图所示 ⬇️)。为了便于描述,我们将这个断点称为 断点甲
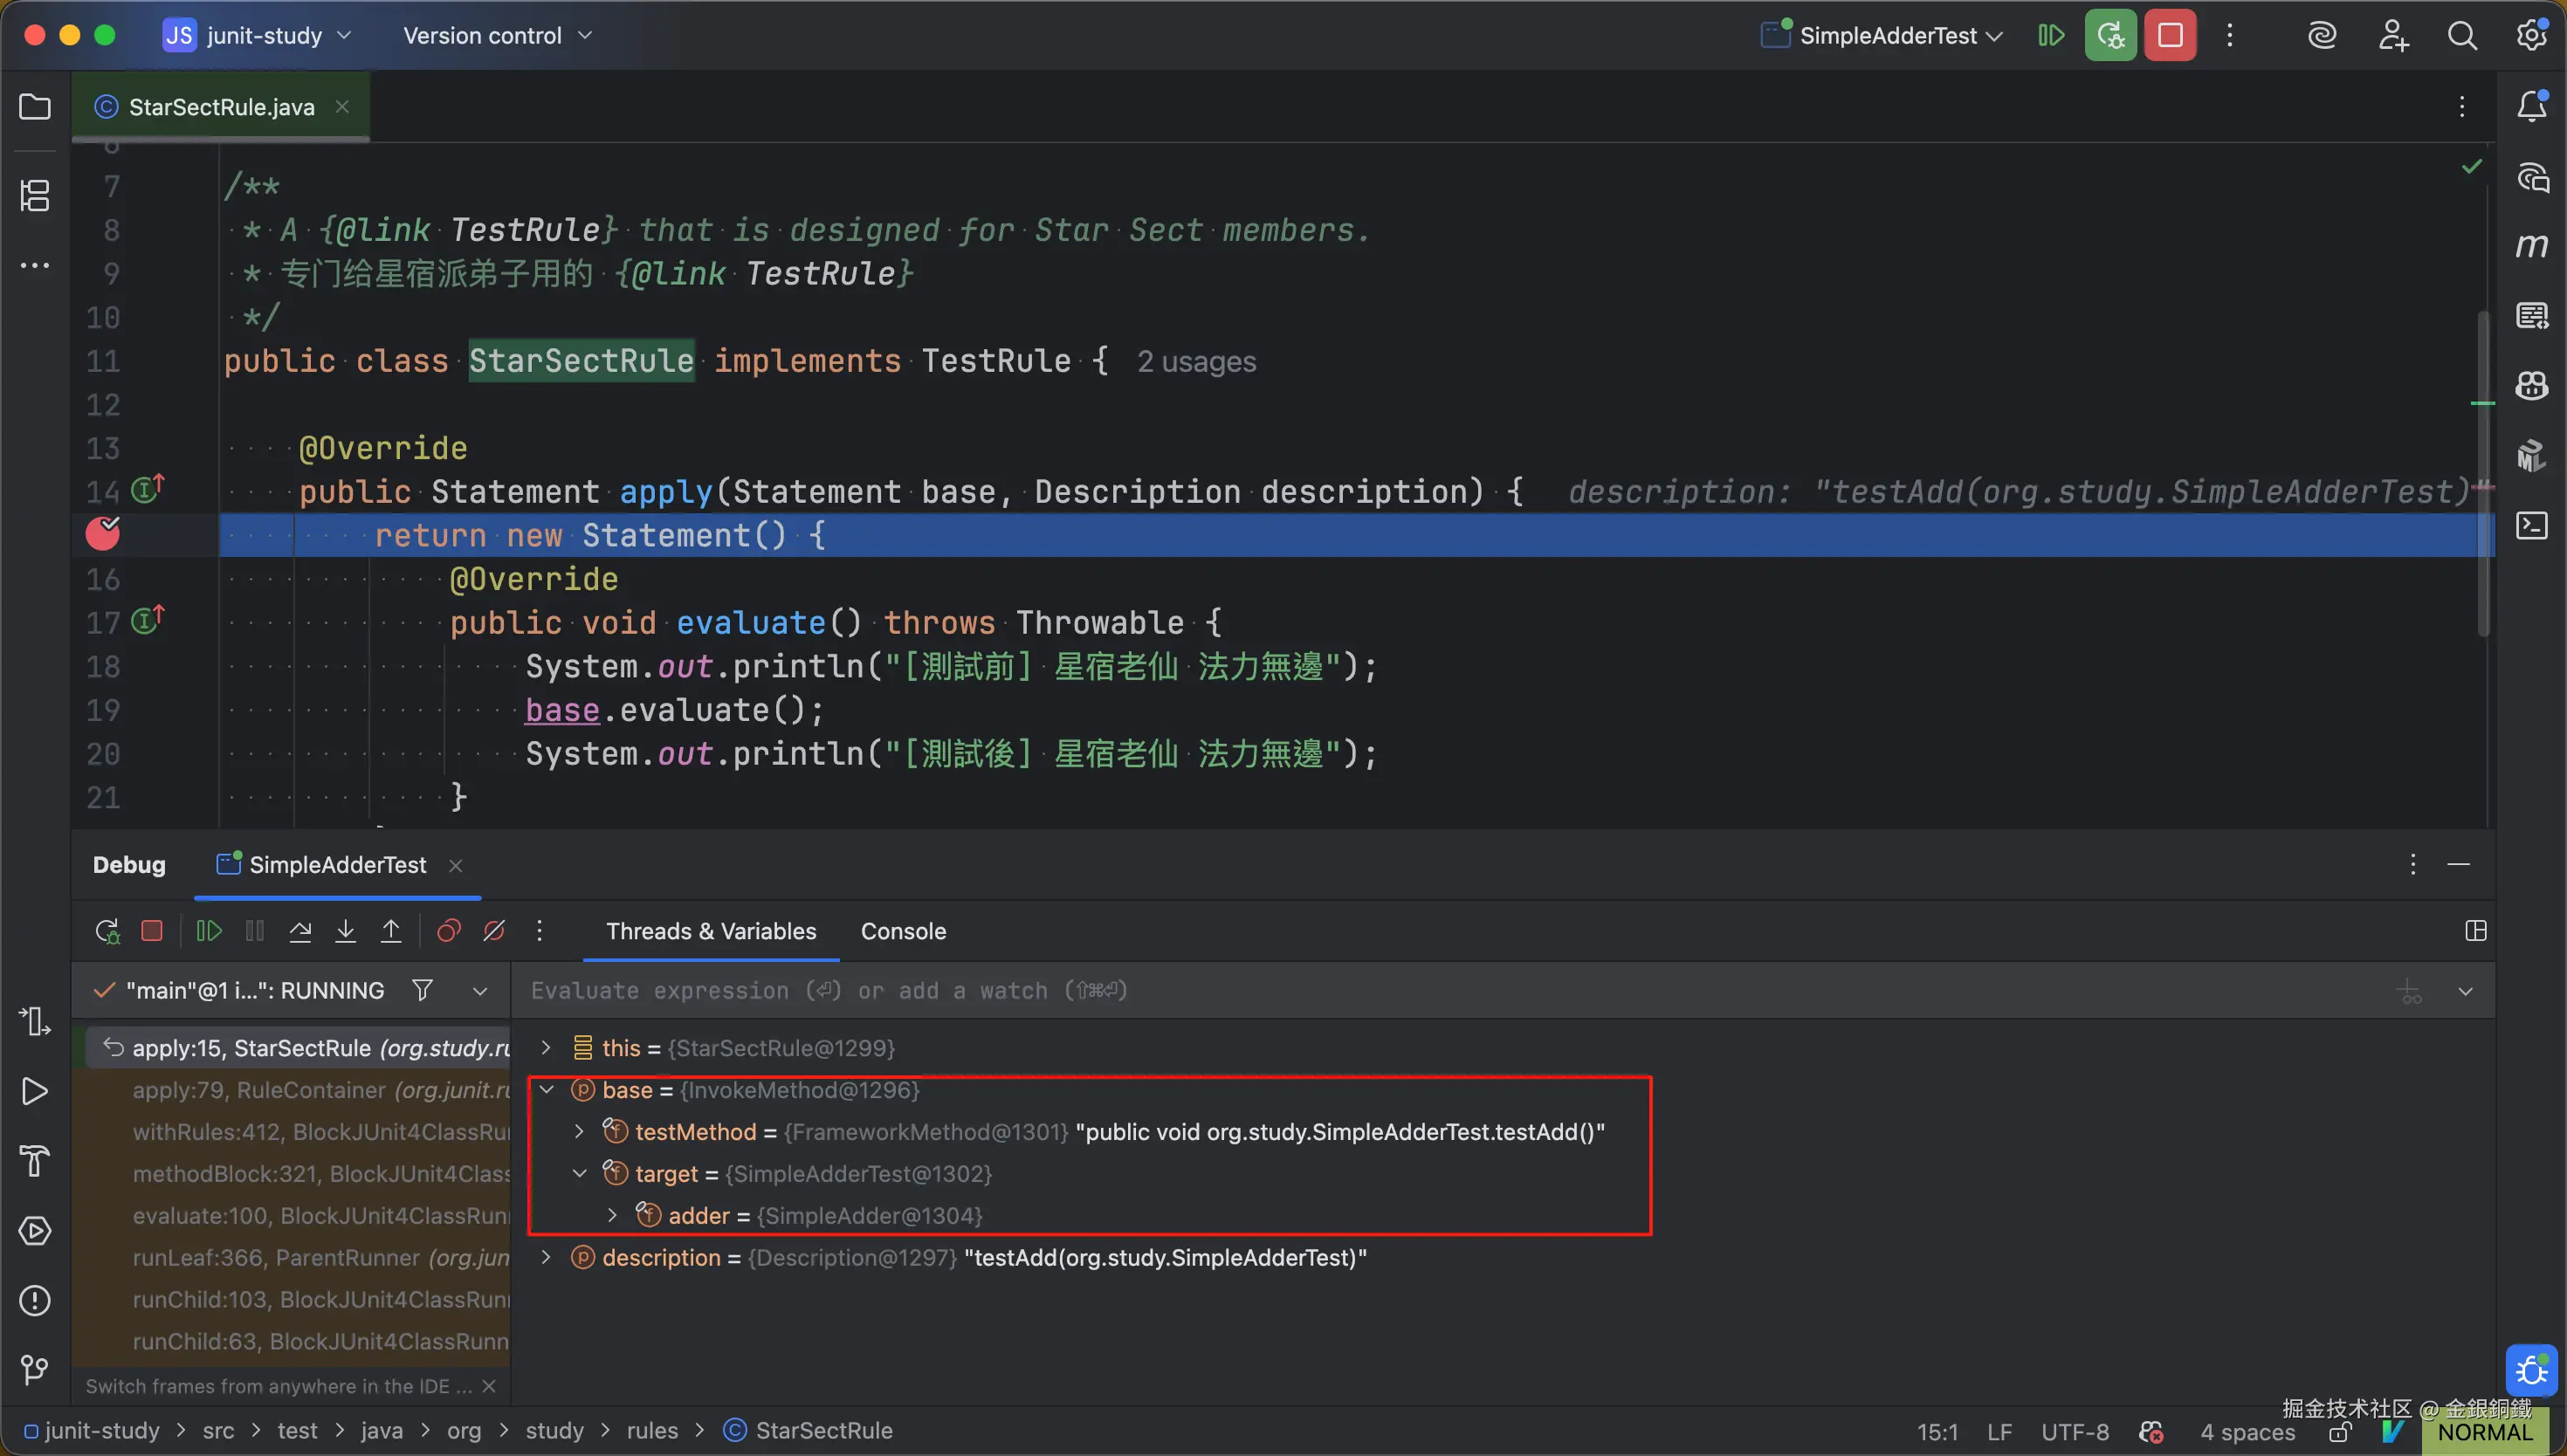
然后 debug SimpleAdderTest 的 main 方法。当程序运行到 断点甲 这里时,可以观察到
base变量和SimpleAdderTest类里的testAdd()方法对应
如果将 apply(Statement base, Description description) 方法
- 入参中的
base称为 statementbase - 返回值称为 statementreturn
那么可以认为 statementreturn 把 statementbase 包装了一层。
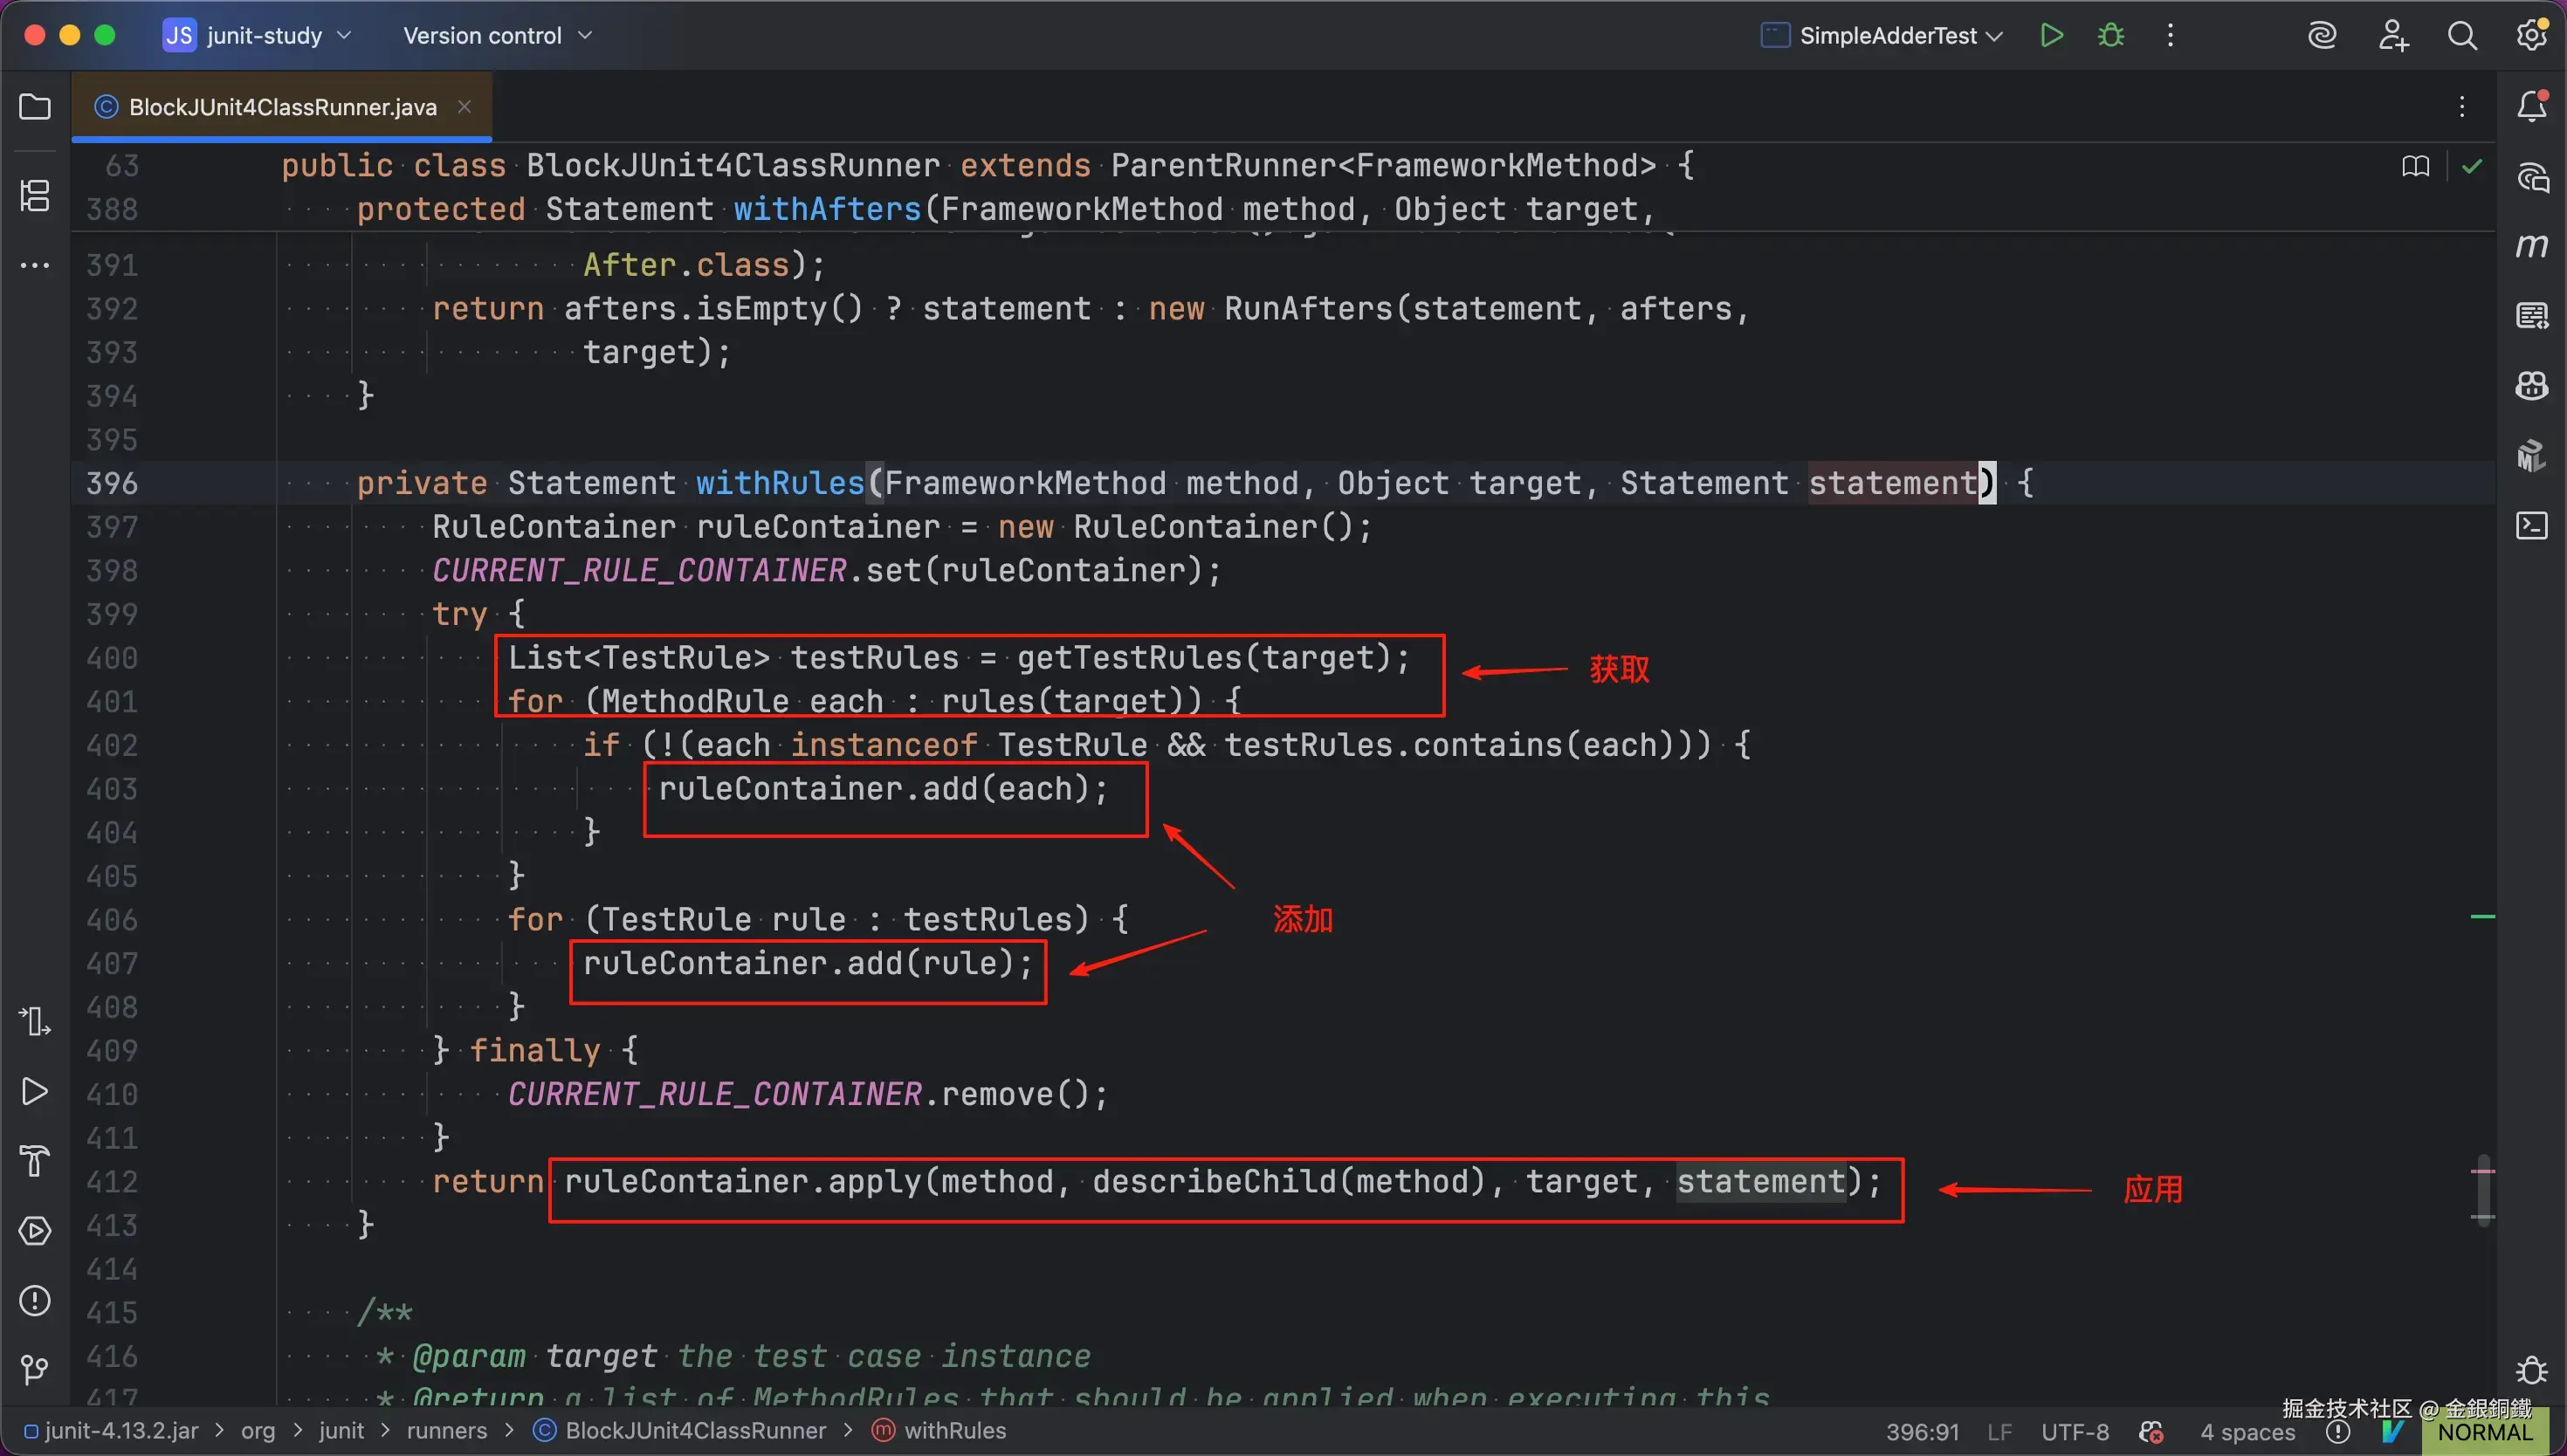
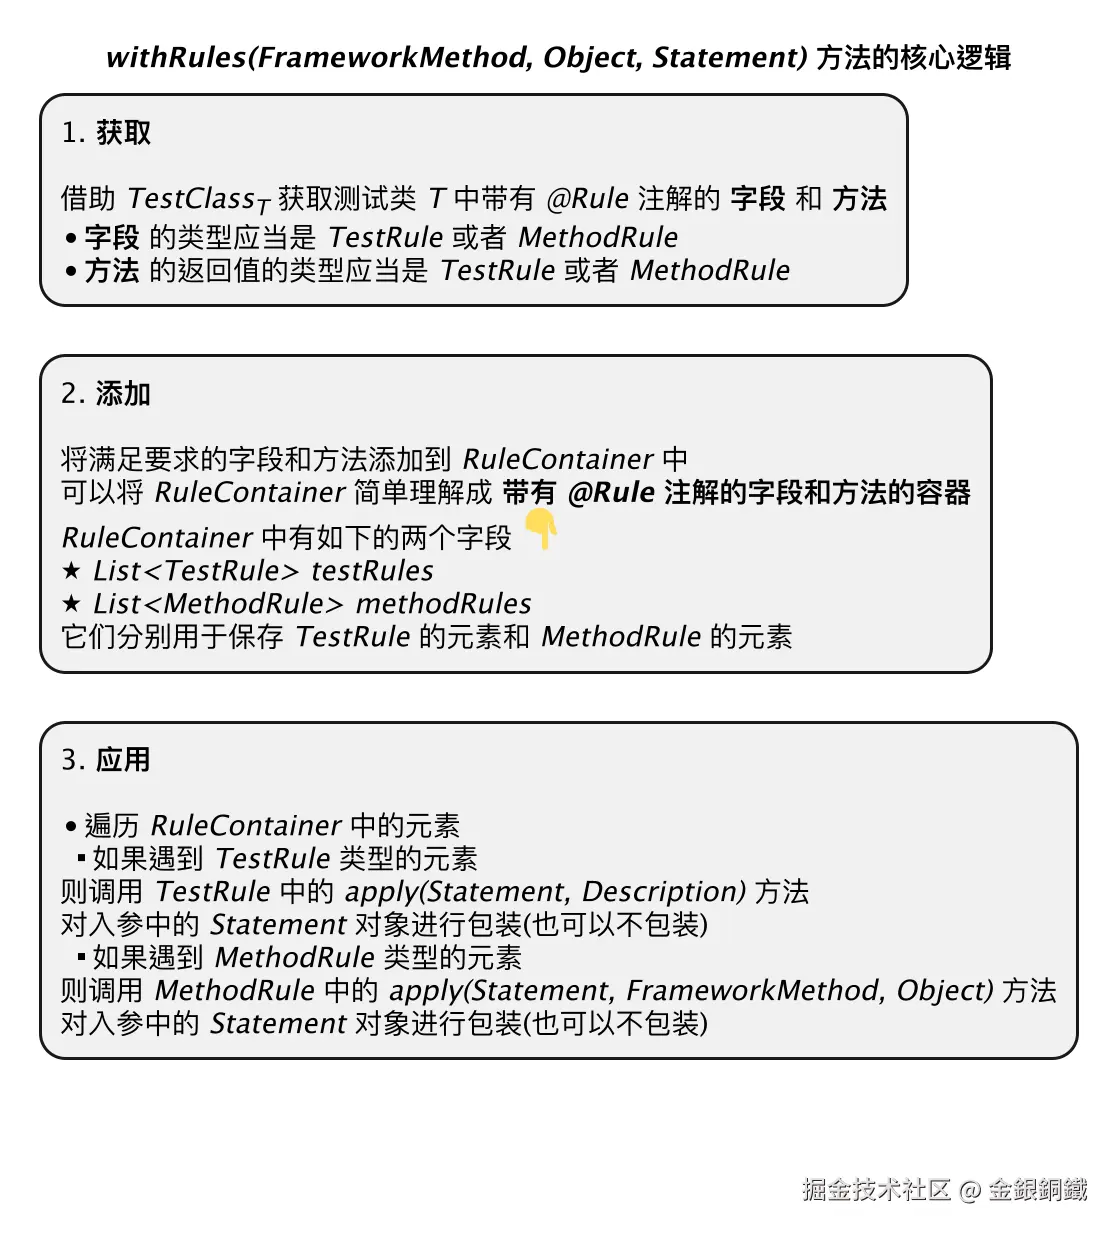
至于 JUnit 4 处理 TestRule 的逻辑在哪里,请前往 org.junit.runners.BlockJUnit4ClassRunner 类的 withRules(FrameworkMethod, Object, Statement) 方法,这个方法的核心逻辑看起来可以概括为三步 ⬇️
我给这三个步骤画了一张思维导图 ⬇️
其他
用 PlantUML 画图,所用到的代码
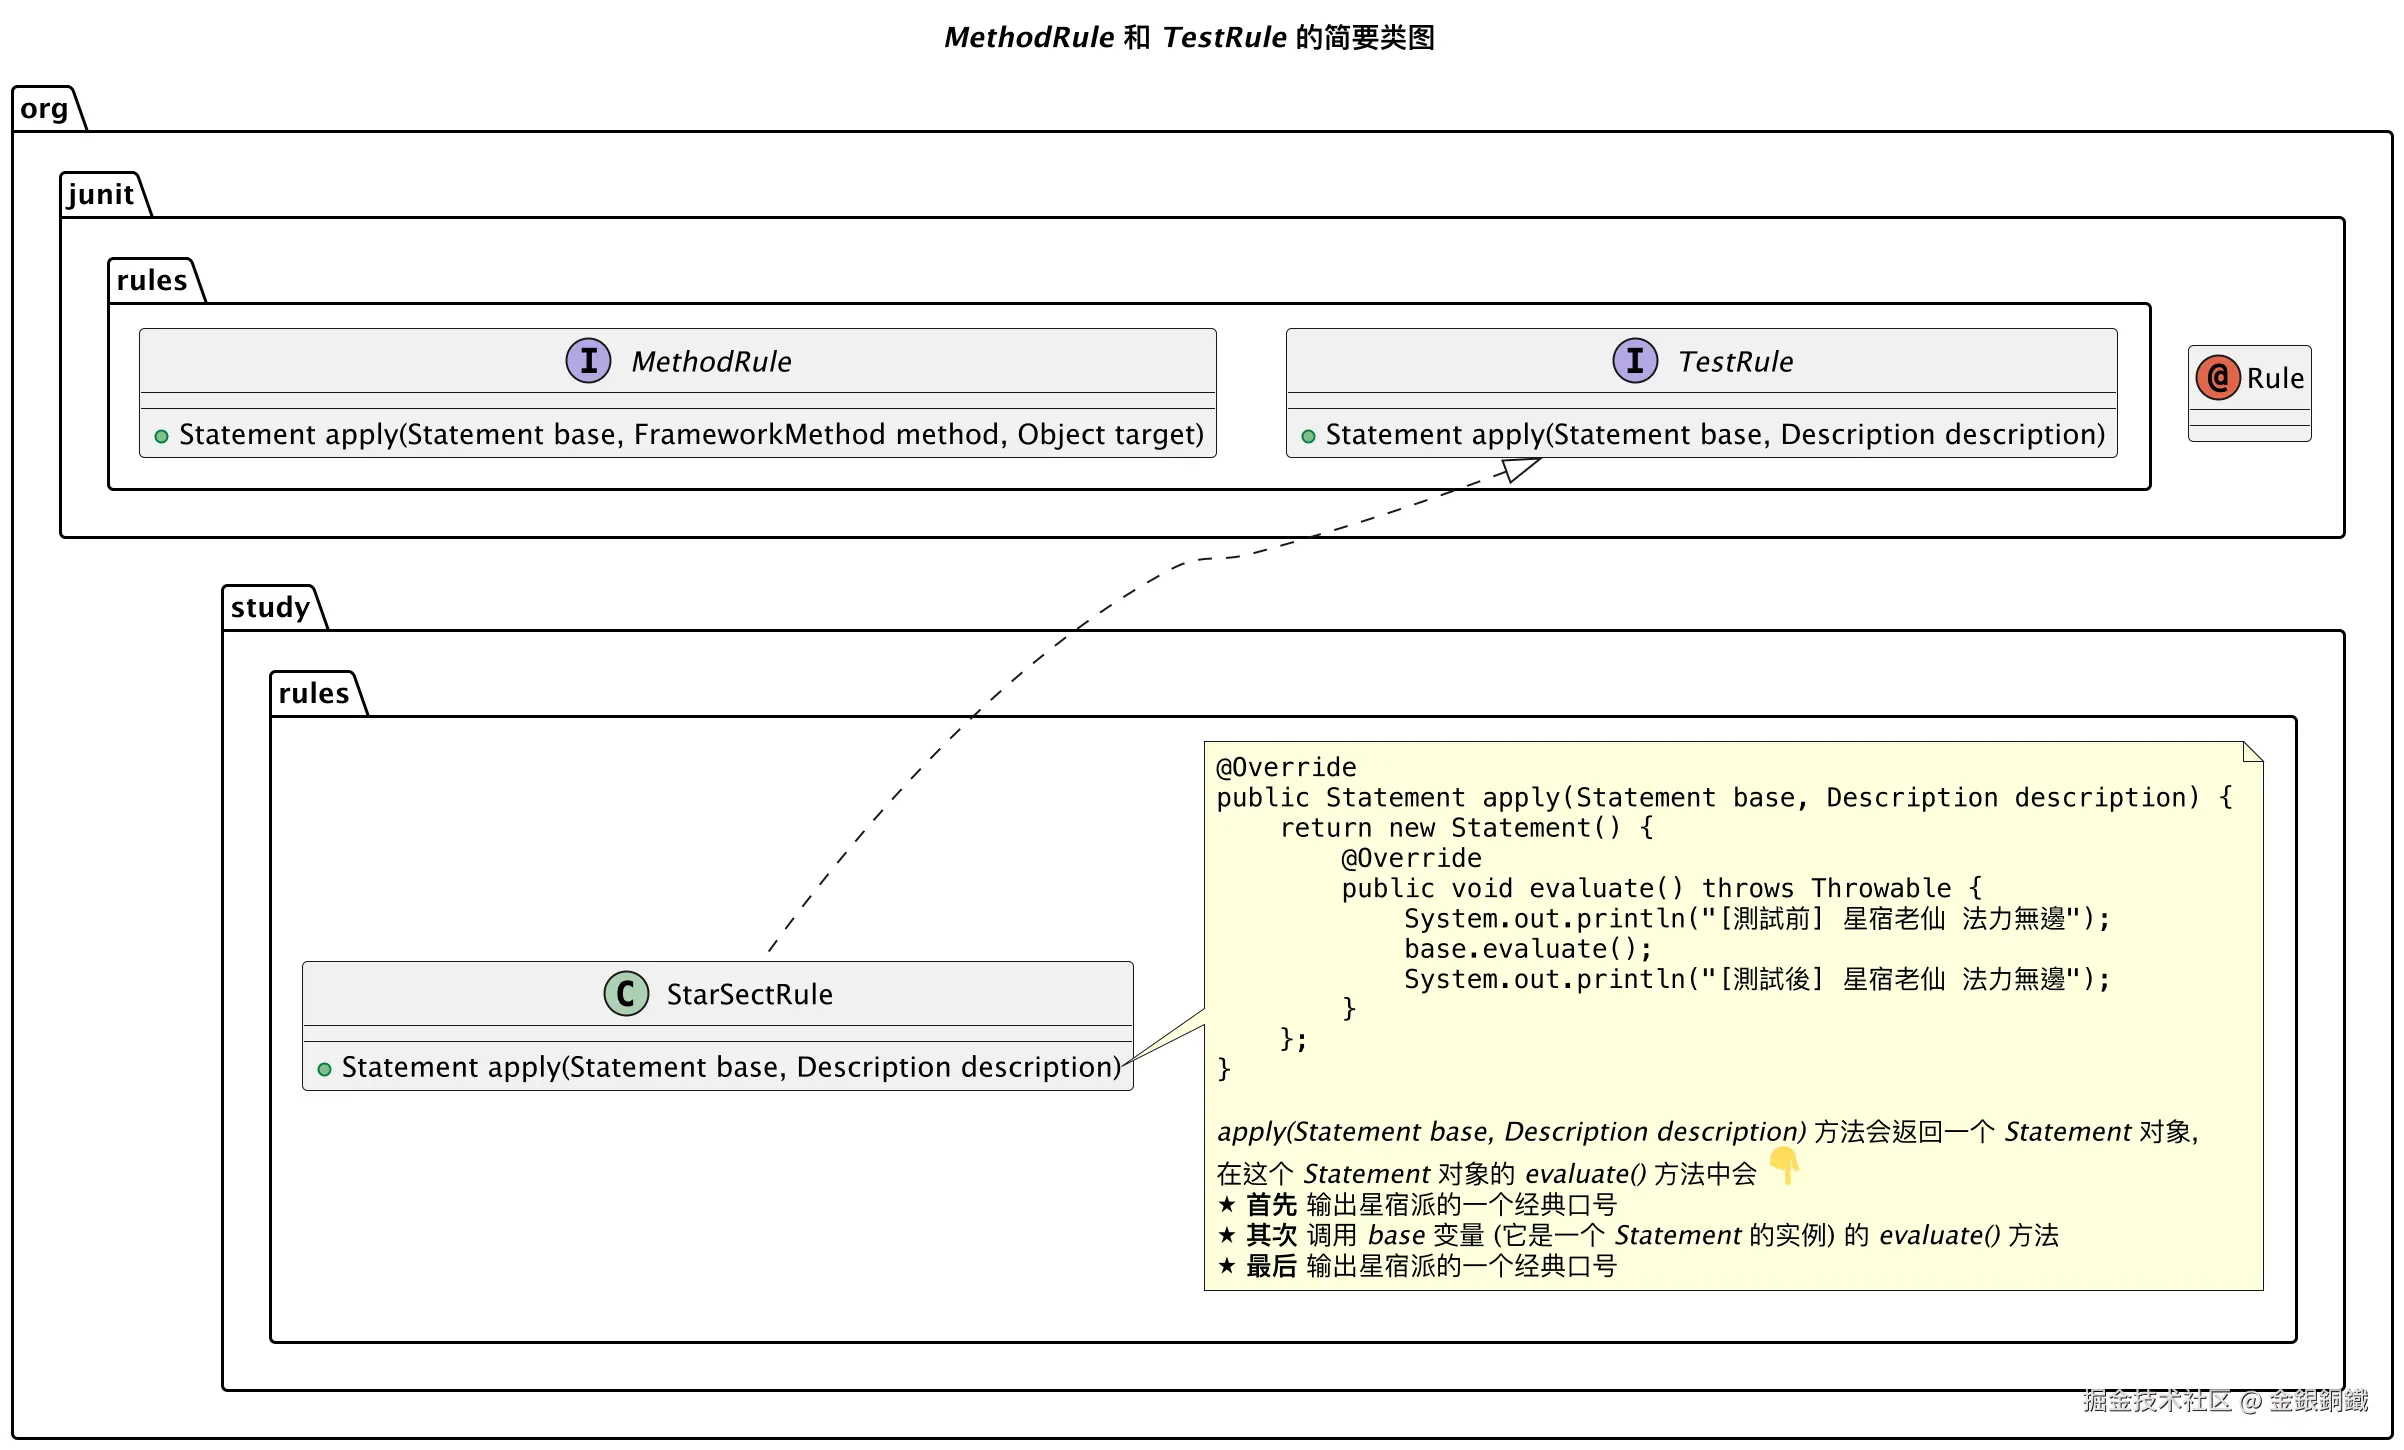
画 "MethodRule 和 TestRule 的简要类图" 一图所用到的代码
puml
@startuml

title <i>MethodRule</i> 和 <i>TestRule</i> 的简要类图

interface org.junit.rules.MethodRule {
    + Statement apply(Statement base, FrameworkMethod method, Object target)
}

interface org.junit.rules.TestRule {
    + Statement apply(Statement base, Description description)
}

annotation org.junit.Rule {
}

org.junit.rules.TestRule <|.. org.study.rules.StarSectRule

class org.study.rules.StarSectRule {
    + Statement apply(Statement base, Description description)
}

note right of org.study.rules.StarSectRule::apply
<code>
@Override
public Statement apply(Statement base, Description description) {
    return new Statement() {
        @Override
        public void evaluate() throws Throwable {
            System.out.println("[測試前] 星宿老仙 法力無邊");
            base.evaluate();
            System.out.println("[測試後] 星宿老仙 法力無邊");
        }
    };
}
</code>

<i>apply(Statement base, Description description)</i> 方法会返回一个 <i>Statement</i> 对象,
在这个 <i>Statement</i> 对象的 <i>evaluate()</i> 方法中会 <:point_down:>
<&star> **首先** 输出星宿派的一个经典口号
<&star> **其次** 调用 <i>base</i> 变量 (它是一个 <i>Statement</i> 的实例) 的 <i>evaluate()</i> 方法
<&star> **最后** 输出星宿派的一个经典口号
end note

@enduml
画 "withRules(FrameworkMethod, Object, Statement) 方法的核心逻辑" 一图所用到的代码
puml
@startmindmap

top to bottom direction
caption \n\n
' caption 中的 \n\n 只是为了防止掘金平台自动添加的水印遮盖图中的内容
' caption 的内容没有特别的含义

title <i>withRules(FrameworkMethod, Object, Statement)</i> 方法的核心逻辑

*:1. <b>获取</b>

借助 <i>TestClass<sub>T</sub></i> 获取测试类 <i>T</i> 中带有 <i>@Rule</i> 注解的 <b>字段</b> 和 <b>方法</b>
* <b>字段</b> 的类型应当是 <i>TestRule</i> 或者 <i>MethodRule</i>
* <b>方法</b> 的返回值的类型应当是 <i>TestRule</i> 或者 <i>MethodRule</i>;

*:2. <b>添加</b>

将满足要求的字段和方法添加到 <i>RuleContainer</i> 中
可以将 <i>RuleContainer</i> 简单理解成 <b>带有 <i>@Rule</i> 注解的字段和方法的容器</b>
<i>RuleContainer</i> 中有如下的两个字段 <:point_down:>
<&star> <i>List<TestRule> testRules</i>
<&star> <i>List<MethodRule> methodRules</i>
它们分别用于保存 <i>TestRule</i> 的元素和 <i>MethodRule</i> 的元素;

*:3. <b>应用</b>

* 遍历 <i>RuleContainer</i> 中的元素
** 如果遇到 <i>TestRule</i> 类型的元素
则调用 <i>TestRule</i> 中的 <i>apply(Statement, Description)</i> 方法
对入参中的 <i>Statement</i> 对象进行包装(也可以不包装)
** 如果遇到 <i>MethodRule</i> 类型的元素
则调用 <i>MethodRule</i> 中的 <i>apply(Statement, FrameworkMethod, Object)</i> 方法
对入参中的 <i>Statement</i> 对象进行包装(也可以不包装);

@endmindmap