咱们要做啥
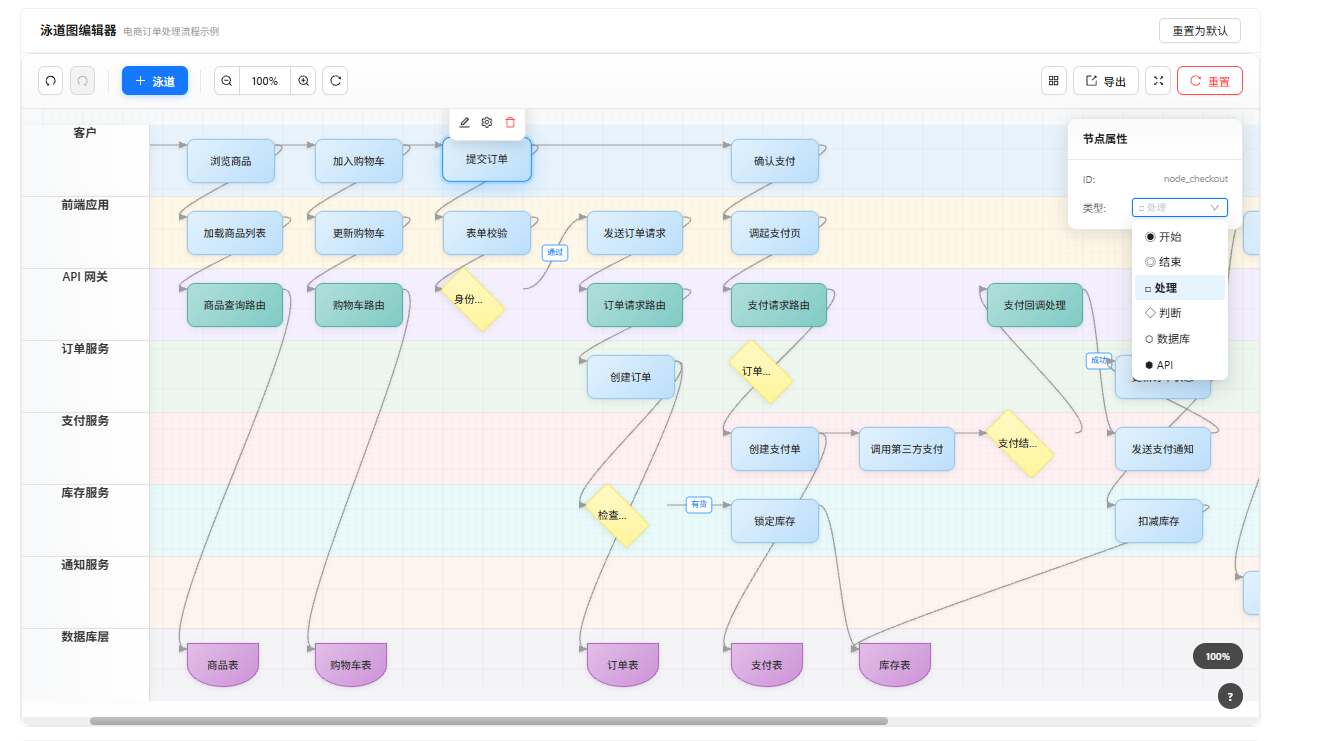
泳道图这东西大家应该都见过,就是把流程图按角色分成好几行,每行是一个"泳道",能清楚看到谁在什么时候干了啥。像公司里梳理业务流程、设计系统架构的时候特别好用。
咱们今天就用 React 从零撸一个,功能包括:
- 拖拽节点移动位置
- 画连接线
- 编辑文字
- 撤销重做
- 缩放和导出
先把数据结构想清楚
这个是最重要的,数据结构设计好了后面都好办。泳道图其实就是三样东西:泳道、节点、连接线。
// 整体数据长这样
const data = {
  lanes: [...],      // 泳道们
  nodes: [...],      // 节点们
  connections: [...] // 连接们
}

// 泳道 - 就是一行
{
  id: 'lane_1',
  name: '前端',
  color: '#E8F4FD',  // 背景色
  order: 0           // 排序用
}

// 节点 - 泳道里的一个个方块
{
  id: 'node_1',
  laneId: 'lane_1',      // 属于哪个泳道
  text: '用户点击按钮',   // 显示的文字
  type: 'process',       // 类型:start/end/process/decision/database
  x: 100,                // 横向位置
  width: 110,
  height: 55
}

// 连接线 - 节点之间的箭头
{
  id: 'conn_1',
  from: 'node_1',    // 从哪来
  to: 'node_2',      // 到哪去
  label: '成功'      // 线上的标签(可选)
}这么设计有个好处:AI 可以直接生成这个数据格式,你描述一下业务流程,AI 吐出 JSON,泳道图就出来了。
状态管理用 Zustand
为啥选 Zustand?简单呗,没那么多花里胡哨的模板代码。
import { create } from 'zustand';
import { persist } from 'zustand/middleware';

export const useSwimlaneStore = create(
  persist(
    (set, get) => ({
      // 数据
      data: DEFAULT_DATA,
      selectedNodeId: null,

      // 添加节点
      addNode: (laneId, text, type, x) => {
        const newNode = {
          id: generateId(),
          laneId, text, type, x,
          width: 110, height: 55
        };
        set(state => ({
          data: { ...state.data, nodes: [...state.data.nodes, newNode] }
        }));
      },

      // 移动节点
      updateNodePosition: (nodeId, x) => {
        set(state => ({
          data: {
            ...state.data,
            nodes: state.data.nodes.map(n =>
              n.id === nodeId ? { ...n, x } : n
            )
          }
        }));
      },

      // 添加连接
      addConnection: (from, to) => {
        // 先看看是不是已经连过了
        const exists = get().data.connections.some(c =>
          c.from === from && c.to === to
        );
        if (exists) return;

        set(state => ({
          data: {
            ...state.data,
            connections: [...state.data.connections, { id: generateId(), from, to }]
          }
        }));
      }
    }),
    { name: 'swimlane-storage' }  // 自动存 localStorage
  )
);
用 persist 中间件,数据自动存到 localStorage,刷新页面不会丢。
渲染泳道和节点
泳道就是一行一行的 div
const renderLane = (lane, index) => (
  <div className={styles.lane} style={{ backgroundColor: lane.color }}>
    {/* 左边的标题栏 */}
    <div className={styles.laneHeader}>
      <span>{lane.name}</span>
      <Button onClick={() => addNode(lane.id)}>添加节点</Button>
    </div>

    {/* 右边的节点区域 */}
    <div className={styles.laneContent}>
      {nodes.filter(n => n.laneId === lane.id).map(renderNode)}
    </div>
  </div>
);
节点是绝对定位的
节点在泳道里是 position: absolute,通过 left 控制横向位置:
const renderNode = (node) => {
  const isSelected = selectedNodeId === node.id;

  return (
    <div
      className={`${styles.node} ${isSelected ? styles.nodeSelected : ''}`}
      style={{
        left: node.x,
        top: (laneHeight - node.height) / 2,  // 垂直居中
        width: node.width,
        height: node.height
      }}
      onMouseDown={handleDrag}
      onClick={() => selectNode(node.id)}
    >
      <span>{node.text}</span>

      {/* 右边的小圆点,用来创建连接 */}
      <div
        className={styles.portRight}
        onClick={(e) => startConnection(e, node.id)}
      />
    </div>
  );
};
画连接线(重点)
连接线用 SVG 画,贝塞尔曲线,看起来更流畅。
const renderConnections = () => {
  return connections.map(conn => {
    const fromNode = getNode(conn.from);
    const toNode = getNode(conn.to);

    // 算出起点终点坐标
    const fromX = fromNode.x + fromNode.width;  // 起点在节点右边
    const fromY = getLaneY(fromNode.laneId);    // 泳道中间
    const toX = toNode.x;                       // 终点在节点左边
    const toY = getLaneY(toNode.laneId);

    // 贝塞尔曲线的控制点偏移量
    const offset = Math.min(Math.abs(toX - fromX) / 2, 80);

    // SVG 路径
    const path = `M ${fromX} ${fromY}
                  C ${fromX + offset} ${fromY},
                    ${toX - offset} ${toY},
                    ${toX} ${toY}`;

    return (
      <path
        d={path}
        stroke="#9e9e9e"
        strokeWidth={1.5}
        markerEnd="url(#arrow)"  // 箭头
      />
    );
  });
};
曲线的效果就是节点之间不是直愣愣的线,而是有个自然的弧度。
拖拽功能
拖拽其实就三步:mousedown 记录起始位置,mousemove 更新位置,mouseup 结束。
// 开始拖
const handleMouseDown = (e, nodeId) => {
  const rect = e.currentTarget.getBoundingClientRect();
  setDragging({
    nodeId,
    offsetX: e.clientX - rect.left  // 鼠标点在节点上的偏移
  });
};

// 拖动中
useEffect(() => {
  const handleMouseMove = (e) => {
    if (!dragging) return;

    const canvasRect = canvasRef.current.getBoundingClientRect();
    const newX = e.clientX - canvasRect.left - dragging.offsetX;

    updateNodePosition(dragging.nodeId, newX);
  };

  document.addEventListener('mousemove', handleMouseMove);
  return () => document.removeEventListener('mousemove', handleMouseMove);
}, [dragging]);

// 结束拖
const handleMouseUp = () => {
  setDragging(null);
  saveToHistory();  // 保存历史,方便撤销
};
注意事件要绑在 document 上,不然拖快了会"掉"。
创建连接
点击节点右边的小圆点开始,再点另一个节点结束:
// 点击右边端口,开始画线
const startConnection = (e, nodeId) => {
  e.stopPropagation();
  setIsConnecting(true);
  setConnectionStart(nodeId);
};

// 点到另一个节点,完成连接
const endConnection = (e, nodeId) => {
  if (!isConnecting || connectionStart === nodeId) return;

  addConnection(connectionStart, nodeId);
  setIsConnecting(false);
  setConnectionStart(null);
};

// 按 ESC 取消
useEffect(() => {
  const handleKeyDown = (e) => {
    if (e.key === 'Escape' && isConnecting) {
      setIsConnecting(false);
      setConnectionStart(null);
    }
  };
  document.addEventListener('keydown', handleKeyDown);
  return () => document.removeEventListener('keydown', handleKeyDown);
}, [isConnecting]);
撤销重做
这个其实就是一个历史记录数组,每次操作都 push 一份快照:
// 状态
history: [],
historyIndex: -1,

// 操作前保存快照
saveToHistory: () => {
  const { data, history, historyIndex } = get();
  const newHistory = [...history.slice(0, historyIndex + 1), JSON.parse(JSON.stringify(data))];
  set({ history: newHistory, historyIndex: newHistory.length - 1 });
},

// 撤销 = 回到上一个快照
undo: () => {
  const { history, historyIndex } = get();
  if (historyIndex > 0) {
    set({ data: history[historyIndex - 1], historyIndex: historyIndex - 1 });
  }
},

// 重做 = 去到下一个快照
redo: () => {
  const { history, historyIndex } = get();
  if (historyIndex < history.length - 1) {
    set({ data: history[historyIndex + 1], historyIndex: historyIndex + 1 });
  }
}
快捷键 Ctrl+Z 撤销,Ctrl+Shift+Z 重做。
样式的小技巧
几个让界面更好看的小细节:
-
节点用渐变背景,不同类型不同颜色
-
hover 时节点往上浮一点 (
transform: translateY(-2px)) -
选中状态用蓝色边框 + 阴影
-
连接线要细一点(1.5px),灰色比黑色好看
-
泳道头部固定宽度,内容区可以滚动
.node {
border-radius: 10px;
box-shadow: 0 2px 8px rgba(0, 0, 0, 0.08);
transition: all 0.2s;&:hover {
transform: translateY(-2px);
box-shadow: 0 6px 20px rgba(0, 0, 0, 0.12);
}
}.nodeSelected {
border: 2px solid #1890ff;
box-shadow: 0 0 0 3px rgba(24, 144, 255, 0.2);
}
导出功能
导出 JSON 就是把数据序列化一下:
const exportJSON = () => {
  const json = JSON.stringify(data, null, 2);
  const blob = new Blob([json], { type: 'application/json' });
  const url = URL.createObjectURL(blob);

  const a = document.createElement('a');
  a.href = url;
  a.download = `swimlane-${Date.now()}.json`;
  a.click();
};
导出 SVG 就是把画布上的 SVG 元素序列化:
const exportSVG = () => {
  const svgData = new XMLSerializer().serializeToString(svgRef.current);
  const blob = new Blob([svgData], { type: 'image/svg+xml' });
  // ... 同上
};
最后
整个组件核心就是:
- 数据结构设计好
- 节点用绝对定位
- 连线用 SVG 贝塞尔曲线
- 事件处理注意绑定到 document