一个基于纯原生HTML/CSS/JavaScript的Markdown架构图生成工具
一个基于纯原生HTML/CSS/JavaScript的Markdown架构图生成工具
一个基于纯原生HTML/CSS/JavaScript的Markdown架构图生成工具,支持无限画布交互和实时预览。功能特性
📝 Markdown解析:通过简单的Markdown语法定义软件架构层次结构
🎨 智能布局 :支持横向(
@row)和纵向(@col)两种布局模式🖱️ 无限画布:支持拖拽平移和以鼠标为中心的缩放操作
⚡ 实时预览:编辑Markdown内容即时更新架构图
🎨 样式自定义:可调整画布背景、模块填充、边框和文字颜色
📱 响应式设计:自适应窗口大小变化
🚀 零依赖:纯原生实现,无需任何外部库
快速开始
克隆或下载本项目文件
用浏览器打开
index.html文件在左侧编辑区编写Markdown架构描述
在右侧画布区查看生成的架构图
Markdown 语法
基本格式
# 层级标题 [布局方向]
- 模块名称: 模块描述
- 模块名称: 模块描述
布局指令
@row- 模块横向排列
@col- 模块纵向排列(默认)示例
# 接入层 (第一层) @row
- 负载均衡: Nginx, F5
- 防火墙: WAF

# 业务逻辑层 (第二层) @col
- 用户服务: 登录, 注册模块
- 订单模块: 下单, 支付, 退款流程
- 搜索服务: Elasticsearch 检索集群

# 数据层 (第三层) @row
- 关系型数据库: MySQL
- 缓存: Redis
- 消息队列: Kafka
操作指南
画布交互
平移:鼠标左键按住并拖拽
缩放:滚动鼠标滚轮(以鼠标指针为中心缩放)
样式设置
在左侧面板调整颜色设置:
画布背景色
模块填充色
模块边框色
模块文字色
项目结构
├── index.html          # 主页面文件
├── README.md           # 项目说明文档
└── 无需其他依赖文件
浏览器兼容性
Chrome 60+
Firefox 55+
Safari 11+
Edge 79+
导出架构图
目前可通过浏览器截图功能保存生成的架构图:
调整到合适的视图
使用浏览器开发者工具截图
或使用系统截图工具
开发与定制
修改布局算法
编辑
<script>标签中的drawModule和parseText函数调整样式
修改
<style>标签中的CSS变量和样式定义扩展功能
添加导出PNG功能
支持更多布局模式
添加节点拖拽编辑
支持连线自定义
技术实现
核心技术
Canvas 2D API - 图形渲染
Markdown解析 - 简单文本解析逻辑
事件处理 - 鼠标拖拽、滚轮缩放
CSS Grid/Flexbox - 界面布局
关键算法
Markdown解析:通过正则表达式和字符串处理解析层级结构
自动布局:根据布局指令计算模块位置
无限画布:通过变换矩阵实现平移和缩放
网格背景:动态绘制背景网格线
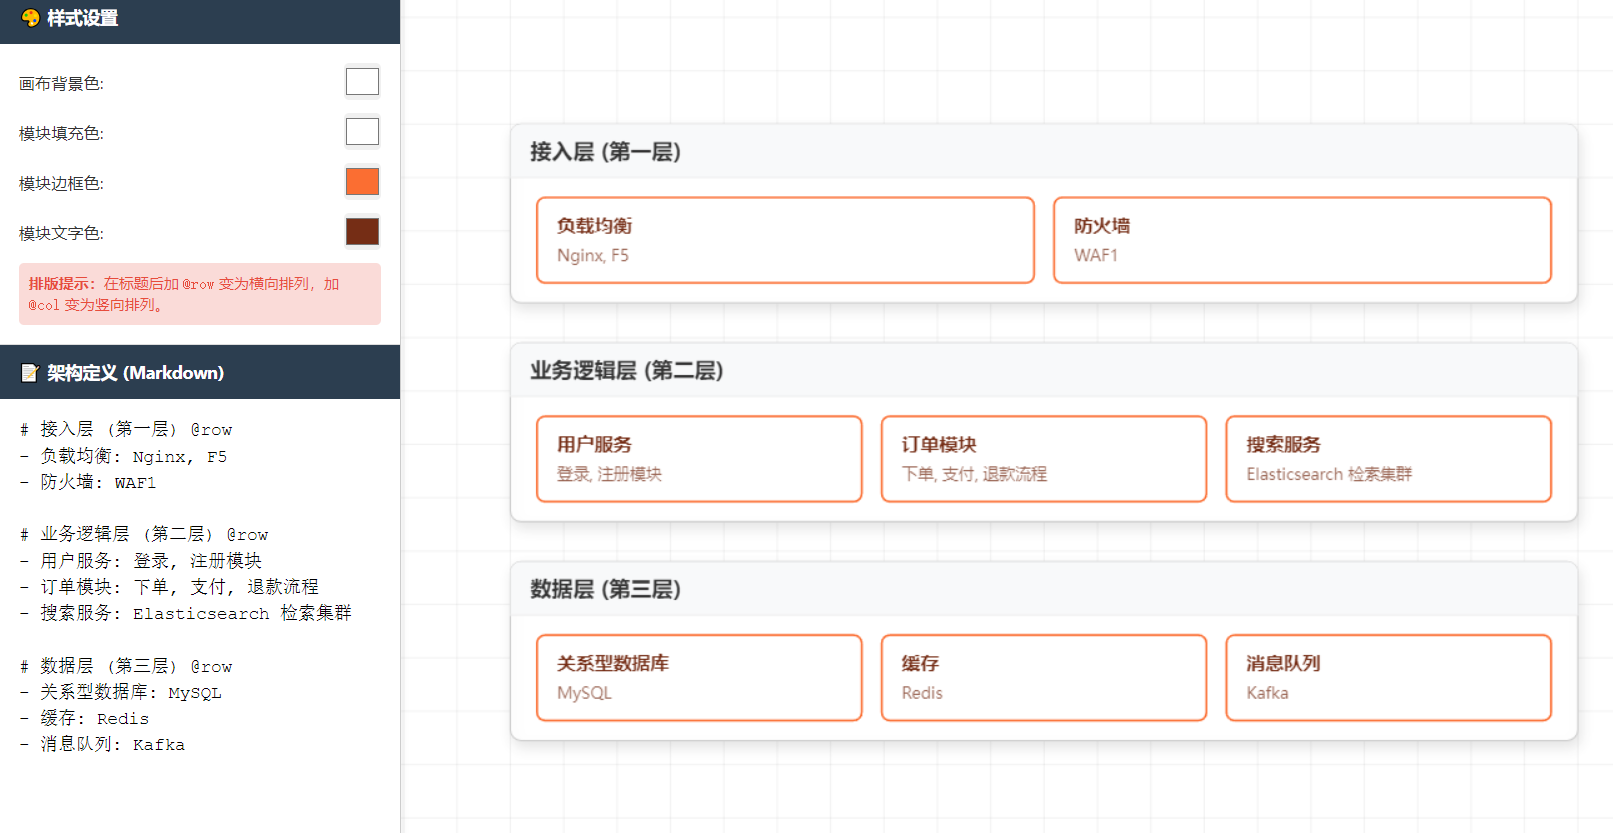
本文介绍了一个基于纯原生HTML/CSS/JavaScript的Markdown架构图生成工具。该工具支持通过简单的Markdown语法定义软件架构层次结构,提供横向(@row)和纵向(@col)两种布局模式,并具备无限画布交互功能(拖拽平移和以鼠标为中心的缩放)。工具采用零依赖实现,包含实时预览、样式自定义和响应式设计等特性。用户只需在浏览器中打开index.html文件,在左侧编辑区编写Markdown架构描述即可在右侧画布区查看生成结果。项目使用Canvas2D API进行图形渲染,通过正则表达式解析Markdown,并实现了基于变换矩阵的无限画布功能。兼容主流现代浏览器,目前可通过截图方式导出架构图。
html<!DOCTYPE html> <html lang="zh-CN"> <head> <meta charset="UTF-8"> <title>MD 架构图生成器 - 无限画布加强版</title> <style> body { margin: 0; display: flex; height: 100vh; font-family: 'Segoe UI', Tahoma, Geneva, Verdana, sans-serif; overflow: hidden; } /* 侧边栏样式 */ #sidebar { width: 320px; border-right: 1px solid #ccc; display: flex; flex-direction: column; background: #fafafa; box-shadow: 2px 0 5px rgba(0,0,0,0.05); z-index: 10; } .panel-header { padding: 12px 15px; background: #2c3e50; color: white; font-weight: bold; font-size: 14px;} /* 控制面板 */ #controls { padding: 15px; border-bottom: 1px solid #ddd; background: #fff; } .control-group { display: flex; align-items: center; justify-content: space-between; margin-bottom: 10px; font-size: 13px; color: #333;} .control-group input[type="color"] { border: none; width: 30px; height: 30px; padding: 0; cursor: pointer; border-radius: 4px; } .tip { font-size: 12px; color: #e74c3c; background: #fadbd8; padding: 8px; border-radius: 4px; margin-top: 10px; line-height: 1.4;} /* 输入区 */ textarea { flex: 1; padding: 15px; border: none; outline: none; background: #fff; resize: none; font-family: 'Courier New', Courier, monospace; font-size: 14px; line-height: 1.5; } /* 画布区 */ #canvas-container { flex: 1; position: relative; cursor: grab; background: #eeeeee; } #canvas-container:active { cursor: grabbing; } canvas { display: block; width: 100%; height: 100%; } .hint-float { position: absolute; bottom: 15px; right: 15px; font-size: 12px; color: #fff; background: rgba(0,0,0,0.5); padding: 6px 12px; border-radius: 20px; pointer-events: none; } </style> </head> <body> <div id="sidebar"> <div class="panel-header">🎨 样式设置</div> <div id="controls"> <div class="control-group">画布背景色: <input type="color" id="bgColor" value="#f4f6f8"></div> <div class="control-group">模块填充色: <input type="color" id="fillColor" value="#e3f2fd"></div> <div class="control-group">模块边框色: <input type="color" id="borderColor" value="#2196f3"></div> <div class="control-group">模块文字色: <input type="color" id="textColor" value="#0d47a1"></div> <div class="tip"> <b>排版提示:</b>在标题后加 <code>@row</code> 变为横向排列,加 <code>@col</code> 变为竖向排列。 </div> </div> <div class="panel-header">📝 架构定义 (Markdown)</div> <textarea id="mdInput"> # 接入层 (第一层) @row - 负载均衡: Nginx, F5 - 防火墙: WAF # 业务逻辑层 (第二层) @col - 用户服务: 登录, 注册模块 - 订单模块: 下单, 支付, 退款流程 - 搜索服务: Elasticsearch 检索集群 # 数据层 (第三层) @row - 关系型数据库: MySQL - 缓存: Redis - 消息队列: Kafka</textarea> </div> <div id="canvas-container"> <canvas id="archCanvas"></canvas> <div class="hint-float">🖱️ 左键拖拽平移 | ⚙️ 滚轮以鼠标为中心缩放</div> </div> <script> const canvas = document.getElementById('archCanvas'); const ctx = canvas.getContext('2d'); const input = document.getElementById('mdInput'); const container = document.getElementById('canvas-container'); // UI 控件 const uiBgColor = document.getElementById('bgColor'); const uiFillColor = document.getElementById('fillColor'); const uiBorderColor = document.getElementById('borderColor'); const uiTextColor = document.getElementById('textColor'); // 监听颜色变化重绘 [uiBgColor, uiFillColor, uiBorderColor, uiTextColor, input].forEach(el => { el.addEventListener('input', () => { layers = parseText(input.value); draw(); }); }); // 状态 let scale = 1; let offsetX = 100; let offsetY = 80; let layers = []; // 1. 解析文本 (加入排版方向解析) function parseText(text) { const lines = text.split('\n'); const result = []; let currentLayer = null; lines.forEach(line => { line = line.trim(); if (!line) return; if (line.startsWith('#')) { let rawTheme = line.replace('#', '').trim(); let dir = 'col'; // 默认竖排 // 探测横排/竖排指令 if (rawTheme.includes('@row')) { dir = 'row'; rawTheme = rawTheme.replace('@row', '').trim(); } else if (rawTheme.includes('@col')) { dir = 'col'; rawTheme = rawTheme.replace('@col', '').trim(); } currentLayer = { theme: rawTheme, dir: dir, modules: [] }; result.push(currentLayer); } else if (line.startsWith('-') && currentLayer) { const parts = line.replace('-', '').split(':'); currentLayer.modules.push({ name: parts[0]?.trim() || '', content: parts[1]?.trim() || '' }); } }); return result; } // 画布绘制无限网格背景 function drawGrid() { ctx.fillStyle = uiBgColor.value; ctx.fillRect(0, 0, canvas.width, canvas.height); const gridSize = 40 * scale; const startX = (offsetX % gridSize) - gridSize; const startY = (offsetY % gridSize) - gridSize; ctx.beginPath(); for (let x = startX; x < canvas.width; x += gridSize) { ctx.moveTo(x, 0); ctx.lineTo(x, canvas.height); } for (let y = startY; y < canvas.height; y += gridSize) { ctx.moveTo(0, y); ctx.lineTo(canvas.width, y); } ctx.strokeStyle = 'rgba(0, 0, 0, 0.05)'; ctx.lineWidth = 1; ctx.stroke(); } // 2. 绘制逻辑 function draw() { // 同步画布物理像素与容器像素 canvas.width = container.clientWidth; canvas.height = container.clientHeight; // 绘制底层网格 drawGrid(); ctx.save(); ctx.translate(offsetX, offsetY); ctx.scale(scale, scale); let currentY = 0; const layerWidth = 800; // 固定整体架构宽度,使其像一个标准的金字塔/切片图 const padding = 20; const moduleHeight = 64; layers.forEach((layer) => { // ----------------------------- // A. 计算层级高度 // ----------------------------- let layerHeight = 0; if (layer.dir === 'col') { // 竖向排列:高度 = 头部 + 内部所有模块累加高度 layerHeight = 50 + (layer.modules.length * (moduleHeight + 10)) + 10; } else { // 横向排列:高度 = 头部 + 一行模块的高度 layerHeight = 50 + moduleHeight + 20; } // ----------------------------- // B. 绘制层级大框与标题 // ----------------------------- // 阴影 ctx.shadowColor = "rgba(0,0,0,0.1)"; ctx.shadowBlur = 10; ctx.shadowOffsetX = 2; ctx.shadowOffsetY = 5; // 层背景 ctx.fillStyle = '#ffffff'; ctx.strokeStyle = '#cccccc'; ctx.lineWidth = 1; // 画外框 (圆角) ctx.beginPath(); ctx.roundRect(0, currentY, layerWidth, layerHeight, 8); ctx.fill(); ctx.stroke(); // 关掉阴影画内部 ctx.shadowColor = "transparent"; // 标题背景 ctx.fillStyle = '#f8f9fa'; ctx.beginPath(); ctx.roundRect(0, currentY, layerWidth, 40, [8, 8, 0, 0]); ctx.fill(); // 绘制标题 ctx.fillStyle = '#333'; ctx.font = 'bold 16px sans-serif'; ctx.fillText(layer.theme, 15, currentY + 26); // 绘制底边线分隔标题 ctx.beginPath(); ctx.moveTo(0, currentY + 40); ctx.lineTo(layerWidth, currentY + 40); ctx.strokeStyle = '#eeeeee'; ctx.stroke(); // ----------------------------- // C. 绘制内部模块 // ----------------------------- ctx.lineWidth = 1.5; if (layer.dir === 'col') { // 竖向布局 layer.modules.forEach((mod, mIdx) => { const modX = padding; const modY = currentY + 50 + (mIdx * (moduleHeight + 10)); const modWidth = layerWidth - 2 * padding; drawModule(modX, modY, modWidth, moduleHeight, mod); }); } else { // 横向布局: 均匀平分宽度 const gap = 15; const count = layer.modules.length; const availableWidth = layerWidth - 2 * padding - (count - 1) * gap; const modWidth = count > 0 ? availableWidth / count : 0; layer.modules.forEach((mod, mIdx) => { const modX = padding + mIdx * (modWidth + gap); const modY = currentY + 55; drawModule(modX, modY, modWidth, moduleHeight, mod); }); } currentY += layerHeight + 30; // 层与层之间的间距 }); ctx.restore(); } // 辅助函数:绘制单个模块小方块 function drawModule(x, y, w, h, mod) { // 模块背景与边框 ctx.fillStyle = uiFillColor.value; ctx.strokeStyle = uiBorderColor.value; ctx.beginPath(); ctx.roundRect(x, y, w, h, 6); ctx.fill(); ctx.stroke(); // 剪裁区域防止文字溢出模块 ctx.save(); ctx.beginPath(); ctx.roundRect(x, y, w, h, 6); ctx.clip(); // 绘制主名称 ctx.fillStyle = uiTextColor.value; ctx.font = 'bold 14px sans-serif'; ctx.fillText(mod.name, x + 15, y + 26); // 绘制内容 (使用主颜色的 80% 透明度作为副标题) ctx.globalAlpha = 0.75; ctx.font = '12px sans-serif'; ctx.fillText(mod.content, x + 15, y + 48); ctx.restore(); } // 3. 无线画布交互逻辑 // 滚轮缩放 (以鼠标指针为中心缩放!) container.addEventListener('wheel', (e) => { e.preventDefault(); // 获取鼠标相对于容器的坐标 const rect = canvas.getBoundingClientRect(); const mouseX = e.clientX - rect.left; const mouseY = e.clientY - rect.top; // 确定缩放系数 const zoomFactor = e.deltaY > 0 ? 0.9 : 1.1; // 缩放核心公式:调整偏移量使得鼠标所在点的内容保持在原位 offsetX = mouseX - (mouseX - offsetX) * zoomFactor; offsetY = mouseY - (mouseY - offsetY) * zoomFactor; scale *= zoomFactor; draw(); }, { passive: false }); // 拖拽平移 let isDragging = false; let startX, startY; container.addEventListener('mousedown', (e) => { isDragging = true; // 记录鼠标按下时的相对位置 startX = e.clientX - offsetX; startY = e.clientY - offsetY; }); window.addEventListener('mousemove', (e) => { if (!isDragging) return; // 计算新的偏移量 offsetX = e.clientX - startX; offsetY = e.clientY - startY; draw(); }); window.addEventListener('mouseup', () => { isDragging = false; }); // 防止鼠标移出窗口时状态卡死 window.addEventListener('mouseleave', () => { isDragging = false; }); // 窗口尺寸变化自适应 window.addEventListener('resize', draw); // 初始化运行 layers = parseText(input.value); draw(); </script> </body> </html>