本文记录一下完整的 SpringBoot3 整合 Mybatis 的步骤。
只要按照本步骤来操作,整合完成后就可以正常使用。
1. 添加数据库驱动依赖
以 MySQL 为例。
当不指定 依赖版本的时候,会 由 springboot 自动管理。
<dependency>
    <groupId>com.mysql</groupId>
    <artifactId>mysql-connector-j</artifactId>
    <!-- <version>8.0.32</version> -->
</dependency>
2. 添加 MyBatis 依赖
第三方的依赖库,需要明确的指定版本号。推荐使用最新的即可。
<!-- https://mvnrepository.com/artifact/org.mybatis.spring.boot/mybatis-spring-boot-starter -->
<dependency>
    <groupId>org.mybatis.spring.boot</groupId>
    <artifactId>mybatis-spring-boot-starter</artifactId>
    <version>3.0.3</version>
</dependency>
3. 配置数据源信息
在 application.yaml 文件中添加数据源的信息
spring:
  datasource:
    # 数据库连接驱动
    driver-class-name: com.mysql.cj.jdbc.Driver
    # 数据源类型: 默认的是 Hikari
    type: com.zaxxer.hikari.HikariDataSource
    # 数据库连接地址
    url: jdbc:mysql://localhost:3306/test?useUnicode=true&characterEncoding=utf-8&useSSL=false&serverTimezone=Asia/Shanghai
    # 数据库连接用户名
    username: root
    # 数据库连接密码
    password: 12345678
4. 配置 mybatis
在 application.yaml 文件中添加mybatis的相关配置。
# mybatis 的配置
mybatis:
  # 配置 mybatis 的xml文件的扫描路径
  mapper-locations: classpath:mybatis/**/*.xml
  # 配置实体类的扫描路径
  type-aliases-package: com.testabc.demo.ssmtest
  configuration:
    # 开启驼峰命名转换
    map-underscore-to-camel-case: true
    # 开启日志
    #log-impl: org.apache.ibatis.logging.stdout.StdOutImpl
    log-impl: org.apache.ibatis.logging.slf4j.Slf4jImpl

# 指定日志级别 : 对mybatis的日志输出
logging:
  level:
    com.testabc.demo.ssmtest: debug
5. 功能开发
5.1 建表
简单创建一张表。包含了普通属性,标准的下划线属性。
CREATE TABLE `test`.`student`  (
  `id` int NOT NULL,
  `name` varchar(20) NOT NULL,
  `age` int NOT NULL,
  `other_message` varchar(100) NULL,
  PRIMARY KEY (`id`)
);
5.2 创建普通的bean类
结合表结构,创建普通的一个bean类。此时属性用标准的驼峰命名。
package com.testabc.demo.ssmtest;

public class Student {
    private int id;
    private String name;
    private int age;
    private String otherMessage;

    。。。。。。
    构造方法
    getter/setter
    toString 方法

}
5.3 创建mapper接口
注意 : 此处的接口用到了
@Mapper注解。先写上吧,没有副作用。
package com.testabc.demo.ssmtest;

import org.apache.ibatis.annotations.Param;
import org.springframework.stereotype.Repository;

@Mapper
public interface StudentMapper {
    // 根据id查询student的方法
    Student getStudentById(@Param("id") int id);
}
5.4 创建xml文件
在 classpath:/resources/mybatis/ 目录下新增
StudentMapper.xml文件。
<?xml version="1.0" encoding="UTF-8" ?>
<!DOCTYPE mapper PUBLIC "-//mybatis.org//DTD Mapper 3.0//EN" "http://mybatis.org/dtd/mybatis-3-mapper.dtd" >
<mapper namespace="com.testabc.demo.ssmtest.StudentMapper">


    <select id="getStudentById" resultType="com.testabc.demo.ssmtest.Student">
        select * from student where id = #{id}
    </select>

</mapper>
5.5 创建controller类
package com.testabc.demo.ssmtest;

@RestController
public class StudentController {

    /**
     * 通过构造方法的方式注入 StudentMapper
     */
    private final StudentMapper studentMapper;

    public StudentController(StudentMapper studentMapper) {
        this.studentMapper = studentMapper;
    }

    @GetMapping("/getStudentById/{id}")
    public Student getStudentById(@PathVariable("id") int id){
        Student student = null;
        student = studentMapper.getStudentById(id);
        return student;
    }
}
5.6 配置扫描的包
在 项目的 启动类上添加注解
MapperScan(xxxx), 指定要扫描的 mapper 接口的包路径。
package com.testabc.demo;

import org.mybatis.spring.annotation.MapperScan;
import org.springframework.boot.SpringApplication;
import org.springframework.boot.autoconfigure.SpringBootApplication;

@SpringBootApplication
@MapperScan("com.testabc.demo.ssmtest")
public class DemoApplication {

    public static void main(String[] args) {

        // 这个工具会返回一个 ApplicationContext 的对象
        var ioc = SpringApplication.run(DemoApplication.class, args);

    }

}
6. 功能测试
浏览器中访问测试。
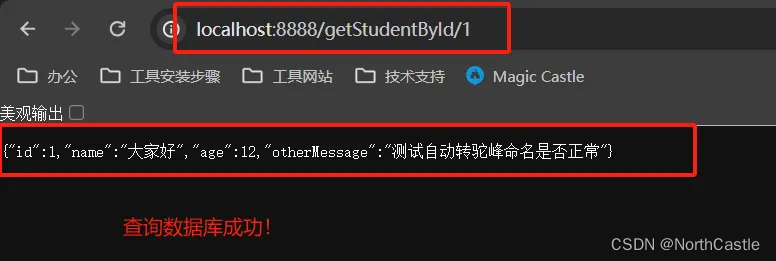

成功,至此,已经完成了 SpringBoot3 整合 Mybatis 的步骤。