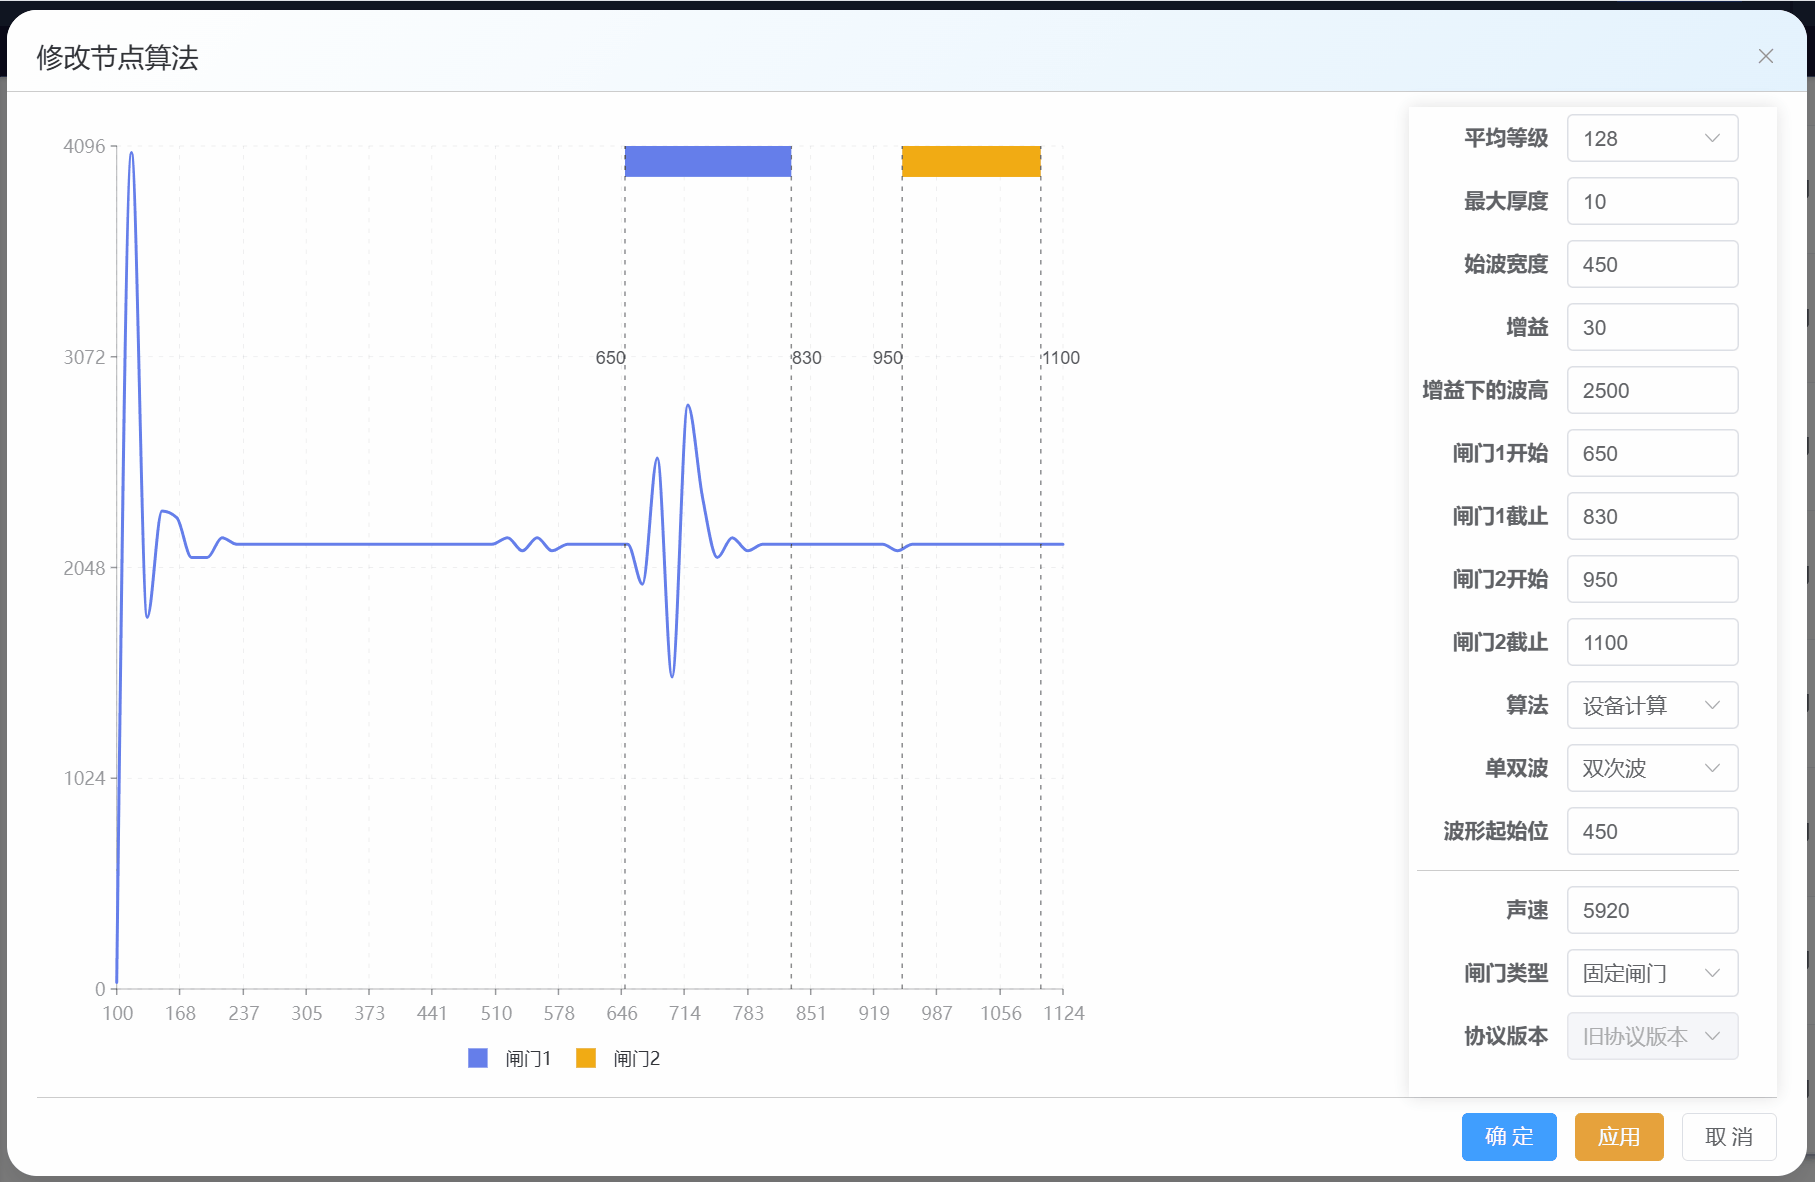
效果
line和range都能通过tooltip显示数据,让line和range共用一套坐标轴,并且当鼠标移动到line上时,tooltip显示line的数据信息;当鼠标移动到range上,tooltip显示range的数据信息
我试过用spaceLayer,让line和range分别在一个view上,但会出现两个坐标轴,而又因为line和range数据结构不一致,所以无法共用一套数据,只能分别设置数据,数据的不同,导致scale比例尺对应不上,坐标轴也对应不上。因此,spaceLayer的方案放弃。
下面是g2chartHook
TypeScript
//g2chartHook.ts
import { ref, onMounted, onUnmounted, onBeforeUnmount } from "vue";
import { Chart } from "@antv/g2";
import { Renderer as SVGRenderer } from "@antv/g-svg";

let option: any = null;
let chart: Chart | null = null;
let viewArea = null;
let plotArea = null;
let mainArea = null;
let contentArea = null;
let chartRect: any = null;
let viewAreaRect = null;
let plotAreaRect = null;
let mainAreaRect = null;
let contentAreaRect = null;
let zhamenRangePath = null;
let zhamenYArr = [3946, 4096];
let zhamenSVGList = [];
let zhamenPositionY = 0;

/**
 * 获取闸门SVG元素并计算其位置信息
 * 该函数用于从G2图表中提取闸门相关的SVG元素,并计算其Y轴位置
 */
function getZhamenRangeSVG() {
    const svgElement = document.querySelector("#g-root");//找到ID为g-root的g2图表svg元素
	console.log("[DEBUG] svgElement", svgElement);
	if (svgElement) {
		const pathElements = svgElement.querySelectorAll('path.element');//选取所有class为element的path标签
		console.log("[DEBUG] Found path elements:", pathElements);
		// 遍历所有path元素,找到height属性不为空的
		for (const path of pathElements) {
			const height = path.getAttribute("height");
			if (Number(height) > 0) {
				//console.log("[DEBUG] Found path with fill:", path);
				zhamenSVGList.push(path); // 将找到的闸门SVG元素添加到数组中
			}
		}
		console.log('zhamenSVGList', zhamenSVGList);

		plotArea = svgElement.children[0]; // 获取绘图区域
		mainArea = plotArea.children[plotArea.children.length - 1]; // 获取主区域
		console.log("[DEBUG] mainArea", mainArea);
		const matrix = mainArea.getAttribute("transform"); // 获取变换矩阵
		console.log("[DEBUG] matrix", matrix);
		// 从变换矩阵中提取顶部边距值
		const paddingTop = matrix?.slice(matrix.lastIndexOf(',')+1, matrix.length-1);
		console.log('paddingTop', paddingTop);
		// 计算闸门的Y轴位置:顶部边距 + 闸门元素高度
		zhamenPositionY = Number(paddingTop) + Math.ceil(Number(zhamenSVGList[0].getAttribute("height")));
	}
}

/**
 * 初始化1124图表
 *
 * @param {HTMLElement} dom - 图表容器DOM元素
 * @param {any[]} bolist - 波形数据/折线数据
 * @param {any[]} rangeData - 范围数据
 * @returns {Chart} 返回初始化后的图表实例
 *
 * @description
 * 该函数用于创建并初始化一个1124图表实例,使用SVG渲染器。
 * 图表会自动适应容器大小,并基于提供的波形数据和范围数据进行渲染。
 * 渲染完成后会获取图表容器的位置信息和闸门范围SVG元素。
 */
export function init1124Chart(
	dom: HTMLElement,
	bolist: any[],
	rangeData: any[],
) {
	chart = new Chart({
		container: dom,
		autoFit: true,
		// height: 400,
		renderer: new SVGRenderer({ outputSVGElementId: true }),
	});


	chart.options(buildWaveOption(bolist, rangeData));

	chart.render().then(() => {
		// console.log("render done");

		chartRect = dom.getBoundingClientRect();
		// console.log("chartRect", chartRect);
		getZhamenRangeSVG();
		console.log("gate h", zhamenSVGList[0].getAttribute("height"));

	});
	return chart;
}
/**
 * 组装g2图表选项
 * @param bolist
 * @param rangeData
 * @returns
 */
function buildWaveOption(bolist: any[], rangeData: any[]) {
	option = {
		type: "view",
		children: [customTooltip(buildLineOption(bolist), rangeData), ...buildRangeOption(rangeData)],
	};

	return option;
}
/**
 * 构建折线图选项
 * @param bolist
 * @returns
 */
function buildLineOption(bolist: any[]) {
	let lineOption = {
		type: "line",
		data: bolist,
		encode: {
			x: "x",
			y: "y",
			shape: "smooth",
		},
		style: {
			stroke: "#667eea",
			lineWidth: 2,
		},
		scale: {
			x: {
				// min: 100,
				// max: 1124,
				nice: false,
				type: "linear", // 指定类型
				domain: [100, 1124], // 指定定义域
				range: [0, 1], // 指定值域
				tickMethod: (min, max, count) => {
					let tickCount = 16;
					let tickStep = (1124 - 100) / (tickCount - 1);
					let ticks = [];
					for (let i = 0; i < tickCount; i++) {
						ticks.push(Number((100 + tickStep * i).toFixed(0)));
					}
					return ticks;
				},
			},
			y: {
				// min: 0,
				// max: 4096,
				nice: false,
				type: "linear", // 指定类型
				domain: [0, 4096], // 指定定义域
				range: [1, 0], // 指定值域
				tickMethod: (min, max, count) => {
					let tickCount = 5;
					let tickStep = (4096 - 0) / (tickCount - 1);
					let ticks = [];
					for (let i = 0; i < tickCount; i++) {
						ticks.push(Number((0 + tickStep * i).toFixed(0)));
					}
					return ticks;
				},
			},
		},
		axis: {
			x: {
				title: false,
				titleFontSize: 14,
				titleFontWeight: "bold",
				labelAutoRotate: false,
				line: {
					lineWidth: 2,
					stroke: "#101010",
				},
				grid: {
					stroke: "#e0e0e0",
					lineWidth: 2,
					lineDash: [4, 4],
				},
			},
			y: {
				title: false,
				titleFontSize: 14,
				titleFontWeight: "bold",
				line: {
					lineWidth: 2,
					stroke: "#101010",
				},
				grid: {
					stroke: "#e0e0e0",
					lineWidth: 2,
					lineDash: [4, 4],
				},
			},
		},
		//不能设置tooltip,否则interaction的自定义tooltip会失效
		// tooltip: {
        //   title: (d) => `位置 ${d.x}`,
        //   items: [{ field: "y", name: "大小" }],
		// }

	};

	return lineOption;
}
/**
 * 自定义提示窗体
 * @param lineOption
 * @param rangeData
 * @returns
 */
function customTooltip(lineOption: any, rangeData: any[]) {

	let tooltip = {
		interaction: {
          tooltip: {

            // 方法1: 在interaction tooltip配置中使用render函数,实现当鼠标悬停在range内时,显示range的tooltip;不在range内时,显示line的tooltip
            render: (event, { items, title }) => {
            //   console.log("render", items, title);
            //   console.log("render",event.x,event.y,event.offsetX,event.offsetY,event.clientX,event.clientY);

              let dataX = title;

              console.log("zhamenPositionY", event.y , zhamenPositionY);

			  if(Array.isArray(rangeData) && event.y < zhamenPositionY) {
				//当鼠标悬停在闸门1内时,显示闸门1的tooltip
				if(rangeData.length > 0 && dataX >= rangeData[0].x[0] && dataX <= rangeData[0].x[1]) {
					return generateTooltipHtml(
						'','位置',`${rangeData[0].x[0]} - ${rangeData[0].x[1]}`,
					);
				}
				//当鼠标悬停在闸门2内时,显示闸门2的tooltip
				else if(rangeData.length > 1 && dataX >= rangeData[1].x[0] && dataX <= rangeData[1].x[1]) {
					return generateTooltipHtml(
						'', '位置',`${rangeData[1].x[0]} - ${rangeData[1].x[1]}`,
					);
				}
			  }
			  //当鼠标悬停在line上时,显示line的tooltip
              return generateTooltipHtml(`位置 ${title}`, '大小',items[0].value);
            },
          },
        }
	}

	Object.assign(lineOption, tooltip);
	return lineOption;
}
/**
 * 生成提示窗体html
 * @param title
 * @param name
 * @param value
 * @returns
 */
function generateTooltipHtml(title, name, value) {
  //最上层div不能用g2-tooltip样式,否则会出现一小一大两个tooltip框,很难看
  let html = `
            <div>
              <div class="g2-tooltip-title">${title}</div>
              <ul class="g2-tooltip-list">
                <li class="g2-tooltip-list-item">
        <span class="g2-tooltip-list-item-name"
        style="display: flex; align-items: center; max-width: 216px;">
          <span class="g2-tooltip-list-item-marker"
          style="background: rgb(102, 126, 234); width: 8px; height: 8px; border-radius: 50%; display: inline-block; margin-right: 4px;"></span>
          <span class="g2-tooltip-list-item-name-label"
          title="大小" style="flex: 1 1 0%; overflow: hidden; white-space: nowrap; text-overflow: ellipsis;">${name}</span>
        </span>
        <span class="g2-tooltip-list-item-value"
        title="2322" style="display: inline-block; float: right; flex: 1 1 0%; text-align: right; min-width: 28px; margin-left: 30px; color: rgba(0, 0, 0, 0.85); overflow: hidden; white-space: nowrap; text-overflow: ellipsis;"
        >${value}</span>
      </li></ul></div>
            `;
  return html;
}
/**
 * 构建范围图选项
 * @param rangeData
 * @returns
 */
function buildRangeOption(rangeData: any[]) {
	if(!rangeData) return [];

	let rangeOption = {
		type: "range",
		data: rangeData,
		encode: { x: "x", y: "y", color: "label" },
		//labels: [{ text: "label", style: { fill: "#fff", dy: 0 } }],
		tooltip: false,
		// zIndex: 1,
		// axis: false,
		scale: {
			color: {
				range: ["#667eea", "#f1ab14"], //设置闸门标记的颜色
			},
		},
		legend: {
			color: {
				position: "bottom",
				itemMarker: "rect",//图例项图标形状为矩形
				itemMarkerSize: 20,//图例项图标大小
				layout: {
					justifyContent: "center", // 主轴(水平)居中
				},
			},
		},
	};
	let lineXArr = [];
	for (const element of rangeData) {
		lineXArr.push({
			type: "lineX",
			data: [element.x[0]],
			style: { stroke: "#000", strokeOpacity: 0.45, lineDash: [3, 4] },
			labels: [
				{
					text: element.x[0],
					position: "right",//辅助线文本位置是镜像的,左右相反
					dy: -140,//默认辅助线文本居中显示,上移140px,正好在闸门矩形下沿
					fill: "#000",
				},
			],
		});
		lineXArr.push({
			type: "lineX",
			data: [element.x[1]],
			style: { stroke: "#000", strokeOpacity: 0.45, lineDash: [3, 4] },
			labels: [
				{
					text: element.x[1],
					position: "left",
					dy: -140,
					fill: "#000",
				},
			],
		});
	}

	return [rangeOption, ...lineXArr];
}

export function buildXdataFor1124(length: number, index: number) {
	//将x轴从100到1124等分为length-1份
	return Number((((1124 - 100) / (length - 1)) * index + 100).toFixed(0));
}
export function buildRangeDataFor1124({
	zhamen1,
	zhamen2,
}: {
	zhamen1: number[];
	zhamen2: number[];
}) {
	let range = [];
	if (
		Array.isArray(zhamen1) &&
		zhamen1.length === 2 &&
		Array.isArray(zhamen2) &&
		zhamen2.length === 2
	) {
		range.push({
			x: [zhamen1[0], zhamen1[1]],
			y: [zhamenYArr[0], zhamenYArr[1]],
			label: "闸门1",
			color: "#667eea",
		});

		if (zhamen2[0] < 1124) {
			//如果闸门2的开始位置在1124之前,那么结束位置不能超过1124
			let z2 = zhamen2[1] > 1124 ? 1124 : zhamen2[1];
			range.push({
				x: [zhamen2[0], z2],
				y: [zhamenYArr[0], zhamenYArr[1]],
				label: "闸门2",
				color: "#f1ab14",
			});
		}
		//如果闸门2的开始位置在1124之后,不绘制闸门2
	}

	return range.length > 0 ? range : null;
}
/**
 * 更新范围图
 * @param rangeData
 */
export function updateRange(rangeData: any[]) {
	// 获取所有 Mark 实例
	// const marks = chart?.getMarks();//获取不到  G2 5.x版本用函数调用方式基本废弃了,option配置是主流
	// console.log('获取mark实例', marks)
	// 根据类型查找特定的 Mark (例如 interval)
	// const range = marks.find(mark => mark.getType() === 'range');
	// console.log('获取mark实例', marks, range)

	chart?.clear();

	option.children = [option.children[0], ...buildRangeOption(rangeData)];
	chart?.options(option);
	chart?.render().then(() => {
		console.log('闸门重绘完成')
	});

}

onBeforeUnmount(() => {
	// 销毁图表实例
	if (chart) {
		chart.destroy();
	}
});
调用时,`init1124Chart(dom, lineData, {x:\[20, 30, y: 100, 200}])`