HarmonyOS 6实战:图片验证码迁移报错的复盘思考
事情是这样的。

之前我们给"旅行回忆盲盒"迭代,登录功能加一个图片验证码,类似上图这样的结构,增加人机校验(毕竟用户有token的使用,要避免薅羊毛的)。因为之前有一些其他的开发基础,所以复用了其他项目验证码接口,返回的是标准的二进制图片数据。在其他端测试,一切正常。
结果到了鸿蒙这边,图片死活显示不出来。不是报错,是完全没有反应 ------Image组件摆在那儿,就是一片空白。

我看了半天代码,又翻了半天文档,最后发现了一个让我哭笑不得的事实:鸿蒙压根不认识其他平台通用的Bitmap类型。
这事儿说起来简单,但排查过程真的很折磨人。后来我又陆续做了文字点选和滑块验证码,今天就把这些经验分享出来,希望对遇到同样问题的你有所帮助。
一、鸿蒙图像处理的"特殊性"
在iOS/Android上,后端返回验证码图片通常是这样的流程:
- 调用验证码接口,返回二进制图片数据
- 前端把二进制数据转换成Bitmap/UIImage对象
- Image组件直接设置这个对象,显示图片
这套逻辑在鸿蒙上完全不work。因为鸿蒙没有Bitmap这个类型。
翻了一通官方文档后,我发现了一个关键差异:
| 平台 | 图像处理核心类型 | 数据源要求 |
|---|---|---|
| Android | Bitmap | 支持二进制流直接转Bitmap |
| iOS | UIImage | 支持NSData转UIImage |
| 鸿蒙 | PixelMap | 需要通过ImageSource转换,或使用文件URI |
鸿蒙的Image组件支持三种数据源:
- 本地资源路径 :
$r('app.media.captcha')或沙箱文件路径 - 网络地址 :
https://example.com/captcha.png(需要配置安全策略) - PixelMap对象 :通过
image.createImageSource()创建
后端返回的是二进制数据,既不是本地文件,也不是网络地址。所以,我们需要先把二进制数据转换成Image组件能认的格式。
核心思路很简单:先把二进制数据存成本地文件,再让Image组件去读。
有两种实现方式:
| 方案 | 原理 | 适用场景 |
|---|---|---|
| URI方案 | 下载到本地,用fileUri获取路径 | 直接展示,简单够用 |
| PixelMap方案 | 转成PixelMap对象 | 需要缩放/裁剪/旋转 |
下面直接上代码。
二、图片验证码:最基础的防线
完整实现(URI方案)
typescript
import { BusinessError, request } from '@kit.BasicServicesKit';
import { fileUri } from '@kit.CoreFileKit';

@Entry
@Component
struct CaptchaDemo {
  @State captchaUri: string = '';
  @State captchaInput: string = '';
  private downloadTask: request.DownloadTask | null = null;

  build() {
    Column({ space: 20 }) {
      Text('图片验证码示例')
        .fontSize(18)
        .fontWeight(FontWeight.Bold)

      // 验证码图片
      Image(this.captchaUri)
        .width(200)
        .height(80)
        .objectFit(ImageFit.Contain)
        .onError(() => {
          console.error('图片加载失败');
        })

      // 输入框
      TextInput({ placeholder: '请输入验证码', text: this.captchaInput })
        .width(200)
        .onChange((value) => {
          this.captchaInput = value;
        })

      // 按钮区域
      Row({ space: 20 }) {
        Button('获取验证码')
          .onClick(() => {
            this.fetchCaptcha();
          })

        Button('提交验证')
          .onClick(() => {
            this.verifyCaptcha();
          })
      }
    }
    .width('100%')
    .height('100%')
    .justifyContent(FlexAlign.Center)
  }

  async fetchCaptcha() {
    // 生成唯一文件名,避免缓存
    const fileName = `captcha_${Date.now()}.png`;
    const tempPath = this.getUIContext().getHostContext()!.filesDir + '/' + fileName;

    try {
      const downloadTask = await request.downloadFile(
        this.getUIContext().getHostContext()!,
        {
          url: 'https://your-api.com/captcha',  // 替换成实际接口
          filePath: tempPath,
          header: {
            'Content-Type': 'application/json',
            // 如果需要token,在这里加
          }
        }
      );

      downloadTask.on('complete', () => {
        // 下载完成,获取文件URI
        const uri = fileUri.getUriFromPath(tempPath);
        this.captchaUri = uri;
        console.info(`验证码已保存: ${uri}`);
      });

      downloadTask.on('fail', (err: BusinessError) => {
        console.error(`下载失败: ${err.message}`);
      });

    } catch (error) {
      console.error(`请求失败: ${JSON.stringify(error)}`);
    }
  }

  async verifyCaptcha() {
    // 调用后端接口验证
    // 这里省略具体实现
    console.log('验证码:', this.captchaInput);
  }
}- 用
Date.now()生成唯一文件名,避免缓存 - 下载完成后用
fileUri.getUriFromPath()转成Image组件能认的URI - 支持携带自定义header(有些验证码接口需要带token)
进阶:转成PixelMap(适合需要二次处理的场景)
如果你需要对验证码做缩放、裁剪、旋转,可以用PixelMap方案:
typescript
import { fileIo } from '@kit.CoreFileKit';
import { image } from '@kit.ImageKit';

async fetchCaptchaAsPixelMap() {
  const fileName = `captcha_${Date.now()}.png`;
  const tempPath = this.getUIContext().getHostContext()!.filesDir + '/' + fileName;

  try {
    const downloadTask = await request.downloadFile(
      this.getUIContext().getHostContext()!,
      { url: 'https://your-api.com/captcha', filePath: tempPath }
    );

    downloadTask.on('complete', async () => {
      // 打开本地文件
      const file = fileIo.openSync(tempPath, fileIo.OpenMode.READ_ONLY);

      // 创建ImageSource
      const imageSource = image.createImageSource(file.fd);

      // 配置PixelMap参数
      const opts: image.InitializationOptions = {
        editable: true,
        pixelFormat: image.PixelMapFormat.RGBA_8888,
        size: { height: 80, width: 200 }  // 可以在这里缩放
      };

      // 创建PixelMap
      this.captchaPixelMap = await imageSource.createPixelMap(opts);

      // 关闭文件
      fileIo.closeSync(file);
    });

  } catch (error) {
    console.error(`转换失败: ${JSON.stringify(error)}`);
  }
}
三、文字点选验证码:让AI"看不懂"汉字
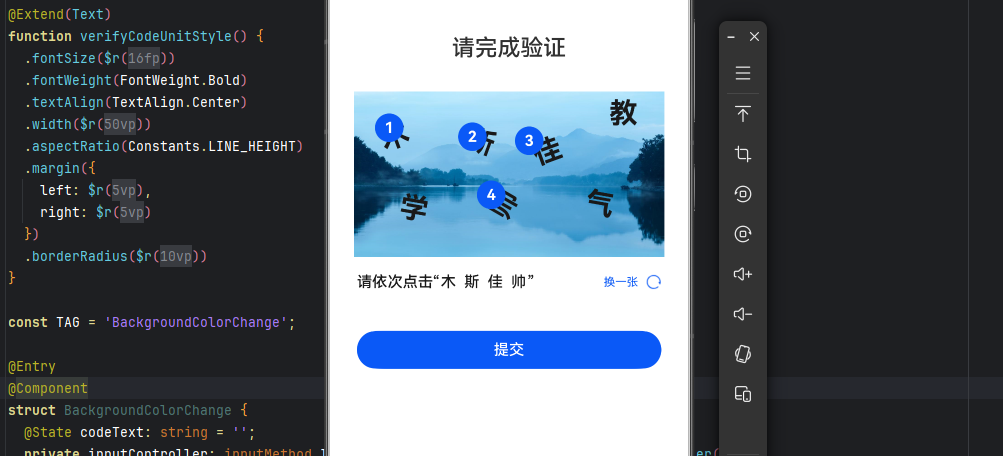
图片验证码太容易被OCR破解了。于是有了第二种方案:让用户按顺序点击特定的汉字。
比如给一张图,上面散落着"华""为""鸿""蒙"四个字,还有三个干扰字"木""斯""佳"。用户需要按顺序点击"华""为""鸿""蒙"。这种方案比普通验证码安全,因为:
- 汉字结构复杂,OCR识别难度大
- 需要理解语义
- 点击顺序增加了破解难度
typescript
import Constants from '../common/Constants';

@Extend(Text)
function wordStyle() {
  .fontSize(28)
  .fontColor('#333')
  .fontWeight(FontWeight.Bold)
}

@Extend(Text)
function numberStyle() {
  .fontSize(16)
  .fontColor(Color.White)
  .fontWeight(FontWeight.Bold)
  .backgroundColor('#007DFF')
  .width(28)
  .height(28)
  .borderRadius(14)
  .textAlign(TextAlign.Center)
}

@Entry
@Component
struct SelectVerificationCode {
  @State wordArr: string[] = [];
  @State wordNumber: number = 1;
  @State opacitySuccess: number = 0;
  @State opacityFail: number = 0;

  // 记录点击位置的坐标
  @State oneX: number = 0;
  @State oneY: number = 0;
  @State twoX: number = 0;
  @State twoY: number = 0;
  @State threeX: number = 0;
  @State threeY: number = 0;
  @State fourX: number = 0;
  @State fourY: number = 0;

  // 每个字是否已被点击
  private flagWordOne: boolean = true;
  private flagWordTwo: boolean = true;
  private flagWordThree: boolean = true;
  private flagWordFour: boolean = true;
  private flagWordFive: boolean = true;
  private flagWordSix: boolean = true;
  private flagWordSeven: boolean = true;

  private timer: number = 0;

  // 处理文字点击
  clickContent(flag: boolean, word: string, e: ClickEvent): boolean {
    if (flag && this.wordArr.length < 4) {
      this.wordArr.push(word);

      // 记录坐标,用于显示数字圆点
      if (this.wordNumber === 1) {
        this.oneX = e.displayX;
        this.oneY = e.displayY;
      } else if (this.wordNumber === 2) {
        this.twoX = e.displayX;
        this.twoY = e.displayY;
      } else if (this.wordNumber === 3) {
        this.threeX = e.displayX;
        this.threeY = e.displayY;
      } else if (this.wordNumber === 4) {
        this.fourX = e.displayX;
        this.fourY = e.displayY;
      }

      this.wordNumber++;
      return false;
    }
    return true;
  }

  // 重置状态
  initWord(): void {
    this.wordArr = [];
    this.wordNumber = 1;
    this.oneX = 0;
    this.oneY = 0;
    this.twoX = 0;
    this.twoY = 0;
    this.threeX = 0;
    this.threeY = 0;
    this.fourX = 0;
    this.fourY = 0;
    this.flagWordOne = true;
    this.flagWordTwo = true;
    this.flagWordThree = true;
    this.flagWordFour = true;
    this.flagWordFive = true;
    this.flagWordSix = true;
    this.flagWordSeven = true;
  }

  build() {
    Column() {
      // 显示点击顺序的数字圆点
      Stack() {
        Text('1').numberStyle().translate({ x: 197 + this.oneX, y: 114 + this.oneY })
        Text('2').numberStyle().translate({ x: 197 + this.twoX, y: 114 + this.twoY })
        Text('3').numberStyle().translate({ x: 197 + this.threeX, y: 114 + this.threeY })
        Text('4').numberStyle().translate({ x: 197 + this.fourX, y: 114 + this.fourY })
      }
      .zIndex(100)

      // 标题
      Text('按顺序点击:华为鸿蒙')
        .fontSize(16)
        .margin({ bottom: 20 })

      // 验证码图片区域
      Stack() {
        Image($r('app.media.background'))
          .width(300)
          .height(200)

        Column() {
          Text('华').wordStyle()
            .translate({ x: -120, y: 30 })
            .rotate({ angle: -20 })
            .onClick((e) => {
              this.flagWordOne = this.clickContent(this.flagWordOne, '华', e);
            })

          Text('为').wordStyle()
            .translate({ x: -30, y: 0 })
            .rotate({ angle: 20 })
            .onClick((e) => {
              this.flagWordTwo = this.clickContent(this.flagWordTwo, '为', e);
            })

          Text('鸿').wordStyle()
            .translate({ x: 40, y: -25 })
            .rotate({ angle: -20 })
            .onClick((e) => {
              this.flagWordThree = this.clickContent(this.flagWordThree, '鸿', e);
            })

          Text('蒙').wordStyle()
            .translate({ x: 140, y: -100 })
            .onClick((e) => {
              this.flagWordFour = this.clickContent(this.flagWordFour, '蒙', e);
            })

          // 干扰字
          Text('木').wordStyle()
            .translate({ x: -100, y: -35 })
            .rotate({ angle: 10 })
            .onClick((e) => {
              this.flagWordFive = this.clickContent(this.flagWordFive, '中', e);
            })

          Text('斯').wordStyle()
            .translate({ x: -5, y: -75 })
            .rotate({ angle: -60 })
            .onClick((e) => {
              this.flagWordSix = this.clickContent(this.flagWordSix, '国', e);
            })

          Text('佳').wordStyle()
            .translate({ x: 95, y: -110 })
            .rotate({ angle: 10 })
            .onClick((e) => {
              this.flagWordSeven = this.clickContent(this.flagWordSeven, '梦', e);
            })
        }
        .width(300)
        .height(200)
      }

      // 提交按钮
      Button('提交验证')
        .backgroundColor('#007DFF')
        .width('80%')
        .height(44)
        .margin({ top: 30 })
        .onClick(() => {
          clearTimeout(this.timer);

          if (this.wordArr.join('') === '华为鸿蒙') {
            this.opacitySuccess = 1;
            this.initWord();
            this.timer = setTimeout(() => {
              this.opacitySuccess = 0;
            }, 3000);
          } else {
            this.opacityFail = 1;
            this.initWord();
            this.timer = setTimeout(() => {
              this.opacityFail = 0;
            }, 3000);
          }
        })

      // 提示
      if (this.wordArr.length === 4 && this.wordArr.join('') === '华为鸿蒙') {
        Text('验证成功')
          .opacity(this.opacitySuccess)
          .fontSize(14)
          .backgroundColor(Color.White)
          .padding(12)
          .borderRadius(8)
          .shadow({ radius: 10 })
      } else if (this.wordArr.length === 4) {
        Text('验证失败,请重试')
          .opacity(this.opacityFail)
          .fontSize(14)
          .backgroundColor(Color.White)
          .padding(12)
          .borderRadius(8)
          .shadow({ radius: 10 })
      }
    }
    .width('100%')
    .height('100%')
    .justifyContent(FlexAlign.Center)
  }
}| 技术点 | 说明 |
|---|---|
@Extend |
自定义Text样式,复用代码 |
translate + rotate |
文字错落布局,增加OCR识别难度 |
| 点击坐标记录 | 用于在点击位置显示顺序圆点 |
| 防重复点击 | 用flag控制每个字只能点一次 |
四、滑块验证码:最丝滑的人机检验
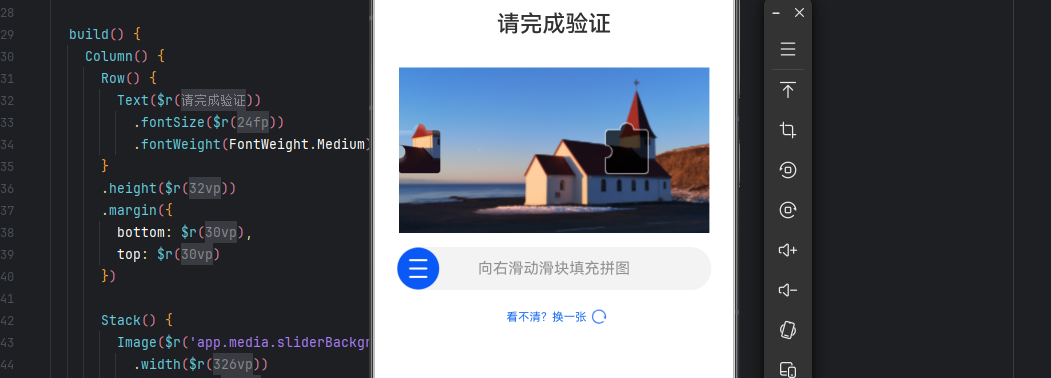
滑块验证码是目前最流行的方案。用户拖动滑块,把拼图块移动到缺口位置。用户体验好(拖动比打字快),安全性高(需要模拟鼠标轨迹才能破解)。
typescript
import Constants from '../common/Constants';

@Entry
@Component
struct SliderVerificationCode {
  @State inSetValueOne: number = 0;
  @State opacityNumber: number = 0;
  @State trajectory: Array<{ x: number, time: number }> = [];

  // 计算滑块位置(系数=滑动条宽度/最大滑块值)
  getTargetTranslateX() {
    return this.inSetValueOne * 3.4;
  }

  build() {
    Column() {
      // 标题
      Text('向右滑动滑块完成拼图')
        .fontSize(16)
        .margin({ bottom: 20 })

      // 验证码图片区域
      Stack() {
        Image($r('app.media.sliderBackground'))
          .width(300)
          .height(200)

        Image($r('app.media.slider'))
          .width(40)
          .height(40)
          .translate({
            x: this.getTargetTranslateX(),
            y: -2
          })
      }
      .alignContent(Alignment.Start)

      // 滑动条区域
      Stack() {
        // 轨道背景
        Row()
          .width(340)
          .height(4)
          .backgroundColor('#E5E5E5')
          .borderRadius(2)

        Text('拖动滑块完成验证')
          .fontSize(12)
          .fontColor('#999')

        // 滑块
        Row() {
          Slider({
            value: this.inSetValueOne,
            min: 0,
            max: 100,
            style: SliderStyle.InSet
          })
            .width(340)
            .trackColor(Color.Transparent)
            .selectedColor('#007DFF')
            .showTips(false)
            .trackThickness(4)
            .sliderInteractionMode(SliderInteraction.SLIDE_ONLY)
            .onChange((value: number, mode: SliderChangeMode) => {
              // 记录轨迹
              if (mode === SliderChangeMode.BEGIN) {
                this.trajectory = [];
              }
              this.trajectory.push({
                x: value,
                time: Date.now()
              });

              this.inSetValueOne = value;

              // 到达终点且松手
              if (value === 100 && mode.valueOf() === 2) {
                // 将轨迹发送给服务端校验
                this.verifyTrajectory(this.trajectory);
                this.opacityNumber = 1;
                setTimeout(() => {
                  this.opacityNumber = 0;
                  if (this.inSetValueOne === 100) {
                    this.inSetValueOne = 0;
                  }
                }, 3000);
              }

              // 未到终点就松手,重置
              if (value !== 100 && mode.valueOf() === 2) {
                this.inSetValueOne = 0;
              }
            })
        }

        // 滑块图标
        Image($r('app.media.button'))
          .fillColor(Color.White)
          .width(24)
          .height(24)
          .margin({ left: 8 })
          .translate({ x: this.getTargetTranslateX() })
          .hitTestBehavior(HitTestMode.Transparent)
      }
      .margin({ top: 20 })

      // 刷新按钮
      Row() {
        Text('刷新验证码')
          .fontSize(12)
          .fontColor('#007DFF')
        Image($r('app.media.refresh'))
          .width(20)
          .height(20)
      }
      .justifyContent(FlexAlign.Center)
      .margin({ top: 20 })
      .onClick(() => {
        this.inSetValueOne = 0;
        this.trajectory = [];
      })

      // 成功提示
      Text('验证成功')
        .opacity(this.opacityNumber)
        .fontSize(14)
        .backgroundColor(Color.White)
        .padding(12)
        .borderRadius(8)
        .shadow({ radius: 10 })
        .margin({ top: 20 })
    }
    .width('100%')
    .height('100%')
    .justifyContent(FlexAlign.Center)
  }

  // 模拟轨迹校验(实际应发送到服务端)
  private verifyTrajectory(trajectory: Array<{ x: number, time: number }>) {
    if (trajectory.length < 5) {
      console.warn('轨迹太短,可能是机器');
      return;
    }

    // 检查是否匀速直线运动
    let lastSpeed = 0;
    let hasAcceleration = false;

    for (let i = 1; i < trajectory.length; i++) {
      const deltaX = trajectory[i].x - trajectory[i-1].x;
      const deltaT = trajectory[i].time - trajectory[i-1].time;
      const speed = deltaX / deltaT;

      if (i > 1 && Math.abs(speed - lastSpeed) > 0.05) {
        hasAcceleration = true;
      }
      lastSpeed = speed;
    }

    if (!hasAcceleration) {
      console.warn('匀速直线运动,可能是机器');
    } else {
      console.log('轨迹正常,通过验证');
    }
  }
}| 技术点 | 说明 |
|---|---|
Slider组件 |
鸿蒙原生滑动条,支持拖动事件 |
SliderChangeMode |
SLIDE_ONLY:只在松手时触发 |
hitTestBehavior |
让滑块图标不拦截触摸事件 |
| 轨迹记录 | 记录拖动轨迹,服务端校验是否像真人 |
| 加速减速检测 | 真人有加速减速,机器常匀速直线 |
五、方案对比与踩坑记录
| 维度 | 图片验证码 | 文字点选 | 滑块验证码 |
|---|---|---|---|
| 实现难度 | ⭐⭐ | ⭐⭐⭐ | ⭐⭐⭐⭐ |
| 用户体验 | ⭐⭐(需打字) | ⭐⭐⭐(需点选) | ⭐⭐⭐⭐(拖动最快) |
| 安全性 | ⭐⭐ | ⭐⭐⭐⭐ | ⭐⭐⭐⭐⭐ |
| 适用场景 | 普通登录 | 注册/找回密码 | 支付/敏感操作中绑定的操作 |
选型建议 :
普通登录场景,图片验证码够用了,像需要用户多轮操作才可以进行的敏感操作,比如支付、或者是费用的额外支出,一些token调用前,可以先做一轮人机检验,这样可以有效防止大量低级脚本。除此之外一些细节也需要大家关注:
文件路径处理
最开始我用临时目录/data/user/0/...,结果Image组件访问不了。后来发现必须用应用沙箱路径 ,通过getUIContext().getHostContext()!.filesDir获取。
第一次实现时,我用固定的文件名captcha.png,结果发现验证码不刷新------因为下载的图片文件名没变,Image组件从缓存里读旧图。解决方案:用Date.now()生成唯一文件名。
异步时序处理
用户可能误点同一个字两次,需要加flag控制。同时需要记录点击顺序,前4个有效,后面的忽略。downloadFile是异步的,如果Image组件在下载完成前就渲染,会显示空白。所以下载完成后才设置captchaUri,触发UI刷新。
用户体验优化
服务端校验时,不能只检查最终位置是否正确。还需要检查:
- 拖动轨迹是否有加速减速(真人有,机器常匀速)
- 拖动总时长是否合理(太快或太慢都可能是机器)
- 是否有回退微调(真人会,机器不会)
总结
回顾这一路走来,从最开始的"图片不显示"到后来的三种验证码实现,我对鸿蒙的图像处理和人机检验有了更深的体会。
一个App里,最容易被用户感知的往往不是"功能多强",而是"细节多细"。验证码这种东西,用户可能每天都会遇到,但很少有人会仔细琢磨它是怎么实现的。可一旦它出问题(比如不显示、验证失败),用户的第一反应就是"这App不好用"。
所以,不管你选择哪种验证方案,都要记住一个原则:让真人轻松通过,让机器寸步难行。
图片验证码简单但体验差(有些6位的大小写字母我真是很容易出错,分不清楚是啥),滑块验证码复杂但体验好。选哪个,取决于你的业务场景和安全要求。但无论如何,后端校验是必须的,前端只是采集数据,真正的判断必须在服务端完成。
希望这篇文章能帮你少踩一些坑,在鸿蒙上快速落地一套可靠的人机检验方案。