本章为单区域OSPF后续
基本信息
多区域OSPF可以减少链路状态数据库的大小,降低SPF计算频率
同时,可以缩减部分路由器的OSPF路由条目,降低路由收敛的复杂度,对某些特定的LSA,可以在区域边界上实现汇总,过滤,控制,从而实现全网互通
也可以提高网络的稳定性,各个区域分开可以保证出了问题不会影响到其他的区域
多区域OSPF中路由器也有一些作用分类
| 种类 | 作用 |
|---|---|
| 内部路由器 | 正常使用,设置的区域相同 |
| 区域边界路由器 | 接口在多个区域且至少有一个在area 0,用于连接骨干和非骨干 |
| 骨干路由器 | 至少一个接口在area 0 |
| 自治系统边界路由器 | 引入外部路由(重分布 |
区域类型分类
| 种类 | 作用 |
|---|---|
| 骨干区域 | 必须存在,所有非骨干必须连接它,并且区域号为0 |
| 标准区域 | 普通非骨干区域 |
| 末节区域 | Stub Area,仅接受本自治系统(OSPF)中其他区域的路由汇总,拒绝其以外的路由信息,可使用默认路由 |
| 完全末节区域 | 不接受外部的路由和本自治系统中的路由,仅使用默认路由通信 |
平常配置时倒不需要注意那么多,分好标准和骨干也差不多了
而在配置时主要抛开Stub,Totally Stub这些,只有区域号需要换
- 实例
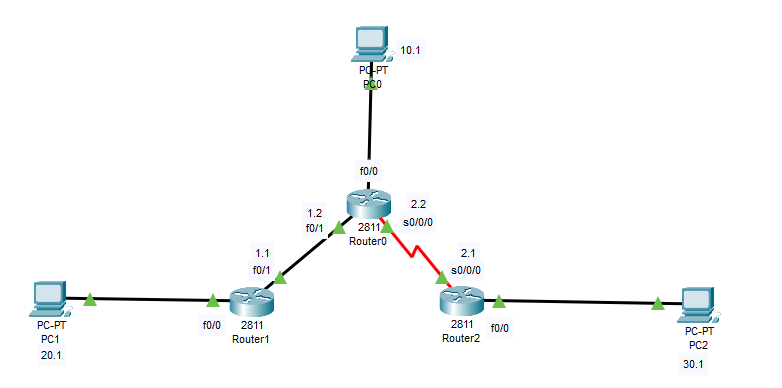
这是一个最基础的多区域OSPF拓扑,仅由三台路由器和三台PC组成
- 第一步,设好设备与链路
-
- 第二步,按图配置PC,路由器的网关和ip
| 设备 | ip | 掩码 | 网关 |
|---|---|---|---|
| PC0 | 192.168.10.1 | 255.255.255.0 | 192.168.10.254 |
| PC1 | 192.168.20.1 | 255.255.255.0 | 192.168.20.254 |
| PC2 | 192.168.30.1 | 255.255.255.0 | 192.168.30.254 |
R0
bash
Router(config)#interface f0/0
Router(config-if)#no shutdown
Router(config-if)#ip address 192.168.10.254 255.255.255.0
Router(config-if)#ex
Router(config)#interface f0/1
Router(config-if)#no shutdown
Router(config-if)#ip address 192.168.1.2 255.255.255.0
Router(config-if)#ex
Router(config)#interface s0/0/0
Router(config-if)#no shutdown
Router(config-if)#ip address 192.168.2.2 255.255.255.0
Router(config-if)#clock rate 128000
Router(config-if)#ex
R1
bash
Router(config)#interface f0/0
Router(config-if)#no shutdown
Router(config-if)#ip address 192.168.20.254 255.255.255.0
Router(config-if)#ex
Router(config)#interface f0/1
Router(config-if)#no shutdown
Router(config-if)#ip address 192.168.1.1 255.255.255.0
Router(config-if)#ex
R2
bash
Router(config)#interface f0/0
Router(config-if)#no shutdown
Router(config-if)#ip address 192.168.30.254 255.255.255.0
Router(config-if)#ex
Router(config)#interface s0/0/0
Router(config-if)#no shutdown
Router(config-if)#ip address 192.168.2.1 255.255.255.0
Router(config-if)#ex
第三步,配置OSPF(主要
R0
bash
Router(config)#router ospf 1
Router(config-router)#router-id 1.1.1.1
Router(config-router)#network 192.168.10.0 0.0.0.255 area 0
Router(config-router)#network 192.168.1.0 0.0.0.255 area 1
Router(config-router)#network 192.168.2.0 0.0.0.255 area 2
#这里的骨干区域同时连接了两个非骨干区域,同时成为了ABR
R1
bash
Router(config)#router ospf 1
Router(config-router)#router-id 2.2.2.2
Router(config-router)#network 192.168.1.0 0.0.0.255 area 1
Router(config-router)#network 192.168.20.0 0.0.0.255 area 1
Router(config-router)#
R2
bash
Router(config)#router ospf 1
Router(config-router)#router-id 3.3.3.3
Router(config-router)#network 192.168.2.0 0.0.0.255 area 2
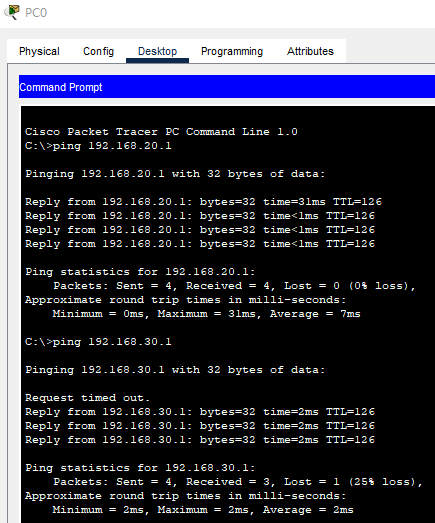
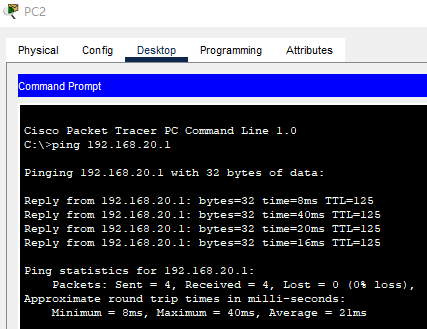
Router(config-router)#network 192.168.30.0 0.0.0.255 area 2- 第四步,验证
一些其他的配置
bash
router ospf 1
area x stub
#将区域x配置为stub区域(要求区域内所有路由器的都配上才能用
area x stub no-summary
#完全末节区域(只在ABR上配,配了之后会自动向区域内下发默认路由
area x nssa
#NSSA区域(允许引入外部路由,产生Type 7 LSA
area x nssa no-summary
#NSSA完全末节区域(ABR上配,不下发Type 3 LSA)
总结
OSPF转为多区域的基础配置较为简单,只需要注意区域号,其他配置也只是多出几行
其他区域一定要连接骨干,而且是在路由器的两边连,可以多个其他区域在一个路由器上连骨干
骨干区域可以很小,但不能没有,只有一个端口也行