这篇只是记录下笔者在编译源码的时候遇到的一些问题,以及自己是如何解决的,其实这些东西是不难的,笔者想只要能够自己去编译源码的同学都完全有能力去解决。笔者的计划是调试一个DEMO出来,这是第一步。
首先具体怎么编译源码,大家可以参考这位大哥的,说的已经很清楚了。
https://blog.csdn.net/layman_pro/article/details/145750510
2025年12月21日21:50:23
因为笔者之前就编过 我的需求 512g就够了 至于非要16+g以上的内存 区别也只在于首次编译 但又不赶时间 所以尽可能的在2000以内 但还是超出了一点点
2025年12月31日20:10:29
代码都下载完成

Bin文件解压
Type "I ACCEPT" if you agree to the terms of the license: I ACCEPT
cpp
vendor/
vendor/google_devices/
vendor/google_devices/panther/
vendor/google_devices/panther/device-partial.mk
vendor/google_devices/panther/android-info.txt
vendor/google_devices/panther/proprietary/
vendor/google_devices/panther/proprietary/BoardConfigVendor.mk
vendor/google_devices/panther/proprietary/com.shannon.imsservice.xml
vendor/google_devices/panther/proprietary/vbmeta_vendor.img
vendor/google_devices/panther/proprietary/Android.bp
vendor/google_devices/panther/proprietary/Android.mk
vendor/google_devices/panther/proprietary/ShannonIms.apk
vendor/google_devices/panther/proprietary/radio.img
vendor/google_devices/panther/proprietary/ShannonRcs.apk
vendor/google_devices/panther/proprietary/bootloader.img
vendor/google_devices/panther/proprietary/com.shannon.rcsservice.xml
vendor/google_devices/panther/proprietary/vendor.img
vendor/google_devices/panther/proprietary/vendor_dlkm.img
vendor/google_devices/panther/proprietary/device-vendor.mk
vendor/google_devices/panther/proprietary/lib64/
vendor/google_devices/panther/proprietary/lib64/libmediaadaptor.so
vendor/google_devices/panther/proprietary/QualifiedNetworksService.apk
vendor/google_devices/panther/BoardConfigPartial.mk
vendor/google_devices/panther/LICENSE
vendor/google_devices/panther/COPYRIGHT
Ubuntu 24.04
whsgzcy@whsgzcy :~/Documents/pixcel13/source$ sudo vim /usr/lib/sysctl.d/10-apparmor.conf
whsgzcy@whsgzcy :~/Documents/pixcel13/source$ sudo sysctl -p /usr/lib/sysctl.d/10-apparmor.conf
kernel.apparmor_restrict_unprivileged_userns = 0
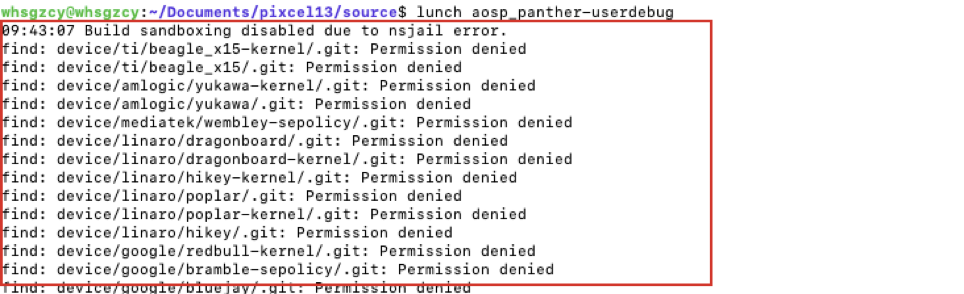
权限消解
sudo chown -R USER:USER .
Swap内存报错 导致make -jx的时候 报错
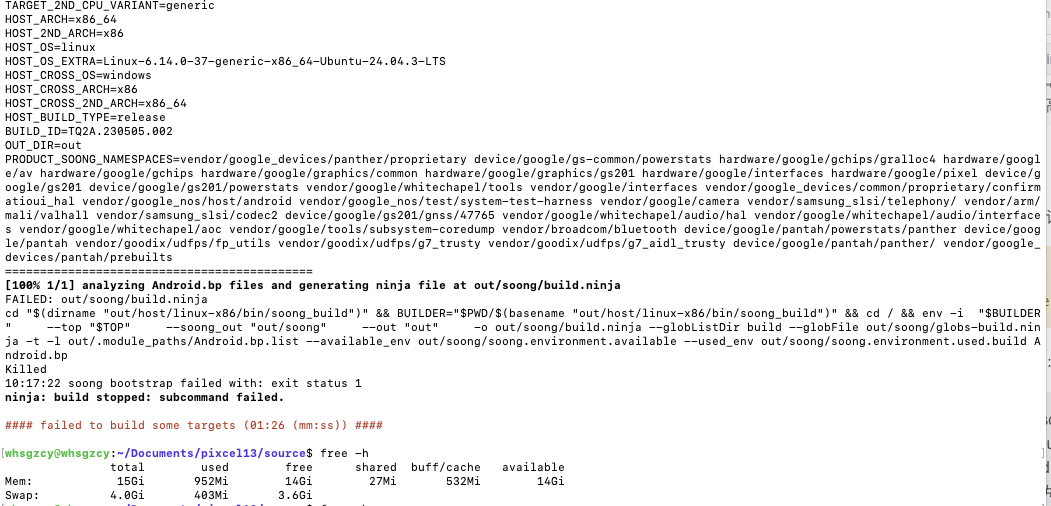
我的解决方案是deepseek问
我的解决方案是
1. 查看当前swap使用情况
sudo swapon --show
free -h
2. 创建一个新的swap文件(推荐大小:8GB-16GB)
对于16GB内存,建议创建8GB的swap文件
sudo fallocate -l 8G /swapfile
如果fallocate失败,可以使用dd(但较慢)
sudo dd if=/dev/zero of=/swapfile bs=1M count=8192
3. 设置正确的权限
sudo chmod 600 /swapfile
4. 格式化为swap
sudo mkswap /swapfile
5. 启用新的swap文件
sudo swapon /swapfile
6. 验证是否生效
free -h
备份当前的fstab文件(安全起见)
sudo cp /etc/fstab /etc/fstab.bak
将swap文件添加到fstab
echo '/swapfile none swap sw 0 0' | sudo tee -a /etc/fstab
验证fstab文件格式正确
sudo mount -a
编译报错集
prebuilts/clang/host/linux-x86/clang-3289846/bin/clang.real: error while loading shared libraries: libncurses.so.5: cannot open shared object file: No such file or directory
推荐下述方式 因为一个工具包他有很多依赖

pass