LMCache + vLLM 部署指南(以 Qwen3-0.6B 为例)
本文档介绍如何在 Ubuntu/CentOS/Linux 环境 下部署 vLLM + LMCache,实现 GPU 上大模型的高性能推理。
1️⃣ 系统及环境准备
1.1 安装系统依赖
bash
sudo apt update
sudo apt install -y python3.12 python3.12-dev build-essential curl gitpython3.12:保证使用 Python 3.12 版本python3.12-dev:用于编译部分 Python C/C++ 扩展build-essential:GCC/G++ 编译器和常用工具
如果你是 CentOS 系统,可用
yum groupinstall 'Development Tools'或dnf安装相应依赖。
1.2 创建 Python 虚拟环境
推荐使用 venv 进行隔离:
bash
python3.12 -m venv .venv
source .venv/bin/activate.venv:虚拟环境目录source .venv/bin/activate:激活虚拟环境
1.3 安装 Python 包
bash
pip install --upgrade pip
pip install lmcache vllmlmcache:GPU KV cache 管理,用于存储 Key/Value tensor,加速大模型推理vllm:高性能推理框架,支持 LMCache 集成
2️⃣ LMCache 服务器部署
启动 LMCache 本地服务,管理 GPU KV cache:
bash
# chunk-size 16 为演示用途,生产环境建议使用默认 256
lmcache server --l1-size-gb 10 --eviction-policy LRU --chunk-size 16
--l1-size-gb 10:一级缓存 10GB--eviction-policy LRU:最近最少使用策略--chunk-size 16:最小存储单元,演示用小值方便观察缓存行为
关键日志示例:
text
[INFO] GPU KV Cache Dimensions: [28][6340, 2, 16, 8, 128]
[INFO] Registered KV cache for GPU ID 0 with 28 layers
更多日志
INFO:     Application startup complete.
INFO:     Uvicorn running on http://0.0.0.0:8080 (Press CTRL+C to quit)
[2026-05-06 08:57:18,946] LMCache INFO: list_depth: 1, tensor_dim: 5 (utils.py:361:lmcache.v1.gpu_connector.utils)
[2026-05-06 08:57:18,946] LMCache INFO: GPU KV Cache Dimensions: [28][6340, 2, 16, 8, 128] (utils.py:374:lmcache.v1.gpu_connector.utils)
[2026-05-06 08:57:18,947] LMCache INFO: vLLM KV cache layout: NHD (utils.py:388:lmcache.v1.gpu_connector.utils)
[2026-05-06 08:57:18,947] LMCache INFO: GPU KV Format: NL x [NB, 2, BS, NH, HS] (utils.py:315:lmcache.v1.gpu_connector.utils)
[2026-05-06 08:57:18,947] LMCache INFO: Currently used by:
  - vLLM non-MLA flash infer (utils.py:316:lmcache.v1.gpu_connector.utils)
[2026-05-06 08:57:18,947] LMCache INFO: KV layer groups (from list): [KVLayerGroupInfo(layers=28, indices=0-27, shape=torch.Size([6340, 2, 16, 8, 128]), dtype=torch.float16)] (kv_layer_groups.py:267:lmcache.v1.kv_layer_groups)
[2026-05-06 08:57:18,966] LMCache INFO: Registered KV cache for GPU ID 9017 with 28 layers (server.py:229:lmcache.v1.multiprocess.server)
[2026-05-06 08:57:18,967] LMCache INFO: Initialized cuda stream on device cuda:0 (gpu_context.py:189:lmcache.v1.multiprocess.gpu_context)
[2026-05-06 08:57:51,907] LMCache INFO: Stored 32 tokens in 0.007 seconds (server.py:390:lmcache.v1.multiprocess.server)
[2026-05-06 08:57:52,555] LMCache INFO: Stored 16 tokens in 0.001 seconds (server.py:390:lmcache.v1.multiprocess.server)
[2026-05-06 08:57:52,691] LMCache INFO: Stored 16 tokens in 0.001 seconds (server.py:390:lmcache.v1.multiprocess.server)
[2026-05-06 08:57:52,802] LMCache INFO: Stored 16 tokens in 0.001 seconds (server.py:390:lmcache.v1.multiprocess.server)
[2026-05-06 08:57:52,914] LMCache INFO: Stored 16 tokens in 0.001 seconds (server.py:390:lmcache.v1.multiprocess.server)
[2026-05-06 08:57:53,026] LMCache INFO: Stored 16 tokens in 0.001 seconds (server.py:390:lmcache.v1.multiprocess.server)
[2026-05-06 08:57:53,139] LMCache INFO: Stored 16 tokens in 0.001 seconds (server.py:390:lmcache.v1.multiprocess.server)
[2026-05-06 09:02:14,225] LMCache INFO: Prefetch request completed (L1+L2): 2/2 prefix hits (2 L1, 0 L2) in 0.8 ms (external_request_id=cmpl-872e320e7b4b9853-0-813a52c6, prefetch_request_id=-1) (storage_manager.py:452:lmcache.v1.distributed.storage_manager)
3️⃣ vLLM 模型部署
pip install modelscope

modelscope download --model Qwen/Qwen3-0.6B
假设模型缓存路径在:
bash
cd /root/.cache/modelscope/hub/models/Qwen/Qwen3-0.6B3.1 启动 vLLM 服务(最基本方式)
bash
vllm serve Qwen/Qwen3-0.6B \
    --port 8000 \
--kv-transfer-config '{"kv_connector":"LMCacheMPConnector", "kv_role":"kv_both"}'-
--kv-transfer-config:指定 KV cache 连接器和角色kv_both→ 读写都通过 LMCache- 还可以指定
kv_readonly或kv_writeonly
3.2 高兼容模式(解决部分 GPU/架构报错)
bash
vllm serve Qwen/Qwen3-0.6B \
  --port 8000 \
  --kv-transfer-config '{"kv_connector":"LMCacheMPConnector","kv_role":"kv_both"}' \
  --disable-cuda-graph \
--enforce-eager--disable-cuda-graph:禁用 CUDA Graph(提高兼容性)--enforce-eager:强制即时计算模式,适用于某些 C++ 扩展缺失报错
常见报错:
text
fatal error: Python.h: No such file or directory解决方法:
bash
sudo apt install python3.12-dev build-essential4️⃣ 测试 vLLM 接口
使用 curl 调用 REST API:
bash
curl http://localhost:8000/v1/completions \
  -H "Content-Type: application/json" \
  -d '{
    "model": "Qwen/Qwen3-0.6B",
    "prompt": "Qwen3 is the latest generation of large language models in Qwen series, offering a comprehensive suite of dense and mixture-of-experts (MoE) models",
    "max_tokens": 100,
    "temperature": 0.7
}'- 返回 JSON 包含生成的 token
- LMCache 会自动缓存 KV,用于加速后续请求
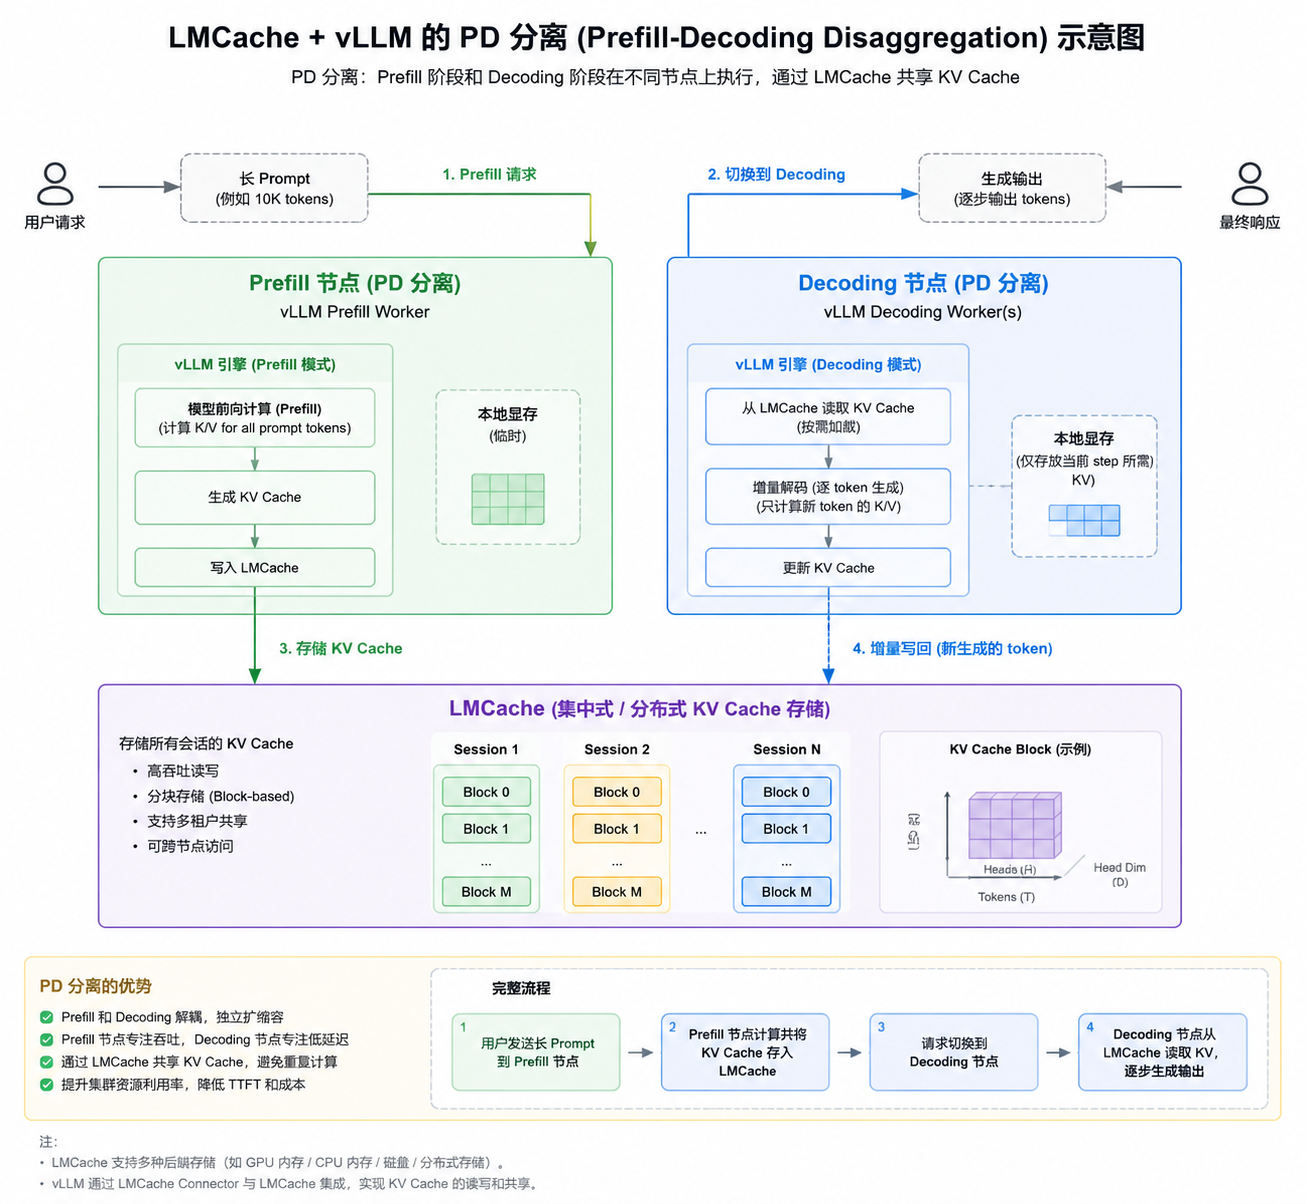
5️⃣ PD 分离(Pipeline/Data 分离)
- Pipeline 分离:模型层分布在不同 GPU
- Device/Data 分离:不同 batch token 分布在不同 GPU
- vLLM + LMCache 支持 PD 分离,提升推理性能和显存利用率
可通过日志观察:
text
Registered KV cache for GPU ID 0 with layers 0-9
Registered KV cache for GPU ID 1 with layers 10-19