1、前言
🎉 「古诗学习宝」已上架华为应用市场! 零广告 / 零内购 / 277 首小学必背古诗全收录,专为小学生打造的鸿蒙原生古诗学习工具。
如果觉得好用,烦请在应用市场帮忙点个五星好评 🌟,您的支持是我持续更新的最大动力!
启动页(Splash Screen)是用户对一款 App 的第一印象。3 秒钟里,要做完 3 件事:
- 品牌传达:Logo + 标题 + 一句话价值主张
- 入场仪式感:让用户从「我在点开一个 App」过渡到「我在欣赏一个产品」
- 后台预热 :偷偷加载首页数据 / Service cache / 用户配置,到主页面 0 等待
很多团队的启动页是这样的:一张大图 PNG 静止 2 秒 → 直接跳 Home。毫无设计感。还有一些团队过度堆叠动画:6 个元素同时 5 种动画一起触发------视觉爆炸、用户根本看不清重点。
「古诗学习宝」的启动页走**「水墨意境 + 错峰入场动画 + 可跳过」**路线:
- 水墨背景图 + 左下竹叶素材 + 远山纹理 = 古典氛围底
- 水墨书卷圆形 Logo 200ms 起 600ms 弹入(scale + opacity)
- 品牌字「古诗学习宝」 500ms 起 700ms 上浮淡入(translateY + opacity)
- 副标题装饰线 + 一行价值主张 900ms 起 600ms 淡入
- 160vp 进度条 3 秒匀速 0 → 100%,配「正在为你打开诗书 · · ·」呼吸文案
- 「跳过」胶囊 让赶时间的用户随时进入主页面
- 3 秒自动跳转 ,timer 在
aboutToDisappear里 cleanup 防泄漏
整套动画不到 200 行代码,0 三方依赖 ,纯 ArkUI V2 + getUIContext().animateTo + setInterval 搭出来。本文用 wqsy 上架版本的真实源码,把启动页 3 段错峰动画、进度条 setInterval 实现、timer 生命周期管理、@Local 动画状态绑定、Stack 多层合成 一次性讲透,照搬即可用到任何鸿蒙项目。
2、整体架构
2.1 启动页的 5 个分层
┌─────────────────────────────────────────────────────────┐
│ Layer 0  背景图  Image($r('splash_bg')) 100% 全屏        │
│          宣纸底 + 远山水墨 + 左下竹叶                      │
├─────────────────────────────────────────────────────────┤
│ Layer 1  Logo 圆     ── 200ms 起 600ms 弹入             │
│          Image foreground.png 160×160 borderRadius:80   │
│          + 12vp 投影                                     │
│          + sealOpacity / sealScale 状态驱动              │
├─────────────────────────────────────────────────────────┤
│ Layer 2  品牌字 + 装饰 ── 500ms 起 700ms 上浮淡入        │
│          Text "古诗学习宝" 40vp 加粗绿 #436444            │
│          + titleOpacity / titleTranslateY                │
├─────────────────────────────────────────────────────────┤
│ Layer 3  副标题 + 价值主张 ── 900ms 起 600ms 淡入         │
│          "教材同步 · 启蒙必备" + "古诗学习 · 背诵 · 赏析" │
│          + subtitleOpacity 驱动                          │
├─────────────────────────────────────────────────────────┤
│ Layer 4  进度条 + 跳过按钮                                │
│          160vp 进度条 setInterval 每 30ms 推进            │
│          "正在为你打开诗书 · · ·"                         │
│          [跳过] 胶囊 onClick → goHome()                  │
└─────────────────────────────────────────────────────────┘

时间轴:
   t=0      触发 aboutToAppear,全部 opacity=0
   t=200    Layer 1 印章开始弹入(duration 600)
   t=500    Layer 2 标题开始上浮(duration 700)
   t=800    Layer 1 完成
   t=900    Layer 3 副标题开始淡入(duration 600)
   t=1200   Layer 2 完成
   t=1500   Layer 3 完成
   t=3000   setTimeout 触发 goHome() → onDone() 关闭 Splash
2.2 动画三大维度对照
| 维度 | API | 用在哪 | 关键参数 |
|---|---|---|---|
| 命令式属性动画 | getUIContext().animateTo(options, () => state++) |
Logo 弹入 / 标题上浮 / 副标题淡入 | duration / curve / delay |
| 隐式属性动画 | .animation({ duration, curve }) 修饰符 |
不用(启动页选命令式更可控) | --- |
| 自定义帧驱动 | setInterval 定时改 @Local progress |
3 秒进度条 | 30ms 间隔,100 帧/3s |
2.3 项目结构
entry/src/main/ets/
├── pages/
│   ├── Index.ets                  # Splash 覆盖在 Navigation 之上
│   └── SplashPage.ets             # ★ 本文核心:水墨启动页
└── resources/base/media/
    ├── splash_bg.png              # 宣纸 + 远山 + 竹叶背景图
    └── foreground.png             # 圆形 Logo 提亮版本
3、效果展示
3.1 完整启动页静态
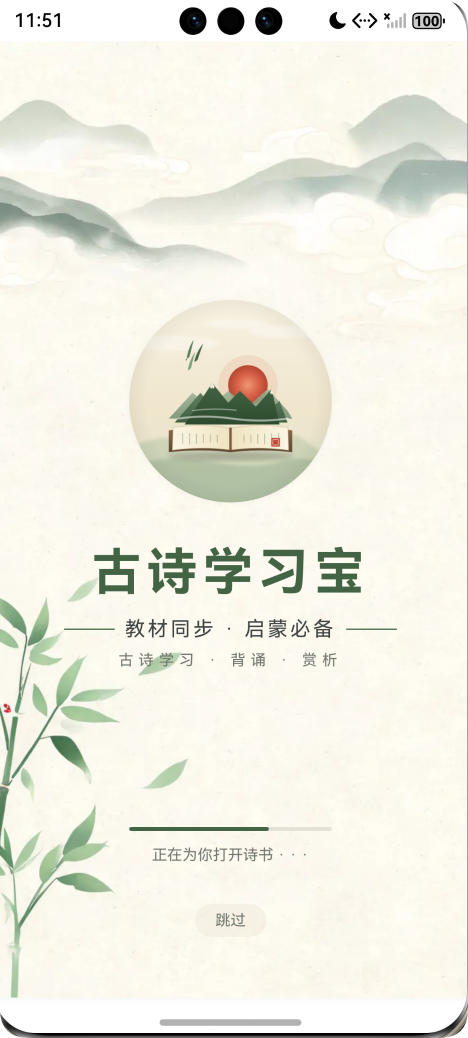
打开应用第一眼:
- 顶部留白(status bar + 50vp)
- 中央 Logo 圆:水墨书卷图案,160vp 圆,带 12vp 主绿透明阴影
- 品牌字「古诗学习宝」 :40vp 加粗、绿色
#436444、字距 4vp - 装饰副标题「--- 教材同步 · 启蒙必备 ---」两端各 40vp 横线
- 副副标题「古诗学习 · 背诵 · 赏析」灰色小字
- 进度条:160vp 长 3vp 厚,3 秒走完
- **「正在为你打开诗书 · · ·」**呼吸感文案
- 跳过 胶囊按钮(轻米色背景)
3.2 三段错峰入场(时序示意)
t=0ms     ┃ ████████████████████████ 全部 opacity=0,屏幕只有背景图
          ┃
t=200ms   ┃ ⚪ Logo 圆开始弹入(scale 0.5→1, opacity 0→1, EaseOut)
          ┃
t=500ms   ┃ 古诗学习宝  标题开始上浮(translateY 30→0, opacity 0→1)
          ┃
t=800ms   ┃ ⚪ Logo 弹入完成
          ┃ 古诗学习宝  标题上浮中
          ┃
t=900ms   ┃ --- 教材同步 · 启蒙必备 ---  副标题开始淡入
          ┃
t=1200ms  ┃ ⚪ Logo 完成
          ┃ 古诗学习宝  标题完成
          ┃ --- 教材同步 · 启蒙必备 ---  副标题中
          ┃
t=1500ms  ┃ 全部入场完成,进度条已走 50%
          ┃
t=3000ms ┃ 进度条 100% → setTimeout 触发 goHome() → 切到主页面错峰节奏感让用户能"看清每一个元素"------而不是 6 个元素一起爆出。
4、核心实现详解
4.1 第一步:组件骨架 + @Local 动画状态
typescript
@ComponentV2
export struct SplashPage {
  @Param pathStack: NavPathStack = new NavPathStack();
  @Event onDone: () => void = () => {};

  // 动画状态(@Local 是 V2 reactive 字段,改动自动重渲染)
  @Local titleOpacity: number = 0;
  @Local titleTranslateY: number = 30;
  @Local subtitleOpacity: number = 0;
  @Local sealOpacity: number = 0;
  @Local sealScale: number = 0.5;
  @Local progress: number = 0;

  // 副作用 - 普通成员变量(不需 reactive)
  private timerId: number = -1;
  private progressTimerId: number = -1;
  private jumped: boolean = false;

  // ... build / aboutToAppear / aboutToDisappear / goHome
}
6 个 @Local 状态拆解:
| 字段 | 初始 | 目标 | 驱动什么 |
|---|---|---|---|
sealOpacity |
0 | 1 | Logo 圆透明度 |
sealScale |
0.5 | 1 | Logo 圆缩放 |
titleOpacity |
0 | 1 | 标题透明度 |
titleTranslateY |
30 | 0 | 标题 y 轴位移(向上浮) |
subtitleOpacity |
0 | 1 | 副标题 + 进度条 + 跳过 一起淡入 |
progress |
0 | 1 | 进度条进度 |
3 个 private 字段:
timerId:3 秒自动跳转的 setTimeout 句柄progressTimerId:进度条 setInterval 句柄jumped:双重跳转保护(按跳过 + 自动 3s 同时触发的边界)
坑点 1 :动画状态用
@Local(响应式),副作用句柄用普通private(非响应式)。timerId 改了不需要重渲染 ,放@Local反而浪费 diff。
4.2 第二步:aboutToAppear 启动三段动画
typescript
aboutToAppear(): void {
  // ① 印章弹入(scale + opacity 同时变化)
  this.getUIContext().animateTo(
    { duration: 600, curve: Curve.EaseOut, delay: 200 },
    () => {
      this.sealOpacity = 1;
      this.sealScale = 1;
    }
  );

  // ② 标题上浮淡入
  this.getUIContext().animateTo(
    { duration: 700, curve: Curve.EaseOut, delay: 500 },
    () => {
      this.titleOpacity = 1;
      this.titleTranslateY = 0;
    }
  );

  // ③ 副标题淡入
  this.getUIContext().animateTo(
    { duration: 600, curve: Curve.EaseOut, delay: 900 },
    () => { this.subtitleOpacity = 1; }
  );

  // ④ 进度条 0 → 1(3 秒)
  const startTs = Date.now();
  this.progressTimerId = setInterval(() => {
    const dt = (Date.now() - startTs) / 3000;
    this.progress = Math.min(dt, 1);
    if (this.progress >= 1 && this.progressTimerId !== -1) {
      clearInterval(this.progressTimerId);
      this.progressTimerId = -1;
    }
  }, 30);

  // ⑤ 3 秒后自动跳转
  this.timerId = setTimeout(() => {
    this.goHome();
  }, 3000);
}
animateTo 5 个关键参数:
| 参数 | 作用 | 推荐 |
|---|---|---|
duration |
动画时长 ms | 入场 600~800 |
curve |
速度曲线 | EaseOut(先快后慢,自然) |
delay |
起始延迟 ms | 错峰 200/500/900 |
iterations |
循环次数 | 默认 1(一次) |
tempo |
速度倍率 | 默认 1.0 |
回调函数 就是「目标状态 」------animateTo 自动从当前值补间到回调里赋的值。
坑点 2 :必须用
this.getUIContext().animateTo(...),不能用全局animateTo。HarmonyOS 6 之后全局animateTo已废弃,多 UI 实例下会找不到正确的 context。
坑点 3 :Curve.EaseOut用在"入场"动画里效果最好(先快后慢,元素"落下"的感觉)。Curve.EaseIn用在"退场"(先慢后快,元素"飞走")。Linear用在进度条。Spring用在按钮反馈。
4.3 第三步:进度条 setInterval 实现
typescript
const startTs = Date.now();
this.progressTimerId = setInterval(() => {
  const dt = (Date.now() - startTs) / 3000;
  this.progress = Math.min(dt, 1);
  if (this.progress >= 1 && this.progressTimerId !== -1) {
    clearInterval(this.progressTimerId);
    this.progressTimerId = -1;
  }
}, 30);
为什么不用 animateTo? ------ 进度条的核心需求是「3 秒内匀速从 0 走到 100% 」,并且 progress 这个值会影响 width 计算(width: 160 * this.progress)。如果用 animateTo:
typescript
// ❌ 不推荐
this.getUIContext().animateTo({ duration: 3000, curve: Curve.Linear }, () => {
  this.progress = 1;
});问题是:animateTo 内部是隐式插值,渲染节流后 progress 不是真实的"每帧值",UI 上看进度可能跳变。而 setInterval 30ms 触发一次,精确控制每帧的 width,体验更稳。
30ms 间隔的原因:
- 60fps = 16.67ms / 帧
- 30ms ≈ 33fps,比屏幕刷新慢一倍------节省 50% 帧数,肉眼无感
- 100 帧 / 3s 进度条体感流畅,更密反而是浪费
坑点 4 :
setInterval必须在 progress >= 1 时clearInterval,否则永远跑下去。双判断this.progressTimerId !== -1防止重复 clear(虽然 clear 同一个 id 是幂等的,但避免无意义调用)。
4.4 第四步:aboutToDisappear 清理 timer
typescript
aboutToDisappear(): void {
  if (this.timerId !== -1) {
    clearTimeout(this.timerId);
    this.timerId = -1;
  }
  if (this.progressTimerId !== -1) {
    clearInterval(this.progressTimerId);
    this.progressTimerId = -1;
  }
}
为什么 cleanup 重要? ------ 用户按"跳过"提前关闭时:
- Splash 组件
aboutToDisappear被触发 - 但
setTimeout(goHome, 3000)还没到 - 如果不 cleanup,3 秒后 setTimeout 仍然触发
goHome()→ 调用onDone()改 Index.showSplash → 但此时 Splash 已经销毁了 → 状态错乱 / 内存泄漏
特别是 setInterval,不 clear 就永远跑 ------背景态下也跑、用户切回前台也跑,电量杀手。
坑点 5 :
@ComponentV2的生命周期回调是aboutToAppear/aboutToDisappear,不是 React 的componentWillUnmount。命名风格 ≈ Vue。
4.5 第五步:双重跳转保护 goHome
typescript
goHome(): void {
  if (this.jumped) return;          // ⭐ 幂等保护
  this.jumped = true;

  if (this.timerId !== -1) {
    clearTimeout(this.timerId);
    this.timerId = -1;
  }
  if (this.progressTimerId !== -1) {
    clearInterval(this.progressTimerId);
    this.progressTimerId = -1;
  }

  this.onDone();                    // 通知父组件关闭 Splash
}
边界 case:
- 用户在 t=1500ms 按「跳过」→ goHome 第 1 次执行
- timer 在 t=3000ms 触发 goHome 第 2 次执行
- 若没有
if (this.jumped) return:onDone 被调两次 → Index.showSplash 被设两次 false(没问题)→ 但其他副作用(埋点 / 动画)可能重复
幂等保护是写鸿蒙生命周期方法的好习惯。
4.6 第六步:build 视图 - Stack 多层 + 状态绑定
typescript
build() {
  Stack() {
    // Layer 0:背景图
    Image($r('app.media.splash_bg'))
      .width('100%')
      .height('100%')
      .objectFit(ImageFit.Cover)

    Column() {
      Blank().layoutWeight(1)

      // Layer 1:Logo 圆 - 用动画状态驱动
      Image($r('app.media.foreground'))
        .width(160)
        .height(160)
        .borderRadius(80)
        .objectFit(ImageFit.Cover)
        .shadow({
          radius: 12,
          color: '#0D4A5A3E',
          offsetX: 0,
          offsetY: 2,
        })
        .opacity(this.sealOpacity)                       // ⭐ 绑定 @Local
        .scale({ x: this.sealScale, y: this.sealScale }) // ⭐ 绑定 @Local

      // Layer 2:品牌字 - 上浮淡入
      Text('古诗学习宝')
        .fontSize(40)
        .fontWeight(FontWeight.Bold)
        .fontColor($r('app.color.primary'))
        .letterSpacing(4)
        .margin({ top: 32 })
        .opacity(this.titleOpacity)                      // ⭐
        .translate({ y: this.titleTranslateY })          // ⭐

      // Layer 3:副标题 + 装饰线
      Row({ space: 8 }) {
        Column().width(40).height(1).backgroundColor($r('app.color.primary_dim'))
        Text('教材同步 · 启蒙必备')
          .fontSize($r('app.float.fs_subtitle'))
          .fontColor($r('app.color.text_body'))
          .letterSpacing(2)
        Column().width(40).height(1).backgroundColor($r('app.color.primary_dim'))
      }
      .margin({ top: 12 })
      .opacity(this.subtitleOpacity)                     // ⭐

      Text('古诗学习 · 背诵 · 赏析')
        .fontSize($r('app.float.fs_caption'))
        .fontColor($r('app.color.text_sub'))
        .letterSpacing(4)
        .margin({ top: 8 })
        .opacity(this.subtitleOpacity)                   // ⭐

      Blank().layoutWeight(1)

      // Layer 4:进度条 + 文案
      Column() {
        Stack({ alignContent: Alignment.Start }) {
          Column()                                       // 底条(灰)
            .width(160).height(3)
            .borderRadius(2)
            .backgroundColor($r('app.color.divider'))
          Column()                                       // 进度条(绿)
            .width(160 * this.progress)                  // ⭐ 绑定 progress
            .height(3)
            .borderRadius(2)
            .backgroundColor($r('app.color.primary'))
        }
        .width(160).height(3)

        Text('正在为你打开诗书 · · ·')
          .fontSize($r('app.float.fs_caption'))
          .fontColor($r('app.color.text_sub'))
          .margin({ top: 12 })
      }
      .opacity(this.subtitleOpacity)                     // ⭐ 跟副标题一起淡入

      // 跳过按钮
      Text('跳过')
        .fontSize($r('app.float.fs_caption'))
        .fontColor($r('app.color.text_sub'))
        .padding({ left: 16, right: 16, top: 6, bottom: 6 })
        .backgroundColor('#80EFE9D8')                    // 半透明米色胶囊
        .borderRadius(16)
        .margin({ top: 32, bottom: 48 })
        .opacity(this.subtitleOpacity)
        .onClick(() => this.goHome())
    }
    .width('100%')
    .height('100%')
    .alignItems(HorizontalAlign.Center)
    .padding({ top: 80 })
  }
  .width('100%')
  .height('100%')
  .backgroundColor($r('app.color.surface'))
}
视图层 4 个关键点:
- Stack 多层叠加:背景图 + 内容 Column,互不影响布局
.opacity(this.x)直接绑定:x 变 → Image / Text 透明度跟着变.scale({ x, y })同时绑定两轴:单独绑 scaleX 会导致 Y 不变形(看起来"压扁").translate({ y })不影响其他元素 :等价于 CSStransform: translateY,不触发布局重排
坑点 6 :
.translate和.offset都是位移,但.offset只影响视觉位置不影响布局;.translate通过transform实现,性能更好且支持 z 轴。入场动画用.translate({ y })更合适。
4.7 第七步:Index.ets 集成 Splash 覆盖层
typescript
@Entry
@ComponentV2
struct Index {
  @Local pathStack: NavPathStack = new NavPathStack();
  @Local showSplash: boolean = true;       // ⭐ 控制 Splash 显示
  @Local favVersion: number = 0;
  @Local avatarRef: string = '';

  async aboutToAppear(): Promise<void> {
    const ctx = this.getUIContext().getHostContext() as common.UIAbilityContext;
    // 偷偷预热 4 个 Service,启动页"显示动画"期间数据已 ready
    await Pref.init(ctx);
    await FavoriteService.load();
    await RecordService.load();
    await PlanService.load();
    this.avatarRef = await Pref.getString(StorageKey.UserAvatar, '');
  }

  build() {
    Stack() {
      // 主框架(永远存在,splash 显示时被覆盖)
      Navigation(this.pathStack) {
        MainTabsPage({
          pathStack: this.pathStack,
          favVersion: this.favVersion,
          avatarRef: this.avatarRef,
          onAvatarChange: (ref) => this.onAvatarChange(ref),
        })
      }
      .navDestination(this.PageMap)
      .hideTitleBar(true)
      .mode(NavigationMode.Stack)

      // ⭐ 启动页覆盖层(关键技巧)
      if (this.showSplash) {
        SplashPage({
          pathStack: this.pathStack,
          onDone: () => { this.showSplash = false; },
        })
      }
    }
    .width('100%')
    .height('100%')
  }
}
为什么 Splash 不走 Navigation 而是 Stack 覆盖? ------ 关键设计:
- 主框架始终挂载:MainTabsPage 在 Splash 期间已经渲染完成(虽然被遮挡),用户跳过的一瞬间无需重渲染
- 数据并行预热 :Index.aboutToAppear 一启动就 load 4 个 Service,和 Splash 动画并行------3 秒走完时数据全部就绪
- 关闭无路由切换 :
showSplash = false直接卸载覆盖层,无 NavPathStack pop 操作,没有路由抖动
坑点 7 :如果 Splash 走
pathStack.pushPathByName('SplashPage'),关闭就要pop(),但主框架还没渲染------会出现"白屏 → 主页"闪烁。覆盖层方案没有这个问题。
5、完整数据流分析
应用冷启
    │
    ▼
EntryAbility.onCreate
    └─ WindowStage.loadContent('pages/Index')
        │
        ▼
Index.aboutToAppear
    ├─ await Pref.init(ctx)
    ├─ await FavoriteService.load()    ─┐
    ├─ await RecordService.load()       ├─ 并行预热(serially awaited
    └─ await PlanService.load()        ─┘   for safety, 但磁盘 IO 快)
    │
    ▼
Index.build
    └─ Stack
        ├─ Navigation { MainTabsPage(...) }   ← 已挂载,被遮挡
        └─ if (showSplash) SplashPage(...)    ← 覆盖层
─────────────────────────────────────────────────────────────────
SplashPage.aboutToAppear (t=0)
    ├─ animateTo({duration:600, curve:EaseOut, delay:200}, () => {
    │     sealOpacity=1; sealScale=1
    │   })
    ├─ animateTo({duration:700, curve:EaseOut, delay:500}, () => {
    │     titleOpacity=1; titleTranslateY=0
    │   })
    ├─ animateTo({duration:600, curve:EaseOut, delay:900}, () => {
    │     subtitleOpacity=1
    │   })
    ├─ progressTimerId = setInterval(updateProgress, 30)
    │     每帧:progress = Math.min((now-start)/3000, 1)
    └─ timerId = setTimeout(goHome, 3000)
─────────────────────────────────────────────────────────────────
t=200ms - Logo 弹入
    └─ V2 reactive 检测到 sealOpacity / sealScale 变化
    └─ Image 重渲染:scale 0.5→1, opacity 0→1
─────────────────────────────────────────────────────────────────
t=500ms - 标题上浮
    └─ titleOpacity / titleTranslateY 变化
    └─ Text 重渲染:translateY 30→0, opacity 0→1
─────────────────────────────────────────────────────────────────
t=900ms - 副标题淡入(含进度条文案 + 跳过按钮)
    └─ subtitleOpacity: 0→1
    └─ Row / Text / Column / Button 5 个元素同时重渲染
─────────────────────────────────────────────────────────────────
t=0~3000ms - 进度条
    └─ setInterval 每 30ms 触发
        └─ progress: 0 → 0.01 → 0.02 → ... → 1
        └─ Column.width 同步变化:0 → 1.6 → 3.2 → ... → 160 vp
─────────────────────────────────────────────────────────────────
分支 A:用户在 t=1500ms 按「跳过」
    └─ 跳过按钮 onClick → goHome()
        ├─ this.jumped = true
        ├─ clearTimeout(timerId)        ← 取消自动跳转
        ├─ clearInterval(progressTimerId) ← 停掉进度条
        └─ this.onDone()
            └─ Index.showSplash = false
                └─ Splash 卸载 → aboutToDisappear
                    ├─ clearTimeout (双保险,已 -1 不再调用)
                    └─ clearInterval (双保险)
                └─ Stack 重新布局,MainTabsPage 暴露
─────────────────────────────────────────────────────────────────
分支 B:用户什么都没做,t=3000ms 自动跳转
    └─ setTimeout 触发 goHome()
        └─ 同上流程
─────────────────────────────────────────────────────────────────
主框架显示
    └─ MainTabsPage 已经在 Splash 期间渲染好
    └─ HomeView / favVersion=0 / avatarRef='' / Service cache 全部就绪
    └─ 用户看到首页:0 ms 延迟
观察点:
- 数据预热和动画并行 :3 秒 Splash 动画期间,4 个 Service load 完毕。对用户来说"3 秒钟感觉很短",对开发者来说"3 秒钟很长,足够初始化一切"。
- 错峰节奏 200/500/900 :让 Logo → 标题 → 副标题 顺次入场,用户能"看清每个元素"。
- 进度条用 setInterval 而非 animateTo:精确控制每帧 width,体验更稳。
- 双重 cleanup :goHome 内部 clear + aboutToDisappear cleanup = 永不泄漏 timer。
- 覆盖层方案 :主框架始终挂载,关闭瞬间 0 等待。
6、代码分析与优化建议
6.1 现有实现的亮点
- 错峰入场 3 段:Logo / 标题 / 副标题 视觉节奏感强,专业感拉满
animateTo+@Local联动 :1 行 animateTo 触发整段动画,无需手写 frame 循环setInterval精控进度条:30ms 间隔 = 节能 + 流畅- timer 双重 cleanup :
aboutToDisappear兜底,goHome 主动清理,杜绝泄漏 - 覆盖层不走路由 :主框架并行预热,关闭无白屏
- 可跳过:尊重用户时间,胶囊按钮一眼可见
6.2 可优化点
优化 1:背景图用 PixelMap 异步解码
问题 :Image($r('app.media.splash_bg')) 同步加载大图,第一次 Splash 可能有 100ms 黑屏。
改进 :在 EntryAbility.onCreate 里预解码:
typescript
import { image } from '@kit.ImageKit';

// EntryAbility.onCreate
const ctx = this.context;
const fd = ctx.resourceManager.getRawFdSync('splash_bg.png');
const decoder = image.createImageSource(fd.fd);
const px = await decoder.createPixelMap();
AppStorage.setOrCreate('splash_bg_pixelmap', px);

// SplashPage.build
Image(AppStorage.get<image.PixelMap>('splash_bg_pixelmap'))
.width('100%').height('100%')第二次冷启时图片已经在内存,0 解码延迟。
优化 2:用 keyframeAnimateTo 实现"弹性入场"
问题 :当前 Logo 用 Curve.EaseOut 平滑弹入,少了"弹一下"的拟物感。
改进:
typescript
this.getUIContext().keyframeAnimateTo({ iterations: 1, delay: 200 }, [
  { duration: 300, curve: Curve.Sharp,   event: () => { this.sealScale = 1.15; this.sealOpacity = 1; } },
  { duration: 200, curve: Curve.EaseOut, event: () => { this.sealScale = 0.95; } },
  { duration: 150, curve: Curve.EaseOut, event: () => { this.sealScale = 1.0; } },
]);
放大 → 微缩 → 回正三段,模仿"印章盖下去"的弹力感。
优化 3:进度条根据真实预热进度走
问题 :当前进度条与真实加载进度无关(纯装饰),用户慢网下加载完了进度条还在走。
改进:把 Service load 拆成 4 段,每段完成时推进 25%:
typescript
async aboutToAppear(): Promise<void> {
  this.progress = 0;
  await Pref.init(ctx);
  this.progress = 0.25;
  await FavoriteService.load();
  this.progress = 0.5;
  await RecordService.load();
  this.progress = 0.75;
  await PlanService.load();
  this.progress = 1;
}
取舍 :4 个 Service 本地 IO 都很快(毫秒级),用户根本看不到分段;纯装饰版本反而更稳定 ------ 真实方案适合需要拉网络的 App。
优化 4:跳过按钮的"延迟可点"
问题 :当前跳过按钮和副标题一起 t=900ms 出现。0~900ms 内用户想跳也跳不了。
改进 :把跳过按钮独立动画,t=300ms 提前出现:
typescript
@Local skipBtnOpacity: number = 0;

aboutToAppear() {
  // ...其他动画
  this.getUIContext().animateTo(
    { duration: 400, curve: Curve.EaseOut, delay: 300 },
    () => { this.skipBtnOpacity = 1; }
  );
}

Text('跳过')
  .opacity(this.skipBtnOpacity)
  .onClick(() => this.goHome())
优化 5:暗色模式适配
问题:当前白宣纸底色在暗色模式下太亮。
改进:
typescript
.backgroundColor($r('app.color.surface'))     // 已是资源引用 ✅
// 但 Logo 圆的阴影色硬编码:
.shadow({ radius: 12, color: '#0D4A5A3E', ... })

// 改成
.shadow({ radius: 12, color: $r('app.color.shadow_primary'), ... })
resources/dark/element/color.json 里定义暗色对应值。
6.3 生产环境 Checklist
| 检查项 | 说明 |
|---|---|
| 动画状态用 @Local,timer 句柄用 private | 区分 reactive / 非 reactive |
所有 animateTo 用 getUIContext().animateTo |
全局版本已废弃 |
入场用 Curve.EaseOut、退场用 EaseIn、进度条用 Linear |
曲线选型 |
| 错峰延迟 ≥ 300ms 让用户看清节奏 | 200/500/900 是典型值 |
setInterval 必须配对 clearInterval |
否则永远跑 |
aboutToDisappear 兜底清理 timer |
防泄漏 |
goHome 加幂等保护 if (jumped) return |
防重入 |
| Splash 走覆盖层而非路由 | 主框架并行预热 |
| 跳过按钮提前可点 | 尊重快用户 |
| 大图 PixelMap 预解码 | 避免首启黑屏 |
7、关键 API 速查
| API | 作用 |
|---|---|
getUIContext().animateTo({duration, curve, delay}, () => state++) |
命令式属性动画 |
getUIContext().keyframeAnimateTo({iterations}, frames[]) |
多段关键帧动画 |
setInterval(cb, ms) / clearInterval(id) |
帧驱动定时器 |
setTimeout(cb, ms) / clearTimeout(id) |
单次延迟 |
Curve.EaseOut / EaseIn / Linear / Spring |
速度曲线 |
.opacity(0~1) |
透明度 |
.scale({ x, y }) |
缩放 |
.translate({ x, y }) |
位移(不触发布局) |
.shadow({ radius, color, offsetX, offsetY }) |
投影 |
Stack 多层叠加 |
背景图 + 内容覆盖 |
aboutToAppear / aboutToDisappear |
V2 生命周期 |
@Local 响应式 / private 非响应式 |
状态分类 |
image.createImageSource + createPixelMap |
大图预解码 |
Indicator.dot() |
进度指示器(Swiper 同款) |
8、总结
本文以「古诗学习宝」上架版本的真实源码为案例,系统讲解了 HarmonyOS 6 ArkUI V2 项目中水墨启动页 + 错峰入场动画 + 自动跳转 + 覆盖层架构的工程化方案:
-
5 层 Stack 视图分层 :Layer 0 背景图 / Layer 1 Logo 圆 / Layer 2 品牌字 / Layer 3 副标题 + 装饰 / Layer 4 进度条 + 跳过------每层独立动画互不干扰。
-
3 段错峰入场动画 :印章 200ms 起 600ms / 标题 500ms 起 700ms / 副标题 900ms 起 600ms------错峰节奏让用户看清每个元素,专业感拉满。
-
animateTo + @Local 联动 :1 行
animateTo改@Local状态、V2 reactive 自动重渲染、opacity / scale / translateY流畅插值------无需手写 frame 循环。 -
setInterval 精控进度条 :30ms 间隔 ≈ 33fps,比 60fps 节能 50%、肉眼无感 ;用
(now - start) / 3000算实时进度,精确到帧。 -
timer 双重 cleanup :
goHome()内部 clear +aboutToDisappear兜底 = 永不泄漏 ;if (jumped) return幂等保护防重入。 -
覆盖层架构 :Splash 不走 Navigation 路由而是
Stack { Navigation(...); if (showSplash) SplashPage(...) }------主框架并行预热,关闭瞬间 0 等待。 -
7 个真坑写进 Checklist:@Local vs private 区分 / 必须用 getUIContext().animateTo / Curve 选型 / setInterval 必须 clear / cleanup / goHome 幂等 / Splash 不走路由------任意踩错都会导致动画异常或泄漏。
-
5 个优化方向:PixelMap 预解码 / keyframeAnimateTo 弹性入场 / 真实进度推进 / 跳过按钮提前可点 / 暗色模式适配------直接对接生产规范。
完整代码 ≈ 200 行 ,0 三方依赖,已在华为应用市场上架版本经历过真实小学生用户验证。把这套**「错峰动画 + setInterval + 覆盖层」模式吃透,任何需要"启动页 / 引导页 / 沉浸式入场"**的鸿蒙应用------电商首启 / 阅读引导 / 教育 App 欢迎页------都能 1 天搭起来。
建议结合官方文档《animateTo》《keyframeAnimateTo》《Image / PixelMap》一起读,再用 DevEco Profiler 验证动画 60fps 稳定性,启动页工程基线就稳了。
🎁 下载体验
**「古诗学习宝」**已上架华为应用市场,搜索 古诗学习宝 即可下载。冷启动那 3 秒水墨入场动画正是本文讲解的实现,欢迎下载亲身感受 🌟。
📚 文中所有代码均来自上架生产版本(
SplashPage.ets/Index.ets),未做删改美化。👋 欢迎在评论区交流启动页动画的工程经验,我会优先回复。