本篇文章分析一下Native View的创建流程,因为View的绘制是非常复杂的,我重点讲这两点:
- 分析主流程,不会特别扣渲染细节
- 关注自定义View的使用流程
初始化
Native View创建流程是基于Native Modules通信机制的,我们先看看它的初始化过程。集成RN时可以在初始化提供开发者自定义的ModulesPackage
kotlin
class MainApplication : Application(), ReactApplication {
  override val reactNativeHost: ReactNativeHost =
      object : DefaultReactNativeHost(this) {
        override fun getPackages(): List<ReactPackage> =
            PackageList(this).packages.apply  {
               //自定义NativePackage
               add(MyReactNativePackage())
            }
}

}
启动初始化时在ReactInstanceManager的构造函数中会添加一个RN源码内置的ModulesPackage
less
/* package */ ReactInstanceManager(
    ...
    mPackages.add(
    new CoreModulesPackage(
        this,
        new DefaultHardwareBackBtnHandler() {
          @Override
          public void invokeDefaultOnBackPressed() {
            ReactInstanceManager.this.invokeDefaultOnBackPressed();
          }
        },
        lazyViewManagersEnabled,
        minTimeLeftInFrameForNonBatchedOperationMs));
    ...
}
CoreModulesPackage中定义了很多RN内部的module
java
@Override
public NativeModule getModule(String name, ReactApplicationContext reactContext) {
switch (name) {
case AndroidInfoModule.NAME:
return new AndroidInfoModule(reactContext);
case DeviceEventManagerModule.NAME:
return new DeviceEventManagerModule(reactContext, mHardwareBackBtnHandler);
case DevMenuModule.NAME:
return new DevMenuModule(reactContext, mReactInstanceManager.getDevSupportManager());
case DevSettingsModule.NAME:
return new DevSettingsModule(reactContext, mReactInstanceManager.getDevSupportManager());
case ExceptionsManagerModule.NAME:
return new ExceptionsManagerModule(mReactInstanceManager.getDevSupportManager());
case LogBoxModule.NAME:
return new LogBoxModule(reactContext, mReactInstanceManager.getDevSupportManager());
case HeadlessJsTaskSupportModule.NAME:
return new HeadlessJsTaskSupportModule(reactContext);
case SourceCodeModule.NAME:
return new SourceCodeModule(reactContext);
case TimingModule.NAME:
return new TimingModule(reactContext, mReactInstanceManager.getDevSupportManager());
case UIManagerModule.NAME:
return createUIManager(reactContext);
case DeviceInfoModule.NAME:
return new DeviceInfoModule(reactContext);
default:
throw new IllegalArgumentException(
"In CoreModulesPackage, could not find Native module for " + name);
}
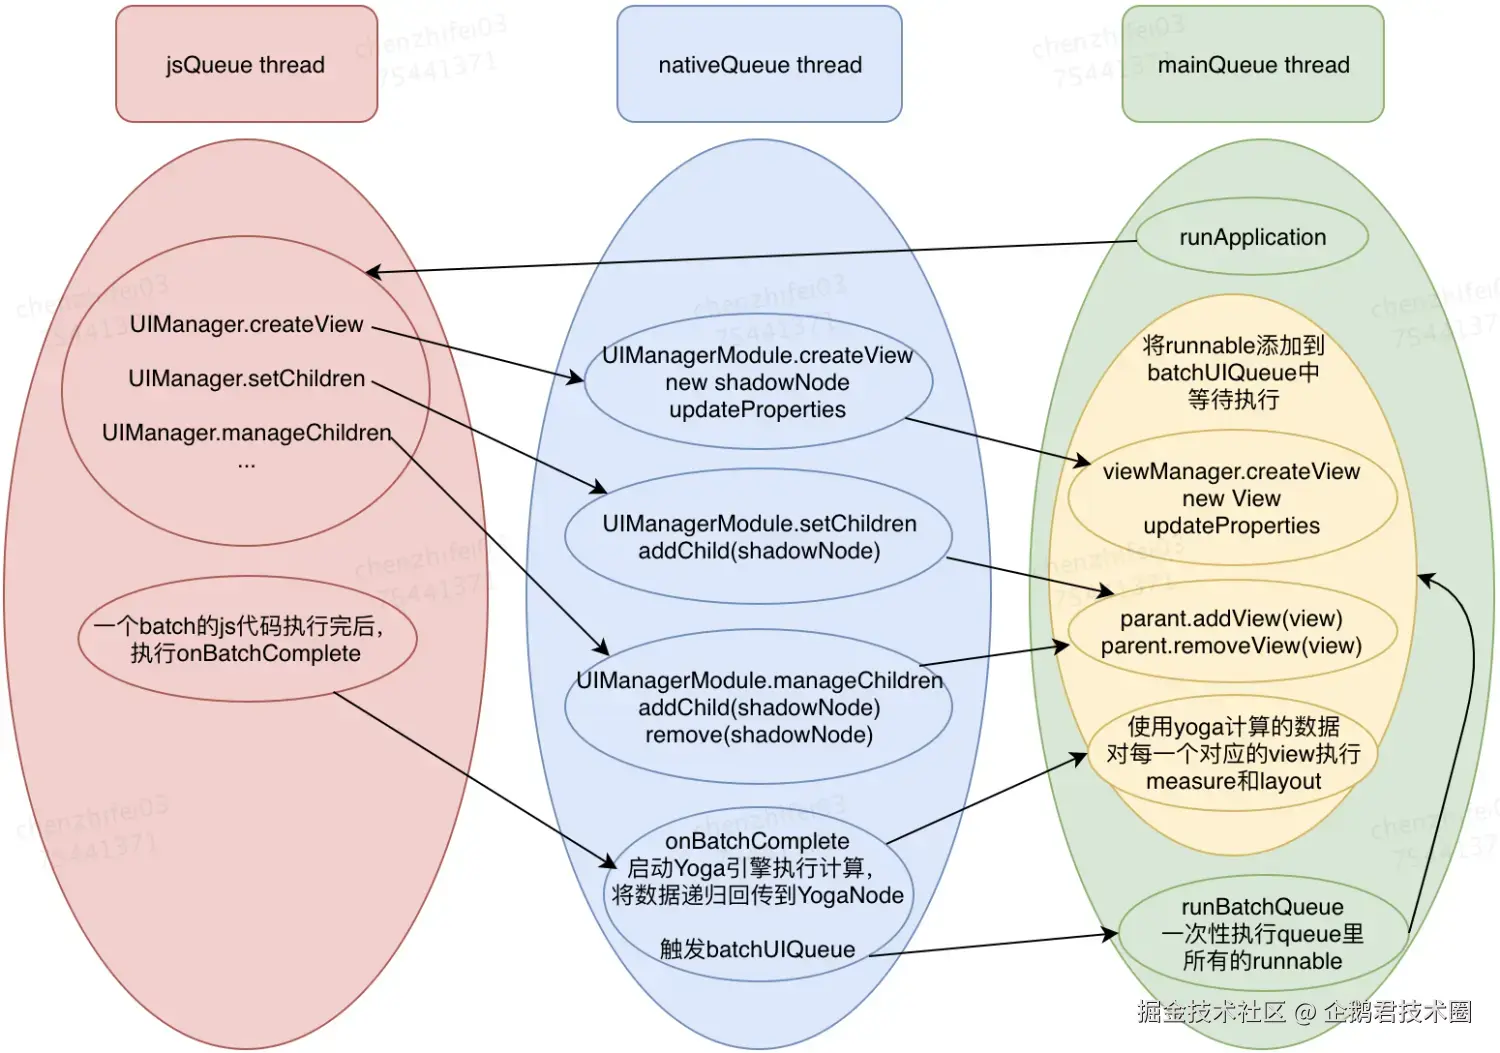
}其中包含UIManagerModule,它负责Native View创建过程中Js到Java的通信,借用网上大佬的一张图片:
- Js端调用UIManager.createView就会调用到Java端UIManagerModule.createView
- setChildren、manageChildren、onBatchComplete也是类似道理
Js端就是通过这些方法来控制Native View的
【图片原文】
为了验证这个猜想,我们可以开始RN源代码中的日志(注意:必须使用旧架构)
less
FLog.setMinimumLoggingLevel(FLog.DEBUG);
FLogDefaultLoggingDelegate.getInstance().setApplicationTag( "xiao1" );
PrinterHolder.setPrinter(new Printer() {
    @Override
    public void logMessage(@NonNull DebugOverlayTag debugOverlayTag, @NonNull String s, @NonNull Object... objects) {
        //将Object... objects转为字符串
        StringBuilder stringBuilder = new StringBuilder();
        for (Object object : objects) {
            stringBuilder.append(object.toString() + " " );
        }
        Log.d( "xiao1" , s + " " + stringBuilder);
    }

    @Override
    public void logMessage(@NonNull DebugOverlayTag debugOverlayTag, @NonNull String s) {
        Log.d( "xiao1" , s);
    }

    @Override
    public boolean shouldDisplayLogMessage(@NonNull DebugOverlayTag debugOverlayTag) {
        return true;
    }
});
然后启动一个非常简单的页面
ini
  return (
    <Text style={{fontSize: 20, textAlign: ' center ' , margin: 10}}>App.tsx</Text>
  );
Android studio过滤日志
objectivec
xiao1:ReactNative       (UIManager.createView) tag: 3, class: RCTRawText, props: {"text":"App.tsx"}
xiao1:ReactNative       (UIManager.createView) tag: 5, class: RCTText, props: {"margin":10,"allowFontScaling":true,"textAlign":"center","ellipsizeMode":"tail","fontSize":20,"accessible":false}
xiao1:ReactNative       (UIManager.setChildren) tag: 5, children: [3]
xiao1:ReactNative       (UIManager.createView) tag: 7, class: RCTView, props: {"pointerEvents":"box-none","flex":1}
xiao1:ReactNative       (UIManager.setChildren) tag: 7, children: [5]
xiao1:ReactNative       (UIManager.setChildren) tag: 11, children: [7]
我们可以看到,其中调用了createView、setChildren,我们分析一下:
- tag:表示节点id,唯一标识
- class:JS映射到native对应节点的类名
- props:节点属性
常见的RN组件与ShadowNode、View之间的映射关系:
| RN组件 | className | ShadowNode | View |
|---|---|---|---|
| Text、Button | RCTText | ReactTextShadowNode | ReactTextView |
| View | RCTView | LayoutShadowNode | ReactViewGroup |
| Image | RCTImageView | LayoutShadowNode | ReactImageView |
日志分析:
- 第一行:创建文本节点,有text属性内容是App.tsx
- 第二行:创建Text节点
- 第三行:设置前面 2 个节点的父子关系
- 第四行:创建View节点,它是RN框架设置的
- 第五行:设置第四行View节点与Text节点父子关系
- 第六行:设置根节点与View节点父子关系
UIManagerModule构造函数
UIManagerModule在createUIManager中创建的,其中传入了ViewManagerResolver,它用于根据JS侧View的名字查找Native对应的ViewManager,非常中重要,后面我们分析view创建时会用到
typescript
//CoreModulesPackage.java
private UIManagerModule createUIManager(final ReactApplicationContext reactContext) {
  try {
    if (mLazyViewManagersEnabled) {
      ViewManagerResolver resolver =
          new ViewManagerResolver() {
            @Override
            public @Nullable ViewManager getViewManager(String viewManagerName) {
              return mReactInstanceManager.createViewManager(viewManagerName);
            }

            @Override
            public Collection<String> getViewManagerNames() {
              return mReactInstanceManager.getViewManagerNames();
            }
          };

      return new UIManagerModule(
          reactContext, resolver, mMinTimeLeftInFrameForNonBatchedOperationMs);
    } else {
      return new UIManagerModule(
          reactContext,
          mReactInstanceManager.getOrCreateViewManagers(reactContext),
          mMinTimeLeftInFrameForNonBatchedOperationMs);
    }
  } finally {
  }
}
在UIManagerModule的构造函数中创建了ViewManagerRegistry和UIImplementation
ini
public UIManagerModule(
    ReactApplicationContext reactContext,
    ViewManagerResolver viewManagerResolver,
    int minTimeLeftInFrameForNonBatchedOperationMs) {
  super(reactContext);
  DisplayMetricsHolder.initDisplayMetricsIfNotInitialized(reactContext);
  mEventDispatcher = new EventDispatcherImpl(reactContext);
  mModuleConstants = createConstants(viewManagerResolver);
  mCustomDirectEvents = UIManagerModuleConstants.getDirectEventTypeConstants();
  mViewManagerRegistry = new ViewManagerRegistry(viewManagerResolver);
  mUIImplementation =
      new UIImplementation(
          reactContext,
          mViewManagerRegistry,
          mEventDispatcher,
          minTimeLeftInFrameForNonBatchedOperationMs);

  reactContext.addLifecycleEventListener(this);
}
在UIImplementation构造函数中创建了UIViewOperationQueue和NativeViewHierarchyManager,并且viewManagers也传递到NativeViewHierarchyManager中了
csharp
UIImplementation(
    ReactApplicationContext reactContext,
    ViewManagerRegistry viewManagers,
    EventDispatcher eventDispatcher,
    int minTimeLeftInFrameForNonBatchedOperationMs) {
  this(
      reactContext,
      viewManagers,
      new UIViewOperationQueue(
          reactContext,
          new NativeViewHierarchyManager(viewManagers),
          minTimeLeftInFrameForNonBatchedOperationMs),
      eventDispatcher);
}
addRootView
我们先看一下RootView的创建,它是在ReactInstanceManager.attachRootViewToInstance中调用的,第一个参与reactRoot.getRootViewGroup()是根节点
scss
if (reactRoot.getUIManagerType() == FABRIC) {
  rootTag =
      uiManager.startSurface(
          reactRoot.getRootViewGroup(),
          reactRoot.getJSModuleName(),
          initialProperties == null
              ? new WritableNativeMap()
              : Arguments.fromBundle(initialProperties),
          reactRoot.getWidthMeasureSpec(),
          reactRoot.getHeightMeasureSpec());
  reactRoot.setShouldLogContentAppeared(true);
} else {//旧架构走这里
  rootTag =
      uiManager.addRootView(
          reactRoot.getRootViewGroup(),
          initialProperties == null
              ? new WritableNativeMap()
              : Arguments.fromBundle(initialProperties));
  reactRoot.setRootViewTag(rootTag);
  reactRoot.runApplication();
}这里会调用getNextRootViewTag创建一个tag, tag 的生成规则:
- 第一个根 View 的 tag = 1,第二个 = 11,第三个 = 21 ... 步长为 10
java
public <T extends View> int addRootView(final T rootView, WritableMap initialProps) {
  final int tag = ReactRootViewTagGenerator.getNextRootViewTag();
  final ReactApplicationContext reactApplicationContext = getReactApplicationContext();

  // We pass in a surfaceId of -1 here - it is used only in Fabric.
  final ThemedReactContext themedRootContext =
      new ThemedReactContext(
          reactApplicationContext,
          rootView.getContext(),
          ((ReactRoot) rootView).getSurfaceID(),
          -1);

  mUIImplementation.registerRootView(rootView, tag, themedRootContext);
  Systrace.endSection(Systrace.TRACE_TAG_REACT_JAVA_BRIDGE);
  return tag;
}
但是在我们前面打印出的log中根节点的tag=11
yaml
xiao1:ReactNative (UIManager.setChildren) tag: 11, children: [7]为什么呢?答案就藏在ReactRootView.init中,因为它里面已经调用了一次
scss
private void init() {
  setRootViewTag(ReactRootViewTagGenerator.getNextRootViewTag());
  setClipChildren(false);
}
我们继续看,这里创建了ThemedReactContext,然后调用registerRootView
- 创建了一个ReactShadowNode,ReactShadowNode我们后面讲一下它的概念
- ShadowNodeRegistry:它里面管理了一棵树的所有ReactShadowNode节点
java
public <T extends View> void registerRootView(T rootView, int tag, ThemedReactContext context) {
  synchronized (uiImplementationThreadLock) {
    final ReactShadowNode rootCSSNode = createRootShadowNode();
    rootCSSNode.setReactTag(tag); // Thread safety needed here
    rootCSSNode.setThemedContext(context);

    context.runOnNativeModulesQueueThread(
        new Runnable() {
          @Override
          public void run() {
            mShadowNodeRegistry.addRootNode(rootCSSNode);
          }
        });

    // register it within NativeViewHierarchyManager
    mOperationsQueue.addRootView(tag, rootView);
  }
}
mOperationsQueue.addRootView最终调用到NativeViewHierarchyManager
- mTagsToViews:记录了tag与view关系
- mTagsToViewManagers:记录了tag与ViewManager的关系,rootview对应的是new RootViewManager()
- view.setId:可以看到tag其实就是分配给每个native view的id
arduino
protected final synchronized void addRootViewGroup(int tag, View view) {
  mTagsToViews.put(tag, view);
  mTagsToViewManagers.put(tag, mRootViewManager);
  mRootTags.put(tag, true);
  view.setId(tag);
}
ReactShadowNode
addRootView中调用了createRootShadowNode创建ReactShadowNode,因为这个知识点非常重要,所以单独用一个小节讲解
ini
protected ReactShadowNode createRootShadowNode() {
  ReactShadowNode rootCSSNode = new ReactShadowNodeImpl();
  I18nUtil sharedI18nUtilInstance = I18nUtil.getInstance();
  if (sharedI18nUtilInstance.isRTL(mReactContext)) {
    rootCSSNode.setLayoutDirection(YogaDirection.RTL);
  }
  rootCSSNode.setViewClassName( "Root" );
  return rootCSSNode;
}
ReactShadowNode的实现是ReactShadowNodeImpl
ini
public ReactShadowNodeImpl() {
  mDefaultPadding = new Spacing(0f);
  if (!isVirtual()) {
    YogaNode node = YogaNodePool.get().acquire();
    mYogaNode = node == null ? YogaNodeFactory.create(sYogaConfig) : node;
    mYogaNode.setData(this);
    Arrays.fill(mPadding, YogaConstants.UNDEFINED);
  } else {
    mYogaNode = null;
  }
}
构造函数又创建了YogaNode,它的实现是YogaNodeJNIFinalizer,其核心实现都在子类YogaNodeJNIBase中
scala
public abstract class YogaNodeFactory {
  public static YogaNode create(YogaConfig config) {
    return new YogaNodeJNIFinalizer(config);
  }
}

public abstract class YogaNodeJNIBase extends YogaNode implements Cloneable {
    YogaNodeJNIBase(YogaConfig config) {
      this(YogaNative.jni_YGNodeNewWithConfigJNI(((YogaConfigJNIBase) config).mNativePointer));
      mConfig = config; // makes sure the YogaConfig is not garbage collected
    }
}子类YogaNodeJNIBase构造函数中又调用了YogaNative.jni_YGNodeNewWithConfigJNI,它是一个native函数
java
static native long jni_YGNodeNewWithConfigJNI(long configPointer);注意这个函数返回值会返回一个指向C++层的指针,我们看看C++层都做了什么
scss
//jni/first-party/yogajni/jni/YGJNIVanilla.cpp
static jlong jni_YGNodeNewWithConfigJNI(
    JNIEnv* /*env*/,
    jobject /*obj*/,
    jlong configPointer) {
  const YGNodeRef node = YGNodeNewWithConfig(_jlong2YGConfigRef(configPointer));
  YGNodeSetContext(node, YGNodeContext{}.asVoidPtr);
  return reinterpret_cast<jlong>(node);
}- C++层创建了一个YGNode节点
- 返回这个节点到Java层,赋值给Java层的YogaNodeJNIBase.mNativePointer
到这里,总共引入了 3 个概念
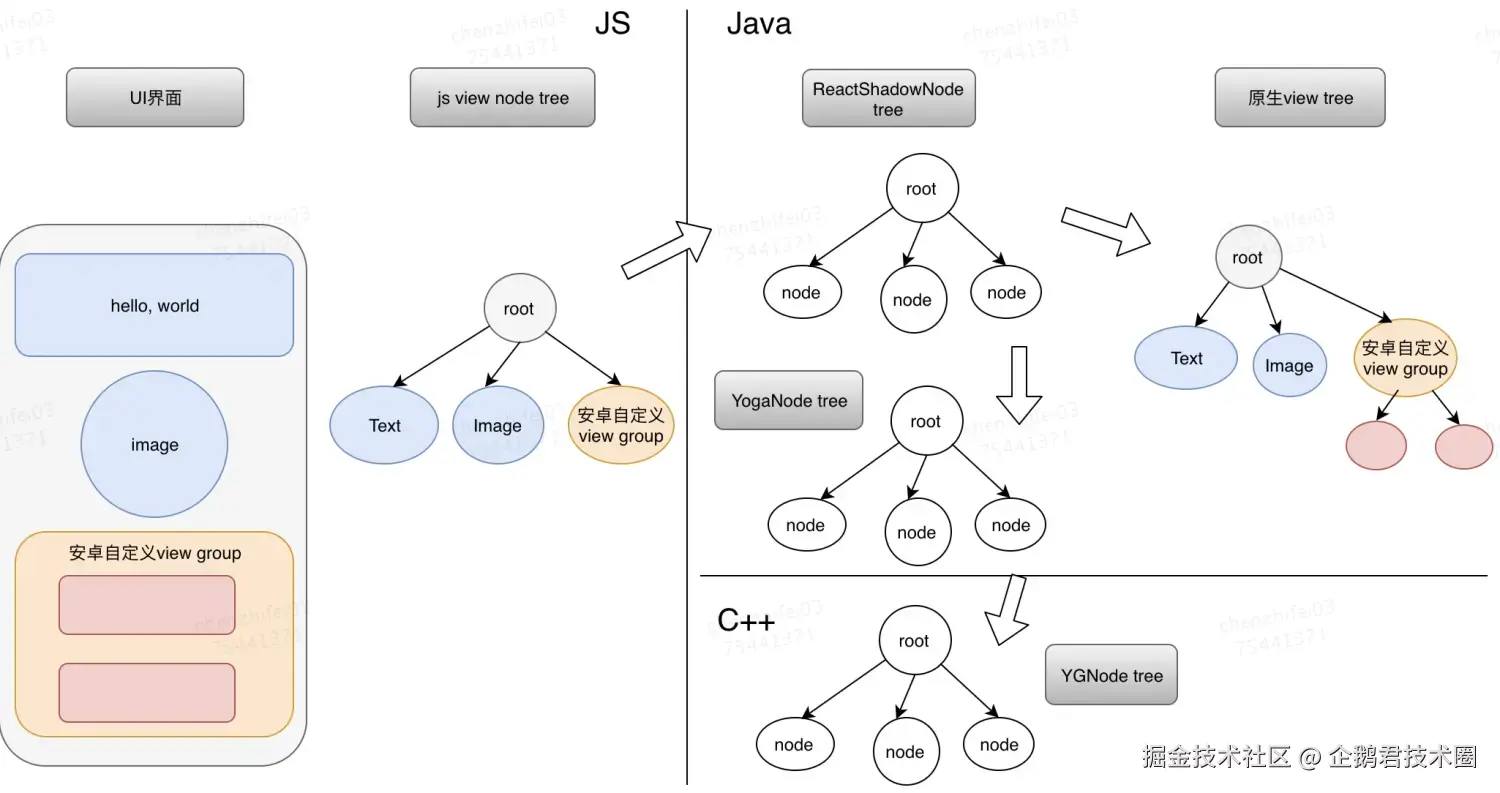
- ReactShadowNode(Java):*「这是哪个 React 视图、怎么映射到真 View」*用来描述UI界面,RN根据这个"剧本"来生成平台原生View tree。对于js端Viewtree中的每一个节点,都会在native端生成一个ReactShadowNode节点作为对时应,同时还会创建一个原生View节点(由于RN的布局优化,实际上它并非一一对应的关系,但先可以理解是一一对应关系)。
- YogaNode(Java):*「这个视图在 flex 里长什么样、去 Native 算一下」*ReactShadowNode承担了Yoga布局的计算工作,其内部会创建一个YogaNode节点,YoggaNode内部再创建c++端的YGNode
- YGNode(C++):*「flex 算法真正算的那棵树上的一个节点」*当Yoga引擎计算完毕后,YGNode中就填充满了尺寸和位置数据,通过jni回设到java端的YogaNode中,留着给原生view使用
最终在native端会生成4颗树
【图片原文】