文章目录
- 前言
- [Git和Xcode Command Line Tools](#Git和Xcode Command Line Tools)
- Homebrew
- Python和pip
- 后记
前言
去年搞了个Surface,想着能当生产力,又能像安卓那样待机随时唤醒用。但实际体验下来Windows的睡眠和休眠的体验上完全不行。今年搞了个MacBook Air,主要是传闻MacOS的待机体验很好,完全不用关机,实际体验下来确实也不错。不过第一次使用Mac,很多软件的安装和Windows或者Linux上有些区别,这里做个相关的记录。
Git和Xcode Command Line Tools
本以为在mac上安装git会很简单,直接通过命令行或者去官网下载安装包安装就行,没想到这里就碰到了问题。mac自带的命令行并没法直接安装git,而二进制文件只能下载到比较旧的版本。
目前git官网上给出的推荐的方法是使用 Homebrew (https://brew.sh) 命令行工具进行安装,所以首先需要安装这个。
安装 Homebrew 可能需要先安装 Xcode Command Line Tools 使用下面命令进行安装:
bash
xcode-select --install当前安装这个工具时可能会同时安装git和python3,所以只是需要git的话到这里就可以用了。
Homebrew
安装 Homebrew 命令如下:
bash
/bin/bash -c "$(curl -fsSL https://raw.githubusercontent.com/Homebrew/install/HEAD/install.sh)"

# 上面方法大陆网络可能不一定能正常安装,可以试试下面方式
# /bin/zsh -c "$(curl -fsSL https://gitee.com/cunkai/HomebrewCN/raw/master/Homebrew.sh)"
大陆地区用brew命令下载软件时可能会受网络影响,可以尝试下面方式先换源:
bash
# 查看当前源
# git -C "$(brew --repo)" remote -v

# 因为版本更新等原因,换源的方式可能会经常有变
# https://mirrors.tuna.tsinghua.edu.cn/help/homebrew/

# 替换清华大学镜像源
git -C "$(brew --repo)" remote set-url origin https://mirrors.tuna.tsinghua.edu.cn/git/homebrew/brew.git
# git -C "$(brew --repo homebrew/core)" remote set-url origin https://mirrors.tuna.tsinghua.edu.cn/git/homebrew/homebrew-core.git
# git -C "$(brew --repo homebrew/cask)" remote set-url origin https://mirrors.tuna.tsinghua.edu.cn/git/homebrew/homebrew-cask.git

# 替换中科大镜像源
# git -C "$(brew --repo)" remote set-url origin https://mirrors.ustc.edu.cn/brew.git
# # git -C "$(brew --repo homebrew/core)" remote set-url origin https://mirrors.ustc.edu.cn/homebrew-core.git
# # git -C "$(brew --repo homebrew/cask)" remote set-url origin https://mirrors.ustc.edu.cn/homebrew-cask.git

# 恢复官方镜像源
# git -C "$(brew --repo)" remote set-url origin https://github.com/Homebrew/brew.git
# # git -C "$(brew --repo homebrew/core)" remote set-url origin https://github.com/Homebrew/homebrew-core.git
# # git -C "$(brew --repo homebrew/cask)" remote set-url origin https://github.com/Homebrew/homebrew-cask.git
下面是一些brew常用的命令:
bash
# 查看 Homebrew 版本
brew --version

# 检查 Homebrew 状态
brew doctor

# 更新 Homebrew
brew update

# 搜索软件包
brew search <关键词>

# 安装软件包
brew install <软件名>
# 比如 brew install git-gui

# 查看已安装软件
brew list

# 升级已安装软件
brew upgrade
brew upgrade <软件名>
Python和pip
安装了Homebrew后可以用它来安装python:
bash
# 搜索可用版本
brew search python
# 安装制定版本
brew search python@3.14
安装完成后使用 python3 --version 去查看会发现可能版本并不是你希望安装的,这是因为系统中已经安装了python3(可能就是安装Xcode Command Line Tools时装上的),所以需要设置下默认应用:
bash
# 查看安装了哪些 python3
# which -a python3

# 将python@3.14链接为默认python3
brew link python@3.14
# 有可能需要加上 --overwrite 甚至 --force 选项
# brew link --force --overwrite python@3.14

# pip3也可能需要处理下
在使用brew安装的python3的pip3安装python的包时可能会提示 error: externally-managed-environment ,这个提示完整信息中说明的相关原因和处理方法,主要就是说软件包需要安装到虚拟环境中。比如按下面方式操作:
bash
# 创建虚拟环境目录
python3 -m venv ~/python3_env
# 激活虚拟环境(每次使用时需要确保激活环境后才能进行后续的安装或使用)
source ~/python3_env/bin/activate
bash
# 接下来就可以正常的安装软件了,比如这里安装了pythorch
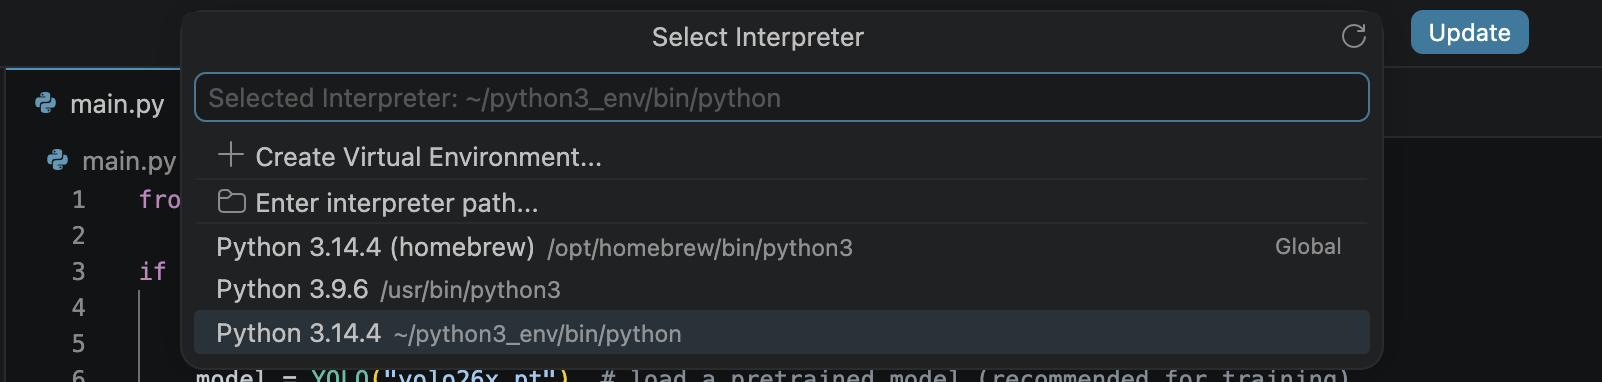
pip install torch torchvision另外提下在 VS Code 中默认启用python虚拟环境,VS Code 安装了python的插件后按下 Cmd + Shift + P ,搜索 Python: Select Interpreter ,然后选择虚拟环境目录就行,这样就可以在图形界面上点击运行直接运行程序,且程序直接是基于虚拟环境设置的。
后记
使用了几个月的Macbook,感觉除了待机这点吊打Windows外,其它方面其实两者各有优劣。对于搞嵌入式开发来说的话Windows和Linux还是不可或缺的。当然现在电脑便宜,其实可以不用做选择题,都买就行了,不好用就出。