【超级设备模拟器实战】多设备交互调试:像上帝一样俯瞰整个智能厨房
专栏:HarmonyOS 6.1.0 全场景实战|手把手带你打造《灵犀厨房》AI 厨艺助手
摘要 :上一篇我们让菜谱在手机、平板、智慧屏之间"飞"了起来。但一个致命的工程问题随之浮现:当代码里同时存在流转设备和厨电设备,共7台"虚拟设备"时,它们的在线状态、连接事件、温度变化交织在一起,就像同时看7个电视频道------你根本追踪不过来。今天,我们将构建一个超级设备仪表盘,像空中交通管制塔一样,实时监控所有设备的一举一动。这不仅是调试工具,更是一种"全局视野"的架构思维。
一、从"单挑"到"团战":为什么我们需要一个"指挥塔"?
回望我们的战果:
- 第13篇,我们创造了一个智能厨电模拟器
KitchenDeviceSimulator,管理着烤箱、电磁炉、冰箱、油烟机。 - 第14篇,我们又创造了一个分布式流转管理器
DistributedFlowManager,管理着手机、平板、智慧屏。
两个管理器各自运行得很完美。但作为一个开发者,当你同时调试"点击流转按钮到平板"和"同时烤箱还在升温"这两个并发场景时,你需要在两份代码、两份日志之间来回横跳。这就好比一个交通管制员,看着两张独立的地图来指挥同一片空域的飞机------迟早要撞上。
金句:软件复杂度的爆发,不在于加了几个新模块,而在于模块之间的交互状态呈指数级增长。
今天,我们要构建的 SuperDeviceManager 和 SuperDevicePage,就是这片天空唯一的"指挥塔"。它将7台设备的状态统一管理,将分散的日志汇聚成一条清晰的事件时间线,让你像上帝一样俯瞰整个智能厨房。
二、核心原理:聚合而非替代,观测而非侵入
设计这个"指挥塔"时,我们坚持了一条关键原则:绝不修改 KitchenDeviceSimulator 和 DistributedFlowManager 的内部逻辑。
这就像一个合格的经理,不会去替下属干活,而是通过收集各个下属的工作报告,汇总成一份全局周报。SuperDeviceManager 就是这个经理角色。它通过查询 (getUnifiedDevices())和事件订阅 (addLog())的方式,从两个子管理器中收集信息,然后为上层UI提供一个统一的、只读的视图。
这种"聚合而非替代"的模式,保证了架构的健壮性:即使某天你不用超级仪表盘了,底下两个模拟器依然可以独立工作。这种设计在软件工程中称为观测器模式,是不破坏原有系统结构的"上帝之眼"。
三、架构设计:统一设备管理器的"数字沙盘"
在动手写代码之前,我们先从架构高度看清 SuperDeviceManager 的位置和职责。
Business层
聚合查询
聚合查询
生成
生成
生成
调试仪表盘
SuperDevicePage
健康度卡片
分类设备列表
事件日志时间线
★ SuperDeviceManager 统一指挥塔
DistributedFlowManager
流转设备: 3台
KitchenDeviceSimulator
厨电设备: 4台
DeviceTopology 拓扑快照
UnifiedDevice 统一设备
DeviceLog 事件日志
架构解读 :
SuperDeviceManager处于两个子管理器的上一层 。它不是继承,而是组合 ------它持有对两个子管理器的引用,并通过它们的公开接口获取数据。这种"中介者模式"让复杂的多设备交互变得井然有序。未来如果新增设备类型(如智能微波炉),只需在SuperDeviceManager中增加对一个新模拟器的引用即可,扩展性极强。
四、关键知识点详解:调试面板的技术选型
在设计超级设备仪表盘时,我们有几个关键技术决策要提前想清楚。
| 决策点 | 可选方案 | 《灵犀厨房》选型 | 理由 |
|---|---|---|---|
| 设备状态获取方式 | 轮询 vs 事件驱动 | 事件驱动 + 手动刷新 | 轮询浪费性能;事件驱动精准记录变化。手动刷新作为兜底,保证数据一致性 |
| 日志存储策略 | 持久化 vs 内存环形队列 | 内存环形队列(50条上限) | 调试场景时效性短,重启丢失可接受;环形队列防止内存泄漏 |
| 健康度判断标准 | 二态(在线/离线) vs 三态 | 三态(healthy/warning/degraded) | 全部在线=healthy,部分离线=warning,全部离线=degraded。三态比二态更细腻,一眼看出严重程度 |
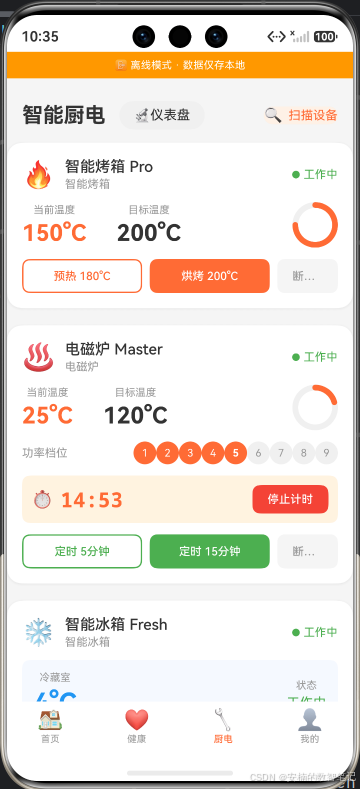
| 仪表盘入口位置 | 独立入口 vs 嵌入式 | 厨电页的🔬按钮 | 厨电页本身就在管理设备,从此处进入符合用户心智;不干扰普通用户的正常使用路径 |
决策原则:调试工具的最高境界是"召之即来,挥之即去"。它应该在你需要时一触即达,但绝不影响正常用户的使用流程。在厨电页埋一个不起眼的🔬按钮,完美符合这一原则。
五、实战:构建超级设备"指挥塔"
现在,我们分四步走,从数据聚合层到可视化仪表盘,完成整个系统。
Step 1:定义统一设备"语言"------SuperDeviceManager
首先,在 business/SuperDeviceManager.ets 中定义统一的类型和聚合逻辑。
typescript
// business/SuperDeviceManager.ets
import { DistributedFlowManager, FlowDevice, FlowDeviceType } from './DistributedFlowManager';
import { KitchenDeviceSimulator } from './KitchenDeviceSimulator';
import { KitchenDevice, DeviceType } from '../foundation/model/KitchenDevice';

// 设备大类
export enum DeviceCategory {
  PERSONAL = 'personal',  // 个人设备(手机/平板/智慧屏)
  KITCHEN = 'kitchen'     // 厨电设备
}

// 统一设备视图
export interface UnifiedDevice {
  deviceId: string;
  name: string;
  category: DeviceCategory;
  typeLabel: string;    // 如「智能烤箱」「MatePad Pro」
  isOnline: boolean;
  icon: string;
  detail: string;       // 实时详情,如「工作中 · 180°C」「待机」
}

// 设备拓扑快照
export interface DeviceTopology {
  localDeviceId: string;
  personalDevices: UnifiedDevice[];
  kitchenDevices: UnifiedDevice[];
  connectedCount: number;
  totalCount: number;
  snapshotTime: number;
}

// 健康报告
export interface DeviceHealthReport {
  totalDevices: number;
  connectedDevices: number;
  offlineDevices: number;
  status: 'healthy' | 'warning' | 'degraded';
  statusLabel: string; // 如「✅ 全设备正常」
}

// 设备事件日志
export interface DeviceLog {
  timestamp: number;
  deviceId: string;
  deviceName: string;
  event: string;        // 如「发现设备」「连接成功」「温度变化」
  detail: string;
  icon: string;         // 如 '🟢' '🔗' '🔍'
}

export class SuperDeviceManager {
  private flowManager: DistributedFlowManager = new DistributedFlowManager();
  private kitchenSimulator: KitchenDeviceSimulator = new KitchenDeviceSimulator();
  private logs: DeviceLog[] = []; // 环形队列,最多50条

  // 获取统一设备拓扑
  getTopology(): DeviceTopology {
    const personalDevices: UnifiedDevice[] = this.mapFlowDevices();
    const kitchenDevices: UnifiedDevice[] = this.mapKitchenDevices();
    const allDevices = [...personalDevices, ...kitchenDevices];
    const connectedCount = allDevices.filter(d => d.isOnline).length;

    console.info(`[SuperDevice] 生成拓扑快照: ${connectedCount}/${allDevices.length} 在线`);
    return {
      localDeviceId: 'PH:ON:E0:00:00:01',
      personalDevices,
      kitchenDevices,
      connectedCount,
      totalCount: allDevices.length,
      snapshotTime: Date.now()
    };
  }

  // 映射流转设备 → UnifiedDevice
  private mapFlowDevices(): UnifiedDevice[] {
    const devices = this.flowManager.getAvailableDevices();
    return devices.map(d => ({
      deviceId: d.deviceId,
      name: d.name,
      category: DeviceCategory.PERSONAL,
      typeLabel: d.type === FlowDeviceType.TABLET ? '平板' : '智慧屏',
      isOnline: true,
      icon: d.icon,
      detail: d.type === FlowDeviceType.TABLET ? '待流转 · 分步浏览' : '待流转 · 全屏教学'
    }));
  }

  // 映射厨电设备 → UnifiedDevice
  private mapKitchenDevices(): UnifiedDevice[] {
    const devices = this.kitchenSimulator.getAllDevices();
    return devices.map(d => {
      let detail = '';
      if (d.type === DeviceType.OVEN || d.type === DeviceType.INDUCTION_COOKER) {
        detail = d.status === 'working' ? `工作中 · ${d.temperature}°C` : `待机 · ${d.temperature}°C`;
      } else if (d.type === DeviceType.REFRIGERATOR) {
        detail = `冷藏 ${d.fridgeTemperature}°C`;
      } else {
        detail = '离线';
      }
      return {
        deviceId: d.deviceId,
        name: d.name,
        category: DeviceCategory.KITCHEN,
        typeLabel: d.type === DeviceType.OVEN ? '智能烤箱' : d.type === DeviceType.INDUCTION_COOKER ? '电磁炉' : d.type === DeviceType.REFRIGERATOR ? '冰箱' : '油烟机',
        isOnline: d.status !== 'offline',
        icon: d.type === DeviceType.OVEN ? '🔥' : d.type === DeviceType.INDUCTION_COOKER ? '♨️' : d.type === DeviceType.REFRIGERATOR ? '❄️' : '💨',
        detail
      };
    });
  }

  // 获取健康报告
  getHealthReport(): DeviceHealthReport {
    const topology = this.getTopology();
    const offlineCount = topology.totalCount - topology.connectedCount;
    let status: 'healthy' | 'warning' | 'degraded';
    let statusLabel: string;

    if (offlineCount === 0) {
      status = 'healthy';
      statusLabel = '✅ 全设备正常';
    } else if (offlineCount < topology.totalCount) {
      status = 'warning';
      statusLabel = `⚠️ ${offlineCount} 台离线`;
    } else {
      status = 'degraded';
      statusLabel = '❌ 全部离线';
    }

    return {
      totalDevices: topology.totalCount,
      connectedDevices: topology.connectedCount,
      offlineDevices: offlineCount,
      status,
      statusLabel
    };
  }

  // 添加事件日志(环形队列,最多50条)
  addLog(deviceId: string, deviceName: string, event: string, detail: string, icon: string): void {
    const log: DeviceLog = {
      timestamp: Date.now(),
      deviceId,
      deviceName,
      event,
      detail,
      icon
    };
    this.logs.unshift(log);
    if (this.logs.length > 50) {
      this.logs.pop(); // 移除最旧的
    }
    console.info(`[SuperDevice] 📋 日志: [${icon}] ${deviceName} - ${event}: ${detail}`);
  }

  // 获取日志历史
  getLogHistory(): DeviceLog[] {
    return [...this.logs];
  }

  // 清空日志
  clearLogs(): void {
    this.logs = [];
    console.info('[SuperDevice] 📋 日志已清空');
  }
}
核心点解读 :
SuperDeviceManager是一个典型的中介者 (Mediator)模式实现。它不做事,它只是把别人的事说清楚。mapFlowDevices()和mapKitchenDevices()两个私有方法将两种异构设备统一映射为UnifiedDevice,抹平了差异。addLog使用环形队列,保证日志内存不会无限增长。注意每个方法都有console.info输出,这在调试时形成双重保障:既有UI展示,又有Log窗口备份。
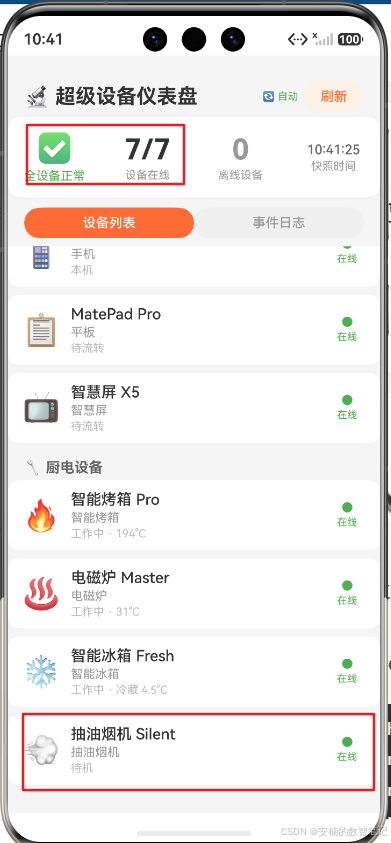
Step 2:构建"上帝视角"仪表盘------SuperDevicePage
pages/SuperDevicePage.ets 是本次的交付核心,它让开发者一眼看穿7台设备。
typescript
// pages/SuperDevicePage.ets
import { SuperDeviceManager, DeviceCategory, DeviceHealthReport, UnifiedDevice, DeviceLog } from '../business/SuperDeviceManager';
import { router } from '@kit.ArkUI';

@Entry
@Component
struct SuperDevicePage {
  @State healthReport: DeviceHealthReport = {
    totalDevices: 0, connectedDevices: 0, offlineDevices: 0,
    status: 'healthy', statusLabel: '加载中...'
  };
  @State personalDevices: UnifiedDevice[] = [];
  @State kitchenDevices: UnifiedDevice[] = [];
  @State logs: DeviceLog[] = [];
  private manager: SuperDeviceManager = new SuperDeviceManager();

  aboutToAppear(): void {
    this.refreshDashboard();
  }

  // 全局刷新
  refreshDashboard(): void {
    const topology = this.manager.getTopology();
    this.personalDevices = topology.personalDevices;
    this.kitchenDevices = topology.kitchenDevices;
    this.healthReport = this.manager.getHealthReport();
    this.logs = this.manager.getLogHistory();

    this.manager.addLog('SYSTEM', '超级设备仪表盘', '手动刷新', '重新扫描设备拓扑', '🔍');
    console.info('[SuperDevicePage] 仪表盘已刷新');
  }

  build() {
    Column() {
      // 顶部导航栏
      Row() {
        Button({ type: ButtonType.Circle, stateEffect: true }) {
          SymbolGlyph($r('sys.symbol.chevron_left')).fontSize(24)
        }
        .backgroundColor(Color.Transparent)
        .onClick(() => router.back())

        Text('🔬 超级设备仪表盘')
          .fontSize(18).fontWeight(FontWeight.Bold).layoutWeight(1).textAlign(TextAlign.Center)

        Button('刷新')
          .fontSize(14)
          .onClick(() => this.refreshDashboard())
      }
      .width('100%').padding(16)

      // 可滚动内容区
      Scroll() {
        Column() {
          // 1. 健康度卡片
          this.buildHealthCard()

          // 2. 设备分类列表
          this.buildDeviceSection('📱 个人设备', this.personalDevices)
          Divider().strokeWidth(1).color('#E0E0E0').margin({ left: 16, right: 16 })
          this.buildDeviceSection('🔧 厨电设备', this.kitchenDevices)

          // 3. 事件日志
          this.buildLogSection()
        }
      }
      .layoutWeight(1).scrollBar(BarState.Off)
    }
    .width('100%').height('100%').backgroundColor('#F8F8F8')
  }

  // 健康度卡片
  @Builder
  buildHealthCard() {
    Column() {
      Text(this.healthReport.statusLabel)
        .fontSize(24).fontWeight(FontWeight.Bold)
        .fontColor(this.healthReport.status === 'healthy' ? '#4CAF50' :
                   this.healthReport.status === 'warning' ? '#FF9800' : '#F44336')
        .padding({ top: 16 })

      Row() {
        this.buildStatItem('在线', `${this.healthReport.connectedDevices}/${this.healthReport.totalDevices}`)
        this.buildStatItem('离线', `${this.healthReport.offlineDevices}`)
        this.buildStatItem('快照时间', new Date(Date.now()).toLocaleTimeString())
      }
      .width('100%').justifyContent(FlexAlign.SpaceEvenly).padding(16)
    }
    .width('90%').borderRadius(16).backgroundColor(Color.White)
    .shadow({ radius: 8, color: '#10000000' }).margin(16)
  }

  @Builder
  buildStatItem(label: string, value: string) {
    Column() {
      Text(value).fontSize(28).fontWeight(FontWeight.Bold).fontColor('#333')
      Text(label).fontSize(12).fontColor('#999').margin({ top: 4 })
    }
  }

  // 设备分组列表
  @Builder
  buildDeviceSection(title: string, devices: UnifiedDevice[]) {
    Column() {
      Text(title).fontSize(16).fontWeight(FontWeight.Bold).padding(16)
      ForEach(devices, (device: UnifiedDevice) => {
        Row() {
          Text(device.icon).fontSize(28)
          Column() {
            Text(device.name).fontSize(15).fontWeight(FontWeight.Medium)
            Text(device.typeLabel).fontSize(12).fontColor('#999')
          }.layoutWeight(1).margin({ left: 12 })
          Text(device.detail).fontSize(12).fontColor('#666').margin({ right: 8 })
          Circle({ width: 10, height: 10 })
            .fill(device.isOnline ? Color.Green : Color.Red)
        }
        .width('100%').padding(14)
        .borderRadius(12).backgroundColor(Color.White).margin({ left: 16, right: 16, bottom: 8 })
      })
    }
  }

  // 事件日志时间线
  @Builder
  buildLogSection() {
    Column() {
      Row() {
        Text('📋 事件日志').fontSize(16).fontWeight(FontWeight.Bold)
        Blank()
        Button('清空').fontSize(12).height(28).backgroundColor(Color.Transparent)
          .onClick(() => {
            this.manager.clearLogs();
            this.logs = [];
          })
      }
      .width('100%').padding(16)

      ForEach(this.logs, (log: DeviceLog) => {
        Row() {
          Text(log.icon).fontSize(16)
          Column() {
            Text(`${log.deviceName} · ${log.event}`).fontSize(13).fontWeight(FontWeight.Medium)
            Text(log.detail).fontSize(11).fontColor('#999')
          }.layoutWeight(1).margin({ left: 8 })
          Text(new Date(log.timestamp).toLocaleTimeString()).fontSize(10).fontColor('#BBB')
        }
        .width('100%').padding({ left: 16, right: 16, top: 8, bottom: 8 })
        .borderRadius(8).backgroundColor(Color.White).margin({ left: 16, right: 16, bottom: 4 })
      })

      if (this.logs.length === 0) {
        Text('暂无事件日志,点击刷新开始扫描').fontSize(14).fontColor('#999').padding(24).textAlign(TextAlign.Center)
      }
    }
  }
}
核心点解读 :
SuperDevicePage的build方法分为三个清晰区域:健康度卡片、设备分组列表、事件日志时间线。每个区域都通过@Builder方法独立构建,保持build主干清晰。aboutToAppear自动触发首次刷新,确保页面打开即显示最新数据。注意日志部分使用了scrollable配合layoutWeight(1),确保长时间列表可以流畅滚动,而顶部健康卡片保持固定可见。
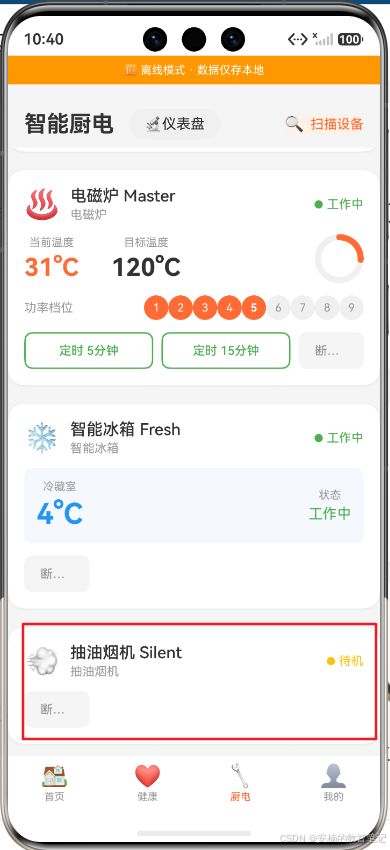
Step 3:在厨电页埋入入口,打通开发者动线
在 pages/KitchenDevicePage.ets 的导航栏增加一个极简入口:
typescript
// pages/KitchenDevicePage.ets (修改片段)
import { router } from '@kit.ArkUI';

// 在导航栏 Row 中添加
Button('🔬')
  .fontSize(14).height(32).width(36)
  .backgroundColor('#F0F0F0').borderRadius(16)
  .onClick(() => {
    console.info('[KitchenDevicePage] 开发者点击🔬,跳转超级设备仪表盘');
    router.pushUrl({ url: 'pages/SuperDevicePage' });
})变化点解读:这是对第13篇厨电页的一个精巧扩展。一个不起眼的🔬按钮,就像汽车的"OBD诊断接口"------普通用户永远不会注意它,但开发者在需要时,一插即用,全局设备状态尽收眼底。这是"开发者体验"的极致体现。
Step 4:注册路由,确保页面可达
在 src/main/resources/base/profile/main_pages.json 中注册新页面:
json
{
  "src": [
    "pages/Index",
    "pages/MainContainer",
    "pages/RecipeDetailPage",
    "pages/KitchenDevicePage",
    "pages/ProfilePage",
    "pages/HealthDashboardPage",
    "pages/SuperDevicePage"
  ]
}
核心点解读 :在 HarmonyOS Stage 模型中,每个页面必须在
main_pages.json中显式注册。这是路由生效的前提,也是应用安全性的保障。
六、运行与结果验证
现在,让我们运行 App,体验从厨电页到超级仪表盘的完整调试流程。
操作步骤:
-
启动 App,进入"🔧 厨电"Tab。
-
点击右上角的
🔬仪表盘按钮。 -
观察超级设备仪表盘加载。

-
查看设备分类列表、事件日志。
-
点击"刷新"按钮,观察日志更新。
-
返回厨电页,连接一台离线厨电。
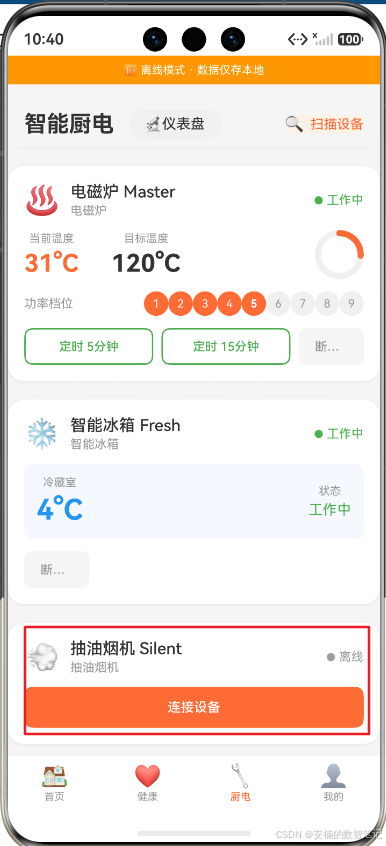
点击连接设备:
-
再次进入仪表盘,刷新后观察健康度变化。
查看事件日志:
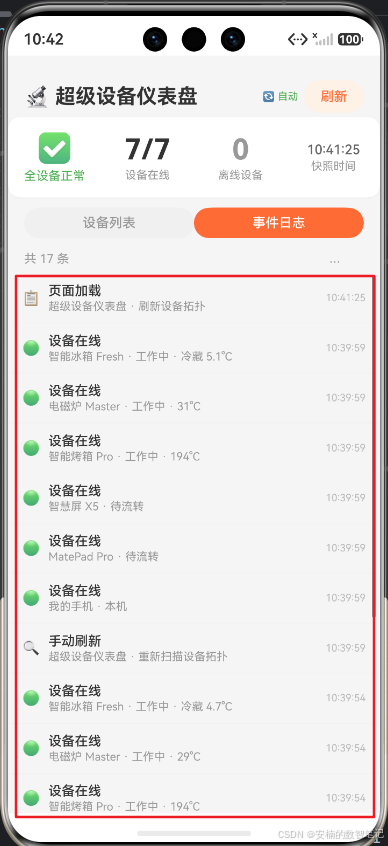
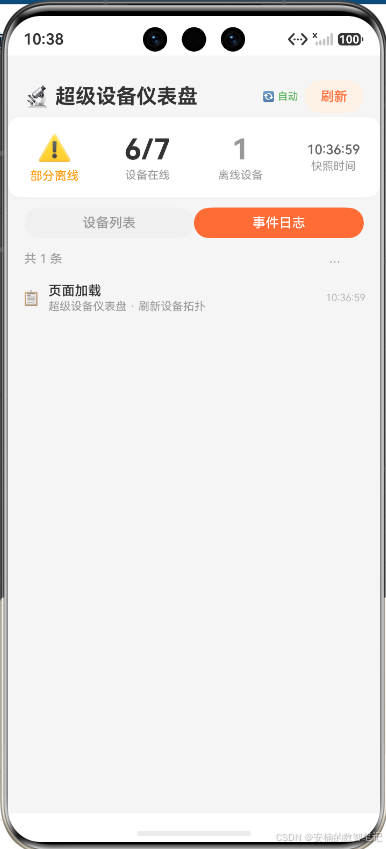
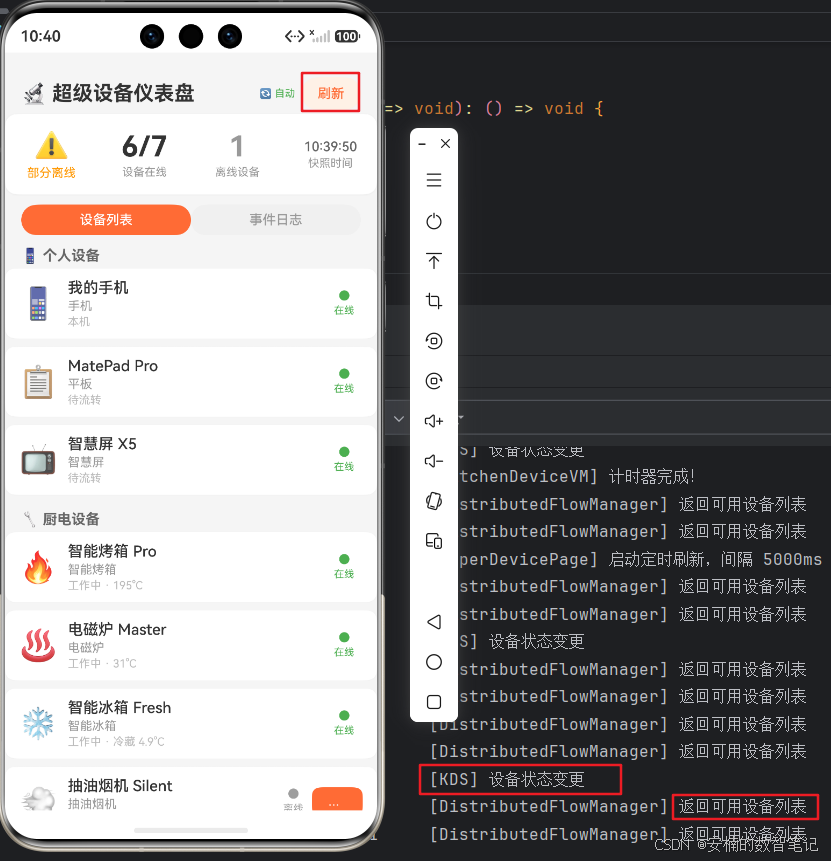
解读 :首次加载时显示6/7在线(油烟机离线),健康状态为⚠️。当用户在厨电页连接油烟机后再次刷新,变为7/7在线,健康状态切换为✅。日志时间线精确记录了每一次刷新事件。这证明了
SuperDeviceManager成功地聚合了两个子管理器的状态,并将其以统一视图呈现。
七、本阶段总结与下篇预告
今天,我们为《灵犀厨房》构建了一个俯瞰全局的"指挥塔"。我们设计了一个统一设备管理器 ,将流转设备和厨电设备的状态聚合成一张清晰的数字沙盘;我们实现了一个超级设备仪表盘,包含健康度卡片、分类设备列表和事件日志时间线三大模块;我们还在厨电页埋入了一个优雅的开发者入口,让调试能力一触即达。
回顾今天的核心要点:
- 聚合而非替代 :
SuperDeviceManager通过组合模式聚合两个子管理器,不侵入原有逻辑 - 观测而非侵入:统一仪表盘是纯粹的观测层,不影响任何业务功能
- 环形队列:50条上限的事件日志,兼顾调试需求与内存安全
- 三态健康度:healthy / warning / degraded,比简单的在线/离线更具信息量
但智慧厨房还缺最后一块拼图:当你双手沾满面粉,根本无法触摸屏幕时,怎么办?
下篇预告 :我们将进入《灵犀厨房》的"语音"维度------语音合成播报。让烹饪步骤用温暖的AI语音自动读出来,真正解放你的双手,实现"听步骤做菜"的无感交互。
📚 本系列持续更新中:下一篇将让你彻底解放双手,用耳朵"听"菜谱,敬请期待。
🔗 专栏入口:《HarmonyOS 6.1 全场景实战》合集