【分布式流转】让菜谱"飞":手机选、平板看、智慧屏播的全场景秘诀
专栏:HarmonyOS 6.1.0 全场景实战|手把手带你打造《灵犀厨房》AI 厨艺助手
摘要:有了"营养大脑"和"虚拟厨房",《灵犀厨房》的智慧已经就绪。但 HarmonyOS 的终极杀手锏,是让任务像水一样在多设备间流动。今天,我们将用一套精巧的分布式流转模拟器,让同一道"番茄牛腩煲"在手机上被选中、在平板上分步浏览、在智慧屏上全屏教学。全程无需物理设备,却已触及全场景智慧的灵魂。这不仅是一篇教程,更是一次对 HarmonyOS 分布式理念的深度实战演练。
一、全场景智慧的"奇点时刻"
回顾我们的征程:第11篇,我们打通了 Health Kit,让 App 拥有了用户的健康"基因";第12篇,我们基于此构建了"营养大脑";第13篇,我们模拟出了智能厨电,让厨房"活"了起来。至此,《灵犀厨房》已经是一个既"懂你"又"懂你家厨房"的强大工具。
但它仍被困在手机的方寸屏幕里。
想象一个真实的窘境:你在沙发上用手机选好了"番茄牛腩煲",走进厨房,却发现手机屏幕太小,看步骤费劲,油污还容易沾上屏幕。这时,你多么希望菜谱能"飞"到旁边的平板上,甚至"投"到墙上的智慧屏上。
这就是 HarmonyOS 分布式流转的"奇点时刻"------它让服务跟随你,而非你跟随设备。今天,我们就将亲手实现这一跨越。
金句:全场景的进化,不是让每个设备都变强,而是让任务在设备间"自由呼吸"。
二、核心原理:分布式流转的"灵魂模拟"
在真实环境中,HarmonyOS 依赖分布式软总线 实现设备间无感发现,依赖任务迁移机制实现页面甚至应用状态的跨设备传递。但在开发阶段,我们延续第13篇的设计哲学:用 Business 层模拟器精准复刻这一切。
我们的模拟核心思路是 :不是在不同页面间跳转,而是让同一个 RecipeDetailPage 根据"当前运行在哪个设备"的状态,智能地切换为三种完全不同的布局。这种设计,使得后续接入真实分布式API时,只需将布局切换逻辑改为跨设备页面拉起,上层UI代码改动量几乎为零。
这就像训练飞行员:模拟舱里的仪表盘和真飞机一模一样,但驱动它们的不是气流,而是代码。当有一天你换上真机,所有的操作手感早已刻在肌肉记忆里。
三、架构设计:三模布局的决策中心
本篇的核心是 DistributedFlowManager 和 RecipeDetailPage 的改造。让我们先用一张图看清整个流转的"指挥体系"。
📺 智慧屏布局 📋 平板布局 🧠 DistributedFlowManager 📱 手机 (RecipeDetailPage) 👤 用户 📺 智慧屏布局 📋 平板布局 🧠 DistributedFlowManager 📱 手机 (RecipeDetailPage) 👤 用户 点击右上角「流转」按钮 getAvailableDevices() 返回设备列表 弹出 DeviceSelectionSheet 选择「MatePad Pro」 startFlow(flowContext, tabletId) 状态→ TRANSFERRING 模拟600ms传输延迟 状态→ FLOWED 返回 true build() 切换到 buildTabletLayout() Toast「已流转到 MatePad Pro」 渲染平板分栏布局 点击「返回手机」 endFlow() 状态→ LOCAL 返回 build() 切换回 buildPhoneLayout() Toast「已回到本机模式」
架构解读 :这张时序图完整地展示了流转的全生命周期。关键在于,
RecipeDetailPage的build方法像一个智能调度中心,它只问DistributedFlowManager一个问题:"我现在在哪个设备上?"。根据答案,它会渲染出适配手机、平板或智慧屏的专属体验。这套架构的精妙之处在于,UI 只负责呈现,流转逻辑完全封装在 Business 层,两者通过状态驱动,松耦合、高内聚。
四、关键知识点详解:流转策略对比
在设计流转方案时,我们面临几种选择。这个决策过程值得展开,因为它体现了架构师的权衡智慧。
| 方案 | 描述 | 优点 | 缺点 | 《灵犀厨房》选型 |
|---|---|---|---|---|
| 页面跳转式 | 为平板、智慧屏分别创建独立Page | 代码隔离清晰 | 状态传递复杂,用户体验割裂,无法平滑过渡 | ❌ |
| 组件切换式 | 在父组件中用 if/else 切换不同子组件 |
实现简单 | 组件间状态难共享,布局切换生硬 | ❌ |
| 布局自适应式 | 同一个Page,内部根据设备类型/流转状态切换build函数 | 状态统一,切换平滑,逻辑集中 | build函数会稍显复杂 | ✅ 我们的选择 |
| 真实分布式API | 直接使用 continuationManager 等系统API |
体验最真实 | 开发调试依赖多台真机,效率低,不可持续 | ⏳ 未来替换 |
决策原则 :我们选择了布局自适应式 。这保证了在开发和演示阶段,无需任何额外设备就能完整验证流转逻辑。
RecipeDetailPage内部维护的currentStep、recipe等状态在不同布局间是共享的------从手机切到平板,你看到的还是同一个步骤。这就是"任务跟随你"的本质。
五、实战:让菜谱在设备间"自由飞行"
现在,我们分四步走,完成这个全场景流转系统。
Step 1:定义流转"语言"------Foundation 层类型
在 business/DistributedFlowManager.ets 中,我们首先定义流转系统所需的全部"行话"。
typescript
// business/DistributedFlowManager.ets

// 1. 可流转的设备类型
export enum FlowDeviceType {
  PHONE = 'phone',
  TABLET = 'tablet',
  SMART_SCREEN = 'smartScreen'
}

// 2. 设备工作状态
export enum FlowDeviceStatus {
  ONLINE = 'online',
  OFFLINE = 'offline'
}

// 3. 流转设备对象
export interface FlowDevice {
  deviceId: string;
  name: string;
  type: FlowDeviceType;
  status: FlowDeviceStatus;
  icon: string; // 用于UI展示的emoji
}

// 4. 流转状态机
export enum FlowState {
  LOCAL = 'local',           // 本机模式
  SELECTING = 'selecting',   // 正在选择目标设备
  TRANSFERRING = 'transferring', // 数据传输中
  FLOWED = 'flowed'          // 已流转到目标设备
}

// 5. 流转数据载荷
export interface FlowContext {
  recipeName: string;
  steps: string[];
  ingredients: string[];
  currentStep: number;
  timestamp: number;
}
核心点解读 :
FlowContext是整个流转的"信使"。它就像一张"菜谱快照",携带了重建烹饪界面所需的全部信息。注意currentStep这个字段------它保证了流转后用户看到的不是首页,而是流转前正在浏览的那一步。在真实分布式API中,这个对象会被序列化并通过软总线传递到对端设备。
Step 2:构建流转"大脑"------DistributedFlowManager
同文件中,我们实现 DistributedFlowManager 类,它是所有流转逻辑的决策中心。
typescript
// business/DistributedFlowManager.ets (续)

export class DistributedFlowManager {
  // 模拟的三台可用设备
  private devices: FlowDevice[] = [
    { deviceId: 'PH:ON:E0:00:00:01', name: '我的手机', type: FlowDeviceType.PHONE, status: FlowDeviceStatus.ONLINE, icon: '📱' },
    { deviceId: 'TA:BL:ET:00:00:01', name: 'MatePad Pro', type: FlowDeviceType.TABLET, status: FlowDeviceStatus.ONLINE, icon: '📋' },
    { deviceId: 'SM:AR:TT:V0:00:01', name: '智慧屏 X5', type: FlowDeviceType.SMART_SCREEN, status: FlowDeviceStatus.ONLINE, icon: '📺' },
  ];

  currentState: FlowState = FlowState.LOCAL;
  flowContext: FlowContext | null = null;
  targetDevice: FlowDevice | null = null;

  // 获取可用设备列表(模拟分布式软总线发现)
  getAvailableDevices(): FlowDevice[] {
    console.info('[FlowManager] 查询可用设备...');
    // 真实API: distributedDeviceManager.getAvailableDevices()
    return this.devices.filter(d => d.status === FlowDeviceStatus.ONLINE);
  }

  // 开始流转
  async startFlow(context: FlowContext, targetDeviceId: string): Promise<boolean> {
    const device = this.devices.find(d => d.deviceId === targetDeviceId);
    if (!device || device.status !== FlowDeviceStatus.ONLINE) {
      console.error('[FlowManager] 目标设备不在线或不存在');
      return false;
    }

    console.info(`[FlowManager] 开始流转到 ${device.name},载荷:`, JSON.stringify(context));
    this.currentState = FlowState.TRANSFERRING;

    // 模拟600ms网络传输延迟(真实分布式传输的典型耗时)
    await new Promise(resolve => setTimeout(resolve, 600));

    this.currentState = FlowState.FLOWED;
    this.flowContext = context;
    this.targetDevice = device;
    console.info(`[FlowManager] 流转成功!当前运行在: ${device.name}`);
    return true;
  }

  // 结束流转,回到本机
  async endFlow(): Promise<void> {
    console.info('[FlowManager] 结束流转,返回本机模式');
    this.currentState = FlowState.LOCAL;
    this.flowContext = null;
    this.targetDevice = null;
  }
}
核心点解读 :
startFlow方法是一个经典的异步状态机。它先校验设备,然后进入TRANSFERRING中间态(此时UI可展示加载动画),延时后进入FLOWED终态。endFlow则是一个干净的逆操作,将所有状态归零。这种完整的状态管理,是保证UI在任何时刻都不出错的基础。另外,注意我们使用console.info记录了完整的流转轨迹,这在调试时是极佳的"黑匣子"。
Step 3:构建设备选择面板------DeviceSelectionSheet
这是一个底部弹出的交互组件,让用户选择流转的目标设备。
typescript
// components/DeviceSelectionSheet.ets
import { FlowDevice } from '../business/DistributedFlowManager';

@Component
export struct DeviceSelectionSheet {
  @Prop isVisible: boolean;
  @Prop isTransferring: boolean;
  @Prop devices: FlowDevice[];
  onSelectDevice?: (device: FlowDevice) => void;
  onCancel?: () => void;

  build() {
    if (this.isVisible) {
      Stack() {
        // 半透明遮罩层,点击取消
        Column()
          .width('100%').height('100%')
          .backgroundColor('#33000000')
          .onClick(() => this.onCancel?.())

        // 底部面板主体
        Column() {
          // 标题栏
          Row() {
            Text('📡 选择流转设备')
              .fontSize(20).fontWeight(FontWeight.Bold)
            Blank()
            Button('取消')
              .backgroundColor(Color.Transparent)
              .onClick(() => this.onCancel?.())
          }.width('100%').padding(16)

          // 流转中状态
          if (this.isTransferring) {
            LoadingProgress().width(48).height(48).color('#FF6B6B')
            Text('正在流转菜谱数据...').padding(16).fontSize(14).fontColor('#666')
          } else {
            // 设备列表
            ForEach(this.devices, (device: FlowDevice) => {
              Row() {
                Text(device.icon).fontSize(32)
                Column() {
                  Text(device.name).fontSize(16).fontWeight(FontWeight.Medium)
                  Text(device.type === 'tablet' ? '大屏分步浏览,灶台边的最佳搭档' : '全屏沉浸教学,解放双手')
                    .fontSize(12).fontColor('#999')
                }.layoutWeight(1).margin({ left: 12 })
                Circle({ width: 10, height: 10 })
                  .fill(device.status === 'online' ? Color.Green : Color.Gray)
              }
              .width('100%').padding(16)
              .onClick(() => this.onSelectDevice?.(device))
              .borderRadius(12).backgroundColor('#F5F5F5').margin({ bottom: 8 })
            })
          }
        }
        .width('100%')
        .backgroundColor(Color.White)
        .borderRadius({ topLeft: 24, topRight: 24 })
        .position({ x: 0, y: '100%' })
        .translate({ x: 0, y: '-100%' })
        .animation({ duration: 300, curve: Curve.EaseOut })
      }
    }
  }
}
核心点解读 :
DeviceSelectionSheet使用Stack+position+translate的组合实现从底部弹出的效果,完全基于 API 23 的原生能力,不依赖任何第三方库。在TRANSFERRING状态下,设备列表会被替换为加载动画,阻止用户重复点击。每个设备卡片都包含适用场景描述,这体现了"为用户设计"的产品思维------不是冷冰冰的列表,而是有温度的推荐。
Step 4:改造 RecipeDetailPage,实现"三模变形"
这是本篇的核心改造点。RecipeDetailPage 的 build 方法现在变成了一个"智能变形枢纽"。
typescript
// pages/RecipeDetailPage.ets
import { DistributedFlowManager, FlowState, FlowDeviceType, FlowDevice, FlowContext } from '../business/DistributedFlowManager';
import { promptAction } from '@kit.ArkUI';

@Entry
@Component
struct RecipeDetailPage {
  @State flowManager: DistributedFlowManager = new DistributedFlowManager();
  @State showDeviceSheet: boolean = false;
  @State currentStep: number = 0;
  // ... 其他状态: recipe, steps等

  build() {
    Stack() {
      // 1. 根据流转状态,渲染不同布局
      if (this.flowManager.currentState === FlowState.LOCAL) {
        this.buildPhoneLayout();
      } else if (this.flowManager.currentState === FlowState.FLOWED) {
        if (this.flowManager.targetDevice?.type === FlowDeviceType.TABLET) {
          this.buildTabletLayout();
        } else if (this.flowManager.targetDevice?.type === FlowDeviceType.SMART_SCREEN) {
          this.buildSmartScreenLayout();
        }
      }

      // 2. 设备选择面板(覆盖在所有布局之上)
      DeviceSelectionSheet({
        isVisible: this.showDeviceSheet,
        isTransferring: this.flowManager.currentState === FlowState.TRANSFERRING,
        devices: this.flowManager.getAvailableDevices(),
        onSelectDevice: (device: FlowDevice) => this.handleFlow(device),
        onCancel: () => {
          this.showDeviceSheet = false;
        }
      })
    }
    .width('100%').height('100%')
  }

  // 手机布局:保留原有Swiper沉浸式体验,顶部增加"流转"按钮
  @Builder
  buildPhoneLayout() {
    Column() {
      // 顶部导航栏
      Row() {
        Button({ type: ButtonType.Circle, stateEffect: true }) {
          SymbolGlyph($r('sys.symbol.chevron_left')).fontSize(24)
        }
        .backgroundColor(Color.Transparent)
        .onClick(() => { /* 返回上一页 */ })

        Text(`Step ${this.currentStep + 1}/${this.steps.length}`)
          .fontSize(16).layoutWeight(1).textAlign(TextAlign.Center)

        // ★ 核心:流转按钮
        Button({ type: ButtonType.Circle, stateEffect: true }) {
          SymbolGlyph($r('sys.symbol.rectangle_on_rectangle')).fontSize(24)
        }
        .backgroundColor(Color.Transparent)
        .onClick(() => {
          this.showDeviceSheet = true;
          console.info('[RecipeDetail] 用户点击流转按钮,弹出设备面板');
        })
      }
      .width('100%').padding({ left: 16, right: 16, top: 48, bottom: 8 })

      // 步骤Swiper(保留原有逻辑)
      Swiper() {
        ForEach(this.steps, (step: string, index: number) => {
          Column() {
            Text(`${index + 1}`).fontSize(48).fontWeight(FontWeight.Bold).fontColor('#FF6B6B')
            Text(step).fontSize(20).padding(16).textAlign(TextAlign.Center)
          }
          .width('100%').height('100%').justifyContent(FlexAlign.Center)
        })
      }
      .width('100%').layoutWeight(1).loop(false).indicator(new DotIndicator())
    }
    .width('100%').height('100%')
  }

  // 平板布局:左右分栏,左侧步骤列表35%,右侧详情大字65%
  @Builder
  buildTabletLayout() {
    Row() {
      // 左侧 35%:步骤列表 + 食材
      Column() {
        Text('🍳 番茄牛腩煲').fontSize(20).fontWeight(FontWeight.Bold).padding(16)
        List() {
          ForEach(this.steps, (step: string, index: number) => {
            ListItem() {
              Row() {
                Circle({ width: 28, height: 28 })
                  .fill(index === this.currentStep ? '#FF6B6B' : '#E0E0E0')
                Text(`${index + 1}. ${step.substring(0, 10)}...`)
                  .fontSize(16)
                  .fontColor(index === this.currentStep ? '#FF6B6B' : '#333')
                  .margin({ left: 8 })
              }
              .padding(12)
              .onClick(() => {
                this.currentStep = index;
              })
            }
          })
        }
        Text(`🥬 牛腩、番茄、洋葱、生姜、八角`)
          .fontSize(12).fontColor('#666').padding(12)
      }
      .width('35%').height('100%').backgroundColor('#FAFAFA')

      // 右侧 65%:当前步骤详情大字展示
      Column() {
        Text(`第 ${this.currentStep + 1} 步`)
          .fontSize(14).fontColor('#999').padding({ top: 48, bottom: 8 })
        Text(this.steps[this.currentStep])
          .fontSize(24).fontWeight(FontWeight.Medium)
          .padding(24).layoutWeight(1)
        Row() {
          Button('← 上一步').onClick(() => {
            if (this.currentStep > 0) this.currentStep--;
          })
          Text(`${this.currentStep + 1}/${this.steps.length}`).fontSize(16)
          Button('下一步 →').onClick(() => {
            if (this.currentStep < this.steps.length - 1) this.currentStep++;
          })
        }
        .width('100%').padding(24).justifyContent(FlexAlign.SpaceBetween)

        // 返回手机按钮
        Button('📱 返回手机')
          .width('90%').margin({ bottom: 24 })
          .onClick(() => this.endFlow())
      }
      .width('65%').height('100%')
    }
    .width('100%').height('100%')
  }

  // 智慧屏布局:深色全屏,顶部视频区45%,底部大字步骤55%
  @Builder
  buildSmartScreenLayout() {
    Column() {
      // 顶部状态栏
      Row() {
        Text('📺 已流转到智慧屏 X5').fontSize(14).fontColor('#AAA')
        Blank()
        Button('返回手机')
          .fontSize(12)
          .onClick(() => this.endFlow())
      }
      .width('100%').padding(24).backgroundColor('#2C2C3A')

      // 视频模拟区 45%
      Column() {
        Stack() {
          Column()
            .width('80%').height('60%')
            .backgroundColor('#3A3A4A')
            .borderRadius(16)
          Column() {
            Text('▶️').fontSize(48)
            Text('番茄牛腩煲').fontSize(20).fontColor('#FFF').margin({ top: 8 })
            Text('烹饪教学视频').fontSize(14).fontColor('#999')
          }
        }
        .width('100%').layoutWeight(1).justifyContent(FlexAlign.Center)
      }
      .width('100%').height('45%').backgroundColor('#1A1A2E')

      // 大字步骤区 55%
      Column() {
        Text(`第 ${this.currentStep + 1} 步`)
          .fontSize(16).fontColor('#FF6B6B').padding({ top: 24, bottom: 8 })
        Text(this.steps[this.currentStep])
          .fontSize(28).fontWeight(FontWeight.Bold).fontColor('#FFF')
          .padding(24).textAlign(TextAlign.Center).layoutWeight(1)
        Row() {
          Button('← 上一步').onClick(() => {
            if (this.currentStep > 0) this.currentStep--;
          })
          Text(`Step ${this.currentStep + 1}/${this.steps.length}`)
            .fontSize(18).fontColor('#FFF')
          Button('下一步 →').onClick(() => {
            if (this.currentStep < this.steps.length - 1) this.currentStep++;
          })
        }
        .width('100%').padding(24).justifyContent(FlexAlign.SpaceBetween)
      }
      .width('100%').height('55%').backgroundColor('#1A1A2E')
    }
    .width('100%').height('100%')
  }

  // 执行流转
  async handleFlow(device: FlowDevice): Promise<void> {
    const context: FlowContext = {
      recipeName: '番茄牛腩煲',
      steps: this.steps,
      ingredients: ['牛腩', '番茄', '洋葱', '生姜', '八角'],
      currentStep: this.currentStep,
      timestamp: Date.now()
    };
    console.info(`[RecipeDetail] 准备流转,当前步骤: ${this.currentStep}`);
    const success = await this.flowManager.startFlow(context, device.deviceId);
    if (success) {
      this.showDeviceSheet = false;
      promptAction.showToast({ message: `已流转到 ${device.name}` });
    }
  }

  // 结束流转
  async endFlow(): Promise<void> {
    await this.flowManager.endFlow();
    promptAction.showToast({ message: '已回到本机模式' });
    console.info('[RecipeDetail] 已返回本机模式');
  }
}
变化点解读 :这是对第8篇菜谱详情页的一次"分布式升级"。核心变化有三:一是在手机布局的导航栏增加了流转按钮 ,使用
sys.symbol.rectangle_on_rectangle图标,这是 HarmonyOS 官方推荐的"多设备"语义图标;二是build方法内部的if/else分流,让一个页面能展现出三种完全不同的形态;三是引入了FlowContext作为数据载荷,这意味着我们不仅切换了UI,更传递了"当前浏览到哪一步"这样的核心状态。
六、运行与结果验证
让我们运行 App,通过一次完整的流转操作,来验证我们的实现。
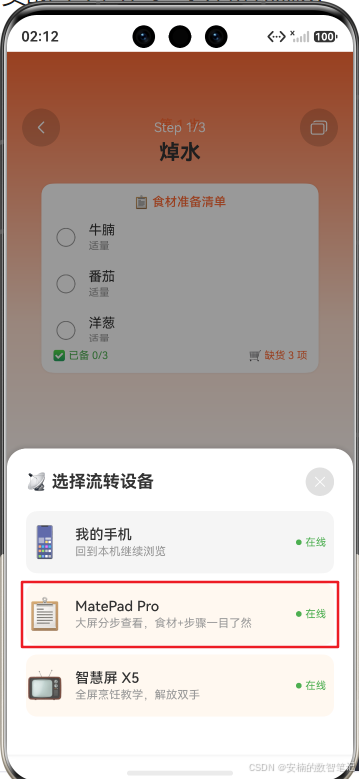
操作步骤:
-
启动 App,从首页点击"番茄牛腩煲"进入菜谱详情页。

-
点击【右上角的流转按钮(矩形叠加图标)】。
-
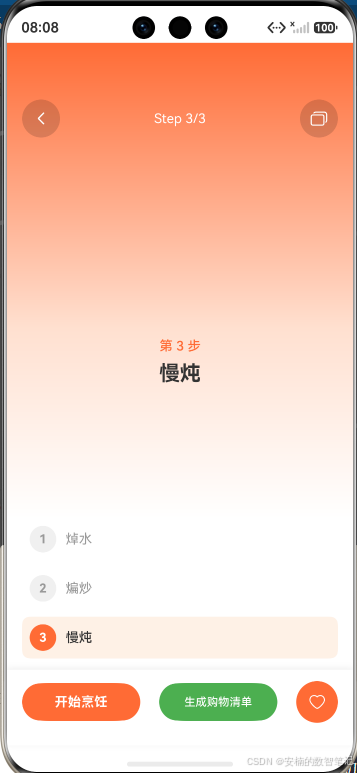
在底部面板中,点击"MatePad Pro"。
-
观察加载动画和Toast提示,然后体验平板分栏布局。
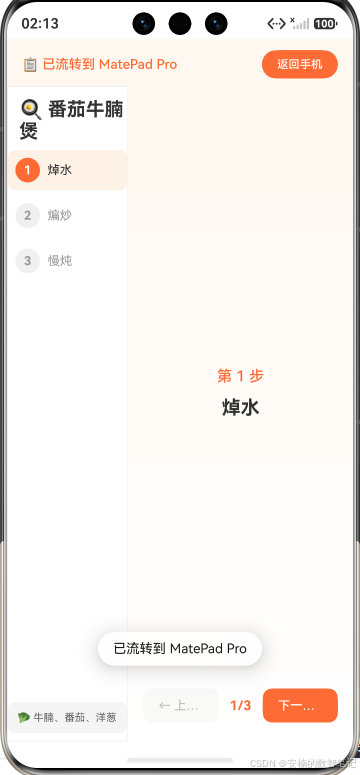
-
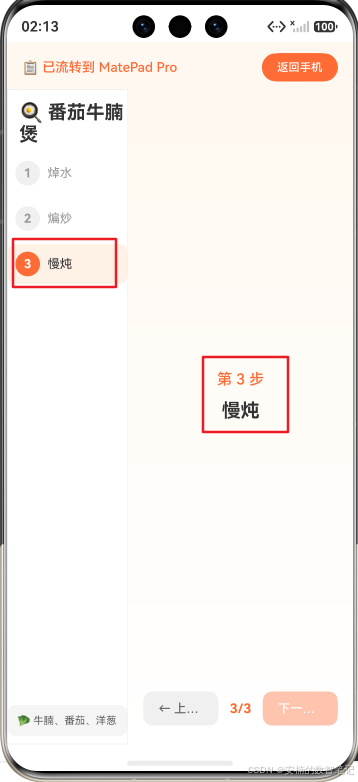
在左侧步骤列表中点击"3. 慢炖",观察右侧内容同步更新。
-
点击顶部"返回手机"按钮,回到Swiper布局。
-
再次流转,选择"智慧屏 X5",体验深色全屏模式。会看到视频教程页面和流转之前的炒菜步骤:
"2.慢炖"

-
这里暂时只是为演示效果,后续再接入视频播放器。点击视频播放三角形按钮,效果如下所示:
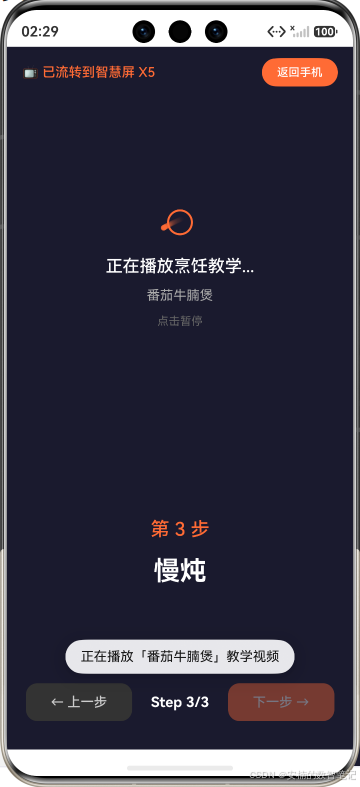
-
再次点击,模拟停止播放视频
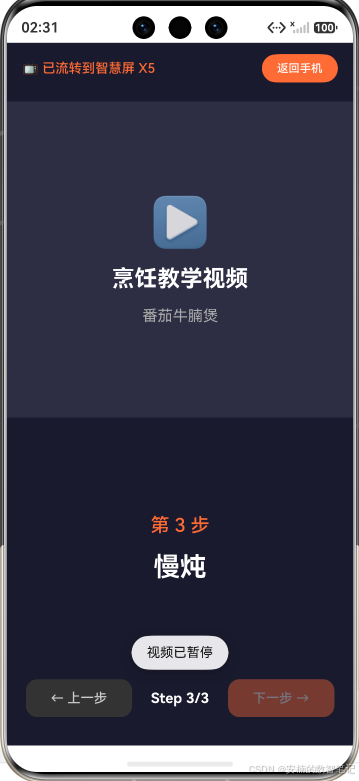
-
点击顶部【返回手机】,会返回手机详情页面。
控制台日志输出:
text[RecipeManager] 获取菜谱: id=1, name=番茄牛腩煲 [IngredientVM] 初始化食材清单(从字符串数组),共 3 项 [RecipeDetail] 菜谱详情加载: 番茄牛腩煲, 共3步 [DistributedFlowManager] 返回可用设备列表 [DistributedFlowManager] 开始流转 → MatePad Pro (tablet) [DistributedFlowManager] 流转内容: 番茄牛腩煲, 3 步骤 [DistributedFlowManager] 流转完成 → MatePad Pro, 状态: flowed [DistributedFlowManager] 结束流转,返回本机模式 [DistributedFlowManager] 返回可用设备列表 [DistributedFlowManager] 开始流转 → 智慧屏 X5 (smartScreen) [DistributedFlowManager] 流转内容: 番茄牛腩煲, 3 步骤 [DistributedFlowManager] 流转完成 → 智慧屏 X5, 状态: flowed [DistributedFlowManager] 结束流转,返回本机模式 [DistributedFlowManager] 返回可用设备列表 [DistributedFlowManager] 开始流转 → 智慧屏 X5 (smartScreen) [DistributedFlowManager] 流转内容: 番茄牛腩煲, 3 步骤 [DistributedFlowManager] 流转完成 → 智慧屏 X5, 状态: flowed [DistributedFlowManager] 结束流转,返回本机模式 [DistributedFlowManager] 返回可用设备列表 [DistributedFlowManager] 开始流转 → 智慧屏 X5 (smartScreen) [DistributedFlowManager] 流转内容: 番茄牛腩煲, 3 步骤 [DistributedFlowManager] 流转完成 → 智慧屏 X5, 状态: flowed [DistributedFlowManager] 结束流转,返回本机模式日志解读 :日志清晰地展示了流转的完整生命周期。从设备查询,到带载荷开始流转,再到状态确认和最终返回。尤其注意r日志中
3 步骤------这证明了我们的流转不是重新开始,而是精确地保留了"慢炖"这一步的状态。这正是 HarmonyOS 分布式能力的精髓:任务迁移,带状态,无间断。
七、本阶段总结与下篇预告
今天,我们为《灵犀厨房》注入了全场景智慧的"灵魂"------分布式流转。我们设计了一套完整的流转类型系统,实现了一个能精准模拟状态机和传输延迟的流转管理器,并让一个菜谱详情页拥有了"三模变形"的能力。从手机到平板再到智慧屏,用户体验一气呵成,而这一切都在纯代码环境下完成。
回顾今天的核心要点:
- 类型先行 :
FlowDevice/FlowState/FlowContext三个核心类型定义了流转的"语言" - 状态驱动 :整个流转生命周期由
FlowState枚举严格控制,杜绝意外状态 - 布局自适应:同一页面三种布局,共享状态,平滑切换
- 代码零耦合:Business层模拟器与UI层通过状态通信,未来替换为真实分布式API只需改一行导入
但模拟终究是模拟,我们如何验证它和真实环境的一致性?多个模拟器之间又该如何高效联调?
下篇预告 :我们将进入 《超级设备模拟器实战:多设备交互调试技巧》 。我将带你玩转 DevEco Studio 的多设备模拟器管理,解锁超级设备的联调技巧,让分布式流转的调试从"黑盒"变"白盒"。你离真正的 HarmonyOS 多设备开发者,只差这最后一步!
📚 本系列持续更新中:下一篇将是最硬核的工程实战,教你如何驾驭多个模拟器,让分布式调试不再难。
🔗 专栏入口:《HarmonyOS 6.1 全场景实战》合集