一、Android 进程优先级机制
1. 进程优先级层次(从高到低)
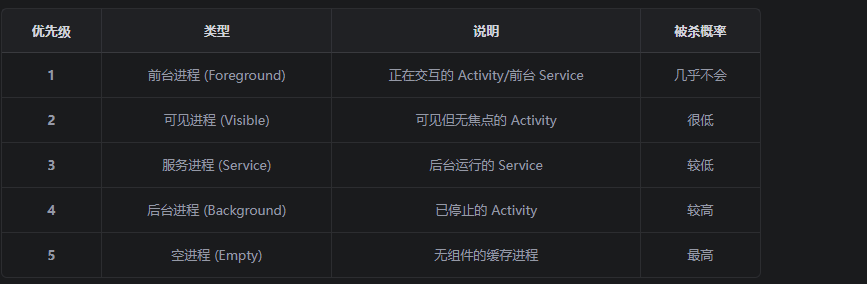
2. OOM_ADJ 机制
Android 使用 OOM_ADJ (Out Of Memory Adjustment)来管理进程优先级:
// ProcessList.java 中的优先级定义
static final int ADJ = 0;              // 前台进程
static final int ADJ = 2;              // 可见进程
static final int ADJ = 5;              // 服务进程
static final int ADJ = 7;              // 后台进程
static final int ADJ = 15;             // 空进程(最容易被杀)
二、提高进程优先级的方法
方法一:绑定 SystemUI(最推荐)
将你的进程绑定到 SystemUI 进程,使其成为 SystemUI 的"依赖者":
// 在你的 Service 中
public class MyService extends Service {

    private final IBinder mBinder = new LocalBinder();

    public class LocalBinder extends Binder {
        public MyService getService() {
            return MyService.this;
        }
    }

    @Override
    public void onCreate() {
        super.onCreate();

        // 关键:绑定到系统进程
        registerSystemUIConnection();
    }

    private void registerSystemUIConnection() {
        // 方式1:通过 ContentProvider 依赖
        // 在 AndroidManifest.xml 中声明
        // <provider android:authorities="com.example.myprovider"
        //           android:process=":system"/>

        // 方式2:通过 Service 绑定
        // 在 SystemUI 进程中绑定你的 Service
    }
}
方法二:设置为前台 Service
// MyService.java
@Override
public int onStartCommand(Intent intent, int flags, int startId) {
    // 创建前台通知
    Notification notification = createForegroundNotification();

    // 启动前台 Service(优先级最高)
    startForeground(NOTIFICATION_ID, notification);

    return START_STICKY;
}

private Notification createForegroundNotification() {
    NotificationChannel channel = new NotificationChannel(
        "my_service_channel",
        "My Service",
        NotificationManager.IMPORTANCE_LOW
    );

    NotificationManager manager = getSystemService(NotificationManager.class);
    manager.createNotificationChannel(channel);

    return new Notification.Builder(this, "my_service_channel")
        .setContentTitle("服务运行中")
        .setContentText("保持服务运行")
        .setSmallIcon(R.drawable.ic_service)
        .setPriority(Notification.PRIORITY_LOW)
        .build();
}
方法三:设置进程优先级
// 在 Application 或 Service 中设置
public class MyApplication extends Application {

    @Override
    public void onCreate() {
        super.onCreate();

        // 设置进程优先级
        setThreadPriority();
    }

    private void setThreadPriority() {
        // 1. 设置主线程优先级
        android.os.Process.setThreadPriority(android.os.Process.THREAD_PRIORITY_FOREGROUND);

        // 2. 设置进程组
        android.os.Process.setProcessGroup(android.os.Process.myPid(),
            android.os.Process.THREAD_GROUP_SYSTEM);
    }
}
方法四:使用 Binder 连接到 SystemUI
// 在你的 Service 中
public class MyService extends Service {

    private static final String SYSTEM_UI_PACKAGE = "com.android.systemui";

    @Override
    public IBinder onBind(Intent intent) {
        // 返回 Binder,允许其他进程连接
        return new MyBinder();
    }

    public class MyBinder extends Binder {
        public MyService getService() {
            return MyService.this;
        }
    }

    // 关键:当 SystemUI 绑定时,提高优先级
    @Override
    public void onBind(Intent intent) {
        super.onBind(intent);

        // 提高自身优先级
        boostProcessPriority();
    }

    private void boostProcessPriority() {
        try {
            // 设置进程优先级为 FOREGROUND
            android.os.Process.setProcessStateList(
                android.os.Process.myPid(),
                android.os.Process.STATE_FOREGROUND_SERVICE
            );
        } catch (Exception e) {
            e.printStackTrace();
        }
    }
}
三、让 SystemUI 启动你的进程
1. 在 SystemUI 中添加启动逻辑
// SystemUI 源码 (packages/SystemUI/)
public class SystemUIService extends Service {

    @Override
    public void onCreate() {
        super.onCreate();

        // 启动依赖进程
        startDependentService();
    }

    private void startDependentService() {
        Intent intent = new Intent();
        intent.setComponent(new ComponentName(
            "com.example.myservice",  // 你的进程包名
            "com.example.myservice.MyService"  // 你的 Service
        ));

        // 关键:使用 START_STICKY 和前台优先级
        startForegroundService(intent);
    }
}
2. 在你的 AndroidManifest.xml 中声明
<manifest xmlns:android="http://schemas.android.com/apk/res/android"
    package="com.example.myservice">

    <uses-permission android:name="android.permission.FOREGROUND_SERVICE" />
    <uses-permission android:name="android.permission.FOREGROUND_SERVICE_SPECIAL_USE" />

    <application>

        <service
            android:name=".MyService"
            android:enabled="true"
            android:exported="true"
            android:foregroundServiceType="specialUse">

            <intent-filter>
                <action android:name="com.example.myservice.ACTION_START" />
            </intent-filter>

            <!-- 关键:设置为独立进程 -->
            <meta-data
                android:name="android.os.IProcessConnection"
                android:value="true" />
        </service>

    </application>
</manifest>
四、完整保活策略
1. Service 端代码
public class MyService extends Service {

    private static final int NOTIFICATION_ID = 10001;
    private static final String TAG = "MyService";

    private LocalBinder mBinder = new LocalBinder();

    public class LocalBinder extends Binder {
        public MyService getService() {
            return MyService.this;
        }
    }

    @Override
    public void onCreate() {
        super.onCreate();
        Log.d(TAG, "Service created");

        // 1. 创建前台通知
        createForegroundNotification();

        // 2. 提高进程优先级
        boostProcessPriority();
    }

    @Override
    public int onStartCommand(Intent intent, int flags, int startId) {
        Log.d(TAG, "Service started");

        // 3. 返回 START_STICKY,确保被杀死后能重启
        return START_STICKY;
    }

    @Override
    public IBinder onBind(Intent intent) {
        // 4. 被绑定时再次提高优先级
        boostProcessPriority();
        return mBinder;
    }

    @Override
    public boolean onUnbind(Intent intent) {
        // 5. 解绑后重新提高优先级
        boostProcessPriority();
        return super.onUnbind(intent);
    }

    private void createForegroundNotification() {
        // 创建通知渠道
        NotificationChannel channel = new NotificationChannel(
            "my_service_channel",
            "My Service Channel",
            NotificationManager.IMPORTANCE_LOW
        );

        NotificationManager manager = getSystemService(NotificationManager.class);
        manager.createNotificationChannel(channel);

        // 创建前台通知
        Notification notification = new Notification.Builder(this, "my_service_channel")
            .setContentTitle("服务运行中")
            .setContentText("保持后台运行")
            .setSmallIcon(R.drawable.ic_notification)
            .setPriority(Notification.PRIORITY_LOW)
            .setOngoing(true)
            .build();

        startForeground(NOTIFICATION_ID, notification);
    }

    private void boostProcessPriority() {
        try {
            // 设置主线程为前台优先级
            android.os.Process.setThreadPriority(
                android.os.Process.THREAD_PRIORITY_FOREGROUND
            );

            // 设置进程组
            android.os.Process.setProcessGroup(
                android.os.Process.myPid(),
                android.os.Process.THREAD_GROUP_SYSTEM
            );

            Log.d(TAG, "Process priority boosted");
        } catch (Exception e) {
            Log.e(TAG, "Failed to boost priority", e);
        }
    }

    @Override
    public void onDestroy() {
        super.onDestroy();
        Log.d(TAG, "Service destroyed");

        // 被杀死前尝试重启
        Intent restartIntent = new Intent(this, MyService.class);
        startForegroundService(restartIntent);
    }
}
2. SystemUI 端代码
// SystemUI 中启动你的 Service
public class MySystemUIService extends SystemUIService {

    private void startMyDependentService() {
        Context otherContext;
        try {
            otherContext = createPackageContext(
                "com.example.myservice",
                CONTEXT_IGNORE_SECURITY
            );
        } catch (PackageManager.NameNotFoundException e) {
            Log.e(TAG, "Package not found", e);
            return;
        }

        Intent serviceIntent = new Intent();
        serviceIntent.setComponent(new ComponentName(
            "com.example.myservice",
            "com.example.myservice.MyService"
        ));

        // 使用特殊权限启动
        try {
            startServiceAsUser(serviceIntent, UserHandle.SYSTEM);
        } catch (SecurityException e) {
            Log.e(TAG, "Failed to start service", e);
        }
    }
}
五、总结
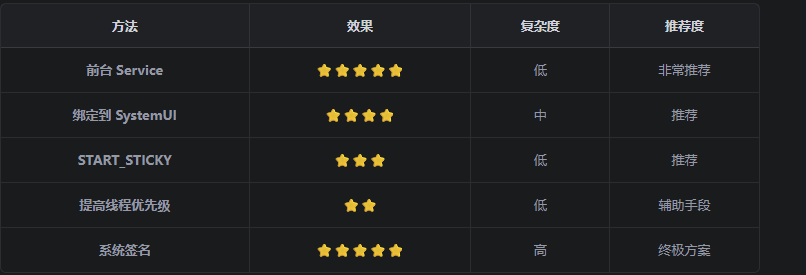
最佳实践组合
// 1. 前台 Service + 通知
// 2. START_STICKY 返回值
// 3. onDestroy 中重启
// 4. 提高进程优先级
// 5. 绑定到系统进程(如果可能)