WeatherApp - 天气应用教程
项目介绍
项目背景
天气应用是移动设备上最常用的应用类型之一。它展示了如何从服务器获取数据并以美观的方式呈现给用户。通过构建一个天气应用,你将学习到 HarmonyOS NEXT 中的数据展示、渐变背景、滚动视图等高级特性。
应用场景
天气应用在日常生活中有着广泛的应用场景:
- 日常出行:查看当天天气,决定穿着和出行方式
- 旅行规划:查看目的地未来几天的天气,安排行程
- 农业种植:农民根据天气情况安排农事活动
- 户外运动:登山、露营等活动前查看天气
功能特性
本天气应用实现了以下功能:
- 当前天气展示:显示当前城市的温度、天气状况、湿度、风速等
- 天气预报:显示未来5天的天气预报
- 渐变背景:根据天气状况显示不同的渐变背景
- 详情展示:以卡片形式展示详细的天气信息
- 滚动视图:支持内容超出屏幕时滚动查看
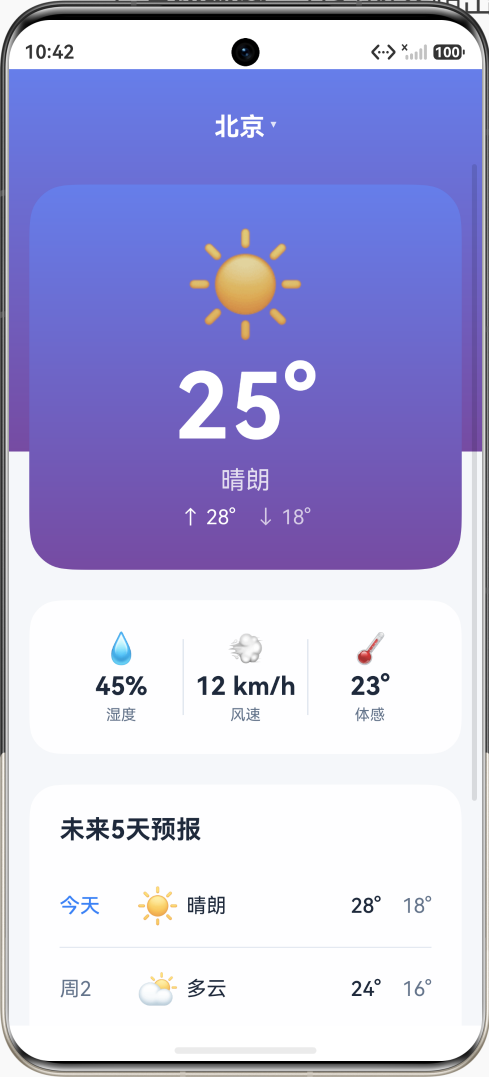
最终效果
应用界面分为以下区域:
- 头部区域:显示城市名称
- 天气卡片:显示当前温度、天气图标、天气状况
- 详情区域:显示湿度、风速、体感温度等详细信息
- 预报区域:显示未来5天的天气预报列表
技术栈
- 开发框架:HarmonyOS NEXT API 23
- 编程语言:ArkTS
- UI 框架:ArkUI 声明式 UI
- 渐变效果:linearGradient
- 滚动视图 :Scroll
开发环境准备
1. 创建项目
创建一个新的 HarmonyOS NEXT 项目:
方式一:使用 DevEco Studio 创建
- 打开 DevEco Studio
- 选择 "Create HarmonyOS Project"
- 选择 "Empty Ability" 模板
- 设置项目名称为 "WeatherApp"
- 选择 API 版本为 23
方式二:复制模板项目
- 复制
project-template目录 - 重命名为 "WeatherApp"
- 修改配置文件
2. 项目结构
WeatherApp/
├── AppScope/                    # 应用全局配置
│   ├── app.json5               # 应用级配置
│   └── resources/              # 应用级资源
├── entry/                       # 主模块
│   └── src/main/
│       ├── ets/                # ArkTS 源代码
│       │   ├── entryability/   # UIAbility 入口
│       │   └── pages/          # 页面组件
│       └── resources/          # 资源文件
├── build-profile.json5         # 构建配置
└── oh-package.json5            # 依赖配置
知识点讲解
1. 接口定义 - 复杂数据结构详解
使用 interface 定义天气数据的结构。在实际开发中,数据结构往往比较复杂,需要包含多个字段。
天气数据接口:
typescript
// 定义天气数据结构
interface WeatherData {
  city: string;        // 城市名称
  temperature: number; // 当前温度
  condition: string;   // 天气状况(晴朗、多云、小雨等)
  humidity: number;    // 湿度百分比
  windSpeed: number;   // 风速(km/h)
  icon: string;        // 天气图标(emoji)
  high: number;        // 最高温度
  low: number;         // 最高温度
}
接口的使用场景:
typescript
// 1. 定义单个天气数据
const currentWeather: WeatherData = {
  city: '北京',
  temperature: 25,
  condition: '晴朗',
  humidity: 45,
  windSpeed: 12,
  icon: '☀️',
  high: 28,
  low: 18
};

// 2. 定义天气数据数组
const forecast: WeatherData[] = [
  { city: '北京', temperature: 25, condition: '晴朗', humidity: 45, windSpeed: 12, icon: '☀️', high: 28, low: 18 },
  { city: '北京', temperature: 22, condition: '多云', humidity: 55, windSpeed: 15, icon: '⛅', high: 24, low: 16 },
  // ... 更多数据
];
接口的扩展:
typescript
// 基础接口
interface BaseWeather {
  temperature: number;
  condition: string;
  icon: string;
}

// 扩展接口
interface WeatherData extends BaseWeather {
  city: string;
  humidity: number;
  windSpeed: number;
  high: number;
  low: number;
  uvIndex?: number;  // 可选字段
  visibility?: number; // 可选字段
}
2. linearGradient - 渐变背景详解
linearGradient 属性用于创建线性渐变背景效果,是现代 UI 设计中常用的视觉效果。
基本语法:
typescript
.linearGradient({
  direction: GradientDirection.Bottom,  // 渐变方向
  colors: [
    [颜色值, 位置],  // 起始颜色和位置
    [颜色值, 位置],  // 中间颜色和位置
    [颜色值, 位置]   // 结束颜色和位置
  ]
})
渐变方向选项:
typescript
// 从左到右
direction: GradientDirection.Left

// 从右到左
direction: GradientDirection.Right

// 从上到下
direction: GradientDirection.Top

// 从下到上
direction: GradientDirection.Bottom
颜色位置说明:
- 位置值范围:0.0 到 1.0
- 0.0 表示起始位置
- 1.0 表示结束位置
- 0.5 表示中间位置
完整示例:
typescript
// 简单渐变(两种颜色)
Column() {
  Text('渐变背景')
}
.linearGradient({
  direction: GradientDirection.Bottom,
  colors: [['#667eea', 0.0], ['#764ba2', 1.0]]
})

// 复杂渐变(多种颜色)
Column() {
  Text('复杂渐变')
}
.linearGradient({
  direction: GradientDirection.Bottom,
  colors: [
    ['#667eea', 0.0],    // 起始颜色
    ['#764ba2', 0.3],    // 30%位置
    ['#f093fb', 0.6],    // 60%位置
    ['#f5576c', 1.0]     // 结束颜色
  ]
})

// 带透明度的渐变
Column() {
  Text('透明渐变')
}
.linearGradient({
  direction: GradientDirection.Bottom,
  colors: [
    ['rgba(102, 126, 234, 1)', 0.0],   // 完全不透明
    ['rgba(118, 75, 162, 0.5)', 1.0]   // 半透明
  ]
})
在天气应用中的应用:
typescript
// 天气卡片渐变背景
Column() {
  // 天气内容
}
.linearGradient({
  direction: GradientDirection.Bottom,
  colors: [['#667eea', 0.0], ['#764ba2', 1.0]]
})
.borderRadius(32)

// 整体页面渐变
Column() {
  // 页面内容
}
.linearGradient({
  direction: GradientDirection.Bottom,
  colors: [
    ['#667eea', 0.0],
    ['#764ba2', 0.4],
    ['#f5f7fa', 0.4]
  ]
})
3. Scroll 组件 - 滚动视图详解
Scroll 组件用于创建可滚动的容器,当内容超出屏幕时可以滚动查看。
基本用法:
typescript
Scroll() {
  Column() {
    // 超出屏幕的内容
    Text('内容1')
    Text('内容2')
    // ... 更多内容
  }
  .padding(16)
}
.layoutWeight(1)  // 占据剩余空间
核心属性:
typescript
Scroll() {
  // 内容
}
.width('100%')              // 宽度
.layoutWeight(1)            // 占据剩余空间
.scrollable(ScrollDirection.Vertical)  // 滚动方向
.edgeEffect(EdgeEffect.Spring)  // 边缘效果
.scrollBar(BarState.Auto)   // 滚动条显示
滚动方向:
typescript
// 垂直滚动(默认)
.scrollable(ScrollDirection.Vertical)

// 水平滚动
.scrollable(ScrollDirection.Horizontal)

// 双向滚动
.scrollable(ScrollDirection.Free)
边缘效果:
typescript
// 弹性效果(推荐)
.edgeEffect(EdgeEffect.Spring)

// 阴影效果
.edgeEffect(EdgeEffect.Fade)

// 无效果
.edgeEffect(EdgeEffect.None)
滚动条显示:
typescript
// 自动显示(推荐)
.scrollBar(BarState.Auto)

// 始终显示
.scrollBar(BarState.On)

// 始终隐藏
.scrollBar(BarState.Off)
在天气应用中的应用:
typescript
Scroll() {
  Column() {
    // 天气卡片
    this.WeatherCard()

    // 天气详情
    this.WeatherDetails()

    // 天气预报
    this.ForecastSection()
  }
  .padding(16)
}
.layoutWeight(1)
4. 模板字符串 - 字符串插值详解
使用反引号和 ${} 语法进行字符串插值,这是 ES6 引入的字符串语法。
基本语法:
typescript
const name = '张三';
const age = 25;

// 模板字符串
const message = `我的名字是${name},今年${age}岁`;

// 等价于
const message2 = '我的名字是' + name + ',今年' + age + '岁';
表达式插值:
typescript
const a = 10;
const b = 20;

// 插入表达式
const result = `${a} + ${b} = ${a + b}`;
// 结果:10 + 20 = 30

// 插入函数调用
const formatResult = `结果是:${Math.max(a, b)}`;
// 结果是:20
多行字符串:
typescript
const html = `
  <div>
    <h1>标题</h1>
    <p>内容</p>
  </div>
`;
在天气应用中的应用:
typescript
// 显示温度
Text(`${this.weather.temperature}°`)

// 显示最高最低温度
Text(`↑ ${this.weather.high}°  ↓ ${this.weather.low}°`)

// 显示湿度
Text(`${this.weather.humidity}%`)

// 显示风速
Text(`${this.weather.windSpeed} km/h`)
5. 多层渐变效果详解
可以为不同组件设置不同的渐变效果,实现层次感丰富的视觉效果。
设计理念:
- 背景使用渐变色
- 卡片使用半透明背景
- 文字使用高对比度颜色
实现示例:
typescript
Column() {
  // 头部区域(紫色渐变)
  Column() {
    Text('头部内容')
      .fontColor('#FFFFFF')
  }
  .linearGradient({
    direction: GradientDirection.Bottom,
    colors: [['#667eea', 0.0], ['#764ba2', 1.0]]
  })
  .padding(32)

  // 内容区域(白色背景)
  Column() {
    Text('内容区域')
  }
  .backgroundColor('#FFFFFF')
  .padding(16)
}
.linearGradient({
  direction: GradientDirection.Bottom,
  colors: [
    ['#667eea', 0.0],
    ['#764ba2', 0.4],
    ['#f5f7fa', 0.4]
  ]
})
在天气应用中的应用:
typescript
Column() {
  // 头部(城市名称)
  Row() {
    Text('北京')
      .fontColor('#FFFFFF')
  }
  .padding({ top: 32, bottom: 16 })

  // 滚动内容
  Scroll() {
    Column() {
      // 天气卡片(紫色渐变)
      Column() { ... }
        .linearGradient({
          direction: GradientDirection.Bottom,
          colors: [['#667eea', 0.0], ['#764ba2', 1.0]]
        })

      // 详情卡片(半透明白色)
      Column() { ... }
        .backgroundColor('rgba(255, 255, 255, 0.9)')

      // 预报卡片(半透明白色)
      Column() { ... }
        .backgroundColor('rgba(255, 255, 255, 0.9)')
    }
  }
}
.linearGradient({
  direction: GradientDirection.Bottom,
  colors: [
    ['#667eea', 0.0],
    ['#764ba2', 0.4],
    ['#f5f7fa', 0.4]
  ]
})
6. 分隔线效果详解
使用窄的 Column 或 Row 创建分隔线效果,用于分隔不同的内容区域。
垂直分隔线:
typescript
Column()
  .width(1)           // 宽度1像素
  .height(60)         // 高度60像素
  .backgroundColor('#E2E8F0')  // 颜色
水平分隔线:
typescript
Row()
  .width('100%')      // 宽度100%
  .height(1)          // 高度1像素
  .backgroundColor('#E2E8F0')  // 颜色
在天气应用中的应用:
typescript
Row() {
  // 湿度
  Column() {
    Text('💧')
    Text('45%')
    Text('湿度')
  }
  .layoutWeight(1)

  // 分隔线
  Column()
    .width(1)
    .height(60)
    .backgroundColor('#E2E8F0')

  // 风速
  Column() {
    Text('💨')
    Text('12 km/h')
    Text('风速')
  }
  .layoutWeight(1)

  // 分隔线
  Column()
    .width(1)
    .height(60)
    .backgroundColor('#E2E8F0')

  // 体感温度
  Column() {
    Text('🌡️')
    Text('23°')
    Text('体感')
  }
  .layoutWeight(1)
}
7. 圆形组件详解
通过设置相同的宽高和 borderRadius 为宽高的一半来创建圆形。
基本用法:
typescript
Column() {
  Text('圆形')
    .fontColor('#FFFFFF')
}
.width(100)
.height(100)
.borderRadius(50)  // 宽高的一半
.backgroundColor('#6366F1')
带边框的圆形:
typescript
Column() {
  Text('带边框')
}
.width(100)
.height(100)
.borderRadius(50)
.backgroundColor('#FFFFFF')
.border({
  width: 4,
  color: '#10B981'
})
在天气应用中的应用:
typescript
// 天气图标圆形背景
Column() {
  Text('☀️')
    .fontSize(48)
}
.width(120)
.height(120)
.borderRadius(60)
.backgroundColor('rgba(255, 255, 255, 0.2)')
8. 布局权重 - layoutWeight详解
layoutWeight 属性用于分配剩余空间,类似于 Android 的 layout_weight。
基本用法:
typescript
Row() {
  Column() { Text('1') }
    .layoutWeight(1)  // 占据1份

  Column() { Text('2') }
    .layoutWeight(1)  // 占据1份

  Column() { Text('3') }
    .layoutWeight(1)  // 占据1份
}
.width('100%')
不等权重:
typescript
Row() {
  Column() { Text('1份') }
    .layoutWeight(1)  // 占据1份

  Column() { Text('2份') }
    .layoutWeight(2)  // 占据2份

  Column() { Text('1份') }
    .layoutWeight(1)  // 占据1份
}
.width('100%')
在天气应用中的应用:
typescript
Row() {
  // 湿度
  Column() {
    Text('💧')
    Text('45%')
    Text('湿度')
  }
  .layoutWeight(1)  // 等分空间
  .alignItems(HorizontalAlign.Center)

  // 风速
  Column() {
    Text('💨')
    Text('12 km/h')
    Text('风速')
  }
  .layoutWeight(1)  // 等分空间
  .alignItems(HorizontalAlign.Center)

  // 体感温度
  Column() {
    Text('🌡️')
    Text('23°')
    Text('体感')
  }
  .layoutWeight(1)  // 等分空间
  .alignItems(HorizontalAlign.Center)
}
.width('100%')
9. 条件样式 - 三元运算符详解
使用三元运算符根据条件设置不同的样式,这是动态样式设置的常用方式。
基本语法:
typescript
// 条件 ? 值1 : 值2
const color = isActive ? '#6366F1' : '#9CA3AF';
在组件中的应用:
typescript
Text('文本')
  .fontColor(isActive ? '#6366F1' : '#9CA3AF')
  .fontWeight(isActive ? FontWeight.Bold : FontWeight.Normal)
  .backgroundColor(isActive ? '#E0E7FF' : '#F3F4F6')
在天气应用中的应用:
typescript
Text(index === 0 ? '今天' : `周${index + 1}`)
  .fontSize(16)
  .fontColor(index === 0 ? '#3B82F6' : '#64748B')
  .fontWeight(index === 0 ? FontWeight.Medium : FontWeight.Regular)
10. 数组遍历 - ForEach详解
ForEach 用于遍历数组并渲染列表项,是列表渲染的核心。
基本语法:
typescript
ForEach(
  array,           // 数据数组
  itemGenerator,   // 渲染函数
  keyGenerator     // 键生成函数
)
在天气应用中的应用:
typescript
ForEach(
  this.forecast,  // 预报数据数组
  (item: WeatherData, index: number) => {
    Row() {
      Text(index === 0 ? '今天' : `周${index + 1}`)
      Text(item.icon)
      Text(item.condition)
      Text(`${item.high}°`)
      Text(`${item.low}°`)
    }
  },
  (item: WeatherData, index: number) => index.toString()
)
完整代码解析
数据结构定义
typescript
// 定义天气数据结构
interface WeatherData {
  city: string;        // 城市
  temperature: number; // 温度
  condition: string;   // 天气状况
  humidity: number;    // 湿度
  windSpeed: number;   // 风速
  icon: string;        // 天气图标
  high: number;        // 最高温度
  low: number;         // 最低温度
}
页面组件定义
typescript
@Entry
@Component
struct Index {
  // 当前天气数据
  @State weather: WeatherData = {
    city: '北京',
    temperature: 25,
    condition: '晴朗',
    humidity: 45,
    windSpeed: 12,
    icon: '☀️',
    high: 28,
    low: 18
  };

  // 预报数据
  @State forecast: WeatherData[] = [
    { city: '北京', temperature: 25, condition: '晴朗', humidity: 45, windSpeed: 12, icon: '☀️', high: 28, low: 18 },
    { city: '北京', temperature: 22, condition: '多云', humidity: 55, windSpeed: 15, icon: '⛅', high: 24, low: 16 },
    { city: '北京', temperature: 18, condition: '小雨', humidity: 75, windSpeed: 20, icon: '🌧️', high: 20, low: 14 },
    { city: '北京', temperature: 20, condition: '阴天', humidity: 65, windSpeed: 10, icon: '☁️', high: 22, low: 15 },
    { city: '北京', temperature: 23, condition: '晴朗', humidity: 40, windSpeed: 8, icon: '☀️', high: 26, low: 17 }
  ];

  build() {
    Column() {
      // 头部区域
      this.HeaderSection()

      // 滚动内容
      Scroll() {
        Column() {
          // 天气卡片
          this.WeatherCard()

          // 天气详情
          this.WeatherDetails()

          // 天气预报
          this.ForecastSection()
        }
        .padding(16)
      }
      .layoutWeight(1)
    }
    .width('100%')
    .height('100%')
    .linearGradient({
      direction: GradientDirection.Bottom,
      colors: [
        ['#667eea', 0.0],
        ['#764ba2', 0.4],
        ['#f5f7fa', 0.4]
      ]
    })
  }
}
头部区域
typescript
@Builder HeaderSection() {
  Row() {
    Text(this.weather.city)
      .fontSize(20)
      .fontWeight(FontWeight.Bold)
      .fontColor('#FFFFFF')

    Text('▾')
      .fontSize(16)
      .fontColor('rgba(255, 255, 255, 0.8)')
      .margin({ left: 4 })
  }
  .padding({ top: 32, bottom: 16 })
}
天气卡片
typescript
@Builder WeatherCard() {
  Column() {
    // 天气图标
    Text(this.weather.icon)
      .fontSize(80)
      .margin({ bottom: 8 })

    // 温度
    Text(`${this.weather.temperature}°`)
      .fontSize(72)
      .fontWeight(FontWeight.Bold)
      .fontColor('#FFFFFF')

    // 天气状况
    Text(this.weather.condition)
      .fontSize(20)
      .fontColor('rgba(255, 255, 255, 0.8)')
      .margin({ top: 4 })

    // 最高/最低温度
    Row() {
      Text(`↑ ${this.weather.high}°`)
        .fontSize(16)
        .fontColor('#FFFFFF')

      Text(`↓ ${this.weather.low}°`)
        .fontSize(16)
        .fontColor('rgba(255, 255, 255, 0.7)')
        .margin({ left: 16 })
    }
    .margin({ top: 8 })
  }
  .width('100%')
  .padding(32)
  .linearGradient({
    direction: GradientDirection.Bottom,
    colors: [['#667eea', 0.0], ['#764ba2', 1.0]]
  })
  .borderRadius(32)
  .margin({ bottom: 24 })
}
天气详情
typescript
@Builder WeatherDetails() {
  Row() {
    // 湿度
    Column() {
      Text('💧')
        .fontSize(24)
        .margin({ bottom: 4 })

      Text(`${this.weather.humidity}%`)
        .fontSize(20)
        .fontWeight(FontWeight.Bold)
        .fontColor('#1E293B')

      Text('湿度')
        .fontSize(12)
        .fontColor('#64748B')
        .margin({ top: 4 })
    }
    .layoutWeight(1)
    .alignItems(HorizontalAlign.Center)

    // 分隔线
    Column()
      .width(1)
      .height(60)
      .backgroundColor('#E2E8F0')

    // 风速
    Column() {
      Text('💨')
        .fontSize(24)
        .margin({ bottom: 4 })

      Text(`${this.weather.windSpeed} km/h`)
        .fontSize(20)
        .fontWeight(FontWeight.Bold)
        .fontColor('#1E293B')

      Text('风速')
        .fontSize(12)
        .fontColor('#64748B')
        .margin({ top: 4 })
    }
    .layoutWeight(1)
    .alignItems(HorizontalAlign.Center)

    // 分隔线
    Column()
      .width(1)
      .height(60)
      .backgroundColor('#E2E8F0')

    // 体感温度
    Column() {
      Text('🌡️')
        .fontSize(24)
        .margin({ bottom: 4 })

      Text(`${this.weather.temperature - 2}°`)
        .fontSize(20)
        .fontWeight(FontWeight.Bold)
        .fontColor('#1E293B')

      Text('体感')
        .fontSize(12)
        .fontColor('#64748B')
        .margin({ top: 4 })
    }
    .layoutWeight(1)
    .alignItems(HorizontalAlign.Center)
  }
  .width('100%')
  .padding(24)
  .backgroundColor('rgba(255, 255, 255, 0.9)')
  .borderRadius(24)
  .margin({ bottom: 24 })
}
预报列表
typescript
@Builder ForecastSection() {
  Column() {
    Text('未来5天预报')
      .fontSize(20)
      .fontWeight(FontWeight.Bold)
      .fontColor('#1E293B')
      .width('100%')
      .margin({ bottom: 16 })

    ForEach(this.forecast, (item: WeatherData, index: number) => {
      Row() {
        Text(index === 0 ? '今天' : `周${index + 1}`)
          .fontSize(16)
          .fontColor(index === 0 ? '#3B82F6' : '#64748B')
          .fontWeight(index === 0 ? FontWeight.Medium : FontWeight.Regular)
          .width(60)

        Text(item.icon)
          .fontSize(28)
          .width(40)

        Text(item.condition)
          .fontSize(16)
          .fontColor('#1E293B')
          .layoutWeight(1)

        Text(`${item.high}°`)
          .fontSize(16)
          .fontWeight(FontWeight.Medium)
          .fontColor('#1E293B')
          .width(40)
          .textAlign(TextAlign.End)

        Text(`${item.low}°`)
          .fontSize(16)
          .fontColor('#64748B')
          .width(40)
          .textAlign(TextAlign.End)
      }
      .width('100%')
      .padding({ top: 16, bottom: 16 })
      .border({
        width: { bottom: index < this.forecast.length - 1 ? 1 : 0 },
        color: '#E2E8F0'
      })
    }, (item: WeatherData, index: number) => index.toString())
  }
  .width('100%')
  .padding(24)
  .backgroundColor('rgba(255, 255, 255, 0.9)')
  .borderRadius(24)
}
常见问题与解决方案
问题1:渐变背景不生效
问题描述:设置渐变背景后没有效果。
解决方案:
typescript
// 确保使用 linearGradient 而不是 backgroundLinearGradient
.linearGradient({
  direction: GradientDirection.Bottom,
  colors: [['#667eea', 0.0], ['#764ba2', 1.0]]
})
问题2:滚动内容被截断
问题描述:滚动内容底部被截断。
解决方案:
typescript
Scroll() {
  Column() {
    // 内容
  }
  .padding({ bottom: 32 })  // 增加底部内边距
}
.layoutWeight(1)
问题3:半透明背景文字不清晰
问题描述:半透明背景上的文字不够清晰。
解决方案:
typescript
Text('文字')
  .fontColor('#1E293B')  // 使用深色文字
  .fontWeight(FontWeight.Bold)  // 增加字体粗细
扩展学习
1. 添加更多功能
- 实时天气数据获取
- 多城市管理
- 天气预警提醒
- 空气质量显示
2. 优化用户体验
- 天气动画效果
- 下拉刷新
- 滑动切换城市
- 夜间模式
3. 数据可视化
- 温度折线图
- 降水概率图
- 风向风速图
总结
通过本教程,你学习了:
- interface - 接口定义复杂数据结构
- linearGradient - 线性渐变背景
- Scroll - 滚动视图
- 模板字符串 - 字符串插值
- 多层渐变 - 层次感设计
- 分隔线 - 布局分隔
- 圆形组件 - borderRadius 创建圆形
- layoutWeight - 布局权重分配
- 条件样式 - 三元运算符设置样式
- ForEach - 数组遍历和渲染
这些知识点构成了 HarmonyOS NEXT 中数据展示类应用开发的基础,掌握它们后,你将能够构建更复杂的天气、新闻、股票等数据展示应用。