PomodoroApp 番茄钟应用开发教程
项目介绍
项目背景
番茄钟(Pomodoro Technique)是一种时间管理方法,由弗朗西斯科·西里洛于20世纪80年代发明。这种方法使用一个定时器来分割出一个一般为25分钟的工作时间和5分钟的休息时间,以帮助人们保持专注和提高工作效率。
本教程将指导您使用 HarmonyOS NEXT 和 ArkTS 语言开发一个功能完整的番茄钟应用,帮助用户实践番茄工作法,提高工作效率。
应用场景
- 学生学习:帮助学生保持专注,提高学习效率
- 程序员开发:避免长时间编码导致的疲劳,保持思维清晰
- 写作创作:帮助作家保持写作节奏,避免拖延
- 日常工作:提高办公室工作效率,合理安排休息时间
功能特性
-
三种计时模式:
- 专注模式(默认25分钟)
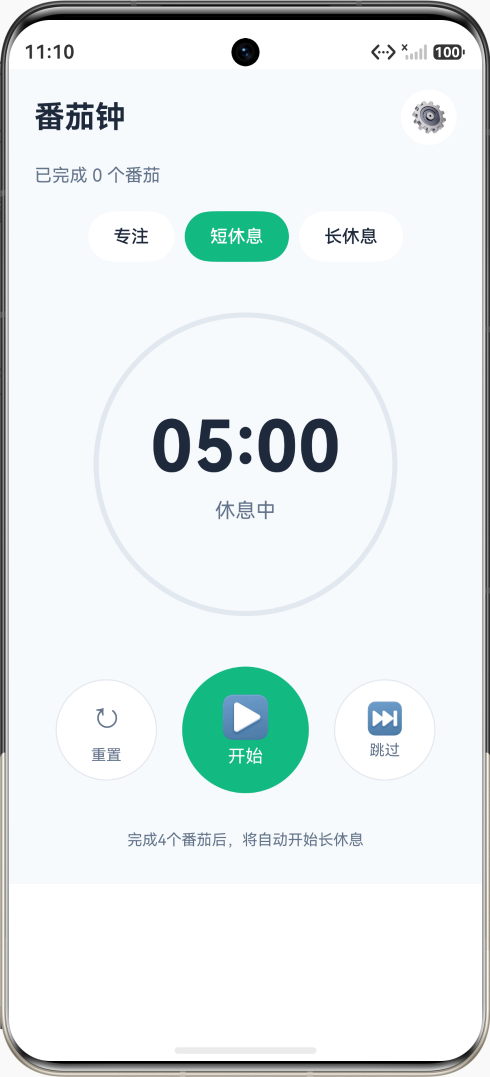
- 短休息模式(默认5分钟)
- 长休息模式(默认15分钟)
-
智能模式切换:
- 自动统计已完成的番茄数
- 每完成4个番茄后自动进入长休息
- 休息结束后自动切换回专注模式
-
直观的进度显示:
- 圆形进度条显示剩余时间
- 大字体时间显示
- 当前模式状态提示
-
灵活的控制功能:
- 开始/暂停计时
- 重置当前计时
- 跳过当前阶段
-
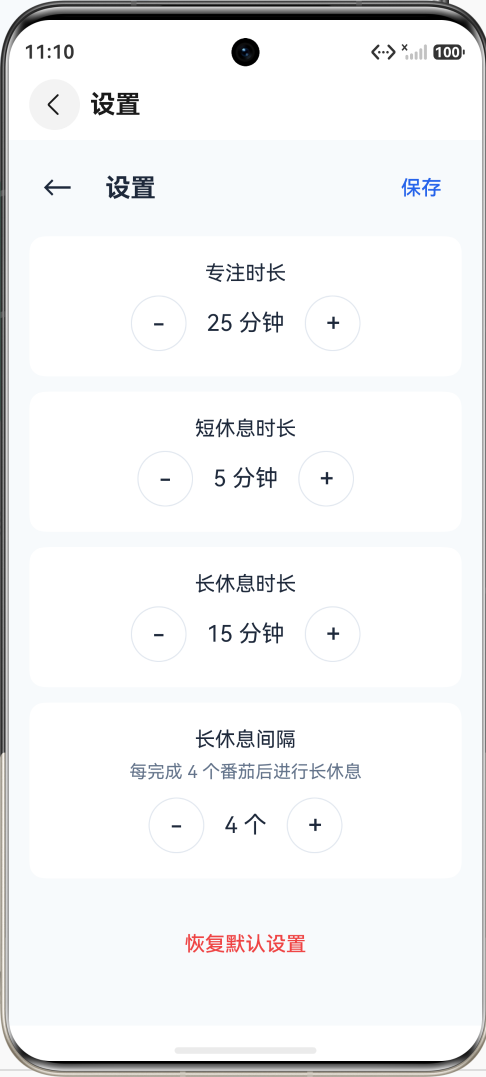
个性化设置:
- 自定义专注时长(1-60分钟)
- 自定义短休息时长(1-30分钟)
- 自定义长休息时长(1-60分钟)
- 自定义长休息间隔(2-10个番茄)
最终效果
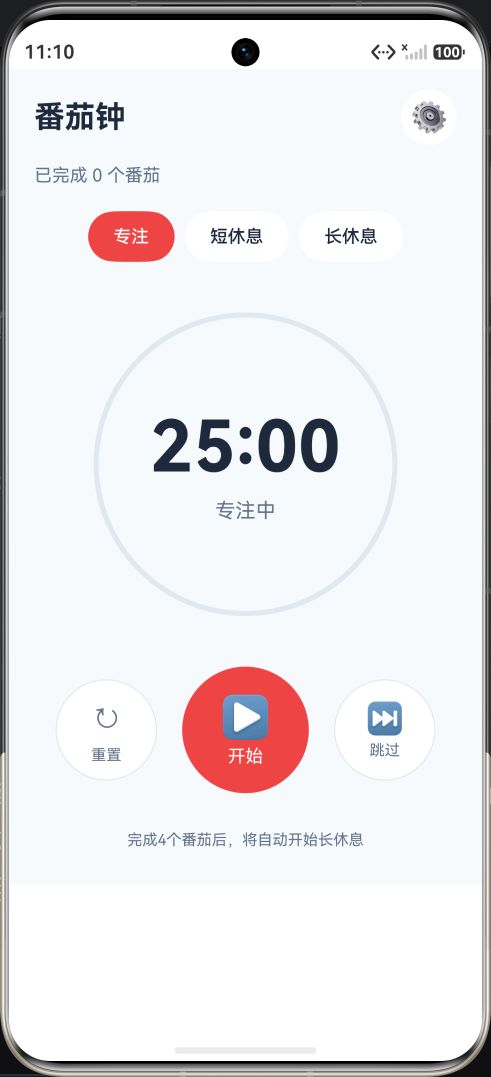
应用采用现代简洁的设计风格,主界面包含:
- 顶部标题栏和设置入口
- 会话统计信息
- 模式选择按钮
- 大型圆形进度计时器
- 控制按钮组
- 底部提示信息
技术栈
- 开发框架:HarmonyOS NEXT (API 20+)
- 编程语言:ArkTS (Stage 模型)
- UI框架:ArkUI 声明式 UI
- 开发工具:DevEco Studio
- 构建工具:hvigor
知识点讲解
1. ArkTS 基础语法
ArkTS 是 HarmonyOS NEXT 的应用开发语言,基于 TypeScript 语法,增加了声明式 UI 和状态管理等特性。
基础类型:
typescript
// 数字类型
let count: number = 0
let duration: number = 25

// 字符串类型
let message: string = 'Hello'
let mode: string = 'work'

// 布尔类型
let isRunning: boolean = false

// 数组类型
let numbers: number[] = [1, 2, 3]
let names: Array<string> = ['Alice', 'Bob']接口定义:
typescript
interface TimerConfig {
  workDuration: number
  shortBreakDuration: number
  longBreakDuration: number
  sessionsBeforeLongBreak: number
}
2. 装饰器(Decorators)
HarmonyOS NEXT 使用装饰器来声明组件和状态管理。
@Entry 装饰器:
typescript
@Entry
@Component
struct MyComponent {
  build() {
    // 组件内容
  }
}
@Component 装饰器:
typescript
@Component
struct MyComponent {
  // 组件实现
}
@State 装饰器:
typescript
@Component
struct MyComponent {
  @State message: string = 'Hello'
  @State count: number = 0
  @State isVisible: boolean = true
}
3. 声明式 UI 语法
ArkUI 使用声明式语法构建用户界面。
基础组件:
typescript
// 文本组件
Text('Hello World')
  .fontSize(24)
  .fontWeight(FontWeight.Bold)
  .fontColor('#333333')

// 按钮组件
Button('点击我')
  .width(120)
  .height(44)
  .backgroundColor('#007DFF')
  .borderRadius(8)
  .onClick(() => {
    console.log('Button clicked')
  })

// 图片组件
Image($r('app.media.icon'))
  .width(100)
  .height(100)
.borderRadius(50)布局容器:
typescript
// 垂直布局
Column() {
  Text('第一行')
  Text('第二行')
  Text('第三行')
}
.width('100%')
.height('100%')
.justifyContent(FlexAlign.Center)

// 水平布局
Row() {
  Text('左侧')
  Text('中间')
  Text('右侧')
}
.width('100%')
.justifyContent(FlexAlign.SpaceBetween)

// 层叠布局
Stack() {
  // 背景层
  Image($r('app.media.background'))
    .width('100%')
    .height('100%')

  // 内容层
  Text('覆盖内容')
    .fontSize(24)
}
.width('100%')
.height(300)
4. 状态管理
状态管理是声明式 UI 的核心,当状态变化时,UI 会自动更新。
@State 状态:
typescript
@Component
struct Counter {
  @State count: number = 0

  build() {
    Column() {
      Text(`计数: ${this.count}`)
        .fontSize(24)

      Button('增加')
        .onClick(() => {
          this.count++  // 状态变化,UI 自动更新
        })
    }
  }
}状态绑定:
typescript
@Component
struct ToggleExample {
  @State isVisible: boolean = true

  build() {
    Column() {
      if (this.isVisible) {
        Text('我会显示/隐藏')
          .fontSize(20)
      }

      Button(this.isVisible ? '隐藏' : '显示')
        .onClick(() => {
          this.isVisible = !this.isVisible
        })
    }
  }
}
5. 定时器使用
番茄钟的核心是定时器功能,使用 setInterval 和 clearInterval。
setInterval 定时器:
typescript
@Component
struct Timer {
  @State seconds: number = 0
  private timerId: number = -1

  startTimer() {
    this.timerId = setInterval(() => {
      this.seconds++
      console.log(`已过 ${this.seconds} 秒`)
    }, 1000)
  }

  stopTimer() {
    if (this.timerId !== -1) {
      clearInterval(this.timerId)
      this.timerId = -1
    }
  }

  resetTimer() {
    this.stopTimer()
    this.seconds = 0
  }
}
6. 条件渲染
根据条件显示不同的 UI 内容。
if/else 渲染:
typescript
@Component
struct ConditionalRender {
  @State isLoggedIn: boolean = false

  build() {
    Column() {
      if (this.isLoggedIn) {
        Text('欢迎回来!')
          .fontSize(24)
        Button('退出登录')
          .onClick(() => {
            this.isLoggedIn = false
          })
      } else {
        Text('请登录')
          .fontSize(24)
        Button('登录')
          .onClick(() => {
            this.isLoggedIn = true
          })
      }
    }
  }
}三元运算符:
typescript
@Component
struct TernaryExample {
  @State isRunning: boolean = false

  build() {
    Column() {
      Button(this.isRunning ? '暂停' : '开始')
        .backgroundColor(this.isRunning ? '#FF0000' : '#00FF00')
        .onClick(() => {
          this.isRunning = !this.isRunning
        })
    }
  }
}
7. 事件处理
处理用户交互事件。
点击事件:
typescript
@Component
struct ClickHandler {
  @State message: string = '等待点击'

  build() {
    Column() {
      Text(this.message)
        .fontSize(24)

      Button('点击我')
        .onClick(() => {
          this.message = '已点击!'
        })

      // 带参数的点击事件
      Button('传递参数')
        .onClick(() => {
          this.handleButtonClick('参数值')
        })
    }
  }

  handleButtonClick(param: string) {
    console.log(`收到参数: ${param}`)
  }
}
8. 样式和布局
设置组件的样式和布局属性。
尺寸设置:
typescript
Text('固定尺寸')
  .width(200)
  .height(100)

Text('百分比尺寸')
  .width('80%')
  .height('50%')

Text('自适应尺寸')
  .width('auto')
.height('auto')间距设置:
typescript
Text('外边距')
  .margin({ top: 10, right: 20, bottom: 10, left: 20 })

Text('内边距')
  .padding(16)

Text('单独设置')
  .margin({ top: 10 })
.padding({ left: 16, right: 16 })边框和圆角:
typescript
Text('带边框')
  .borderWidth(2)
  .borderColor('#000000')
  .borderRadius(8)

Text('圆形')
  .width(100)
  .height(100)
  .borderRadius(50)
  .backgroundColor('#007DFF')
9. 渐变效果
使用线性渐变增强视觉效果。
线性渐变:
typescript
Column() {
  Text('渐变背景')
    .fontSize(24)
    .fontColor('#FFFFFF')
}
.width('100%')
.height(200)
.linearGradient({
  direction: GradientDirection.Bottom,
  colors: [['#FF6B6B', 0.0], ['#4ECDC4', 1.0]]
})径向渐变:
typescript
Circle()
  .width(200)
  .height(200)
  .fill('transparent')
  .linearGradient({
    direction: GradientDirection.Bottom,
    colors: [['#FF6B6B', 0.0], ['#4ECDC4', 1.0]]
  })
10. 组件生命周期
了解组件的生命周期方法。
生命周期方法:
typescript
@Component
struct LifecycleExample {
  @State data: string = ''

  aboutToAppear() {
    // 组件即将出现时调用
    console.log('组件即将出现')
    this.loadData()
  }

  aboutToDisappear() {
    // 组件即将消失时调用
    console.log('组件即将消失')
    this.cleanup()
  }

  build() {
    Column() {
      Text(this.data)
    }
  }

  loadData() {
    // 加载数据
    this.data = '已加载数据'
  }

  cleanup() {
    // 清理资源
    console.log('清理资源')
  }
}
完整代码解析
页面结构设计
番茄钟应用采用单页面设计,主要分为以下几个区域:
- 顶部区域:标题栏和设置按钮
- 统计区域:显示已完成的番茄数量
- 模式选择区域:专注、短休息、长休息三个模式按钮
- 计时器区域:圆形进度条和时间显示
- 控制区域:重置、开始/暂停、跳过三个控制按钮
- 提示区域:底部使用提示
主页面代码结构
typescript
@Entry
@Component
struct PomodoroTimer {
  // 状态变量
  @State isRunning: boolean = false
  @State timeLeft: number = 25 * 60
  @State totalTime: number = 25 * 60
  @State currentMode: string = 'work'
  @State sessionsCompleted: number = 0

  // 颜色配置
  private readonly colors = { ... }

  // 方法实现
  private formatTime(seconds: number): string { ... }
  private getProgress(): number { ... }
  private toggleTimer() { ... }
  private startTimer() { ... }
  private pauseTimer() { ... }
  private resetTimer() { ... }
  private switchMode(mode: string) { ... }

  // UI 构建
  build() {
    Column() {
      // 顶部标题栏
      Row() { ... }

      // 会话统计
      Row() { ... }

      // 模式选择
      Row() { ... }

      // 计时器显示
      Stack() { ... }

      // 控制按钮
      Row() { ... }

      // 底部提示
      Text(...)
    }
  }
}
核心方法实现
时间格式化:
typescript
private formatTime(seconds: number): string {
  const mins = Math.floor(seconds / 60)
  const secs = seconds % 60
  return `${mins.toString().padStart(2, '0')}:${secs.toString().padStart(2, '0')}`
}进度计算:
typescript
private getProgress(): number {
  return (this.totalTime - this.timeLeft) / this.totalTime
}计时器控制:
typescript
private toggleTimer() {
  if (this.isRunning) {
    this.pauseTimer()
  } else {
    this.startTimer()
  }
}

private startTimer() {
  this.isRunning = true
  this.timerId = setInterval(() => {
    if (this.timeLeft > 0) {
      this.timeLeft--
    } else {
      this.onTimerComplete()
    }
  }, 1000)
}

private pauseTimer() {
  this.isRunning = false
  if (this.timerId !== -1) {
    clearInterval(this.timerId)
    this.timerId = -1
  }
}模式切换:
typescript
private switchMode(mode: string) {
  this.currentMode = mode
  let duration = 25

  if (mode === 'work') {
    duration = this.workDuration
  } else if (mode === 'shortBreak') {
    duration = this.shortBreakDuration
  } else {
    duration = this.longBreakDuration
  }

  this.totalTime = duration * 60
  this.timeLeft = this.totalTime
}
常见问题与解决方案
1. 定时器不准确
问题描述:定时器运行一段时间后,时间显示不准确。
原因分析 :JavaScript 的 setInterval 并不是完全精确的,可能会有延迟。
解决方案:
typescript
private startTimer() {
  this.isRunning = true
  const startTime = Date.now()
  const expectedTime = this.timeLeft

  this.timerId = setInterval(() => {
    const elapsed = Math.floor((Date.now() - startTime) / 1000)
    const newTimeLeft = expectedTime - elapsed

    if (newTimeLeft > 0) {
      this.timeLeft = newTimeLeft
    } else {
      this.timeLeft = 0
      this.onTimerComplete()
    }
  }, 1000)
}
2. 组件销毁后定时器仍在运行
问题描述:退出页面后,定时器仍在后台运行。
原因分析:没有在组件销毁时清除定时器。
解决方案:
typescript
aboutToDisappear() {
  // 组件销毁时清除定时器
  if (this.timerId !== -1) {
    clearInterval(this.timerId)
    this.timerId = -1
  }
}
3. 状态更新后 UI 不刷新
问题描述:修改状态变量后,界面没有更新。
原因分析 :可能没有正确使用 @State 装饰器。
解决方案:
typescript
// 正确使用 @State
@State timeLeft: number = 25 * 60

// 修改状态时直接赋值
this.timeLeft = newValue

// 对于数组,使用展开运算符
this.items = [...this.items, newItem]

// 对于对象,使用 Object.assign
this.config = { ...this.config, newValue }
扩展学习
可添加功能
-
声音提醒:
- 使用
@ohos.multimedia.audio播放提示音 - 在计时完成时播放不同的音效
- 使用
-
震动反馈:
- 使用
@ohos.vibrator添加震动反馈 - 在重要状态变化时提供触觉反馈
- 使用
-
数据统计:
- 记录每天完成的番茄数量
- 使用图表展示历史数据
- 计算专注效率和趋势
-
任务管理:
- 为每个番茄关联具体任务
- 记录任务完成情况
- 提供任务列表管理功能
-
主题切换:
- 支持深色/浅色主题
- 自定义颜色方案
- 根据时间自动切换主题
优化建议
-
性能优化:
- 使用
LazyForEach优化长列表 - 避免在
build方法中进行复杂计算 - 使用
@Watch装饰器监听状态变化
- 使用
-
用户体验:
- 添加动画效果,提升交互体验
- 支持手势操作,如滑动切换模式
- 提供使用引导和帮助信息
-
代码规范:
- 使用接口定义数据结构
- 提取常量到配置文件
- 编写单元测试确保代码质量
-
国际化支持:
- 使用资源文件管理字符串
- 支持多语言切换
- 考虑不同地区的显示习惯
总结
通过本教程,您已经学会了:
- HarmonyOS NEXT 基础:项目结构、配置文件、页面路由
- ArkTS 语法:装饰器、状态管理、事件处理
- ArkUI 组件:Text、Button、Column、Row、Stack 等
- 定时器实现:setInterval、clearInterval 的使用
- 状态管理:@State 装饰器的使用和状态更新
- UI 设计:布局、样式、渐变效果
番茄钟应用虽然功能简单,但涵盖了 HarmonyOS NEXT 开发的多个核心知识点。您可以基于这个项目继续扩展功能,开发更复杂的应用。
下一步学习建议:
- 学习 Navigation 组件实现多页面导航
- 学习数据持久化存储用户设置
- 学习通知和后台任务功能
- 学习网络请求和数据同步