创建 uni-app 项目
uni-app 支持两种方式创建项目:
- 通过 HBuilderX 创建(需安装 HBuilderX 编辑器)
- 通过命令行创建(需安装 NodeJS 环境)
HBuilderX 创建 uni-app 项目
- 下载安装 HbuilderX 编辑器
- 通过 HbuilderX 创建 uni-app vue3 项目
- 安装 uni-app vue3 编译器插件
- 编译成微信小程序端代码
- 开启服务端口
HBuildeX 和 微信开发者工具 关系

pages.json 和 tabBar 案例
目录结构
├─pages 业务页面文件存放的目录
│ └─index
│ └─index.vue index页面
├─static 存放应用引用的本地静态资源的目录(注意:静态资源只能存放于此)
├─unpackage 非工程代码,一般存放运行或发行的编译结果
├─index.html H5端页面
├─main.js Vue初始化入口文件
├─App.vue 配置App全局样式、监听应用生命周期
├─pages.json 配置页面路由、导航栏、tabBar等页面类信息
├─manifest.json 配置appid 、应用名称、logo、版本等打包信息
└─uni.scss uni-app内置的常用样式变量
pages.json
用于配置页面路由、导航栏、tabBar 等页面类信息
{
  // 页面路由
  "pages": [
    {
      "path": "pages/index/index",
      // 页面样式配置
      "style": {
        "navigationBarTitleText": "首页"
      }
    },
    {
      "path": "pages/my/my",
      "style": {
        "navigationBarTitleText": "我的"
      }
    }
  ],
  // 全局样式配置
  "globalStyle": {
    "navigationBarTextStyle": "white",
    "navigationBarTitleText": "uni-app",
    "navigationBarBackgroundColor": "#27BA9B",
    "backgroundColor": "#F8F8F8"
  },
  // tabBar 配置
  // 至少两个才显示
  "tabBar": {
    "selectedColor": "#27BA9B",
    "list": [
      {
        "pagePath": "pages/index/index",
        "text": "首页",
        "iconPath": "static/tabs/home_default.png",
        "selectedIconPath": "static/tabs/home_selected.png"
      },
      {
        "pagePath": "pages/my/my",
        "text": "我的",
        "iconPath": "static/tabs/user_default.png",
        "selectedIconPath": "static/tabs/user_selected.png"
      }
    ]
  }
}
uni-app 和原生小程序开发区别
uni-app 项目每个页面是一个 .vue 文件,数据绑定及事件处理同 Vue.js 规范:
开发区别
- 属性绑定
src="{ { url }}"升级成:src="url" - 事件绑定
bindtap="eventName"升级成@tap="eventName",支持()传参 - 支持 Vue 常用指令
v-for、v-if、v-show、v-model等
其他区别补充
-
调用接口能力,建议前缀
wx替换为uni,养成好习惯,支持多端开发。 -
<style>页面样式不需要写scoped,小程序是多页面应用,页面样式自动隔离。 -
生命周期分三部分:应用生命周期(小程序),页面生命周期(小程序),组件生命周期(Vue)
命令行创建 uni-app 项目
通过命令行创建 uni-app 项目,不必依赖 HBuilderX,TypeScript 类型支持友好。
命令行创建 uni-app 项目:
vue3 + ts 版
# 通过 npx 从 github 下载
npx degit dcloudio/uni-preset-vue#vite-ts 项目名称

# 通过 git 从 gitee 克隆下载
git clone -b vite-ts https://gitee.com/dcloud/uni-preset-vue.git
编译和运行 uni-app 项目
- 安装依赖
pnpm install - 编译成微信小程序
pnpm dev:mp-weixin - 导入微信开发者工具
用 VS Code 开发 uni-app 项目
VS Code 对 TS 类型支持友好 ,前端开发者主流的编辑器
项目采用 Vue3 + TS 开发 uni-app 项目,所以需要分别安装 Vue3 + TS 插件 和 uni-app 插件
- TS 类型校验
- 安装最新版本 类型声明文件
pnpm i -D miniprogram-api-typings@latest @uni-helper/uni-app-types@latest - 配置
tsconfig.json
- 安装最新版本 类型声明文件
- JSON 注释问题
- 设置文件关联,把
manifest.json和pages.json设置为jsonc
- 设置文件关联,把
tsconfig.json 参考
// tsconfig.json

{

  "extends": "@vue/tsconfig/tsconfig.json",

  "compilerOptions": {

    "importsNotUsedAsValues": "remove",

     "preserveValueImports": false,

    "sourceMap": true,

    "baseUrl": ".",

    "skipLibCheck": true,

    "verbatimModuleSyntax": true,

    "ignoreDeprecations": "6.0",

    "paths": {

      "@/*": ["./src/*"]

    },

    "lib": ["esnext", "dom"],

    // 类型声明文件

    "types": [

      "@dcloudio/types", // uni-app API 类型

      "miniprogram-api-typings", // 原生微信小程序类型

      "@uni-helper/uni-app-types" // uni-app 组件类型

    ]

  },

  // vue 编译器类型,校验标签类型

  "vueCompilerOptions": {

    // 原配置 experimentalRuntimeMode 已废弃,请升级 Vue - Official 插件至最新版本

    "plugins": ["@uni-helper/uni-app-types/volar-plugin"]

  },

  "include": ["src/**/*.ts", "src/**/*.d.ts", "src/**/*.tsx", "src/**/*.vue"]

}
对于报错

反其道而行之,将其全部写上即可
项目架构
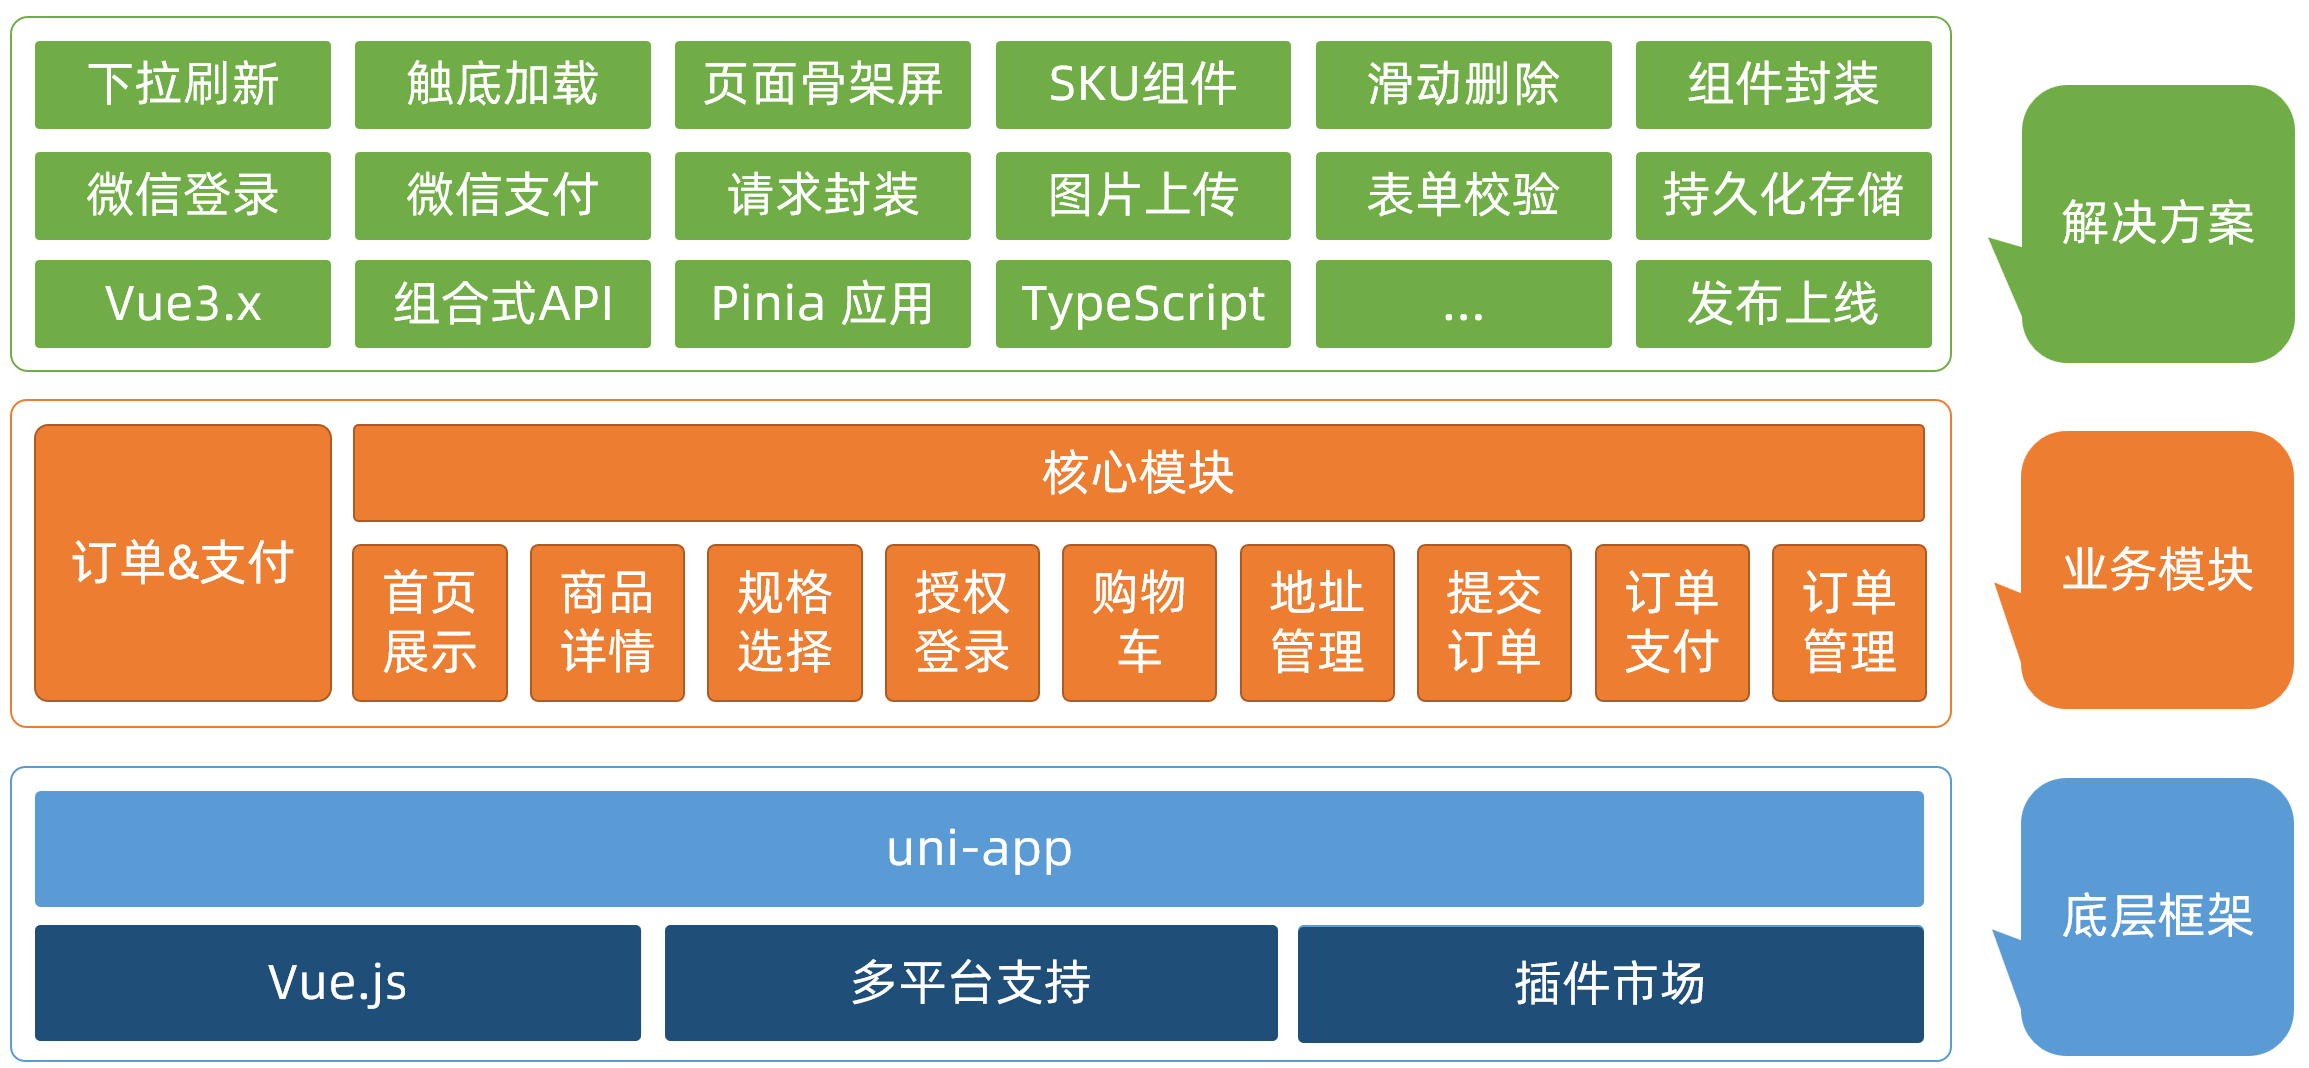
拉取项目模板代码
项目模板包含:目录结构,项目素材,代码风格
git clone -b template https://gitee.com/heima-fe/uniapp-shop-vue3-ts.git heima-shopps:小程序真机预览需在 manifest.json 中添加微信小程序的 appid
重复下面步骤
uni-app 基础 > 编译和运行 uni-app 项目
引入 uni-ui 组件库
操作步骤
安装 uni-ui 组件库
pnpm i @dcloudio/uni-ui配置自动导入组件
// pages.json
{
  // 组件自动导入
  "easycom": {
    "autoscan": true,
    "custom": {
      // uni-ui 规则如下配置
      "^uni-(.*)": "@dcloudio/uni-ui/lib/uni-$1/uni-$1.vue"
    }
  },
  "pages": [
    // ...省略
  ]
}重新pnpm dev:mp-weixin
小程序端 Pinia 持久化
Pinia 用法与 Vue3 项目完全一致,uni-app 项目仅需解决持久化插件兼容性问题
持久化存储插件
安装持久化存储插件: pinia-plugin-persistedstate
pnpm i pinia-plugin-persistedstate插件默认使用 localStorage 实现持久化,小程序端不兼容,需要替换持久化 API。
stores/modules/member.ts
import { defineStore } from 'pinia'
import { ref } from 'vue'

// 定义 Store
export const useMemberStore = defineStore(
  'member',
  () => {
    // 会员信息
    const profile = ref<any>()

    // 保存会员信息,登录时使用
    const setProfile = (val: any) => {
      profile.value = val
    }

    // 清理会员信息,退出时使用
    const clearProfile = () => {
      profile.value = undefined
    }

    // 记得 return
    return {
      profile,
      setProfile,
      clearProfile,
    }
  },
  // TODO: 持久化
  {
    persist: true,
  },
)
多端兼容
网页端持久化 API
// 网页端API
localStorage.setItem()
localStorage.getItem()
多端持久化 API
// 兼容多端API
uni.setStorageSync()
uni.getStorageSync()

// stores/modules/member.ts
export const useMemberStore = defineStore(
  'member',
  () => {
    //...省略
  },
  {
    // 配置持久化
    persist: {
      // 调整为兼容多端的API
      storage: {
        setItem(key, value) {
          uni.setStorageSync(key, value)
        },
        getItem(key) {
          return uni.getStorageSync(key)
        },
      },
    },
  },
)具体参考官方文档:Pinia Plugin Persistedstate
uni.request 请求封装
请求和上传文件拦截器
uniapp 拦截器 : uni.addInterceptor
接口说明 :接口文档
实现需求
-
拼接基础地址
-
设置超时时间
-
添加请求头标识
-
添加 token
// src/utils/http.ts
import { useMemberStore } from '@/stores'
// 请求基地址
const baseURL = 'https://pcapi-xiaotuxian-front-devtest.itheima.net'// 拦截器配置
const httpInterceptor = {
// 拦截前触发
invoke(options: UniApp.RequestOptions) {
// 1. 非 http 开头需拼接地址
if (!options.url.startsWith('http')) {
options.url = baseURL + options.url
}
// 2. 请求超时
options.timeout = 10000
// 3. 添加小程序端请求头标识
options.header = {
'source-client': 'miniapp',
...options.header,
}
// 4. 添加 token 请求头标识
const memberStore = useMemberStore()
const token = memberStore.profile?.token
if (token) {
// Authorization是header里面的固定字段
options.header.Authorization = token
}
},
}// 拦截 request 请求
uni.addInterceptor('request', httpInterceptor)
// 拦截 uploadFile 文件上传
uni.addInterceptor('uploadFile', httpInterceptor)
封装 Promise 请求函数
实现需求
-
返回 Promise 对象,用于处理返回值类型
-
成功 resolve
- 提取数据
- 添加泛型
-
失败 reject
- 401 错误
- 其他错误
- 网络错误
/**
- 请求函数
- @param UniApp.RequestOptions
- @returns Promise
-
- 返回 Promise 对象,用于处理返回值类型
-
- 获取数据成功
- 2.1 提取核心数据 res.data
- 2.2 添加类型,支持泛型
-
- 获取数据失败
- 3.1 401错误 -> 清理用户信息,跳转到登录页
- 3.2 其他错误 -> 根据后端错误信息轻提示
- 3.3 网络错误 -> 提示用户换网络
*/
type Data= {
code: string
msg: string
result: T
}
// 2.2 添加类型,支持泛型
export const http =(options: UniApp.RequestOptions) => {
// 1. 返回 Promise 对象
return new Promise<Data>((resolve, reject) => {
uni.request({
...options,
// 响应成功
success(res) {
// 状态码 2xx,参考 axios 的设计
if (res.statusCode >= 200 && res.statusCode < 300) {
// 2.1 提取核心数据 res.data
resolve(res.data as Data)
} else if (res.statusCode === 401) {
// 401错误 -> 清理用户信息,跳转到登录页
const memberStore = useMemberStore()
memberStore.clearProfile()
uni.navigateTo({ url: '/pages/login/login' })
reject(res)
} else {
// 其他错误 -> 根据后端错误信息轻提示
uni.showToast({
icon: 'none',
title: (res.data as Data).msg || '请求错误',
})
reject(res)
}
},
// 响应失败
fail(err) {
uni.showToast({
icon: 'none',
title: '网络错误,换个网络试试',
})
reject(err)
},
})
})
}
问题
-
为什么要封装promise函数?
uni.request是回调式API,如果有多个请求,会形成回调地狱,promise可以拯救回调地狱,用.then调用,不用嵌套回调request('/user') .then(user => request('/orders?userId=' + user.id)) .then(orders => request('/orderDetail?id=' + orders[0].id)) .then(detail => { // 拿到 detail }) .catch(err => { // 统一处理任何一步的错误 }) -
怎么转?用
new Promisenew Promise是一个"转换器"。它接收一个函数,这个函数会被立即执行,并且它给你两个道具:resolve和reject然后我们把
uni.request放在这个函数里,用它的回调来触发resolve或rejectfunction request(options) { // 返回一个Promise,这样外面才能 .then / await return new Promise((resolve, reject) => { uni.request({ ...options, success(res) { // 网络请求成功(收到响应) if (res.statusCode === 200) { resolve(res.data); // 业务成功,数据传递出去 } else { reject(res); // 业务失败,错误传递出去 } }, fail(err) { reject(err); // 网络失败,错误传递出去 } }) }) } -
为什么外面不能用
async/await直接调uni.request?因为
await只能等 Promise 。如果uni.request不返回 Promise,你写await uni.request(...)毫无意义,它返回undefined -
resolve或reject是什么?可以看作return
-
showToast是什么
uni.showToast是 uni-app 提供的一个 显示消息提示框 的 API,效果类似安卓/苹果手机顶部或中间弹出的短暂提示uni.showToast({ title: '网络错误,换个网络试试', icon: 'none', // 图标:success、error、none、loading duration: 2000 // 显示时长,单位毫秒,默认1500 }) -
什么时候用try,catch,then等
.then().catch()------ 直接处理 Promisetry/catch------ 在async函数里配合await使用
它们本质上都是捕获 Promise 的 reject,不能混着用 ,但可以二选一- 当你用
async/await时 ,就一定要用try/catch(或者让错误冒泡到上层去处理)。因为await后面的表达式如果 Promise 被 reject,就会抛出异常 ,try/catch可以接住 - 当你直接拿到一个 Promise 不打算
await它 (例如在 Vue 的methods里不想用async),或者你想链式调用多个 Promise 时
- 当你用
自定义导航栏
操作步骤
- 准备组件静态结构
- 修改页面配置,隐藏默认导航栏,修改文字颜色
- 样式适配 -> 安全区域
静态结构
新建业务组件:src/pages/index/components/CustomNavbar.vue
<script setup lang="ts">
//
</script>

<template>
  <view class="navbar">
    <!-- logo文字 -->
    <view class="logo">
      <image class="logo-image" src="@/static/images/logo.png"></image>
      <text class="logo-text">新鲜 · 亲民 · 快捷</text>
    </view>
    <!-- 搜索条 -->
    <view class="search">
      <text class="icon-search">搜索商品</text>
      <text class="icon-scan"></text>
    </view>
  </view>
</template>

<style lang="scss">
/* 自定义导航条 */
.navbar {
  background-image: url(@/static/images/navigator_bg.png);
  background-size: cover;
  position: relative;
  display: flex;
  flex-direction: column;
  padding-top: 20px;
  .logo {
    display: flex;
    align-items: center;
    height: 64rpx;
    padding-left: 30rpx;
    padding-top: 20rpx;
    .logo-image {
      width: 166rpx;
      height: 39rpx;
    }
    .logo-text {
      flex: 1;
      line-height: 28rpx;
      color: #fff;
      margin: 2rpx 0 0 20rpx;
      padding-left: 20rpx;
      border-left: 1rpx solid #fff;
      font-size: 26rpx;
    }
  }
  .search {
    display: flex;
    align-items: center;
    justify-content: space-between;
    padding: 0 10rpx 0 26rpx;
    height: 64rpx;
    margin: 16rpx 20rpx;
    color: #fff;
    font-size: 28rpx;
    border-radius: 32rpx;
    background-color: rgba(255, 255, 255, 0.5);
  }
  .icon-search {
    &::before {
      margin-right: 10rpx;
    }
  }
  .icon-scan {
    font-size: 30rpx;
    padding: 15rpx;
  }
}
</style>
安全区域
不同手机的安全区域不同,适配安全区域能防止页面重要内容被遮挡。
可通过 uni.getSystemInfoSync() 获取屏幕边界到安全区的距离。
Pasted image 20260524142907.png
自定义导航配置
// src/pages.json
{
  "path": "pages/index/index",
  "style": {
    "navigationStyle": "custom", // 隐藏默认导航
    "navigationBarTextStyle": "white",
    "navigationBarTitleText": "首页"
  }
}
组件安全区适配
<!-- src/pages/index/componets/CustomNavbar.vue -->
<script>
// 获取屏幕边界到安全区域距离
const { safeAreaInsets } = uni.getSystemInfoSync()
</script>

<template>
  <!-- 顶部占位 -->
  <view class="navbar" :style="{ paddingTop: safeAreaInsets?.top + 'px' }">
    <!-- ...省略 -->
  </view>
</template>
通用轮播组件
小兔鲜儿项目中总共有两处广告位,分别位于【首页】和【商品分类页】
轮播图组件需要在首页和分类页使用,需要封装成通用组件
静态结构
首页广告布局为独立的组件 XtxSwiper ,位于的 src/components 目录中。
该组件定义了 list 属性接收外部传入的数据,内部通过小程序内置组件 swiper 展示首页广告的数据。
轮播图组件
静态结构:src/components/XtxSwiper.vue
<script setup lang="ts">
import { ref } from 'vue'

const activeIndex = ref(0)
</script>

<template>
  <view class="carousel">
    <swiper :circular="true" :autoplay="false" :interval="3000">
      <swiper-item>
        <navigator url="/pages/index/index" hover-class="none" class="navigator">
          <image
            mode="aspectFill"
            class="image"
            src="https://pcapi-xiaotuxian-front-devtest.itheima.net/miniapp/uploads/slider_1.jpg"
          ></image>
        </navigator>
      </swiper-item>
      <swiper-item>
        <navigator url="/pages/index/index" hover-class="none" class="navigator">
          <image
            mode="aspectFill"
            class="image"
            src="https://pcapi-xiaotuxian-front-devtest.itheima.net/miniapp/uploads/slider_2.jpg"
          ></image>
        </navigator>
      </swiper-item>
      <swiper-item>
        <navigator url="/pages/index/index" hover-class="none" class="navigator">
          <image
            mode="aspectFill"
            class="image"
            src="https://pcapi-xiaotuxian-front-devtest.itheima.net/miniapp/uploads/slider_3.jpg"
          ></image>
        </navigator>
      </swiper-item>
    </swiper>
    <!-- 指示点 -->
    <view class="indicator">
      <text
        v-for="(item, index) in 3"
        :key="item"
        class="dot"
        :class="{ active: index === activeIndex }"
      ></text>
    </view>
  </view>
</template>

<style lang="scss">
/* 轮播图 */
.carousel {
  height: 280rpx;
  position: relative;
  overflow: hidden;
  transform: translateY(0);
  background-color: #efefef;
  .indicator {
    position: absolute;
    left: 0;
    right: 0;
    bottom: 16rpx;
    display: flex;
    justify-content: center;
    .dot {
      width: 30rpx;
      height: 6rpx;
      margin: 0 8rpx;
      border-radius: 6rpx;
      background-color: rgba(255, 255, 255, 0.4);
    }
    .active {
      background-color: #fff;
    }
  }
  .navigator,
  .image {
    width: 100%;
    height: 100%;
  }
}
</style>
自动导入全局组件
参考配置
{
  // 组件自动引入规则
  "easycom": {
    // 是否开启自动扫描 @/components/$1/$1.vue 组件
    "autoscan": true,
    // 以正则方式自定义组件匹配规则
    "custom": {
      // uni-ui 规则如下配置
      "^uni-(.*)": "@dcloudio/uni-ui/lib/uni-$1/uni-$1.vue",
      // 以 Xtx 开头的组件,在 components 目录中查找
      "^Xtx(.*)": "@/components/Xtx$1.vue"
    }
  }
}
全局组件类型声明
Volar 插件说明:Vue Language Tools
// src/types/components.d.ts
import XtxSwiper from './XtxSwiper.vue'
declare module 'vue' {
  export interface GlobalComponents {
    XtxSwiper: typeof XtxSwiper
  }
}
轮播图指示点
<script setup lang="ts">

	import { ref } from 'vue'

	const activeIndex = ref(0)

	// 当swiper 下标发生变化时触发
	// unihelper 为 uni-app 提供事件类型
	const onChange: UniHelper.SwiperOnChange = (ev) => {

	  // console.log(ev.detail.current)

	  // ! 非空断言,主观上排除非空情况

	  activeIndex.value = ev.detail!.current

	}

</script>


<template>

  <view class="carousel">
 // 添加@change监听
    <swiper :circular="true" :autoplay="false" :interval="3000" @change="onChange">

      <swiper-item>

        <navigator url="/pages/index/index" hover-class="none" class="navigator">

          <image

            mode="aspectFill"

            class="image"

            src="https://pcapi-xiaotuxian-front-devtest.itheima.net/miniapp/uploads/slider_1.jpg"

          ></image>

        </navigator>

      </swiper-item>

      <swiper-item>

        <navigator url="/pages/index/index" hover-class="none" class="navigator">

          <image

            mode="aspectFill"

            class="image"

            src="https://pcapi-xiaotuxian-front-devtest.itheima.net/miniapp/uploads/slider_2.jpg"

          ></image>

        </navigator>

      </swiper-item>

      <swiper-item>

        <navigator url="/pages/index/index" hover-class="none" class="navigator">

          <image

            mode="aspectFill"

            class="image"

            src="https://pcapi-xiaotuxian-front-devtest.itheima.net/miniapp/uploads/slider_3.jpg"

          ></image>

        </navigator>

      </swiper-item>

    </swiper>

    <!-- 指示点 -->

    <view class="indicator">

      <text

        v-for="(item, index) in 3"

        :key="item"

        class="dot"

        :class="{ active: index === activeIndex }"

      ></text>

    </view>

  </view>

</template>


<style lang="scss">

	/* 轮播图 */

	.carousel {

	  height: 280rpx;

	  position: relative;

	  overflow: hidden;

	  transform: translateY(0);

	  background-color: #efefef;

	  .indicator {

	    position: absolute;

	    left: 0;

	    right: 0;

	    bottom: 16rpx;

	    display: flex;

	    justify-content: center;

	    .dot {

	      width: 30rpx;

	      height: 6rpx;

	      margin: 0 8rpx;

	      border-radius: 6rpx;

	      background-color: rgba(255, 255, 255, 0.4);

	    }

	    .active {

	      background-color: #fff;

	    }

	  }

	  .navigator,

	  .image {

	    width: 100%;

	    height: 100%;

	  }

	}

</style>
获取数据
接口调用
该业务功能对于前端来说比较简单,只需调用后端提供的接口将获得的数据展现,结合运营人员的营销策略跳转到对应的链接地址即可。
接口地址:/home/banner
请求方式:GET
请求参数:
Query:
| 字段名 | 必须 | 默认值 | 备注 |
|---|---|---|---|
| distributionSite | 否 | 1 | 活动 banner 位置,1 代表首页,2 代表商品分类页,默认为 1 |
请求封装
// 存放路径: src/services/home.ts
import type { BannerItem } from '@/types/home'

/**
 * 首页-广告区域-小程序
 * @param distributionSite 广告区域展示位置(投放位置 投放位置,1为首页,2为分类商品页) 默认是1
 */
export const getHomeBannerAPI = (distributionSite = 1) => {
  return http<BannerItem[]>({
    method: 'GET',
    url: '/home/banner',
    data: {
      distributionSite,
    },
  })
}
这里的 data 对象 { distributionSite } 会被处理成 查询参数(Query Parameters) ,附加在 URL 后面
类型声明
存放路径:src/types/home.d.ts
/** 首页-广告区域数据类型 */
export type BannerItem = {
  /** 跳转链接 */
  hrefUrl: string
  /** id */
  id: string
  /** 图片链接 */
  imgUrl: string
  /** 跳转类型 */
  type: number
}
最后,将获得的数据结合模板语法渲染到页面中
轮播图组件:src\components\XtxSwiper.vue
<script setup lang="ts">
import type { BannerItem } from '@/types/home'
import { ref } from 'vue'

const activeIndex = ref(0)

// 当 swiper 下标发生变化时触发
const onChange: UniHelper.SwiperOnChange = (ev) => {
  // ! 非空断言,主观上排除掉空值情况
  activeIndex.value = ev.detail.current
}
// 定义 props 接收
defineProps<{
  list: BannerItem[]
}>()
</script>

<template>
  <view class="carousel">
    <swiper :circular="true" :autoplay="false" :interval="3000" @change="onChange">
      <swiper-item v-for="item in list" :key="item.id">
        <navigator url="/pages/index/index" hover-class="none" class="navigator">
          <image mode="aspectFill" class="image" :src="item.imgUrl"></image>
        </navigator>
      </swiper-item>
    </swiper>
    <!-- 指示点 -->
    <view class="indicator">
      <text
        v-for="(item, index) in list"
        :key="item.id"
        class="dot"
        :class="{ active: index === activeIndex }"
      ></text>
    </view>
  </view>
</template>
首页分类
准备工作
- 准备组件,只有首页使用
- 导入并使用组件
- 设置首页底色为
#F7F7F7
静态结构
前台类目布局为独立的组件 CategoryPanel属于首页的业务组件,存放到首页的 components 目录中
<script setup lang="ts">
//
</script>

<template>
  <view class="category">
    <navigator
      class="category-item"
      hover-class="none"
      url="/pages/index/index"
      v-for="item in 10"
      :key="item"
    >
      <image
        class="icon"
        src="https://pcapi-xiaotuxian-front-devtest.itheima.net/miniapp/images/nav_icon_1.png"
      ></image>
      <text class="text">居家</text>
    </navigator>
  </view>
</template>

<style lang="scss">
/* 前台类目 */
.category {
  margin: 20rpx 0 0;
  padding: 10rpx 0;
  display: flex;
  flex-wrap: wrap;
  min-height: 328rpx;

  .category-item {
    width: 150rpx;
    display: flex;
    justify-content: center;
    flex-direction: column;
    align-items: center;
    box-sizing: border-box;

    .icon {
      width: 100rpx;
      height: 100rpx;
    }
    .text {
      font-size: 26rpx;
      color: #666;
    }
  }
}
</style>
获取数据
接口调用
该业务功能对于前端来说比较简单,只需调用后端提供的接口将获得的数据展现。
接口地址:/home/category/mutli
请求方式:GET
请求参数:无
请求封装
// services/home.ts
/**
 * 首页-前台分类-小程序
 */
export const getHomeCategoryAPI = () => {
  return http<CategoryItem[]>({
    method: 'GET',
    url: '/home/category/mutli',
  })
}
数据类型
/** 首页-前台类目数据类型 */
export type CategoryItem = {
  /** 图标路径 */
  icon: string
  /** id */
  id: string
  /** 分类名称 */
  name: string
}
最后,将获得的数据结合模板语法渲染到页面中
src\pages\index\components\CategoryPanel.vue
<script setup lang="ts">
import type { CategoryItem } from '@/types/home'

// 定义 props 接收数据
defineProps<{
  list: CategoryItem[]
}>()
</script>

<template>
  <view class="category">
    <navigator
      class="category-item"
      hover-class="none"
      url="/pages/index/index"
      v-for="item in list"
      :key="item.id"
    >
      <image class="icon" :src="item.icon"></image>
      <text class="text">{{ item.name }}</text>
    </navigator>
  </view>
</template>
热门推荐
热门推荐功能,后端根据用户的消费习惯等信息向用户推荐的一系列商品,前端负责展示这些商品展示给用户
静态结构
热门推荐布局为独立的组件 HotPanel,属于首页的业务组件,存放到首页的 components 目录中
<script setup lang="ts">
//
</script>

<template>
  <!-- 推荐专区 -->
  <view class="panel hot">
    <view class="item" v-for="item in 4" :key="item">
      <view class="title">
        <text class="title-text">特惠推荐</text>
        <text class="title-desc">精选全攻略</text>
      </view>
      <navigator hover-class="none" url="/pages/hot/hot" class="cards">
        <image
          class="image"
          mode="aspectFit"
          src="https://pcapi-xiaotuxian-front-devtest.itheima.net/miniapp/uploads/goods_small_1.jpg"
        ></image>
        <image
          class="image"
          mode="aspectFit"
          src="https://pcapi-xiaotuxian-front-devtest.itheima.net/miniapp/uploads/goods_small_2.jpg"
        ></image>
      </navigator>
    </view>
  </view>
</template>

<style lang="scss">
/* 热门推荐 */
.hot {
  display: flex;
  flex-wrap: wrap;
  min-height: 508rpx;
  margin: 20rpx 20rpx 0;
  border-radius: 10rpx;
  background-color: #fff;

  .title {
    display: flex;
    align-items: center;
    padding: 24rpx 24rpx 0;
    font-size: 32rpx;
    color: #262626;
    position: relative;
    .title-desc {
      font-size: 24rpx;
      color: #7f7f7f;
      margin-left: 18rpx;
    }
  }

  .item {
    display: flex;
    flex-direction: column;
    width: 50%;
    height: 254rpx;
    border-right: 1rpx solid #eee;
    border-top: 1rpx solid #eee;
    .title {
      justify-content: start;
    }
    &:nth-child(2n) {
      border-right: 0 none;
    }
    &:nth-child(-n + 2) {
      border-top: 0 none;
    }
    .image {
      width: 150rpx;
      height: 150rpx;
    }
  }
  .cards {
    flex: 1;
    padding: 15rpx 20rpx;
    display: flex;
    justify-content: space-between;
    align-items: center;
  }
}
</style>
获取数据
接口调用
该业务功能对于前端来说比较简单,只需调用后端提供的接口将获得的数据展现。
接口地址:/home/hot/mutli
请求方式:GET
请求参数:
Headers:
| 字段名称 | 是否必须 | 默认值 | 备注 |
|---|---|---|---|
| source-client | 是 | 无 | 后端程序区分接口调用者,miniapp 代表小程序端 |
成功响应结果:
| 字段名称 | 数据类型 | 备注 |
|---|---|---|
| id | string | ID |
| title | string | 推荐标题 |
| type | number | 推荐类型 |
| alt | string | 推荐说明 |
| pictures | arraystring | 图片集合 图片路径 |
类型声明
/** 首页-热门推荐数据类型 */
export type HotItem = {
  /** 说明 */
  alt: string
  /** id */
  id: string
  /** 图片集合[ 图片路径 ] */
  pictures: string[]
  /** 跳转地址 */
  target: string
  /** 标题 */
  title: string
  /** 推荐类型 */
  type: string
}
接口封装
// services/home.ts
/**
 * 首页-热门推荐-小程序
 */
export const getHomeHotAPI = () => {
  return http<HotItem[]>({
    method: 'GET',
    url: '/home/hot/mutli',
  })
}
最后将获得的数据结合模板语法渲染到页面中
src\pages\index\components\HotPanel.vue
<script setup lang="ts">
import type { HotItem } from '@/types/home'

// 定义 props 接收数据
defineProps<{
  list: HotItem[]
}>()
</script>

<template>
  <!-- 推荐专区 -->
  <view class="panel hot">
    <view class="item" v-for="item in list" :key="item.id">
      <view class="title">
        <text class="title-text">{{ item.title }}</text>
        <text class="title-desc">{{ item.alt }}</text>
      </view>
      <navigator hover-class="none" :url="`/pages/hot/hot?type=${item.type}`" class="cards">
        <image
          v-for="src in item.pictures"
          :key="src"
          class="image"
          mode="aspectFit"
          :src="src"
        ></image>
      </navigator>
    </view>
  </view>
</template>
猜你喜欢(重点难点)
猜你喜欢功能,后端根据用户的浏览记录等信息向用户随机推荐的一系列商品,前端负责把商品在多个页面中展示
- 准备组件 (通用组件,多页面使用)
- 定义组件类型
- 准备
scroll-view滚动容器 - 设置
page和scroll-view样式
静态结构
猜你喜欢是一个通用组件 XtxGuess,多个页面会用到该组件,存放到 src/components 目录中
<script setup lang="ts">
//
</script>

<template>
  <!-- 猜你喜欢 -->
  <view class="caption">
    <text class="text">猜你喜欢</text>
  </view>
  <view class="guess">
    <navigator
      class="guess-item"
      v-for="item in 10"
      :key="item"
      :url="`/pages/goods/goods?id=4007498`"
    >
      <image
        class="image"
        mode="aspectFill"
        src="https://pcapi-xiaotuxian-front-devtest.itheima.net/miniapp/uploads/goods_big_1.jpg"
      ></image>
      <view class="name"> 德国THORE男表 超薄手表男士休闲简约夜光石英防水直径40毫米 </view>
      <view class="price">
        <text class="small">¥</text>
        <text>899.00</text>
      </view>
    </navigator>
  </view>
  <view class="loading-text"> 正在加载... </view>
</template>

<style lang="scss">
:host {
  display: block;
}
/* 分类标题 */
.caption {
  display: flex;
  justify-content: center;
  line-height: 1;
  padding: 36rpx 0 40rpx;
  font-size: 32rpx;
  color: #262626;
  .text {
    display: flex;
    justify-content: center;
    align-items: center;
    padding: 0 28rpx 0 30rpx;

    &::before,
    &::after {
      content: '';
      width: 20rpx;
      height: 20rpx;
      background-image: url(@/static/images/bubble.png);
      background-size: contain;
      margin: 0 10rpx;
    }
  }
}

/* 猜你喜欢 */
.guess {
  display: flex;
  flex-wrap: wrap;
  justify-content: space-between;
  padding: 0 20rpx;
  .guess-item {
    width: 345rpx;
    padding: 24rpx 20rpx 20rpx;
    margin-bottom: 20rpx;
    border-radius: 10rpx;
    overflow: hidden;
    background-color: #fff;
  }
  .image {
    width: 304rpx;
    height: 304rpx;
  }
  .name {
    height: 75rpx;
    margin: 10rpx 0;
    font-size: 26rpx;
    color: #262626;
    overflow: hidden;
    text-overflow: ellipsis;
    display: -webkit-box;
    -webkit-line-clamp: 2;
    -webkit-box-orient: vertical;
  }
  .price {
    line-height: 1;
    padding-top: 4rpx;
    color: #cf4444;
    font-size: 26rpx;
  }
  .small {
    font-size: 80%;
  }
}
// 加载提示文字
.loading-text {
  text-align: center;
  font-size: 28rpx;
  color: #666;
  padding: 20rpx 0;
}
</style>
全局组件类型
// types/components.d.ts
import XtxSwiper from '@/components/XtxSwiper.vue'
import XtxGuess from '@/components/XtxGuess.vue'

declare module 'vue' {
  export interface GlobalComponents {
    XtxSwiper: typeof XtxSwiper
    XtxGuess: typeof XtxGuess
  }
}

// 组件实例类型
export type XtxGuessInstance = InstanceType<typeof XtxGuess>
获取数据
接口调用
该业务功能对于前端来说比较简单,只需调用后端提供的接口将获得的数据展现。
接口地址:/home/goods/guessLike
请求方式:GET
请求参数:
Query:
| 字段名称 | 是否必须 | 默认值 | 备注 |
|---|---|---|---|
| page | 否 | 1 | 分页的页码 |
| pageSize | 否 | 10 | 每页数据的条数 |
请求封装
// src/services/home.ts
/**
 * 猜你喜欢-小程序
 */
export const getHomeGoodsGuessLikeAPI = (data?: PageParams) => {
  return http<PageResult<GuessItem>>({
    method: 'GET',
    url: '/home/goods/guessLike',
    data,
  })
}
类型声明
通用分页结果类型如下,新建 src/types/global.d.ts 文件:
/** 通用分页结果类型 */
export type PageResult<T> = {
  /** 列表数据 */
  items: T[]
  /** 总条数 */
  counts: number
  /** 当前页数 */
  page: number
  /** 总页数 */
  pages: number
  /** 每页条数 */
  pageSize: number
}
猜你喜欢-商品类型如下,存放到 src/types/home.d.ts 文件:
/** 猜你喜欢-商品类型 */
export type GuessItem = {
  /** 商品描述 */
  desc: string
  /** 商品折扣 */
  discount: number
  /** id */
  id: string
  /** 商品名称 */
  name: string
  /** 商品已下单数量 */
  orderNum: number
  /** 商品图片 */
  picture: string
  /** 商品价格 */
  price: number
}
通用分页参数类型如下,存放到 src/types/global.d.ts 文件:
/** 通用分页参数类型 */
export type PageParams = {
  /** 页码:默认值为 1 */
  page?: number
  /** 页大小:默认值为 10 */
  pageSize?: number
}
核心业务
- 子组件内部获取数据
- 父滚动触底需加载分页
- 组件通讯,子调父
参考代码
项目首页
// pages/index/index.vue
<script setup lang="ts">
import type { XtxGuessInstance } from '@/types/components'
import { ref } from 'vue'
// 获取猜你喜欢组件实例
const guessRef = ref<XtxGuessInstance>()

// 滚动触底事件
const onScrolltolower = () => {
  guessRef.value?.getMore()
}
</script>

<template>
  <!-- 滚动容器 -->
  <scroll-view scroll-y @scrolltolower="onScrolltolower">
    <!-- 猜你喜欢 -->
    <XtxGuess ref="guessRef" />
  </scroll-view>
</template>
猜你喜欢组件
// src/components/XtxGuess.vue
<script setup lang="ts">
import { getHomeGoodsGuessLikeAPI } from '@/services/home'
import type { PageParams } from '@/types/global'
import type { GuessItem } from '@/types/home'
import { onMounted, ref } from 'vue'

// 分页参数
const pageParams: Required<PageParams> = {
  page: 1,
  pageSize: 10,
}
// 猜你喜欢的列表
const guessList = ref<GuessItem[]>([])
// 已结束标记
const finish = ref(false)
// 获取猜你喜欢数据
const getHomeGoodsGuessLikeData = async () => {
  // 退出分页判断
  if (finish.value === true) {
    return uni.showToast({ icon: 'none', title: '没有更多数据~' })
  }
  const res = await getHomeGoodsGuessLikeAPI(pageParams)
  // 数组追加
  guessList.value.push(...res.result.items)
  // 分页条件
  if (pageParams.page < res.result.pages) {
    // 页码累加
    pageParams.page++
  } else {
    finish.value = true
  }
}
// 重置数据
const resetData = () => {
  pageParams.page = 1
  guessList.value = []
  finish.value = false
}
// 组件挂载完毕
onMounted(() => {
  getHomeGoodsGuessLikeData()
})
// 暴露方法
defineExpose({
  resetData,
  getMore: getHomeGoodsGuessLikeData,
})
</script>

<template>
  <!-- 猜你喜欢 -->
  <view class="caption">
    <text class="text">猜你喜欢</text>
  </view>
  <view class="guess">
    <navigator
      class="guess-item"
      v-for="item in guessList"
      :key="item.id"
      :url="`/pages/goods/goods`"
    >
      <image class="image" mode="aspectFill" :src="item.picture"></image>
      <view class="name"> {{ item.name }} </view>
      <view class="price">
        <text class="small">¥</text>
        <text>{{ item.price }}</text>
      </view>
    </navigator>
  </view>
  <view class="loading-text">
    {{ finish ? '没有更多数据~' : '正在加载...' }}
  </view>
</template>
下拉刷新
下拉刷新实际上是在用户操作下拉交互时重新调用接口,然后将新获取的数据再次渲染到页面中。
操作步骤
基于 scroll-view 组件实现下拉刷新,需要通过以下方式来实现下拉刷新的功能。
- 配置
refresher-enabled属性,开启下拉刷新交互 - 监听
@refresherrefresh事件,判断用户是否执行了下拉操作 - 配置
refresher-triggered属性,关闭下拉状态
参考代码
猜你喜欢组件定义重置数据的方法
// src/components/XtxGuess.vue
// 重置数据
const resetData = () => {
  pageParams.page = 1
  guessList.value = []
  finish.value = false
}
// 暴露方法
defineExpose({
  resetData,
})
首页触发下拉刷新
// src/pages/index/index.vue
<script setup lang="ts">
// 下拉刷新状态
const isTriggered = ref(false)
// 自定义下拉刷新被触发
const onRefresherrefresh = async () => {
  // 开启动画
  isTriggered.value = true
  // 重置猜你喜欢组件数据
  guessRef.value?.resetData() // 加载数据
  await Promise.all([getHomeBannerData(), getHomeCategoryData(), getHomeHotData()]) // 关闭动画
  isTriggered.value = false
}
</script>

<!-- 滚动容器 -->
<scroll-view
  refresher-enabled
  @refresherrefresh="onRefresherrefresh"
  :refresher-triggered="isTriggered"
  class="scroll-view"
  scroll-y
>
  ...省略
</scroll-view>
骨架屏
骨架屏是页面的一个空白版本,通常会在页面完全渲染之前,通过一些灰色的区块大致勾勒出轮廓,待数据加载完成后,再替换成真实的内容
生成骨架屏
微信开发者工具提供了自动生成骨架屏代码的能力。
使用时需要把自动生成的 xxx.skeleton.wxml 和 xxx.skeleton.wxss 封装成 vue 组件