Spring AI Alibaba + Ollama Function Calling 项目完整指南
一、项目概述
SpringBoot中使用Spring AI框架集成本地Ollama实现AI快速对话完整示例:
https://blog.csdn.net/BADAO_LIUMANG_QIZHI/article/details/161516580
基于上述示例,本项目基于 Spring AI Alibaba 框架,集成本地 Ollama 大模型服务,实现 Function Calling(函数调用)功能。
1.1 框架关系说明
| 框架 | 角色 | 说明 |
|---|---|---|
| Spring AI Alibaba | 开发框架 | 阿里巴巴基于 Spring AI 增强的 AI 开发框架,提供 @Tool、@ToolParam 等注解 |
| Spring AI | 底层基础 | Spring 官方 AI 框架,Spring AI Alibaba 的底层依赖 |
| Ollama | 模型服务 | 本地大模型运行引擎,替代阿里云 DashScope(无需 API Key) |
核心认知 :
@Tool和@ToolParam注解实际来自 Spring AI 核心包(org.springframework.ai.tool.annotation),Spring AI Alibaba 依赖并扩展了 Spring AI,因此所有 Spring AI 的注解在 Spring AI Alibaba 项目中同样可用。
1.2 技术栈
| 技术 | 版本 | 说明 |
|---|---|---|
| Spring Boot | 3.2.5 | 应用框架 |
| Spring AI Alibaba | 1.0.0-M6.1 | AI 开发框架 |
| Spring AI | 1.0.0-M6 | 底层 AI 框架 |
| JDK | 17+ | Java 运行环境 |
| Ollama | 最新 | 本地大模型服务 |
| 模型 | qwen2.5 | 通义千问开源版 |
1.3 核心功能
- ✅ 时间日期查询
- ✅ 天气信息查询
- ✅ 数学计算(加减乘除)
- ✅ 温度单位转换(摄氏度→华氏度)
二、环境准备
2.1 JDK 安装
要求:JDK 17 或更高版本
2.2 Ollama 安装与配置
下载安装:https://ollama.com/
启动服务:
bash
ollama serve拉取模型:
bash
ollama pull qwen2.5验证服务:
bash
# 查看已下载模型
ollama list

# 测试 API 连通性
curl http://localhost:11434/api/tags
注:
三、项目搭建
3.1 项目结构
spring-ai-alibaba-ollama-functioncall/
├── src/main/java/com/badao/ai/
│   ├── SpringAiDemoApplication.java      # 启动类
│   ├── config/
│   │   └── ChatClientConfig.java         # ChatClient 配置
│   ├── controller/
│   │   └── ChatController.java           # 接口控制器
│   └── function/
│       └── ToolService.java              # 工具服务(Function Calling 核心)
├── src/main/resources/
│   ├── application.yml                   # 配置文件
│   └── static/
│       └── function-call-test.html       # 测试页面
└── pom.xml                               # Maven 依赖
3.2 Maven 依赖配置
pom.xml:
xml
<?xml version="1.0" encoding="UTF-8"?>
<project xmlns="http://maven.apache.org/POM/4.0.0"
         xmlns:xsi="http://www.w3.org/2001/XMLSchema-instance"
         xsi:schemaLocation="http://maven.apache.org/POM/4.0.0
         http://maven.apache.org/xsd/maven-4.0.0.xsd">
    <modelVersion>4.0.0</modelVersion>

    <parent>
        <groupId>org.springframework.boot</groupId>
        <artifactId>spring-boot-starter-parent</artifactId>
        <version>3.2.5</version>
    </parent>

    <groupId>com.badao.ai</groupId>
    <artifactId>spring-ai-ollama-functioncall</artifactId>
    <version>1.0</version>

    <properties>
        <java.version>17</java.version>
        <spring-ai.version>1.0.0-M6</spring-ai.version>
        <spring-ai-alibaba.version>1.0.0-M6.1</spring-ai-alibaba.version>
    </properties>

    <dependencies>
        <!-- Spring Boot Web Starter -->
        <dependency>
            <groupId>org.springframework.boot</groupId>
            <artifactId>spring-boot-starter-web</artifactId>
        </dependency>

        <!-- Spring AI Ollama 模型连接 -->
        <dependency>
            <groupId>org.springframework.ai</groupId>
            <artifactId>spring-ai-ollama-spring-boot-starter</artifactId>
            <version>${spring-ai.version}</version>
        </dependency>

        <!-- Spring AI Alibaba 框架核心 -->
        <dependency>
            <groupId>com.alibaba.cloud.ai</groupId>
            <artifactId>spring-ai-alibaba-core</artifactId>
            <version>${spring-ai-alibaba.version}</version>
        </dependency>
    </dependencies>

    <repositories>
        <repository>
            <id>spring-milestones</id>
            <name>Spring Milestones</name>
            <url>https://repo.spring.io/milestone</url>
            <snapshots>
                <enabled>false</enabled>
            </snapshots>
        </repository>
    </repositories>
</project>依赖说明:
| 依赖 | 作用 | 如果不引入会怎样 |
|---|---|---|
spring-boot-starter-web |
Web 服务 | 无法启动 HTTP 服务 |
spring-ai-ollama-spring-boot-starter |
连接 Ollama 模型 | 无法连接本地模型 |
spring-ai-alibaba-core |
Spring AI Alibaba 框架 | 无法使用框架扩展功能 |
⚠️ 为什么不直接使用
spring-ai-alibaba-starter?
spring-ai-alibaba-starter默认集成了阿里云 DashScope 自动配置,启动时会要求提供 DashScope API Key。如果只想用本地 Ollama 模型,用spring-ai-alibaba-core即可获得框架能力,同时避免 DashScope 的强制依赖。
3.3 Boot 配置文件
application.yml:
yaml
server:
  port: 885

logging:
  level:
    com.badao: debug
    org.springframework.ai: debug

spring:
  ai:
    ollama:
      base-url: http://localhost:11434
      chat:
        options:
          model: qwen2.5
temperature: 0.7配置说明:
| 配置项 | 含义 | 必填 |
|---|---|---|
spring.ai.ollama.base-url |
Ollama 服务地址 | ✅ |
spring.ai.ollama.chat.options.model |
使用的模型名称 | ✅ |
spring.ai.ollama.chat.options.temperature |
创造性参数(0=保守,1=创意) | ❌ |
四、核心代码实现
4.1 启动类
SpringAiDemoApplication.java:
java
package com.badao.ai;

import org.springframework.boot.SpringApplication;
import org.springframework.boot.autoconfigure.SpringBootApplication;

@SpringBootApplication
public class SpringAiDemoApplication {
    public static void main(String[] args) {
        SpringApplication.run(SpringAiDemoApplication.class, args);
    }
}
4.2 工具服务(Function Calling 核心)
ToolService.java:
java
package com.badao.ai.function;

import org.springframework.ai.tool.annotation.Tool;
import org.springframework.ai.tool.annotation.ToolParam;
import org.springframework.stereotype.Service;
import java.time.LocalDate;
import java.time.LocalTime;
import java.time.format.DateTimeFormatter;
import java.util.HashMap;
import java.util.Map;

@Service
public class ToolService {

    @Tool(description = "获取当前日期,格式为yyyy-MM-dd")
    public String getCurrentDate() {
        return LocalDate.now().format(DateTimeFormatter.ISO_LOCAL_DATE);
    }

    @Tool(description = "获取当前时间,格式为HH:mm:ss")
    public String getCurrentTime() {
        return LocalTime.now().format(DateTimeFormatter.ISO_LOCAL_TIME);
    }

    @Tool(description = "根据城市名称获取天气信息")
    public String getWeather(@ToolParam(description = "城市名称,例如:北京、上海、广州") String city) {
        Map<String, String> weatherData = new HashMap<>();
        weatherData.put("北京", "晴天,温度25°C,湿度30%");
        weatherData.put("上海", "多云,温度22°C,湿度60%");
        weatherData.put("广州", "阴天,温度28°C,湿度75%");
        weatherData.put("深圳", "晴天,温度30°C,湿度50%");
        return weatherData.getOrDefault(city, "抱歉,暂无" + city + "的天气信息");
    }

    @Tool(description = "计算器功能,支持加减乘除运算")
    public String calculate(
            @ToolParam(description = "第一个数字") double num1,
            @ToolParam(description = "运算符:+、-、*、/") String operator,
            @ToolParam(description = "第二个数字") double num2) {
        double result;
        switch (operator) {
            case "+": result = num1 + num2; break;
            case "-": result = num1 - num2; break;
            case "*": result = num1 * num2; break;
            case "/":
                if (num2 == 0) return "错误:除数不能为零";
                result = num1 / num2;
                break;
            default:
                return "错误:不支持的运算符,请使用 +、-、*、/";
        }
        return num1 + " " + operator + " " + num2 + " = " + result;
    }

    @Tool(description = "将摄氏度转换为华氏度")
    public String celsiusToFahrenheit(
            @ToolParam(description = "摄氏度温度值") double celsius) {
        double fahrenheit = (celsius * 9 / 5) + 32;
        return celsius + "°C = " + String.format("%.2f", fahrenheit) + "°F";
    }
}
4.3 注解详解
@Tool 注解
java
@Tool(
    description = "工具的描述",  // ✅ 必填:AI 据此判断何时调用工具
    name = "工具名称",           // 可选:默认使用方法名
    returnDirect = false         // 可选:true 则跳过 AI 二次处理直接返回
)最佳实践:
| 场景 | ✅ 好的描述 | ❌ 不好的描述 |
|---|---|---|
| 时间 | 获取当前时间,格式为HH:mm:ss |
获取时间 |
| 天气 | 根据城市名称获取天气信息 |
天气查询 |
| 计算 | 计算器功能,支持加减乘除运算 |
工具1 |
@ToolParam 注解
java
@ToolParam(
    description = "参数的描述",  // ✅ 必须:含格式、范围、示例
    required = true              // 可选:默认 true
)最佳实践:
| 场景 | ✅ 好的描述 |
|---|---|
| 城市 | 城市名称,例如:北京、上海、广州 |
| 运算符 | 运算符:+、-、*、/ |
| 温度 | 摄氏度温度值 |
4.4 ChatClient 配置
ChatClientConfig.java:
java
package com.badao.ai.config;

import com.badao.ai.function.ToolService;
import org.springframework.ai.chat.client.ChatClient;
import org.springframework.context.annotation.Bean;
import org.springframework.context.annotation.Configuration;

@Configuration
public class ChatClientConfig {

    @Bean
    public ChatClient chatClientWithTools(ChatClient.Builder builder, ToolService toolService) {
        return builder
                .defaultSystem("你是一个智能助手,可以使用提供的工具来帮助用户解决问题。")
                .build();
    }
}说明:
ChatClient.Builder由 Spring Boot 自动装配(来自spring-ai-ollama-spring-boot-starter)defaultSystem()设置系统提示词,引导 AI 合理使用工具
4.5 控制器
ChatController.java:
java
package com.badao.ai.controller;

import com.badao.ai.function.ToolService;
import org.springframework.ai.chat.client.ChatClient;
import org.springframework.web.bind.annotation.*;
import java.util.Map;

@RestController
public class ChatController {

    private final ChatClient chatClient;
    private final ToolService toolService;

    public ChatController(ChatClient.Builder builder, ToolService toolService) {
        this.chatClient = builder.build();
        this.toolService = toolService;
    }

    /** GET 方式调用 Function Calling */
    @GetMapping("/ai/function-call")
    public String functionCall(
            @RequestParam(value = "message", defaultValue = "现在几点了?") String message) {
        return chatClient.prompt()
                .user(message)
                .tools(toolService)  // 注册工具
                .call()
                .content();
    }

    /** POST 方式调用 Function Calling */
    @PostMapping("/ai/function-call/chat")
    public Map<String, String> functionCallChat(@RequestBody Map<String, String> request) {
        String message = request.get("message");
        String response = chatClient.prompt()
                .user(message)
                .tools(toolService)
                .call()
                .content();
        return Map.of(
                "message", message,
                "response", response,
                "model", "ollama-qwen2.5",
                "type", "function-call"
        );
    }
}
4.6 Function Calling 工作流程
用户发起请求:"北京天气怎么样?"
    ↓
ChatClient 发送消息给 Ollama 模型
    ↓
AI 分析:需要查询天气 → 决定调用 getWeather("北京")
    ↓
ChatClient 自动执行 ToolService.getWeather("北京")
    ↓
工具返回:"晴天,温度25°C,湿度30%"
    ↓
结果返回给 AI 模型
    ↓
AI 生成最终回答:"北京现在是晴天,温度25°C,湿度30%。"
    ↓
返回给用户
五、测试验证
5.1 启动项目
bash
# 编译
mvn clean compile

# 启动
mvn spring-boot:run
5.2 接口测试
测试1:获取时间
bash
curl "http://localhost:885/ai/function-call?message=现在几点了?"预期 :现在是 15:30:25。
测试2:查询日期
bash
curl "http://localhost:885/ai/function-call?message=今天是什么日期?"预期 :今天是 2026-06-01。
测试3:查询天气
bash
curl "http://localhost:885/ai/function-call?message=北京天气怎么样?"预期 :北京现在是晴天,温度25°C,湿度30%。
测试4:数学计算
bash
curl "http://localhost:885/ai/function-call?message=计算123乘以456"预期 :123 * 456 = 56088.0
测试5:温度转换(POST)
bash
curl -X POST http://localhost:885/ai/function-call/chat \
  -H "Content-Type: application/json" \
-d '{"message": "100摄氏度等于多少华氏度?"}'预期:
json
{
  "message": "100摄氏度等于多少华氏度?",
  "response": "100.0°C = 212.00°F",
  "model": "ollama-qwen2.5",
  "type": "function-call"
}
测试6:新建测试页面测试
resources下static下新建测试页面
<!DOCTYPE html>
<html lang="zh-CN">
<head>
    <meta charset="UTF-8">
    <meta name="viewport" content="width=device-width, initial-scale=1.0">
    <title>Function Call 测试</title>
    <style>
        * {
            margin: 0;
            padding: 0;
            box-sizing: border-box;
        }
        body {
            font-family: 'Segoe UI', Tahoma, Geneva, Verdana, sans-serif;
            background: linear-gradient(135deg, #667eea 0%, #764ba2 100%);
            min-height: 100vh;
            display: flex;
            justify-content: center;
            align-items: center;
            padding: 20px;
        }
        .container {
            background: white;
            border-radius: 20px;
            box-shadow: 0 20px 60px rgba(0,0,0,0.3);
            max-width: 800px;
            width: 100%;
            padding: 40px;
        }
        h1 {
            color: #333;
            margin-bottom: 10px;
            text-align: center;
        }
        .subtitle {
            color: #666;
            text-align: center;
            margin-bottom: 30px;
            font-size: 14px;
        }
        .quick-tests {
            margin-bottom: 20px;
        }
        .quick-tests h3 {
            color: #555;
            margin-bottom: 10px;
            font-size: 14px;
        }
        .quick-test-btn {
            background: #f0f0f0;
            border: 1px solid #ddd;
            padding: 8px 12px;
            margin: 5px;
            border-radius: 8px;
            cursor: pointer;
            font-size: 13px;
            transition: all 0.3s;
        }
        .quick-test-btn:hover {
            background: #667eea;
            color: white;
            border-color: #667eea;
        }
        .input-group {
            display: flex;
            gap: 10px;
            margin-bottom: 20px;
        }
        input {
            flex: 1;
            padding: 15px;
            border: 2px solid #e0e0e0;
            border-radius: 10px;
            font-size: 16px;
            transition: border-color 0.3s;
        }
        input:focus {
            outline: none;
            border-color: #667eea;
        }
        button {
            background: linear-gradient(135deg, #667eea 0%, #764ba2 100%);
            color: white;
            border: none;
            padding: 15px 30px;
            border-radius: 10px;
            font-size: 16px;
            cursor: pointer;
            transition: transform 0.2s;
        }
        button:hover {
            transform: translateY(-2px);
        }
        button:active {
            transform: translateY(0);
        }
        button:disabled {
            opacity: 0.5;
            cursor: not-allowed;
        }
        .response-box {
            background: #f8f9fa;
            border-left: 4px solid #667eea;
            padding: 20px;
            border-radius: 10px;
            min-height: 100px;
            max-height: 400px;
            overflow-y: auto;
        }
        .response-box h3 {
            color: #667eea;
            margin-bottom: 10px;
            font-size: 16px;
        }
        .response-content {
            color: #333;
            line-height: 1.6;
            white-space: pre-wrap;
        }
        .loading {
            color: #999;
            font-style: italic;
        }
        .examples {
            margin-top: 20px;
            padding: 15px;
            background: #fff3cd;
            border-radius: 10px;
            border-left: 4px solid #ffc107;
        }
        .examples h4 {
            color: #856404;
            margin-bottom: 10px;
            font-size: 14px;
        }
        .examples ul {
            margin-left: 20px;
            color: #856404;
        }
        .examples li {
            margin: 5px 0;
            font-size: 13px;
        }
    </style>
</head>
<body>
    <div class="container">
        <h1>🤖 Function Call 测试</h1>
        <p class="subtitle">基于 Spring AI + Ollama 的函数调用示例</p>

        <div class="quick-tests">
            <h3>快速测试(点击自动填充):</h3>
            <button class="quick-test-btn" onclick="setQuestion('现在几点了?')">⏰ 查询时间</button>
            <button class="quick-test-btn" onclick="setQuestion('今天是什么日期?')">📅 查询日期</button>
            <button class="quick-test-btn" onclick="setQuestion('北京天气怎么样?')">🌤️ 查询天气</button>
            <button class="quick-test-btn" onclick="setQuestion('上海的天气如何?')">🌥️ 查询天气2</button>
            <button class="quick-test-btn" onclick="setQuestion('计算 123 乘以 456 等于多少?')">🧮 计算乘法</button>
            <button class="quick-test-btn" onclick="setQuestion('100 除以 0 等于多少?')">➗ 除零测试</button>
            <button class="quick-test-btn" onclick="setQuestion('25摄氏度等于多少华氏度?')">🌡️ 温度转换</button>
            <button class="quick-test-btn" onclick="setQuestion('现在是几点?北京天气怎么样?帮我算一下567加234')">🎯 组合调用</button>
        </div>

        <div class="input-group">
            <input
                type="text"
                id="questionInput"
                placeholder="请输入你的问题,例如:现在几点了?北京天气怎么样?"
                onkeypress="if(event.key === 'Enter') sendMessage()"
            >
            <button id="sendBtn" onclick="sendMessage()">发送</button>
        </div>

        <div class="response-box">
            <h3>📝 AI 回复:</h3>
            <div id="responseContent" class="response-content">
                <span class="loading">等待提问...</span>
            </div>
        </div>

        <div class="examples">
            <h4>💡 可用的Function Call示例:</h4>
            <ul>
                <li><strong>获取时间</strong>:现在几点了?当前时间是什么?</li>
                <li><strong>获取日期</strong>:今天几号?现在是什么日期?</li>
                <li><strong>查询天气</strong>:北京天气怎么样?上海今天天气如何?</li>
                <li><strong>计算功能</strong>:123加456等于多少?567乘以890是多少?</li>
                <li><strong>温度转换</strong>:25摄氏度等于多少华氏度?</li>
                <li><strong>组合问题</strong>:现在几点?北京天气如何?计算100加200</li>
            </ul>
        </div>
    </div>

    <script>
        function setQuestion(question) {
            document.getElementById('questionInput').value = question;
            document.getElementById('questionInput').focus();
        }

        async function sendMessage() {
            const input = document.getElementById('questionInput');
            const sendBtn = document.getElementById('sendBtn');
            const responseContent = document.getElementById('responseContent');
            const question = input.value.trim();

            if (!question) {
                alert('请输入问题!');
                return;
            }

            sendBtn.disabled = true;
            sendBtn.textContent = '发送中...';
            responseContent.innerHTML = '<span class="loading">AI正在思考中,可能正在调用函数...</span>';

            try {
                const response = await fetch('/ai/function-call/chat', {
                    method: 'POST',
                    headers: {
                        'Content-Type': 'application/json',
                    },
                    body: JSON.stringify({ message: question })
                });

                if (!response.ok) {
                    throw new Error('网络请求失败');
                }

                const data = await response.json();
                responseContent.textContent = data.response;
            } catch (error) {
                responseContent.innerHTML = `<span style="color: red;">❌ 错误:${error.message}</span>`;
            } finally {
                sendBtn.disabled = false;
                sendBtn.textContent = '发送';
                input.value = '';
            }
        }
    </script>
</body>
</html>
启动项目并访问:
http://localhost:885/function-call-test.html
测试效果:
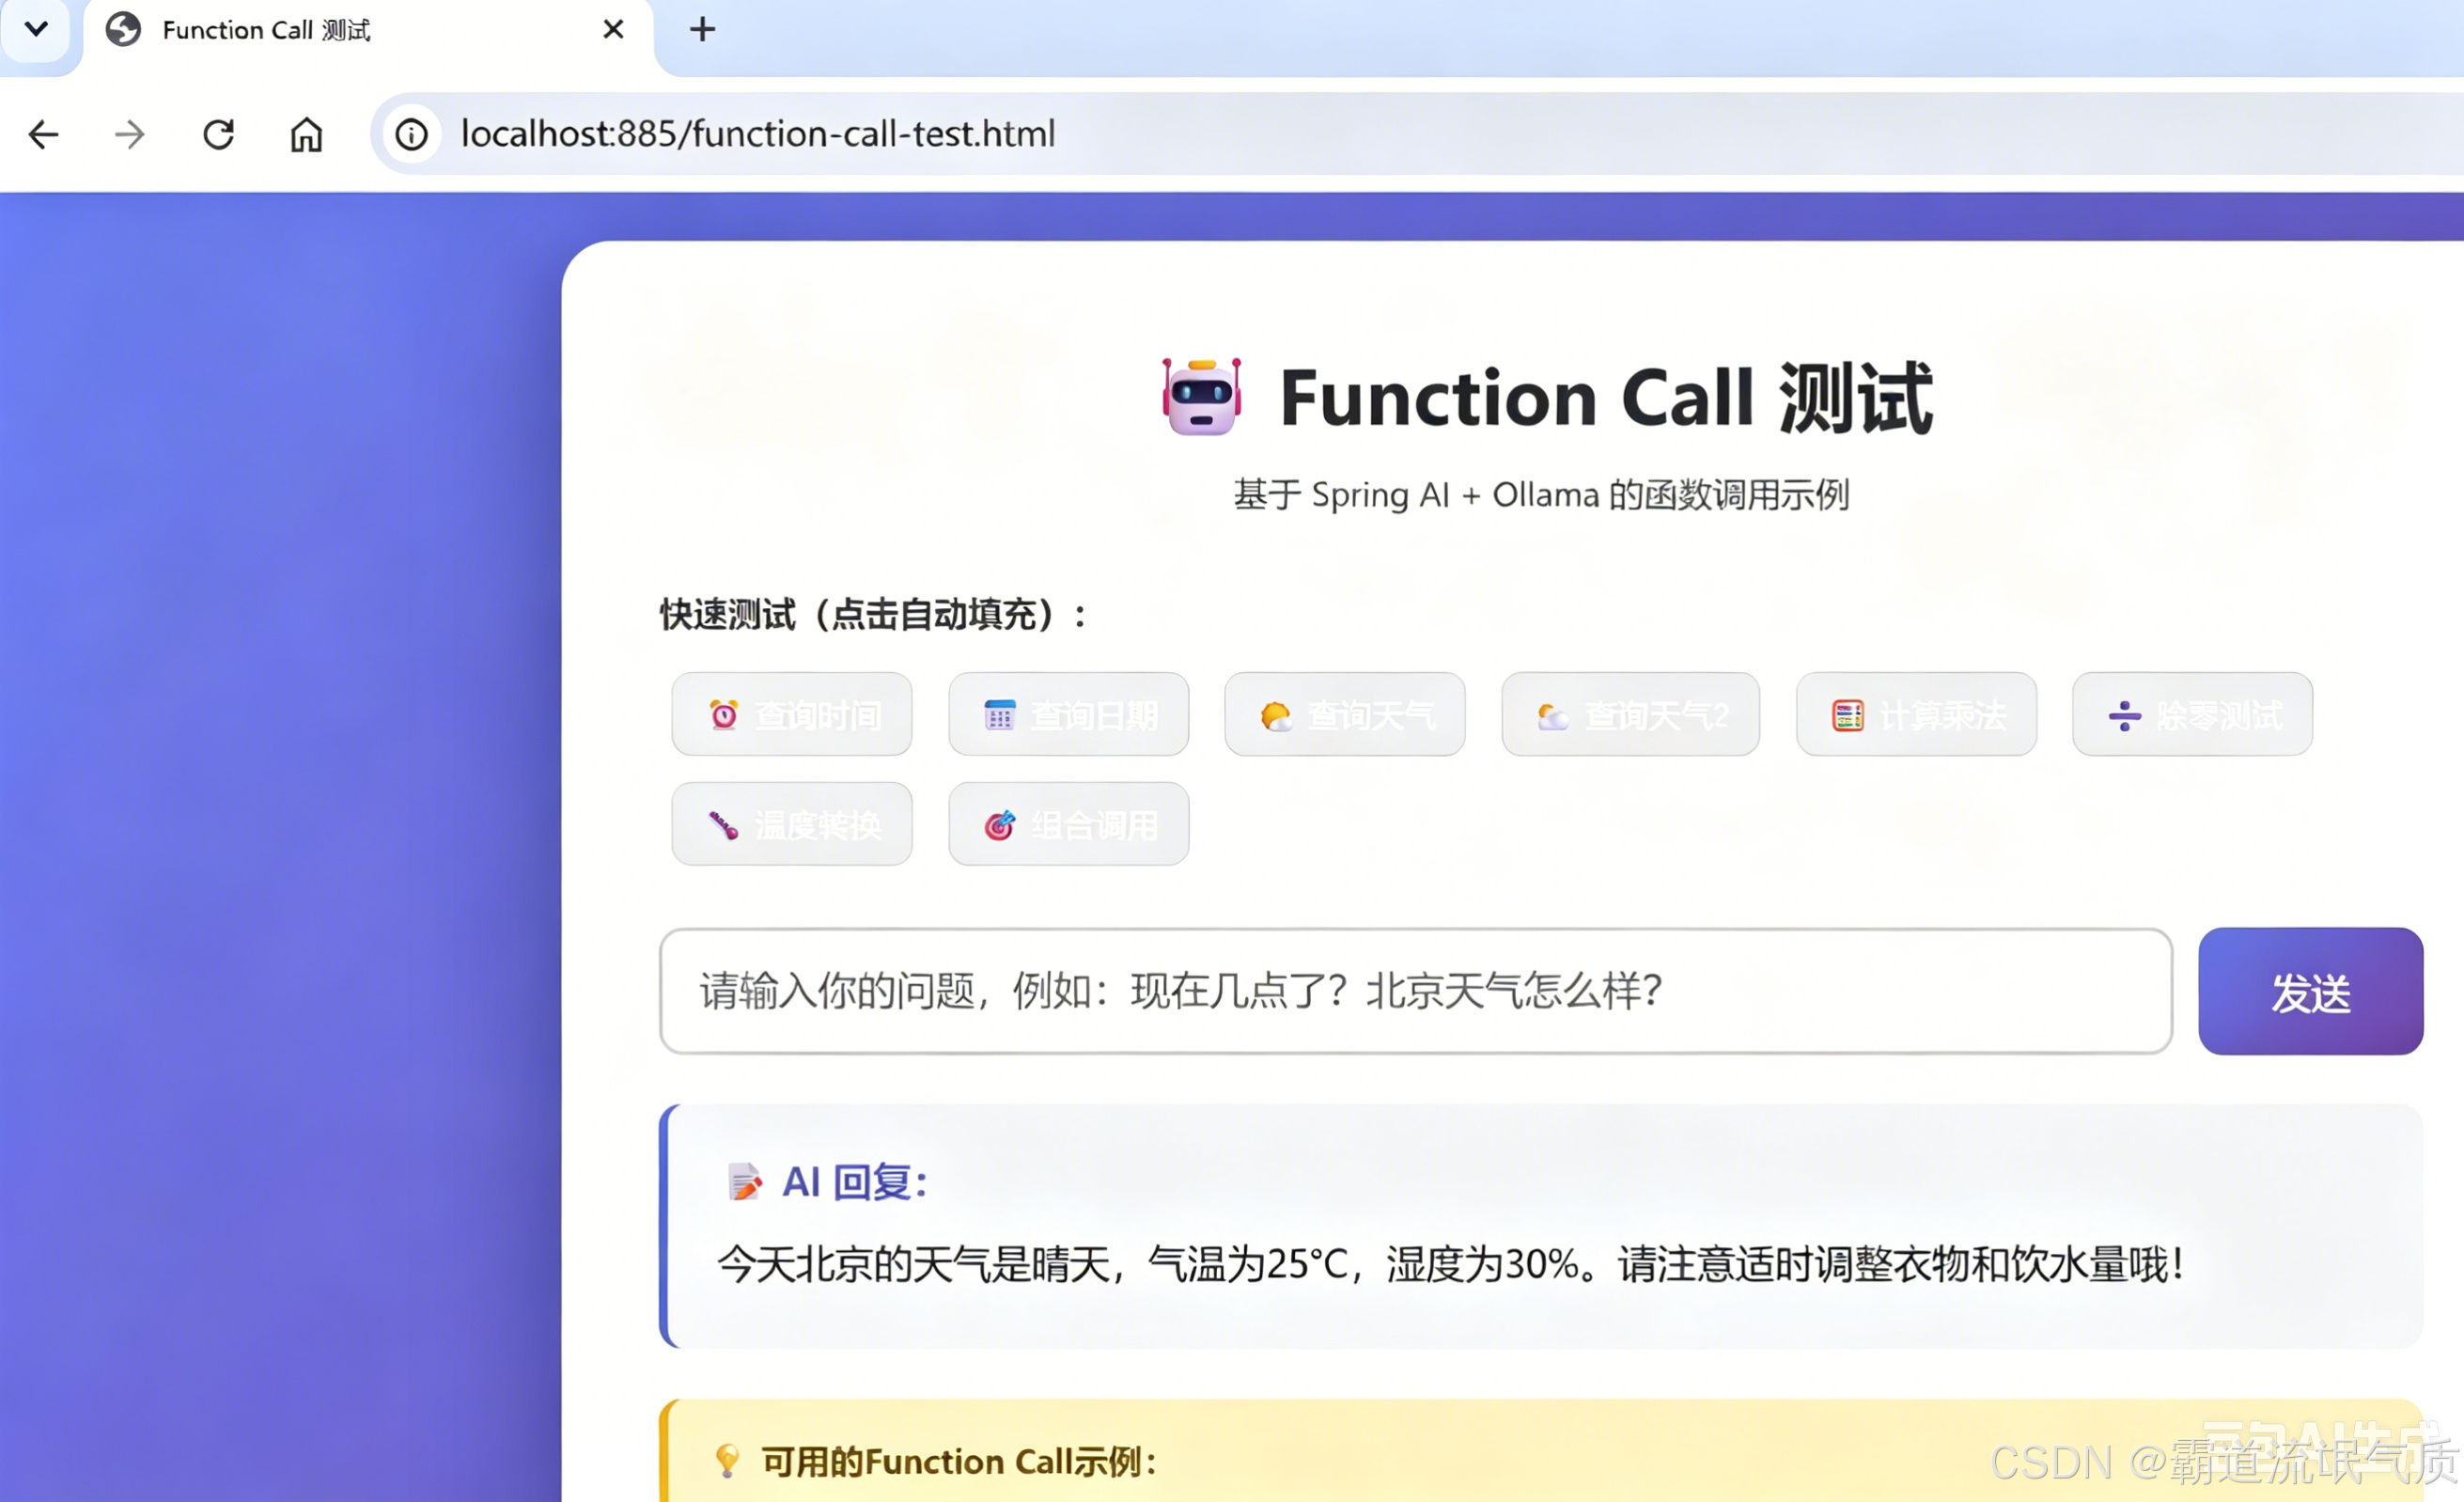
六、常见问题与解决方案
问题1:Java 版本不匹配
错误:
[ERROR] Fatal error compiling: 无效的标志: --release原因:Maven 使用了 JDK 8/11,但 Spring Boot 3.x 要求 JDK 17+
解决:
bash
set JAVA_HOME=D:\jdk-17
set PATH=%JAVA_HOME%\bin;%PATH%
mvn clean compile
问题2:找不到 @Tool 注解
错误:
[ERROR] 程序包 org.springframework.ai.tool.annotation 不存在原因:Spring AI 版本过低(M5 版本不支持),或使用了错误的 starter
解决:确保使用 M6+ 版本
xml
<spring-ai.version>1.0.0-M6</spring-ai.version>问题3:多个 ChatModel Bean 冲突
错误:
expected single matching bean but found 2: dashscopeChatModel, ollamaChatModel原因 :同时引入了 spring-ai-alibaba-starter(含 DashScope)和 spring-ai-ollama-spring-boot-starter
解决 :用 spring-ai-alibaba-core 替代 spring-ai-alibaba-starter
xml
<!-- ✅ 正确 -->
<dependency>
    <groupId>com.alibaba.cloud.ai</groupId>
    <artifactId>spring-ai-alibaba-core</artifactId>
    <version>1.0.0-M6.1</version>
</dependency>
问题4:DashScope API Key 缺失
错误:
DashScope API key must be set原因 :spring-ai-alibaba-starter 默认集成 DashScope,需要 API Key
解决 :同上,用 spring-ai-alibaba-core 替代
问题5:OllamaOptions.Builder 方法名错误
错误:
找不到符号: 方法 withModel(java.lang.String)原因 :M5 版本用 withModel(),M6 版本改成了 model()
解决:
java
// ❌ M5 写法
OllamaOptions.builder().withModel("qwen2.5").build();

// ✅ M6 写法
OllamaOptions.builder().model("qwen2.5").build();
问题6:Ollama 服务未启动
错误:
Connection refused: localhost/127.0.0.1:11434解决:
bash
ollama serve
ollama pull qwen2.5
问题7:工具未被 AI 调用
现象:AI 回答"我不知道",而不是调用工具
原因 :@Tool 的 description 不够清晰,AI 无法理解何时使用
解决:
java
// ❌ 太模糊
@Tool(description = "获取时间")

// ✅ 清晰明确
@Tool(description = "获取当前时间,格式为HH:mm:ss,当用户询问时间、几点时使用此工具")
七、踩坑记录
| 序号 | 问题 | 根因 | 解决 |
|---|---|---|---|
| 1 | --release 编译错误 |
JDK 版本不匹配 | 切换到 JDK 17+ |
| 2 | @Tool 注解找不到 |
版本号 1.0.0-M5 不存在 | 改为 1.0.0-M6.1 |
| 3 | Maven 依赖下载失败 | 版本号 1.0.0-M5 仓库中不存在 | 改为 1.0.0-M5.1 |
| 4 | OllamaOptions.withModel() 不存在 |
M5→M6 API 变更 | 改为 model() |
| 5 | OllamaChatModel 构造器参数不匹配 |
手动创建 Bean 不正确 | 依赖自动配置 |
| 6 | DashScope API Key 缺失 | starter 默认集成 DashScope | 改用 core 包 |
| 7 | 两个 ChatModel Bean 冲突 | 同时引入两个 starter | 只保留一个 |
| 8 | 工具不被调用 | 描述不够清晰 | 优化 @Tool description |
八、总结
本项目通过 Spring AI Alibaba 框架 + 本地 Ollama 模型,实现了完整的 Function Calling 功能。
核心要点:
| 要点 | 说明 |
|---|---|
| 🎯 框架选择 | Spring AI Alibaba(spring-ai-alibaba-core) |
| 🎯 模型选择 | Ollama 本地模型(qwen2.5),无需 API Key |
| 🎯 版本要求 | Spring AI 1.0.0-M6+、JDK 17+ |
| 🎯 注解来源 | @Tool/@ToolParam 来自 Spring AI 核心包 |
| 🎯 关键配置 | spring.ai.ollama.base-url 和 model |
项目优势:
- 🚀 完全本地运行,无需网络
- 🚀 数据隐私安全
- 🚀 无 API 调用费用
- 🚀 支持多种开源模型