ArcGIS JS 基础教程(8):环境光照与阴影
零、写在前面
📌 本系列教程完整目录 :ArcGIS JS 系列基础教程(100个项目常用热门功能)
💡 在线示例 :完整可运行的 HTML 示例,无需任何环境配置,可直接在浏览器中打开体验
🗂️ 专栏导航 :收藏 + 关注,专栏文章第一时间送达
❤️ 一键三连:点赞(给教程充电)+ 评论(提问必回)+ 收藏(下次再看)
一、功能介绍
在三维场景中,光照是决定场景真实感的核心要素。ArcGIS Maps SDK for JavaScript 提供了 environment.lighting API,5.0 版本中有两种光照类型:
SunLighting(type: "sun"):模拟真实太阳,通过date属性指定日期时间,SDK 会根据场景地理位置自动计算太阳的方位角和高度角VirtualLighting(type: "virtual"):虚拟光照,光方向跟随相机,适合无特定地理位置的场景
配合 directShadowsEnabled 属性和图层的 castShadows / receiveShadows 配置,还能开启真实的阴影投射------物体遮挡阳光后在地面或其他物体上留下阴影,大幅提升三维场景的视觉真实度。
二、功能实现
核心 API: view.environment.lighting,类型为 SunLighting | VirtualLighting
在 5.0 版本中,可以通过设置 date 属性让 SDK 自动计算太阳方向:
javascript
// SunLighting:根据日期时间自动计算太阳位置
view.environment.lighting = {
    type: "sun",                              // 使用 SunLighting
    date: new Date(2026, 5, 1, 17, 0, 0),     // 2026年6月1日 17:00
    directShadowsEnabled: true                 // 开启阴影
};
SDK 会根据场景的地理位置(经纬度)和传入的 date 自动计算太阳的方位角和高度角。设置不同的时间就能模拟清晨、正午、傍晚等不同时段的真实光照效果。
💡 注意: SunLighting 没有 azimuth/altitude 属性,太阳方向只能通过 date 驱动。如果想手动控制光方向(非现实模拟),可以使用 VirtualLighting(光方向跟随相机)。
阴影配置(三层开关):
开启阴影需要三个条件同时满足:
| 层级 | 配置 | 说明 |
|---|---|---|
| 全局 | view.environment.lighting.directShadowsEnabled = true |
场景整体阴影开关 |
| 图层投射 | layer.castShadows = true |
该图层的物体可以投射阴影 |
| 图层接收 | layer.receiveShadows = true |
该图层可以接收其他物体的阴影 |
javascript
// 全局开关
view.environment.lighting.directShadowsEnabled = true;

// 图层级别
const graphicsLayer = new GraphicsLayer({
    castShadows: true,
    receiveShadows: true
});
搭配 3D 物体观察阴影:
仅使用地形(DEM)来观察阴影效果不明显,推荐在场景中放置 3D 物体 (如方块、柱子)来直观地观察阴影的方向、长度变化。可通过 Mesh.createBox() 创建立方体,放入 GraphicsLayer 中并开启阴影(Mesh.createBox 的 Point.z 是底部中心,设为 0 即可贴地)。
三、功能应用
| 应用场景 | 光照策略 | 阴影需求 | 说明 |
|---|---|---|---|
| 日照分析(城市规划) | SunLighting + date,模拟冬至/夏至 | 必须开启 | 评估新建建筑对周边采光的影响 |
| 实时阴影观察 | SunLighting + 滑动时间轴 | 必须开启 | 直观展示不同时段建筑阴影变化 |
| 清晨/黄昏景观 | SunLighting,date 设为 6:00 或 19:00 | 建议开启(阴影长) | 烘托氛围的摄影视角 |
| 正午光照模拟 | SunLighting,date 设为 12:00 | 关闭或减弱 | 阴影最短,适合平面观察 |
| 智慧城市大屏 | SunLighting,date 驱动当前真实时间 | 选择性开启 | 随真实时间变化的光照效果 |
| 虚拟光照 | VirtualLighting(光方向跟随相机) | 可开启 | 无特定地理位置的演示场景 |
四、核心代码
📦 完整代码 已保存至
sample/lesson11_lighting_shadows.html,可直接在浏览器打开。
html
<!DOCTYPE html>
<html lang="zh-CN">
<head>
<meta charset="UTF-8">
<meta name="viewport" content="width=device-width, initial-scale=1.0">
<title>第8课:环境光照与阴影</title>
<link rel="stylesheet" href="https://js.arcgis.com/5.0/esri/themes/light/main.css">
<script type="module" src="https://js.arcgis.com/5.0/"></script>
<style>
* { margin: 0; padding: 0; box-sizing: border-box; }
body { font-family: "Microsoft YaHei", sans-serif; }
#mapContainer { width: 100vw; height: 100vh; }
.page-title {
position: absolute;
top: 20px; left: 50%;
transform: translateX(-50%);
background: rgba(255,255,255,0.95);
padding: 10px 24px; border-radius: 6px;
font-size: 18px; font-weight: bold;
z-index: 100;
box-shadow: 0 2px 8px rgba(0,0,0,0.15);
}
.control-panel {
position: absolute;
top: 80px; right: 20px;
background: rgba(255,255,255,0.95);
padding: 16px; border-radius: 8px;
box-shadow: 0 2px 12px rgba(0,0,0,0.15);
z-index: 100; min-width: 260px;
}
.control-panel h3 { margin: 0 0 12px 0; font-size: 14px; color: #333; }
.form-group { margin-bottom: 12px; }
.form-group label { display: block; font-size: 12px; color: #666; margin-bottom: 4px; }
.form-group input[type="range"] { width: 100%; }
.form-group input[type="checkbox"] { margin-right: 6px; }
.form-group input[type="datetime-local"] { width: 100%; padding: 4px; }
.preset-row { display: flex; gap: 6px; margin-top: 8px; flex-wrap: wrap; }
.preset-row button {
padding: 4px 10px; font-size: 12px;
border: 1px solid #d9d9d9; border-radius: 4px;
background: white; cursor: pointer;
}
.preset-row button:hover { border-color: #1890ff; color: #1890ff; }
.preset-row button.active { background: #1890ff; color: white; border-color: #1890ff; }
.btn-row { display: flex; gap: 8px; margin-top: 12px; }
.btn-row button {
flex: 1; padding: 8px 0;
border: 1px solid #d9d9d9; border-radius: 4px;
background: white; cursor: pointer; font-size: 13px;
}
.btn-row button:hover { border-color: #1890ff; color: #1890ff; }
.status-text {
position: absolute; bottom: 20px; left: 50%;
transform: translateX(-50%);
background: rgba(0,0,0,0.7); color: white;
padding: 8px 20px; border-radius: 20px;
font-size: 13px; z-index: 100; pointer-events: none;
}
</style>
</head>
<body>
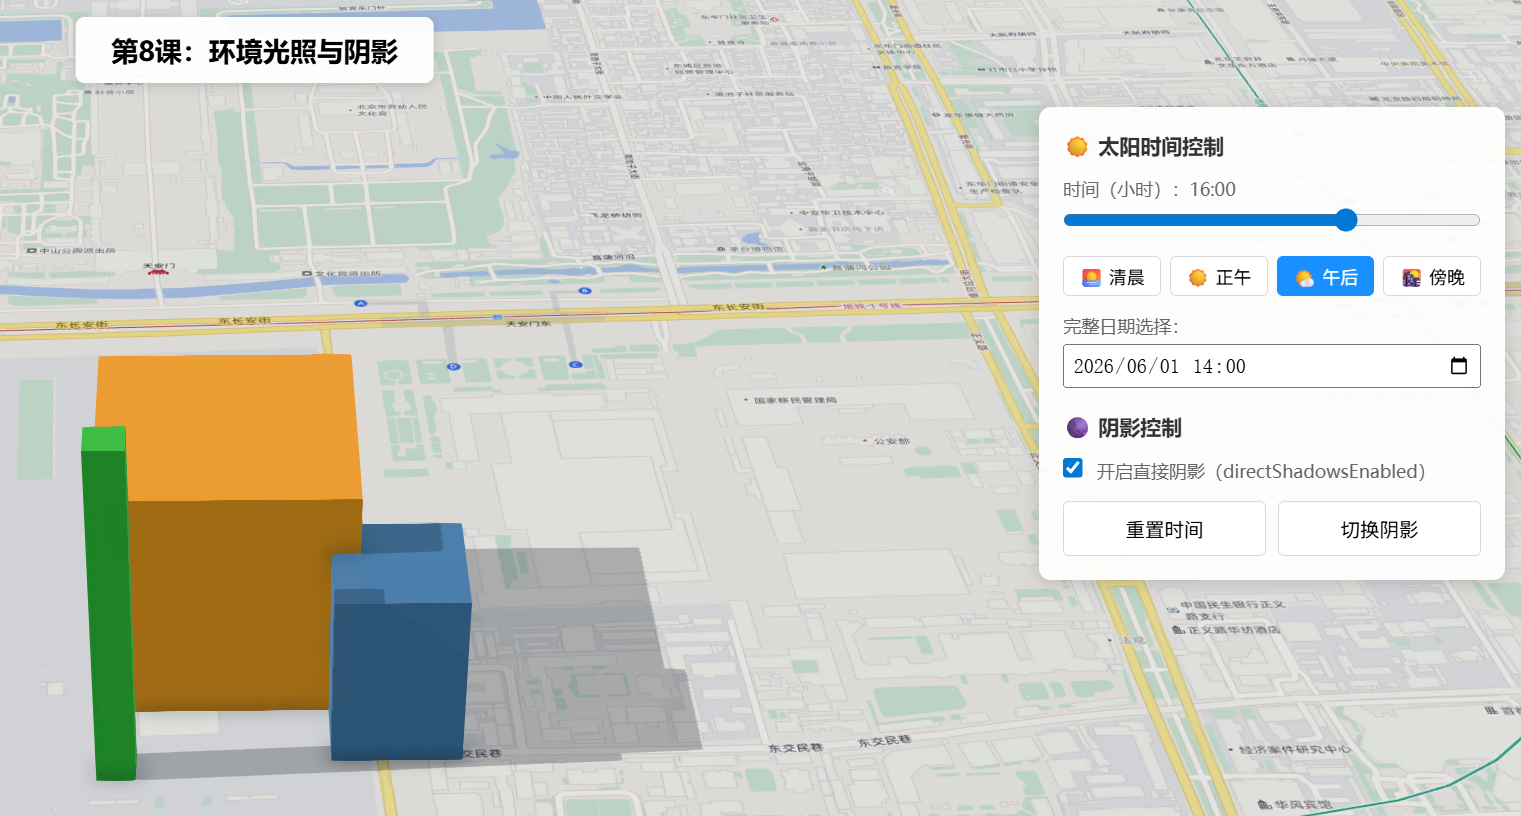
<h1 class="page-title">第8课:环境光照与阴影</h1>
<div class="control-panel">
<h3>☀️ 太阳时间控制</h3>
<div class="form-group">
<label>时间(小时):<span id="valHour">14:00</span></label>
<input type="range" id="sliderHour" min="5" max="21" value="14" step="0.5">
</div>
<div class="preset-row">
<button data-hour="6">🌅 清晨</button>
<button data-hour="12">☀️ 正午</button>
<button data-hour="16">🌤 午后</button>
<button data-hour="19">🌇 傍晚</button>
</div>
<div class="form-group" style="margin-top:12px;">
<label>完整日期选择:</label>
<input type="datetime-local" id="datetimePicker" style="width:100%;padding:4px;">
</div>
<h3 style="margin-top:16px;">🌑 阴影控制</h3>
<div class="form-group">
<label><input type="checkbox" id="chkDirectShadows" checked> 开启直接阴影(directShadowsEnabled)</label>
</div>
<div class="btn-row">
<button id="btnResetLight">重置时间</button>
<button id="btnToggleShadows">切换阴影</button>
</div>
</div>
<div class="status-text" id="statusText">时间:14:00 | 阴影:开启</div>
<div id="mapContainer"></div>
<script type="module">
const Map = await $arcgis.import("@arcgis/core/Map.js");
const SceneView = await $arcgis.import("@arcgis/core/views/SceneView.js");
const GraphicsLayer = await $arcgis.import("@arcgis/core/layers/GraphicsLayer.js");
const Graphic = await $arcgis.import("@arcgis/core/Graphic.js");
const Mesh = await $arcgis.import("@arcgis/core/geometry/Mesh.js");
const Point = await $arcgis.import("@arcgis/core/geometry/Point.js");
const getTianditu = await $arcgis.import("https://openlayers.vip/examples/resources/tianditu.js");
const vecLayers = getTianditu.default({ type: "vec_w" });
const map = new Map({
basemap: { baseLayers: [vecLayers.base, vecLayers.anno] },
ground: {
surface: {
elevationLayers: [{
url: "https://www.geosceneonline.cn/image/rest/services/OpenData/ChinaTerrain3D/ImageServer/"
}]
}
}
});
const view = new SceneView({
container: "mapContainer", map: map,
center: [116.39, 39.9], zoom: 17, tilt: 65
});
function addShadowObjects() {
// Mesh.createBox: Point.z 是底部中心 = 0 贴地
const boxGraphic = new Graphic({
geometry: Mesh.createBox(
new Point({ longitude: 116.392, latitude: 39.902, z: 0 }),
{ size: { width: 200, height: 200, depth: 200 } }
),
symbol: { type: "mesh-3d", symbolLayers: [{ type: "fill", material: { color: [255, 165, 0, 0.95] } }] }
});
const smallBox = new Graphic({
geometry: Mesh.createBox(
new Point({ longitude: 116.3935, latitude: 39.901, z: 0 }),
{ size: { width: 100, height: 150, depth: 100 } }
),
symbol: { type: "mesh-3d", symbolLayers: [{ type: "fill", material: { color: [70, 130, 180, 0.95] } }] }
});
const pillar = new Graphic({
geometry: Mesh.createBox(
new Point({ longitude: 116.391, latitude: 39.9005, z: 0 }),
{ size: { width: 30, height: 300, depth: 30 } }
),
symbol: { type: "mesh-3d", symbolLayers: [{ type: "fill", material: { color: [50, 205, 50, 0.95] } }] }
});
map.add(new GraphicsLayer({
graphics: [boxGraphic, smallBox, pillar],
castShadows: true, receiveShadows: true, title: "阴影观察物体"
}));
}
view.when(() => { addShadowObjects(); initLighting(); updateStatus(); });
function initLighting() {
applySunDate(getDateWithHour(14));
document.getElementById("sliderHour").addEventListener("input", (e) => {
const h = parseFloat(e.target.value);
applySunDate(getDateWithHour(h));
document.getElementById("valHour").textContent = formatHour(h);
clearPresetActive(); updateStatus();
});
document.querySelectorAll(".preset-row button").forEach(btn => {
btn.addEventListener("click", () => {
const h = parseFloat(btn.dataset.hour);
document.getElementById("sliderHour").value = h;
document.getElementById("valHour").textContent = formatHour(h);
applySunDate(getDateWithHour(h));
clearPresetActive(); btn.classList.add("active"); updateStatus();
});
});
const dp = document.getElementById("datetimePicker");
dp.value = formatDateLocal(getDateWithHour(14));
dp.addEventListener("change", (e) => {
const d = new Date(e.target.value);
applySunDate(d);
const h = d.getHours() + d.getMinutes() / 60;
document.getElementById("sliderHour").value = h;
document.getElementById("valHour").textContent = formatHour(h);
clearPresetActive(); updateStatus();
});
}
function applySunDate(date) {
view.environment.lighting = {
type: "sun", date: date,
directShadowsEnabled: document.getElementById("chkDirectShadows").checked
};
}
function getDateWithHour(h) {
const d = new Date();
d.setHours(Math.floor(h), Math.round((h % 1) * 60), 0, 0);
return d;
}
document.getElementById("chkDirectShadows").addEventListener("change", (e) => {
view.environment.lighting.directShadowsEnabled = e.target.checked; updateStatus();
});
document.getElementById("btnResetLight").addEventListener("click", () => {
const h = 14;
document.getElementById("sliderHour").value = h;
document.getElementById("valHour").textContent = formatHour(h);
applySunDate(getDateWithHour(h)); clearPresetActive(); updateStatus();
});
document.getElementById("btnToggleShadows").addEventListener("click", () => {
const c = view.environment.lighting.directShadowsEnabled;
view.environment.lighting.directShadowsEnabled = !c;
document.getElementById("chkDirectShadows").checked = !c; updateStatus();
});
function clearPresetActive() {
document.querySelectorAll(".preset-row button").forEach(b => b.classList.remove("active"));
}
function formatHour(h) {
const hh = Math.floor(h), mm = Math.round((h % 1) * 60);
return String(hh).padStart(2, "0") + ":" + String(mm).padStart(2, "0");
}
function formatDateLocal(d) {
const y = d.getFullYear(), m = String(d.getMonth() + 1).padStart(2, "0");
const dd = String(d.getDate()).padStart(2, "0");
const hh = String(d.getHours()).padStart(2, "0");
const mm = String(d.getMinutes()).padStart(2, "0");
return `${y}-${m}-${dd}T${hh}:${mm}`;
}
function updateStatus() {
const l = view.environment.lighting;
const hour = l.date ? formatHour(l.date.getHours() + l.date.getMinutes() / 60) : "--:--";
document.getElementById("statusText").textContent =
`时间:${hour}(UTC+8) | 阴影:${l.directShadowsEnabled ? "开启" : "关闭"}`;
}
</script>
</body>
</html>五、在线示例
🔗 在线体验地址(GitHub资源,等待时间较长,或者架梯子) :https://southjor.github.io/arcgis-examples/lessons/lesson8.html
操作说明:
- 拖动「时间」滑块(5:00-21:00),观察太阳位置变化及三个方块的阴影变化
- 点击「🌅 清晨 / ☀️ 正午 / 🌤 午后 / 🌇 傍晚」预设,快速切换时段
- 勾选/取消「开启直接阴影」观察阴影开关效果
- 使用「完整日期选择器」可指定具体年月日时分
- 三个方块(橙/蓝/绿)分别是 200m³、150m³、300m 细高柱子,便于对比阴影
六、关键API说明
| API | 说明 |
|---|---|
SunLighting(type: "sun") |
5.0 模拟太阳光照类,通过 date 自动计算太阳方向 |
VirtualLighting(type: "virtual") |
5.0 虚拟光照类,光方向跟随相机移动 |
lighting.date |
Date 对象,SDK 根据地理位置自动计算太阳方位角/高度角 |
lighting.directShadowsEnabled |
场景阴影开关(boolean),SunLighting/VirtualLighting 均支持 |
layer.castShadows |
图层级:该图层物体能否投射阴影 |
layer.receiveShadows |
图层级:该图层能否接收其他物体的阴影 |
Mesh.createBox(point, options) |
创建立方体 Mesh,Point.z 为盒体底部中心 |
常见坑点
| 问题 | 原因 | 解决方案 |
|---|---|---|
azimuth/altitude 属性不存在 |
SunLighting 和 VirtualLighting 都没有这两个属性 | 使用 date 驱动 SunLighting 自动计算 |
| 阴影不显示 | 需同时满足:directShadowsEnabled + castShadows + receiveShadows |
检查三层开关 |
Mesh.createBox 物体悬浮 |
Point.z 是底部中心,非几何中心 |
z=0 即可贴地 |
DirectionalLighting 类不存在 |
这是 4.x 的类,5.0 API 已移除 | 用 SunLighting 或 VirtualLighting |
七、系列导航
💡 小贴士 :
directShadowsEnabled可以单独设为false来关闭场景全局阴影,即使图层的castShadows和receiveShadows为true也不会渲染阴影------这在你需要临时提升性能时非常有用。