【 声明:版权所有,欢迎转载,请勿用于商业用途。 联系信箱:feixiaoxing @163.com】
有一种输入,叫ps2,就是类似于那种游戏手柄,其实用的地方也非常多。虽然叫ps2,但是在机器人领域、无人车领域也是有很多的应用场景,所以,今天正好可以看下ps2是怎么开发的。
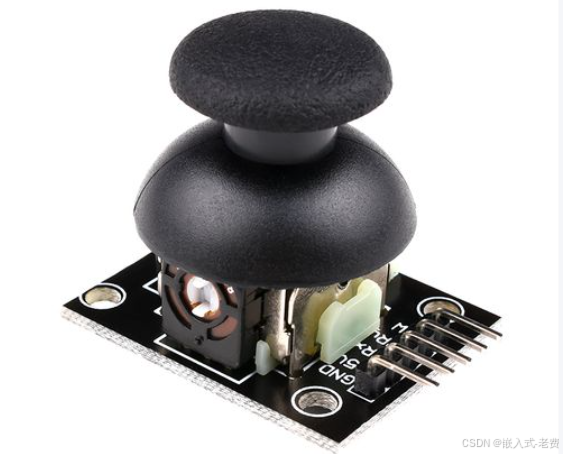
1、ps2的引脚
本身ps2的引脚有5个,主要是vcc、gnd、x、y和sw引脚。其中vcc一般接5v,但是esp32只能输入3.3v,所以这边的话还是直接vcc接3.3v。x和y,本质上就是ad采样。sw就是gpio引脚。
2、连线
熟悉了的ps2的引脚之后,接下来就可以开始连线了。vcc接3.3v,gnd直接对接esp32的gnd。x接d32,y接d33,sw接d25即可。
3、关于ad采样
本身ps2里面x和y就是一个可调电压输出,所以esp32就是使用adc采样电路来完成的。其中x对接的是adc_channel_4,y对接的是adc_channel_5,也就是两个ad采样通道。
4、ai生成代码
所有引脚、连线都确认之后,就可以用ai生成代码了。当然这次因为用的idf都是最新的6.1版本,所以这一点也要及时告诉ai,不然有可能生成的代码有问题。
#include <stdio.h>
#include <stdlib.h>
#include "freertos/FreeRTOS.h"
#include "freertos/task.h"
#include "driver/gpio.h"
#include "esp_log.h"
#include "esp_adc/adc_oneshot.h"

#define JOYSTICK_X_ADC     ADC_CHANNEL_4   // GPIO32
#define JOYSTICK_Y_ADC     ADC_CHANNEL_5   // GPIO33
#define JOYSTICK_BTN_GPIO  25
#define SAMPLE_INTERVAL_MS 50
#define DEADZONE_PERCENT   10

static const char *TAG = "Joystick";

// ADC handle
static adc_oneshot_unit_handle_t adc1_handle;

// Initialize ADC and button GPIO
static void init_joystick(void)
{
    // ADC init
    adc_oneshot_unit_init_cfg_t init_config = {
        .unit_id = ADC_UNIT_1,
    };
    ESP_ERROR_CHECK(adc_oneshot_new_unit(&init_config, &adc1_handle));

    adc_oneshot_chan_cfg_t chan_config = {
        .atten = ADC_ATTEN_DB_12,          // 0 ~ 3.3V
        .bitwidth = ADC_BITWIDTH_DEFAULT,  // 12-bit
    };
    ESP_ERROR_CHECK(adc_oneshot_config_channel(adc1_handle, JOYSTICK_X_ADC, &chan_config));
    ESP_ERROR_CHECK(adc_oneshot_config_channel(adc1_handle, JOYSTICK_Y_ADC, &chan_config));

    // Button GPIO init
    gpio_config_t io_conf = {
        .pin_bit_mask = (1ULL << JOYSTICK_BTN_GPIO),
        .mode = GPIO_MODE_INPUT,
        .pull_up_en = GPIO_PULLUP_ENABLE,
        .pull_down_en = GPIO_PULLDOWN_DISABLE,
        .intr_type = GPIO_INTR_DISABLE
    };
    ESP_ERROR_CHECK(gpio_config(&io_conf));

    ESP_LOGI(TAG, "Joystick initialized: X=GPIO32, Y=GPIO33, Btn=GPIO%d", JOYSTICK_BTN_GPIO);
}

// Read ADC in millivolts
static int read_adc_voltage(adc_channel_t channel)
{
    int adc_raw = 0;
    ESP_ERROR_CHECK(adc_oneshot_read(adc1_handle, channel, &adc_raw));
    int voltage_mv = (adc_raw * 3300) / 4095;
    return voltage_mv;
}

// Main joystick task
static void joystick_task(void *pvParameters)
{
    int last_button_state = 1;

    while (1)
    {
        int x_mv = read_adc_voltage(JOYSTICK_X_ADC);
        int y_mv = read_adc_voltage(JOYSTICK_Y_ADC);

        // Convert to percentage (-100% ~ 100%)
        int x_percent = ((x_mv - 1650) * 100) / 1650;
        int y_percent = ((y_mv - 1650) * 100) / 1650;

        if (x_percent > 100) x_percent = 100;
        if (x_percent < -100) x_percent = -100;
        if (y_percent > 100) y_percent = 100;
        if (y_percent < -100) y_percent = -100;

        // Apply deadzone
        if (abs(x_percent) < DEADZONE_PERCENT) x_percent = 0;
        if (abs(y_percent) < DEADZONE_PERCENT) y_percent = 0;

        // Read button
        int btn_state = gpio_get_level(JOYSTICK_BTN_GPIO);

        // Print result
        printf("X=%d%%, Y=%d%%, Btn=%s", x_percent, y_percent, btn_state ? "RELEASED" : "PRESSED");

        // Direction detection
        if (x_percent != 0 || y_percent != 0) {
            printf(" [Dir:");
            if (y_percent < -20) printf(" UP");
            if (y_percent > 20)  printf(" DOWN");
            if (x_percent < -20) printf(" LEFT");
            if (x_percent > 20)  printf(" RIGHT");
            printf("]");
        }

        // Button press event
        if (btn_state == 0 && last_button_state == 1) {
            printf(" -> Button Pressed!");
        }

        printf(" | Raw: X=%dmV, Y=%dmV\n", x_mv, y_mv);

        last_button_state = btn_state;

        vTaskDelay(pdMS_TO_TICKS(SAMPLE_INTERVAL_MS));
    }
}

void app_main(void)
{
    ESP_LOGI(TAG, "Starting PS2 Joystick Example (ESP32 3.3V)");
    init_joystick();
    xTaskCreate(joystick_task, "joystick_task", 4096, NULL, 5, NULL);
}
5、测试和验证
代码、硬件都准备好之后,就可以编译烧入了。烧入之后,实际测试一下,比如上、下、左、右推杆的时候,是不是打印正常。还有就是按键按下去的时候,有没有release打印。功能基本ok的话,就要看一下ai生成的代码,主要是了解一下整体流程即可。
最后就是,这次借助于ps2第一次学习了ad采样,其实后面其他类似的ad采样,都可以通过这个原理来完成,原理是一样的。