一、产品概述
| 项目 | 说明 |
|---|---|
| 产品名称 | Midscene.js |
| 厂商 | 字节跳动 Web Infra 团队(开源) |
| 官网 | midscenejs.com |
| GitHub | github.com/web-infra-dev/midscene |
| 核心原理 | Vision-Driven(纯视觉驱动)--- 基于截图 + AI 多模态模型实现 UI 操作 |
| 协议 | 适配 WebDriver 协议(通过 WebDriverAgent 连接 iOS 设备) |
| License | MIT(完全开源免费) |
| 支持技术栈 | Native / Flutter / React Native / Lynx 等任意 iOS 应用 |
二、环境准备
2.1 硬件 & 系统要求
| 项目 | 要求 |
|---|---|
| 操作系统 | macOS(iOS 开发必需) |
| Xcode | 安装 Xcode 和命令行工具 |
| iOS 设备 | 真机或模拟器(iPhone / iPad) |
| Node.js | ≥ 18.0.0 |
| 网络 | 能够访问 AI 模型 API 服务 |
| WebDriverAgent 版本 | 需要 >= 7.0.0 |
2.2 软件依赖安装
步骤 1:安装 Node.js

# 推荐使用 nvm 管理 Node 版本

curl -o- https://raw.githubusercontent.com/nvm-sh/nvm/v0.40.0/install.sh | bash

nvm install 18

nvm use 18

步骤 2:安装 Xcode 命令行工具

xcode-select --install

步骤 3:准备 WebDriverAgent
方式 A:iOS 模拟器(较简单)

# 使用 Appium 提供的预编译 WDA

# 参考:https://appium.github.io/appium-xcuitest-driver/latest/guides/run-prebuilt-wda/


方式 B:真机(需要开发者账号)

# 参考官方文档配置开发者模式:

# https://appium.github.io/appium-xcuitest-driver/latest/getting-started/device-setup/

# 需要配置:

# 1. Apple Developer 账号 + WebDriverAgent Runner target 签名

# 2. 开启开发者模式:设置 → 隐私与安全性 → 开发者模式

# 3. 开启 UI Automation:设置 → 开发者 → UI Automation

# 4. 设备信任 Mac 电脑

步骤 4:验证 WebDriverAgent 连接

# 访问 WebDriverAgent 状态接口(默认端口 8100)

curl http://localhost:8100/status

# 正确响应示例:
{
  "value" : {
    "build" : {
      "version" : "13.2.0",
      "time" : "Jun  7 2026 22:03:27",
      "productBundleIdentifier" : "com.facebook.WebDriverAgentRunner"
    },
    "os" : {
      "testmanagerdVersion" : 65535,
      "name" : "iOS",
      "sdkVersion" : "17.0",
      "version" : "18.7.9"
    },
    "device" : "iphone",
    "ios" : {
      "ip" : "192.168.1.192"
    },
    "message" : "WebDriverAgent is ready to accept commands",
    "state" : "success",
    "ready" : true
  },
  "sessionId" : null
}
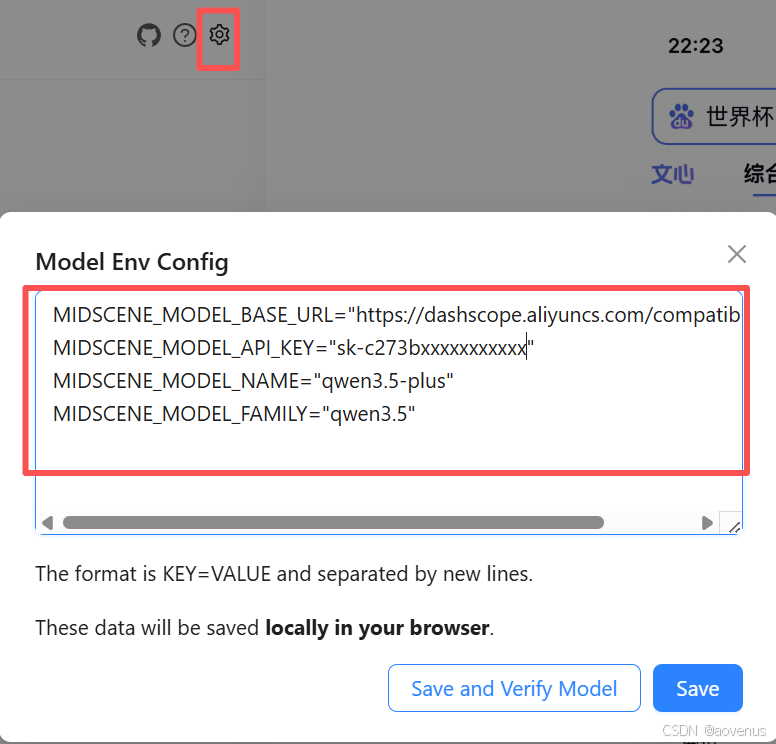
2.3 AI 模型配置
Midscene 支持多种视觉语言(VL)模型,配置通过环境变量注入:
方式一:配置环境变量文件 .env
# 创建 .env 文件

cat > .env << 'EOF'

# 必选配置

MIDSCENE_MODEL_API_KEY="替换为你的 API Key"

MIDSCENE_MODEL_BASE_URL="https://你的模型服务地址/v1"

MIDSCENE_MODEL_NAME="你的模型名称"

MIDSCENE_MODEL_FAMILY="模型系列"

# 可选:超时配置(毫秒)

MIDSCENE_MODEL_TIMEOUT=180000

EOF
方式二:支持的模型配置示例
| 模型 | 配置示例 | 说明 |
|---|---|---|
| 千问 Qwen2.5-VL | MODEL_FAMILY="qwen-vl" | 阿里云通义千问 |
| 豆包 Doubao-Vision | MODEL_FAMILY="doubao-vision" | 火山引擎 |
| 智谱 GLM-4.6V | MODEL_FAMILY="glm-4v" | 智谱 AI |
| Gemini-3-Pro/Flash | MODEL_FAMILY="gemini-3" | Google Cloud |
| UI-TARS | MODEL_FAMILY="ui-tars" | 字节开源模型,火山引擎 |
| GPT-4o / GPT-4.5 | MODEL_FAMILY="gpt-4o" | OpenAI |
| Codex App Server | BASE_URL="codex://app-server" | OAuth 登录,无需 API Key |
方式三:通过 Midscene CLI 全局配置
# 全局安装 Midscene CLI

npm install -g @midscene/cli

# 配置模型

export MIDSCENE_MODEL_BASE_URL="https://dashscope.aliyuncs.com/compatible-mode/v1"

export MIDSCENE_MODEL_API_KEY="your-api-key"

export MIDSCENE_MODEL_NAME="qwen-vl-max"

export MIDSCENE_MODEL_FAMILY="qwen-vl"
三、快速上手
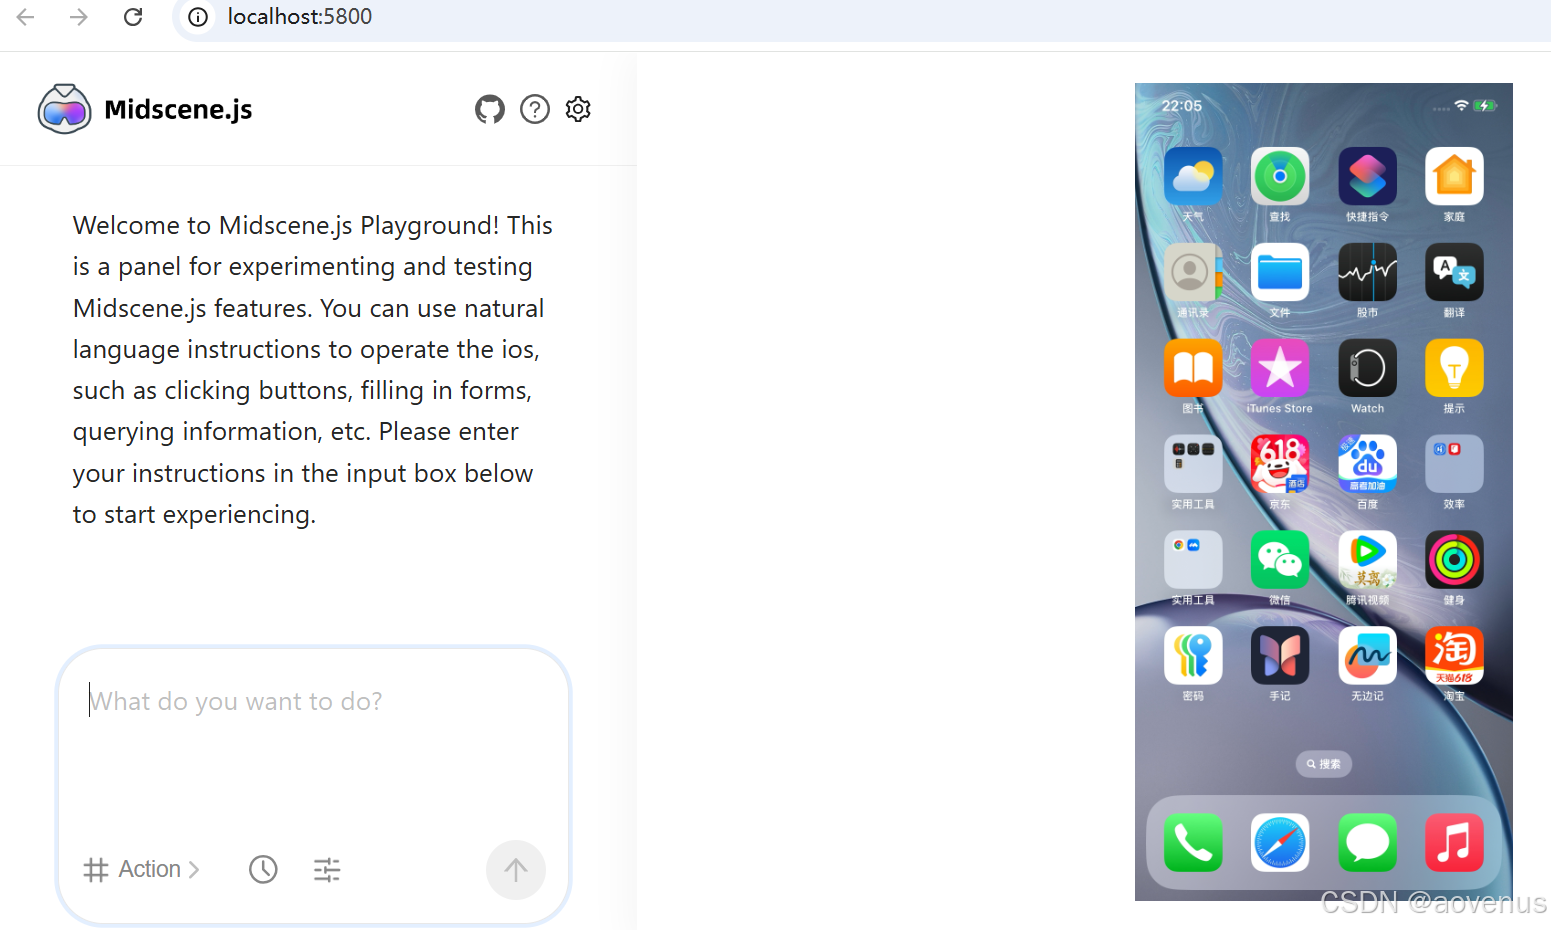
3.1 零代码体验 --- Playground
Playground 是 Midscene 提供的零代码体验工具,最快验证 AI 驱动流程:
# 启动 Playground(自动下载)

npx --yes @midscene/ios-playground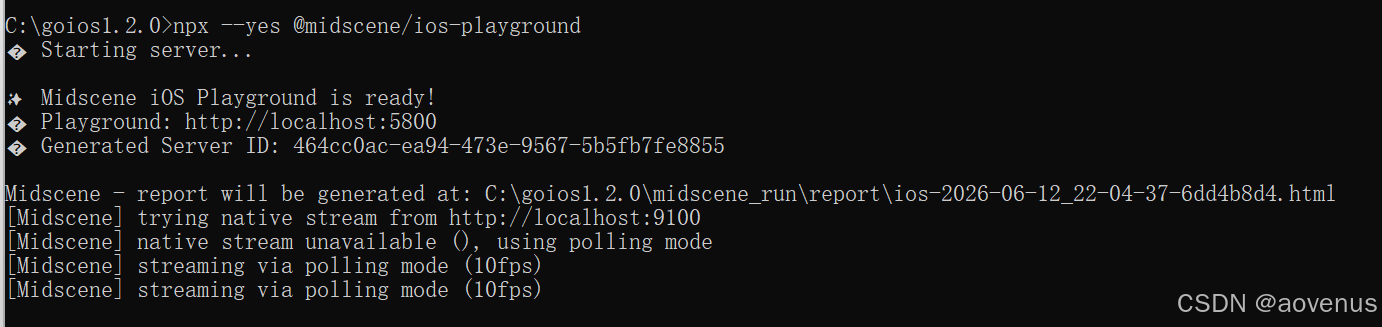
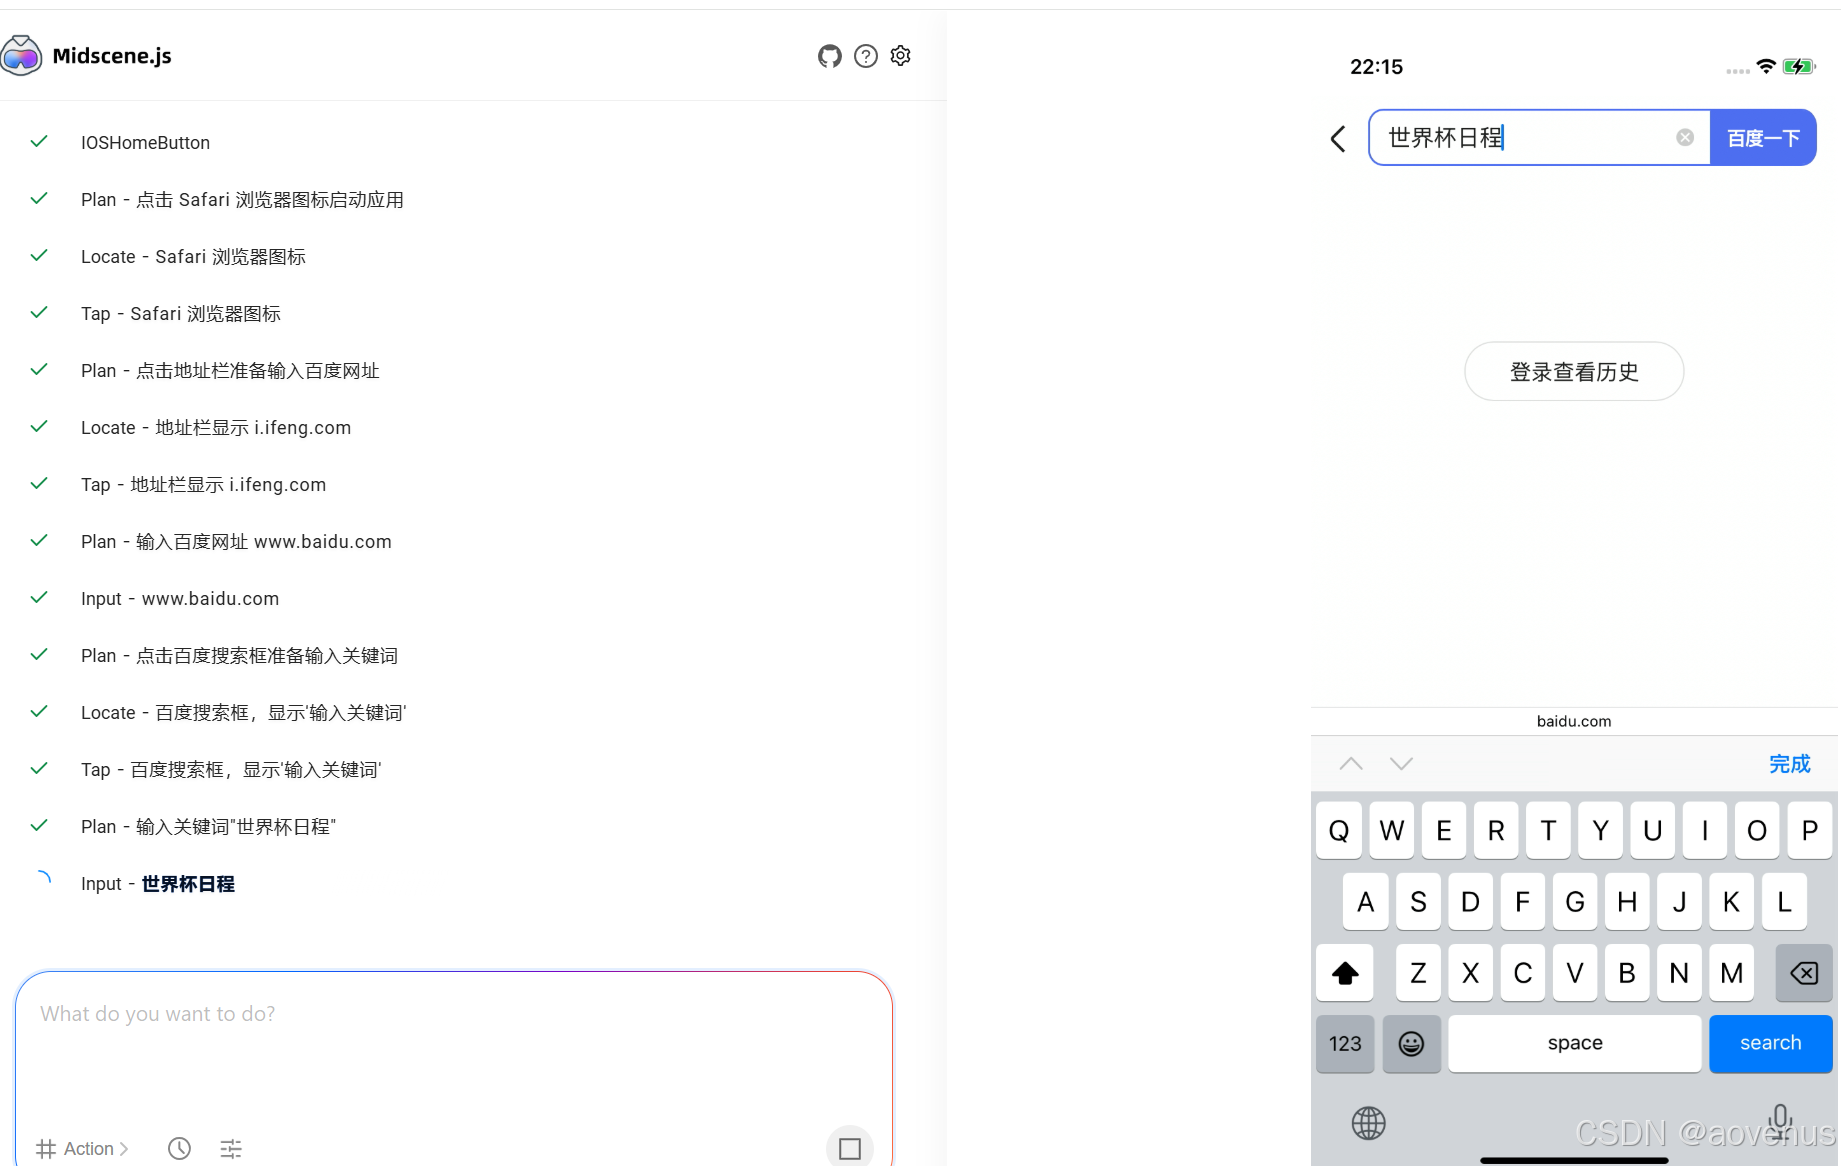
场景演示示例:
1、打开safari浏览器应用
2、输入百度网址:www.baidu.com
3、搜索框输入关键词:世界杯日程
4、点搜索
执行结果:


启动后界面包含 4 个核心 Tab:
| Tab | 功能 | 对应 API |
|---|---|---|
| Act | AI 自动规划操作步骤 | aiAct() |
| Query | 从界面提取 JSON 数据 | aiQuery() / aiBoolean() / aiNumber() / aiString() |
| Assert | AI 智能断言验证 | aiAssert() |
| Tap | 即时点击操作(无需 AI 规划) | aiTap() |
💡 提示: Playground 中通过的流程,在脚本中运行保持一致。
3.2 真机端口转发(如需)
真机连接远程 Mac 时需要端口转发:
# 安装 iproxy(来自 libimobiledevice)

brew install libimobiledevice

# 端口转发(WDA 默认 8100,MJPEG 9100)

iproxy 8100 8100 YOUR_DEVICE_ID

iproxy 9100 9100 YOUR_DEVICE_ID
windows下端口转发执行命令:
# windows下使用go-ios(官网下载:https://github.com/danielpaulus/go-ios)重新建立隧道、端口转发并启动 WDA
ios tunnel start --udid XXX
ios forward 8100 8100 --udid XXXX
ios runwda --bundleid=com.facebook.WebDriverAgentRunner.xctrunner --testrunnerbundleid=com.facebook.WebDriverAgentRunner.xctrunner --xctestconfig=WebDriverAgentRunner.xctest --udid xxxx
四、编写第一个测试脚本
4.1 安装依赖
# 创建项目目录

mkdir my-ios-test && cd my-ios-test

npm init -y

# 安装 Midscene iOS SDK

npm install @midscene/ios dotenv --save-dev
4.2 编写脚本示例
// demo.ts
import 'dotenv/config'; // 自动加载 .env 环境变量
import {
  IOSDevice,
  IOSAgent,
  agentFromWebDriverAgent,
} from '@midscene/ios';
const sleep = (ms) => new Promise((r) => setTimeout(r, ms));

await (async () => {
// 方式一:直接创建设备和 Agent
const page = new IOSDevice({
wdaPort: 8100,
wdaHost: 'localhost',
});

// 初始化 Midscene Agent
const agent = new IOSAgent(page, {
aiActionContext:
'If any location, permission, user agreement, etc. popup appears, click agree. If login page appears, close it.',
});
await page.connect();

// 方式二:使用便捷函数(推荐)
// const agent = await agentFromWebDriverAgent({
//   wdaPort: 8100,
//   wdaHost: 'localhost',
//   aiActionContext: 'If any location popup appears, click agree.',
// });

// ✅ 打开 Safari 并访问 eBay
await page.launch('https://ebay.com');
await sleep(3000);

// ✅ AI 自动规划:搜索 "Headphones"
await agent.aiAct('Search for "Headphones"');

// ✅ 等待页面加载
await agent.aiWaitFor('At least one headphone product is displayed');

// ✅ 从页面提取数据
const items = await agent.aiQuery(
'{itemTitle: string, price: Number}[], find product titles and prices in the list',
);
console.log('Headphone products:', items);

// ✅ AI 断言验证
await agent.aiAssert('Multiple headphone products are displayed on the interface');

await page.destroy();
console.log('✅ Test completed successfully');
})();
4.3 运行脚本
```bash

# 使用 tsx 运行 TypeScript

npx tsx demo.ts

# 或使用 Midscene CLI(YAML 模式)

midscene /path/to/yaml --headed
4.4 查看测试报告
脚本成功后会输出:
Midscene - report file updated: /path/to/report/some_id.html在浏览器中打开 HTML 文件,可以回放每一步交互、查询与断言的完整过程。
五、核心 API 一览
| API | 说明 | 示例 |
|---|---|---|
| aiAct(description) | AI 自动规划并执行操作 | await agent.aiAct('Search for "iPhone"') |
| aiTap(target) | 即时点击(无需 AI 规划) | await agent.aiTap('登录按钮') |
| aiQuery(schema, instruction) | 从界面提取 JSON 数据 | await agent.aiQuery('{price: Number}') |
| aiBoolean/Number/String() | 提取单一类型数据 | await agent.aiBoolean('是否存在立即购买按钮') |
| aiAssert(assertion) | AI 智能断言验证 | await agent.aiAssert('页面显示登录成功') |
| aiWaitFor(condition) | 等待条件满足 | await agent.aiWaitFor('页面加载完成') |
| page.connect() | 连接 iOS 设备 | * |
| page.launch(app) | 启动 App 或打开 URL | await page.launch('twitter://') |
| page.destroy() | 断开连接 | * |
六、使用场景举例
场景 1:iOS 原生 App 登录流程自动化
// 登录测试场景

await page.launch('twitter://');

await sleep(2000);

// AI 自动填充登录表单

await agent.aiAct('Fill in the phone number field with "13800138000"');

await agent.aiAct('Fill in the password field with "test123456"');

await agent.aiAct('Click the login button');

// AI 断言验证登录成功

await agent.aiAssert('The home page is displayed with user avatar');
场景 2:电商 App 商品搜索与筛选
// 打开电商 App

await page.launch('com.example.shopping://');

// AI 操作搜索

await agent.aiAct('Tap on the search box');

await agent.aiAct('Type "wireless headphones" and press search');

// AI 筛选和提取

await agent.aiAct('Filter by "4 stars and above" and "free shipping"');

const products = await agent.aiQuery(

'{name: string, price: Number, rating: Number}[], extract product list',

);

console.log('Filtered products:', products);
场景 3:社交 App 动态发布
await page.launch('instagram://');

await agent.aiAct('Tap on the "+" button to create a new post');

await agent.aiAct('Select the first photo from the gallery');

await agent.aiAct('Add caption "Beautiful sunset #travel"');

await agent.aiAct('Click the share button');

await agent.aiAssert('The post is successfully published and visible in the feed');
场景 4:银行 App 转账流程
await page.launch('com.example.bank://');

await agent.aiAct('Navigate to the transfer section');

await agent.aiAct('Enter recipient card number "6222021234567890"');

await agent.aiAct('Enter amount "1000" and note "生活费"');

await agent.aiAssert('Confirmation page shows correct recipient and amount');

await agent.aiAct('Enter PIN code "123456" to confirm');

await agent.aiAssert('Transfer is completed successfully with confirmation message');
场景 5:探索式测试 --- AI 全自动遍历页面
// AI 自主探索 App 所有功能
await page.launch('com.example.myapp://');
let continueExploration = true;
let step = 0;

while (continueExploration && step < 20) {
  try {
    // AI 决定下一步操作
    await agent.aiAct('Explore any unexplored UI element or navigation');
    await sleep(1000);

    // 提取页面信息
    const info = await agent.aiQuery('{screen: string, elements: string[]}');
    console.log(`Step ${step}: ${info.screen}`, info.elements);

    step++;
  } catch (e) {
    // 无法继续时停止
    continueExploration = false;
  }
}
七、真机 vs 模拟器对比
| 特性 | 真机 | 模拟器 |
|---|---|---|
| 端口转发 | 需要 iproxy | 不需要 |
| 开发者模式 | 必须手动开启 | 默认开启 |
| UI Automation 设置 | 必须手动开启 | 默认开启 |
| 性能 | 取决于真机硬件 | 取决于 Mac 性能 |
| 传感器/硬件 | 真实传感器数据 | 模拟数据 |
| 成本 | 需要真实设备 | Xcode 免费提供 |
| 适合场景 | 兼容性测试、真机性能 | 快速验证、功能测试 |
八、常见问题排查
| 问题 | 解决方案 |
|---|---|
| WebDriverAgent 已连接但无法控制设备 | 检查开发者模式是否开启、UI Automation 是否开启、设备是否信任 Mac |
| MJPEG 画面延迟高 | 启用原生 MJPEG 流:iproxy 9100 9100 YOUR_DEVICE_ID |
| AI 操作超时 | 调整 MIDSCENE_MODEL_TIMEOUT(默认 180s) |
| 模型调用失败 | 检查 API Key、Base URL、模型名称是否正确配置 |
| 无法安装 dotenv | 确保 Node.js ≥ 18,使用 npm install dotenv --save-dev |
九、Midscene vs 传统 iOS 自动化工具对比
| 维度 | **Midscene** | Appium / XCTest | UIAutomation |
|---|---|---|---|
| 元素定位方式 | AI 视觉定位(截图) | 代码/XPath 定位 | 代码定位 |
| 脚本编写方式 | 自然语言描述 | 代码脚本 | 代码脚本 |
| 页面变化适应性 | ✅ AI 自动适应 | ❌ 需维护元素定位 | ❌ 需维护元素定位 |
| 多技术栈支持 | ✅ Native/Flutter/RN/Lynx | ✅ | ❌ 仅 Native |
| 上手难度 | ⭐ 低(零代码) | ⭐⭐⭐ 中 | ⭐⭐⭐⭐ 高 |
| 学习成本 | 极低 | 高 | 高 |
| 是否开源免费 | ✅ MIT | ✅ 开源 | ✅ 内置 |
| 社区活跃度 | 活跃(字节跳动维护) | 成熟 | 已废弃 |
💡 总结:
Midscene 的核心优势在于零代码门槛 + AI 视觉驱动,用自然语言描述操作步骤即可驱动 iOS 设备,大幅降低自动化测试的维护成本,特别适合快速验证、探索式测试、跨技术栈 App 等场景。