前言
在技术文档领域,选择一个合适的文档站点生成工具往往比写文档本身更让人头疼。GitBook 太重、Hexo 需要构建、Docusaurus 配置繁琐......如果你只想安安静静地写 Markdown,然后立刻看到一个漂亮的文档网站,Docsify 就是为你而生的。
Docsify 的核心理念极其简单:不生成静态 HTML,运行时渲染 Markdown 。这意味着你写完 .md 文件,刷新浏览器就能看到效果------零构建、零等待、零污染。
本文将从零开始,带你完整掌握 Docsify 的安装配置、主题定制、插件生态、全文搜索、多语言支持、部署上线,直到企业级实践的全流程。无论你是个人开发者搭建项目文档,还是团队构建知识库,这篇指南都能帮你快速上手。
第一章 Docsify 核心概念与工作原理
1.1 运行时渲染:Docsify 的灵魂
传统文档工具(如 Hexo、VuePress、Hugo)的工作流是:
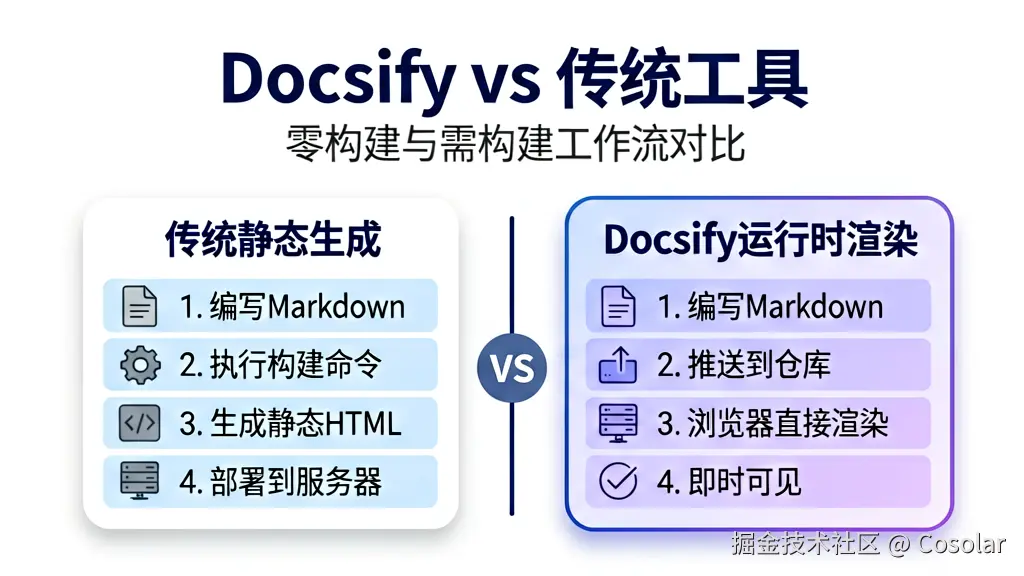
css
Markdown文件 → 构建工具 → 生成静态HTML → 部署Docsify 完全不同,它的工作流是:
Markdown文件 → 浏览器运行时加载并渲染 → 直接展示核心区别在于:Docsify 不会将 .md 文件预编译成 .html 。它只在浏览器端通过 JavaScript 动态加载 Markdown 文件,使用内置的 marked 解析器将其转换为 HTML,然后插入到页面中。
javascript
// Docsify 核心渲染流程(简化版)
const renderProcess = {
  loadMarkdown: async (path) => {
    const response = await fetch(path);
    return response.text();
  },
  compileToHTML: (markdown) => {
    return marked.parse(markdown);
  },
  updateDOM: (html) => {
    document.getElementById('app').innerHTML = html;
  }
};
1.2 三大核心优势
| 优势 | 说明 |
|---|---|
| 零构建步骤 | 无需 npm install、webpack 打包等复杂流程,写完即看 |
| 轻量级部署 | 仅需托管一个 index.html 和若干 .md 文件,无需后端服务 |
| Git 友好 | 不会生成一堆 .html 文件污染 commit 记录 |
1.3 与主流文档工具对比
| 特性 | Docsify | GitBook | VuePress | Docusaurus | Hugo |
|---|---|---|---|---|---|
| 构建方式 | 运行时渲染 | 静态生成 | 静态生成 | 静态生成 | 静态生成 |
| 构建步骤 | 无 | 需要 | 需要 | 需要 | 需要 |
| 包体积 | ~18kB | 较大 | 中等 | 较大 | 二进制 |
| 学习成本 | 极低 | 低 | 中 | 中 | 中 |
| 插件生态 | 丰富 | 一般 | 丰富 | 丰富 | 丰富 |
| SSR 支持 | 有限 | 支持 | 支持 | 支持 | 支持 |
| 适合场景 | 轻量文档/知识库 | 书籍/文档 | 技术文档 | 开源项目文档 | 博客/文档 |
1.4 Docsify 的适用场景
- ✅ 项目技术文档
- ✅ 个人知识库 / Wiki
- ✅ API 文档
- ✅ 内部团队文档
- ✅ 快速原型展示
- ❌ 大型电商网站(需要 SSR/SEO)
- ❌ 高并发公开站点(运行时渲染有性能开销)
第二章 快速上手:5分钟搭建文档站
2.1 环境准备
Docsify 的运行只需要两样东西:
- Node.js(推荐 v18+):用于安装 docsify-cli 工具
- 一个文本编辑器:写 Markdown
bash
# 安装 docsify-cli
npm i docsify-cli -g

# 验证安装
docsify --version
2.2 初始化项目
bash
# 创建项目目录
mkdir my-docs && cd my-docs

# 初始化 Docsify 项目
docsify init .

# 查看生成的文件
ls -la
初始化后会生成三个核心文件:
perl
my-docs/
├── index.html   # 入口文件,Docsify 核心配置
├── README.md    # 首页内容
└── .nojekyll    # 阻止 GitHub Pages 忽略下划线开头的文件
2.3 本地预览
bash
# 启动本地开发服务器(默认 http://localhost:3000)
docsify serve .

# 指定端口
docsify serve . --port 4000
打开浏览器访问 http://localhost:3000,你就能看到文档站了!
2.4 最小化 index.html 解析
html
<!DOCTYPE html>
<html>
<head>
  <meta charset="UTF-8">
  <title>My Docs</title>
  <!-- Docsify 主题样式 -->
  <link rel="stylesheet" href="//cdn.jsdelivr.net/npm/docsify@4/lib/themes/vue.css">
</head>
<body>
  <!-- Docsify 渲染容器 -->
  <div id="app">加载中...</div>
  <!-- Docsify 核心脚本 -->
  <script>
    window.$docsify = {
      name: 'My Docs',       // 站点名称
      repo: '',              // GitHub 仓库地址
      loadSidebar: true,     // 加载侧边栏
      subMaxLevel: 3,        // 侧边栏最大层级
    }
  </script>
  <script src="//cdn.jsdelivr.net/npm/docsify@4/lib/docsify.min.js"></script>
</body>
</html>关键配置说明:
| 配置项 | 作用 | 默认值 |
|---|---|---|
name |
侧边栏顶部显示的站点名称 | 无 |
repo |
右上角显示的 GitHub 图标链接 | 无 |
loadSidebar |
是否加载 _sidebar.md 侧边栏 |
false |
subMaxLevel |
侧边栏自动生成的标题层级 | 0 |
第三章 目录结构与导航
3.1 推荐的项目结构
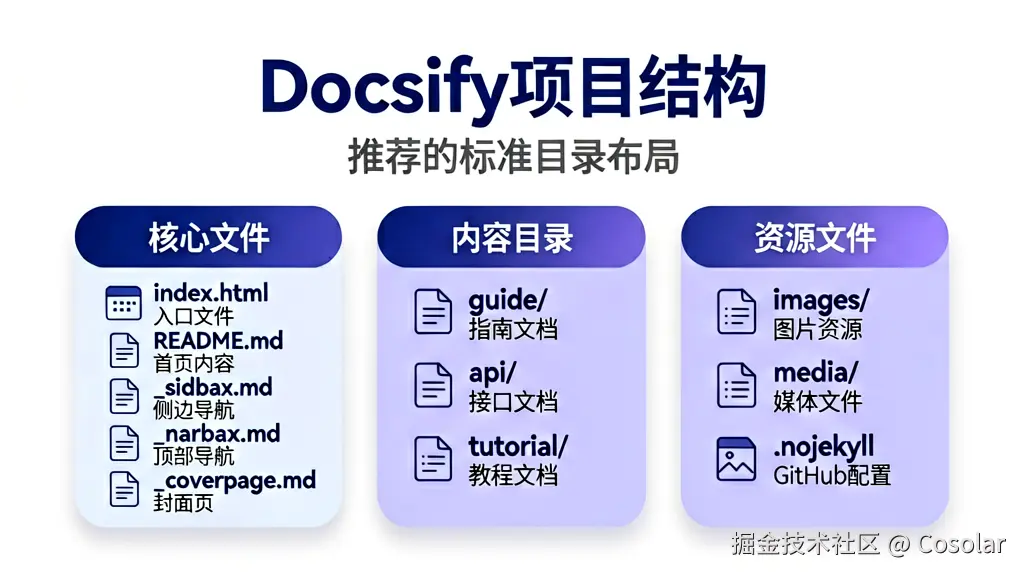
perl
my-docs/
├── index.html              # 入口文件
├── README.md               # 首页
├── _sidebar.md             # 侧边栏配置
├── _navbar.md              # 导航栏配置
├── _coverpage.md           # 封面页
├── guide/                  # 指南章节
│   ├── README.md           # 指南首页
│   ├── getting-started.md  # 快速开始
│   ├── configuration.md    # 配置说明
│   └── deployment.md       # 部署指南
├── api/                    # API 文档章节
│   ├── README.md           # API 首页
│   ├── core.md             # 核心 API
│   └── plugins.md          # 插件 API
├── images/                 # 图片资源
│   └── logo.png
└── .nojekyll               # GitHub Pages 兼容
3.2 侧边栏配置
创建 _sidebar.md 文件:
markdown
- **入门指南**
  - [首页](/)
  - [快速开始](guide/getting-started.md)
  - [配置说明](guide/configuration.md)

- **API 文档**
  - [核心 API](api/core.md)
  - [插件 API](api/plugins.md)

- **进阶**
  - [部署指南](guide/deployment.md)
  - [自定义主题](custom-theme.md)
⚠️ 重要 :
loadSidebar必须设置为true,否则_sidebar.md不会被加载。
3.3 导航栏配置
创建 _navbar.md 文件:
markdown
- [首页](/)
- [指南](guide/)
- [API](api/)
- [GitHub](https://github.com/your-repo)
配置中需要添加:
javascript
window.$docsify = {
  loadNavbar: true,  // 加载导航栏
}
3.4 封面页配置
创建 _coverpage.md 文件:
markdown

# My Docs <small>v2.0</small>
> 一个神奇的文档站点生成器
- 零构建,写完即看
- 轻量级,仅 18kB
- 丰富的插件生态
[GitHub](https://github.com/your-repo)
[开始阅读](#指南)配置中需要添加:
javascript
window.$docsify = {
  coverpage: true,  // 启用封面页
  onlyCover: true,  // 首页只显示封面(可选)
}
第四章 主题定制与样式美化
4.1 内置主题
Docsify 提供了 4 套内置主题,只需修改 index.html 中的 CSS 链接即可切换:
html
<!-- Vue 主题(默认,推荐) -->
<link rel="stylesheet" href="//cdn.jsdelivr.net/npm/docsify@4/lib/themes/vue.css">

<!-- Buble 主题 -->
<link rel="stylesheet" href="//cdn.jsdelivr.net/npm/docsify@4/lib/themes/buble.css">

<!-- Dark 主题 -->
<link rel="stylesheet" href="//cdn.jsdelivr.net/npm/docsify@4/lib/themes/dark.css">

<!-- Pure 主题(极简风格) -->
<link rel="stylesheet" href="//cdn.jsdelivr.net/npm/docsify@4/lib/themes/pure.css">| 主题 | 风格 | 适用场景 |
|---|---|---|
| Vue | 清爽现代 | 通用文档站 |
| Buble | 简洁圆润 | 轻量文档 |
| Dark | 暗色护眼 | 技术文档/开发者 |
| Pure | 极简白色 | 偏学术文档 |
4.2 自定义 CSS 样式
创建自定义样式文件 style.css,覆盖默认主题:
css
/* 修改主色调 */
:root {
  --theme-color: #2563EB;       /* 主色:蓝色 */
  --theme-color-dark: #1D4ED8;  /* 主色深色 */
}

/* 修改侧边栏样式 */
.sidebar {
  background-color: #f8fafc;
  border-right: 1px solid #e2e8f0;
}

.sidebar > h1 {
  font-size: 1.5rem;
  color: #1e293b;
}

/* 修改内容区域样式 */
.content {
  max-width: 900px;
  margin: 0 auto;
  padding: 2rem;
}

/* 代码块样式 */
.markdown-section pre {
  background-color: #1e293b;
  border-radius: 8px;
  padding: 1.5rem;
}

.markdown-section code {
  font-family: 'JetBrains Mono', 'Fira Code', monospace;
}

/* 表格样式 */
.markdown-section table {
  border-collapse: collapse;
  width: 100%;
  margin: 1.5rem 0;
}

.markdown-section th,
.markdown-section td {
  border: 1px solid #e2e8f0;
  padding: 0.75rem 1rem;
}

.markdown-section th {
  background-color: #f1f5f9;
  font-weight: 600;
}
在 index.html 中引入:
html
<link rel="stylesheet" href="style.css">4.3 社区主题
除了内置主题,社区还提供了多种高质量主题:
html
<!-- docsify-themeable:最流行的主题框架 -->
<link rel="stylesheet" href="https://cdn.jsdelivr.net/npm/docsify-themeable@0/dist/css/theme-simple.css">

<!-- docsify-darklight-theme:暗色/亮色切换 -->
<link rel="stylesheet" href="https://cdn.jsdelivr.net/npm/docsify-darklight-theme@0/dist/style.css">暗色/亮色切换配置:
javascript
window.$docsify = {
darklightTheme: {
siteFont: 'Source Sans Pro, Helvetica Neue, Arial, sans-serif',
codeFontFamily: 'Roboto Mono, Monaco, courier, monospace',
bodyFontSize: '15px',
dark: {
background: '#1e293b',
textColor: '#e2e8f0',
codeTextColor: '#e2e8f0',
codeBackgroundColor: '#0f172a',
},
light: {
background: '#ffffff',
textColor: '#1e293b',
codeTextColor: '#1e293b',
codeBackgroundColor: '#f8fafc',
}
}
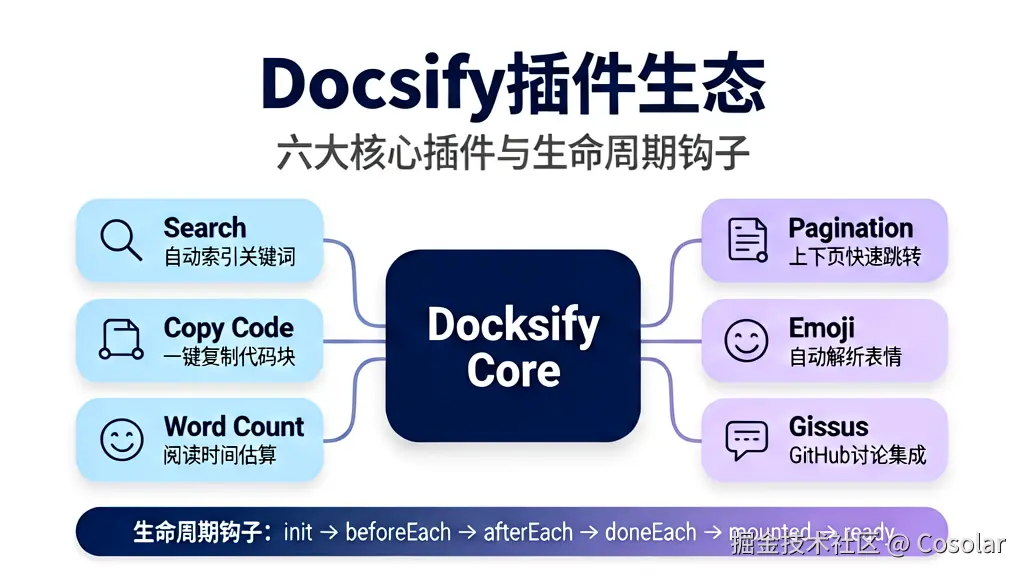
}第五章 插件生态与核心功能
5.1 全文搜索
全文搜索是 Docsify 最实用的内置功能之一,无需额外配置即可启用:
javascript
window.$docsify = {
  search: {
    maxAge: 86400000,        // 缓存时间(毫秒)
    paths: 'auto',           // 自动索引所有页面
    placeholder: '搜索文档',  // 搜索框占位文字
    noData: '没有找到结果',   // 无结果提示
    depth: 6,                // 搜索标题深度
    hideOtherSidebarContent: true,  // 搜索时隐藏其他侧边栏内容
  }
}
引入搜索插件:
html
<script src="//cdn.jsdelivr.net/npm/docsify@4/lib/plugins/search.min.js"></script>自定义搜索范围:如果只想搜索特定目录:
javascript
window.$docsify = {
  search: {
    paths: ['/guide/', '/api/'],  // 只索引这两个目录
  }
}
5.2 代码高亮
Docsify 内置支持 Prism.js 代码高亮,默认支持 HTML、CSS、JavaScript、Python 等常见语言。要支持更多语言,需要额外引入 Prism 组件:
html
<!-- 支持 Go 语法高亮 -->
<script src="//cdn.jsdelivr.net/npm/prismjs@1/components/prism-go.min.js"></script>

<!-- 支持 Rust 语法高亮 -->
<script src="//cdn.jsdelivr.net/npm/prismjs@1/components/prism-rust.min.js"></script>

<!-- 支持 SQL 语法高亮 -->
<script src="//cdn.jsdelivr.net/npm/prismjs@1/components/prism-sql.min.js"></script>

<!-- 支持 Shell/Bash 语法高亮 -->
<script src="//cdn.jsdelivr.net/npm/prismjs@1/components/prism-bash.min.js"></script>

<!-- 支持 YAML 语法高亮 -->
<script src="//cdn.jsdelivr.net/npm/prismjs@1/components/prism-yaml.min.js"></script>

<!-- 支持 TOML 语法高亮 -->
<script src="//cdn.jsdelivr.net/npm/prismjs@1/components/prism-toml.min.js"></script>代码行号显示:
javascript
window.$docsify = {
  formatUpdated: '{YYYY}-{MM}-{DD} {HH}:{mm}',
}
5.3 代码复制按钮
html
<script src="//cdn.jsdelivr.net/npm/docsify-copy-code@2/dist/docsify-copy-code.min.js"></script>5.4 Emoji 支持
html
<script src="//cdn.jsdelivr.net/npm/docsify@4/lib/plugins/emoji.min.js"></script>使用方式:在 Markdown 中直接写 Emoji 代码,如 :smile: → 😄
5.5 外部链接跳转
自动为外部链接添加 target="_blank" 属性:
html
<script src="//cdn.jsdelivr.net/npm/docsify@4/lib/plugins/external-script.min.js"></script>5.6 分页导航
在文档底部添加"上一页/下一页"导航:
javascript
window.$docsify = {
  pagination: {
    previousText: '上一章节',
    nextText: '下一章节',
    crossChapter: true,
    crossChapterText: true,
  }
}
html
<script src="//cdn.jsdelivr.net/npm/docsify-pagination@2/dist/docsify-pagination.min.js"></script>5.7 字数统计
javascript
window.$docsify = {
  count: {
    countable: true,
    fontsize: '0.9em',
    color: 'rgb(90,90,90)',
    language: 'chinese'
  }
}
html
<script src="//cdn.jsdelivr.net/npm/docsify-count@latest/dist/countable.min.js"></script>5.8 评论系统(Giscus)
集成 GitHub Discussions 作为评论系统:
javascript
window.$docsify = {
  plugins: [
    function giscus(hook) {
      hook.afterEach(function(html) {
        return html + '<div id="giscus-container"></div>';
      });
      hook.doneEach(function() {
        const script = document.createElement('script');
        script.src = 'https://giscus.app/client.js';
        script.setAttribute('data-repo', 'your-username/your-repo');
        script.setAttribute('data-repo-id', 'your-repo-id');
        script.setAttribute('data-category', 'Announcements');
        script.setAttribute('data-category-id', 'your-category-id');
        script.setAttribute('data-mapping', 'pathname');
        script.setAttribute('data-theme', 'preferred_color_scheme');
        script.setAttribute('data-reactions-enabled', '1');
        script.setAttribute('data-emit-metadata', '0');
        script.setAttribute('data-input-position', 'top');
        script.setAttribute('data-lang', 'zh-CN');
        script.crossOrigin = 'anonymous';
        script.async = true;
        document.getElementById('giscus-container').appendChild(script);
      });
    }
  ]
}
第六章 多语言(i18n)支持
6.1 目录结构
Docsify 原生支持多语言文档,目录结构如下:
perl
my-docs/
├── index.html
├── README.md              # 默认语言首页(中文)
├── _sidebar.md            # 默认语言侧边栏
├── guide/
│   └── getting-started.md
├── en/                    # 英文文档
│   ├── README.md
│   ├── _sidebar.md
│   └── guide/
│       └── getting-started.md
└── ja/                    # 日文文档
    ├── README.md
    ├── _sidebar.md
    └── guide/
        └── getting-started.md
6.2 配置
javascript
window.$docsify = {
  name: 'My Docs',
  // 多语言配置
  alias: {
    '/.*/_sidebar.md': '_sidebar.md',  // 所有语言共享侧边栏
  },
  // 语言切换
  auto2top: true,
}在导航栏中添加语言切换链接(_navbar.md):
markdown
- [中文](/)
- [English](/en/)
- [日本語](/ja/)
第七章 部署上线
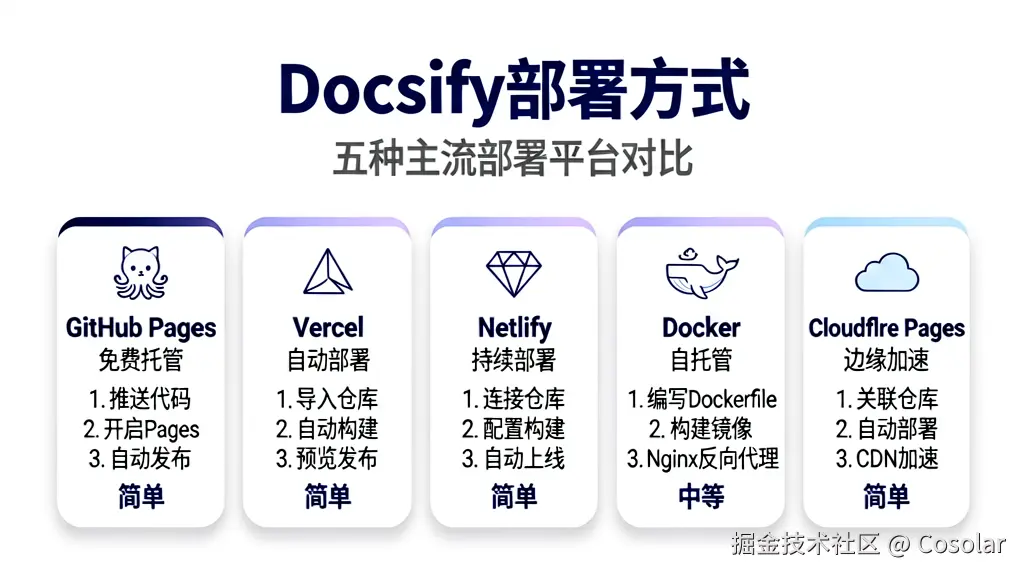
7.1 GitHub Pages 部署(推荐)
GitHub Pages 是 Docsify 最自然的部署方式------因为 Docsify 本质上就是一个 index.html + Markdown 文件,直接推送到 GitHub 仓库即可。
方式一:直接推送
bash
# 初始化 Git 仓库
git init
git add .
git commit -m "init: docsify docs"

# 推送到 GitHub
git remote add origin https://github.com/your-username/your-repo.git
git push -u origin main
然后在 GitHub 仓库的 Settings → Pages 中选择 main 分支即可。
方式二:GitHub Actions 自动部署
创建 .github/workflows/deploy.yml:
yaml
name: Deploy Docs

on:
  push:
    branches: [main]
  workflow_dispatch:

permissions:
  contents: read
  pages: write
  id-token: write

concurrency:
  group: pages
  cancel-in-progress: false

jobs:
  deploy:
    environment:
      name: github-pages
      url: ${{ steps.deployment.outputs.page_url }}
    runs-on: ubuntu-latest
    steps:
      - name: Checkout
        uses: actions/checkout@v4

      - name: Setup Pages
        uses: actions/configure-pages@v4

      - name: Upload artifact
        uses: actions/upload-pages-artifact@v3
        with:
          path: '.'

      - name: Deploy to GitHub Pages
        id: deployment
        uses: actions/deploy-pages@v4
7.2 Vercel 部署
bash
# 安装 Vercel CLI
npm i vercel -g

# 部署
cd my-docs
vercel

# 生产环境部署
vercel --prod
Vercel 会自动识别静态站点,无需额外配置。
7.3 Netlify 部署
创建 netlify.toml:
toml
[build]
  publish = "."

[[redirects]]
  from = "/*"
  to = "/index.html"
  status = 200
然后在 Netlify 控制台中连接 GitHub 仓库,设置构建命令为空(因为无需构建),发布目录为 .。
7.4 Docker 部署
dockerfile
FROM nginx:alpine

# 复制文档文件到 Nginx 目录
COPY . /usr/share/nginx/html/

# 自定义 Nginx 配置(处理路由)
RUN echo 'server { \
    listen 80; \
    server_name localhost; \
    root /usr/share/nginx/html; \
    index index.html; \
    location / { \
        try_files $uri $uri/ /index.html; \
    } \
}' > /etc/nginx/conf.d/default.conf

EXPOSE 80
CMD ["nginx", "-g", "daemon off;"]
bash
# 构建镜像
docker build -t my-docs .

# 运行容器
docker run -d -p 8080:80 my-docs
7.5 Cloudflare Pages 部署
- 登录 Cloudflare Dashboard → Pages
- 连接 GitHub 仓库
- 构建命令留空
- 输出目录设为
. - 部署完成
第八章 高级配置与技巧
8.1 运行时配置($docsify)
window.$docsify 是 Docsify 的核心配置对象,支持 50+ 配置项。以下是最常用的配置:
javascript
window.$docsify = {
  // 基础配置
  name: 'My Docs',                    // 站点名称
  nameLink: '/',                      // 名称链接
  repo: 'user/repo',                  // GitHub 仓库

  // 导航配置
  loadSidebar: true,                  // 加载侧边栏
  loadNavbar: true,                   // 加载导航栏
  coverpage: true,                    // 启用封面页

  // 渲染配置
  el: '#app',                         // 挂载元素
  formatUpdated: '{YYYY}-{MM}-{DD}',  // 文档更新时间格式
  relativePath: false,                // 相对路径模式

  // 路由配置
  alias: {
    '/.*/_sidebar.md': '_sidebar.md', // 侧边栏别名
  },
  autoHeader: true,                   // 自动添加标题
  subMaxLevel: 3,                     // 侧边栏最大层级

  // 行为配置
  auto2top: true,                     // 路由切换时自动回到顶部
  homepage: 'README.md',              // 首页文件
  notFoundPage: true,                 // 自定义 404 页面
  topMargin: 60,                      // 内容顶部间距

  // 外观配置
  themeColor: '#2563EB',              // 主题色
  mergeNavbar: true,                  // 移动端合并导航栏

  // 搜索配置
  search: {
    maxAge: 86400000,
    paths: 'auto',
    placeholder: '搜索',
    noData: '无结果',
  },
}
8.2 自定义插件开发
Docsify 的插件系统基于生命周期钩子,提供了 5 个核心钩子:
javascript
// 自定义插件模板
function myPlugin(hook, vm) {
  // 钩子1:初始化之前
  hook.init(function() {
    console.log('Docsify 初始化之前');
  });

  // 钩子2:每次路由切换之前
  hook.beforeEach(function(markdown) {
    console.log('路由切换前,Markdown 内容:', markdown.substring(0, 50));
    return markdown; // 可以修改 Markdown 内容
  });

  // 钩子3:每次路由切换之后(HTML 已生成)
  hook.afterEach(function(html) {
    console.log('路由切换后,HTML 内容:', html.substring(0, 50));
    return html; // 可以修改 HTML 内容
  });

  // 钩子4:每次路由切换之后(DOM 已更新)
  hook.doneEach(function() {
    console.log('DOM 已更新');
  });

  // 钩子5:初始化完成
  hook.mounted(function() {
    console.log('Docsify 已挂载');
  });

  // 钩子6:准备完成
  hook.ready(function() {
    console.log('Docsify 完全就绪');
  });
}

// 注册插件
window.$docsify = {
  plugins: [myPlugin]
};
实战示例:自动添加"编辑此页"按钮
javascript
function editOnGitHub(hook, vm) {
  hook.afterEach(function(html) {
    const repo = 'https://github.com/user/repo/edit/main';
    const path = vm.route.file;
    if (path) {
      const editLink = `<p style="text-align: right; margin-top: 2rem;">
        <a href="${repo}${path}" target="_blank" style="color: #2563EB;">
          ✏️ 编辑此页
        </a>
      </p>`;
      return html + editLink;
    }
    return html;
  });
}

window.$docsify = {
  plugins: [editOnGitHub]
};
8.3 Markdown 扩展语法
Docsify 支持一些 Markdown 扩展语法:
1. 文档嵌入
markdown
<!-- 嵌入其他 Markdown 文件 -->
[嵌入的文档](some/document.md)
2. 重要提示容器
markdown
> [!NOTE]
> 这是一个提示信息

> [!TIP]
> 这是一个技巧提示

> [!WARNING]
> 这是一个警告信息

> [!IMPORTANT]
> 这是一个重要信息
3. 忽略标题链接
markdown
<!-- 在标题后添加 {docsify-ignore} 忽略该标题的锚点 -->
### 不需要锚点的标题 {docsify-ignore}

<!-- 忽略所有子标题 -->
### 标题 {:ignore}
8.4 服务端渲染(SSR)
Docsify 支持 SSR,用于 SEO 优化:
javascript
// server.js
const docsifyServerRenderer = require('docsify-server-renderer');
const config = {
  name: 'My Docs',
  repo: 'user/repo',
  // ... 其他配置
};

const renderer = new docsifyServerRenderer(config);

// 渲染指定路径
renderer.render('/guide/getting-started').then(html => {
  console.log(html);
});
第九章 企业级实践
9.1 Monorepo 多项目文档
在企业中,通常需要在一个文档站中管理多个项目的文档。推荐结构:
css
docs/
├── index.html
├── README.md
├── _sidebar.md
├── _navbar.md
├── project-a/
│   ├── README.md
│   ├── architecture.md
│   └── api.md
├── project-b/
│   ├── README.md
│   └── guide.md
└── shared/
    ├── coding-standards.md
└── deployment-guide.md侧边栏配置(_sidebar.md):
markdown
- **项目 A**
  - [概述](project-a/)
  - [架构设计](project-a/architecture.md)
  - [API 文档](project-a/api.md)

- **项目 B**
  - [概述](project-b/)
  - [使用指南](project-b/guide.md)

- **共享文档**
  - [编码规范](shared/coding-standards.md)
  - [部署指南](shared/deployment-guide.md)
9.2 CI/CD 自动发布
结合 GitHub Actions,实现文档的自动发布和版本管理:
yaml
name: Publish Docs

on:
  push:
    branches: [main]
    paths: ['docs/**']  # 只在 docs 目录变更时触发

jobs:
  publish:
    runs-on: ubuntu-latest
    steps:
      - uses: actions/checkout@v4

      - name: Check broken links
        run: npx linkinator docs/ --recurse --skip '^(?!http://localhost)'

      - name: Lint Markdown
        run: npx markdownlint-cli docs/**/*.md

      - name: Deploy to GitHub Pages
        uses: peaceiris/actions-gh-pages@v3
        with:
          github_token: ${{ secrets.GITHUB_TOKEN }}
          publish_dir: ./docs
9.3 访问控制
Docsify 本身没有访问控制功能,但可以通过以下方式实现:
方式一:Cloudflare Access
将文档站部署到 Cloudflare Pages,然后配置 Access 策略:
- Cloudflare Dashboard → Zero Trust → Access → Applications
- 添加应用,选择域名
- 配置访问策略(邮箱白名单、IP 白名单等)
方式二:Nginx Basic Auth
nginx
server {
    listen 80;
    server_name docs.example.com;
    root /var/www/docs;
    index index.html;

    auth_basic "Internal Docs";
    auth_basic_user_file /etc/nginx/.htpasswd;

    location / {
        try_files $uri $uri/ /index.html;
    }
}
方式三:OAuth2 Proxy
使用 OAuth2 Proxy 在文档站前加一层认证:
nginx
server {
    listen 80;
    server_name docs.example.com;

    location /oauth2/ {
        proxy_pass http://oauth2-proxy:4180;
    }

    location / {
        auth_request /oauth2/auth;
        error_page 401 = /oauth2/sign_in;
        proxy_pass http://docs:3000;
    }
}
9.4 性能优化
1. CDN 加速
将 Docsify 核心文件和主题 CSS 托管到 CDN:
html
<!-- 使用 jsDelivr CDN -->
<script src="//cdn.jsdelivr.net/npm/docsify@4/lib/docsify.min.js"></script>
<link rel="stylesheet" href="//cdn.jsdelivr.net/npm/docsify@4/lib/themes/vue.css">
2. 预加载关键资源
html
<link rel="preload" href="//cdn.jsdelivr.net/npm/docsify@4/lib/themes/vue.css" as="style">
<link rel="preload" href="//cdn.jsdelivr.net/npm/docsify@4/lib/docsify.min.js" as="script">
3. Gzip 压缩
在 Nginx 中启用 Gzip:
nginx
gzip on;
gzip_types text/plain text/css application/json application/javascript text/xml;
gzip_min_length 256;
4. 图片懒加载
javascript
function lazyLoadImages(hook) {
  hook.afterEach(function(html) {
    return html.replace(/<img src=/g, '<img loading="lazy" src=');
  });
}

window.$docsify = {
  plugins: [lazyLoadImages]
};
9.5 SEO 优化
Docsify 运行时渲染对 SEO 不友好,但可以通过以下方式改善:
1. 预渲染(Prerender)
使用 docsify-cli 的预渲染功能:
bash
docsify generate .2. 添加 meta 标签
html
<meta name="description" content="你的文档站描述">
<meta name="keywords" content="docsify, 文档, 教程">
<meta property="og:title" content="My Docs">
<meta property="og:description" content="你的文档站描述">
<meta property="og:type" content="website">
3. Sitemap 生成
使用插件自动生成 sitemap:
javascript
// build 脚本中生成 sitemap
const fs = require('fs');
const path = require('path');

function generateSitemap(dir, baseUrl) {
  let sitemap = '<?xml version="1.0" encoding="UTF-8"?>\n';
  sitemap += '<urlset xmlns="http://www.sitemaps.org/schemas/sitemap/0.9">\n';

  function walk(currentDir) {
    const files = fs.readdirSync(currentDir);
    for (const file of files) {
      const fullPath = path.join(currentDir, file);
      const stat = fs.statSync(fullPath);
      if (stat.isDirectory()) {
        walk(fullPath);
      } else if (file.endsWith('.md')) {
        const urlPath = fullPath
          .replace(dir, '')
          .replace(/\.md$/, '')
          .replace(/\\/g, '/');
        sitemap += `  <url><loc>${baseUrl}${urlPath}</loc></url>\n`;
      }
    }
  }

  walk(dir);
  sitemap += '</urlset>';
  return sitemap;
}

fs.writeFileSync('sitemap.xml', generateSitemap('.', 'https://docs.example.com'));
第十章 常见问题与排错
Q1: 侧边栏不显示?
检查清单:
index.html中是否设置了loadSidebar: true_sidebar.md文件是否存在于根目录_sidebar.md中的链接路径是否正确
Q2: 页面 404?
原因 :Docsify 使用前端路由,服务器需要将所有请求重定向到 index.html。
Nginx 配置:
nginx
location / {
    try_files $uri $uri/ /index.html;
}
Q3: GitHub Pages 下划线文件不显示?
原因:GitHub Pages 默认使用 Jekyll,会忽略下划线开头的文件。
解决 :确保 .nojekyll 文件存在于根目录。
Q4: 搜索功能不工作?
检查清单:
- 是否引入了搜索插件脚本
- 是否在
window.$docsify中配置了search选项 - Markdown 文件是否有标题(搜索依赖标题索引)
Q5: 代码高亮不生效?
检查清单:
- 是否引入了对应语言的 Prism 组件
- Markdown 代码块是否指定了语言(如 ```````python````)
Q6: 移动端侧边栏不显示?
解决 :Docsify 在移动端会自动隐藏侧边栏,点击左上角按钮即可展开。如果按钮不显示,检查 mergeNavbar 配置。
总结
Docsify 用最简洁的架构------一个 index.html + 若干 Markdown 文件------实现了令人惊喜的文档站体验。它的核心价值在于:
- 零构建:写完 Markdown 刷新即看,开发体验极致流畅
- 轻量级:核心仅 18kB,加载速度快
- 插件丰富:搜索、代码复制、分页导航、评论系统等开箱即用
- 部署简单:推送到 GitHub 即可上线,支持多种托管平台
- 高度可定制:主题、样式、插件、钩子,灵活度极高
当然,Docsify 也有其局限性:运行时渲染对 SEO 不友好、不适合大型高并发站点、SSR 支持有限。但对于绝大多数项目文档、团队知识库和个人博客来说,Docsify 的"零构建"哲学是最务实的选择。
如果你正在寻找一个"写完就能看"的文档工具,Docsify 值得你一试。