大家好,我是云计算磊哥,从业20年的IT老鸟。运维培训15年,总结了一套从入门到精通的全运维开发宝典手册。准备用300天时间写一套博文,手把手从安装软件讲起,从行业到产品,从过去到未来,从理论到操作,从视频到文档工具,一站式。从零基础入门到20k运维开发工程师岗位诸多就业问题。多方位全方面的给你讲清楚云计算这个行业该如何做。关注我。后续AI大模型开发课程更精彩。
开源数据库MySQL DBA运维实战
主从复制
1 概述
1.1 MySQL 复制技术目的
远程灾备
高可用HA
负载均衡
1.2 类型
M
M-S
M-S-S
M-M
M-M-S-S
1.3 原理
- 在主库上把数据更改(DDL DML DCL)记录到二进制日志(Binary Log)中。
- 备库I/O线程将主库上的日志复制到自己的中继日志(Relay Log)中。
- 备库SQL线程读取中继日志中的事件,将其重放到备库数据库之上。
2 案例
2.1 环境
master1 10.18.41.54
systemctl start mysqld

master2	10.18.41.66
systemctl start mysqld

slave 1 10.18.41.56
systemctl start mysqld

slave 2 10.18.41.69
systemctl start mysqld
建议
域名解析可以使用host文件的形式,也可以使用DNS服务器解析。
2.2 一主一从(M-S)(1)
主(master1)
准备数据1(验证主从同步使用)
create database master1db;
create table master1db.master1tab(name char(50));
insert into master1db.master1tab values (1111);
insert into master1db.master1tab values (2222);

开启二进制日志
[root@localhost ~]# vim /etc/my.cnf
log_bin
server-id=1
[root@localhost ~]# systemctl restart mysqld

创建复制用户
grant replication slave, replication
 client on *.* to 'rep'@'192.168.2.%'  identified by 'XuLei@123';

备份master数据库的数据
[root@localhost ~]# mysqldump -p'XuLei@123' --all-databases --single-transaction --master-data=2 --flush-logs > `date +%F`-mysql-all.sql
[root@localhost ~]# scp -r 2026-1-1-mysql-all.sql master2:/tmp

观察二进制日志分割点
CHANGE MASTER TO MASTER_LOG_FILE='localhost-bin.000002', MASTER_LOG_POS=154;

准备数据2(验证主从同步使用) master1上
insert into master1db.master1tab values (33333333);
insert into master1db.master1tab values (44444);
从(master2)
测试rep用户是否可用
部署数据库应用
mysql -h master1 -urep -p'XuLei@123'

启动服务器序号
[root@localhost ~]#vim /etc/my.cn
server-id=2
[root@localhost ~]# systemctl restart mysqld
[root@localhost ~]# mysql -uroot -p'XuLei@123'
测试服务器是否修改正确。能否正常登陆。

恢复手动同步数据
mysql>  set sql_log_bin=0;
mysql>  source /tmp/2026-1-1-mysql-full.sql

设置主服务器
mysql> change master to
master_host='master1',
master_user='rep',
master_password='XuLei@123',
master_log_file='localhost-bin.000002',
master_log_pos=154;

启动从设备
mysql> start slave;

查看启动状态(IO-YES/SQL-YES)
mysql> show slave status\G;
*************************** 1. row ***************************
               Slave_IO_State: Waiting for master to send event
                  Master_Host: master1
                  Master_User: rep
                  Master_Port: 3306
                Connect_Retry: 60
              Master_Log_File: localhost-bin.000003
          Read_Master_Log_Pos: 154
               Relay_Log_File: localhost-relay-bin.000003
                Relay_Log_Pos: 375
        Relay_Master_Log_File: localhost-bin.000003
             Slave_IO_Running: Yes
            Slave_SQL_Running: Yes

返回主服务器(master1)更新数据,在从服务器(master2)观察是否同步。
2.3 一主一从(M-S)(2)
需求
实验2与上一个实验需求基本相同经。master1 作为主mysql,master2 作为从mysql。

不同之处,使用了
"gtid_mode=ON
enforce_gtid_consistency=1"
该属性自动记录position位置。不需要手动指定了。
环境
因与实验1功能相同
请重置master2数据库
[root@localhost ~]# systemctl stop mysqld
[root@localhost ~]# rm -rf /var/lib/mysql/*
[root@localhost ~]# systemctl start mysqld
[root@localhost ~]# grep password /var/log/mysqld.log
[root@localhost ~]# mysqladmin -p'VsudOt+g%5Nw' password 'XuLei@123'
主
1 启动二进制日志,服务器ID,GTID
[root@localhost ~]# vim /etc/my.cnf
log_bin
server-id=1
gtid_mode=ON
enforce_gtid_consistency=1
[root@localhost ~]# systemctl restart mysqld

2 授权复制用户rep(略)
mysql> grant replication slave,replication client on *.* to 'rep'@'192.168.122.%' identified by 'XuLei@123';
mysql> flush privileges;

3 备份数据
mysql> mysqldump -p'XuLei@123' --all-databases --single-transaction --master-data=2 --flush-logs > `date +%F`-mysql-all.sql

[root@localhost ~]#scp 2026-1-1-mysql-all.sql    master2:/tmp

4 模拟数据变化
[root@localhost ~]#insert into master1db.master1tab values (6666666666);
从
1 master2测试rep用户是否可用
[root@localhost ~]#mysql -h master1 -urep -p'XuLei@123'

2 启动二进制日志,服务器ID,GTID
[root@localhost ~]#vim /etc/my.cnf
log_bin
server-id=2
gtid_mode=ON
enforce_gtid_consistency=1
[root@localhost ~]#systemctl restart mysqld

3 还恢复手动同步数据
set sql_log_bin=0;
source /tmp/2026-1-1-mysql-full.sql
select * from master1db.master1tab;

4 设置主服务器
mysql> change master to
master_host='master1',
master_user='rep',
master_password='XuLei@123',
master_auto_position=1;
mysql> start slave;
mysql> show slave status\G;

5 返回主服务器(master1)更新数据,在从服务器(master2)观察是否同步。
2.4 双主双从(MM-SS)
前言
前面的实验,主服务器单节点设置。假如主服务器故障会影响全局的写入事件。故设置双主。目前:已经设置master1为master2的主服务器,只需设置master2为master1的主服务器。
1  设置master2为master1的主服务器,在master2 上进行授权
mysql> grant replication slave, replication  client on *.* to 'rep'@'192.168.2.%'  identified by 'XuLei@123';
mysql> flush privileges;

2 master1
mysql> change master to
master_host='master2',
master_user='rep',
master_password='XuLei@123',
master_auto_position=1;
start slave;
show slave status\G;
测试
master1上插入数据,在master2上观察
master2上插入数据,在master1上观察
双方同步成功,双主设置完成。

3 同步现有数据库
master1备份数据
mysqldump -p'XuLei@123' --all-databases --single-transaction --master-data=2  --flush-logs > `date +%F`-mysql-all.sql
scp -r 2026-1-1-mysql-all.sql slave1:/tmp
scp -r 2026-1-1-mysql-all.sql slave2:/tmp

slave1  slave2导入数据
[root@slave1 ~]# mysql -p'XuLei@123' < /tmp/2026-1-1-mysql-all.sql
[root@slave2 ~]# mysql -p'XuLei@123' < /tmp/2026-1-1-mysql-all.sql

4 启动从服务器ID,gtid
slave1上启动gtid
[root@slave1 ~]# vim /etc/my.cnf
server-id=3
gtid_mode=ON
enforce_gtid_consistency=1
master-info-repository=TABLE
relay-log-info-repository=TABLE
[root@slave1 ~]# systemctl restart mysqld

slave2上启动gtid
[root@slave2 ~]# vim /etc/my.cnf
server-id=4
gtid_mode=ON
enforce_gtid_consistency=1
master-info-repository=TABLE
relay-log-info-repository=TABLE
[root@slave1 ~]# systemctl restart mysqld

5 设置主服务器
slave1配置主服务器
mysql> change master to
master_host='master1',
master_user='rep',
master_password='XuLei@123',
master_auto_position=1 for channel 'master1';
mysql> change master to
master_host='master2',
master_user='rep',
master_password='XuLei@123',
master_auto_position=1 for channel 'master2';
start slave;
show slave status\G;

slave2配置主服务器
mysql> change master to
master_host='master1',
master_user='rep',
master_password='XuLei@123',
master_auto_position=1 for channel 'master1';
mysql> change master to
master_host='master2',
master_user='rep',
master_password='XuLei@123',
master_auto_position=1 for channel 'master2';
mysql> start slave;
mysql> show slave status\G;

6 测试
master1 插入数据
master2插入数据
停止master1,在master2上插入数据
停止slave1,在slave2上查看数据
代理
1 简介
功能
- 读写分离 M-S-S M-M-S-S
- 负载均衡 Galera Cluster
- 支持数据的分片自动路由与聚合
产品
- MySQL Proxy MySQL官方
- Atlas 奇虎360
- DBProxy 美团点评
- Amoeba 早期阿里巴巴
- cober 阿里巴巴
- MyCat 阿里巴巴
2 Mycat 实战
2.1 环境 mycat+ M-M-S-S
10.18.43.163 mycat
10.18.43.41 master1
10.18.43.170 master2
192.168.0.116 slave1
192.168.0.117 slave2
2.2 配置 Java环境(请官网下载jdk)
[root@localhost ~]# tar xf jdk-8u91-linux-x64.tar.gz -C /usr/local/
[root@localhost ~]# ln -s /usr/local/jdk1.8.0_91/ /usr/local/java
[root@localhost ~]# tail -3 /etc/profile
JAVA_HOME=/usr/local/java
PATH=$JAVA_HOME/bin:$PATH
export JAVA_HOME PATH
[root@localhost ~]# source /etc/profile
[root@localhost ~]#java      -version
2.3 配置Mycat
[root@localhost ~]#wget http://dl.mycat.io/1.6-RELEASE/Mycat-server-1.6-RELEASE-20161028204710-linux.tar.gz
[root@localhost ~]#tar xf  Mycat-server-1.6-RELEASE-20161028204710-linux.tar.gz -C /usr/local/
[root@localhost ~]#ls /usr/local/mycat/

配置mycat前端
[root@localhost ~]#vim  /usr/local/mycat/conf/server.xml
注释掉多余用户,如下图。开启管理员账号。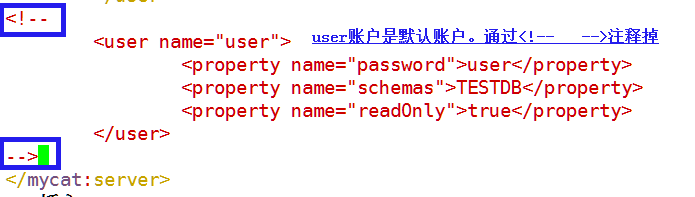
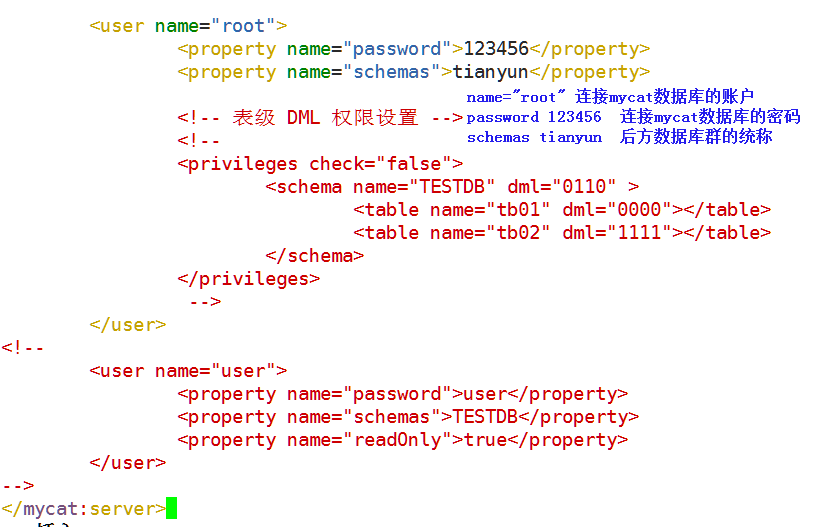
配置mycat后端(建议备份该文件)
vim /usr/local/mycat/conf/schema.xml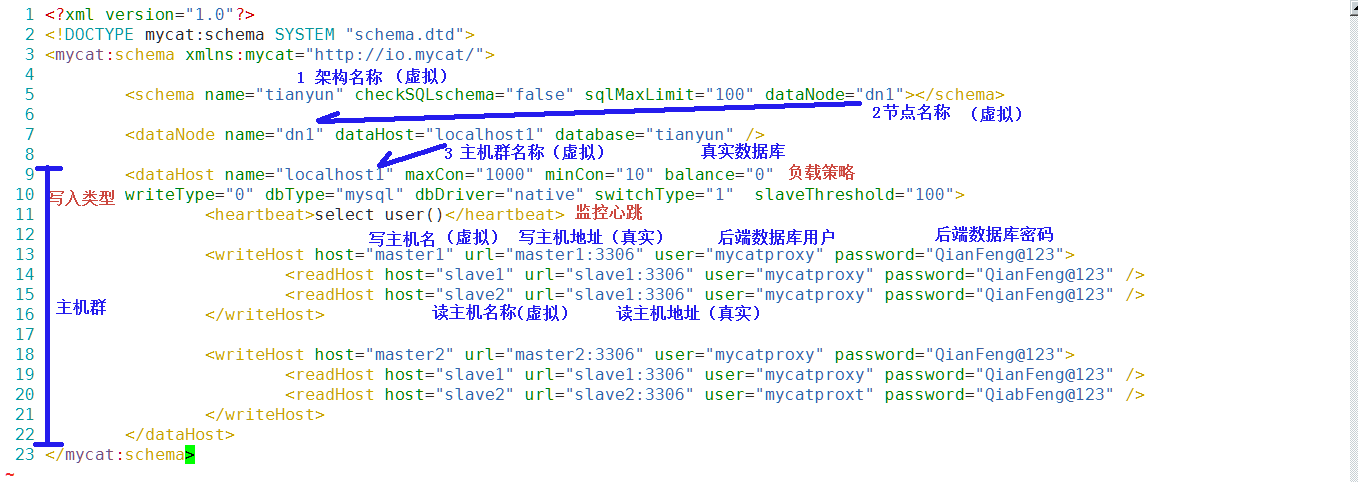
注释:
schema name:mycat维护的集群名称。
datanode:后方节点群的名称。
datahost:后方节点群的主机名称。
writehost:写主机
readhost:读主机
2.4 配置mysql群
grant all on *.* to 'mycatproxy'@'192.168.0.118' identified by 'XuLei@123';2.5 启动Mycat
/usr/local/mycat/bin/mycat start
netstat  -anpt | grep java
ps aux | grep mycat
yum install -y mariadb
mysql -hmycat -uroot -p123456 -P8066
show databases;
select * from tianyun.t1;
insert into tianyun.t1 values(3);
注意:后方mysql群中应该手动在mysql-master1上创建该库tianyun;
mysql阶段