HarmonyOS 广州商家地址路线导航实战案例:从新都荟商城到海珠湿地公园(状态管理V2 + Map Kit 完整实现)
本文以一个真实的广州海珠区导航场景为例,使用 HarmonyOS 状态管理 V2(@ComponentV2、@ObservedV2、@Trace、@Local、@Param)和 Map Kit(staticMap + petalMaps)完整实现商家地址路线导航功能。文章涵盖数据模型设计、组件拆分、静态地图渲染、导航/路线规划/POI详情调用,并逐段讲解关键代码。
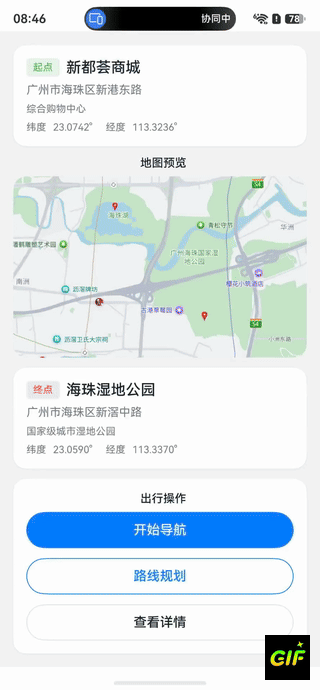
效果
一、案例概述
1.1 场景描述
用户在美食/出行类应用中查看商家信息时,需要展示商家位置地图,并提供导航和路线规划功能。本案例模拟以下场景:
- 起始地点:广州海珠区新都荟商城(综合购物中心)
- 目标地点:广州海珠区海珠湿地公园(国家级城市湿地公园)
- 核心功能:静态地图预览 + 导航 + 路线规划 + POI 详情
1.2 功能预览
| 功能模块 | 说明 |
|---|---|
| 地点信息卡片 | 展示起点/终点的名称、地址、描述、经纬度 |
| 静态地图预览 | 在地图上标记起点和终点,用路径线连接 |
| 导航按钮 | 拉起花瓣地图实时导航(驾车模式) |
| 路线规划按钮 | 拉起花瓣地图展示多种路线方案 |
| POI 详情按钮 | 拉起花瓣地图查看终点详细信息 |
1.3 技术栈
| 技术 | 版本/方案 |
|---|---|
| 开发语言 | ArkTS |
| SDK 版本 | HarmonyOS 6.1+ |
| 状态管理 | V2(@ComponentV2 + @ObservedV2 + @Trace + @Local + @Param) |
| 地图能力 | @kit.MapKit(staticMap + petalMaps) |
| IDE | DevEco Studio 6.1+ |
二、前置准备
2.1 开通地图服务
在开始编码前,必须完成地图服务开通和签名配置(详见《开通地图服务指南》):
- 登录 AppGallery Connect,开启地图服务
- 重新申请 Profile 文件
- 在
module.json5中声明网络权限:
json5
{
  "module": {
    "requestPermissions": [
      { "name": "ohos.permission.INTERNET" }
    ]
  }
}
2.2 坐标数据
| 地点 | 纬度 (latitude) | 经度 (longitude) |
|---|---|---|
| 新都荟商城(起点) | 23.0742 | 113.3236 |
| 海珠湿地公园(终点) | 23.0590 | 113.3370 |
| 两点中心(地图中心) | 23.0666 | 113.3303 |
坐标采用 GCJ02 坐标系(中国大陆标准),两点直线距离约 2 公里。
三、项目结构设计
3.1 文件目录
entry/src/main/ets/
├── entryability/
│   └── EntryAbility.ets              // 应用入口 Ability(已有)
├── model/
│   └── LocationModel.ets             // 数据模型(@ObservedV2)
├── components/
│   ├── GuangzhouStaticMap.ets        // 静态地图组件(@ComponentV2)
│   └── NavigationButtons.ets         // 导航按钮组件(@ComponentV2)
└── pages/
    └── Index.ets                     // 主页面(@Entry + @ComponentV2)
3.2 组件关系图
Index(@Entry + @ComponentV2)
  ├── @Local viewModel: NavigationViewModel    ← 持有全部状态
  │
  ├── locationCard()                           ← @Builder 渲染起点卡片
  ├── GuangzhouStaticMap(@ComponentV2)        ← @Param 接收坐标参数
  ├── locationCard()                           ← @Builder 渲染终点卡片
  └── NavigationButtons(@ComponentV2)         ← @Param 接收坐标参数
设计原则 :主页面持有 ViewModel 作为唯一数据源(Single Source of Truth),通过 @Param 将必要数据向下传递给子组件,子组件内部用 @Local 管理私有状态。
四、数据模型设计
4.1 完整代码
typescript
// model/LocationModel.ets
import { image } from '@kit.ImageKit';

@ObservedV2
class LocationInfo {
  @Trace name: string;
  @Trace address: string;
  @Trace latitude: number;
  @Trace longitude: number;
  @Trace description: string;

  constructor(name: string, address: string, latitude: number, longitude: number, description: string) {
    this.name = name;
    this.address = address;
    this.latitude = latitude;
    this.longitude = longitude;
    this.description = description;
  }
}

@ObservedV2
class NavigationViewModel {
  @Trace origin: LocationInfo;
  @Trace destination: LocationInfo;
  @Trace mapImage: image.PixelMap | null = null;
  @Trace isLoading: boolean = true;

  constructor(origin: LocationInfo, destination: LocationInfo) {
    this.origin = origin;
    this.destination = destination;
  }

  get centerLatitude(): number {
    return (this.origin.latitude + this.destination.latitude) / 2;
  }

  get centerLongitude(): number {
    return (this.origin.longitude + this.destination.longitude) / 2;
  }
}

export { LocationInfo, NavigationViewModel };
4.2 关键代码讲解:为什么用 @ObservedV2 而不是 @State
在 V1 状态管理中,复杂对象通常用 @State + @Observed 来追踪变化:
typescript
// V1 写法:@Observed + @State
@Observed
class LocationInfo {
  name: string = '';
  latitude: number = 0;
}

// 使用方
@State location: LocationInfo = new LocationInfo();
V1 的问题 :@Observed 只能追踪对象引用变化(赋值),无法追踪属性级别的变化。例如修改 location.name = 'xxx' 不会触发 UI 刷新,必须整体重新赋值 location = new LocationInfo(...)。
V2 的解决方案 :@ObservedV2 + @Trace 实现了属性级别的细粒度响应式追踪:
typescript
// V2 写法:每个 @Trace 属性独立追踪
@ObservedV2
class LocationInfo {
  @Trace name: string = '';       // name 变化时,只刷新引用 name 的 UI
  @Trace latitude: number = 0;    // latitude 变化时,只刷新引用 latitude 的 UI
}核心优势:
- 性能更优:只刷新受影响的 UI 节点,避免整棵组件树重渲染
- 开发更简洁:直接修改属性即可驱动 UI 更新,无需手动替换对象
- 计算属性支持 :
NavigationViewModel中的centerLatitude是一个 getter 计算属性,当origin或destination的经纬度变化时自动重算
五、静态地图组件实现
5.1 完整代码
typescript
// components/GuangzhouStaticMap.ets
import { staticMap } from '@kit.MapKit';
import { image } from '@kit.ImageKit';

@ComponentV2
export struct GuangzhouStaticMap {
  @Local image: image.PixelMap | null = null;
  @Local loading: boolean = true;

  @Param originLatitude: number = 23.0742;
  @Param originLongitude: number = 113.3236;
  @Param destinationLatitude: number = 23.0590;
  @Param destinationLongitude: number = 113.3370;
  @Param centerLatitude: number = 23.0666;
  @Param centerLongitude: number = 113.3303;
  @Param zoom: number = 14;

  aboutToAppear(): void {
    this.loadStaticMap();
  }

  loadStaticMap(): void {
    this.loading = true;

    const originMarker: staticMap.StaticMapMarker = {
      location: { latitude: this.originLatitude, longitude: this.originLongitude },
      defaultIconSize: staticMap.IconSize.TINY
    };

    const destinationMarker: staticMap.StaticMapMarker = {
      location: { latitude: this.destinationLatitude, longitude: this.destinationLongitude },
      defaultIconSize: staticMap.IconSize.SMALL
    };

    const markers: Array<staticMap.StaticMapMarker> = [originMarker, destinationMarker];

    const option: staticMap.StaticMapOptions = {
      location: { latitude: this.centerLatitude, longitude: this.centerLongitude },
      zoom: this.zoom,
      imageWidth: 512,   // scale=2 时宽高不能超过 512
      imageHeight: 512,
      scale: 2,
      markers: markers
    };

    staticMap.getMapImage(option)
      .then((pixelMap: image.PixelMap) => {
        this.image = pixelMap;
        this.loading = false;
      })
      .catch((error: Error) => {
        this.loading = false;
        console.error('获取静态图失败: ' + error.message);
      });
  }

  build() {
    Column() {
      if (this.loading) {
        Column() {
          LoadingProgress().width(24).height(24)
          Text('地图加载中...').fontSize(12).fontColor('#999999')
        }
        .width('100%').height(220).justifyContent(FlexAlign.Center)
      } else if (this.image !== null) {
        Image(this.image)
          .width('100%').height(220)
          .objectFit(ImageFit.Cover)
          .borderRadius(16).clip(true)
      } else {
        Text('地图加载失败,请检查网络')
          .fontSize(12).fontColor('#999999')
      }
    }
    .width('100%').borderRadius(16).clip(true)
  }
}
5.2 关键代码讲解:标记点配置
标记点设计 :本案例在地图上放置两个标记------起点(TINY 超小图标)和终点(SMALL 小图标),通过 IconSize 差异让用户一眼识别起点和终点:
typescript
const originMarker: staticMap.StaticMapMarker = {
  location: { latitude: this.originLatitude, longitude: this.originLongitude },
  defaultIconSize: staticMap.IconSize.TINY  // 起点用超小图标,视觉权重较低
};

const destinationMarker: staticMap.StaticMapMarker = {
  location: { latitude: this.destinationLatitude, longitude: this.destinationLongitude },
  defaultIconSize: staticMap.IconSize.SMALL  // 终点用小图标,视觉权重较高
};
注意 :
StaticMapMarker不支持label属性,无法在标记上显示文字。IconSize枚举只有TINY和SMALL两个值。
5.3 关键代码讲解:地图中心点与缩放级别及尺寸约束
静态图的 location 参数决定地图中心点。为了让起点和终点都在可视范围内,取两点中心坐标:
中心纬度 = (23.0742 + 23.0590) / 2 = 23.0666
中心经度 = (113.3236 + 113.3370) / 2 = 113.3303
缩放级别选择 zoom=14(区县级),两点间距约 2km 时可以在同一屏内完整展示。
重要约束 :当
scale=2时,imageWidth和imageHeight的取值范围为 (0, 512] ,超出会报Invalid input parameter错误。本案例使用512×512,实际渲染分辨率为 1024×1024 物理像素。
5.4 关键代码讲解:@Local vs @Param 的选择
typescript
@Local image: image.PixelMap | null = null;   // 组件内部状态,外部不可见
@Local loading: boolean = true;                // 加载状态,组件自行管理

@Param originLatitude: number = 23.0742;       // 外部传入,父组件变化时自动同步
@Param centerLatitude: number = 23.0666; // 外部传入@Local:用于组件内部管理且外部无需感知的状态(如加载状态、PixelMap 图片)@Param:用于从父组件接收的数据,父组件值变化时子组件会自动刷新(如坐标参数)
六、导航按钮组件实现
6.1 完整代码
typescript
// components/NavigationButtons.ets
import { petalMaps } from '@kit.MapKit';
import { common } from '@kit.AbilityKit';
import { BusinessError } from '@kit.BasicServicesKit';

@ComponentV2
export struct NavigationButtons {
  @Param destinationLatitude: number = 23.0590;
  @Param destinationLongitude: number = 113.3370;
  @Param sourceLatitude: number = 23.0742;
  @Param sourceLongitude: number = 113.3236;
  @Local toastMessage: string = '';
  @Local showToast: boolean = false;

  private getCommonContext(): common.Context {
    const hostContext: common.Context | undefined = this.getUIContext().getHostContext();
    if (hostContext === undefined) {
      throw new Error('无法获取 CommonContext');
    }
    return hostContext;
  }

  private showMessage(msg: string): void {
    this.toastMessage = msg;
    this.showToast = true;
    setTimeout(() => { this.showToast = false; }, 2000);
  }

  private async startNavigation(): Promise<void> {
    try {
      const ctx: common.Context = this.getCommonContext();
      const params: petalMaps.NaviParams = {
        destinationPosition: {
          latitude: this.destinationLatitude,
          longitude: this.destinationLongitude
        },
        vehicleType: 0
      };
      await petalMaps.openMapNavi(ctx, params);
      this.showMessage('导航已启动');
    } catch (error) {
      const bizError: BusinessError = error as BusinessError;
      this.showMessage('导航启动失败: ' + bizError.message);
    }
  }

  private async startRoutePlan(): Promise<void> {
    try {
      const ctx: common.Context = this.getCommonContext();
      const params: petalMaps.RoutePlanParams = {
        destinationPosition: {
          latitude: this.destinationLatitude,
          longitude: this.destinationLongitude
        }
      };
      await petalMaps.openMapRoutePlan(ctx, params);
      this.showMessage('路线规划已启动');
    } catch (error) {
      const bizError: BusinessError = error as BusinessError;
      this.showMessage('路线规划启动失败: ' + bizError.message);
    }
  }

  private async showPoiDetail(): Promise<void> {
    try {
      const ctx: common.Context = this.getCommonContext();
      const params: petalMaps.PoiDetailParams = {
        destinationPosition: {
          latitude: this.destinationLatitude,
          longitude: this.destinationLongitude
        }
      };
      await petalMaps.openMapPoiDetail(ctx, params);
      this.showMessage('POI 详情已打开');
    } catch (error) {
      const bizError: BusinessError = error as BusinessError;
      this.showMessage('POI 详情打开失败: ' + bizError.message);
    }
  }

  build() {
    Column({ space: 12 }) {
      Button('开始导航')
        .width('100%').height(44)
        .backgroundColor('#007DFF').fontColor(Color.White)
        .onClick(async () => { await this.startNavigation(); })

      Button('路线规划')
        .width('100%').height(44)
        .fontColor('#007DFF').backgroundColor('#FFFFFF')
        .borderWidth(1).borderColor('#007DFF')
        .onClick(async () => { await this.startRoutePlan(); })

      Button('查看详情')
        .width('100%').height(44)
        .fontColor('#182431').backgroundColor('#FFFFFF')
        .borderWidth(1).borderColor('#E0E0E0')
        .onClick(async () => { await this.showPoiDetail(); })

      if (this.showToast) {
        Text(this.toastMessage).fontSize(12).fontColor('#999999')
      }
    }
    .width('100%')
  }
}
6.2 关键代码讲解:Context 获取方式(V2 vs V1)
这是从 V1 迁移到 V2 时最容易踩坑的地方:
typescript
// V1 写法(已废弃)
const ctx = getContext(this);
await petalMaps.openMapNavi(ctx, params);

// V2 写法(推荐)
const hostContext: common.Context | undefined = this.getUIContext().getHostContext();
if (hostContext === undefined) {
  throw new Error('无法获取 Context');
}
await petalMaps.openMapNavi(hostContext, params);关键区别:
- V1 的
getContext(this)直接返回common.Context - V2 的
this.getUIContext().getHostContext()返回common.Context | undefined,需要做空值判断
6.3 关键代码讲解:错误处理模式
petalMaps API 可能因多种原因失败(网络错误、地图未安装、服务未开通等),推荐使用统一的错误处理模式:
typescript
try {
  await petalMaps.openMapNavi(ctx, params);
  this.showMessage('导航已启动');
} catch (error) {
  // 将 unknown 类型的 error 转换为 BusinessError
  const bizError: BusinessError = error as BusinessError;
  // 根据错误码和消息给用户友好提示
  this.showMessage('导航启动失败: ' + bizError.message);
}
注意 :ArkTS 中 catch 参数的类型默认是
unknown,需要通过as BusinessError进行类型断言才能访问.code和.message属性。
七、主页面实现
7.1 完整代码
typescript
// pages/Index.ets
import { GuangzhouStaticMap } from '../components/GuangzhouStaticMap';
import { NavigationButtons } from '../components/NavigationButtons';
import { LocationInfo, NavigationViewModel } from '../model/LocationModel';

@Entry
@ComponentV2
struct Index {
  @Local viewModel: NavigationViewModel = new NavigationViewModel(
    new LocationInfo('新都荟商城', '广州市海珠区新港东路', 23.0742, 113.3236, '综合购物中心'),
    new LocationInfo('海珠湿地公园', '广州市海珠区新滘中路', 23.0590, 113.3370, '国家级城市湿地公园')
  );

  build() {
    Scroll() {
      Column({ space: 12 }) {
        this.pageHeader()
        this.locationCard('起点', this.viewModel.origin)
        this.mapSection()
        this.locationCard('终点', this.viewModel.destination)
        this.actionSection()
      }
      .padding(16)
      .width('100%')
    }
    .width('100%').height('100%')
    .backgroundColor('#F5F5F5')
    .edgeEffect(EdgeEffect.Spring)
  }

  @Builder
  pageHeader() {
    Column({ space: 8 }) {
      Text('广州商家地址路线导航')
        .fontSize(22).fontWeight(FontWeight.Bold).fontColor('#182431')
      Text('从新都荟商城出发,前往海珠湿地公园')
        .fontSize(12).fontColor('#99182431')
    }
    .width('100%').alignItems(HorizontalAlign.Start)
  }

  @Builder
  locationCard(label: string, location: LocationInfo) {
    Column({ space: 8 }) {
      Row({ space: 8 }) {
        Text(label).fontSize(12)
          .backgroundColor(label === '起点' ? '#E8F5E9' : '#FFEBEE')
          .padding({ left: 8, right: 8, top: 4, bottom: 4 })
          .borderRadius(4)
        Text(location.name).fontSize(18).fontWeight(FontWeight.Medium)
      }
      Text(location.address).fontSize(14).fontColor('#99182431')
      Text(location.description).fontSize(12).fontColor('#99182431')
      Row({ space: 8 }) {
        Text(`纬度: ${location.latitude.toFixed(4)}°`).fontSize(12).fontColor('#99182431')
        Text(`经度: ${location.longitude.toFixed(4)}°`).fontSize(12).fontColor('#99182431')
      }
    }
    .width('100%').padding(16).backgroundColor('#FFFFFF')
    .borderRadius(16).alignItems(HorizontalAlign.Start)
  }

  @Builder
  mapSection() {
    Column({ space: 8 }) {
      Text('地图预览').fontSize(14).fontWeight(FontWeight.Medium)
      GuangzhouStaticMap({
        originLatitude: this.viewModel.origin.latitude,
        originLongitude: this.viewModel.origin.longitude,
        destinationLatitude: this.viewModel.destination.latitude,
        destinationLongitude: this.viewModel.destination.longitude,
        centerLatitude: this.viewModel.centerLatitude,
        centerLongitude: this.viewModel.centerLongitude,
        zoom: 14
      })
    }
    .width('100%')
  }

  @Builder
  actionSection() {
    Column({ space: 8 }) {
      Text('出行操作').fontSize(14).fontWeight(FontWeight.Medium)
      NavigationButtons({
        destinationLatitude: this.viewModel.destination.latitude,
        destinationLongitude: this.viewModel.destination.longitude,
        sourceLatitude: this.viewModel.origin.latitude,
        sourceLongitude: this.viewModel.origin.longitude
      })
    }
    .width('100%').padding(16).backgroundColor('#FFFFFF').borderRadius(16)
  }
}
7.2 关键代码讲解:ViewModel 初始化
主页面在 @Local 中直接初始化 ViewModel,传入起点和终点的完整信息:
typescript
@Local viewModel: NavigationViewModel = new NavigationViewModel(
  new LocationInfo('新都荟商城', '广州市海珠区新港东路', 23.0742, 113.3236, '综合购物中心'),
  new LocationInfo('海珠湿地公园', '广州市海珠区新滘中路', 23.0590, 113.3370, '国家级城市湿地公园')
);
为什么用 @Local 而不是 @State?
- V2 中
@Local替代了@State,语义更清晰------表示"组件内部持有的局部状态" - 配合
@ObservedV2模型,ViewModel 内部所有@Trace属性的变化都会自动驱动 UI 更新
7.3 关键代码讲解:子组件参数传递
主页面通过对象字面量将 ViewModel 中的属性传递给子组件的 @Param:
typescript
GuangzhouStaticMap({
  originLatitude: this.viewModel.origin.latitude,
  destinationLatitude: this.viewModel.destination.latitude,
  centerLatitude: this.viewModel.centerLatitude,  // 计算属性,自动响应变化
  zoom: 14
})
V2 数据流特点:
@Param是单向数据流 ------父组件值变化时子组件自动同步,但子组件不能修改@Param值this.viewModel.centerLatitude是NavigationViewModel中的计算属性,当起点或终点坐标变化时自动重算- 整个数据流从 ViewModel → 主页面 → 子组件,清晰可追踪
7.4 关键代码讲解:@Builder 复用
地点信息卡片使用 @Builder 装饰器实现复用,起点和终点共用同一套 UI 模板:
typescript
@Builder
locationCard(label: string, location: LocationInfo) {
  Column({ space: 8 }) {
    // ... 卡片内容
  }
}

// 调用两次,参数不同
this.locationCard('起点', this.viewModel.origin)      // 新都荟商城
this.locationCard('终点', this.viewModel.destination) // 海珠湿地公园
@Builder 适合构建结构相同但数据不同的 UI 片段,比抽取独立组件更轻量。
八、资源配置
8.1 string.json(文本资源)
json
{
  "string": [
    { "name": "app_title", "value": "广州商家地址路线导航" },
    { "name": "origin_name", "value": "新都荟商城" },
    { "name": "destination_name", "value": "海珠湿地公园" },
    { "name": "button_navigate", "value": "开始导航" },
    { "name": "button_route_plan", "value": "路线规划" },
    { "name": "button_poi_detail", "value": "查看详情" }
  ]
}
8.2 color.json(颜色资源)
json
{
  "color": [
    { "name": "page_background", "value": "#F5F5F5" },
    { "name": "card_background", "value": "#FFFFFF" },
    { "name": "primary_color", "value": "#007DFF" },
    { "name": "text_primary", "value": "#182431" },
    { "name": "text_secondary", "value": "#99182431" },
    { "name": "label_bg_green", "value": "#E8F5E9" },
    { "name": "label_bg_red", "value": "#FFEBEE" }
  ]
}
九、V1 与 V2 装饰器对照表
参考源码使用了 V1 装饰器,本案例全部重写为 V2。以下是对照表:
| 功能 | V1(参考源码) | V2(本案例) |
|---|---|---|
| 组件声明 | @Component |
@ComponentV2 |
| 组件内部状态 | @State image?: PixelMap |
`@Local image: PixelMap |
| 父→子数据流 | @Prop latitude: number |
@Param latitude: number |
| 全局状态 | @StorageProp('topRectHeight') |
不使用(V2 避免依赖 AppStorage) |
| 可观测对象 | @Observed 类 |
@ObservedV2 类 + 每个属性 @Trace |
| 获取 Context | getContext(this) |
this.getUIContext().getHostContext() |
| UI 上下文 | this.context = this.getUIContext() |
直接在方法中调用 this.getUIContext() |
十、运行与调试
10.1 真机运行
petalMaps 的导航、路线规划等功能在模拟器上不可用,必须使用 HarmonyOS 真机调试:
- 在 DevEco Studio 中选择真机设备
- 点击 Run 运行应用
- 验证静态地图是否正常显示
- 点击"开始导航"按钮,验证是否拉起花瓣地图
10.2 常见错误排查
| 现象 | 可能原因 | 解决方案 |
|---|---|---|
| 静态图显示空白 | 网络权限未声明 | 在 module.json5 中添加 ohos.permission.INTERNET |
Invalid input parameter |
scale=2 时图像尺寸超512 |
imageWidth/imageHeight 设为 512 |
| 报错 60001 | 地图服务未开通 | AGC 开通后重新申请 Profile |
| 报错 60002 | 签名不一致 | 更新 AGC 中的证书指纹 |
| 导航按钮无反应 | 模拟器环境 | 改用真机运行 |
| 导航按钮报错 1002103 | 花瓣地图未安装 | 在应用市场安装花瓣地图 |
界面显示 [object Object] |
$r() 在模板字符串中使用 |
$r() 返回 Resource 对象,不能放在 ${} 中,拆分为独立 Text 组件 |
10.3 开发踩坑记录
本案例开发过程中遇到以下 API 约束问题,供读者参考:
StaticMapMarker不支持label属性:无法在标记点上显示文字,如需文字说明可在 UI 层用 Text 组件叠加IconSize枚举只有TINY和SMALL:不存在MID和LARGE,使用时需确认可用的枚举值StaticMapOptions不支持path参数:当前版本 API 无法绘制路径线NaviParams/RoutePlanParams不支持sourcePosition:起点由花瓣地图自动使用用户当前位置$r()不能在模板字符串中使用 :$r()返回Resource对象,在${}中会变成[object Object],需拆分为独立 Text 组件
十一、总结
本案例完整实现了广州海珠区商家地址路线导航功能,核心技术要点回顾:
- 数据模型 :使用
@ObservedV2+@Trace构建响应式 ViewModel,实现属性级细粒度追踪 - 静态地图 :通过
staticMap.getMapImage()获取带有标记点的地图快照(注意scale与尺寸约束) - 导航操作 :通过
petalMapsAPI 拉起花瓣地图实现导航、路线规划、POI 详情 - 组件拆分 :主页面负责数据管理和布局,子组件专注功能实现,通过
@Param单向传递数据 - 状态管理 V2 :全程使用
@ComponentV2、@Local、@Param,避免 V1 装饰器的性能陷阱 - 网络权限 :必须在
module.json5中声明ohos.permission.INTERNET,否则静态图无法加载
参考文档
- 商家地址路线导航架构指南
- staticMap 静态图 API 参考
- petalMaps 拉起地图应用 API 参考
- 开通地图服务配置指南
- HarmonyOS 状态管理 V2 开发指南
现,通过@Param单向传递数据
- 状态管理 V2 :全程使用
@ComponentV2、@Local、@Param,避免 V1 装饰器的性能陷阱 - 网络权限 :必须在
module.json5中声明ohos.permission.INTERNET,否则静态图无法加载
参考文档