K8s 集群 NFS 存储部署流程
1.架构
架构:独立 NFS 服务端 + K8s 集群,NFS 作为 K8s 统一共享存储(动态 PV)
用途:为集群内应用、中间件提供持久化存储
2.NFS服务器环境
系统版本:Ubuntu 24.04 LTS
物理 IP:
172.16.2.38网段:
172.16.0.0/16(整个 K8s 集群宿主机网段)共享目录:
/nfs/k8s
一、NFS服务器部署
1.安装NFS服务组件
bash
apt update && apt install -y nfs-kernel-server rpcbind2.创建共享目录并配置权限
bash
mkdir -p /nfs/k8s
chmod 755 /nfs/k8s
chown nobody:nogroup /nfs/k8s
3.配置共享规则
bash
vim /etc/exports写入适配k8s网段
bash
/nfs/k8s 172.16.0.0/16(rw,sync,no_root_squash,no_subtree_check)生效配置
bash
exportfs -r
showmount -e
4.固定NFS端口
编辑 /etc/nfs.conf:
bash
[nfsd]
port=2049
udp=y

[mountd]
port=20048
udp=y

[statd]
port=4003
outgoing-port=4004

[lockd]
port=4005
udp-port=4005
内核参数固定 lockd 端口:
bash
echo -e "fs.nfs.nlm_tcpport=4005\nfs.nfs.nlm_udpport=4005" >> /etc/sysctl.conf
sysctl -p
5.重启服务并验证端口
bash
systemctl restart rpcbind nfs-kernel-server
rpcinfo -p  # 需看到 111/2049/20048/4003/4005 端口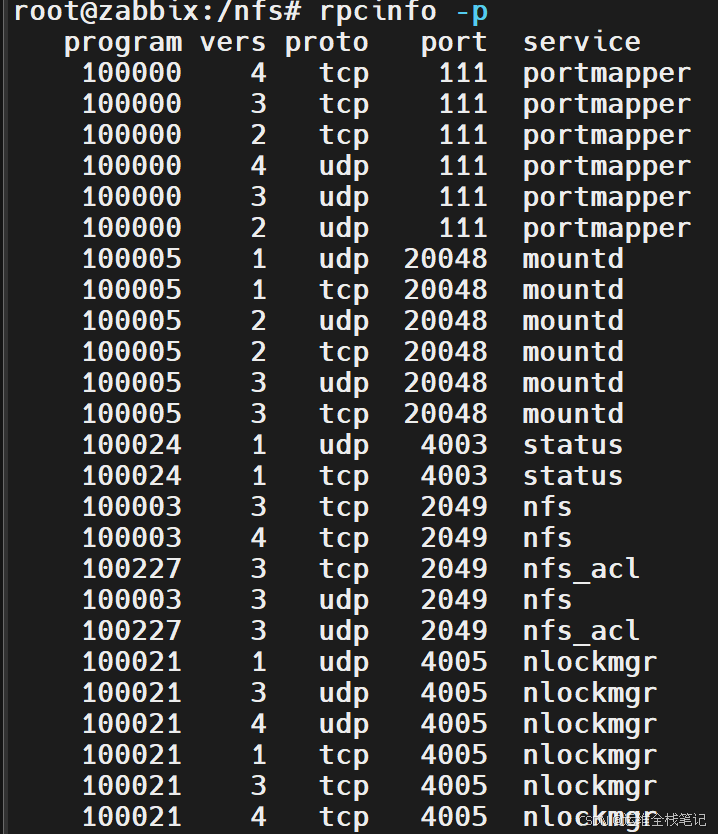
6.配置防火墙
bash
ufw allow in from 172.16.0.0/16 to any port 111,2049,20048,4003:4005 proto tcp
ufw allow in from 172.16.0.0/16 to any port 111,2049,20048,4003:4005 proto udp
ufw reload
二、K8s所有节点安装NFS客户端
1.安装
bash
apt update && apt install -y nfs-common2.任选一台 K8s 节点做挂载测试
bash
# 创建目录
mkdir -p /nfs

# 挂载 NFS 共享
mount -t nfs 172.16.2.38:/nfs/k8s /nfs
# 写入测试文件
touch /nfs/test.txt
3.NFS服务器查看文件是否写入
NFS 服务端能看到 test.txt,说明网络、权限、客户端均正常。
三、部署 K8s NFS 动态存储供给器
1.创建命名空间
bash
kubectl create namespace nfs2.创建RBAC 权限
yaml
#rbac.yaml
apiVersion: v1
kind: ServiceAccount
metadata:
  name: nfs-client-provisioner
  namespace: nfs
---
apiVersion: rbac.authorization.k8s.io/v1
kind: ClusterRole
metadata:
  name: nfs-client-provisioner-runner
rules:
  - apiGroups: [""]
    resources: ["persistentvolumes"]
    verbs: ["get", "list", "watch", "create", "delete"]
  - apiGroups: [""]
    resources: ["persistentvolumeclaims"]
    verbs: ["get", "list", "watch", "update"]
  - apiGroups: ["storage.k8s.io"]
    resources: ["storageclasses"]
    verbs: ["get", "list", "watch"]
  - apiGroups: [""]
    resources: ["events"]
    verbs: ["create", "update", "patch"]
  # 新增:选举锁需要操作 endpoints
  - apiGroups: [""]
    resources: ["endpoints"]
    verbs: ["get", "list", "watch", "create", "update", "patch", "delete"]
---
apiVersion: rbac.authorization.k8s.io/v1
kind: ClusterRoleBinding
metadata:
  name: run-nfs-client-provisioner
subjects:
  - kind: ServiceAccount
    name: nfs-client-provisioner
    namespace: nfs
roleRef:
  kind: ClusterRole
  name: nfs-client-provisioner-runner
  apiGroup: rbac.authorization.k8s.io
3.创建NFS 自动管理程序
yaml
#deployment.yaml
apiVersion: apps/v1
kind: Deployment
metadata:
  name: nfs-client-provisioner
  namespace: nfs
spec:
  replicas: 1
  selector:
    matchLabels:
      app: nfs-client-provisioner
  template:
    metadata:
      labels:
        app: nfs-client-provisioner
    spec:
      serviceAccountName: nfs-client-provisioner
      containers:
        - name: nfs-client-provisioner
          image: dyrnq/nfs-subdir-external-provisioner:v4.0.2
          volumeMounts:
            - name: nfs-client-root
              mountPath: /persistentvolumes
          env:
            - name: PROVISIONER_NAME
              value: k8s-sigs.io/nfs-subdir-external-provisioner
            - name: NFS_SERVER
              value: nfs   #填nfs服务器地址,这里我们把域名nfs解析到了172.16.2.38
            - name: NFS_PATH
              value: /nfs/k8s
      volumes:
        - name: nfs-client-root
          nfs:
            server: nfs    #填nfs服务器地址,这里我们把域名nfs解析到了172.16.2.38
            path: /nfs/k8s
4.创建存储类定义
yaml
#sc.yaml
apiVersion: storage.k8s.io/v1
kind: StorageClass
metadata:
  name: nfs-storage
  annotations:      #标记为集群默认存储类
    storageclass.kubernetes.io/is-default-class: "true"
provisioner: k8s-sigs.io/nfs-subdir-external-provisioner
parameters:
  archiveOnDelete: "false"
5.应用配置
bash
kubectl apply -f rbac.yaml
kubectl apply -f deployment.yaml
kubectl apply -f sc.yaml
6.验证部署状态
bash
#查看pod状态
kubectl get pods -n nfs

#查看存储类
kubectl get sc

#查看运行日志
kubectl logs -f deployment/nfs-client-provisioner -n nfs
四、功能测试(验证动态创建 PV/PVC)
1.创建PVC
yaml
# test-pvc.yaml
apiVersion: v1
kind: PersistentVolumeClaim
metadata:
  name: test-nfs-pvc
spec:
  accessModes:
    - ReadWriteMany
  resources:
    requests:
      storage: 1Gi
应用配置
kubectl apply -f test-pvc.yaml
kubectl get pvc
确认状态为 Bound

2.创建测试Pod
yaml
# test-pod.yaml
apiVersion: v1
kind: Pod
metadata:
  name: test-nfs-pod
spec:
  containers:
  - name: nginx
    image: nginx:alpine
    volumeMounts:
    - name: nfs-data
      mountPath: /usr/share/nginx/html
  volumes:
  - name: nfs-data
    persistentVolumeClaim:
      claimName: test-nfs-pvc
应用配置
bash
kubectl apply -f test-pod.yaml
kubectl get pods
等待 Pod 变为 Running
3.验证读写+持久化
(1)验证读写
bash
# 进入Pod写入文件
kubectl exec -it test-nfs-pod -- sh
echo "test nfs storage" > /usr/share/nginx/html/index.html
cat /usr/share/nginx/html/index.html
exit
登录NFS服务器查看文件

(2)验证数据持久化
bash
kubectl delete pod test-nfs-pod
kubectl apply -f test-pod.yaml
# 重新查看内容
kubectl exec test-nfs-pod -- cat /usr/share/nginx/html/index.html