时间轨迹第 3 篇:相机页源代码拆解,拍照、录像、定位、手势与水印合成
这一篇讲的是
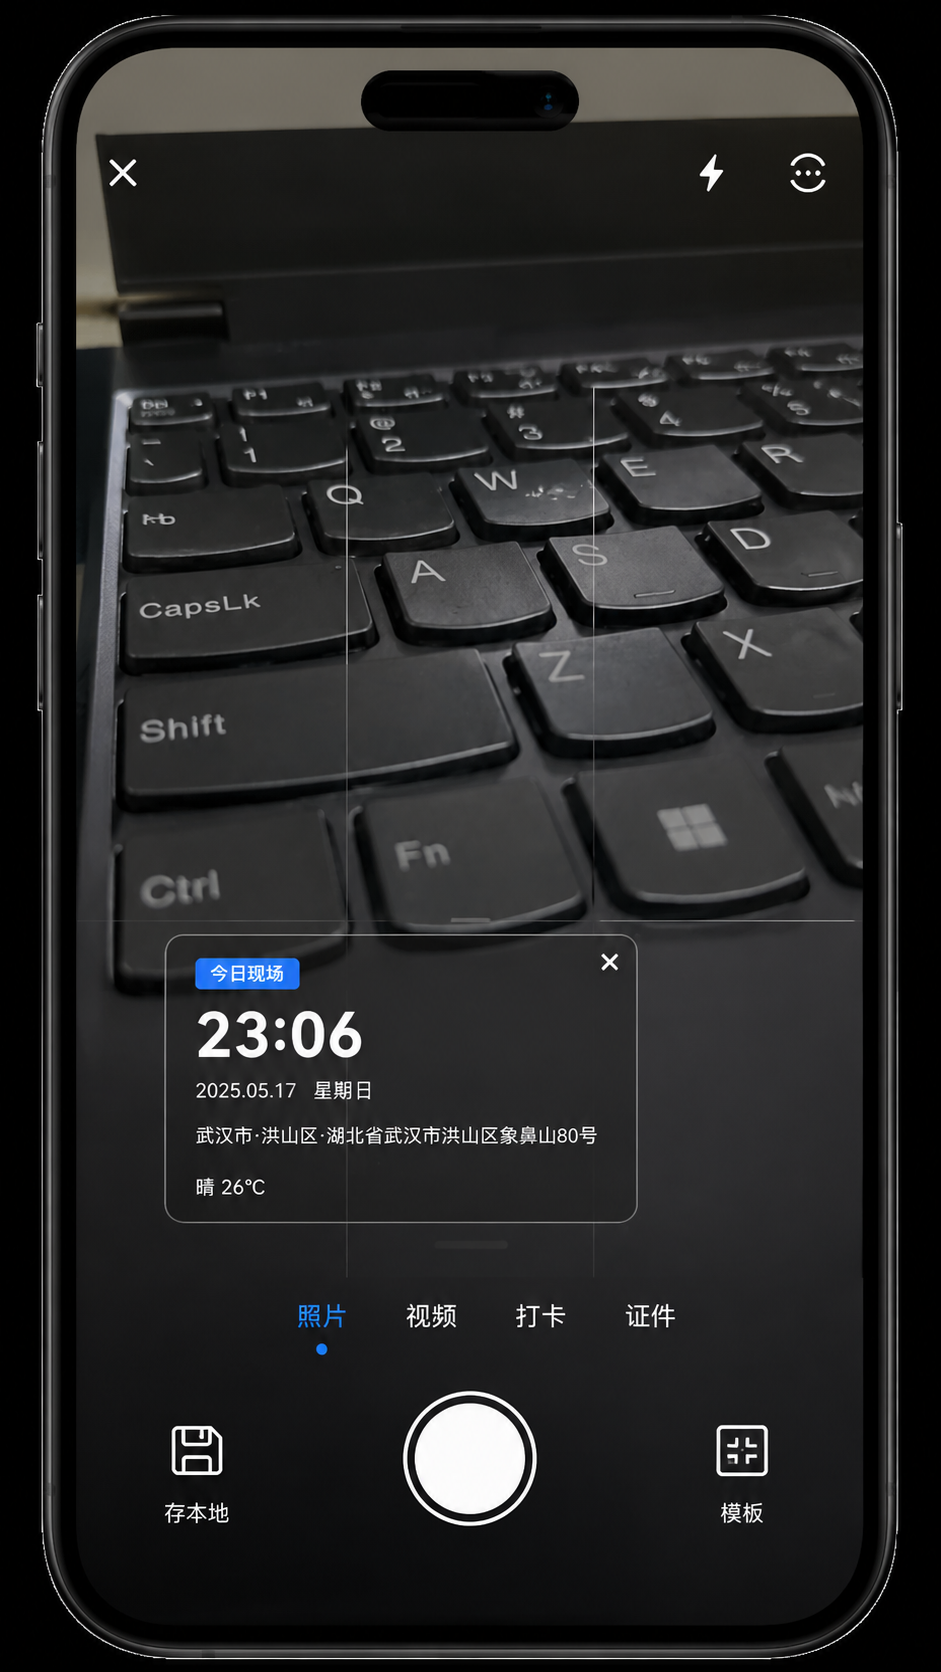
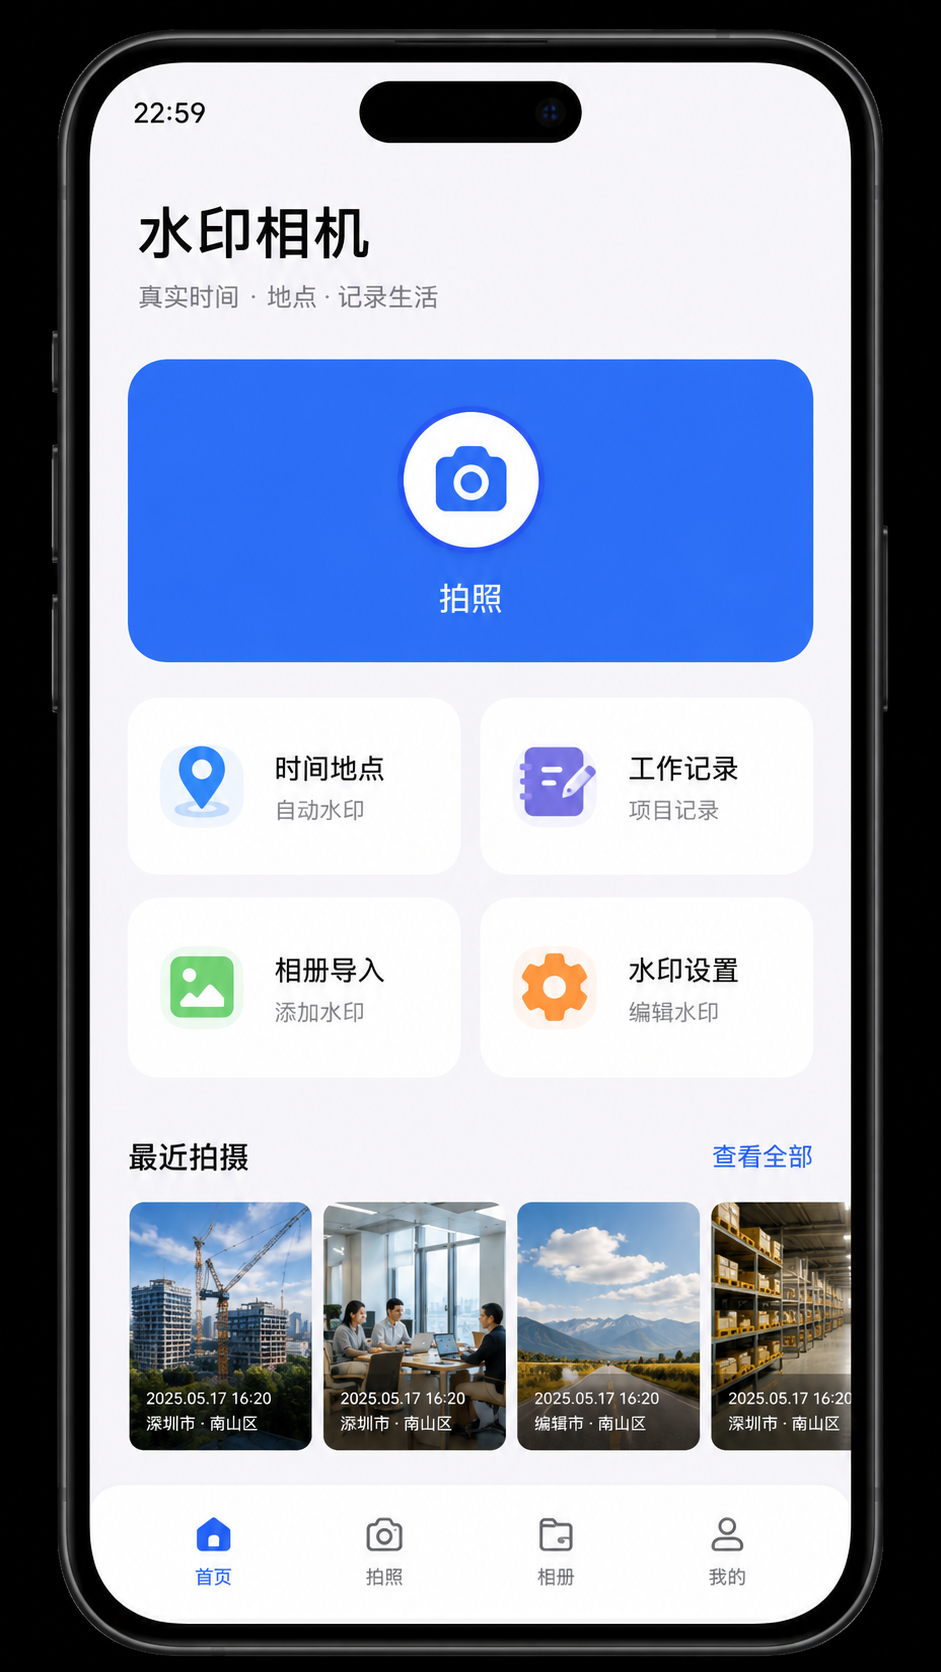
CameraPage.ets。它是整套应用里最重的一页,也是最能体现产品完成度的一页。因为这里要同时处理权限、相机预览、定位、水印、拍照、录像、保存和回流。
系列导航
摘要
CameraPage 不是"点一下拍照按钮"这么简单,而是一个持续运行的工作流:
- 先申请权限
- 再初始化相机
- 再启动定位和传感器监听
- 再根据当前模式合成水印
- 最后决定保存到本地还是系统相册
如果把这页做顺,整个应用的核心体验就顺了。
目录
- 整体工作流
- 权限与生命周期
- 定位与水印输入
- 手势和传感器
- 拍照与录像分支
- 保存与回流
- 实操检查清单
- 参考资料
一、先看整体工作流
#mermaid-svg-00PhKvvpG0INsL3T{font-family:"trebuchet ms",verdana,arial,sans-serif;font-size:16px;fill:#333;}@keyframes edge-animation-frame{from{stroke-dashoffset:0;}}@keyframes dash{to{stroke-dashoffset:0;}}#mermaid-svg-00PhKvvpG0INsL3T .edge-animation-slow{stroke-dasharray:9,5!important;stroke-dashoffset:900;animation:dash 50s linear infinite;stroke-linecap:round;}#mermaid-svg-00PhKvvpG0INsL3T .edge-animation-fast{stroke-dasharray:9,5!important;stroke-dashoffset:900;animation:dash 20s linear infinite;stroke-linecap:round;}#mermaid-svg-00PhKvvpG0INsL3T .error-icon{fill:#552222;}#mermaid-svg-00PhKvvpG0INsL3T .error-text{fill:#552222;stroke:#552222;}#mermaid-svg-00PhKvvpG0INsL3T .edge-thickness-normal{stroke-width:1px;}#mermaid-svg-00PhKvvpG0INsL3T .edge-thickness-thick{stroke-width:3.5px;}#mermaid-svg-00PhKvvpG0INsL3T .edge-pattern-solid{stroke-dasharray:0;}#mermaid-svg-00PhKvvpG0INsL3T .edge-thickness-invisible{stroke-width:0;fill:none;}#mermaid-svg-00PhKvvpG0INsL3T .edge-pattern-dashed{stroke-dasharray:3;}#mermaid-svg-00PhKvvpG0INsL3T .edge-pattern-dotted{stroke-dasharray:2;}#mermaid-svg-00PhKvvpG0INsL3T .marker{fill:#333333;stroke:#333333;}#mermaid-svg-00PhKvvpG0INsL3T .marker.cross{stroke:#333333;}#mermaid-svg-00PhKvvpG0INsL3T svg{font-family:"trebuchet ms",verdana,arial,sans-serif;font-size:16px;}#mermaid-svg-00PhKvvpG0INsL3T p{margin:0;}#mermaid-svg-00PhKvvpG0INsL3T .label{font-family:"trebuchet ms",verdana,arial,sans-serif;color:#333;}#mermaid-svg-00PhKvvpG0INsL3T .cluster-label text{fill:#333;}#mermaid-svg-00PhKvvpG0INsL3T .cluster-label span{color:#333;}#mermaid-svg-00PhKvvpG0INsL3T .cluster-label span p{background-color:transparent;}#mermaid-svg-00PhKvvpG0INsL3T .label text,#mermaid-svg-00PhKvvpG0INsL3T span{fill:#333;color:#333;}#mermaid-svg-00PhKvvpG0INsL3T .node rect,#mermaid-svg-00PhKvvpG0INsL3T .node circle,#mermaid-svg-00PhKvvpG0INsL3T .node ellipse,#mermaid-svg-00PhKvvpG0INsL3T .node polygon,#mermaid-svg-00PhKvvpG0INsL3T .node path{fill:#ECECFF;stroke:#9370DB;stroke-width:1px;}#mermaid-svg-00PhKvvpG0INsL3T .rough-node .label text,#mermaid-svg-00PhKvvpG0INsL3T .node .label text,#mermaid-svg-00PhKvvpG0INsL3T .image-shape .label,#mermaid-svg-00PhKvvpG0INsL3T .icon-shape .label{text-anchor:middle;}#mermaid-svg-00PhKvvpG0INsL3T .node .katex path{fill:#000;stroke:#000;stroke-width:1px;}#mermaid-svg-00PhKvvpG0INsL3T .rough-node .label,#mermaid-svg-00PhKvvpG0INsL3T .node .label,#mermaid-svg-00PhKvvpG0INsL3T .image-shape .label,#mermaid-svg-00PhKvvpG0INsL3T .icon-shape .label{text-align:center;}#mermaid-svg-00PhKvvpG0INsL3T .node.clickable{cursor:pointer;}#mermaid-svg-00PhKvvpG0INsL3T .root .anchor path{fill:#333333!important;stroke-width:0;stroke:#333333;}#mermaid-svg-00PhKvvpG0INsL3T .arrowheadPath{fill:#333333;}#mermaid-svg-00PhKvvpG0INsL3T .edgePath .path{stroke:#333333;stroke-width:2.0px;}#mermaid-svg-00PhKvvpG0INsL3T .flowchart-link{stroke:#333333;fill:none;}#mermaid-svg-00PhKvvpG0INsL3T .edgeLabel{background-color:rgba(232,232,232, 0.8);text-align:center;}#mermaid-svg-00PhKvvpG0INsL3T .edgeLabel p{background-color:rgba(232,232,232, 0.8);}#mermaid-svg-00PhKvvpG0INsL3T .edgeLabel rect{opacity:0.5;background-color:rgba(232,232,232, 0.8);fill:rgba(232,232,232, 0.8);}#mermaid-svg-00PhKvvpG0INsL3T .labelBkg{background-color:rgba(232, 232, 232, 0.5);}#mermaid-svg-00PhKvvpG0INsL3T .cluster rect{fill:#ffffde;stroke:#aaaa33;stroke-width:1px;}#mermaid-svg-00PhKvvpG0INsL3T .cluster text{fill:#333;}#mermaid-svg-00PhKvvpG0INsL3T .cluster span{color:#333;}#mermaid-svg-00PhKvvpG0INsL3T div.mermaidTooltip{position:absolute;text-align:center;max-width:200px;padding:2px;font-family:"trebuchet ms",verdana,arial,sans-serif;font-size:12px;background:hsl(80, 100%, 96.2745098039%);border:1px solid #aaaa33;border-radius:2px;pointer-events:none;z-index:100;}#mermaid-svg-00PhKvvpG0INsL3T .flowchartTitleText{text-anchor:middle;font-size:18px;fill:#333;}#mermaid-svg-00PhKvvpG0INsL3T rect.text{fill:none;stroke-width:0;}#mermaid-svg-00PhKvvpG0INsL3T .icon-shape,#mermaid-svg-00PhKvvpG0INsL3T .image-shape{background-color:rgba(232,232,232, 0.8);text-align:center;}#mermaid-svg-00PhKvvpG0INsL3T .icon-shape p,#mermaid-svg-00PhKvvpG0INsL3T .image-shape p{background-color:rgba(232,232,232, 0.8);padding:2px;}#mermaid-svg-00PhKvvpG0INsL3T .icon-shape .label rect,#mermaid-svg-00PhKvvpG0INsL3T .image-shape .label rect{opacity:0.5;background-color:rgba(232,232,232, 0.8);fill:rgba(232,232,232, 0.8);}#mermaid-svg-00PhKvvpG0INsL3T .label-icon{display:inline-block;height:1em;overflow:visible;vertical-align:-0.125em;}#mermaid-svg-00PhKvvpG0INsL3T .node .label-icon path{fill:currentColor;stroke:revert;stroke-width:revert;}#mermaid-svg-00PhKvvpG0INsL3T :root{--mermaid-font-family:"trebuchet ms",verdana,arial,sans-serif;} 进入 CameraPage
申请相机 / 存储 / 定位权限
初始化 CameraService
启动定位监听
启动加速度传感器监听
更新地点与坐标
更新横竖屏角度
拍照 / 录像
合成水印
保存到本地或系统相册
写入工作记录 / 历史地址
这张图说明了一件事:
CameraPage不是单点功能,而是一条连续工作流。
图 1 说明
这张图适合放在正文开头,因为它会让读者先理解:相机页不是拍照按钮,而是整条拍摄链路的协调中心。
二、权限必须前置
1. 进页面先申请权限
ts
private async requestPermissionsEarly(): Promise<void> {
  const ctx = getContext(this) as common.UIAbilityContext;
  const results = await Promise.all([
    PermissionUtil.requestCameraPermissions(ctx),
    PermissionUtil.requestMediaPermissions(ctx),
  ]);
  this.permissionGranted = results[0];
}
这一步很关键,因为后面所有能力都依赖权限:
- 相机权限
- 存储权限
- 定位权限
如果权限没先处理好,后面的水印、保存、回流逻辑都会断。
2. 生命周期里要能释放资源
ts
private onLifecycleChange(): void {
  if (this.appInBackground) {
    if (this.isRecording) {
      this.cameraService.stopRecording(ctx, this.saveMode).then(() => {});
      this.isRecording = false;
    }
    this.cameraReady = false;
    this.cameraService.release();
  } else {
    if (this._resuming || this.surfaceId === '') { return; }
    this._resuming = true;
    this.initCamera().finally(() => { this._resuming = false; });
  }
}
这段逻辑说明了相机页的真实约束:
- 切到后台时要及时释放
- 返回前台时要重新初始化
- 录像状态不能在后台悬空
这类代码写好了,页面才不会"看起来能用,实际很脆"。
三、定位是水印主输入之一
1. 启动定位监听
ts
private async startLocationWatch(): Promise<void> {
  const ctx = getContext(this) as common.UIAbilityContext;
  const granted = await PermissionUtil.requestLocationPermissions(ctx);
  if (!granted) {
    this.locationStr = '定位权限未授予';
    return;
  }
  LocationService.startLocationWatch((loc: LocationInfo) => {
    this.locationStr = loc.address || LocationService.formatLatLng(loc.latitude, loc.longitude);
    this.coordStr = LocationService.formatLatLng(loc.latitude, loc.longitude);
  }, (status: string) => {
    this.locationStr = status;
  });
}
这里最重要的不是"拿到地址",而是"持续维护拍摄上下文"。
因为拍照时真正写入水印的地址,应该尽量是当前可用的最新值,而不是拍完再补。
2. 手动地址和实时定位有优先级
ts
private getWatermarkLocation(): string {
  if (this.wmManualLocation !== '') { return this.wmManualLocation; }
  if (this.locationStr !== '' && this.locationStr !== '定位权限未授予') {
    return this.locationStr;
  }
  if (this.wmSelectedTemplateName !== '') { return this.wmSelectedTemplateDesc; }
  return this.locationStr;
}
这段优先级很实用:
- 手动地址优先
- 实时定位其次
- 模板描述兜底
它保证了不同场景都能拿到一个可用地点,而不会因为定位失败直接让水印空掉。
四、传感器是用户体验的一部分
ts
private accelCallback = (data: sensor.AccelerometerResponse): void => {
  const raw = Math.atan2(data.x, data.y) * 180 / Math.PI;
  const angle = ((Math.round(raw / 90) * 90) % 360 + 360) % 360;
  if (angle !== this.deviceAngle) {
    this.deviceAngle = angle;
    this.cameraService.setDeviceAngle(angle);
  }
};
很多相机页只关心"能不能拍",但这里还要关心"拍出来的方向对不对"。
加速度传感器的作用就是:
- 帮助判断横竖屏
- 让水印和预览更贴近真实方向
- 避免用户旋转设备后画面和 UI 不一致
这类细节会直接影响专业感。
五、拍照和录像是两条分支
1. 录像模式
ts
if (this.currentMode === '视频') {
  if (this.isRecording) {
    const ok = await this.cameraService.stopRecording(ctx, this.saveMode, { ...wmInfo });
    this.isRecording = false;
    if (ok && this.saveMode === 'local') {
      this.onGoVideoAlbum?.();
    }
  } else {
    await this.cameraService.startRecording();
    this.isRecording = true;
  }
  return;
}
录像模式里最重要的是状态切换要清楚:
- 进入录制
- 结束录制
- 保存模式切换
- 保存后是否跳转相册
2. 拍照模式
ts
const wmInfo: WatermarkBurnInfo = {
  enabled: this.wmAutoWatermark && this.currentMode !== '证件',
  style: 'card',
  templateIndex: this.watermarkTemplate,
  time: this.timeStr,
  date: this.dateStr,
  location: this.getWatermarkLocation(),
  coords: this.coordStr,
  customText: this.wmCustomText,
  showTime: this.wmShowTime,
  showAddress: this.wmShowAddress,
  cropRatio: this.photoRatio
};
这段信息非常关键,因为它决定了最终照片怎么生成。
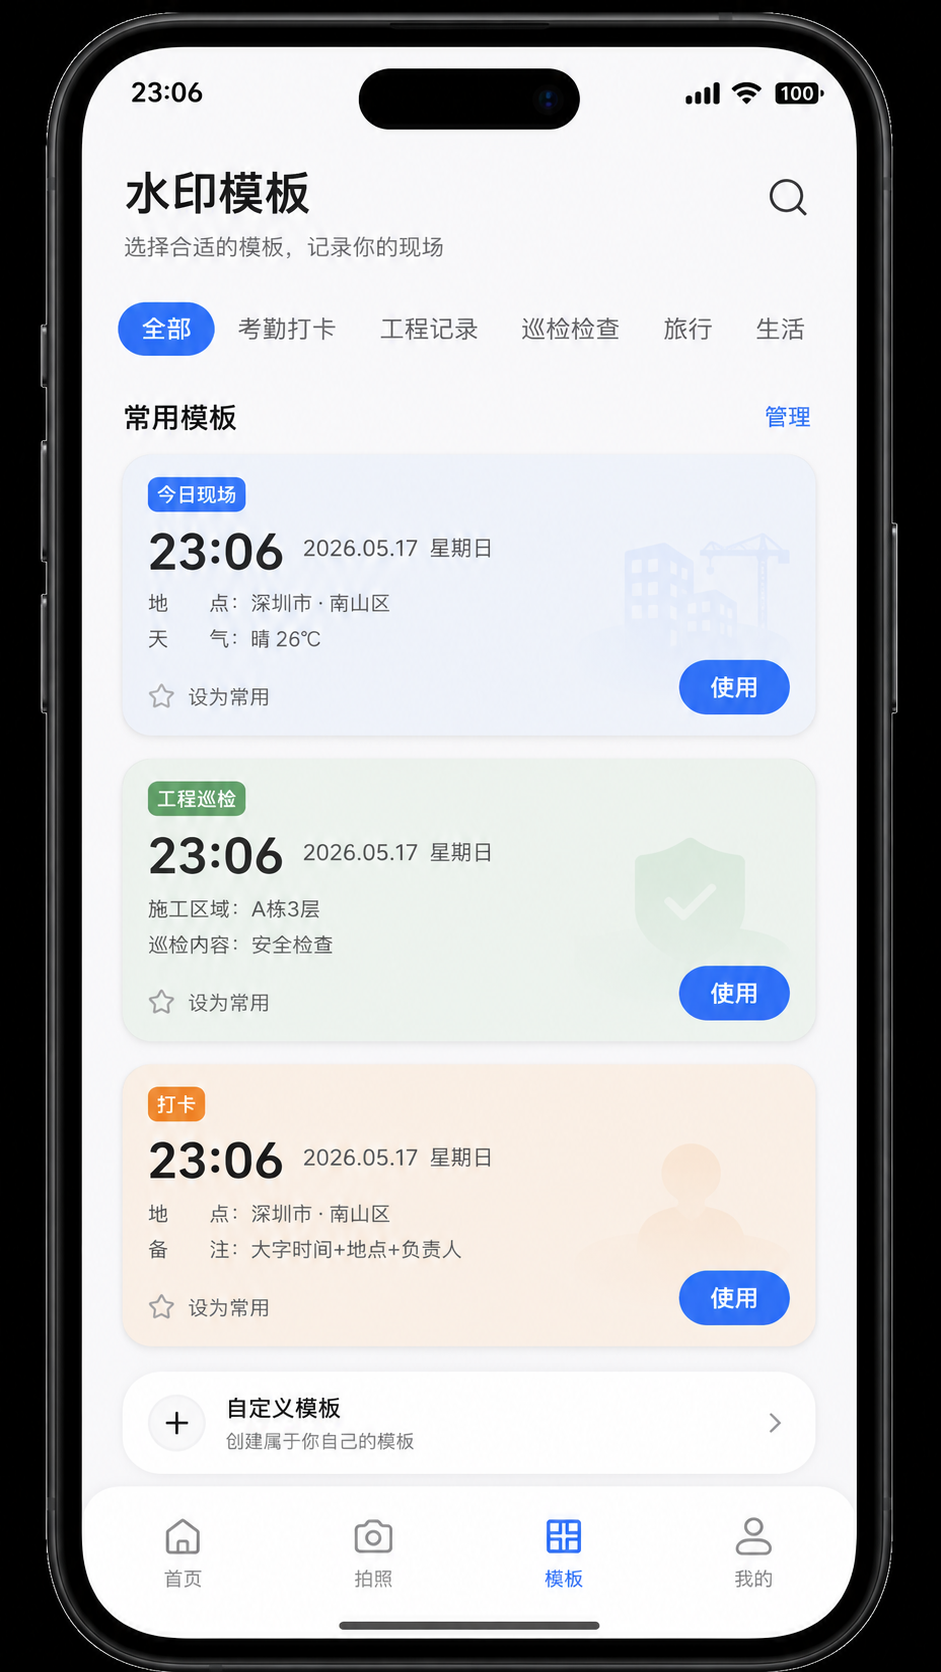
你可以把它理解成一个"拍照前的水印配置包":
- 时间
- 日期
- 地址
- 坐标
- 模板
- 自定义文本
- 显示开关
- 裁剪比例
拍照时先准备好这些信息,再把结果交给保存逻辑。
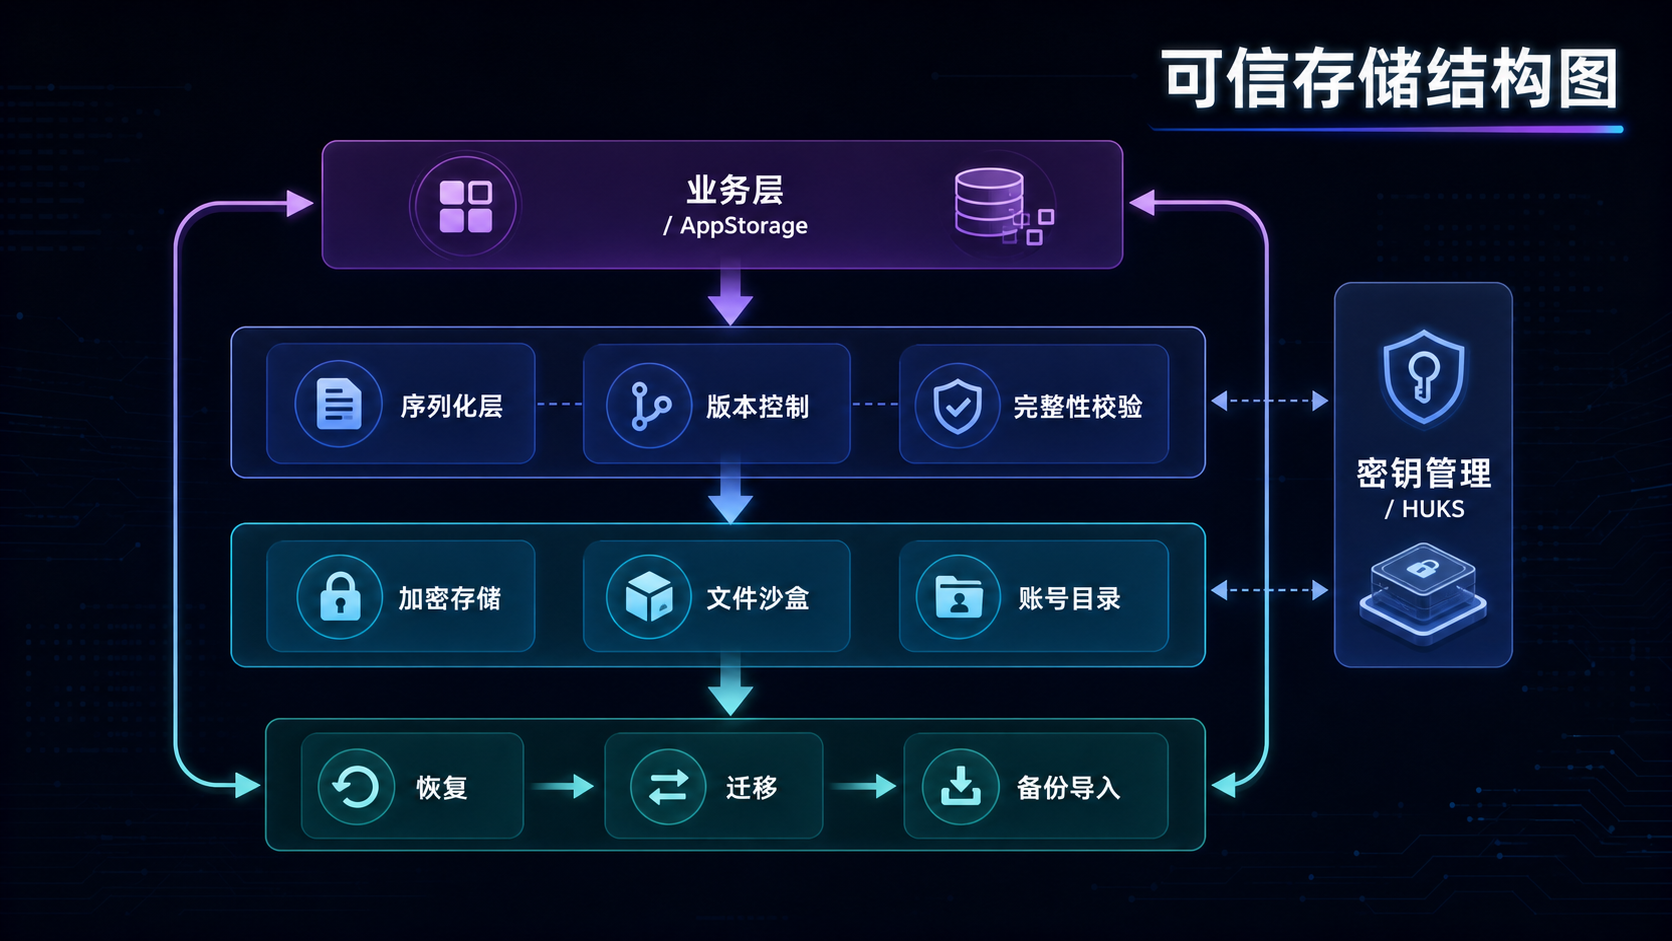
六、保存策略决定产品体验
ts
if (this.saveMode === 'local') {
  this.cameraService.saveToAppStorage(ctx, wmInfo).then((path: string) => {
    if (path) {
      if (this.wrAutoRecord) { this.appendWorkRecord(path); }
      this.recordLocationToHistory();
    }
  });
} else {
  this.cameraService.saveToSystemAlbum(ctx, wmInfo).then((ok: boolean) => {
    if (ok) {
      this.recordLocationToHistory();
    }
  });
}
这里体现的是两个完全不同的产品方向:
local:更偏应用内闭环,方便后续回看和管理systemAlbum:更偏系统级保存,用户更熟悉
这类分支写得清楚,产品定位也会清楚。
七、拍照后还要回流到工作记录
ts
private appendWorkRecord(photoPath: string): void {
  const now = new Date();
  const list = JSON.parse(this.wrRecords) as WorkRecord[];
  const rec: WorkRecord = {
    id: Date.now().toString(),
    type: this.wrCurrentType,
    date: dateStr,
    location: this.locationStr,
    photoPath: photoPath
  };
  list.unshift(rec);
  this.wrRecords = JSON.stringify(list.slice(0, 100));
}
这一步的意义很大:
- 照片不是终点
- 它会进入工作记录页
- 最终形成拍摄 -> 归档 -> 检索的链路
如果没有这一步,拍照只是拍照;有了这一步,照片就变成了业务记录。
八、保留记录次数不是细节,而是产品控制
ts
private async onPhotoSavedForReview(): Promise<void> {
  if (this.reviewCompleted) { return; }
  this.reviewPhotoCount = this.reviewPhotoCount + 1;
  if (this.reviewPhotoCount >= 5) {
    await this.showCommentDialogBeforeContinue();
  }
}
这种提示逻辑的价值在于:
- 避免用户长时间连拍后完全没有反馈
- 给"继续拍"这个动作增加轻量引导
- 把拍摄行为和产品评价、提示节奏连起来
九、这页最值得写进文章的 3 个点
- 权限、生命周期、传感器和定位是相机页的前置条件
- 水印信息不是拍完再补,而是在拍前就准备好
- 拍照后会回流到工作记录,整个链路才算闭环
小结表
| 模块 | 作用 |
|---|---|
| 权限 | 保证相机、存储、定位可用 |
| 生命周期 | 后台释放、前台恢复 |
| 定位 | 为水印提供实时地址 |
| 传感器 | 让预览方向更稳定 |
| 保存 | 决定本地还是系统相册 |
| 回流 | 让图片成为业务记录 |
问题 - 方案 - 验证
问题
相机页最容易出问题的不是"能不能拍",而是"拍出来的数据是否完整、资源是否能恢复"。
方案
把权限、定位、传感器、水印合成和保存分成几个固定步骤,按顺序执行。
验证
后台切换后相机能恢复、拍照后能生成记录、地址能同步到历史,说明这条链路是闭环的。
十、实操检查清单
- 相机权限拒绝后是否有兜底提示
- 后台切换后相机是否能正确释放并恢复
- 拍照时水印信息是否完整
- 手动地址是否能覆盖实时定位
- 录像结束后是否能正确保存并跳转
- 拍照后是否自动写入工作记录
结语
CameraPage 是这套应用里最能体现完成度的一页,因为它把"拍摄"从一个动作变成了一套流程。
把这页写顺了,应用就不只是能拍,而是真的能用。
参考资料
常见问题
1. 为什么水印要在拍照前准备
因为真正拍照时需要的是一个完整的上下文包,而不是拍完再补信息。前置准备可以避免拍后补录造成的信息不同步。
2. 为什么定位监听要常驻
因为地址会变化,拍照点和进入页面时的地址未必一致。常驻监听能让水印信息更接近真实拍摄时刻。
3. 为什么拍照后要写工作记录
因为单张图片只能说明"拍了",工作记录才能说明"在什么场景、什么时间、什么地点拍的"。它把图片变成业务数据。
发布前检查
- 拍照、录像、定位三条链路是否讲清楚
- 是否有一段代码专门解释水印合成
- 是否说明了保存到本地和系统相册的区别
- 是否写出了后台释放和前台恢复
- 是否有拍后回流到工作记录的闭环