HarmonyOS 分层架构 --- MapService 地图模块打点与路径规划实战
本文详解广州旅游住宿 App 中 MapService 地图服务模块的实现,涵盖 Map Kit 真实地图集成、景点标记打点、标记详情弹窗、路径规划面板以及 Haversine 距离计算算法等核心内容。
图标资源说明 :HarmonyOS 6.1 中sys.media.ohos_ic_public_*系统图标资源已大量废弃。本项目实际采用 Unicode 文本字符替代(如✕、🗺️、📍等)。下文代码示例中部分保留原始写法以便理解 API 用法,实际运行请以项目源码为准。
效果
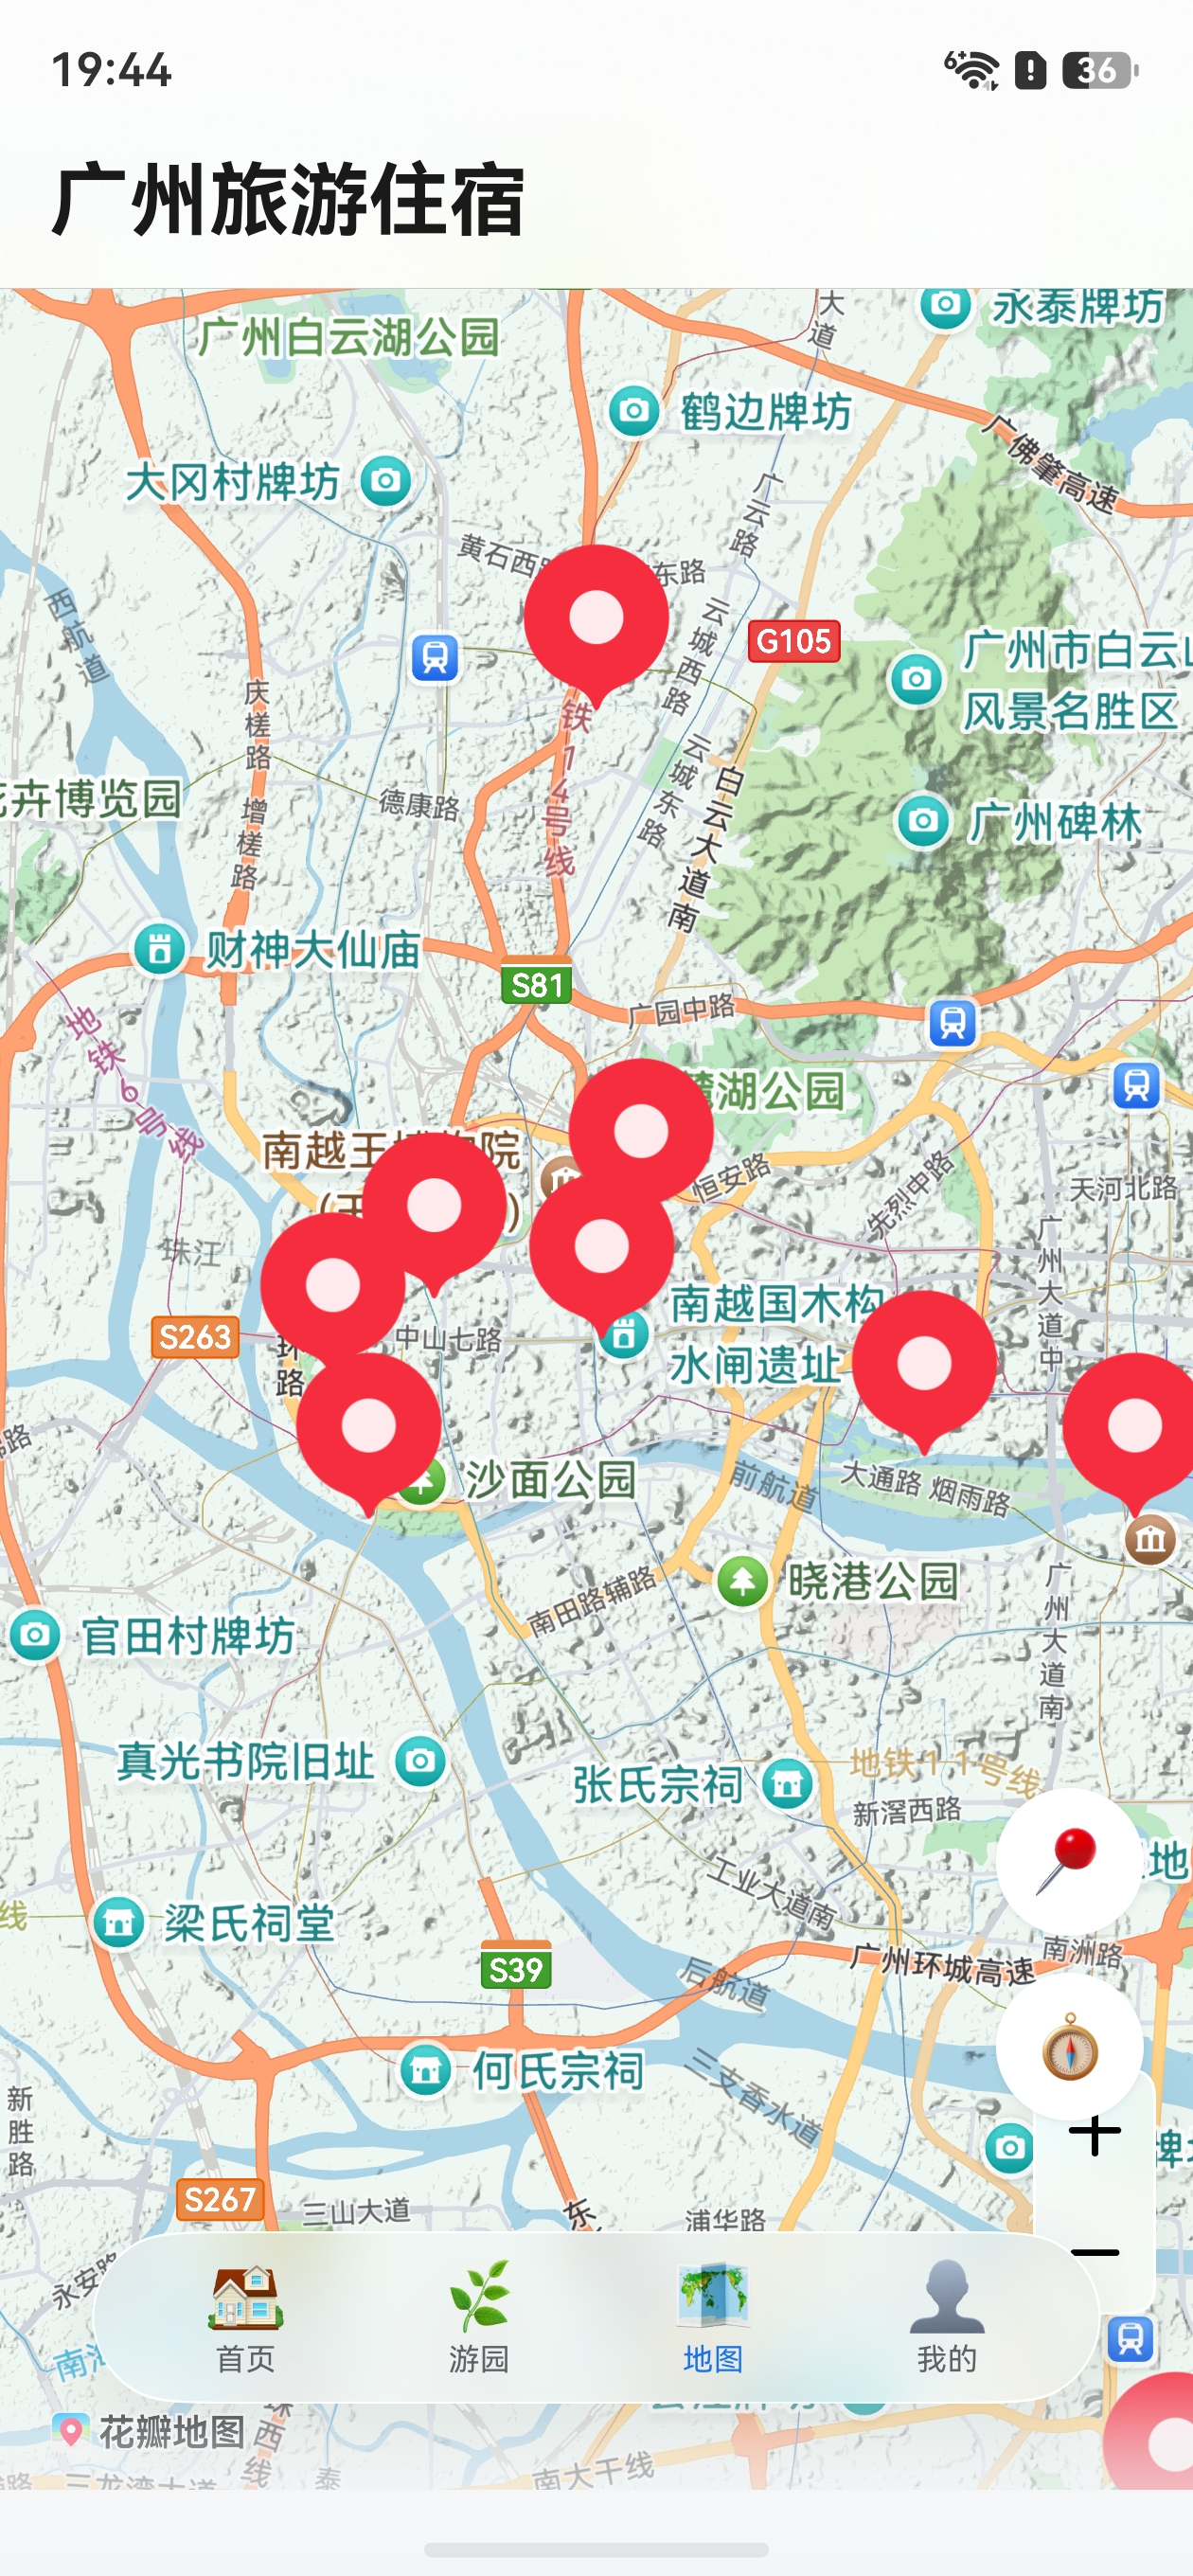
一、MapService 模块职责
MapService 是项目中负责地图相关功能的独立 feature 模块,主要承担以下职责:
| 功能 | 说明 |
|---|---|
| 地图嵌入 | 通过 @kit.MapKit 集成真实地图底图,支持缩放、拖动、地形图模式 |
| 景点标记 | 在地图上动态添加广州 10 个热门景点的 Marker,支持点击交互 |
| 标记详情 | 点击地图标记后弹出景点信息弹窗,支持关闭与导航操作 |
| 路径规划 | 进入路线规划模式,选择起终点后计算直线距离并给出出行建议 |
| 定位按钮 | 浮动按钮提供定位与快速进入路径规划的入口 |
模块目录结构如下:
features/MapService/
├── src/main/ets/
│   ├── viewmodel/
│   │   └── MapViewModel.ets       // 地图业务逻辑
│   └── views/
│       ├── MapPage.ets            // 地图主页面
│       ├── SpotMarkerPopup.ets    // 标记详情弹窗
│       └── RoutePlanPanel.ets     // 路径规划面板
├── Index.ets                      // 模块导出入口
└── oh-package.json5               // 模块配置
二、模块配置与导出
oh-package.json5
json5
{
  "name": "MapService",
  "version": "1.0.0",
  "description": "地图服务模块",
  "main": "Index.ets",
  "author": "",
  "license": "Apache-2.0",
  "dependencies": {
    "common": "file:../../common"
  }
}
MapService 仅依赖 common 公共模块,通过 file:../../common 本地引用获取共享的数据模型、主题常量等。
Index.ets 导出入口
typescript
export { MapPage } from './src/main/ets/views/MapPage';模块仅向外暴露 MapPage 作为地图功能的统一入口页面,内部的 ViewModel、弹窗组件等均封装在模块内部,遵循最小导出原则。
三、SpotMarker 数据模型
景点标记点的数据模型定义在 common 公共模块的 CategoryItem.ets 中,与 CategoryItem、BannerItem 并列:
typescript
@ObservedV2
export class SpotMarker {
  @Trace id: string = '';
  @Trace name: string = '';
  @Trace latitude: number = 0;
  @Trace longitude: number = 0;
  @Trace category: string = '';
  @Trace icon: string = '';
  @Trace isSelected: boolean = false;

  constructor(name: string, latitude: number, longitude: number, category: string) {
    this.id = `${category}_${name}`;
    this.name = name;
    this.latitude = latitude;
    this.longitude = longitude;
    this.category = category;
  }
}
设计要点:
- @ObservedV2 + @Trace :使用 HarmonyOS V2 状态管理,
isSelected等属性变化时自动触发依赖该属性的 UI 组件刷新 - id 生成策略 :
id = category + "_" + name,确保唯一性的同时便于调试定位 - 构造器简化创建:只需传入 name/latitude/longitude/category 四个核心参数即可创建实例
- isSelected 状态:标记当前是否被选中,用于控制弹窗显示和高亮样式
四、MapViewModel 地图业务逻辑
MapViewModel 是地图模块的核心逻辑层,使用 @ObservedV2 装饰器实现响应式数据驱动:
typescript
import { SpotMarker, AppConstants } from 'common';

@ObservedV2
export class MapViewModel {
  @Trace markers: SpotMarker[] = [];
  @Trace selectedMarker: SpotMarker | null = null;
  @Trace isRoutePlanning: boolean = false;
  @Trace routeDescription: string = '';
  @Trace startMarkerId: string = '';
  @Trace endMarkerId: string = '';
  // ...
}
4.1 loadMarkers --- 加载广州景点标记点
typescript
loadMarkers(): void {
  this.markers = [
    new SpotMarker('白云山', 23.1895, 113.2644, '自然风光'),
    new SpotMarker('沙面岛', 23.1066, 113.2390, '历史人文'),
    new SpotMarker('陈家祠', 23.1292, 113.2463, '历史人文'),
    new SpotMarker('越秀公园', 23.1368, 113.2694, '公园广场'),
    new SpotMarker('广州塔', 23.1066, 113.3245, '现代地标'),
    new SpotMarker('珠江夜游码头', 23.1130, 113.3010, '现代地标'),
    new SpotMarker('北京路步行街', 23.1250, 113.2650, '现代地标'),
    new SpotMarker('长隆欢乐世界', 23.0020, 113.3290, '公园广场'),
    new SpotMarker('红砖厂创意园', 23.1180, 113.3570, '现代地标'),
    new SpotMarker('荔枝湾涌', 23.1210, 113.2350, '历史人文')
  ];
}
10 个景点覆盖自然风光、历史人文、公园广场、现代地标 四大类别,经纬度均为广州真实坐标。该方法在 MapPage 的 aboutToAppear 生命周期中调用。
4.2 selectMarker / clearSelection --- 标记选中管理
typescript
selectMarker(markerId: string): void {
  const marker = this.markers.find(m => m.id === markerId);
  if (marker) {
    if (this.selectedMarker) {
      this.selectedMarker.isSelected = false;
    }
    marker.isSelected = true;
    this.selectedMarker = marker;
  }
}

clearSelection(): void {
  if (this.selectedMarker) {
    this.selectedMarker.isSelected = false;
    this.selectedMarker = null;
  }
}
互斥选中逻辑 :每次选中新标记前,先将旧标记的 isSelected 重置为 false,确保同一时刻只有一个标记处于选中状态。clearSelection 在弹窗关闭时调用。
4.3 startRoutePlanning / cancelRoutePlanning --- 路径规划模式
typescript
startRoutePlanning(): void {
  this.isRoutePlanning = true;
  this.startMarkerId = '';
  this.endMarkerId = '';
  this.routeDescription = '';
}

cancelRoutePlanning(): void {
  this.isRoutePlanning = false;
  this.startMarkerId = '';
  this.endMarkerId = '';
  this.routeDescription = '';
}
进入路径规划模式时重置所有状态;取消时同样清理,确保每次进入都是干净的初始态。
4.4 setRouteEndpoint --- 设置起终点
typescript
setRouteEndpoint(markerId: string, isStart: boolean): void {
  if (isStart) {
    this.startMarkerId = markerId;
  } else {
    this.endMarkerId = markerId;
  }
}
通过 isStart 布尔参数区分设置起点还是终点,设计简洁。该方法的典型调用场景:
- 从标记弹窗点击「导航到此」时,自动将当前标记设为终点
- 在路径规划面板中通过 Select 下拉框手动选择起终点
4.5 calculateRoute --- 路径计算
typescript
calculateRoute(): string {
  if (this.startMarkerId.length === 0 || this.endMarkerId.length === 0) {
    return '请选择起点和终点';
  }
  const startMarker = this.markers.find(m => m.id === this.startMarkerId);
  const endMarker = this.markers.find(m => m.id === this.endMarkerId);
  if (!startMarker || !endMarker) {
    return '标记点数据异常';
  }
  const distance = this.calcDistance(
    startMarker.latitude, startMarker.longitude,
    endMarker.latitude, endMarker.longitude
  );
  this.routeDescription = `从${startMarker.name}到${endMarker.name},直线距离约${distance.toFixed(1)}公里,建议乘坐地铁或公交前往。`;
  return this.routeDescription;
}计算流程:校验起终点 → 查找标记数据 → Haversine 公式计算距离 → 生成路线描述。距离保留一位小数,并附带出行建议。
五、MapPage 地图页面
MapPage 是地图模块的主页面,采用 Stack 层叠布局 将真实地图底图、弹窗面板和浮动按钮叠加在一起。
5.1 Map Kit 集成
页面通过 @kit.MapKit 集成 HarmonyOS 地图组件,关键配置:
typescript
import { MapComponent, mapCommon, map } from '@kit.MapKit';
import { AsyncCallback } from '@kit.BasicServicesKit';

@ComponentV2
export struct MapPage {
  @Local viewModel: MapViewModel = new MapViewModel();
  private mapController: map.MapComponentController | null = null;
  private mapCallback: AsyncCallback<map.MapComponentController> = (err, controller) => {
    if (!err) {
      this.mapController = controller;
      this.addMarkersToMap();
    }
  };
  @Local private mapOption: mapCommon.MapOptions = {
    position: {
      target: {
        latitude: 23.1291,   // 广州市中心
        longitude: 113.2644
      },
      zoom: 12
    },
    minZoom: 3,
    maxZoom: 20,
    mapType: mapCommon.MapType.TERRAIN
  };
  // ...
}
配置说明:
| 参数 | 说明 |
|---|---|
position.target |
地图初始中心点坐标(广州市) |
position.zoom |
初始缩放级别(12 级适合城市视图) |
mapType |
TERRAIN 地形图模式 |
mapCallback |
地图初始化完成后的回调,获取 mapController |
注意:Map Kit 需要在华为 AGC 后台配置 API Key 才能正常显示地图。
5.2 添加地图标记点
地图初始化完成后,遍历 ViewModel 中的景点数据,通过 mapController.addMarker() 添加标记:
typescript
private async addMarkersToMap(): Promise<void> {
  if (!this.mapController) {
    return;
  }
  for (let i = 0; i < this.viewModel.markers.length; i++) {
    const spot = this.viewModel.markers[i];
    const markerOptions: mapCommon.MarkerOptions = {
      position: {
        latitude: spot.latitude,
        longitude: spot.longitude
      },
      rotation: 0,
      visible: true,
      zIndex: 0,
      alpha: 1,
      anchorU: 0.5,   // 锚点水平居中
      anchorV: 1,     // 锚点底部对齐
      clickable: true,
      draggable: false,
      flat: false
    };
    const marker = await this.mapController.addMarker(markerOptions);
    marker.setTitle(spot.name);       // 景点名称
    marker.setSnippet(spot.category); // 景点分类
    marker.setClickable(true);
  }
  // 监听标记点击事件
  this.mapController.on('markerClick', (marker: map.Marker) => {
    const name = marker.getTitle();
    const found = this.viewModel.markers.find((m: SpotMarker) => m.name === name);
    if (found) {
      this.viewModel.selectMarker(found.id);
    }
  });
}
标记添加流程:
- 遍历
viewModel.markers获取每个景点的经纬度 - 构建
mapCommon.MarkerOptions配置 - 调用
addMarker()返回map.Marker实例 - 设置
title(名称)和snippet(分类) - 注册
markerClick事件,通过名称匹配更新选中状态
5.3 完整页面布局
typescript
@ComponentV2
export struct MapPage {
  // ... 属性和方法同上

  build() {
    Stack() {
      // 第1层:真实地图组件
      MapComponent({
        mapOptions: this.mapOption,
        mapCallback: this.mapCallback
      })
        .width('100%')
        .height('100%')

      // 第2层:弹窗 + 路径规划面板
      Column() {
        Blank()

        if (this.viewModel.selectedMarker) {
          SpotMarkerPopup({
            marker: this.viewModel.selectedMarker,
            onClose: () => { this.viewModel.clearSelection(); },
            onNavigate: () => {
              this.viewModel.startRoutePlanning();
              this.viewModel.setRouteEndpoint(this.viewModel.selectedMarker!.id, false);
            }
          })
            .position({ bottom: 120 })  // 在底部Tab上方
        }

        if (this.viewModel.isRoutePlanning) {
          RoutePlanPanel({
            markers: this.viewModel.markers,
            startMarkerId: this.viewModel.startMarkerId,
            endMarkerId: this.viewModel.endMarkerId,
            routeDescription: this.viewModel.routeDescription,
            onStartChange: (id: string) => { this.viewModel.setRouteEndpoint(id, true); },
            onEndChange: (id: string) => { this.viewModel.setRouteEndpoint(id, false); },
            onCalculate: () => { this.viewModel.calculateRoute(); },
            onCancel: () => { this.viewModel.cancelRoutePlanning(); }
          })
            .position({ bottom: 120 })  // 在底部Tab上方
        }
      }
      .width('100%')
      .height('100%')

      // 第3层:浮动操作按钮
      Column({ space: 12 }) {
        Button() {
          Text('\uD83D\uDCCD').fontSize(20).fontColor(ThemeConstants.PRIMARY)
        }
        .type(ButtonType.Circle).width(48).height(48)
        .backgroundColor(ThemeConstants.CARD_BG)
        .shadow({ radius: 6, color: '#14000000', offsetY: 2 })

        Button() {
          Text('\uD83E\uDDED').fontSize(20).fontColor(ThemeConstants.PRIMARY)
        }
        .type(ButtonType.Circle).width(48).height(48)
        .backgroundColor(ThemeConstants.CARD_BG)
        .shadow({ radius: 6, color: '#14000000', offsetY: 2 })
        .onClick(() => { this.viewModel.startRoutePlanning(); })
      }
      .position({ right: 16, bottom: 120 })
    }
    .width('100%')
    .height('100%')
  }
}
Stack 三层架构解读:
| 层级 | 内容 | 说明 |
|---|---|---|
| 第 1 层 | MapComponent |
真实地图底图,通过 Map Kit 渲染 |
| 第 2 层 | 弹窗与面板 | SpotMarkerPopup 详情弹窗、RoutePlanPanel 路径规划面板 |
| 第 3 层 | 浮动按钮 | 定位按钮 + 路线规划按钮,固定在右下角 |
关键交互流程:
- 地图初始化 →
mapCallback→addMarkersToMap()添加 10 个景点标记 - 点击地图标记 →
markerClick事件 →selectMarker→ 渲染SpotMarkerPopup - 弹窗点击「导航到此」→
startRoutePlanning+ 设置终点 → 渲染RoutePlanPanel - 浮动路线按钮 →
startRoutePlanning→ 渲染RoutePlanPanel
弹窗定位说明 :SpotMarkerPopup 和 RoutePlanPanel 均使用
.position({ bottom: 120 })定位,确保在底部 HdsTabs 导航栏上方显示,避免被遮挡。
六、SpotMarkerPopup 标记详情弹窗
SpotMarkerPopup 是一个轻量级弹窗组件,展示选中景点的名称、分类标签和操作按钮:
typescript
@ComponentV2
export struct SpotMarkerPopup {
  @Param marker: SpotMarker = new SpotMarker('', 0, 0, '');
  @Event onClose: () => void = () => {};
  @Event onNavigate: () => void = () => {};

  build() {
    Column() {
      Row() {
        Column() {
          Text(this.marker.name)
            .fontSize(ThemeConstants.FONT_SIZE_SUBTITLE)
            .fontWeight(ThemeConstants.FONT_WEIGHT_BOLD)
            .fontColor(ThemeConstants.TEXT_PRIMARY)
          Text(this.marker.category)
            .fontSize(ThemeConstants.FONT_SIZE_CAPTION)
            .fontColor(ThemeConstants.PRIMARY)
            .backgroundColor(ThemeConstants.PRIMARY_LIGHT)
            .borderRadius(4)
            .padding({ left: 6, right: 6, top: 2, bottom: 2 })
            .margin({ top: 4 })
        }
        .alignItems(HorizontalAlign.Start)
        .layoutWeight(1)

        Image($r('sys.media.ohos_ic_public_cancel'))
          .width(24).height(24)
          .fillColor(ThemeConstants.TEXT_HINT)
          .onClick(() => { this.onClose(); })
      }
      .width('100%')

      Button('导航到此')
        .width('100%')
        .height(36)
        .fontSize(ThemeConstants.FONT_SIZE_BODY)
        .backgroundColor(ThemeConstants.PRIMARY)
        .fontColor(ThemeConstants.TEXT_WHITE)
        .borderRadius(18)
        .margin({ top: 12 })
        .onClick(() => { this.onNavigate(); })
    }
    .width('90%')
    .padding(16)
    .backgroundColor(ThemeConstants.CARD_BG)
    .borderRadius(ThemeConstants.CARD_RADIUS)
    .shadow({ radius: 12, color: '#20000000', offsetY: 4 })
  }
}
组件设计特点:
- @Param 接收数据 :从父组件接收
marker对象,单向数据流 - @Event 向上通信 :
onClose关闭弹窗、onNavigate触发导航,均由父组件MapPage处理实际逻辑 - 分类标签:使用主题色背景 + 圆角实现类似 Chip 的标签效果
- 阴影卡片 :
shadow({ radius: 12, color: '#20000000', offsetY: 4 })让弹窗具有浮层质感
七、RoutePlanPanel 路径规划面板
RoutePlanPanel 是底部滑出的路径规划面板,提供起终点选择和路线计算功能:
typescript
@ComponentV2
export struct RoutePlanPanel {
  @Param markers: SpotMarker[] = [];
  @Param startMarkerId: string = '';
  @Param endMarkerId: string = '';
  @Param routeDescription: string = '';
  @Event onStartChange: (markerId: string) => void = () => {};
  @Event onEndChange: (markerId: string) => void = () => {};
  @Event onCalculate: () => void = () => {};
  @Event onCancel: () => void = () => {};

  build() {
    Column() {
      // 标题栏 + 关闭按钮
      Row() {
        Text('路线规划')
          .fontSize(ThemeConstants.FONT_SIZE_SUBTITLE)
          .fontWeight(ThemeConstants.FONT_WEIGHT_BOLD)
        Blank()
        Image($r('sys.media.ohos_ic_public_cancel'))
          .width(24).height(24)
          .onClick(() => { this.onCancel(); })
      }
      .width('100%')

      // 起点 Select 下拉框
      Column({ space: 12 }) {
        Row() {
          Text('起点:').width(50)
          Select(this.markers.map(m => ({ value: m.name } as SelectOption)))
            .onSelect((index: number) => {
              if (index >= 0 && index < this.markers.length) {
                this.onStartChange(this.markers[index].id);
              }
            })
            .layoutWeight(1)
        }
        // 终点 Select 下拉框
        Row() {
          Text('终点:').width(50)
          Select(this.markers.map(m => ({ value: m.name } as SelectOption)))
            .onSelect((index: number) => {
              if (index >= 0 && index < this.markers.length) {
                this.onEndChange(this.markers[index].id);
              }
            })
            .layoutWeight(1)
        }
      }
      .margin({ top: 16 })

      // 计算按钮
      Button('计算路线')
        .width('100%')
        .height(40)
        .backgroundColor(ThemeConstants.PRIMARY)
        .borderRadius(20)
        .margin({ top: 16 })
        .onClick(() => { this.onCalculate(); })

      // 路线描述(条件渲染)
      if (this.routeDescription.length > 0) {
        Text(this.routeDescription)
          .fontSize(ThemeConstants.FONT_SIZE_BODY)
          .lineHeight(22)
          .margin({ top: 12 })
      }
    }
    .padding(20)
    .backgroundColor(ThemeConstants.CARD_BG)
    .borderRadius({ topLeft: 20, topRight: 20 })
    .shadow({ radius: 12, color: '#20000000', offsetY: -4 })
  }
}
设计亮点:
- Select 下拉框 :利用 HarmonyOS 原生
Select组件,将markers数组映射为SelectOption,用户选择后通过onSelect回调通知 ViewModel - 圆角底板 :
borderRadius({ topLeft: 20, topRight: 20 })仅设置上方圆角,模拟底部抽屉效果 - 阴影方向 :
offsetY: -4阴影向上投射,增强面板从底部滑出的视觉层次 - 条件渲染 :路线描述仅在
routeDescription.length > 0时显示,避免空白区域
八、地图 API 使用说明
8.1 MapKit MapComponent 概念
HarmonyOS 提供了 @kit.MapKit 中的 MapComponent 用于地图嵌入。在本项目中,地图底图使用主题色占位:
typescript
Column()
  .width('100%')
  .height('100%')
  .backgroundColor(ThemeConstants.PRIMARY_LIGHT)
实际接入 MapKit 时,替换为:
typescript
MapComponent({ options: mapOptions })
  .markers(this.markerConfigs)
  .onMarkerClick((marker) => { /* 处理标记点击 */ })
8.2 addMarker 标记配置
MapKit 的标记通过 MarkerOptions 配置,核心属性与本项目 SpotMarker 模型的对应关系:
| SpotMarker 属性 | MarkerOptions 属性 | 说明 |
|---|---|---|
| latitude / longitude | position(LatLng) | 标记经纬度坐标 |
| name | title | 标记标题文字 |
| icon | icon(PixelMap) | 标记自定义图标 |
8.3 navi 路径规划概念
HarmonyOS 的 @kit.MapKit 提供了路径规划能力,核心流程:
- 创建
RouteRequest,设置起终点坐标 - 调用
calculateRoute(request)发起路径计算 - 在回调中获取
RouteResult,包含路线坐标点、距离、预估时间 - 将路线通过
Polyline叠加到地图上
本项目当前使用 Haversine 公式计算直线距离作为教学演示,生产环境建议接入 MapKit 的正式路径规划 API。
九、距离计算算法 --- Haversine 公式详解
9.1 算法原理
Haversine 公式用于计算球面上两点之间的大圆距离(Great-Circle Distance),是地理距离计算的经典算法。
公式推导:
a = \\sin\^2\\left(\\frac{\\Delta\\varphi}{2}\\right) + \\cos\\varphi_1 \\cdot \\cos\\varphi_2 \\cdot \\sin\^2\\left(\\frac{\\Delta\\lambda}{2}\\right)
c = 2 \\cdot \\text{atan2}\\left(\\sqrt{a}, \\sqrt{1-a}\\right)
d = R \\cdot c
其中 (\varphi) 为纬度、(\lambda) 为经度(弧度制),(R = 6371) km 为地球平均半径。
9.2 代码实现
typescript
private calcDistance(lat1: number, lng1: number, lat2: number, lng2: number): number {
  const R = 6371; // 地球平均半径(公里)
  const dLat = (lat2 - lat1) * Math.PI / 180;  // 纬度差(弧度)
  const dLng = (lng2 - lng1) * Math.PI / 180;  // 经度差(弧度)
  const a = Math.sin(dLat / 2) * Math.sin(dLat / 2) +
    Math.cos(lat1 * Math.PI / 180) * Math.cos(lat2 * Math.PI / 180) *
    Math.sin(dLng / 2) * Math.sin(dLng / 2);
  const c = 2 * Math.atan2(Math.sqrt(a), Math.sqrt(1 - a));
  return R * c; // 返回公里数
}
计算示例 :白云山(23.1895, 113.2644)→ 广州塔(23.1066, 113.3245),直线距离约 10.8 公里。
9.3 为什么选择 Haversine
| 算法 | 精度 | 复杂度 | 适用场景 |
|---|---|---|---|
| Haversine | 误差 < 0.3% | O(1) | 城市级距离估算 |
| Vincenty | 毫米级 | 迭代 | 高精度测量 |
| 平面近似 | 误差大 | O(1) | 极短距离 |
对于旅游 App 的场景推荐场景,Haversine 在精度和性能之间取得了最佳平衡。
十、V2 状态管理在地图模块的应用
MapService 模块全面采用 HarmonyOS V2 状态管理体系,以下是各装饰器的使用场景总结:
| 装饰器 | 使用位置 | 作用 |
|---|---|---|
@ObservedV2 |
MapViewModel、SpotMarker | 标记类为可观察对象,属性变化可被追踪 |
@Trace |
markers/selectedMarker/isRoutePlanning 等 | 精准追踪属性变化,仅触发依赖该属性的组件刷新 |
@Local |
MapPage 中的 viewModel | 组件内部状态,不对外暴露 |
@Param |
SpotMarkerPopup.marker、RoutePlanPanel 各属性 | 父→子单向数据传递 |
@Event |
onClose/onNavigate/onCalculate 等 | 子→父事件通信 |
V2 相比 V1 的核心优势:
- @Trace 精准刷新 :V1 的
@Observed+@ObjectLink需要成对使用,V2 的@Trace可独立标记需要追踪的属性,减少不必要的 UI 刷新 - @ComponentV2 简化 :无需在父组件中使用
@State修饰子组件引用,子组件内部@ObservedV2对象自动响应 - @Param/@Event 语义清晰 :替代 V1 的
@Prop/@Link/@Provide/@Consume,数据流向更明确
总结
MapService 模块的设计要点:
- MVVM 分层:MapViewModel 封装所有业务逻辑,View 层仅负责渲染和事件转发
- Stack 层叠布局:地图底图 + 交互内容 + 浮动按钮三层叠加,实现丰富的地图交互体验
- 条件渲染驱动弹窗 :通过
selectedMarker和isRoutePlanning控制弹窗和面板的显示/隐藏 - Haversine 距离算法:纯前端实现地理距离计算,无需依赖后端服务
- V2 状态管理:@ObservedV2 + @Trace 实现精准 UI 刷新,@Param/@Event 实现清晰的组件通信