Android 自定义 HAL 开发篇之 HIDL 篇 ------ 从入门到实战 (上)
本文基于 Android 12,从零带你实现一个完整的自定义 HIDL HAL:从
.hal接口定义、代码生成、服务注册、SELinux 配置,到 Java/Framework 层调用,再到回调崩溃、多客户端订阅等真实踩坑。全文不堆 API 文档,而是按"基础版 → 踩坑 → 修复 → 进阶 "四阶段迭代一个
HelloHAL,让你每写一段代码都清楚它在解决什么问题。📌 关于版本 :HIDL 自 Android 13 起已进入冻结状态(不再接受新接口),新 HAL 官方推荐走 AIDL。本文面向 Android 12 及以下老平台维护、遗留 HIDL 接口理解、Treble 架构入门。后续我会另开 AIDL 篇,并把本文的演进路线更新到 Android 13/14。

目录
- [前言:为什么还要学 HIDL](#前言:为什么还要学 HIDL "#%E5%89%8D%E8%A8%80%E4%B8%BA%E4%BB%80%E4%B9%88%E8%BF%98%E8%A6%81%E5%AD%A6-hidl")
- [第 1 章 搭骨架:让 HAL 跑起来](#第 1 章 搭骨架:让 HAL 跑起来 "#%E7%AC%AC-1-%E7%AB%A0-%E6%90%AD%E9%AA%A8%E6%9E%B6%E8%AE%A9-hal-%E8%B7%91%E8%B5%B7%E6%9D%A5")
- [第 2 章 SELinux 配置](#第 2 章 SELinux 配置 "#%E7%AC%AC-2-%E7%AB%A0-selinux-%E9%85%8D%E7%BD%AE")
- [第 3 章 加入回调:能推送了,然后崩了](#第 3 章 加入回调:能推送了,然后崩了 "#%E7%AC%AC-3-%E7%AB%A0-%E5%8A%A0%E5%85%A5%E5%9B%9E%E8%B0%83%E8%83%BD%E6%8E%A8%E9%80%81%E4%BA%86%E7%84%B6%E5%90%8E%E5%B4%A9%E4%BA%86")
- [第 4 章 修复崩溃:死亡通知两条防线](#第 4 章 修复崩溃:死亡通知两条防线 "#%E7%AC%AC-4-%E7%AB%A0-%E4%BF%AE%E5%A4%8D%E5%B4%A9%E6%BA%83%E6%AD%BB%E4%BA%A1%E9%80%9A%E7%9F%A5%E4%B8%A4%E6%9D%A1%E9%98%B2%E7%BA%BF")
- [第 5 章 进阶:多客户端订阅](#第 5 章 进阶:多客户端订阅 "#%E7%AC%AC-5-%E7%AB%A0-%E8%BF%9B%E9%98%B6%E5%A4%9A%E5%AE%A2%E6%88%B7%E7%AB%AF%E8%AE%A2%E9%98%85")
前言:为什么还要学 HIDL
一句话定位
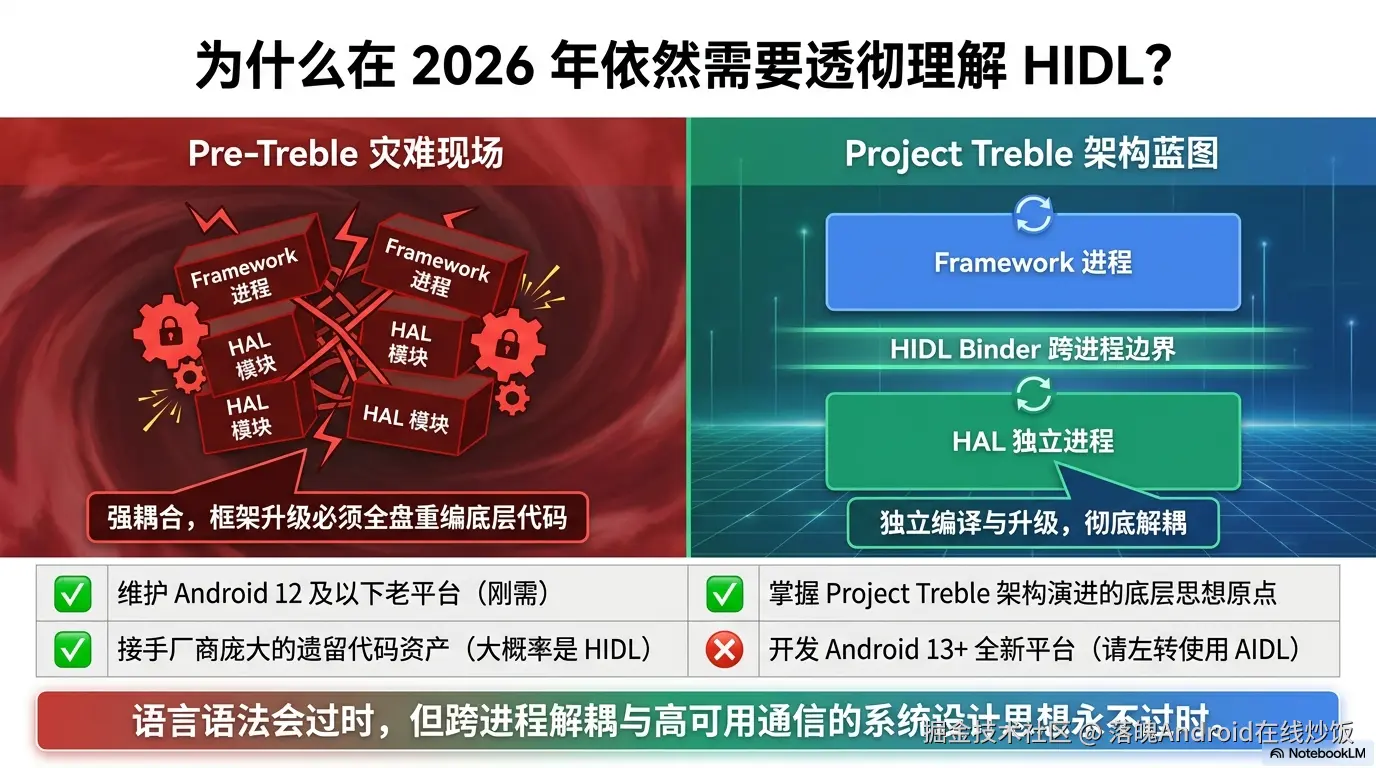
HIDL(HAL Interface Definition Language) 是 Google 在 Android 8.0(Project Treble)引入的接口描述语言,用来把"Framework ↔ HAL"之间的调用从"直接函数调用"变成"跨进程 Binder 调用",从而让系统框架和厂商 HAL 可以独立编译、独立升级。
一句话:HIDL 是给 HAL 用的 Binder 接口定义语言。
Project Treble 与 HAL 架构
在 Treble 之前,Framework 和 HAL 耦合在一个进程里,升级 Framework 往往要连带重编 HAL,设备厂商升级成本极高。Treble 把 HAL 拆成独立进程,中间用 HIDL(后来是 AIDL)做契约:
scss
┌──────────────┐      HIDL / AIDL      ┌──────────────────┐
│  Framework   │  ───────────────────▶  │  HAL Service     │
│ (system_server│       hwbinder        │ (vendor 进程)     │
│  / App)      │  ◀───────────────────  │ cc_binary        │
└──────────────┘                        │  + cc_library    │
└──────────────────┘cc_binary:真正的 HAL 服务进程(如vendor.custom.hello_hidl@1.0-service),开机由 init 启动,向hwservicemanager注册自己。cc_library_shared/cc_library_static:HAL 接口的实现库(@1.0-impl),里面是硬件操作的实际代码。
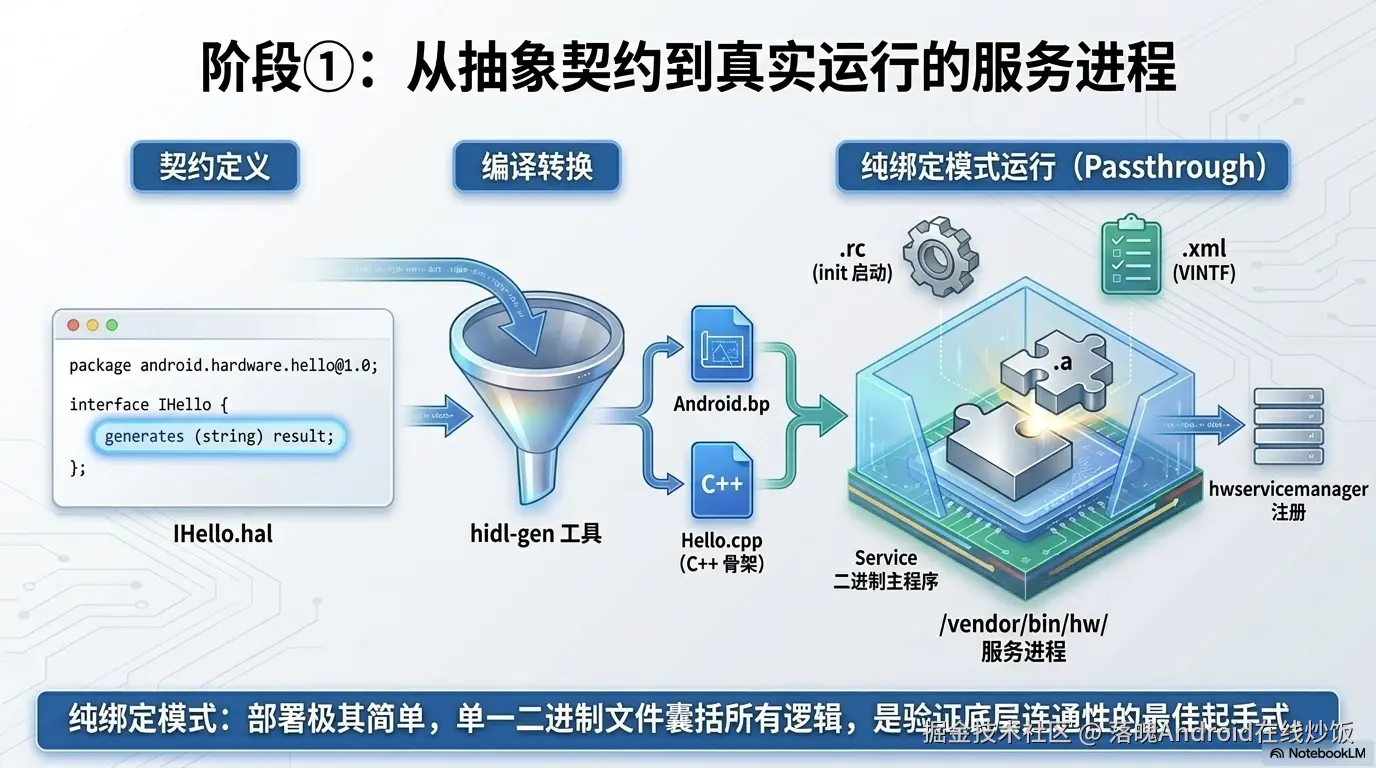
本文走"纯绑定模式(Passthrough 的一种)"------实现库以 static_libs 形式被 service 进程静态链入,结构最简单,适合入门。
为什么 2026 年还学 HIDL
你需要准备什么
- 一套能编译的 AOSP 源码(Android 12,本文基于 Rockchip 平台,其他平台路径类似)
- 基本的 AOSP 编译流程(
source build/envsetup.sh→lunch→make) - 一点点 C++ 和 Binder 基础
- 一台能跑的设备或模拟器
全文地图:四阶段迭代
我不会一上来就甩一坨完整代码,而是分四个阶段逐步把 Hello HAL 喂大:
| 阶段 | 实现版本 | 达成目标 | 对应章节 |
|---|---|---|---|
| ① 基础版 | 版本 A | 同步调用 App→HAL 全通 | 第 1 章 |
| ② 踩坑版 | 版本 B | 能推送回调,但 App 退出 HAL 崩溃 | 第 3 章 |
| ③ 修复版 | 版本 C | 死亡通知修好崩溃,单客户端稳定 | 第 4 章 |
| ④ 进阶版 | 版本 D | map<pid_t> 支持多客户端订阅 |
第 5 章 |
每一阶段的代码都是上一阶段的增量,到第 6 章汇总成完整版。准备好就开干。
第 1 章 搭骨架:让 HAL 跑起来
本章目标 :定义一个只有三个同步方法的
HelloHAL,从.hal到服务注册、编译运行,跑通"App 调calculate_plus→ HAL 返回结果"的完整链路。本章不涉及回调、不涉及订阅------那俩是后面几章的坑主。先把骨架立住。
本章我们的 HAL 接口长这样:
hidl
interface IHello {
    calculate_plus(uint32_t a, uint32_t b) generates (uint32_t total);  // 加法
    write(string name) generates (uint32_t result);                      // 写一个字符串
    read() generates (string name);                                      // 读回那个字符串
};
1.1 创建目录与定义 .hal 接口
HIDL 接口文件放在 vendor/custom/hardware/interfaces/ 下,按"接口名/版本号"组织。
bash
mkdir -p vendor/custom/hardware/interfaces/hello_hidl/1.0
cd vendor/custom/hardware/interfaces/hello_hidl/1.0
touch IHello.halIHello.hal:
hidl
// 定义包名,最后跟一个版本号
package vendor.custom.hello_hidl@1.0;

// 定义 HAL 服务对外提供的接口
interface IHello {
    // 计算加法,generates 后面跟的是返回类型
    calculate_plus(uint32_t a, uint32_t b) generates (uint32_t total);

    // 写入一个字符串(模拟"写驱动")
    write(string name) generates (uint32_t result);

    // 读回刚才写入的字符串(模拟"读驱动")
    read() generates (string name);
};
几点说明:
package名格式是厂商.模块@版本,这里vendor.custom是我们的包根,hello_hidl是模块名,@1.0是版本。- HIDL 的返回值用
generates声明,和普通函数的return不太一样,这是 HIDL 的语法特点(它把"返回"也当成一种同步回调来处理)。 - 本章没有
types.hal、没有IHelloCallback.hal------基础版用不到自定义结构和回调,保持最简。
1.2 创建 update-makefiles.sh
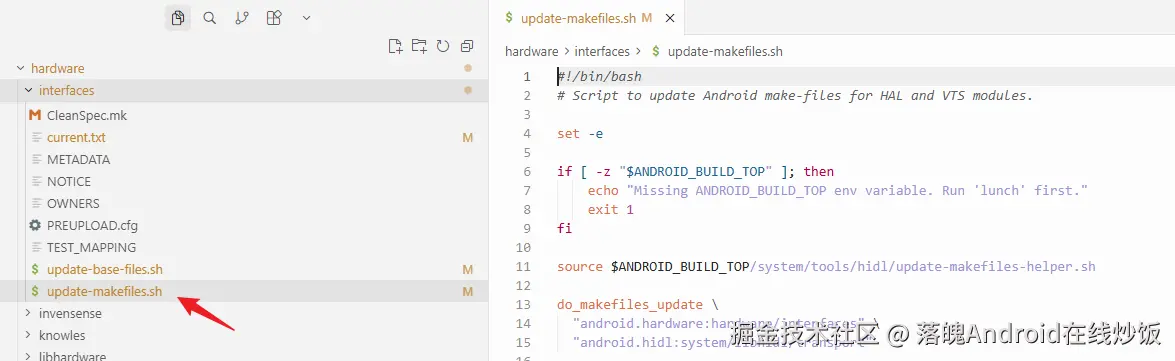
HIDL 的 Android.bp 不是手写的,而是由 hidl-gen 工具根据 .hal 自动生成。update-makefiles.sh 就是批量调用 hidl-gen 生成各接口 Android.bp 的脚本。其实这块如果你们拿到源码,源码的hardware/interfaces下就有
在 vendor/custom/hardware/interfaces/ 下创建:
bash
cd vendor/custom/hardware/interfaces/
touch update-makefiles.shupdate-makefiles.sh:
bash
#!/bin/bash

source $ANDROID_BUILD_TOP/system/tools/hidl/update-makefiles-helper.sh

do_makefiles_update \
    "vendor.custom:vendor/custom/hardware/interfaces" \
    "android.hardware:hardware/interfaces" \
    "android.hidl:system/libhidl/transport"
do_makefiles_update的参数格式是包根:对应路径。我们声明了三个包根:自己的vendor.custom、系统的android.hardware和android.hidl。
确保已经 source build/envsetup.sh && lunch 过(否则 $ANDROID_BUILD_TOP 为空),然后执行:
bash
chmod +x update-makefiles.sh
./update-makefiles.sh
1.3 根目录的 Android.bp 与 current.txt
执行完脚本后,1.0/ 目录下会自动生成一个 Android.bp。但还需要在 vendor/custom/hardware/interfaces/ 根目录补两个东西。
根 Android.bp(声明包根):
bash
cd vendor/custom/hardware/interfaces/
touch Android.bp
bp
hidl_package_root {
    name: "vendor.custom",
    use_current: true,
}
hidl_package_root告诉编译系统:vendor.custom这个包根对应vendor/custom/hardware/interfaces/目录。
current.txt(接口哈希登记,用于版本兼容性校验):
bash
touch current.txt此时 current.txt 先留空,1.9 节会用 hidl-gen -L hash 往里填哈希。
执行 update-makefiles.sh 后,1.0/ 下自动生成的 Android.bp 长这样:
hello_hidl/1.0/Android.bp:
bp
// This file is autogenerated by hidl-gen -Landroidbp.
hidl_interface {
    name: "vendor.custom.hello_hidl@1.0",
    root: "vendor.custom",
    system_ext_specific: true,
    srcs: [
        "IHello.hal",
    ],
    interfaces: [
        "android.hidl.base@1.0",
    ],
    gen_java: true,
}
注意
gen_java: true------它会顺带生成 Java 绑定,第 6 章 App 调用就靠它。
先单独编一下这个接口库,确认 .hal 没写错:
bash
mmm vendor/custom/hardware/interfaces/hello_hidl/1.0/编译通过,说明接口定义没问题。
1.4 用 hidl-gen 生成 C++ 实现骨架
接口库只是"契约",真正的硬件逻辑要我们手写。hidl-gen 能帮我们生成 C++ 实现的骨架文件(.h / .cpp),我们往里填业务即可。
先建 default 目录(注意拼写,原文档里写成 defualt 是笔误):
bash
mkdir -p vendor/custom/hardware/interfaces/hello_hidl/1.0/default设置两个变量方便复用:
bash
PACKAGE=vendor.custom.hello_hidl@1.0
LOC=vendor/custom/hardware/interfaces/hello_hidl/1.0/default
① 生成 C++ 实现骨架:
bash
hidl-gen -o $LOC -L c++-impl \
    -r vendor.custom:vendor/custom/hardware/interfaces/ \
    -r android.hidl:system/libhidl/transport \
    $PACKAGE
这会生成 Hello.h 和 Hello.cpp(里面是空实现)。
② 生成 impl 的 Android.bp:
bash
hidl-gen -o $LOC -L androidbp-impl \
    -r vendor.custom:vendor/custom/hardware/interfaces/ \
    -r android.hidl:system/libhidl/transport \
    $PACKAGE
此时目录结构:
bash
vendor/custom/hardware/interfaces/
├── Android.bp              # 包根声明
├── current.txt
├── update-makefiles.sh
└── hello_hidl/
    └── 1.0/
        ├── Android.bp       # 自动生成的接口库
        ├── IHello.hal
        └── default/
            ├── Android.bp   # 自动生成的 impl
            ├── Hello.h
            └── Hello.cpp
1.5 编写 service 主程序
Hello.h/.cpp 是实现,还需要一个 main() 把它跑起来并注册到 hwservicemanager。创建 HelloService.cpp:
bash
cd vendor/custom/hardware/interfaces/hello_hidl/1.0/default
touch HelloService.cppHelloService.cpp:
cpp
#define LOG_TAG "vendor.custom.hello_hidl@1.0-service"

#include <hidl/HidlTransportSupport.h>  // configureRpcThreadpool, joinRpcThreadpool
#include <android/log.h>                // ALOGD, ALOGE

#include "Hello.h"

// libhwbinder:
using ::android::hardware::configureRpcThreadpool;
using ::android::hardware::joinRpcThreadpool;
using ::android::sp;
using ::android::OK;
using ::android::status_t;

int main() {
    sp<::vendor::custom::hello_hidl::V1_0::IHello> service = nullptr;
    status_t status;

    service = new ::vendor::custom::hello_hidl::implementation::Hello();
    if (service == nullptr) {
        ALOGD("Failed to create Hello service instance.");
        return 1;
    }

    configureRpcThreadpool(1, true /* callerWillJoin */);

    // 注册 binder 服务到 hwservicemanager
    status = service->registerAsService();
    if (status != OK) {
        ALOGE("Failed to register Hello service, status=%d.", status);
        return 1;
    }

    ALOGD("Hello service started successfully.");
    joinRpcThreadpool();

    return 0;
}
解读一下这个 main 的三步走:
new Hello():创建实现实例。configureRpcThreadpool(1, true):配一个 binder 线程,true表示主线程会自己 join 进线程池。registerAsService():把自己注册到hwservicemanager,名字默认是default。之后joinRpcThreadpool()阻塞主线程开始接请求。
1.6 添加 .rc 和 .xml
HAL 服务要被 init 启动、要被 VINTF 校验,需要配两个文件。
vendor.custom.hello_hidl@1.0-service.rc:
bash
touch vendor.custom/hardware/interfaces/hello_hidl/1.0/default/vendor.custom.hello_hidl@1.0-service.rc
rc
service hello-hidl /vendor/bin/hw/vendor.custom.hello_hidl@1.0-service
    class hal
    user system
    group system
class hal让它在class_start hal时启动;user/group system是运行身份。
vendor.custom.hello_hidl@1.0-service.xml(VINTF manifest 片段):
bash
touch vendor/custom/hardware/interfaces/hello_hidl/1.0/default/vendor.custom.hello_hidl@1.0-service.xml
xml
<manifest version="1.0" type="device">
    <hal format="hidl">
        <name>vendor.custom.hello_hidl</name>
        <transport>hwbinder</transport>
        <version>1.0</version>
        <interface>
            <name>IHello</name>
            <instance>default</instance>
        </interface>
    </hal>
</manifest>
这个 XML 告诉系统:"本设备提供了一个名为
vendor.custom.hello_hidl::IHello/default的 HIDL 服务,走 hwbinder 传输。" VINTF 框架会拿它和 compatibility matrix 做匹配校验。
1.7 配置 default/Android.bp(纯绑定模式)
hidl-gen 生成的 Android.bp 只是骨架,我们要改成完整的编译规则。本章是"纯绑定模式"------impl 静态库被打包进 service 二进制。
default/Android.bp:
bp
cc_defaults {
    name: "hello-hidl_defaults",
    relative_install_path: "hw",
    defaults: ["hidl_defaults"],

    // 模块属于 vendor 分区,受 Vendor 链接规则约束
    vendor: true,
    // 厂商私有代码,法律/发布标记
    proprietary: true,

    cflags: [
        "-Wno-unused-parameter",
        "-Wall",
    ],
    shared_libs: [
        "libcutils",
        "liblog",
        "libbase",
        "libsysutils",
        "libhidlbase",
        "libhidltransport",
        "libutils",
        "vendor.custom.hello_hidl@1.0",
    ],
}

cc_library_static {
    name: "vendor.custom.hello_hidl@1.0-impl",
    defaults: ["hello-hidl_defaults"],
    srcs: [
        "Hello.cpp",
    ],
}

// 真正跑起来的 service
cc_binary {
    name: "vendor.custom.hello_hidl@1.0-service",
    defaults: ["hello-hidl_defaults"],
    init_rc: ["vendor.custom.hello_hidl@1.0-service.rc"],
    vintf_fragments: ["vendor.custom.hello_hidl@1.0-service.xml"],
    srcs: [
        "HelloService.cpp",
    ],
    static_libs: [
        "vendor.custom.hello_hidl@1.0-impl",  // 纯绑定式,实现被打包进 service
    ],
}
几个关键点:
relative_install_path: "hw"→ 二进制装到/vendor/bin/hw/,和.rc里的路径对齐。cc_library_static把Hello.cpp编成静态库,再被cc_binary静态链入------这样部署只有一个二进制,简单。init_rc/vintf_fragments让 Soong 自动把.rc和.xml装到对应位置。
1.8 基础版 Hello 实现(版本 A)
现在填 Hello.h 和 Hello.cpp。本章只实现三个同步方法,没有任何回调、线程、订阅------那是后面章节的事。
Hello.h:
cpp
#pragma once

#include <vendor/custom/hello_hidl/1.0/IHello.h>
#include <hidl/MQDescriptor.h>
#include <hidl/Status.h>

#include <string>

namespace vendor::custom::hello_hidl::implementation {

using ::android::hardware::hidl_array;
using ::android::hardware::hidl_memory;
using ::android::hardware::hidl_string;
using ::android::hardware::hidl_vec;
using ::android::hardware::Return;
using ::android::hardware::Void;
using ::android::sp;

struct Hello : public V1_0::IHello {
    Hello();
    ~Hello();

    // 计算加法
    Return<uint32_t> calculate_plus(uint32_t a, uint32_t b) override;
    // 写入字符串
    Return<uint32_t> write(const hidl_string& name) override;
    // 读回字符串
    Return<void> read(read_cb _hidl_cb) override;

private:
    std::string mStoredString;  // 暂存 write() 写入的字符串
};

} // namespace vendor::custom::hello_hidl::implementationHello.cpp:
cpp
#include "Hello.h"

#define LOG_TAG "HelloHAL"
#include <log/log.h>

namespace vendor::custom::hello_hidl::implementation {

using ::android::hardware::hidl_string;

Hello::Hello() {
    ALOGI("Hello HAL instance created");
}

Hello::~Hello() {
    ALOGI("Hello HAL instance destroyed");
}

// ---- calculate_plus ----
Return<uint32_t> Hello::calculate_plus(uint32_t a, uint32_t b) {
    uint32_t total = a + b;
    ALOGI("calculate_plus: %u + %u = %u", a, b, total);
    return total;
}

// ---- write ----
Return<uint32_t> Hello::write(const hidl_string& name) {
    mStoredString = name.c_str();
    ALOGI("write: stored \"%s\"", mStoredString.c_str());
    return 0;  // 0 表示成功
}

// ---- read ----
Return<void> Hello::read(read_cb _hidl_cb) {
    ALOGI("read: returning \"%s\"", mStoredString.c_str());
    _hidl_cb(mStoredString);  // 通过回调返回结果
    return Void();
}

}  // namespace vendor::custom::hello_hidl::implementation
说明:
read()的签名里有个read_cb _hidl_cb------这是 HIDL 为generates (string name)生成的回调类型,调用它就是把结果传回给调用方。它不是第 2 章那种异步回调,只是 HIDL 表达"返回值"的方式。mStoredString暂存write()的内容,read()原样吐回,模拟一个最简的"写驱动→读驱动"。
1.9 更新 current.txt 的哈希
接口定义有变动时,要把它的哈希写进 current.txt,否则后续 hidl_interface 编译会报版本校验错误:
bash
hidl-gen -L hash \
    -r vendor.custom:vendor/custom/hardware/interfaces \
    $PACKAGE -o $LOC >> vendor/custom/hardware/interfaces/current.txt
哈希用于保证接口的向后兼容------一旦发布,
1.0的方法签名就不能再改,要加功能只能出1.1。
1.10 VINTF 兼容性矩阵
光有设备侧 manifest(1.6 节的 .xml)还不够,框架侧要声明"我期望这个 HAL 可选存在"。在设备配置里加一个 compatibility matrix 片段:
device/<platform>/common/manifests/frameworks/vendor.custom.hello_hidl@1.0-service.xml:
xml
<compatibility-matrix version="1.0" type="framework">
    <hal format="hidl" optional="true">
        <name>vendor.custom.hello_hidl</name>
        <transport>hwbinder</transport>
        <version>1.0</version>
        <interface>
            <name>IHello</name>
            <instance>default</instance>
        </interface>
    </hal>
</compatibility-matrix>
关键属性
optional="true"------告诉系统"这个 HAL 不是必选项,设备不提供也不影响兼容性"。
然后在设备的 vintf.mk(或等效 mk 文件)里注册:
makefile
DEVICE_FRAMEWORK_COMPATIBILITY_MATRIX_FILE += \
    device/<platform>/common/manifests/frameworks/vendor.custom.hello_hidl@1.0-service.xml
1.11 加入 device.mk 并编译
在产品的 device.mk 里把三个产物加进去:
makefile
PRODUCT_PACKAGES += \
    vendor.custom.hello_hidl@1.0 \
    vendor.custom.hello_hidl@1.0-service
重新编译:
bash
mmm vendor/custom/hardware/interfaces/hello_hidl/1.0/default/编译产物大致是:
kotlin
out/target/product/xxx/vendor/bin/hw/vendor.custom.hello_hidl@1.0-service
out/target/product/xxx/vendor/etc/init/vendor.custom.hello_hidl@1.0-service.rc
out/target/product/xxx/vendor/etc/vintf/manifest/vendor.custom.hello_hidl@1.0-service.xml
1.12 (可选)Java 侧 jar 包怎么选
gen_java: true 会在编译产物里生成一组 Java 绑定 jar,路径类似:
bash
out/soong/.intermediates/vendor/custom/hardware/interfaces/hello_hidl/
  1.0/vendor.custom.hello_hidl-V1.0-java/android_common/
里面有几个子目录,用途不同:
| 目录 | 内容 | 用途 |
|---|---|---|
turbine/ |
仅头文件 jar(方法体为空) | 编译系统内部加速依赖推导 |
javac/ |
当前模块自己的实现 jar | 不含静态依赖 |
combined/ ⭐ |
javac 产物 + 所有静态依赖合并 | 导给 IDE、转 dex 都用它 |
turbine-combined/ |
turbine + 静态依赖的 header jar 合并 | 编译期推导用 |
无脑选 combined/ 下的 vendor.custom.hello_hidl-V1.0-java.jar 就行------它是完整产物,拖进 Android Studio 当 library 依赖,代码补全上下文齐全。第 6 章写 App 调用时就是用它。
本章小结
第 1 章我们搭起了 HAL 的骨架:
- 定义了只有三个同步方法的
IHello.hal - 用
hidl-gen生成了接口库和 C++ 实现骨架 - 写了
HelloService.cpp把服务注册到hwservicemanager - 配好了
.rc/.xml/Android.bp/ VINTF 矩阵 - 实现了基础版
Hello(版本 A),开机日志确认服务已注册
到这里,calculate_plus / write / read 三个同步接口已经能从 App 一路调到 HAL。
但真实的硬件场景里,HAL 往往需要主动 把数据推给上层------比如传感器周期上报、驱动事件通知。这种"HAL → App"的反向推送,靠同步调用做不到,需要回调机制。而回调,正是后面一系列问题的源头。
但是在此之前,我们先完善SELinux 的配置。
第 2 章 SELinux 配置
本章目标:给 Hello HAL 配好 SELinux 策略,让它能在 enforcing 模式下正常运行。

2.1 两种配置方式
SELinux 策略可以放在两个地方:
| 方式 | 位置 | 推荐度 |
|---|---|---|
| 专属目录 | vendor/custom/.../default/sepolicy/ |
⭐ 推荐,策略跟着 HAL 走 |
| 平台专属 | device/<platform>/common/sepolicy/vendor/ |
不推荐,策略分散难维护 |
本章采用专属目录方式 ------把所有 SELinux 文件放在 HAL 自己的 default/sepolicy/ 下。
2.2 文件清单
bash
vendor/custom/hardware/interfaces/hello_hidl/1.0/default/sepolicy/
├── hello_hidl.te             # HAL 域策略(核心)
├── hello_hidl_test.te        # 测试程序域策略(可选)
├── file_contexts             # 文件安全上下文
└── hwservice_contexts        # HwService 注册上下文
然后在 device/<platform>/common/modules/sepolicy.mk 里注册:
makefile
BOARD_SEPOLICY_DIRS += vendor/custom/hardware/interfaces/hello_hidl/1.0/default/sepolicy2.3 file_contexts --- 文件安全上下文
sepolicy/file_contexts:
bash
# hello_hidl 相关文件的安全标签
/dev/hello                                                    u:object_r:hello_hidl_dev_t:s0
/vendor/bin/hw/vendor\.custom\.hello_hidl@1\.0-service         u:object_r:hello_hidl_exec:s0
/vendor/bin/hello_hidl_test                                    u:object_r:hello_hidl_test_exec:s0
这三行告诉系统:
/dev/hello设备节点打hello_hidl_dev_t标签,service 二进制打hello_hidl_exec标签,测试程序打hello_hidl_test_exec标签。
2.4 hello_hidl.te --- HAL 域策略(核心)
sepolicy/hello_hidl.te:
ini
# ============================================================
# vendor.custom.hello_hidl HAL --- SELinux domain policy
# ============================================================

# ---- 类型声明 ----
type hello_hidl, domain;
type hello_hidl_exec, exec_type, vendor_file_type, file_type;
type hello_hidl_dev_t, dev_type;
type hello_hidl_hwservice, hwservice_manager_type;
type hello_hidl_service, vendor_service, service_manager_type;

# ---- 服务端 ----

# 由 init 启动
init_daemon_domain(hello_hidl);

# 向 hwservicemanager 注册
add_hwservice(hello_hidl, hello_hidl_hwservice)
allow hello_hidl hidl_base_hwservice:hwservice_manager { add };

# hwbinder 通信 + hwservicemanager 属性访问
hwbinder_use(hello_hidl)
get_prop(hello_hidl, hwservicemanager_prop)

# 跨域 binder 调用:service ↔ hwservicemanager / system_server / system_app
binder_call(hello_hidl, hwservicemanager)
binder_call(hello_hidl, system_server)
binder_call(hello_hidl, system_app)
binder_call(system_server, hello_hidl)
binder_call(system_app, hello_hidl)

# 设备节点
allow hello_hidl hello_hidl_dev_t:chr_file { open read write };

# ---- 客户端 ----

# 允许 system_server / system_app 在 hwservicemanager 中查找本 HAL
allow system_server hello_hidl_hwservice:hwservice_manager { find };
allow system_app hello_hidl_hwservice:hwservice_manager { find };

# ---- hwservicemanager 跨域调用 ----
allow hwservicemanager hello_hidl:binder { transfer call };

# ---- 测试程序 ----
# 由 hello_hidl_test.te 定义域,这里补 hwbinder 跨域调用
binder_call(hello_hidl_test, hello_hidl)
binder_call(hello_hidl, hello_hidl_test)
逐段解读:
- 类型声明:定义了 domain、exec、dev_t、hwservice、service 五个类型
init_daemon_domain:让 init 启动 service 二进制时自动切到hello_hidl域add_hwservice:允许向 hwservicemanager 注册hello_hidl_hwservicehwbinder_use+binder_call:打通 hwbinder 通信链路- 客户端
find权限:允许 system_server / system_app 查找本 HAL - 测试程序跨域:让测试程序能调用 HAL
2.5 hello_hidl_test.te --- 测试程序域(可选)
如果你写了 native 测试程序(hello_hidl_test),需要给它单独的域:
sepolicy/hello_hidl_test.te:
scss
type hello_hidl_test, domain;
type hello_hidl_test_exec, exec_type, vendor_file_type, file_type;

# 从 shell 执行时自动切换域
domain_auto_trans(shell, hello_hidl_test_exec, hello_hidl_test);

# 允许在 hwservicemanager 中查找 HAL
get_prop(hello_hidl_test, hwservicemanager_prop)
allow hello_hidl_test hello_hidl_hwservice:hwservice_manager { find };
hwbinder_use(hello_hidl_test);

# 跨域调用:测试程序 ↔ HAL 服务
binder_call(hello_hidl_test, hello_hidl)
binder_call(hello_hidl, hello_hidl_test)
2.6 hwservice_contexts --- 服务注册上下文
sepolicy/hwservice_contexts:
arduino
vendor.custom.hello_hidl::IHello u:object_r:hello_hidl_hwservice:s0这行把 HIDL 服务名
vendor.custom.hello_hidl::IHello映射到hello_hidl_hwservice标签。hwservicemanager 注册和查找时都会校验这个上下文。
2.7 调试 SELinux 拒绝
编译后若遇到 SELinux 拒绝,用以下命令定位:
bash
# 查看 SELinux 拒绝日志
adb logcat -b all -d | grep "avc.*denied.*hello"

# 调试期间临时放开(生产环境不要用!)
adb shell setenforce 0
setenforce 0切到 permissive 模式,只记录拒绝不真正拦截,方便排查。调完记得setenforce 1恢复。
刷机开机后,logcat 应该能看到:
ruby
HelloHAL: Hello HAL instance created
HidlServiceManagement: Registered vendor.custom.hello_hidl@1.0::IHello/default
Hello service started successfully.
看到这三行,说明你的 HAL 服务已经起来并注册成功了。🎉。下一章我们给 Hello 加上订阅推送,然后......你会踩到 HIDL 的一个经典坑。
本章小结
第 2 章配好了 SELinux:
- 4 个策略文件放在 HAL 自己的
sepolicy/目录下 file_contexts给设备节点和二进制打标签hello_hidl.te定义域策略:init 启动、hwservicemanager 注册、binder 通信、客户端查找hwservice_contexts注册服务名映射setenforce 0+ logcat 排查拒绝
第 3 章 加入回调:能推送了,然后崩了
本章目标 :给 Hello 加上"HAL → App"的回调推送机制。我们会先跑通一个单客户端订阅版,然后演示 App 退出时 HAL 崩溃的经典坑------并搞清楚它为什么崩溃。
3.1 为什么 HAL 需要回调?看看 Vehicle HAL 怎么做的
在动手之前,先看一张图------这是 Android Automotive OS(AAOS)里最经典的 HIDL HAL 之一:Vehicle HAL。
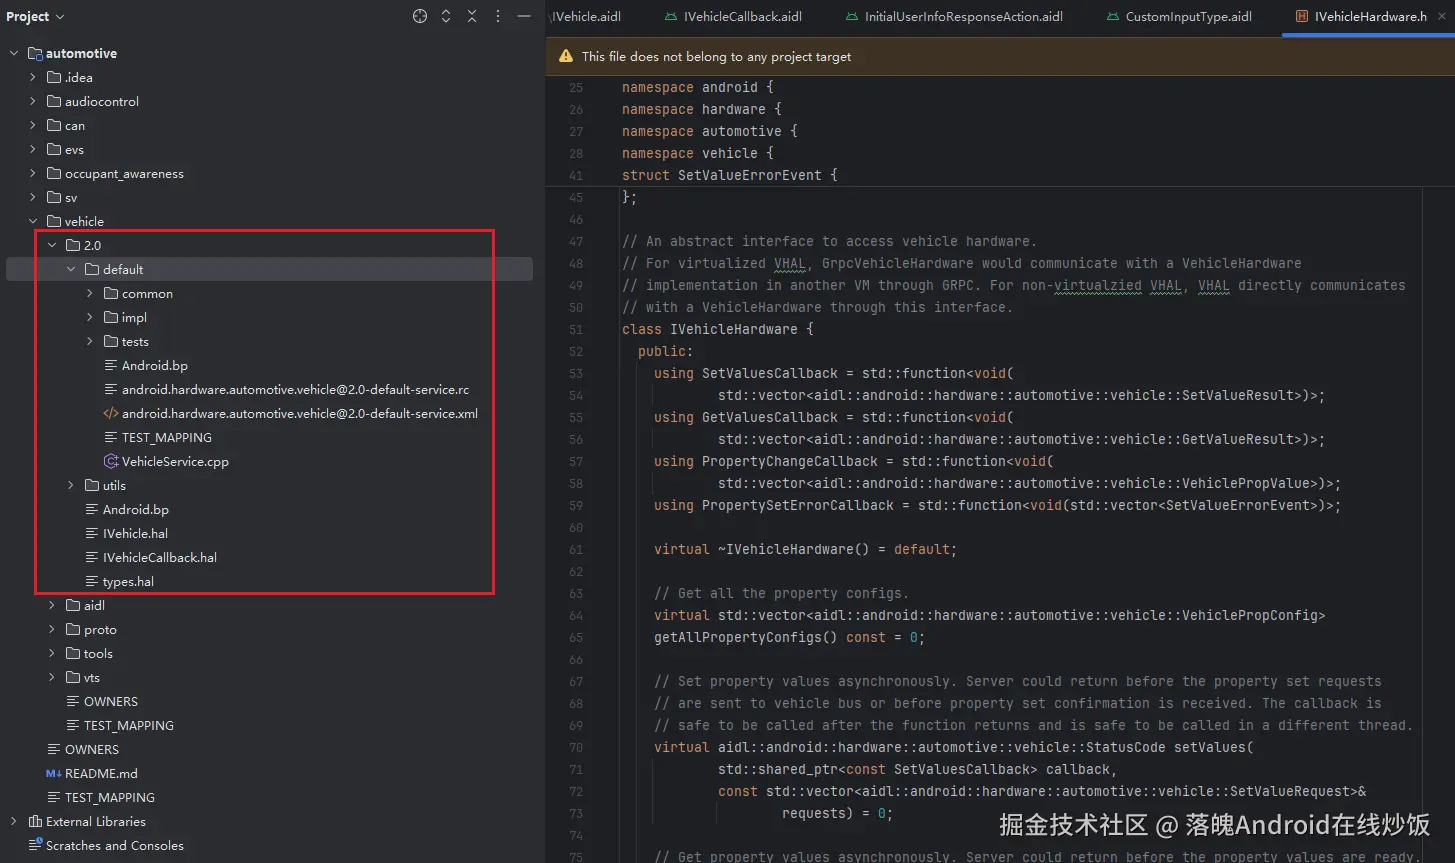
hardware/interfaces/automotive/vehicle/2.0/default/ --- AAOS Vehicle HAL 的实现目录
注意看 utils/ 下面这三个文件:
utils/
├── IVehicle.hal           ← 服务端接口(App 调用它)
├── IVehicleCallback.hal   ← 回调接口(HAL 用它推数据给 App)
└── types.hal              ← 自定义数据结构
这就是 HIDL 回调模式的标准模板:
| 文件 | 角色 | 方向 |
|---|---|---|
IVehicle.hal |
服务端接口 | App → HAL(调用、查询、订阅) |
IVehicleCallback.hal |
回调接口 | HAL → App(属性变化通知) |
types.hal |
共享数据 | 双向传递的结构体 |
Vehicle HAL 的典型工作流是这样的:
- CarService (Framework 层)拿到
IVehicle服务 - 调用
ivehicle.subscribe(callback, propertyId)------ 把自己的IVehicleCallback实现传进去 - Vehicle HAL 收到 CAN 总线数据后,调用
callback->onPropertyEvent(events)把传感器数据推回来 - CarService 拿到数据做策略处理
关键点 :subscribe() 时传进来的 callback 对象是一个跨进程 binder 代理------它的实体在客户端进程里。如果客户端挂了,这个代理就变成"悬空指针"。Vehicle HAL 原厂代码里用了完善的死亡通知机制来处理这个问题。
我们的 Hello HAL 就要模仿这套设计:
| Vehicle HAL | 我们的 Hello HAL | 含义 |
|---|---|---|
IVehicle |
IHello |
服务端主接口 |
IVehicleCallback |
IHelloCallback |
回调接口 |
PropertyValues[] |
TemperatureAndPressure |
自定义数据结构 |
subscribe(property, callback) |
subscribe(callback) |
订阅推送 |
onPropertyEvent(values) |
onValueSet(value) / onValueSetError(err) |
推送通知 |
理解了这套"原型",下面就开始写代码。
3.2 扩展 .hal:加入自定义类型和回调接口
回到我们的项目,现在要扩展 .hal 定义。新增三个文件(或者把新内容加到现有文件里):
① types.hal(新增------自定义数据结构)
bash
touch vendor/custom/hardware/interfaces/hello_hidl/1.0/types.hal
hidl
package vendor.custom.hello_hidl@1.0;

// 模拟传感器数据:温度 + 气压
struct TemperatureAndPressure {
    uint64_t temperature;
    uint64_t pressure;
};

// 状态码枚举
enum StatusCode : int32_t {
    OK = 0,
    ERROR = -1,
    INTERNAL_ERROR = -2,
};
TemperatureAndPressure是我们模拟的"传感器数据"------后面每秒递增一次,通过回调推给客户端。
② IHelloCallback.hal(新增------回调接口)
bash
touch vendor/custom/hardware/interfaces/hello_hidl/1.0/IHelloCallback.hal
hidl
package vendor.custom.hello_hidl@1.0;

interface IHelloCallback {
    // 推送传感器数据(oneway = 异步,不阻塞 HAL 推送线程)
    oneway onValueSet(TemperatureAndPressure value);
    // 推送错误信息
    oneway onValueSetError(StatusCode errorCode);
};
两个关键设计点:
oneway关键字 :表示这是一个异步单向调用。HAL 调用后不等返回就继续走,不会阻塞notificationLoop。这对高频推送场景至关重要。- 两个方法 :正常数据走
onValueSet,异常情况走onValueSetError,和 Vehicle HAL 的onPropertyEvent/onPropertyError一脉相承。
③ 更新 IHello.hal(追加订阅方法)
在原有三个同步方法基础上追加:
hidl
package vendor.custom.hello_hidl@1.0;

import IHelloCallback;   // ← 新增导包

interface IHello {
    // ---- 同步方法(已有)----
    calculate_plus(uint32_t a, uint32_t b) generates (uint32_t total);
    write(string name) generates (uint32_t result);
    read() generates (string name);

    // ---- 订阅方法(新增)----
    // 客户端传入回调对象,订阅传感器数据推送
    subscribe(IHelloCallback callback) generates (StatusCode status);
    // 取消订阅
    unsubscribe(IHelloCallback callback) generates (StatusCode status);
};
3.3 重新生成代码
.hal 改过了,要重新跑一遍代码生成流程:
bash
# 重新生成 impl 骨架(会覆盖 Hello.h/.cpp,注意备份!)
PACKAGE=vendor.custom.hello_hidl@1.0
LOC=vendor/custom/hardware/interfaces/hello_hidl/1.0/default

# 首先更新current.txt
hidl-gen -L hash \
    -r vendor.custom:vendor/custom/hardware/interfaces \
    $PACKAGE -o $LOC >> vendor/custom/hardware/interfaces/current.txt

# 重新生成接口库的 Android.bp(会自动包含新的 types/IHelloCallback)
cd vendor/custom/hardware/interfaces/
./update-makefiles.sh

hidl-gen -o $LOC -L c++-impl \
    -r vendor.custom:vendor/custom/hardware/interfaces/ \
    -r android.hidl:system/libhidl/transport \
    $PACKAGE

# 重新生成 impl 的 Android.bp
hidl-gen -o $LOC -L androidbp-impl \
    -r vendor.custom:vendor/custom/hardware/interfaces/ \
    -r android.hidl:system/libhidl/transport \
    $PACKAGE

# 重新编译接口库
mmm vendor/custom/hardware/interfaces/hello_hidl/1.0/
⚠️
hidl-gen -L c++-impl会覆盖Hello.h和Hello.cpp!如果之前已经填过业务逻辑,要先备份再执行。
此时目录结构变成了这样:
csharp
hello_hidl/1.0/
├── IHello.hal              # 扩展后的服务接口
├── IHelloCallback.hal      # 新增的回调接口
├── types.hal               # 新增的自定义类型
├── Android.bp              # 自动更新(含新文件)
│
├── default/
│   ├── Android.bp          # 自动更新
│   ├── Hello.h             # 重新生成的骨架(含新方法声明)
│   ├── Hello.cpp           # 重新生成的空实现(含新方法桩)
│   ├── HelloCallback.h     # 新增:回调实现的头文件骨架
│   ├── HelloCallback.cpp   # 新增:回调实现的空桩
│   ├── HelloService.cpp    # 不变
│   ├── *.rc                # 不变
│   └── *.xml               # 不变
注意到 hidl-gen 多生成了 HelloCallback.h 和 HelloCallback.cpp------这是 IHelloCallback 的 C++ 实现骨架。服务端的 HelloCallback 只是空桩,真正的实现在客户端。
3.4 单客户端踩坑版实现(版本 B)
现在开始填代码。本章的目标是做一个能跑但会崩溃的单客户端版本。(我chovy!拿代码TM给我拿好的啊!🤪)
HelloCallback(服务端空桩)
HelloCallback.h:
cpp
#pragma once

#include <vendor/custom/hello_hidl/1.0/IHelloCallback.h>
#include <hidl/MQDescriptor.h>
#include <hidl/Status.h>

namespace vendor::custom::hello_hidl::implementation {

using ::android::hardware::hidl_array;
using ::android::hardware::hidl_memory;
using ::android::hardware::hidl_string;
using ::android::hardware::hidl_vec;
using ::android::hardware::Return;
using ::android::hardware::Void;
using ::android::sp;

// IHelloCallback 在客户端实现;服务端保留空桩以便 impl 库编译通过
struct HelloCallback : public V1_0::IHelloCallback {

    Return<void> onValueSet(
        const ::vendor::custom::hello_hidl::V1_0::TemperatureAndPressure& value) override;

    Return<void> onValueSetError(
        ::vendor::custom::hello_hidl::V1_0::StatusCode errorCode) override;

};

} // namespace vendor::custom::hello_hidl::implementationHelloCallback.cpp:
cpp
#include "HelloCallback.h"
#include <android/log.h>

#define LOG_TAG "HelloHAL-Callback"
#define ALOGI(...) __android_log_print(ANDROID_LOG_INFO, LOG_TAG, __VA_ARGS__)

namespace vendor::custom::hello_hidl::implementation {

// 服务端空桩------客户端的 IHelloCallback 实现会通过 binder 被调用
Return<void> HelloCallback::onValueSet(
    const ::vendor::custom::hello_hidl::V1_0::TemperatureAndPressure& value) {

    ALOGI("onValueSet stub called (client would normally receive this): "
          "temp=%llu, press=%llu",
          (unsigned long long)value.temperature,
          (unsigned long long)value.pressure);
    return Void();
}

Return<void> HelloCallback::onValueSetError(
    ::vendor::custom::hello_hidl::V1_0::StatusCode errorCode) {

    ALOGI("onValueSetError stub called: errorCode=%d", static_cast<int32_t>(errorCode));
    return Void();
}

}  // namespace vendor::custom::hello_hidl::implementation
这两文件只是让编译通过的桩。真正的
IHelloCallback实现(接收数据的那个)写在客户端 Java/C++ 侧。
Hello(单客户端踩坑版)
Hello.h(版本 B ------ 加入回调相关成员):
cpp
#pragma once

#include <vendor/custom/hello_hidl/1.0/IHello.h>
#include <hidl/MQDescriptor.h>
#include <hidl/Status.h>

#include <string>
#include <thread>
#include <atomic>

namespace vendor::custom::hello_hidl::implementation {

using ::android::hardware::hidl_array;
using ::android::hardware::hidl_memory;
using ::android::hardware::hidl_string;
using ::android::hardware::hidl_vec;
using ::android::hardware::Return;
using ::android::hardware::Void;
using ::android::sp;

struct Hello : public V1_0::IHello {
    Hello();
    ~Hello();

    // ---- 同步方法 ----
    Return<uint32_t> calculate_plus(uint32_t a, uint32_t b) override;
    Return<uint32_t> write(const hidl_string& name) override;
    Return<void> read(read_cb _hidl_cb) override;

    // ---- 订阅方法 ----
    Return<V1_0::StatusCode> subscribe(
        const sp<V1_0::IHelloCallback>& callback) override;
    Return<V1_0::StatusCode> unsubscribe(
        const sp<V1_0::IHelloCallback>& callback) override;

private:
    std::string mStoredString;       // read/write 暂存

    // ====== 单客户端回调(版本 B ------ 故意不用 map 和 linkToDeath)======
    sp<V1_0::IHelloCallback> mCallback;   // 单个回调引用
    std::thread mNotifyThread;             // 推送线程
    std::atomic<bool> mThreadRunning{false};

    uint64_t mTemperature{0};      // 模拟温度值
    uint64_t mPressure{0};         // 模拟气压值

    void notificationLoop();        // 推送循环
    void startNotifyThreadIfNeeded();   // 启动线程
    void stopNotifyThreadIfEmpty();     // 停止线程
};

}  // namespace vendor::custom::hello_hidl::implementation
对比版本 A,新增了:
mCallback:单个回调强引用mNotifyThread+mThreadRunning:后台推送线程mTemperature/mPressure:模拟传感器数据
Hello.cpp(版本 B ------ 单客户端,无 linkToDeath):
cpp
#include "Hello.h"

#define LOG_TAG "HelloHAL"
#include <log/log.h>

#include <chrono>
#include <unistd.h>

namespace vendor::custom::hello_hidl::implementation {

using ::android::hardware::hidl_string;

Hello::Hello() {
    ALOGI("Hello HAL instance created");
}

Hello::~Hello() {
    mThreadRunning = false;
    if (mNotifyThread.joinable()) {
        mNotifyThread.join();
    }
    ALOGI("Hello HAL instance destroyed");
}

// ---- calculate_plus / write / read(同版本 A,略)----

Return<uint32_t> Hello::calculate_plus(uint32_t a, uint32_t b) {
    uint32_t total = a + b;
    ALOGI("calculate_plus: %u + %u = %u", a, b, total);
    return total;
}

Return<uint32_t> Hello::write(const hidl_string& name) {
    mStoredString = name.c_str();
    ALOGI("write: stored \"%s\"", mStoredString.c_str());
    return 0;
}

Return<void> Hello::read(read_cb _hidl_cb) {
    ALOGI("read: returning \"%s\"", mStoredString.c_str());
    _hidl_cb(mStoredString);
    return Void();
}

// ============================================================
// 订阅 / 取消订阅(版本 B:单客户端,无 linkToDeath)
// ============================================================

Return<V1_0::StatusCode> Hello::subscribe(
    const sp<V1_0::IHelloCallback>& callback) {

    if (callback == nullptr) {
        ALOGE("subscribe: callback is null");
        return V1_0::StatusCode::ERROR;
    }

    if (mCallback != nullptr) {
        ALOGE("subscribe: already subscribed");
        return V1_0::StatusCode::ERROR;
    }

    // 🔴 版本 B 特征:直接存 callback,不调 linkToDeath
    mCallback = callback;

    startNotifyThreadIfNeeded();

    ALOGI("subscribe: callback registered, starting notification thread");
    return V1_0::StatusCode::OK;
}

Return<V1_0::StatusCode> Hello::unsubscribe(
    const sp<V1_0::IHelloCallback>& /*callback*/) {

    if (mCallback == nullptr) {
        ALOGE("unsubscribe: not subscribed");
        return V1_0::StatusCode::ERROR;
    }

    mCallback = nullptr;   // 清掉引用
    stopNotifyThreadIfEmpty();

    ALOGI("unsubscribe: callback cleared");
    return V1_0::StatusCode::OK;
}

// ---- 推送线程管理 ----

void Hello::startNotifyThreadIfNeeded() {
    if (!mThreadRunning) {
        if (mNotifyThread.joinable()) {
            mNotifyThread.join();
        }
        mThreadRunning = true;
        mTemperature = 0;
        mPressure = 0;
        mNotifyThread = std::thread(&Hello::notificationLoop, this);
        ALOGI("notification thread started");
    }
}

void Hello::stopNotifyThreadIfEmpty() {
    mThreadRunning = false;
    if (mNotifyThread.joinable()) {
        mNotifyThread.join();
        ALOGI("notification thread stopped");
    }
}

// ---- 推送循环 ----
void Hello::notificationLoop() {
    ALOGI("notificationLoop started, pushing every 1 second");

    while (mThreadRunning) {
        std::this_thread::sleep_for(std::chrono::seconds(1));

        if (!mThreadRunning) break;

        V1_0::TemperatureAndPressure value;
        value.temperature = mTemperature;
        value.pressure = mPressure;

        // 🔴 直接调 callback->onValueSet() ------ 如果客户端已死,这里会崩
        if (mCallback != nullptr && mThreadRunning) {
            ALOGI("pushing to client: t=%llu p=%llu",
                  (unsigned long long)value.temperature,
                  (unsigned long long)value.pressure);
            mCallback->onValueSet(value);   // ⚡ 危险操作!
        }

        mTemperature++;
        mPressure++;
    }

    mTemperature = 0;
    mPressure = 0;
    ALOGI("notificationLoop stopped");
}

}  // namespace vendor::custom::hello_hidl::implementation
🔴 版本 B 的 bug 标注了两处:
subscribe()里没有callback->linkToDeath()------ 不知道客户端何时死亡notificationLoop里直接调mCallback->onValueSet()------ 客户端死后这行就是致命一击
同时别忘了更新 default/Android.bp,把 HelloCallback.cpp 加到 srcs:
bp
cc_library_static {
    name: "vendor.custom.hello_hidl@1.0-impl",
    defaults: ["hello-hidl_defaults"],
    srcs: [
        "Hello.cpp",
        "HelloCallback.cpp",   # ← 新增
    ],
}
3.5 编译运行 + Java 端验证
重新编译:
bash
mmm vendor/custom/hardware/interfaces/hello_hidl/1.0/default/刷机开机,确认服务启动成功。然后在 Java 侧写个简单验证(详细代码在第 7 章,这里只放核心片段,心里有个数就行):
java
// 1. 获取 HAL 服务
IHello service = IHello.getService();

// 2. 先测同步方法
int result = service.calculate_plus(10, 20);  // → 30 ✅
service.write("Hello from Java!");
service.read((status, name) -> {
    Log.i(TAG, "read: " + name);  // → "Hello from Java!" ✅
});

// 3. 订阅推送
MyHelloCallback callback = new MyHelloCallback(TAG);
int st = service.subscribe(callback);
if (st == StatusCode.OK) {
    Log.i(TAG, "subscribed! waiting for callbacks...");
    // logcat 会刷出:
    // t=0 p=0
    // t=1 p=1
    // t=2 p=2 ...
}跑起来:subscribe 返回 OK,logcat 里每秒刷一行 t=0 p=0、t=1 p=1......一切正常。
3.6 💥 退出 App → HAL 崩溃
现在退出 App(或杀掉进程),观察 logcat:
sql
--- APP 进程被杀 ---

*** *** *** *** ***
Build fingerprint: '...'
Binary crash handler enabled.
pid: xxx, tid: xxx, name: Binder:x  >>> vendor.custom.hello_hidl@1x <<<
signal 6 (SIGABRT), code -1 (SI_QUEUE), fault addr --------
    Abort message: 'Failed transact on interface ...'
HAL 进程跟着一起死了 😱
这不是偶发问题,而是 HIDL 回调的一个经典陷阱。先别急着改代码------我们先彻底搞清楚:HAL 为什么会跟着 App 一起死?
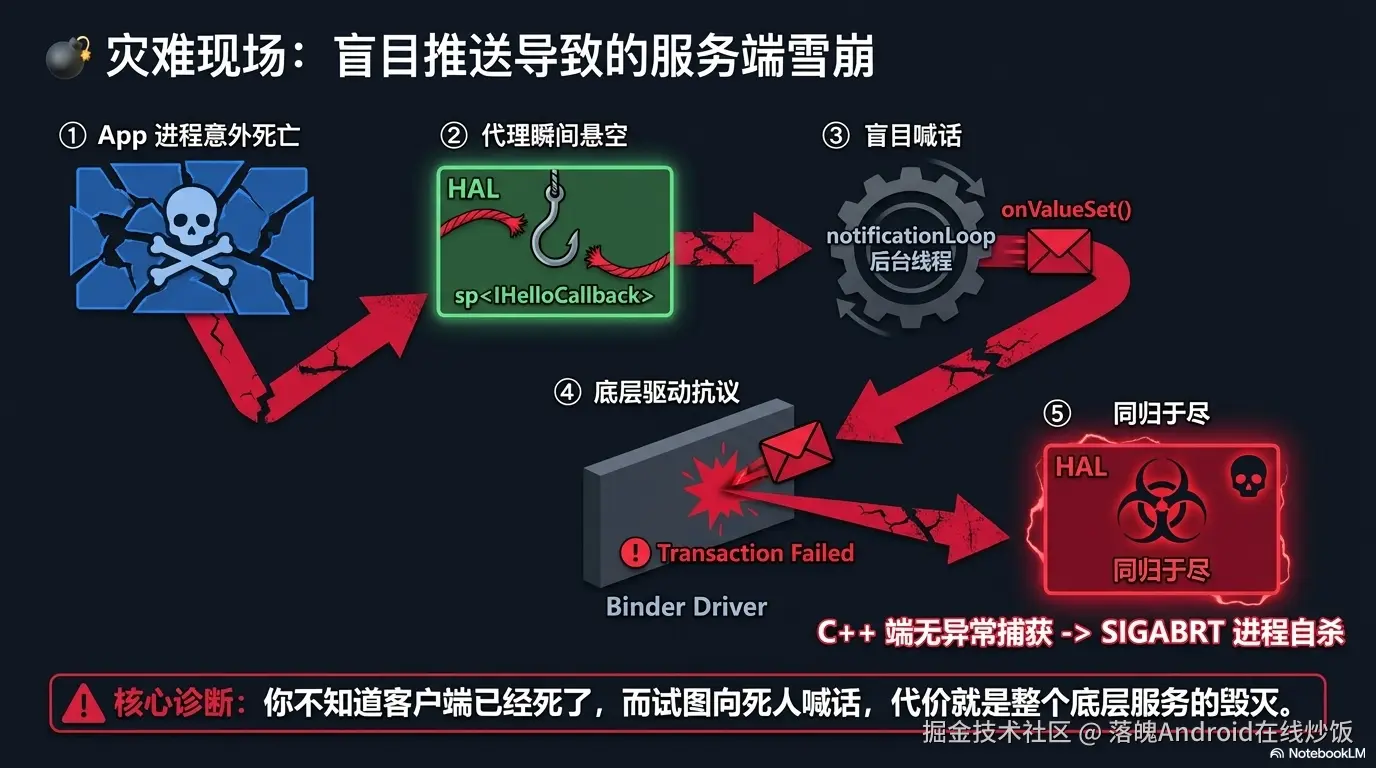
3.7 根因分析:崩溃链路全解
你的 notificationLoop 里持有客户端的 sp<IHelloCallback>(强引用),每秒调用 onValueSet 往外推数据。当 App 被杀时,发生了以下连锁反应:
scss
App 进程被杀(用户按 Home 上滑 / am force-stop)
       │
       ▼
Binder 驱动检测到对端进程死亡
(hwbinder 连接断开)
       │
       ▼
HAL 服务端的 mCallback 变成"悬空代理"
(sp<> 还活着,但它指向的远程对象已经没了)
       │
       ▼
下一次 notificationLoop 到来
调用 mCallback->onValueSet(value)
       │
       ▼
Binder 事务发送失败
(对端不存在)
       │
       ▼
没有来处理这个错误 → 自动触发 abort() 触发 SIGABRT
       │
       ▼
❌ HAL 进程崩溃
核心问题有两个:
- 不知道客户端死了 :我们没有注册死亡通知,所以
mCallback还是那个旧的强引用,不知道它已经失效。 - 要处理异常 :
onValueSet()在 C++ HIDL 中,底层其实是不抛出传统 C++ try-catch 异常的。真正导致 abort 的原因是 HIDL 的底层机制:oneway 方法会返回一个 Return 对象,当 IPC 事务失败(比如远端进程已死)时,该对象内部包含错误状态。如果开发者没有显式调用 .isOk() 来处理这个错误,那么当这个 Return 对象由于生命周期结束而发生析构时,系统底层(Bionic库)会自动触发 abort() 杀死当前进程 。
回过头来看 Vehicle HAL 原厂是怎么处理的------它做了两件事:
linkToDeath:订阅时就向 Binder 驱动注册死亡监听,客户端一死立刻收到通知- 异常兜底:即使死亡通知延迟,处理错误。
这两条防线,就是下一章我们要加的东西。
本章小结
第 3 章我们把 Hello 从纯同步接口升级成了带回调推送的版本:
- 参照 AAOS Vehicle HAL 的
IVehicle/IVehicleCallback模板,设计了IHello/IHelloCallback - 用
oneway保证推送不阻塞 HAL 线程 - 实现了单客户端踩坑版(版本 B) ------故意不留
linkToDeath - 验证了推送功能正常,然后演示了 App 退出 HAL 崩溃的经典坑
- 分析了完整的崩溃链路:悬空代理 → 事务失败 → 未处理错误 → 进程 abort
崩溃原因清楚了,下一章修。
第 4 章 修复崩溃:死亡通知两条防线
本章目标 :给单客户端版加上死亡通知机制,修掉"App 退出 HAL 崩溃"的 bug。最终得到稳定可用的单客户端版(版本 C)。
本章完成后,你的 Hello HAL 已经可以在生产环境支撑单个客户端的安全订阅了。多客户端支持在第 5 章。
4.1 修复方案总览
我们要加两层防护:
scss
┌─────────────────────────────────────────────┐
│           防 线 体 系                         │
├────────────────────┬────────────────────────┤
│  防线 1:主动监听    │  防线 2:兜底清理       │
│                    │                        │
│  subscribe() 时    │  线程退出时的收尾       │
│  linkToDeath()     │                        │
│       │            │  ┌──────────────────┐  │
│       ▼            │  │ lock → 清空引用    │  │
│  客户端死亡时      │  │ → 重置计数器       │  │
│  serviceDied()    │  │ → 停止线程         │  │
│       │            │  └──────────────────┘  │
│       ▼            │                        │
│  onClientDied()    │  即使防线1延迟触发,   │
│  → 清空 mCallback  │  防线2也能保住进程     │
│  → 停止线程        │                        │
└────────────────────┴────────────────────────┘
4.2 防线 1:linkToDeath + ClientDeathRecipient

HIDL/Binder 提供了一个标准 API 来监听远端进程死亡:IBase::linkToDeath()。
原理很简单:你传给它一个 hidl_death_recipient 子类对象,当 binder 对端进程被杀时,binder 驱动会在任意一个 binder 线程 中回调你的 serviceDied() 方法。
我们需要:
- 定义一个
ClientDeathRecipient类继承hidl_death_recipient - 在
subscribe()时调用callback->linkToDeath(deathRecipient) - 在
serviceDied()中清空回调、停止线程
修改 Hello.h
在成员变量区域替换原来的单字段为以下内容:
cpp
private:
    std::string mStoredString;

    friend class ClientDeathRecipient;  // ← 新增友元

    // 单个回调 + 死亡通知(版本 C)
    sp<V1_0::IHelloCallback> mCallback;
    sp<::android::hardware::hidl_death_recipient> mDeathRecipient;  // ← 新增

    std::thread mNotifyThread;
    std::atomic<bool> mThreadRunning{false};

    uint64_t mTemperature{0};
    uint64_t mPressure{0};

    void notificationLoop();
    void startNotifyThreadIfNeeded();
    void stopNotifyThreadIfEmpty();

    // 由死亡通知触发:清理回调
    void onClientDied();  // ← 新增
修改 Hello.cpp(版本 C)
首先加上 ClientDeathRecipient 类定义和 onClientDied 方法:
cpp
#include "Hello.h"

#define LOG_TAG "HelloHAL"
#include <log/log.h>
#include <chrono>
#include <unistd.h>
#include <hidl/HidlSupport.h>
#include <hwbinder/IPCThreadState.h>   // ← 新增

namespace vendor::custom::hello_hidl::implementation {

using ::android::hardware::hidl_string;
using ::android::hardware::IPCThreadState;

// ============================================================
// 死亡通知 --- 监听客户端死亡,自动清理回调
// ============================================================
class ClientDeathRecipient : public ::android::hardware::hidl_death_recipient {
    Hello* mHello;
public:
    ClientDeathRecipient(Hello* hello) : mHello(hello) {}

    void serviceDied(uint64_t /*cookie*/,
                     const ::android::wp<::android::hidl::base::V1_0::IBase>& /*who*/)
                     override {
        ALOGI("ClientDeathRecipient: client died, auto-cleanup");
        if (mHello) {
            mHello->onClientDied();
        }
    }
};

// ============================================================
// onClientDied --- 死亡通知的处理逻辑
// ============================================================

void Hello::onClientDied() {
    mCallback = nullptr;        // 清掉悬空引用
    stopNotifyThreadIfEmpty();  // 停止推送线程
    ALOGI("onClientDied: callback cleared, thread stopped");
}
然后重写 subscribe() 和 unsubscribe():
cpp
// ---- subscribe(版本 C:加 linkToDeath)----

Return<V1_0::StatusCode> Hello::subscribe(
    const sp<V1_0::IHelloCallback>& callback) {

    if (callback == nullptr) {
        ALOGE("subscribe: callback is null");
        return V1_0::StatusCode::ERROR;
    }

    if (mCallback != nullptr) {
        ALOGE("subscribe: already subscribed");
        return V1_0::StatusCode::ERROR;
    }

    mCallback = callback;

    // ✅ 版本 C 关键改动:注册死亡通知
    mDeathRecipient = new ClientDeathRecipient(this);
    bool linked = mCallback->linkToDeath(mDeathRecipient, 0 /*cookie*/);
    if (!linked) {
        ALOGE("subscribe: linkToDeath failed, client may already be dead");
        mCallback = nullptr;
        mDeathRecipient = nullptr;
        return V1_0::StatusCode::ERROR;
    }

    startNotifyThreadIfNeeded();
    ALOGI("subscribe: callback registered with death notification");
    return V1_0::StatusCode::OK;
}

// ---- unsubscribe(版本 C:加 unlinkToDeath)----

Return<V1_0::StatusCode> Hello::unsubscribe(
    const sp<V1_0::IHelloCallback>& /*callback*/) {

    if (mCallback == nullptr) {
        ALOGE("unsubscribe: not subscribed");
        return V1_0::StatusCode::ERROR;
    }

    // ✅ 版本 C 关键改动:取消死亡通知绑定
    if (mDeathRecipient != nullptr && mCallback != nullptr) {
        mCallback->unlinkToDeath(mDeathRecipient);
        mDeathRecipient = nullptr;
    }

    mCallback = nullptr;
    stopNotifyThreadIfEmpty();

    ALOGI("unsubscribe: callback and death recipient cleared");
    return V1_0::StatusCode::OK;
}同步方法和推送循环保持不变(notificationLoop 里已经有 if (mCallback != nullptr) 检查,作为防线 2 兜底):
cpp
// notificationLoop 保持不变 ------ 已有 null 检查作为防线2
void Hello::notificationLoop() {
    ALOGI("notificationLoop started, pushing every 1 second");

    while (mThreadRunning) {
        std::this_thread::sleep_for(std::chrono::seconds(1));
        if (!mThreadRunning) break;

        V1_0::TemperatureAndPressure value;
        value.temperature = mTemperature;
        value.pressure = mPressure;

        // 防线 2:null 检查 ------ 即使防线1还没来得及触发,
        // 这里发现 mCallback 为 null 就跳过,不会崩
        if (mCallback != nullptr && mThreadRunning) {
            ALOGI("pushing to client: t=%llu p=%llu",
                  (unsigned long long)value.temperature,
                  (unsigned long long)value.pressure);
            mCallback->onValueSet(value);
        }

        mTemperature++;
        mPressure++;
    }

    mTemperature = 0;
    mPressure = 0;
    ALOGI("notificationLoop stopped");
}
4.3 linkToDeath 为什么这么快?内核级原理
你可能会问:linkToDeath 到底是怎么做到"客户端一死,HAL 立刻就知道"的?它不是轮询,也不是定时检测------而是由 Linux 内核的 Binder 驱动直接触发,几乎没有延迟。
这是 Android 系统高可用性的核心机制之一,值得花两分钟搞懂。
完整链路
arduino
客户端进程崩溃(段错误 Segfault / 被 OOM 杀 / 被 force-stop)
       │
       ▼
Linux 内核自动回收该进程的所有资源
       │
       ├── 释放虚拟内存
       ├── 关闭所有打开的文件描述符(fd)
       │     │
       │     └── 其中就包括 /dev/hwbinder 的 fd  ⚡ 关键
       │
       ▼
Binder 驱动在内核态立刻感知到这个 binder 节点的消失
(fd 关闭 → 驱动收到 release 回调 → 节点被标记为 dead)
       │
       ▼
Binder 驱动"顺藤摸瓜":
遍历所有曾经向该节点注册过 linkToDeath 的进程
       │
       ▼
向每一个注册者发送 binderDied 回调
(通过 binder 线程投递,不需要用户态轮询)
       │
       ▼
HAL 进程的 ClientDeathRecipient::serviceDied() 被调用
       │
       ▼
onClientDied() → 清理回调 → 停止线程 ✅
几个关键点
-
内核驱动驱动,不是用户态轮询 :
linkToDeath注册时会在 binder 驱动里挂一个"死亡监听节点"。客户端进程死掉时,是内核主动推送死亡通知,不依赖任何用户态定时检查。 -
fd 关闭是触发点 :进程崩溃时内核会自动关闭它的所有 fd,包括
/dev/hwbinder。Binder 驱动在binder_release()回调里发现节点没了,就触发死亡通知。这就是为什么几乎无延迟------fd 关闭和死亡通知在内核态同步完成。 -
覆盖所有死亡方式 :不管是段错误(SIGSEGV)、被
kill -9、被 OOM Killer、还是am force-stop------只要进程没了,内核都会回收 fd,binder 驱动都能感知到。 -
binder 线程投递 :
serviceDied()在 HAL 进程的某个 binder 线程中被调用,不是你自己的业务线程。所以onClientDied()里的清理逻辑要注意线程安全(这也是为什么版本 D 用std::mutex保护mSubscriptions)。
💡 一句话总结 :
linkToDeath的可靠性来自 Linux 内核------进程死则 fd 关,fd 关则驱动知,驱动知则回调至。整条链路在内核态完成,用户态零延迟感知。
理解了 linkToDeath 的原理,我们再验证修复效果:
4.4 验证:App 退出 HAL 不再崩
编译刷机,重复上次的测试流程:
- App 启动 →
subscribe→ 每秒收到推送 ✅ - 退出 App(Home 上滑 /
am force-stop) - 观察 logcat:
vbnet
HelloHAL: subscribe: callback registered with death notification
HelloHAL: notification thread started
HelloHAL: pushing to client: t=0 p=0
HelloHAL: pushing to client: t=1 p=1
...
ClientDeathRecipient: client died, auto-cleanup     ← 防线1 触发
HelloHAL: onClientDied: callback cleared, thread stopped
HelloHAL: notificationLoop stopped                   ← 线程安全退出
HAL 进程稳如老狗 🎉
4.5 两条防线各自的作用时机
| 场景 | 防线 1(linkToDeath) | 防线 2(null check) |
|---|---|---|
| 正常 unsubscribe | ✅ unlinkToDeath + 清空 |
--- |
| App 被 kill | ✅ serviceDied → 清空 |
兜底:如果死亡通知延迟,下次循环 null check 跳过 |
| App 被 OOM 杀 | ✅ 同上 | ✅ 同上 |
| Binder 驱动异常 | ❌ 可能不触发 | ✅ null check 保命 |
两条防线互补:防线 1 是主力,防线 2 是保险。
4.6 延伸:AAOS 的另一道高可用防线 ------ CarWatchDog
在研究 Vehicle HAL 的过程中,我还发现 AAOS 里有一个比 linkToDeath 更"狠"的高可用机制:CarWatchdog。

linkToDeath 解决的是"客户端死了,服务端怎么知道 "的问题。但反过来还有一个问题:如果 HAL 服务端自己卡死了呢? 客户端光知道对方"还活着"(进程没死)是不够的------进程可能在跑,但主线程死锁了、消息队列堵了、传感器数据十分钟没更新了。
这就是 CarWatchdog 要解决的场景。它的核心思路是主动心跳 + 超时杀进程:
arduino
┌───────────────────────────────────────────────────┐
│              CarWatchdog 架构(简化)               │
│                                                   │
│  ┌─────────────┐    注册为 Client     ┌────────┐  │
│  │  你的 HAL    │ ──────────────────▶ │ CarWatch│  │
│  │  / Service   │                     │  dog    │  │
│  └──────┬──────┘                     │ Server  │  │
│         │                             └───┬────┘  │
│         │  每 3s 调 tellClientAlive()      │       │
│         │  "我还活着,这是我的心跳"         │       │
│         ▼─────────────────────────────────▶│       │
│                                           │       │
│         如果超过超时时间没收到心跳 ─────────▶│       │
│                                           ▼       │
│                                    ❌ 杀掉该 Client│
│                                    (carwatchdog  │
│                                     重启策略)     │
└───────────────────────────────────────────────────┘
对比一下两者的定位:
| 机制 | 解决什么问题 | 触发方式 | 后果 |
|---|---|---|---|
linkToDeath |
对端进程没了 | 内核 fd 关闭 → 驱动推送 | 活着的一方收到回调,做清理 |
CarWatchdog |
对端进程在但卡了 | 心跳超时 | 杀掉卡死的进程并重启 |
简单说:linkToDeath 是"死了通知我 ",CarWatchdog 是"没死但哑了,我帮你杀"。两者在 AAOS 里配合使用,构成车规级的高可用双保险。
CarWatchdog 的完整实现涉及 ICarWatchdog AIDL 接口、WatchdogPerServiceHandler、超时策略配置、以及和 init 的重启联动------内容比较多,这里先画个饼:
🍩 后续预告 :如果你对 AAOS 的高可用机制感兴趣,我会单独开一篇讲 CarWatchdog 的完整实现------包括如何让你的 HAL 注册为 Watchdog Client、心跳机制怎么写、超时后的重启策略怎么配。到时候我们会从
CarServiceHelperService一路追到 native 层的CarWatchdogDaemon。
现在,让我们回到 Hello HAL 的演进。linkToDeath 已经能保住单客户端场景下的稳定性了,下一章解决多客户端的问题。
本章小结
第 4 章我们修掉了崩溃,并深入了底层原理:
- 引入
ClientDeathRecipient继承hidl_death_recipient,在subscribe()时注册死亡通知 - 客户端死亡 →
serviceDied()→onClientDied()→ 清空引用 + 停止线程 unsubscribe()时不忘unlinkToDeath()解绑notificationLoop的 null 检查作为兜底防线- 深入
linkToDeath内核级原理:进程死 → fd 关 → 驱动知 → 回调至,几乎零延迟 - 延伸了解 AAOS 的 CarWatchdog 心跳机制(进程在但卡了的场景)
- 验证:App 退出后 HAL 进程不再崩溃
现在的 Hello 已经是稳定的单客户端版 了。但如果生产环境有多个进程想同时订阅呢?比如 system_server 要收传感器数据,同时一个诊断 App 也想看实时值------当前的"单 callback"会被第二次 subscribe 直接覆盖。
下一章解决这个问题。
第 5 章 进阶:多客户端订阅
本章目标 :从"单客户端"升级到"多客户端隔离",每个客户端独立拥有自己的回调 + 死亡通知,互不影响。最终得到生产级完整版(版本 D)。
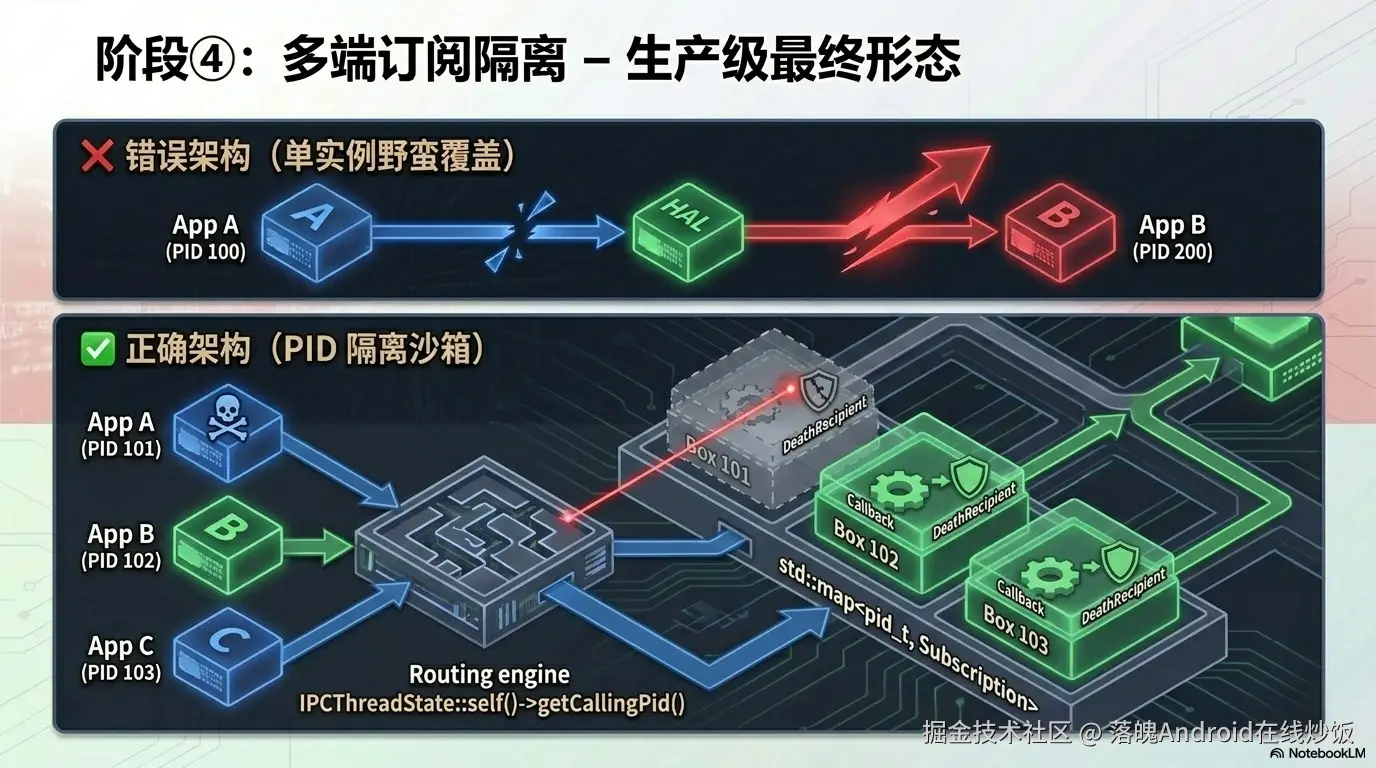
5.1 问题:第二个订阅者会干掉第一个
当前版本的 subscribe() 有这段逻辑:
cpp
if (mCallback != nullptr) {
    return ERROR;  // "已经有人订了,你来晚了"
}
这意味着同一时刻只能有一个客户端订阅。但在真实系统里,多个进程往往需要同时监听同一个 HAL:
scss
┌──────────────┐    subscribe()    ┌──────────────┐
│ system_server │ ───────────────▶  │              │
│ (策略决策)    │                  │  Hello HAL   │
└──────────────┘                  │  (单 callback │
                                  │   被覆盖!)    │
┌──────────────┐    subscribe()    │              │
│ DiagnosticApp│ ───────────────▶  │              │
│ (调试工具)    │                  └──────────────┘
└──────────────┘
第二个 subscribe 要么报错拒绝,要么覆盖第一个------两种都不合理。
正确做法:每个客户端进程维护自己独立的回调通道,互不干扰。
5.2 架构对比
ini
┌─────────────────────────────────┐    ┌─────────────────────────────────┐
│       版本 C(单客户端)          │    │       版本 D(多客户端)          │
│                                 │    │                                 │
│   mCallback (单个 sp<>)         │    │   mSubscriptions (map)          │
│                                 │    │                                 │
│   mDeathRecipient (单个)        │    │   ├─ pid=1234 → {cb₁, death₁}   │
│                                 │    │   ├─ pid=5678 → {cb₂, death₂}   │
│   notificationLoop:             │    │   └─ pid=9012 → {cb₃, death₃}   │
│   → push 1 个回调               │    │                                 │
│                                 │    │   notificationLoop:             │
│   线程: 首次启/最后停            │    │   → 遍历 map,逐个推送           │
│                                 │    │                                 │
└─────────────────────────────────┘    │   线程: 首次启/最后停或死完停      │
                                      └─────────────────────────────────┘
5.3 设计要点
1️⃣ 用 PID 区分客户端
每个客户端进程有一个唯一的 PID(进程 ID)。我们用 PID 作为 key,把每个客户端的回调 + 死亡通知打包成一个 Subscription 结构体:
cpp
struct Subscription {
    sp<V1_0::IHelloCallback> callback;
    sp<hidl_death_recipient> deathRecipient;
};

std::map<pid_t, Subscription> mSubscriptions;  // key = 客户端 PID
std::mutex mSubscriptionMutex;                 // 保护 map 的并发访问
PID 通过 IPCThreadState::self()->getCallingPid() 在 subscribe() 调用时获取------这是 Binder 框架提供的标准 API,返回的是发起本次 IPC 调用的客户端进程 ID。
2️⃣ 每个客户端独立的死亡通知
cpp
// subscribe() 时:
auto& sub = mSubscriptions[pid];
sub.callback = callback;
sub.deathRecipient = new ClientDeathRecipient(this, pid);
callback->linkToDeath(sub.deathRecipient, 0);
每个 Subscription 有自己的 deathRecipient,当某个客户端挂掉时,只移除它自己的条目,其他不受影响。
3️⃣ 线程启停规则不变
- 第一个
subscribe→ 启动notificationLoop - 最后一个
unsubscribe或死亡 → 停止notificationLoop - 无人订阅时不浪费资源
5.4 完整实现(版本 D)
Hello.h
cpp
#pragma once

#include <vendor/custom/hello_hidl/1.0/IHello.h>
#include <hidl/MQDescriptor.h>
#include <hidl/Status.h>

#include <string>
#include <mutex>
#include <thread>
#include <atomic>
#include <map>

namespace vendor::custom::hello_hidl::implementation {

using ::android::hardware::hidl_array;
using ::android::hardware::hidl_memory;
using ::android::hardware::hidl_string;
using ::android::hardware::hidl_vec;
using ::android::hardware::Return;
using ::android::hardware::Void;
using ::android::sp;

struct Hello : public V1_0::IHello {

    friend class ClientDeathRecipient;

    Hello();
    ~Hello();

    // 同步方法
    Return<uint32_t> calculate_plus(uint32_t a, uint32_t b) override;
    Return<uint32_t> write(const hidl_string& name) override;
    Return<void> read(read_cb _hidl_cb) override;

    // 订阅方法
    Return<V1_0::StatusCode> subscribe(
        const sp<V1_0::IHelloCallback>& callback) override;
    Return<V1_0::StatusCode> unsubscribe(
        const sp<V1_0::IHelloCallback>& callback) override;

private:
    std::string mStoredString;

    // 单个订阅信息
    struct Subscription {
        sp<V1_0::IHelloCallback> callback;
        sp<::android::hardware::hidl_death_recipient> deathRecipient;
    };

    // 所有活跃订阅,key = 客户端 PID
    std::map<pid_t, Subscription> mSubscriptions;
    std::mutex mSubscriptionMutex;    // 保护 map

    // 通知线程
    std::thread mNotifyThread;
    std::atomic<bool> mThreadRunning{false};

    uint64_t mTemperature{0};
    uint64_t mPressure{0};

    void notificationLoop();

    // 死亡通知触发:清理指定 PID 的订阅
    void onClientDied(pid_t pid);

    // 线程管理(需在锁外调用)
    void startNotifyThreadIfNeeded();
    void stopNotifyThreadIfEmpty();
};

}  // namespace vendor::custom::hello_hidl::implementation
Hello.cpp
cpp
#include "Hello.h"

#define LOG_TAG "HelloHAL"
#include <log/log.h>
#include <chrono>
#include <unistd.h>
#include <hidl/HidlSupport.h>
#include <hwbinder/IPCThreadState.h>

namespace vendor::custom::hello_hidl::implementation {

using ::android::hardware::hidl_string;
using ::android::hardware::IPCThreadState;

// ============================================================
// 死亡通知 --- 单个客户端挂掉时,只移除它自己的订阅
// ============================================================
class ClientDeathRecipient : public ::android::hardware::hidl_death_recipient {
    Hello* mHello;
    pid_t mPid;
public:
    ClientDeathRecipient(Hello* hello, pid_t pid)
        : mHello(hello), mPid(pid) {}

    void serviceDied(uint64_t /*cookie*/,
                     const ::android::wp<::android::hidl::base::V1_0::IBase>& /*who*/)
                     override {
        ALOGI("ClientDeathRecipient: pid=%d died, auto-cleanup",
              static_cast<int>(mPid));
        if (mHello) {
            mHello->onClientDied(mPid);
        }
    }
};

// ============================================================
// 构构 / 析构
// ============================================================
Hello::Hello() { ALOGI("Hello HAL instance created"); }

Hello::~Hello() {
    mThreadRunning = false;
    if (mNotifyThread.joinable()) {
        mNotifyThread.join();
    }
    ALOGI("Hello HAL instance destroyed");
}

// ============================================================
// 同步方法(不变)
// ============================================================
Return<uint32_t> Hello::calculate_plus(uint32_t a, uint32_t b) {
    uint32_t total = a + b;
    ALOGI("calculate_plus: %u + %u = %u", a, b, total);
    return total;
}

Return<uint32_t> Hello::write(const hidl_string& name) {
    mStoredString = name.c_str();
    ALOGI("write: stored \"%s\"", mStoredString.c_str());
    return 0;
}

Return<void> Hello::read(read_cb _hidl_cb) {
    ALOGI("read: returning \"%s\"", mStoredString.c_str());
    _hidl_cb(mStoredString);
    return Void();
}

// ============================================================
// subscribe(多客户端)
// ============================================================
Return<V1_0::StatusCode> Hello::subscribe(
    const sp<V1_0::IHelloCallback>& callback) {

    if (callback == nullptr) {
        ALOGE("subscribe: callback is null");
        return V1_0::StatusCode::ERROR;
    }

    pid_t pid = IPCThreadState::self()->getCallingPid();

    // 阶段 1:持锁 --- 注册回调 + 死亡通知
    {
        std::lock_guard<std::mutex> lock(mSubscriptionMutex);

        if (mSubscriptions.count(pid) > 0) {
            ALOGE("subscribe: pid=%d already subscribed",
                  static_cast<int>(pid));
            return V1_0::StatusCode::ERROR;
        }

        Subscription sub;
        sub.callback = callback;
        sub.deathRecipient = new ClientDeathRecipient(this, pid);

        bool linked = callback->linkToDeath(sub.deathRecipient, 0);
        if (!linked) {
            ALOGE("subscribe: pid=%d linkToDeath failed, "
                  "client may already be dead", static_cast<int>(pid));
            return V1_0::StatusCode::ERROR;
        }

        mSubscriptions[pid] = sub;
        ALOGI("subscribe: pid=%d added (total subscribers=%zu)",
              static_cast<int>(pid), mSubscriptions.size());
    }  // ← 锁释放

    // 阶段 2:无锁 --- 首次订阅时启动线程
    startNotifyThreadIfNeeded();

    return V1_0::StatusCode::OK;
}

// ============================================================
// unsubscribe(多客户端)
// ============================================================
Return<V1_0::StatusCode> Hello::unsubscribe(
    const sp<V1_0::IHelloCallback>& /*callback*/) {

    pid_t pid = IPCThreadState::self()->getCallingPid();

    // 阶段 1:持锁 --- 解绑死亡通知 + 移除订阅
    {
        std::lock_guard<std::mutex> lock(mSubscriptionMutex);

        auto it = mSubscriptions.find(pid);
        if (it == mSubscriptions.end()) {
            ALOGE("unsubscribe: pid=%d not subscribed",
                  static_cast<int>(pid));
            return V1_0::StatusCode::ERROR;
        }

        if (it->second.deathRecipient != nullptr
            && it->second.callback != nullptr) {
            it->second.callback->unlinkToDeath(it->second.deathRecipient);
        }

        mSubscriptions.erase(it);
        ALOGI("unsubscribe: pid=%d removed (total subscribers=%zu)",
              static_cast<int>(pid), mSubscriptions.size());
    }  // ← 锁释放

    // 阶段 2:无锁 --- 无人订阅时停止线程
    stopNotifyThreadIfEmpty();

    return V1_0::StatusCode::OK;
}

// ============================================================
// onClientDied:死亡通知处理(只移除指定 PID)
// ============================================================
void Hello::onClientDied(pid_t pid) {
    {
        std::lock_guard<std::mutex> lock(mSubscriptionMutex);
        auto it = mSubscriptions.find(pid);
        if (it == mSubscriptions.end())
            return;  // 已经清理过了

        // deathRecipient 会自毁,不需要手动 unlink
        mSubscriptions.erase(it);
        ALOGI("onClientDied: pid=%d auto-removed "
              "(total subscribers=%zu)",
              static_cast<int>(pid), mSubscriptions.size());
    }  // ← 锁释放

    stopNotifyThreadIfEmpty();
}

// ============================================================
// 线程管理
// ============================================================
void Hello::startNotifyThreadIfNeeded() {
    if (!mThreadRunning) {
        if (mNotifyThread.joinable())
            mNotifyThread.join();
        mThreadRunning = true;
        mTemperature = 0;
        mPressure = 0;
        mNotifyThread = std::thread(&Hello::notificationLoop, this);
        ALOGI("subscribe: notification thread started");
    }
}

void Hello::stopNotifyThreadIfEmpty() {
    {
        std::lock_guard<std::mutex> lock(mSubscriptionMutex);
        if (!mSubscriptions.empty())
            return;  // 还有其他订阅者,不停线程
    }

    mThreadRunning = false;
    if (mNotifyThread.joinable()) {
        mNotifyThread.join();
        ALOGI("unsubscribe: notification thread stopped (no subscribers)");
    }
}

// ============================================================
// 推送循环(遍历所有订阅者)
// ============================================================
void Hello::notificationLoop() {
    ALOGI("notificationLoop: started, pushing every 1 second");

    while (mThreadRunning) {
        std::this_thread::sleep_for(std::chrono::seconds(1));
        if (!mThreadRunning) break;

        V1_0::TemperatureAndPressure value;
        {
            // 只持锁读取计数器(短时间锁)
            value.temperature = mTemperature;
            value.pressure = mPressure;
        }

        // 持锁遍历所有订阅,逐个推送
        std::lock_guard<std::mutex> lock(mSubscriptionMutex);
        for (auto& entry : mSubscriptions) {
            pid_t pid = entry.first;
            auto& sub = entry.second;

            if (sub.callback != nullptr && mThreadRunning) {
                ALOGI("notificationLoop: push to pid=%d: t=%llu p=%llu",
                      static_cast<int>(pid),
                      (unsigned long long)value.temperature,
                      (unsigned long long)value.pressure);
                // oneway ------ 任一客户端挂掉也不影响其他
                sub.callback->onValueSet(value);
            }
        }

        mTemperature++;
        mPressure++;
    }

    // 线程退出清理
    {
        std::lock_guard<std::mutex> lock(mSubscriptionMutex);
        mTemperature = 0;
        mPressure = 0;
    }

    ALOGI("notificationLoop: stopped");
}

}  // namespace vendor::custom::hello_hidl::implementation
5.5 关键机制总结
| 机制 | 说明 |
|---|---|
| 按 PID 区分 | subscribe() → getCallingPid() → mSubscriptions[pid] = {...} |
| 取消匹配 | unsubscribe() → getCallingPid() → mSubscriptions.erase(pid) |
| 死亡隔离 | ClientDeathRecipient(pid).serviceDied() → onClientDied(pid) → 只 erase 该 pid |
| oneway 安全 | onValueSet() 是 oneway,某个客户端挂掉不影响其他客户端的投递 |
| 线程启停 | 首次 subscribe 启动,最后一个 unsubscribe 或死亡时停止 |
5.6 多客户端验证场景
假设三个进程同时订阅:
ini
时间轴:
  t=0s  system_server (pid=1001)  → subscribe → OK
  t=2s  DiagApp      (pid=5678)  → subscribe → OK
  t=5s  TestApp      (pid=9012)  → subscribe → OK
        ↓ 三方都收到推送 (t=0,p=0) (t=1,p=1) ...
  t=10s 用户杀掉 TestApp
        ↓ ClientDeathRecipient(pid=9012) 触发
        ↓ onClientDied(9012) → erase 9012
        ↓ 1001 和 5678 继续收推送 ✅
  t=15s DiagApp 调 unsubscribe
        ↓ erase 5678,只剩 1 个
  t=20s system_server 调 unsubscribe
        ↓ map 为空,notificationLoop 停止 ✅
本章小结
第 5 章完成了从单客户端到多客户端的演进:
- 用
std::map<pid_t, Subscription>替代单个mCallback - 每个 Subscription 有独立的
callback+deathRecipient getCallingPid()区分客户端,死亡通知只影响对应 PIDoneway保证某客户端挂掉不影响其他- 线程启停规则:首个订阅启,最后离开停
经过"基础版 → 踩坑 → 修复 → 多客户端"四轮迭代,Hello 的实现已经比较完整了。下一章把最终完整代码汇总在一起,方便整体对照。
📝 下一章 :[第 6 章 完整版代码汇总](#第 6 章 完整版代码汇总 "#%E7%AC%AC-6-%E7%AB%A0-%E5%AE%8C%E6%95%B4%E7%89%88%E4%BB%A3%E7%A0%81%E6%B1%87%E6%80%BB")
由于文章太大了,所以拆分到下篇了。
9.5 参考资料
- Project Treble 官方文档
- HIDL Codelab
- AAOS Vehicle HAL 源码
- Binder & linkToDeath 机制
- SELinux 策略语法
- HIDL Hal 开发指南5 ------ Passthrough HALs 实例分析整体框架 Passthrough HALs - 掘金
- HIDL Hal 开发指南3 ------ HIDL HAL 实例程序在分析 HAL 层源码之前,我们先实现一个 Binder - 掘金