一、准备Hive配置文件(⚠️最关键的一步)
Spark连接Hive查表需要知道Hive的元数据(Metastore)在哪里,需要以下"配置三剑客",所以必须把Hive的配置文件放到IDEA的src/main/resources目录下:
hive-site.xml(⭐⭐⭐最重要)
作用:告诉Spark Hive的元数据库(Metastore)在哪里。没有它,Spark不知道有哪些表。
常见路径:/usr/local/service/hive/conf/hive-site.xml或/etc/hive/conf/hive-site.xml。
core-site.xml(⭐⭐必须)
作用:告诉Spark HDFS的NameNode地址(比如hdfs://nameservice1),以及Hadoop的基础安全/压缩配置。
常见路径:和hdfs-site.xml同目录,即/usr/local/service/hadoop/etc/hadoop/core-site.xml。
hdfs-site.xml(⭐视情况而定)
作用:只有在HDFS开启了高可用(HA,即有两个NameNode),或者配置了特定的HDFS权限/短路读取时,才必须提供它。
路径:和core-site.xml同目录,/usr/local/service/hadoop/etc/hadoop/hdfs-site.xml。
1.1 获取配置文件
去linux集群找hive-site.xml
(可选:如果集群配置了HDFS高可用,建议把Hadoop的core-site.xml和hdfs-site.xml也一起下载下来)
powershell
locate hive-site.xml
locate core-site.xml
locate hdfs-site.xml
去服务器对于位置下载文件(如 /usr/local/service/hadoop/etc/hadoop/hdfs-site.xml)
1.2 放入IDEA项目
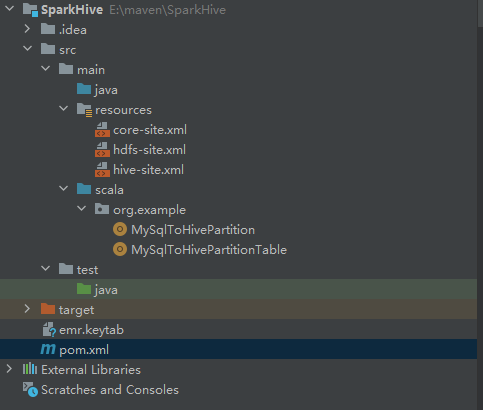
回到IDEA,在左侧找到src/main/resources目录。
(如果没有resources目录:右键src/main->New->Directory命名为resources,然后右键resources->Mark Directory as->Resources Root,让它变成带小星星的黄色文件夹)。
把刚才下载的hive-site.xml core-site.xml hdfs-site.xml复制并粘贴到resources目录下。
1.3 windows本地配置主机名
xml
远程连接Hive(JDBC/ODBC)	hive.server2.thrift.bind.host	HiveServer2服务监听的地址,也是客户端(如Beeline、JDBC程序)需要连接的IP。
应用访问Metastore元数据	hive.metastore.uris	            Metastore服务对外提供的Thrift API地址。值通常是thrift://<IP或主机名>:9083的格式。
Metastore后端数据库	    javax.jdo.option.ConnectionURL	Metastore服务自身连接后端元数据库(如MySQL)的JDBC地址。注意:这个地址仅供Hive服务端内部使用,客户端不能通过它来连接Hive。
在Windows上作为客户端访问远程Hadoop集群,需要配置host
去hive-site.xml文件搜索hive.metastore.uris
xml
    <property>
        <name>hive.metastore.uris</name>
        <value>thrift://tbds-woker1:7004,thrift://tbds-woker2:7004</value>
    </property>
如果是高可用HA还需要找hive.zookeeper.quorum
xml
    <property>
        <name>hive.zookeeper.quorum</name>
        <value>tbds-woker1:2181,tbds-woker2:2181,tbds-woker3:2181</value>
    </property>
修改Windows的hosts文件:将远程集群节点的主机名解析为正确的IP地址
文件路径:C:\Windows\System32\drivers\etc\hosts,在文件末尾添加映射,格式为<IP地址> <主机名>

可以在hadoop集群,通过ping tbds-woker1的方式找到实际的ip地址并写入hosts文件
xml
10.23.14.888 tbds-woker1
10.23.14.889 tbds-woker2
10.23.14.991 tbds-woker3
启用客户端通过主机名访问DataNode:在客户端的hdfs-site.xml中,确保存在并启用以下配置:
xml
	<property>
		<name>dfs.client.use.datanode.hostname</name>
		<value>true</value>
	</property>
1.4 测试Windows到集群的"网络连通性"
windows PowerShell里面
powershell
Test-NetConnection -ComputerName 10.23.14.888 -Port 7004
Test-NetConnection -ComputerName 10.23.14.889 -Port 7004
Test-NetConnection -ComputerName 10.23.14.991 -Port 7004
二、kerberos 认证
2.1 获取"通行证"文件
查看hive-site.xml
powershell
    <property>
        <name>hive.metastore.kerberos.principal</name>
        <value>hadoop/_HOST@TBDS-4ZHV0QQN</value>
    </property>
获取Hive Metastore服务的Kerberos主体(Principal)=》hadoop/_HOST@TBDS-4ZHV0QQN
powershell
locate krb5.conf
powershell
[root@tbds-10-23-14-888 ~]# locate krb5.conf
/data/tbds_install_client/krb5.conf
/etc/krb5.conf
/etc/krb5.conf.20251201
/etc/krb5.conf.d
/etc/crypto-policies/back-ends/krb5.config
/etc/krb5.conf.d/crypto-policies
/etc/krb5.conf.d/kcm_default_ccache
/usr/local/service/knox/templates/krb5.conf
/usr/local/service/krb5/share/examples/krb5/krb5.conf
/usr/local/service/krb5/share/man/man5/krb5.conf.5
/usr/local/service/krb5/var/krb5kdc/krb5.conf
/usr/share/sssd/sssd.api.d/sssd-krb5.conf
2.1.1 krb5.conf :去Linux集群的/etc/目录下,把krb5.conf文件下载到Windows电脑上,直接放到C盘根目录(即C:\krb5.conf)。
查看文件中realms内容
powershell
[realms]
    TBDS-4ZHV0QQN = {
        kdc = 10.23.200.11:40003
        admin_server = 10.23.200.11:40002
    }
    DCBOCI.COM = {
       kdc = 10.23.13.16:88
       admin_server = 10.23.13.16:88
    }
这段配置是Kerberos的"地址簿",告诉客户端程序:"当需要认证时,应该去找哪个服务器(IP地址)和哪个端口"。
定义了两个独立的Kerberos安全域(Realm):
2.1.1.1 针对EMR集群:TBDS-4ZHV0QQN
hadoop/tbds-woker1@TBDS-4ZHV0QQN所属的域。配置里的内容含义如下:
kdc = 10.23.200.11:40003:这是认证服务器的地址和端口。当执行kinit或程序发起Kerberos认证时,客户端会连接这个IP的40003端口来获取"入场券"(TGT,即票据授予票据)。
admin_server = 10.23.200.11:40002:这是管理服务器的地址和端口。通常用于管理员修改密码或维护主体(Principal),日常客户端认证不常用到这个端口,主要靠上面的kdc端口。
2.1.1.2 另一个域:DCBOCI.COM
这是另一个完全独立的Kerberos环境(可能是其他集群或企业内部认证系统)。它指定了不同的KDC服务器地址(10.23.13.16)和标准端口(88)。如果程序尝试连接这个域的主体(如user@DCBOCI.COM),客户端就会去连接10.23.13.16:88。
结论:
这里写的是10.23.200.11这样的硬编码IP,而不是主机名。这意味着Windows客户端不需要在hosts文件中为KDC服务器配置域名解析,直接通过IP就能找到它。
powershell
Test-NetConnection -ComputerName 10.23.200.11 -Port 40003查看网络连通性
2.1.2 keytab文件 :找运维要keytab文件(比如hive.keytab或your_name.keytab),并问清楚这个keytab对应的Principal名称(比如hive/node1@HADOOP.COM)。直接放到C盘根目录(即C:\your_name.keytab)
hadoop集群可以用klist查看认证的用户
powershell
Ticket cache: FILE:/tmp/krb5cc_0
Default principal: hadoop/tbds-woker1@TBDS-4ZHV0QQN

Valid starting       Expires              Service principal
2026-06-25T08:51:51  2026-06-25T20:51:51  krbtgt/TBDS-4ZHV0QQN@TBDS-4ZHV0QQN
renew until 2026-07-02T08:51:51windows中查看keytab用户E:\tool\jdk1.8\bin\klist.exe -kt E:\maven\SparkHiveDemo\emr.keytab
powershell
Key tab: E:\maven\SparkHiveDemo\emr.keytab, 16 entries found.
[1] Service principal: hadoop/tbds-woker1@TBDS-4ZHV0QQN
         KVNO: 1
[2] Service principal: hadoop/tbds-woker1@TBDS-4ZHV0QQN
三、使用
3.1 读取hive数据 本地版
pom.xml
xml
<?xml version="1.0" encoding="UTF-8"?>
<project xmlns="http://maven.apache.org/POM/4.0.0"
         xmlns:xsi="http://www.w3.org/2001/XMLSchema-instance"
         xsi:schemaLocation="http://maven.apache.org/POM/4.0.0 http://maven.apache.org/xsd/maven-4.0.0.xsd">
    <modelVersion>4.0.0</modelVersion>

    <groupId>org.example</groupId>
    <artifactId>sparkmysqltohive</artifactId>
    <version>1.0-SNAPSHOT</version>


    <properties>
        <scala.version>2.12</scala.version>
        <!--<spark.version>3.3.1</spark.version> -->
        <spark.version>3.4.2</spark.version>
        <hive.version>3.1.3</hive.version>
        <hadoop.version>3.2.2</hadoop.version>
        <slf4j.version>1.7.29</slf4j.version>
        <maven.compiler.source>8</maven.compiler.source>
        <maven.compiler.target>8</maven.compiler.target>
        <project.build.sourceEncoding>UTF-8</project.build.sourceEncoding>
        <project.reporting.outputEncoding>UTF-8</project.reporting.outputEncoding>
        <!--        <scope>compile</scope>-->
        <scope>provided</scope>
    </properties>
    <dependencies>
        <!--spark-->
        <dependency>
            <groupId>org.apache.spark</groupId>
            <artifactId>spark-core_${scala.version}</artifactId>
            <version>${spark.version}</version>
            <scope>${scope}</scope>
        </dependency>
        <dependency>
            <groupId>org.apache.spark</groupId>
            <artifactId>spark-sql_${scala.version}</artifactId>
            <version>${spark.version}</version>
            <scope>${scope}</scope>
        </dependency>
        <dependency>
            <groupId>org.apache.spark</groupId>
            <artifactId>spark-hive_${scala.version}</artifactId>
            <version>${spark.version}</version>
            <scope>${scope}</scope>
        </dependency>

        <!--fastjson-->
        <dependency>
            <groupId>com.alibaba</groupId>
            <artifactId>fastjson</artifactId>
            <version>1.2.75</version>
        </dependency>


        <!--log4j + slf4j-->
        <dependency>
            <groupId>org.slf4j</groupId>
            <artifactId>slf4j-api</artifactId>
            <version>${slf4j.version}</version>
        </dependency>
        <dependency>
            <groupId>org.slf4j</groupId>
            <artifactId>slf4j-log4j12</artifactId>
            <version>${slf4j.version}</version>
        </dependency>
        <dependency>
            <groupId>log4j</groupId>
            <artifactId>log4j</artifactId>
            <version>1.2.17</version>
        </dependency>

    </dependencies>
    <build>
        <plugins>
            <plugin>
                <groupId>org.apache.maven.plugins</groupId>
                <artifactId>maven-assembly-plugin</artifactId>
                <version>2.4</version>
                <configuration>
                    <appendAssemblyId>false</appendAssemblyId>
                    <descriptorRefs>
                        <!-- 将依赖的jar包中的class文件打进生成的jar包-->
                        <descriptorRef>jar-with-dependencies</descriptorRef>
                    </descriptorRefs>
                </configuration>
                <executions>
                    <execution>
                        <id>make-assembly</id>
                        <phase>package</phase>
                        <goals>
                            <goal>assembly</goal>
                        </goals>
                    </execution>
                </executions>
            </plugin>
        </plugins>
    </build>

</project>
SparkHiveDemo.scala
scala
package org.example

import org.apache.hadoop.conf.Configuration
import org.apache.hadoop.security.UserGroupInformation
import org.apache.spark.sql.SparkSession

object SparkHiveDemo {
  def main(args: Array[String]): Unit = {

    // ================= 1. 解决 Kerberos 认证问题 =================
    // 注意:Windows 路径必须使用双反斜杠 \\ 或者正斜杠 /
    val krb5ConfPath = "C:\\krb5.conf"
    val keytabPath = "C:\\emr.keytab"

    System.setProperty("java.security.krb5.conf", krb5ConfPath)

    val hadoopConf = new Configuration()
    hadoopConf.set("hadoop.security.authentication", "Kerberos")
    UserGroupInformation.setConfiguration(hadoopConf)

    // 【重要】请将 "hadoop@TBDS-4ZHV0QQN" 替换为您实际在集群中的 principal!
    // 如果是服务账号通常是 hadoop/tbds-woker1@TBDS-4ZHV0QQN,个人账号通常是 username@TBDS-4ZHV0QQN
    val principal = "hadoop/tbds-woker1@TBDS-4ZHV0QQN"
    println(s"正在使用 principal: $principal 进行 Kerberos 登录...")
    UserGroupInformation.loginUserFromKeytab(principal, keytabPath)
    println("Kerberos 登录成功!")

    // ================= 2. 构建 SparkSession =================
    val spark = SparkSession.builder()
      .appName("SparkHiveDemo")
      .master("local[*]")
      .enableHiveSupport()

      // 【核心修复】指定 Metastore URI 和 Kerberos 认证参数
      .config("hive.metastore.uris", "thrift://tbds-woker1:7004")
      .config("hive.metastore.sasl.enabled", "true") // 开启 SASL/Kerberos 认证
      // 关键:直接写死服务端的 Principal,避免 _HOST 在 Windows 下解析错误
      .config("hive.metastore.kerberos.principal", "hadoop/tbds-woker1@TBDS-4ZHV0QQN")

      // 解决 Windows 下的 Short-circuit 警告
      .config("dfs.client.read.shortcircuit", "false")
      // 解决 Hive aux jars 在 Windows 本地不存在的报错
      .config("hive.aux.jars.path", "")
      // 禁用 Hive 的并发编译,减少本地调试时的元数据连接压力
      .config("hive.driver.parallel.compilation", "false")
      .getOrCreate()


    // ================= 3. 执行业务逻辑 =================
    println("====== 开始执行 SQL:查看所有数据库 ======")
    spark.sql("SHOW DATABASES").show()

    println("====== 测试读取 HDFS 文件列表 ======")
    // 测试 HDFS 4007 端口是否真的能正常读写
    val fs = org.apache.hadoop.fs.FileSystem.get(hadoopConf)
    val files = fs.listStatus(new org.apache.hadoop.fs.Path("/"))
    files.foreach(f => println(f.getPath.getName))

    spark.stop()
    println("====== 任务执行完毕 ======")
  }
}
3.2 读取mysql数据并推到hive(本地版)
pom.xml
xml
<?xml version="1.0" encoding="UTF-8"?>
<project xmlns="http://maven.apache.org/POM/4.0.0"
         xmlns:xsi="http://www.w3.org/2001/XMLSchema-instance"
         xsi:schemaLocation="http://maven.apache.org/POM/4.0.0 http://maven.apache.org/xsd/maven-4.0.0.xsd">
    <modelVersion>4.0.0</modelVersion>

    <groupId>org.example</groupId>
    <artifactId>sparkmysqltohive</artifactId>
    <version>1.0-SNAPSHOT</version>


    <properties>
        <scala.version>2.12</scala.version>
        <!--<spark.version>3.3.1</spark.version> -->
        <spark.version>3.4.2</spark.version>
        <hive.version>3.1.3</hive.version>
        <hadoop.version>3.2.2</hadoop.version>
        <slf4j.version>1.7.29</slf4j.version>
        <maven.compiler.source>8</maven.compiler.source>
        <maven.compiler.target>8</maven.compiler.target>
        <project.build.sourceEncoding>UTF-8</project.build.sourceEncoding>
        <project.reporting.outputEncoding>UTF-8</project.reporting.outputEncoding>
        <!--        <scope>compile</scope>-->
        <scope>provided</scope>
    </properties>
    <dependencies>
        <!--spark-->
        <dependency>
            <groupId>org.apache.spark</groupId>
            <artifactId>spark-core_${scala.version}</artifactId>
            <version>${spark.version}</version>
            <scope>${scope}</scope>
        </dependency>
        <dependency>
            <groupId>org.apache.spark</groupId>
            <artifactId>spark-sql_${scala.version}</artifactId>
            <version>${spark.version}</version>
            <scope>${scope}</scope>
        </dependency>
        <dependency>
            <groupId>org.apache.spark</groupId>
            <artifactId>spark-hive_${scala.version}</artifactId>
            <version>${spark.version}</version>
            <scope>${scope}</scope>
        </dependency>

        <!--fastjson-->
        <dependency>
            <groupId>com.alibaba</groupId>
            <artifactId>fastjson</artifactId>
            <version>1.2.75</version>
        </dependency>


        <!--log4j + slf4j-->
        <dependency>
            <groupId>org.slf4j</groupId>
            <artifactId>slf4j-api</artifactId>
            <version>${slf4j.version}</version>
        </dependency>
        <dependency>
            <groupId>org.slf4j</groupId>
            <artifactId>slf4j-log4j12</artifactId>
            <version>${slf4j.version}</version>
        </dependency>
        <dependency>
            <groupId>log4j</groupId>
            <artifactId>log4j</artifactId>
            <version>1.2.17</version>
        </dependency>
        <!-- MySQL JDBC 驱动 -->
        <dependency>
            <groupId>mysql</groupId>
            <artifactId>mysql-connector-java</artifactId>
            <version>8.0.28</version> <!-- 如果是 MySQL 5.7,可改为 5.1.49 -->
        </dependency>


    </dependencies>
    <build>
        <plugins>
            <plugin>
                <groupId>org.apache.maven.plugins</groupId>
                <artifactId>maven-assembly-plugin</artifactId>
                <version>2.4</version>
                <configuration>
                    <appendAssemblyId>false</appendAssemblyId>
                    <descriptorRefs>
                        <!-- 将依赖的jar包中的class文件打进生成的jar包-->
                        <descriptorRef>jar-with-dependencies</descriptorRef>
                    </descriptorRefs>
                </configuration>
                <executions>
                    <execution>
                        <id>make-assembly</id>
                        <phase>package</phase>
                        <goals>
                            <goal>assembly</goal>
                        </goals>
                    </execution>
                </executions>
            </plugin>
        </plugins>
    </build>

</project>
MySqlToHivePartitionDemo.scala
scala
package org.example

import org.apache.hadoop.conf.Configuration
import org.apache.hadoop.security.UserGroupInformation
import org.apache.spark.sql.{SaveMode, SparkSession}
import org.apache.spark.sql.functions.col

object MySqlToHivePartitionDemo {
  def main(args: Array[String]): Unit = {

    // ================= 1. Kerberos 认证 =================
    val krb5ConfPath = "C:\\krb5.conf"
    val keytabPath = "C:\\emr.keytab"
    System.setProperty("java.security.krb5.conf", krb5ConfPath)

    val hadoopConf = new Configuration()
    hadoopConf.set("hadoop.security.authentication", "Kerberos")
    UserGroupInformation.setConfiguration(hadoopConf)
    UserGroupInformation.loginUserFromKeytab("hadoop/tbds-woker1@TBDS-4ZHV0QQN", keytabPath)

    // ================= 2. 构建 SparkSession =================
    val spark = SparkSession.builder()
      .appName("MySqlToHivePartitionDemo")
      .master("local[*]")
      .enableHiveSupport()
      .config("hive.metastore.uris", "thrift://tbds-woker1:7004")
      .config("hive.metastore.sasl.enabled", "true")
      .config("hive.metastore.kerberos.principal", "hadoop/tbds-woker1@TBDS-4ZHV0QQN")
      .config("dfs.client.read.shortcircuit", "false")
      // 【关键补全】解决 Hive aux jars 在 Windows 本地不存在导致的 InputFormat 初始化报错
      .config("hive.aux.jars.path", "")
      // 禁用 Hive 的并发编译,减少本地调试时的元数据连接压力
      .config("hive.driver.parallel.compilation", "false")
      .getOrCreate()

    // ================= 3. 从 MySQL 读取数据 =================
    val jdbcUrl = "jdbc:mysql://10.23.6.109:3307/t0_v2?useSSL=false&serverTimezone=Asia/Shanghai"
    val mysqlUser = "query_user"
    val mysqlPwd = "Boci@1234"
    val part = "20260618"

    val dbtable = "(select id,trade_acc_id,client_id,strategy_opening_date,strategy_begin_trading_date,total_turnover,total_commission," +
      "strategy_market,total_stock_num,strategy_balance,strategy_flag,daily_complete_shares,daily_turnover,week_turnover,month_turnover," +
      "is_trading_in_latest_day,profit_in_latest_day,total_profit from t0_v2.strategy_summary_20260618) AS tmp_orders"

    println("====== 正在从 MySQL 读取数据 ======")
    val mysqlDF = spark.read.format("jdbc")
      .option("url", jdbcUrl)
      .option("dbtable", dbtable)
      .option("user", mysqlUser)
      .option("password", mysqlPwd)
      .option("driver", "com.mysql.cj.jdbc.Driver")
      .option("partitionColumn", "id")
      .option("lowerBound", "1")
      .option("upperBound", "10000")
      .option("numPartitions", "10")
      .load()

    // ================= 4. 数据转换:严格对齐列顺序 =================
    println("====== 正在转换数据并对齐 Hive 表结构 ======")
    // 将 MySQL 读出来的原始 DF 注册为临时视图
    mysqlDF.createOrReplaceTempView("tmp_mysql_raw")

    // 用 SQL 语句完成顺序调整 + 类型 Cast
    val insertSql =
      """
        |SELECT
        |  CAST(id AS BIGINT) AS id,
        |  CAST(client_id AS STRING) AS client_id,
        |  CAST(strategy_opening_date AS BIGINT) AS strategy_opening_date,
        |  CAST(strategy_begin_trading_date AS BIGINT) AS strategy_begin_trading_date,
        |  CAST(total_turnover AS DECIMAL(38,17)) AS total_turnover,
        |  CAST(total_commission AS DECIMAL(38,17)) AS total_commission,
        |  CAST(strategy_market AS DECIMAL(38,17)) AS strategy_market,
        |  CAST(total_stock_num AS BIGINT) AS total_stock_num,
        |  CAST(strategy_balance AS DECIMAL(38,17)) AS strategy_balance,
        |  CAST(strategy_flag AS BIGINT) AS strategy_flag,
        |  CAST(daily_complete_shares AS BIGINT) AS daily_complete_shares,
        |  CAST(daily_turnover AS DECIMAL(38,17)) AS daily_turnover,
        |  CAST(week_turnover AS DECIMAL(38,17)) AS week_turnover,
        |  CAST(month_turnover AS DECIMAL(38,17)) AS month_turnover,
        |  CAST(is_trading_in_latest_day AS BIGINT) AS is_trading_in_latest_day,
        |  CAST(profit_in_latest_day AS DECIMAL(38,17)) AS profit_in_latest_day,
        |  CAST(total_profit AS DECIMAL(38,17)) AS total_profit,
        |  CAST(trade_acc_id AS STRING) AS trade_acc_id
        |FROM tmp_mysql_raw
        |""".stripMargin

    val finalDF = spark.sql(insertSql)

//    // 注意:直写 HDFS 时,DataFrame 中【不需要】包含分区字段 etl_date
//    val hiveColumnOrder = Seq(
//      "id", "client_id", "strategy_opening_date", "strategy_begin_trading_date",
//      "total_turnover", "total_commission", "strategy_market", "total_stock_num",
//      "strategy_balance", "strategy_flag", "daily_complete_shares", "daily_turnover",
//      "week_turnover", "month_turnover", "is_trading_in_latest_day", "profit_in_latest_day",
//      "total_profit", "trade_acc_id"
//    )
//
//    val finalDF = mysqlDF.select(hiveColumnOrder.map(col): _*)

    println("====== 数据预览 ======")
    finalDF.show(5, truncate = false)

    // ================= 5. 直写 HDFS 并刷新元数据 (终极方案) =================
    val targetDatabase = "ods"
    val targetTable = "ods_feitu_t0_v2_strategy_summary_dd"
    val fullTableName = s"$targetDatabase.$targetTable"

    // 从您之前的建表 DDL 中获取的 HDFS 基础路径 (LOCATION)
    val hdfsBasePath = "hdfs://HDFS78000003/usr/hive/warehouse/ods.db/ods_feitu_t0_v2_strategy_summary_dd"
    // 拼接当前分区的 HDFS 绝对路径 (注意:目录名必须严格符合 etl_date=xxx 的格式)
    val partitionPath = s"$hdfsBasePath/etl_date=$part"

    println(s"====== 正在直接写入 HDFS 分区路径: $partitionPath ======")

    // 直接写入 HDFS。
    // 这里的 SaveMode.Overwrite 只会覆盖 partitionPath 这一个目录,绝对不会误删其他分区的数据!
    finalDF.write
      .mode(SaveMode.Overwrite)
      .format("parquet")
      .option("compression", "snappy")
      .save(partitionPath)

    println("====== 刷新 Hive Metastore 元数据 ======")
    // MSCK REPAIR 会扫描 HDFS 目录,自动将新写入的分区注册到 Hive 元数据中
    spark.sql(s"MSCK REPAIR TABLE $fullTableName")

    // ================= 6. 验证写入结果 =================
    println("====== 验证 Hive 表数据及分区 ======")
    // 验证元数据(这个走 Metastore,不会报错)
    spark.sql(s"SHOW PARTITIONS $fullTableName").show()
//    spark.sql(s"SELECT count(1) as cnt, etl_date FROM $fullTableName GROUP BY etl_date").show()
    println("====== 验证 HDFS 实际数据内容 ======")
    // 【本地验证优化】:在 Windows 本地,直接读取 HDFS 上的 Parquet 文件来验证数据。
    // 这样可以完美绕过 Hive MapredParquetInputFormat 在本地缺少辅助 Jar 包导致的报错。
    // (注:当此代码打包提交到集群 YARN 运行时,您可以直接改回 spark.sql("SELECT ... FROM ods.xxx").show())
    spark.read.parquet(partitionPath).show(5, truncate = false)

    // 统计数据条数
    val count = spark.read.parquet(partitionPath).count()
    println(s"====== 成功写入数据条数: $count ======")

    spark.stop()
    println("====== 任务执行完毕 ======")
  }
}
3.3 读取mysql数据并推到hive(集群版)
pom.xml
xml
<?xml version="1.0" encoding="UTF-8"?>
<project xmlns="http://maven.apache.org/POM/4.0.0"
         xmlns:xsi="http://www.w3.org/2001/XMLSchema-instance"
         xsi:schemaLocation="http://maven.apache.org/POM/4.0.0 http://maven.apache.org/xsd/maven-4.0.0.xsd">
    <modelVersion>4.0.0</modelVersion>

    <groupId>org.example</groupId>
    <artifactId>sparkmysqltohive</artifactId>
    <version>1.0-SNAPSHOT</version>


    <properties>
        <!-- 【修改点 1】拆分为两个变量 -->
        <scala.binary.version>2.12</scala.binary.version> <!-- 用于拼接 Spark 依赖后缀 -->
        <scala.version>2.12.17</scala.version>            <!-- 用于 Scala 库的精确版本 (Spark 3.4.x 推荐 2.12.17) -->
        <!--<spark.version>3.3.1</spark.version> -->
        <spark.version>3.4.2</spark.version>
        <hive.version>3.1.3</hive.version>
        <hadoop.version>3.2.2</hadoop.version>
        <slf4j.version>1.7.29</slf4j.version>
        <maven.compiler.source>8</maven.compiler.source>
        <maven.compiler.target>8</maven.compiler.target>
        <project.build.sourceEncoding>UTF-8</project.build.sourceEncoding>
        <project.reporting.outputEncoding>UTF-8</project.reporting.outputEncoding>
        <!--        <scope>compile</scope>-->
        <scope>provided</scope>
    </properties>
    <dependencies>
        <!--spark-->
        <dependency>
            <groupId>org.apache.spark</groupId>
            <artifactId>spark-core_${scala.binary.version}</artifactId>
            <version>${spark.version}</version>
            <scope>${scope}</scope>
        </dependency>
        <dependency>
            <groupId>org.apache.spark</groupId>
            <artifactId>spark-sql_${scala.binary.version}</artifactId>
            <version>${spark.version}</version>
            <scope>${scope}</scope>
        </dependency>
        <dependency>
            <groupId>org.apache.spark</groupId>
            <artifactId>spark-hive_${scala.binary.version}</artifactId>
            <version>${spark.version}</version>
            <scope>${scope}</scope>
        </dependency>

        <!--fastjson-->
        <dependency>
            <groupId>com.alibaba</groupId>
            <artifactId>fastjson</artifactId>
            <version>1.2.75</version>
        </dependency>


        <!--log4j + slf4j-->
        <dependency>
            <groupId>org.slf4j</groupId>
            <artifactId>slf4j-api</artifactId>
            <version>${slf4j.version}</version>
        </dependency>
        <dependency>
            <groupId>org.slf4j</groupId>
            <artifactId>slf4j-log4j12</artifactId>
            <version>${slf4j.version}</version>
        </dependency>
        <dependency>
            <groupId>log4j</groupId>
            <artifactId>log4j</artifactId>
            <version>1.2.17</version>
        </dependency>
        <!-- MySQL JDBC 驱动 -->
        <dependency>
            <groupId>mysql</groupId>
            <artifactId>mysql-connector-java</artifactId>
            <version>8.0.28</version> <!-- 如果是 MySQL 5.7,可改为 5.1.49 -->
        </dependency>


    </dependencies>
    <build>
        <plugins>
            <!-- 【关键新增】1. Scala 编译插件:没有它,.scala 文件不会被编译! -->
            <plugin>
                <groupId>net.alchim31.maven</groupId>
                <artifactId>scala-maven-plugin</artifactId>
                <version>4.8.1</version>
                <executions>
                    <execution>
                        <goals>
                            <goal>compile</goal>
                            <goal>testCompile</goal>
                        </goals>
                    </execution>
                </executions>
            </plugin>
            <plugin>
                <groupId>org.apache.maven.plugins</groupId>
                <artifactId>maven-assembly-plugin</artifactId>
                <version>2.4</version>
                <configuration>
                    <appendAssemblyId>false</appendAssemblyId>
                    <descriptorRefs>
                        <!-- 将依赖的jar包中的class文件打进生成的jar包-->
                        <descriptorRef>jar-with-dependencies</descriptorRef>
                    </descriptorRefs>
                </configuration>
                <executions>
                    <execution>
                        <id>make-assembly</id>
                        <phase>package</phase>
                        <goals>
                            <goal>assembly</goal>
                        </goals>
                    </execution>
                </executions>
            </plugin>
        </plugins>
        <resources>
            <resource>
                <directory>src/main/resources</directory>
                <filtering>false</filtering>
                <includes>
                    <!-- 只打包你真正需要的文件,比如某些 sql 脚本或 properties -->
                    <include>**/*.properties</include>
                </includes>
                <excludes>
                    <!-- 【关键】排除本地调试用的 Hadoop/Hive/Kerberos 配置 -->
                    <exclude>**/*.xml</exclude>
                    <exclude>**/*.keytab</exclude>
                    <exclude>**/krb5.conf</exclude>
                    <exclude>**/log4j*.properties</exclude>
                </excludes>
            </resource>
        </resources>
    </build>

</project>
MySqlToHivePartitionTable.scala
scala
package org.example

import org.apache.spark.sql.{SaveMode, SparkSession}
import org.apache.spark.sql.functions.{col, trim}

object MySqlToHivePartitionTable {
  def main(args: Array[String]): Unit = {

    // ================= 0. 解析命令行参数 =================
    val argsMap = args.filter(_.contains("=")).map { arg =>
      val kv = arg.split("=", 2)
      kv(0) -> kv(1)
    }.toMap

    val mysqlHost = argsMap.getOrElse("mysql_host", throw new IllegalArgumentException("缺少必要参数: mysql_host"))
    val mysqlPort = argsMap.getOrElse("mysql_port", throw new IllegalArgumentException("缺少必要参数: mysql_port"))
    val mysqlUser = argsMap.getOrElse("mysql_user", throw new IllegalArgumentException("缺少必要参数: mysql_user"))
    val mysqlPwd  = argsMap.getOrElse("mysql_pwd", throw new IllegalArgumentException("缺少必要参数: mysql_pwd"))
    val part      = argsMap.getOrElse("part", throw new IllegalArgumentException("缺少必要参数: part"))

    val hdfsPartitionPathArg = argsMap.getOrElse("hdfs_partition_path", "")
    val hiveTableName = argsMap.getOrElse("hive_table_name", "ods.ods_feitu_t0_v2_strategy_summary_dd")

    println(s"====== 运行参数: host=$mysqlHost, port=$mysqlPort, user=$mysqlUser, part=$part ======")

    // ================= 1. 构建 SparkSession =================
    val spark = SparkSession.builder()
      .appName("MySqlToHivePartitionTable")
      .enableHiveSupport()
      // 解决 Kyuubi/Ranger 扩展类缺失问题(若集群无此要求可去掉)
      .config("spark.sql.extensions", "")
      .config("spark.kyuubi.auth.enabled", "false")
      // 强制指定 Hive 本地临时目录,避免权限问题
      .config("hive.downloaded.resources.dir", "/tmp/hive_session_tmp")
      .config("hive.exec.local.scratchdir", "/tmp/hive_scratch")
      .getOrCreate()

    // ================= 2. 确定最终的 HDFS 分区路径 =================
    var finalHdfsPartitionPath = hdfsPartitionPathArg

    if (finalHdfsPartitionPath.isEmpty) {
      println(s"====== 未传入 hdfs_partition_path,正在从 Hive 元数据自动获取表路径并拼接分区 ======")
      try {
        val descDF = spark.sql(s"DESCRIBE FORMATTED $hiveTableName")
        val locationArray = descDF.filter(trim(col("col_name")) === "Location").select("data_type").take(1)

        if (locationArray.nonEmpty) {
          val hdfsBasePath = locationArray(0).getString(0).trim
          finalHdfsPartitionPath = s"$hdfsBasePath/etl_date=$part"
          println(s"====== 成功自动推断 HDFS 分区路径: $finalHdfsPartitionPath ======")
        } else {
          throw new RuntimeException("无法从 DESCRIBE FORMATTED 结果中找到 Location 字段")
        }
      } catch {
        case e: Exception =>
          throw new RuntimeException(s"自动获取表路径失败,请检查表 [$hiveTableName] 是否存在。错误: ${e.getMessage}", e)
      }
    } else {
      println(s"====== 使用外部传入的完整 HDFS 分区路径: $finalHdfsPartitionPath ======")
    }

    // ================= 3. 提前获取 Hive 表结构 (核心优化点) =================
    println(s"====== 正在读取 Hive 表 [$hiveTableName] 结构 ======")
    // 获取非分区字段
    val hiveColumns = spark.catalog.listColumns(hiveTableName).collect().filter(!_.isPartition)

    // ================= 4. 从 MySQL 精准读取数据 (只查需要的字段) =================
    val jdbcUrl = s"jdbc:mysql://$mysqlHost:$mysqlPort/t0_v2?useSSL=false&serverTimezone=Asia/Shanghai"

    // 【性能优化】动态拼接 MySQL 的 SELECT 字段,避免 select * 拉取无用数据浪费网络 IO
    val mysqlSelectCols = hiveColumns.map(c => s"`${c.name}`").mkString(", ")
    val dbtable = s"(select $mysqlSelectCols from t0_v2.strategy_summary_$part) AS tmp_orders"

    println(s"====== 正在从 MySQL 精准读取数据,查询字段: $mysqlSelectCols ======")
    val mysqlDF = spark.read.format("jdbc")
      .option("url", jdbcUrl)
      .option("dbtable", dbtable)
      .option("user", mysqlUser)
      .option("password", mysqlPwd)
      .option("driver", "com.mysql.cj.jdbc.Driver")
      .option("partitionColumn", "id")
      .option("lowerBound", "1")
      .option("upperBound", "10000")
      .option("numPartitions", "10")
      .load()

    mysqlDF.createOrReplaceTempView("tmp_mysql_raw")

    // ================= 5. 动态生成类型转换 SQL =================
    println("====== 正在动态生成类型对齐 SQL ======")
    val selectExprs = hiveColumns.map { colMeta =>
      val colName = colMeta.name
      val colType = colMeta.dataType
      s"CAST(`$colName` AS $colType) AS `$colName`"
    }

    val insertSql =
      s"""
         |SELECT
         |  ${selectExprs.mkString(",\n  ")}
         |FROM tmp_mysql_raw
         |""".stripMargin

    val finalDF = spark.sql(insertSql)

    println("====== 数据预览 ======")
    finalDF.show(5, truncate = false)

    // ================= 6. 直写 HDFS 并刷新元数据 =================
    println(s"====== 正在直接写入 HDFS 分区路径: $finalHdfsPartitionPath ======")
    finalDF.write
      .mode(SaveMode.Overwrite)
      .format("parquet")
      .option("compression", "snappy")
      .save(finalHdfsPartitionPath)

    println(s"====== 刷新 Hive Metastore 元数据: $hiveTableName ======")
    spark.sql(s"MSCK REPAIR TABLE $hiveTableName")

    // ================= 7. 验证写入结果 =================
    println("====== 验证 Hive 表数据及分区 ======")
    spark.sql(s"SHOW PARTITIONS $hiveTableName").show()

    println("====== 验证 HDFS 实际数据内容 ======")
    spark.read.parquet(finalHdfsPartitionPath).show(5, truncate = false)

    val count = spark.read.parquet(finalHdfsPartitionPath).count()
    println(s"====== 成功写入数据条数: $count ======")

    spark.stop()
    println("====== 任务执行完毕 ======")
  }
}
3.4 读取mysql数据并推到hive,且字段动态映射(集群版)
scala
package org.example

//import org.apache.hadoop.conf.Configuration
//import org.apache.hadoop.security.UserGroupInformation
import org.apache.spark.sql.{SaveMode, SparkSession}
import org.apache.spark.sql.functions.{col, trim}

object ods_feitu_t0_v2_account_symbol_stats_dd {
  def main(args: Array[String]): Unit = {
    // ================= 1. Kerberos 认证 =================
//    val krb5ConfPath = "C:\\krb5.conf"
//    val keytabPath = "C:\\emr.keytab"
//    System.setProperty("java.security.krb5.conf", krb5ConfPath)
//
//    val hadoopConf = new Configuration()
//    hadoopConf.set("hadoop.security.authentication", "Kerberos")
//    UserGroupInformation.setConfiguration(hadoopConf)
//    UserGroupInformation.loginUserFromKeytab("hadoop/tbds-woker1@TBDS-4ZHV0QQN", keytabPath)

    // ================= 0. 解析命令行参数 =================
    val argsMap = args.filter(_.contains("=")).map { arg =>
      val kv = arg.split("=", 2)
      kv(0) -> kv(1)
    }.toMap

    val mysqlHost = argsMap.getOrElse("mysql_host", throw new IllegalArgumentException("缺少必要参数: mysql_host"))
    val mysqlPort = argsMap.getOrElse("mysql_port", throw new IllegalArgumentException("缺少必要参数: mysql_port"))
    val mysqlUser = argsMap.getOrElse("mysql_user", throw new IllegalArgumentException("缺少必要参数: mysql_user"))
    val mysqlPwd  = argsMap.getOrElse("mysql_pwd", throw new IllegalArgumentException("缺少必要参数: mysql_pwd"))
    val part      = argsMap.getOrElse("part", throw new IllegalArgumentException("缺少必要参数: part"))

    val hdfsPartitionPathArg = argsMap.getOrElse("hdfs_partition_path", "")
    val hiveTableName = argsMap.getOrElse("hive_table_name", "ods.ods_feitu_t0_v2_account_symbol_stats_dd")

    println(s"====== 运行参数: host=$mysqlHost, port=$mysqlPort, user=$mysqlUser, part=$part ======")

    // ================= 1. 构建 SparkSession =================
//    val spark = SparkSession.builder()
//      .appName("ods_feitu_t0_v2_account_symbol_stats_dd")
//      .master("local[*]")
//      .enableHiveSupport()
//      .config("hive.metastore.uris", "thrift://tbds-woker1:7004")
//      .config("hive.metastore.sasl.enabled", "true")
//      .config("hive.metastore.kerberos.principal", "hadoop/tbds-woker1@TBDS-4ZHV0QQN")
//      .config("dfs.client.read.shortcircuit", "false")
//      .config("hive.aux.jars.path", "")
//      .config("hive.driver.parallel.compilation", "false")
//      .getOrCreate()
    val spark = SparkSession.builder()
      .appName("ods_feitu_t0_v2_account_symbol_stats_dd")
      .enableHiveSupport()
      // 解决 Kyuubi/Ranger 扩展类缺失问题(若集群无此要求可去掉)
      .config("spark.sql.extensions", "")
      .config("spark.kyuubi.auth.enabled", "false")
      // 强制指定 Hive 本地临时目录,避免权限问题,加上 user.name 避免 YARN 多用户/多任务并发时的权限冲突 (Permission denied)
      .config("hive.downloaded.resources.dir", s"/tmp/hive_session_tmp_${System.getProperty("user.name")}")
      .config("hive.exec.local.scratchdir", s"/tmp/hive_scratch_${System.getProperty("user.name")}")
      .getOrCreate()

    // ================= 2. 确定最终的 HDFS 分区路径 =================
    var finalHdfsPartitionPath = hdfsPartitionPathArg

    if (finalHdfsPartitionPath.isEmpty) {
      println(s"====== 未传入 hdfs_partition_path,正在从 Hive 元数据自动获取表路径并拼接分区 ======")
      try {
        val descDF = spark.sql(s"DESCRIBE FORMATTED $hiveTableName")
        val locationArray = descDF.filter(trim(col("col_name")) === "Location").select("data_type").take(1)

        if (locationArray.nonEmpty) {
          val hdfsBasePath = locationArray(0).getString(0).trim
          finalHdfsPartitionPath = s"$hdfsBasePath/etl_date=$part"
          println(s"====== 成功自动推断 HDFS 分区路径: $finalHdfsPartitionPath ======")
        } else {
          throw new RuntimeException("无法从 DESCRIBE FORMATTED 结果中找到 Location 字段")
        }
      } catch {
        case e: Exception =>
          throw new RuntimeException(s"自动获取表路径失败,请检查表 [$hiveTableName] 是否存在。错误: ${e.getMessage}", e)
      }
    } else {
      println(s"====== 使用外部传入的完整 HDFS 分区路径: $finalHdfsPartitionPath ======")
    }

    // ================= 3. 提前获取 Hive 表结构 (核心优化点) =================
    println(s"====== 正在读取 Hive 表 [$hiveTableName] 结构 ======")
    // 获取非分区字段(以 Hive 结构为绝对基准)
    val hiveColumns = spark.catalog.listColumns(hiveTableName).collect().filter(!_.isPartition)
    val hiveColumnNames = hiveColumns.map(_.name.toLowerCase).toSet

    // ================= 4. 从 MySQL 精准读取数据 (字段动态对齐) =================
    val jdbcUrl = s"jdbc:mysql://$mysqlHost:$mysqlPort/t0_v2?useSSL=false&serverTimezone=Asia/Shanghai"

    // 【新增优化】零成本获取 MySQL 表结构(WHERE 1=0 保证不传输实际数据,只拿 Schema)
    println(s"====== 正在获取 MySQL 表结构以进行字段比对 ======")
    val mysqlSchemaDF = spark.read.format("jdbc")
      .option("url", jdbcUrl)
      .option("dbtable", s"(SELECT * FROM t0_v2.account_symbol_stats_$part WHERE 1=0) AS tmp_schema")
      .option("user", mysqlUser)
      .option("password", mysqlPwd)
      .option("driver", "com.mysql.cj.jdbc.Driver")
      .load()

    val mysqlColumnNames = mysqlSchemaDF.schema.fieldNames.map(_.toLowerCase).toSet

    // 【新增优化】比对字段差异并打印日志,方便排查问题
    val missingInMysql = hiveColumnNames.diff(mysqlColumnNames)
    val extraInMysql = mysqlColumnNames.diff(hiveColumnNames)

    if (missingInMysql.nonEmpty) {
      println(s"====== [警告] Hive 有但 MySQL 没有的字段(将自动补 NULL): ${missingInMysql.mkString(", ")} ======")
    }
    if (extraInMysql.nonEmpty) {
      println(s"====== [提示] MySQL 有但 Hive 没有的字段(将自动丢弃以节省 IO): ${extraInMysql.mkString(", ")} ======")
    }

    // 【性能优化】动态拼接 MySQL 的 SELECT 字段
    val mysqlSelectExprs = hiveColumns.map { colMeta =>
      val colName = colMeta.name
      // 忽略大小写判断 MySQL 是否包含该字段
      if (mysqlColumnNames.contains(colName.toLowerCase)) {
        s"`${colName}`"
      } else {
        // MySQL 中不存在该字段,补 NULL 并起别名
        s"NULL AS `${colName}`"
      }
    }
    val mysqlSelectCols = mysqlSelectExprs.mkString(", ")

    val dbtable = s"(SELECT $mysqlSelectCols FROM t0_v2.account_symbol_stats_$part) AS tmp_orders"

    println(s"====== 正在从 MySQL 精准读取数据,查询字段: $mysqlSelectCols ======")
    val mysqlDF = spark.read.format("jdbc")
      .option("url", jdbcUrl)
      .option("dbtable", dbtable)
      .option("user", mysqlUser)
      .option("password", mysqlPwd)
      .option("driver", "com.mysql.cj.jdbc.Driver")
      .option("partitionColumn", "id")
      .option("lowerBound", "1")
      .option("upperBound", "10000")
      //upperBound如果设置太小(如10000),当实际id达到百万时,Spark会把1~10000均分给9个分区,而把10001~1000000的全部数据全部塞给最后1个分区,导致严重的数据倾斜和OOM。建议设置一个较大的值或去掉
//      .option("upperBound", "1000000")
      .option("numPartitions", "10")
      // 【优化】集群网络带宽大,增加 fetchsize 可大幅减少与 MySQL 的网络交互次数,提升读取速度
      .option("fetchsize", "2000")
      .load()

    mysqlDF.createOrReplaceTempView("tmp_mysql_raw")

    // ================= 5. 动态生成类型转换 SQL =================
    println("====== 正在动态生成类型对齐 SQL ======")
    val selectExprs = hiveColumns.map { colMeta =>
      val colName = colMeta.name
      val colType = colMeta.dataType
      // 将 MySQL 查出来的字段(包含补的 NULL)强制转换为 Hive 定义的类型
      s"CAST(`$colName` AS $colType) AS `$colName`"
    }

    val insertSql =
      s"""
         |SELECT
         |  ${selectExprs.mkString(",\n  ")}
         |FROM tmp_mysql_raw
         |""".stripMargin

    val finalDF = spark.sql(insertSql)

    println("====== 数据预览 ======")
    finalDF.show(5, truncate = false)

    // ================= 6. 直写 HDFS 并刷新元数据 =================
    println(s"====== 正在直接写入 HDFS 分区路径: $finalHdfsPartitionPath ======")
    finalDF.write
      .mode(SaveMode.Overwrite)
      .format("parquet")
      .option("compression", "snappy")
      .save(finalHdfsPartitionPath)

    println(s"====== 刷新 Hive Metastore 元数据: $hiveTableName ======")
    spark.sql(s"MSCK REPAIR TABLE $hiveTableName")

    // ================= 7. 验证写入结果 =================
    println("====== 验证 Hive 表数据及分区 ======")
    spark.sql(s"SHOW PARTITIONS $hiveTableName").show()

    println("====== 验证 HDFS 实际数据内容 ======")
    spark.read.parquet(finalHdfsPartitionPath).show(5, truncate = false)

    val count = spark.read.parquet(finalHdfsPartitionPath).count()
    println(s"====== 成功写入数据条数: $count ======")

    spark.stop()
    println("====== 任务执行完毕 ======")
  }
}