Ultralytics:解读MLP模块
前言
- 由于本人水平有限,难免出现错漏,敬请批评改正。
- 更多精彩内容,可点击进入Python日常小操作专栏、OpenCV-Python小应用专栏、YOLO系列专栏、自然语言处理专栏、人工智能混合编程实践专栏或我的个人主页查看
- YOLOs-CPP:一个免费开源的YOLO全系列C++推理库(以YOLO26为例)
- PaddleOCR:Win10上安装使用PPOCRLabel标注工具
- 目标检测:使用自己的数据集微调DEIMv2进行物体检测
- 图像分割:PyTorch从零开始实现SegFormer语义分割
- 图像超分:使用自己的数据集微调Real-ESRGAN-x4plus进行超分重建
- 图像生成:PyTorch从零开始实现一个简单的扩散模型
- Stable Diffusion:使用自己的数据集微调 Stable Diffusion 3.5 LoRA 文生图模型
- 图像超分:使用自己的数据集微调Real-ESRGAN-x2plus进行超分重建
- Anomalib:使用Anomalib 2.1.0训练自己的数据集进行异常检测
- Anomalib:在Linux服务器上安装使用Anomalib 2.1.0
- 人工智能混合编程实践:C++调用封装好的DLL进行异常检测推理
- 人工智能混合编程实践:C++调用封装好的DLL进行FP16图像超分重建(v3.0)
- 隔离系统Python:源码编译3.11.8到自定义目录(含PGO性能优化)
- 在线机的Python环境迁移到离线机上
- Nuitka 将 Python 脚本封装为 .pyd 或 .so 文件
- Ultralytics:使用 YOLO11 进行速度估计
- Ultralytics:使用 YOLO11 进行物体追踪
- Ultralytics:使用 YOLO11 进行物体计数
- Ultralytics:使用 YOLO11 进行目标打码
- 人工智能混合编程实践:C++调用Python ONNX进行YOLOv8推理
- 人工智能混合编程实践:C++调用封装好的DLL进行YOLOv8实例分割
- 人工智能混合编程实践:C++调用Python ONNX进行图像超分重建
- 人工智能混合编程实践:C++调用Python AgentOCR进行文本识别
- 通过计算实例简单地理解PatchCore异常检测
- Python将YOLO格式实例分割数据集转换为COCO格式实例分割数据集
- YOLOv8 Ultralytics:使用Ultralytics框架训练RT-DETR实时目标检测模型
- 基于DETR的人脸伪装检测
- YOLOv7训练自己的数据集(口罩检测)
- YOLOv8训练自己的数据集(足球检测)
- YOLOv5:TensorRT加速YOLOv5模型推理
- YOLOv5:IoU、GIoU、DIoU、CIoU、EIoU
- 玩转Jetson Nano(五):TensorRT加速YOLOv5目标检测
- YOLOv5:添加SE、CBAM、CoordAtt、ECA注意力机制
- YOLOv5:yolov5s.yaml配置文件解读、增加小目标检测层
- Python将COCO格式实例分割数据集转换为YOLO格式实例分割数据集
- YOLOv5:使用7.0版本训练自己的实例分割模型(车辆、行人、路标、车道线等实例分割)
- 使用Kaggle GPU资源免费体验Stable Diffusion开源项目
- Stable Diffusion:在服务器上部署使用Stable Diffusion WebUI进行AI绘图(v2.0)
- Stable Diffusion:使用自己的数据集微调训练LoRA模型(v2.0)
相关介绍
Ultralytics 简介
Ultralytics 基于多年的计算机视觉和人工智能基础研究,创建了最先进的 (SOTA) YOLO 模型。我们的模型不断更新性能和灵活性,快速、准确且易于使用。他们擅长对象检测、跟踪、实例分割、语义分割、图像分类和姿势估计任务。
前提条件
- 熟悉Python、Pytorch
实验环境
bash
Package                  Version
------------------------ ------------
Python                   3.11.8
absl-py                  2.4.0
accelerate               1.13.0
annotated-doc            0.0.4
anyio                    4.13.0
calflops                 0.3.2
certifi                  2026.4.22
charset-normalizer       3.4.7
click                    8.3.3
colorama                 0.4.6
contourpy                1.3.3
cycler                   0.12.1
filelock                 3.29.0
flatbuffers              25.12.19
fonttools                4.62.1
fsspec                   2026.4.0
grpcio                   1.80.0
h11                      0.16.0
hf-xet                   1.5.0
httpcore                 1.0.9
httpx                    0.28.1
huggingface_hub          1.14.0
idna                     3.15
Jinja2                   3.1.6
kiwisolver               1.5.0
Markdown                 3.10.2
markdown-it-py           4.2.0
MarkupSafe               3.0.3
matplotlib               3.10.9
mdurl                    0.1.2
ml_dtypes                0.5.0
mpmath                   1.3.0
networkx                 3.6.1
numpy                    1.26.4
nvidia-cublas-cu12       12.8.3.14
nvidia-cuda-cupti-cu12   12.8.57
nvidia-cuda-nvrtc-cu12   12.8.61
nvidia-cuda-runtime-cu12 12.8.57
nvidia-cudnn-cu12        9.7.1.26
nvidia-cufft-cu12        11.3.3.41
nvidia-cufile-cu12       1.13.0.11
nvidia-curand-cu12       10.3.9.55
nvidia-cusolver-cu12     11.7.2.55
nvidia-cusparse-cu12     12.5.7.53
nvidia-cusparselt-cu12   0.6.3
nvidia-nccl-cu12         2.26.2
nvidia-nvjitlink-cu12    12.8.61
nvidia-nvtx-cu12         12.8.55
onnx                     1.19.0
onnxruntime-gpu          1.26.0
onnxslim                 0.1.94
opencv-python            4.6.0.66
packaging                26.2
pillow                   12.2.0
pip                      24.0
polars                   1.40.1
polars-runtime-32        1.40.1
protobuf                 7.34.1
psutil                   7.2.2
pycocotools              2.0.11
Pygments                 2.20.0
pyparsing                3.3.2
python-dateutil          2.9.0.post0
PyYAML                   6.0.3
regex                    2026.5.9
requests                 2.34.1
rich                     15.0.0
safetensors              0.7.0
scipy                    1.16.0
setuptools               65.5.0
shellingham              1.5.4
six                      1.17.0
sympy                    1.14.0
tabulate                 0.10.0
tensorboard              2.20.0
tensorboard-data-server  0.7.2
tokenizers               0.22.2
torch                    2.7.1+cu128
torchaudio               2.7.1+cu128
torchvision              0.22.1+cu128
tqdm                     4.67.3
transformers             5.8.1
triton                   3.3.1
typer                    0.25.1
typing_extensions        4.15.0
ultralytics              8.4.58
ultralytics-thop         2.0.19
urllib3                  2.7.0
Werkzeug                 3.1.8
MLP(多层感知机)
MLP 是一个通用的 多层感知机 (Multi-Layer Perceptron)模块,它由多个线性层(全连接层)堆叠而成,中间穿插激活函数,并支持 残差连接 、输出归一化 和 Sigmoid 输出激活 等高级特性。在 Transformer 架构中,它常作为 前馈网络(FFN) 使用,是模型非线性能力的核心来源。
代码实现
python
import cv2
import math
import torch
import numpy as np
import matplotlib.pyplot as plt
from torch import nn

class MLP(nn.Module):
    """A simple multi-layer perceptron (also called FFN).

    This class implements a configurable MLP with multiple linear layers, activation functions, and optional sigmoid
    output activation.

    Attributes:
        num_layers (int): Number of layers in the MLP.
        layers (nn.ModuleList): List of linear layers.
        sigmoid (bool): Whether to apply sigmoid to the output.
        act (nn.Module): Activation function.
    """

    def __init__(
        self,
        input_dim: int,
        hidden_dim: int,
        output_dim: int,
        num_layers: int,
        act=nn.ReLU,
        sigmoid: bool = False,
        residual: bool = False,
        out_norm: nn.Module = None,
    ):
        """Initialize the MLP with specified input, hidden, output dimensions and number of layers.

        Args:
            input_dim (int): Input dimension.
            hidden_dim (int): Hidden dimension.
            output_dim (int): Output dimension.
            num_layers (int): Number of layers.
            act (type): Activation function class.
            sigmoid (bool): Whether to apply sigmoid to the output.
            residual (bool): Whether to use residual connections.
            out_norm (nn.Module, optional): Normalization layer for the output.
        """
        super().__init__()
        self.num_layers = num_layers
        h = [hidden_dim] * (num_layers - 1)
        self.layers = nn.ModuleList(nn.Linear(n, k) for n, k in zip([input_dim, *h], [*h, output_dim]))
        self.sigmoid = sigmoid
        self.act = act()
        if residual and input_dim != output_dim:
            raise ValueError("residual is only supported if input_dim == output_dim")
        self.residual = residual
        # whether to apply a normalization layer to the output
        assert isinstance(out_norm, nn.Module) or out_norm is None
        self.out_norm = out_norm or nn.Identity()

    def forward(self, x: torch.Tensor) -> torch.Tensor:
        """Forward pass for the entire MLP.

        Args:
            x (torch.Tensor): Input tensor.

        Returns:
            (torch.Tensor): Output tensor after MLP.
        """
        orig_x = x
        for i, layer in enumerate(self.layers):
            x = getattr(self, "act", nn.ReLU())(layer(x)) if i < self.num_layers - 1 else layer(x)
        if getattr(self, "residual", False):
            x = x + orig_x
        x = getattr(self, "out_norm", nn.Identity())(x)
        return x.sigmoid() if getattr(self, "sigmoid", False) else x
功能
- 通用前馈网络 :支持任意层数(
num_layers),每层隐藏维度可配置(所有隐藏层维度相同,为hidden_dim)。 - 灵活性 :
- 可选的 残差连接(仅当输入输出维度相等时可用)。
- 可选的 输出归一化层 (如
LayerNorm、BatchNorm1d等)。 - 可选的 Sigmoid 输出激活(用于二分类或生成概率)。
- 标准流程:除最后一层外,每层均使用激活函数;最后一层无激活。
初始化参数
| 参数 | 类型 | 说明 |
|---|---|---|
input_dim |
int | 输入特征维度 |
hidden_dim |
int | 隐藏层维度(所有隐藏层统一) |
output_dim |
int | 输出特征维度 |
num_layers |
int | 总层数(包括输入→隐藏、隐藏→隐藏、隐藏→输出) |
act |
type | 激活函数类(默认 nn.ReLU),在内部实例化 |
sigmoid |
bool | 是否在输出后应用 Sigmoid(默认 False) |
residual |
bool | 是否使用残差连接(仅当 input_dim == output_dim 时有效) |
out_norm |
nn.Module 或 None | 输出后的归一化层(默认 None,即 Identity) |
注意 :当
residual=True时,必须满足input_dim == output_dim,否则抛出ValueError。
前向方法
forward(x):输入x(形状任意,但最后一维必须为input_dim),输出形状与输入相同,但最后一维变为output_dim(若input_dim == output_dim且启用残差,则形状不变)。
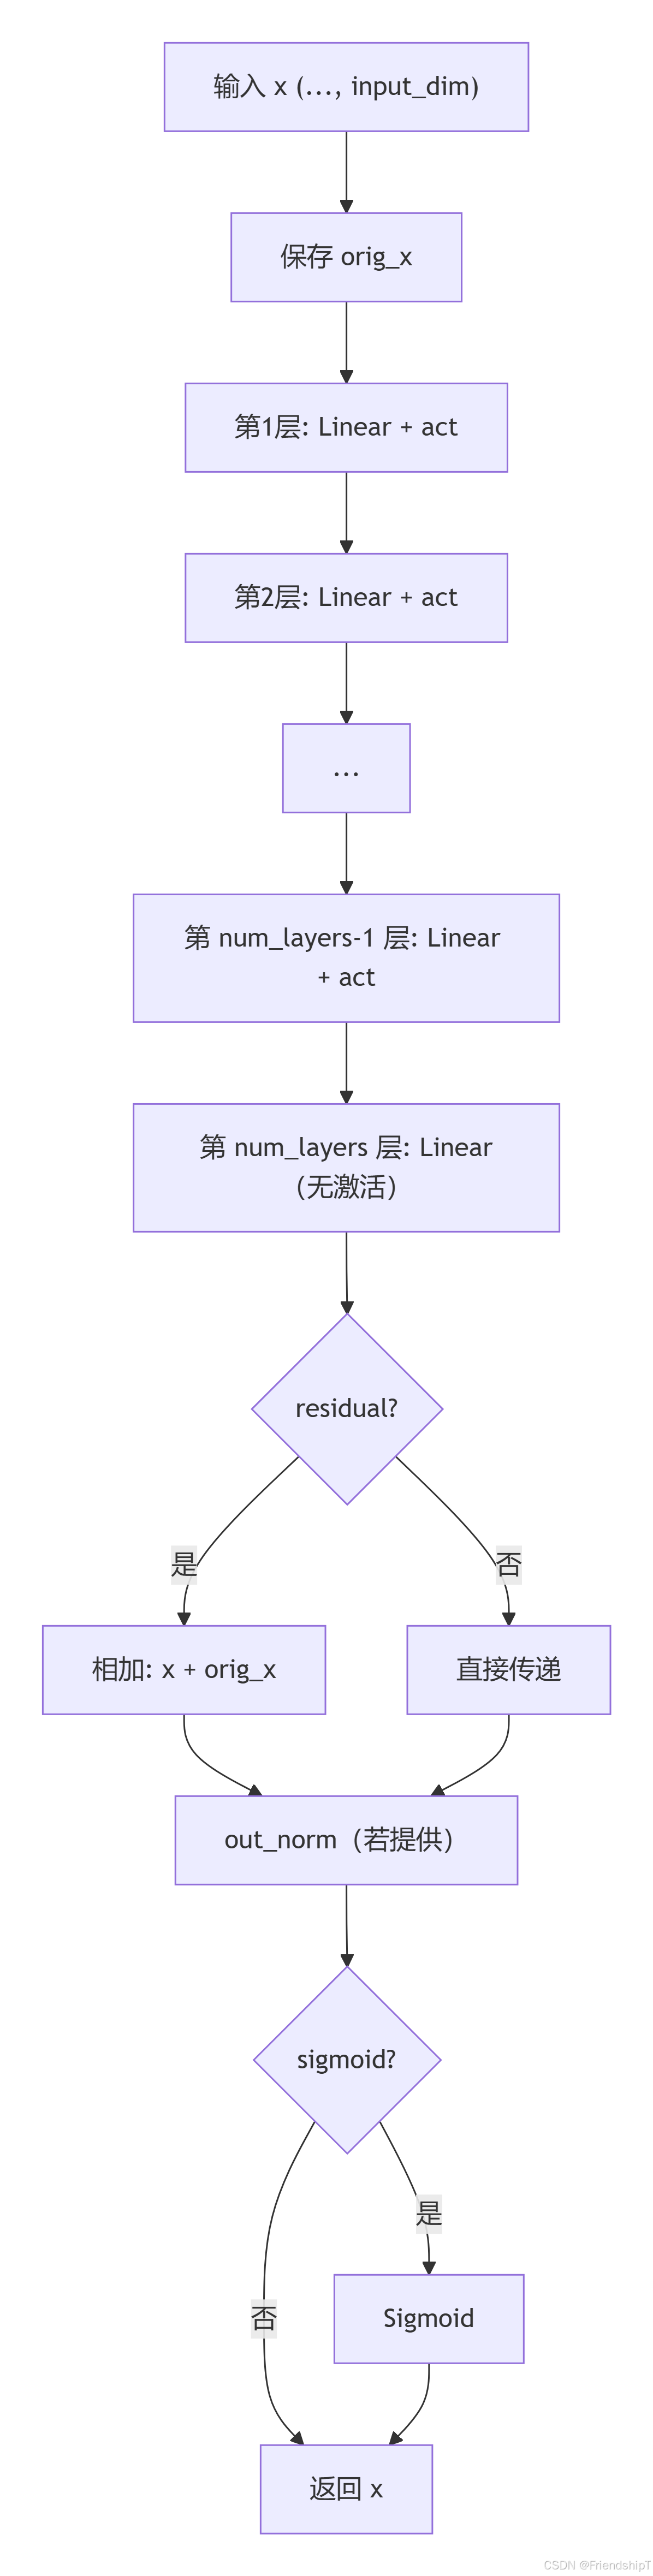
计算流程:
- 保存原始输入
orig_x = x(用于残差)。 - 遍历所有线性层(
self.layers):- 对于前
num_layers-1层:线性变换后应用激活函数act。 - 对于最后一层:仅线性变换(无激活)。
- 对于前
- 若启用残差(
residual=True),则x = x + orig_x。 - 若有输出归一化层,则应用
out_norm。 - 若有
sigmoid=True,则应用sigmoid(),否则直接返回x。
使用示例

python
if __name__ == '__main__':
    # 1. 基础用法:3层 MLP(输入→隐藏→隐藏→输出)
    mlp = MLP(input_dim=128, hidden_dim=256, output_dim=64, num_layers=3, act=nn.GELU)
    x = torch.randn(4, 10, 128)  # (batch, seq, dim)
    with torch.no_grad():
        out = mlp(x)
    print("输入形状:", x.shape)   # [4, 10, 128]
    print("输出形状:", out.shape) # [4, 10, 64]

    # 2. 使用残差和输出归一化
    mlp_res = MLP(input_dim=128, hidden_dim=256, output_dim=128, num_layers=2,
                  act=nn.ReLU, residual=True, out_norm=nn.LayerNorm(128))
    with torch.no_grad():
        out_res = mlp_res(x)  # x 形状 [4,10,128]
    print("残差+Norm输出形状:", out_res.shape)  # [4,10,128]

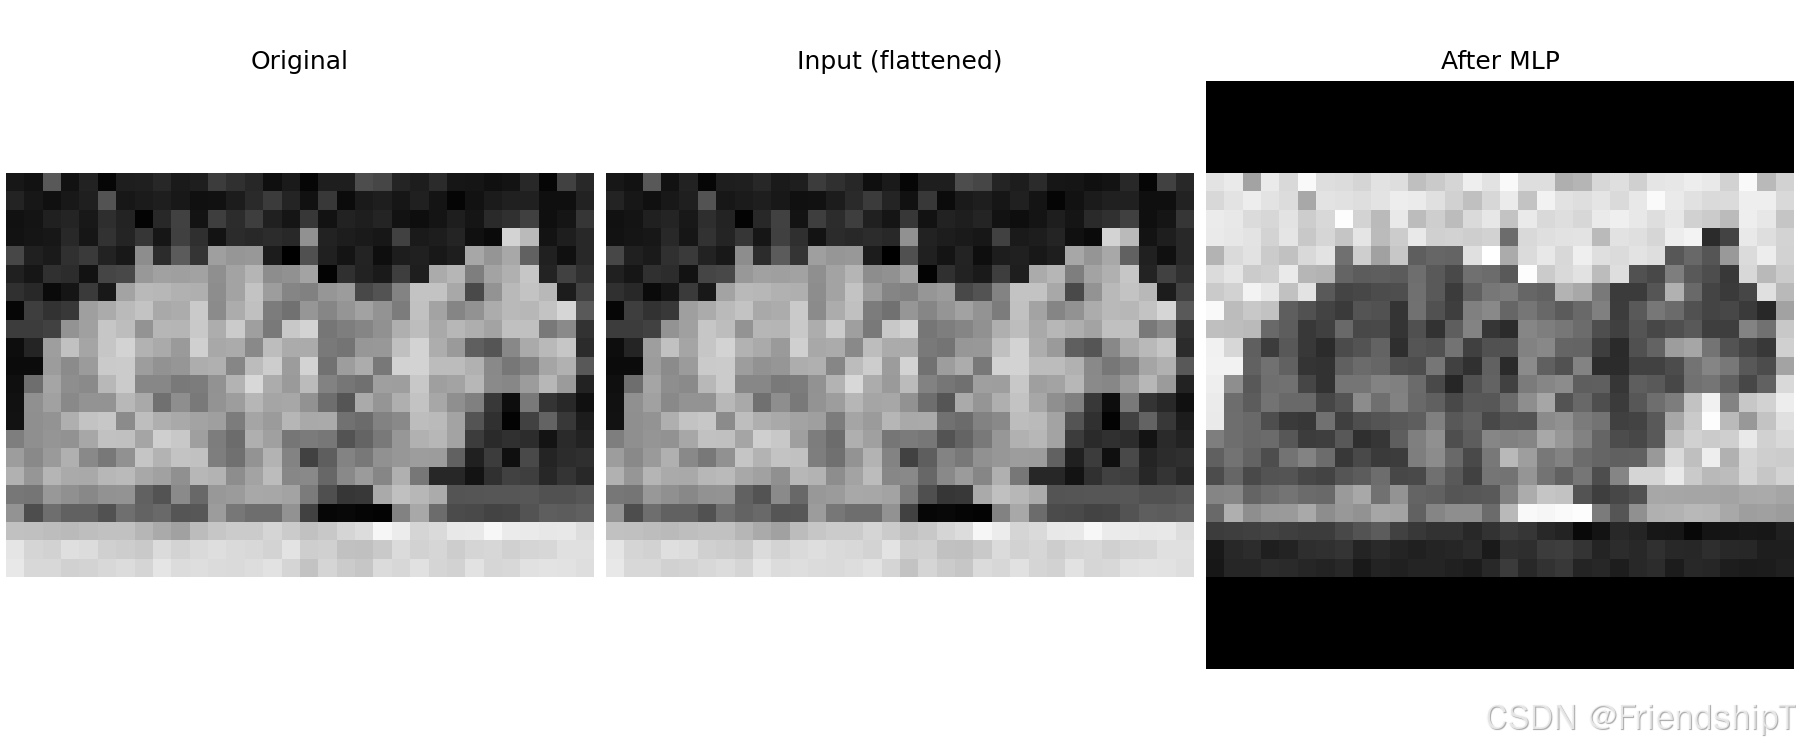
    # 3. 图像演示:将灰度图展平后通过 MLP
    img_path = "cat_640x640.png"
    img_bgr = cv2.imread(img_path)
    if img_bgr is not None:
        img_gray = cv2.cvtColor(cv2.resize(img_bgr, (32, 32)), cv2.COLOR_BGR2GRAY)
        img_tensor = torch.from_numpy(img_gray).float().unsqueeze(0).unsqueeze(0)  # [1,1,32,32]
        seq = img_tensor.flatten(2).permute(0, 2, 1)  # [1, 1024, 1]
        # 构造一个简单 MLP:1 -> 128 -> 128 -> 1
        mlp_img = MLP(input_dim=1, hidden_dim=128, output_dim=1, num_layers=3, act=nn.ReLU)
        with torch.no_grad():
            out_seq = mlp_img(seq)  # [1, 1024, 1]
        out_img = out_seq[0, :, 0].reshape(32, 32).cpu().numpy()
        inp_img = seq[0, :, 0].reshape(32, 32).cpu().numpy()
        # 归一化显示
        def norm(arr):
            return (arr - arr.min()) / (arr.max() - arr.min() + 1e-8)
        plt.figure(figsize=(12, 5), constrained_layout=True)
        plt.subplot(1, 3, 1)
        plt.imshow(img_gray, cmap='gray')
        plt.title("Original")
        plt.axis("off")
        plt.subplot(1, 3, 2)
        plt.imshow(norm(inp_img), cmap='gray')
        plt.title("Input (flattened)")
        plt.axis("off")
        plt.subplot(1, 3, 3)
        plt.imshow(norm(out_img), cmap='gray')
        plt.title("After MLP")
        plt.axis("off")
        plt.savefig("mlp_demo.png", dpi=150)
print("可视化已保存为 mlp_demo.png")输出示例:
输入形状: torch.Size([4, 10, 128])
输出形状: torch.Size([4, 10, 64])
残差+Norm输出形状: torch.Size([4, 10, 128])
可视化已保存为 mlp_demo.png
流程示意图
代码解读
-
__init__:h = [hidden_dim] * (num_layers - 1)生成隐藏层维度列表(长度为num_layers-1)。- 使用
zip([input_dim, *h], [*h, output_dim])构建每层的(in_features, out_features)对,从而生成线性层。 self.layers是一个ModuleList,包含所有线性层。- 激活函数
act被实例化并保存为self.act。 - 检查残差有效性:若
residual为真,且input_dim != output_dim,则报错。 out_norm可为None或nn.Module子类,否则断言失败。
-
forward:- 保存
orig_x用于残差。 - 遍历
self.layers,对前num_layers-1层应用act,最后一层仅线性。 - 注意:这里使用了
getattr(self, "act", nn.ReLU()),但正常情况self.act已定义,只是为了防御性编程。 - 残差相加(若启用)。
- 应用
out_norm(若提供)。 - 若有
sigmoid标志,则应用sigmoid();否则直接返回。
- 保存
注意事项
- 残差限制 :只有当
input_dim == output_dim时才能启用残差,否则会抛出ValueError。 - 激活函数:所有隐藏层(除最后一层)共用同一个激活函数,无法为不同层指定不同的激活。
- 输出归一化 :
out_norm可以是任意归一化层(如LayerNorm、BatchNorm1d),但注意输入形状:对于(batch, seq, dim),LayerNorm通常在最后一维操作,而BatchNorm1d需要在(batch, dim)形状下使用,可能需要调整。 - Sigmoid 输出 :若启用,输出将被压缩到
(0,1),适合二分类或概率输出。 - 维度要求 :输入张量的最后一维必须等于
input_dim,否则会触发线性层的维度不匹配错误。
优缺点
优点
- 高度可配置:支持任意层数、隐藏维度、残差、归一化、输出激活,适应多种场景。
- 通用性强:可作为 Transformer 的 FFN,也可独立用于分类、回归等任务。
- 残差连接:缓解梯度消失,有助于训练深层网络。
- 输出归一化:可提升训练稳定性。
缺点
- 所有隐藏层维度相同:无法为不同层设置不同的隐藏大小,限制了灵活性。
- 激活函数单一:所有隐藏层使用同一个激活,无法混合使用不同类型的激活。
- 与
MLPBlock相比,实现稍复杂 :对于简单需求(仅两层),MLPBlock更轻量。 - 残差条件限制:只有输入输出维度相等时才能用,限制了残差的适用范围。
在 Transformer 或 YOLO 等模型中,MLP 可作为灵活的前馈网络组件。使用时建议根据任务调整 num_layers、hidden_dim 和激活函数,并在需要时启用残差和归一化以优化训练。
参考文献
1 https://docs.ultralytics.com/
2 https://github.com/ultralytics/ultralytics.git
- 由于本人水平有限,难免出现错漏,敬请批评改正。
- 更多精彩内容,可点击进入Python日常小操作专栏、OpenCV-Python小应用专栏、YOLO系列专栏、自然语言处理专栏、人工智能混合编程实践专栏或我的个人主页查看
- YOLOs-CPP:一个免费开源的YOLO全系列C++推理库(以YOLO26为例)
- PaddleOCR:Win10上安装使用PPOCRLabel标注工具
- 目标检测:使用自己的数据集微调DEIMv2进行物体检测
- 图像分割:PyTorch从零开始实现SegFormer语义分割
- 图像超分:使用自己的数据集微调Real-ESRGAN-x4plus进行超分重建
- 图像生成:PyTorch从零开始实现一个简单的扩散模型
- Stable Diffusion:使用自己的数据集微调 Stable Diffusion 3.5 LoRA 文生图模型
- 图像超分:使用自己的数据集微调Real-ESRGAN-x2plus进行超分重建
- Anomalib:使用Anomalib 2.1.0训练自己的数据集进行异常检测
- Anomalib:在Linux服务器上安装使用Anomalib 2.1.0
- 人工智能混合编程实践:C++调用封装好的DLL进行异常检测推理
- 人工智能混合编程实践:C++调用封装好的DLL进行FP16图像超分重建(v3.0)
- 隔离系统Python:源码编译3.11.8到自定义目录(含PGO性能优化)
- 在线机的Python环境迁移到离线机上
- Nuitka 将 Python 脚本封装为 .pyd 或 .so 文件
- Ultralytics:使用 YOLO11 进行速度估计
- Ultralytics:使用 YOLO11 进行物体追踪
- Ultralytics:使用 YOLO11 进行物体计数
- Ultralytics:使用 YOLO11 进行目标打码
- 人工智能混合编程实践:C++调用Python ONNX进行YOLOv8推理
- 人工智能混合编程实践:C++调用封装好的DLL进行YOLOv8实例分割
- 人工智能混合编程实践:C++调用Python ONNX进行图像超分重建
- 人工智能混合编程实践:C++调用Python AgentOCR进行文本识别
- 通过计算实例简单地理解PatchCore异常检测
- Python将YOLO格式实例分割数据集转换为COCO格式实例分割数据集
- YOLOv8 Ultralytics:使用Ultralytics框架训练RT-DETR实时目标检测模型
- 基于DETR的人脸伪装检测
- YOLOv7训练自己的数据集(口罩检测)
- YOLOv8训练自己的数据集(足球检测)
- YOLOv5:TensorRT加速YOLOv5模型推理
- YOLOv5:IoU、GIoU、DIoU、CIoU、EIoU
- 玩转Jetson Nano(五):TensorRT加速YOLOv5目标检测
- YOLOv5:添加SE、CBAM、CoordAtt、ECA注意力机制
- YOLOv5:yolov5s.yaml配置文件解读、增加小目标检测层
- Python将COCO格式实例分割数据集转换为YOLO格式实例分割数据集
- YOLOv5:使用7.0版本训练自己的实例分割模型(车辆、行人、路标、车道线等实例分割)
- 使用Kaggle GPU资源免费体验Stable Diffusion开源项目
- Stable Diffusion:在服务器上部署使用Stable Diffusion WebUI进行AI绘图(v2.0)
- Stable Diffusion:使用自己的数据集微调训练LoRA模型(v2.0)