天下开发苦windows久矣
windows的cmd黑窗口,性能拉胯,样式奇丑,还有编码问题,狗都不用。虽然现在有了windows terminal,但是没有bash,开发体验还是跟不上。用wsl2吧,但是跨文件系统通信性能也很拉胯,oh my posh?No! powershell又长又臭,没有bash灵活优雅,难道没有更好的选择?
非也!今天我们来一步一步把windows终端大改造,从狗都嫌的辣鸡改造成爱不释手的效率工具,我们通过windows terminal + cmder + starship,从性能,shell,美化三个角度来全面升级体验。教程比较长,但是请耐心跟着做,最终的结果绝对值得!
windows terminal
win11自带windows terminal,无需单独安装,但是有些低版本的win10可能没有,需要更新系统,或者到微软应用商店安装
cmder
cnder是一款为 Windows 打造的增强型命令行工具,可以把它理解为 Windows 自带 cmd 的"专业美化加强版"。它的开发初衷,就是因为在 Windows 上缺少一款界面漂亮又好用的终端模拟器。
它本质上是一个软件包,将几款强大的工具整合在了一起:
ConEmu:提供多标签页、分屏、透明背景等丰富的界面功能。
Clink:为 cmd 带来 bash 风格的命令自动补全、历史记录搜索等增强特性。
Git for Windows (完整版):让你在 Windows 下也能直接使用 grep、ls、ssh 等大量的 Linux/Unix 命令。
这里我们并不是要直接使用cmder,而是将cmder作为内核,套上windows terminal使用,因为cmder的渲染性能远比不上windows terminal,而且有不少bug
配置windows terminal
打开windows terminal,打开设置,然后添加一个新配置,也可以打开JSON文件来配置, 以下是我的个人配置,可参考,字体用的Maple Mono Normal NL NF CN ,不过要注意cmder的配置路径"cmd.exe /k \"C:\\cmder\\vendor\\init.bat\"", 因为我是将cmder的目录放在了C盘,这个你可以按照你实际的路径来修改。但是建议最好不好放C盘,因为会遇到一些权限问题,会导致历史记录读取失败。
json
{
    "$help": "https://aka.ms/terminal-documentation",
    "$schema": "https://aka.ms/terminal-profiles-schema",
    "actions": [
        {
            "command": {
                "action": "copy",
                "singleLine": false
            },
            "id": "User.copy.644BA8F2"
        },
        {
            "command": {
                "action": "globalSummon"
            },
            "id": "User.globalSummon.51A3D78C"
        },
        {
            "command": {
                "action": "quakeMode"
            },
            "id": "User.quakeMode.F1E129A4"
        },
        {
            "command": "paste",
            "id": "User.paste"
        },
        {
            "command": "duplicateTab",
            "id": "User.duplicateTab"
        },
        {
            "command": "find",
            "id": "User.find"
        },
        {
            "command": {
                "action": "splitPane",
                "split": "auto",
                "splitMode": "duplicate"
            },
            "id": "User.splitPane.A6751878"
        }
    ],
    "alwaysShowTabs": true,
    "copyFormatting": "none",
    "copyOnSelect": true,
    "defaultProfile": "{f15b60f6-b700-472a-8b2f-d79c7bd4b9a5}",
    "disabledProfileSources": [
        "Windows.Terminal.Azure"
    ],
    "firstWindowPreference": "defaultProfile",
    "keybindings": [
        {
            "id": "User.copy.644BA8F2",
            "keys": "ctrl+c"
        },
        {
            "id": "User.duplicateTab",
            "keys": "ctrl+shift+d"
        },
        {
            "id": "User.paste",
            "keys": "ctrl+v"
        },
        {
            "id": "User.globalSummon.51A3D78C",
            "keys": "alt+s"
        },
        {
            "id": "User.splitPane.A6751878",
            "keys": "alt+shift+d"
        },
        {
            "id": "User.quakeMode.F1E129A4",
            "keys": "alt+f2"
        },
        {
            "id": "User.find",
            "keys": "ctrl+f"
        },
        {
            "id": null,
            "keys": "alt+enter"
        }
    ],
    "newTabMenu": [
        {
            "type": "remainingProfiles"
        }
    ],
    "profiles": {
        "defaults": {
            "antialiasingMode": "grayscale",
            "colorScheme": "Dark+",
            "font": {
                "face": "Cascadia Code"
            },
            "opacity": 79
        },
        "list": [
            {
                "adjustIndistinguishableColors": "indexed",
                "antialiasingMode": "cleartype",
                "colorScheme": "Dark+",
                "commandline": "cmd.exe /k \"C:\\cmder\\vendor\\init.bat\"",
                "elevate": false,
                "experimental.rainbowSuggestions": true,
                "font": {
                    "cellHeight": "1.4",
                    "face": "Maple Mono Normal NL NF CN",
                    "size": 12,
                    "weight": "semi-light"
                },
                "guid": "{f15b60f6-b700-472a-8b2f-d79c7bd4b9a5}",
                "historySize": 9001,
                "icon": "C:\\cmder\\icons\\cmder_green.ico",
                "name": "Terminal",
                "opacity": 73,
                "padding": "6",
                "snapOnInput": true,
                "startingDirectory": "%USERPROFILE%",
                "useAcrylic": true
            },
            {
                "commandline": "%SystemRoot%\\System32\\WindowsPowerShell\\v1.0\\powershell.exe",
                "font": {
                    "face": "Maple Mono Normal NL NF CN"
                },
                "guid": "{61c54bbd-c2c6-5271-96e7-009a87ff44bf}",
                "hidden": true,
                "name": "Windows PowerShell",
                "opacity": 73
            },
            {
                "colorScheme": "Dark+",
                "font": {
                    "face": "Maple Mono Normal NL NF CN"
                },
                "guid": "{574e775e-4f2a-5b96-ac1e-a2962a402336}",
                "hidden": false,
                "name": "PowerShell",
                "opacity": 74,
                "source": "Windows.Terminal.PowershellCore",
                "useAcrylic": true
            }
        ]
    },
    "rendering.graphicsAPI": "direct3d11",
    "schemes": [],
    "showTabsInTitlebar": true,
    "theme": "dark",
    "themes": [],
    "useAcrylicInTabRow": true,
    "windowingBehavior": "useAnyExisting"
}
配置vscode
当然配置好了之后,也是希望在vscode终端中使用我们的cmder,那么就可以在 setting.json中加入
json
{
      "terminal.integrated.profiles.windows": {
        "Cmder": {
            "overrideName": true,
            "path": [
                "${env:windir}\\Sysnative\\cmd.exe",
                "${env:windir}\\System32\\cmd.exe"
            ],
            "args": [
                "/k",
                "C:\\cmder\\vendor\\init.bat"
            ],
            "icon": "terminal-cmd"
        }
    },
    "terminal.integrated.defaultProfile.windows": "Cmder",
    "terminal.integrated.copyOnSelection": true,
    "terminal.integrated.fontFamily": "Maple Mono Normal NL NF CN",
}
}
关于字体
Maple Mono Normal NL NF CN是一款国人开发的,对中英文都有优秀支持的编程字体,Maple Mono Normal NL NF CN中的NF是指嵌入 Nerd-Font 的版本,安装这个字体作为终端字体,为终端显示图标做准备。我们常常看到macOs的终端,会有很多emoji字体,会显得生动形象好看,改善枯燥无聊的编译执行的体验,windows总是显示丑丑的?号和乱码字符,让人很是恼火。有了这个字体,将完全和macOs终端拉平体验。
starship
starship是一款使用rust编写的高性能终端美化工具,支持linux,windows,macos,是windows上拉平macos终端体验的关键。
安装
powershell
winget install --id Starship.Starshipcmder配置
因为我们使用的是cmder,所以我们需要在cmder/config目录中添加一个 starship.lua文件,使用lua来在clink中加载starship,这样才能生效,内容如下:
starship配置
在``C:\Users{这里是你的个人电脑用户名}.config 目录中新建一个starship.toml` 来配置,我的个人内容如下:
toml
"$schema" = 'https://starship.rs/config-schema.json'

# 将提示符中的 '❯' 替换为 '➜'
[character] # 此组件名称为 'character'
success_symbol = '[➜](bold green)'
error_symbol = '[➜](bold red)'

[dart]
format = "[$symbol]($style)"

[deno]
format = "[$symbol]($style)"

[golang]
format = '[$symbol]($style)'

[java]
format = '[$symbol]($style)'

[lua]
format = '[$symbol]($style)'

[nodejs]
disabled = true

[php]
format = '[$symbol]($style)'

[python]
format = '[$symbol]($style)'

[bun]
disabled = true

[package]
symbol = '🏷️ '

[git_status]
conflicted = '💥'
ahead = '🏎💨'
behind = '😰'
diverged = '😵'
up_to_date = '✨'
untracked = '⚡️'
stashed = '📦'
modified = '📝'
staged = '⏳[++\($count\)](green)'
renamed = '👅'
deleted = '🗑'
配置完成之后,home目录变成了~,有点那个味了,git status也增加了形象的emoji表情来表示,你也可以按照你自己的理解来修改。
继续深入cmder配置
自动完成
cmder基于clink,而clink实际上通过lua扩展了自动完成的功能,非常好用,可以通过在终端中输入以下命令开启
powershell
# 开启自动建议,打开后会你在你输入命令的时候根据以往的历史记录来显示建议
# 你按f2的时候,还可以切换到历史记录下拉列表,实现模糊查找,关闭这个功能则是再按一下f2
clink set autosuggest.enable true
别名
在macos或者linux终端中,配置别名能提高我们的效率,但是在原生windows终端中,别名的支持不是很好,在cmder\config\user_aliases.cmd中配置你的别名,就能实现一样的体验。
可以通过$1来表示获取第一个参数,如果有多个参数,可以使用 $*。注意 e.命令可以在终端使用资源管理器打开当前目录,类似于macos中的oepn命令,也是非常好用。
powershell
e.=explorer .
gcb=git checkout $1
gc=git stash
gd=git diff
glg=git log --stat
gcbn=git checkout -b $1
gs=git status
gl=git log
gpr=git pull origin $1
gpo=git push -u origin HEAD
gpc=git push origin HEAD
gbd=git branch -d $*
gbdf=git branch -D $*
gbm=git branch -m $1
gp=git push origin $*
ga=git add .
gf=git fetch
glg=git log --stat
clone=git clone $*
gbl=git branch
gcp=git stash pop
gcl=git stash list
gcne=git commit --amend --no-edit
pw
gfs=git flow feature start $1
gff=git flow feature finish $1
grs=git flow release start $1
grf=git flow release finish $1
ghs=git flow hotfix start $1
ghf=git flow hotfix finish $1
vi=vim $*
cc=claude --dangerously-skip-permissions $*
home跳转
虽然我们的home目录变成了~,但是如果我们使用cd ~ 并不会跳转home目录,系统并不能识别这个符号,所以我们需要使用lua扩展来实现这个功能。在cmder\vendor目录中增加一个文件HomeClink.lua,内容如下:
lua
-- Small clink script to automatically expand ~ to %HOME% in any command the user executes via Windows' CMD shell.

-- Look for escaped tildes, replaces any instance of "|~" with placeholder text.
local function tilde_escape(command)
	return string.gsub(command, "|~", "##EXPANDEDTILDEFORTILDEEXPANDER##")
end

-- Turn escaped tildes back into a regular tilde "~" after we've expanded unescaped tildes.
local function tilde_descape(command)
	return string.gsub(command, "##EXPANDEDTILDEFORTILDEEXPANDER##", "~")
end

-- Expand unescaped tildes with rl.expandetilde. Returns two values, the first is the expanded input command, the second is a boolean indicating whether any tildes were expanded. This second value not used in this script.
local function cmd_tilde_expander(input)
	local escaped_input = tilde_escape(input)
	local expanded_input, was_expanded = rl.expandtilde(escaped_input, true)
	local descaped_input = tilde_descape(expanded_input)
	return descaped_input
end

-- Register the main tilde expander function to run after the user has executed a command.
clink.onfilterinput(cmd_tilde_expander)
还有更多的clink 自动完成的lua脚本,可以在 github.com/chrisant996... 找找有没有适合你使用的脚本
目录跳转
在终端中切换目录要频繁使用cd,先退出后进入,非常麻烦,在macos上使用zsh,有一个autoJump,z这类插件可以实现目录记忆功能,通过一个z或者j命令去跳转,实际上windows也可以。安装zoxide, 这个是使用rust实现的目录跳转工具,性能非常优秀。
powershell
winget install ajeetdsouza.zoxide由于我们用的是cmder套壳的,所以不能直接使用,还要使用lua插件才能支持,我们可以clink-zoxide,将他放到``cmder\vendor`目录中,即可使用。
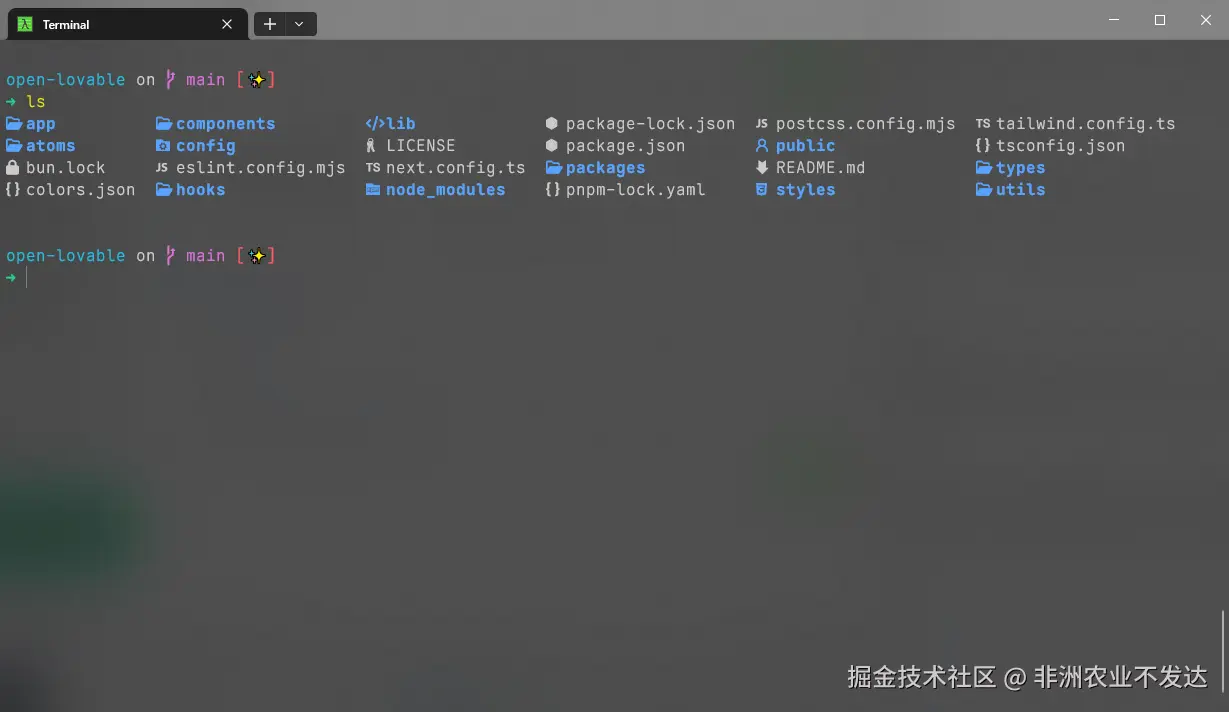
列表图标
LSD也是使用rust编写的高性能工具,是ls的替代体品,支持按照文件类型来显示文件图标,但是要安装了内置Nerd Font的字体才能正常显示,上面我们已经安装好了Maple Mono Normal NL NF CN,那么我们直接安装就行了。
powershell
winget install --id lsd-rs.lsdlsd可以直接替代ls,所以我们这里修改一下别名,让ls命令指向lsd
powershell
ls=lsd $*
la=lsd -a
ll= lsd -l
体验优化
包含隐藏文件补全,如果你发现tab没那么好使了,可能就是这个设置为了false,把这个开启,你会发现tab能够补全很多东西,比如你切换git分支的时候,他也能补全
powershell
clink set files.hidden true在cmder/config目录下增加.inputrc配置,增强自动补全的体验
powershell
# 基础配置
set colored-stats on                    # 启用彩色补全
set colored-completion-prefix on        # 为补全前缀着色
set completion-ignore-case on           # 补全忽略大小写
set show-all-if-ambiguous on           # 立即显示所有匹配项
set mark-symlinked-directories on       # 标记符号链接目录
set mark-symlinked-directories on       # 标记符号链接目录
总结
经过以上配置,相信我们的终端体验已经能达到macos的水平,而且性能也是不错的。总的来说,windows终端也能拥有mac的体验,只是并不是开箱即用的那种,而是要经过比较繁琐的配置,但是配置完了之后,能够让你的体验翻好几倍。实际上clink是一个非常强大的工具,他还有很多功能未用上,你可以自己折腾一下,来解锁更多好玩好用的功能。
改造完成终端的效果