AI 智能体实战速成指南:从零到企业级落地 | ai-agents-from-zero
节点重试
比如正常你建一个图是这样,直接写死。
python
def build_graph():
    builder = StateGraph(DiliState)

    builder.add_node(
        "unstable_api",
        unstable_api_call,
        retry_policy=RetryPolicy(max_attempts=5),
    )

    builder.add_edge(START, "unstable_api")
    builder.add_edge("unstable_api", END)

    return builder.compile()
你想建一个节点重试的,并且通用的,就直接建一个方法,你想建什么样的,给什么节点建什么样的策略,直接传入不同的参数即可。
python
# 工具函数
def build_retry_graph(node_name: str, node_func, retry_policy: RetryPolicy):
    builder = StateGraph(DiliState)
    # 为节点添加重试策略,需要在add_node中设置retry_policy参数。
    # retry_policy参数接受一个RetryPolicy命名元组对象。
    # 默认情况下,retry_on参数使用default_retry_on函数,该函数会在遇到任何异常时重试
    builder.add_node(node_name, node_func, retry_policy=retry_policy)
    builder.add_edge(START, node_name)
    builder.add_edge(node_name, END)
    return builder.compile()
然后就可以这样,就很灵活,用build_retry_graph来创建有重试策略的图。
python
# 工具函数
def build_retry_graph(node_name: str, node_func, retry_policy: RetryPolicy):
    builder = StateGraph(DiliState)
    # 为节点添加重试策略,需要在add_node中设置retry_policy参数。
    # retry_policy参数接受一个RetryPolicy命名元组对象。
    # 默认情况下,retry_on参数使用default_retry_on函数,该函数会在遇到任何异常时重试
    builder.add_node(node_name, node_func, retry_policy=retry_policy)
    builder.add_edge(START, node_name)
    builder.add_edge(node_name, END)
    return builder.compile()


# 模拟不稳定的API调用,使用全局变量跟踪尝试次数
def unstable_api_call(state: DiliState) -> Dict[str, Any]:
    """模拟不稳定API:前2次失败,第3次成功(全局计数器记录尝试次数)"""
    global attempt_counter
    attempt_counter += 1
    # 纯文本打印尝试次数
    print(f"尝试调用API,这是第 {attempt_counter} 次尝试")

    # 模拟失败/成功逻辑:前2次抛异常,第3次返回结果
    if attempt_counter < 3:
        raise Exception(f"模拟API调用失败abcd (尝试 {attempt_counter})")
    return {"result": f"API调用成功,经过 {attempt_counter} 次尝试"}


# 总的就看这个测试方法:默认重试策略
def test_default_retry():
    global attempt_counter
    print("1. 使用默认重试策略:")
    print("   默认策略会对除特定异常外的所有异常进行重试")
    print("   不会重试的异常包括: ValueError, TypeError, ArithmeticError, ImportError,")
    print("                     LookupError, NameError, SyntaxError, RuntimeError,")
    print(
        "                     ReferenceError, StopIteration, StopAsyncIteration, OSError\n"
    )

    print("测试默认重试策略:")
    attempt_counter = 0  # 重置计数器
    default_graph = build_retry_graph(
        node_name="unstable_api",
        node_func=unstable_api_call,
        retry_policy=RetryPolicy(max_attempts=5),  # 最多5次尝试,足够重试成功
    )
    try:
        result = default_graph.invoke({"result": ""})
        print(f"最终结果: {result}\n")
    except Exception as e:
        print(f"最终失败: {type(e).__name__}: {e}\n")
入口点和条件入口点
从 START 开始就根据状态分支 示例:
python
"""
【案例】条件入口点:从 START 开始就根据状态分支,使用 add_conditional_edges(START, route_fn, mapping),根据初始输入(如 user_input)决定进入哪个处理节点。
对应教程章节:第 24 章 - LangGraph API:节点、边与进阶 → 2、Graph API 之 Edge(边)
知识点速览:
- add_conditional_edges(START, route_input, {"greeting": "greeting_node", ...}):invoke 传入的 state 先交给 route_input,返回值作为 key 在 mapping 中查下一节点,实现「不同输入走不同入口」。
- 与「条件边」区别:条件边是"某节点执行完后"再分支;条件入口点是"图一启动"就分支,常用于做一级路由。
- 本例重点是理解"图从哪里开始"可以由输入动态决定;至于问候、告别、问题这三类文案本身,只是为了帮助观察路由效果。
"""
from typing import TypedDict
from langgraph.graph import StateGraph, START, END
# 1. 定义简单的状态
class SimpleState(TypedDict):
user_input: str
response: str
node_visited: str
# 2. 路由函数 - 决定从START去哪
def route_input(state: SimpleState) -> str:
"""根据用户输入决定去哪个节点"""
text = state["user_input"].lower()
if "hello" in text or "hi" in text:
return "greeting" # 返回路由键
elif "bye" in text or "exit" in text:
return "farewell" # 返回路由键
else:
return "question" # 返回路由键
# 3. 各个处理节点
def handle_greeting(state: SimpleState) -> SimpleState:
"""处理问候"""
state["response"] = "你好!很高兴见到你!"
state["node_visited"] = "greeting_node"
return state
def handle_farewell(state: SimpleState) -> SimpleState:
"""处理告别"""
state["response"] = "再见!祝你有个美好的一天!"
state["node_visited"] = "farewell_node"
return state
def handle_question(state: SimpleState) -> SimpleState:
"""处理问题"""
state["response"] = "我听到了你的问题,需要更多帮助吗?"
state["node_visited"] = "question_node"
return state
# 4. 创建图
def create_simple_graph():
"""创建一个简单的图"""
stateGraph = StateGraph(SimpleState)
# 添加节点
stateGraph.add_node("greeting_node", handle_greeting)
stateGraph.add_node("farewell_node", handle_farewell)
stateGraph.add_node("question_node", handle_question)
# 条件入口点:图从 START 进入后,先调用 route_input,再根据 mapping 决定第一跳去哪个业务节点
stateGraph.add_conditional_edges(
START, # 起点
route_input, # 路由函数
# 路由映射(可选):路由函数的返回值 -> 节点名
{
"greeting": "greeting_node", # route_input返回"greeting"时,去greeting_node
"farewell": "farewell_node", # route_input返回"farewell"时,去farewell_node
"question": "question_node", # route_input返回"question"时,去question_node
},
)
# 所有节点都到END
stateGraph.add_edge("greeting_node", END)
stateGraph.add_edge("farewell_node", END)
stateGraph.add_edge("question_node", END)
return stateGraph.compile()
# 5. 使用示例
def run_example():
# 创建图
graph = create_simple_graph()
# 测试不同的输入
test_inputs = ["Hello everyone!", "Goodbye now", "What time is it?"]
for user_input in test_inputs:
print(f"\n输入: {user_input}")
print("-" * 30)
# 创建初始状态
initial_state = SimpleState(user_input=user_input, response="", node_visited="")
# 执行图
result = graph.invoke(initial_state)
print(f"路由决策: {route_input(initial_state)}")
print(f"访问的节点: {result['node_visited']}")
print(f"响应: {result['response']}")
print()
# 打印图的ascii可视化结构
print(graph.get_graph().print_ascii())
print("=================================")
print()
# 打印图的可视化结构,生成更加美观的Mermaid 代码,通过processon 编辑器查看
print(graph.get_graph().draw_mermaid())
# 运行示例
if __name__ == "__main__":
print("简单条件入口点示例")
print("=" * 40)
run_example()
"""
【输出示例】
简单条件入口点示例
========================================
输入: Hello everyone!
------------------------------
路由决策: greeting
访问的节点: greeting_node
响应: 你好!很高兴见到你!
输入: Goodbye now
------------------------------
路由决策: farewell
访问的节点: farewell_node
响应: 再见!祝你有个美好的一天!
输入: What time is it?
------------------------------
路由决策: question
访问的节点: question_node
响应: 我听到了你的问题,需要更多帮助吗?
+-----------+
| __start__ |.
.....+-----------+ .....
.... . ....
..... . .....
... . ...
+---------------+ +---------------+ +---------------+
| farewell_node | | greeting_node | | question_node |
+---------------+**** +---------------+ ***+---------------+
**** * ****
***** * *****
*** * ***
+---------+
| __end__ |
+---------+
None
=================================
---
config:
flowchart:
curve: linear
---
graph TD;
__start__([<p>__start__</p>]):::first
greeting_node(greeting_node)
farewell_node(farewell_node)
question_node(question_node)
__end__([<p>__end__</p>]):::last
__start__ -. farewell .-> farewell_node;
__start__ -. greeting .-> greeting_node;
__start__ -. question .-> question_node;
farewell_node --> __end__;
greeting_node --> __end__;
question_node --> __end__;
classDef default fill:#f2f0ff,line-height:1.2
classDef first fill-opacity:0
classDef last fill:#bfb6fc
"""send
案例:
python
"""
【案例】Send 与 Map-Reduce 模式:条件边函数返回 Sequence[Send],每个 Send(节点名, 状态) 触发一次该节点的执行,LangGraph 并行执行后按 Reducer 汇总(如列表合并),适合「动态数量子任务」并行再汇总。

对应教程章节:第 24 章 - LangGraph API:节点、边与进阶 → 3、Send、Command 与 Runtime 上下文

知识点速览:
- 条件边若返回 List[Send](或 Sequence[Send]),每个 Send 指定「下一节点 + 传入该节点的 state」,框架会并行执行这些分支并合并结果。
- Map 阶段:生成主题列表 → 为每个主题构造 Send("make_joke", {"subject": 主题});Reduce 阶段:jokes 字段用列表合并 Reducer,多路结果合并成一条列表。
- 适合「一批输入拆成多份、并行处理、再汇总」的流程。
- 本例最值得观察的是:每个 Send 分支拿到的是"自己的那份状态",而最终能不能顺利汇总,取决于下游字段有没有设计好对应的 Reducer。
"""

from typing import Annotated, List, Sequence
from typing_extensions import TypedDict
from langgraph.graph import StateGraph, START, END
from langgraph.types import Send


# 定义状态
class DiliState(TypedDict):
    subjects: List[str]
    jokes: Annotated[List[str], lambda x, y: x + y]  # 使用列表合并的方式


# 第一个节点:生成需要处理的主题列表
def generate_subjects(state: DiliState) -> dict:
    """生成需要处理的主题列表"""
    print("执行节点(第一个节点:生成需要处理的主题列表): generate_subjects")
    subjects = ["猫", "狗", "程序员"]
    print(f"生成主题列表: {subjects}")
    return {"subjects": subjects}


# Map节点:为每个主题生成笑话
def make_joke(state: DiliState) -> dict:
    """为单个主题生成笑话"""
    subject = state.get("subject", "未知")
    print(f"执行节点: make_joke,处理主题: {subject}")

    # 根据主题生成相应笑话
    jokes_map = {
        "猫": "为什么猫不喜欢在线购物?因为它们更喜欢实体店!",
        "狗": "为什么狗不喜欢计算机?因为它们害怕被鼠标咬!",
        "程序员": "为什么程序员喜欢洗衣服?因为他们在寻找bugs!",
        "未知": "这是一个关于未知主题的神秘笑话。",
    }

    joke = jokes_map.get(subject, f"这是一个关于{subject}的即兴笑话。")
    print(f"生成笑话: {joke}")
    return {"jokes": [joke]}


# 条件边函数:根据主题列表生成Send对象列表
def map_subjects_to_jokes(state: DiliState) -> List[Send]:
    """将主题列表映射到joke生成任务"""
    print("执行条件边函数: map_subjects_to_jokes")
    subjects = state["subjects"]
    print(f"映射主题到joke任务: {subjects}")

    # 为每个主题创建一个Send对象,指向make_joke节点
    # 每个Send对象包含节点名称和传递给该节点的状态
    send_list = [Send("make_joke", {"subject": subject}) for subject in subjects]
    print(f"生成Send对象列表: {send_list}")
    return send_list


def main():
    """演示Map-Reduce模式"""
    print("=== Map-Reduce 模式演示 ===\n")

    # 创建图
    builder = StateGraph(DiliState)

    # 添加节点
    builder.add_node("generate_subjects", generate_subjects)
    builder.add_node("make_joke", make_joke)

    # 添加边
    builder.add_edge(START, "generate_subjects")

    # 添加条件边,使用Send对象实现map-reduce
    builder.add_conditional_edges(
        "generate_subjects",  # 源节点
        map_subjects_to_jokes,  # 路由函数,返回Send对象列表
    )

    # 从make_joke到结束
    builder.add_edge("make_joke", END)

    # 编译图
    graph = builder.compile()
    print(graph.get_graph().print_ascii())

    # 执行图
    initial_state = {"subjects": [], "jokes": []}
    print("初始状态:", initial_state)
    print("\n开始执行图...")

    result = graph.invoke(initial_state)
    print(f"\n最终结果: {result}")

    print("\n=== 演示完成 ===")


if __name__ == "__main__":
    main()

"""
【输出示例】
=== Map-Reduce 模式演示 ===

    +-----------+
    | __start__ |
    +-----------+
          *
          *
          *
+-------------------+
| generate_subjects |
+-------------------+
          *
          *
          *
     +---------+
     | __end__ |
     +---------+
None
初始状态: {'subjects': [], 'jokes': []}

开始执行图...
执行节点(第一个节点:生成需要处理的主题列表): generate_subjects
生成主题列表: ['猫', '狗', '程序员']
执行条件边函数: map_subjects_to_jokes
映射主题到joke任务: ['猫', '狗', '程序员']
生成Send对象列表: [Send(node='make_joke', arg={'subject': '猫'}), Send(node='make_joke', arg={'subject': '狗'}), Send(node='make_joke', arg={'subject': '程序员'})]
执行节点: make_joke,处理主题: 猫
生成笑话: 为什么猫不喜欢在线购物?因为它们更喜欢实体店!
执行节点: make_joke,处理主题: 狗
生成笑话: 为什么狗不喜欢计算机?因为它们害怕被鼠标咬!
执行节点: make_joke,处理主题: 程序员
生成笑话: 为什么程序员喜欢洗衣服?因为他们在寻找bugs!

最终结果: {'subjects': ['猫', '狗', '程序员'], 'jokes': ['为什么猫不喜欢在线购物?因为它们更喜欢实体店!', '为什么狗不喜欢计算机?因为它们害怕被鼠标咬!', '为什么程序员喜欢洗衣服?因为他们在寻找bugs!']}

=== 演示完成 ===
"""command:更新并跳转
如果说条件边只负责"去哪",那 Command 解决的是另一个很常见的需求:某个节点在做完判断后,既想更新状态,又想直接决定下一步去哪。
Command 可以把状态更新和控制流放到同一次返回里。
最常见的两个参数是:
-
update:当前节点希望写回 State 的局部更新内容,仍然会按字段对应的 Reducer 规则合并。 -
goto:当前节点执行完后,希望图下一步跳转到哪个节点;也可以直接跳到END结束流程。
一个节点可以:
-
一边返回新的状态更新
-
一边直接告诉图"下一步去哪个节点"
这和条件边的边界要分清楚:
-
条件边:通常更适合"节点做完了,再单独根据状态决定去哪"
-
Command:更适合"这个节点本身就是决策点,离开时把状态和去向一起交代清楚"

案例:
python
"""
【案例】Command 对象:节点可返回 Command(update=..., goto=节点或END),在「更新状态」的同时「指定下一跳」,实现状态更新与路由一步完成,适合人机闭环与多智能体交接。

对应教程章节:第 24 章 - LangGraph API:节点、边与进阶 → 3、Send、Command 与 Runtime 上下文

知识点速览:
- `Command(update=..., goto=...)` 可以先按 Reducer 规则把 update 合并回 State,再决定下一跳;这正是它和普通节点返回 dict 的关键区别。
- 与条件边的区别:条件边更像"节点执行完后再单独路由",而 Command 更像"这个节点自己就是决策点,离场时把状态和去向一起交代清楚"。
- 本例还顺手演示了一个工程上很重要的点:带循环或回跳的图,最好配合明确的终止条件与递归上限,避免流程跑飞。
"""

from typing import Annotated
from typing_extensions import TypedDict
from langgraph.graph import StateGraph, START, END
from langgraph.types import Command

# 全局常量:统一递归限制,便于维护
RECURSION_LIMIT = 50


# 定义状态
class AgentState(TypedDict):
    messages: Annotated[list, lambda x, y: x + y]  # 自动合并消息
    current_agent: str
    task_completed: bool


# 决策代理(核心路由节点)
def decision_agent(state: AgentState) -> Command[AgentState]:
    """根据消息内容路由代理,任务完成则直接终止"""
    print("执行节点: decision_agent")
    # 优先终止流程(核心防循环逻辑)
    if state["task_completed"]:
        print("✅ 检测到任务已完成,直接终止流程")
        return Command(
            update={"messages": [("system", "所有任务处理完成,流程正常结束")]},
            goto=END,
        )
    # 提取消息文本(兼容空消息)
    last_message = state["messages"][-1] if state["messages"] else ("", "")
    last_msg_content = last_message[1]
    print(f"最新消息文本: {last_msg_content}")

    # 动态路由
    if "数学" in last_msg_content:
        print("✅ 检测到数学任务,路由到数学代理")
        return Command(
            update={
                "messages": [("system", "路由到数学代理")],
                "current_agent": "math_agent",
            },
            goto="math_agent",
        )
    elif "翻译" in last_msg_content:
        print("✅ 检测到翻译任务,路由到翻译代理")
        return Command(
            update={
                "messages": [("system", "路由到翻译代理")],
                "current_agent": "translation_agent",
            },
            goto="translation_agent",
        )
    else:
        print("❌ 未识别任务类型,标记任务完成并终止")
        return Command(
            update={"messages": [("system", "任务完成")], "task_completed": True},
            goto=END,
        )


# 数学代理(业务节点)
def math_agent(state: AgentState) -> Command[AgentState]:
    """处理数学计算任务,完成后返回决策代理"""
    print("执行节点: math_agent")
    result = "2 + 2 = 4"
    print(f"计算结果: {result}")
    return Command(
        update={
            "messages": [("assistant", f"数学计算结果: {result}")],
            "current_agent": "decision_agent",
            "task_completed": True,
        },
        goto="decision_agent",
    )


# 翻译代理(业务节点)
def translation_agent(state: AgentState) -> Command[AgentState]:
    """处理中英翻译任务,完成后返回决策代理"""
    print("执行节点: translation_agent")
    translation = "Hello -> 你好"
    print(f"翻译结果: {translation}")
    return Command(
        update={
            "messages": [("assistant", f"翻译结果: {translation}")],
            "current_agent": "decision_agent",
            "task_completed": True,
        },
        goto="decision_agent",
    )


def main():
    """演示Command基础用法:状态更新+动态路由+流程终止"""
    print("=== Command 基础演示(LangGraph 1.0.6)===\n")

    # 1. 构建状态图
    builder = StateGraph(AgentState)
    builder.add_node("decision_agent", decision_agent)
    builder.add_node("math_agent", math_agent)
    builder.add_node("translation_agent", translation_agent)

    # 2. 定义边(完整节点关系)
    builder.add_edge(START, "decision_agent")
    builder.add_edge("math_agent", "decision_agent")
    builder.add_edge("translation_agent", "decision_agent")
    builder.add_edge("decision_agent", END)

    # 3. 编译图
    graph = builder.compile()

    # 测试1:数学任务
    print("【测试1: 数学任务】")
    initial_state = {
        "messages": [("user", "我需要计算数学题")],
        "current_agent": "user",
        "task_completed": False,
    }
    print("初始状态:", initial_state)
    result = graph.invoke(initial_state, recursion_limit=RECURSION_LIMIT)
    print(
        "最终状态(简化):", {k: v for k, v in result.items() if k != "messages"}
    )  # 简化输出
    print("\n" + "-" * 50 + "\n")

    # 测试2:翻译任务
    print("【测试2: 翻译任务】")
    initial_state = {
        "messages": [("user", "我需要翻译文本")],
        "current_agent": "user",
        "task_completed": False,
    }
    print("初始状态:", initial_state)
    result = graph.invoke(initial_state, recursion_limit=RECURSION_LIMIT)
    print("最终状态(简化):", {k: v for k, v in result.items() if k != "messages"})
    print("\n" + "-" * 50 + "\n")

    # 测试3:未识别任务
    print("【测试3: 未识别任务类型】")
    initial_state = {
        "messages": [("user", "你好")],
        "current_agent": "user",
        "task_completed": False,
    }
    print("初始状态:", initial_state)
    result = graph.invoke(initial_state, recursion_limit=RECURSION_LIMIT)
    print("最终状态(简化):", {k: v for k, v in result.items() if k != "messages"})

    # 新增:可视化图结构(教学演示必备)
    print("\n=== 图结构可视化 ===")
    print(graph.get_graph().draw_mermaid())


if __name__ == "__main__":
    main()

"""
【输出示例】
=== Command 基础演示(LangGraph 1.0.6)===

【测试1: 数学任务】
初始状态: {'messages': [('user', '我需要计算数学题')], 'current_agent': 'user', 'task_completed': False}
执行节点: decision_agent
最新消息文本: 我需要计算数学题
✅ 检测到数学任务,路由到数学代理
执行节点: math_agent
计算结果: 2 + 2 = 4
执行节点: decision_agent
✅ 检测到任务已完成,直接终止流程
最终状态(简化): {'current_agent': 'decision_agent', 'task_completed': True}

--------------------------------------------------

【测试2: 翻译任务】
初始状态: {'messages': [('user', '我需要翻译文本')], 'current_agent': 'user', 'task_completed': False}
执行节点: decision_agent
最新消息文本: 我需要翻译文本
✅ 检测到翻译任务,路由到翻译代理
执行节点: translation_agent
翻译结果: Hello -> 你好
执行节点: decision_agent
✅ 检测到任务已完成,直接终止流程
最终状态(简化): {'current_agent': 'decision_agent', 'task_completed': True}

--------------------------------------------------

【测试3: 未识别任务类型】
初始状态: {'messages': [('user', '你好')], 'current_agent': 'user', 'task_completed': False}
执行节点: decision_agent
最新消息文本: 你好
❌ 未识别任务类型,标记任务完成并终止
最终状态(简化): {'current_agent': 'user', 'task_completed': True}

=== 图结构可视化 ===
---
config:
  flowchart:
    curve: linear
---
graph TD;
        __start__(<p>__start__</p>)
        decision_agent(decision_agent)
        math_agent(math_agent)
        translation_agent(translation_agent)
        __end__(<p>__end__</p>)
        __start__ --> decision_agent;
        decision_agent --> __end__;
        classDef default fill:#f2f0ff,line-height:1.2
        classDef first fill-opacity:0
        classDef last fill:#bfb6fc
"""
Runtime:配置与状态分开
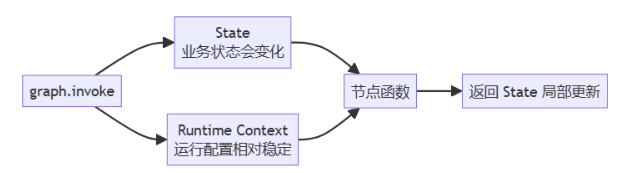
前面我们一直在强调 State,但真实项目里并不是所有数据都该放进 State。比如下面这些东西:模型名、API Key、数据库连接、用户环境配置、当前运行的外部依赖对象。
它们通常都不属于"图在节点间流转的业务状态",而更像是这次运行的静态上下文。这时就更适合放进 Runtime 上下文,而不是硬塞进 State。
官方 Graph API 和 Use the graph API 指南都强调了这一点:运行时配置可以通过 context_schema 声明,并在调用图时通过 context=... 传入。
所以可以把两者的区别记成:
- State:会随着图运行不断变化的共享业务数据
- Runtime Context:本次运行里节点可读、但不应混入业务状态的静态依赖或配置
custom自定义数据流
writer就是推送到正在调用 graph.stream() / graph.astream() 的那一端代码。
它不是自动推送到浏览器、数据库、消息队列或用户;writer(...) 只是把自定义事件放进当前 LangGraph 的流输出中。谁在迭代这个流,谁就收到。
python
"""
【案例】自定义流 + 状态更新组合:节点内多次 writer(...) 推送进度,同时返回 dict 更新 State;演示 custom / updates / 组合。

对应教程章节:第 25 章 - LangGraph 高级特性 → 1、流式处理(Streaming)

知识点速览:
- `get_stream_writer()` 负责把"图运行过程中的自定义消息"主动往外推;它和节点返回的状态更新是两条并行通道。
- `stream_mode=["custom", "updates"]` 时,迭代得到 `(mode, chunk)`,非常适合前端一边看业务进度,一边看状态更新。
- 本例最值得观察的是:`writer(...)` 写出的 `custom` 数据不会自动进 State;节点真正写回图状态的,仍然是最后 return 的那份 dict。
"""

from typing import TypedDict

from langgraph.config import get_stream_writer
from langgraph.graph import StateGraph, START, END


class State(TypedDict):
    query: str
    answer: str
    progress: list


def node_with_custom_streaming(state: State) -> State:
    """带自定义流式传输的节点:边写自定义流边更新状态。"""
    writer = get_stream_writer()

    writer({"custom_key": "开始处理查询"})
    writer({"progress": "步骤1: 分析查询内容", "status": "running"})

    query = state["query"]

    writer({"progress": "步骤2: 生成结果", "status": "running"})
    writer({"progress": "步骤3: 完成处理", "status": "completed"})
    writer({"custom_key": "查询处理完成"})

    result = f"处理结果: {query.upper()}"
    return {
        "answer": result,
        "progress": state.get("progress", []) + ["处理完成"],
    }


def main():
    print("=== LangGraph 自定义数据流式传输演示 ===\n")

    graph = (
        StateGraph(State)
        .add_node("node_with_custom_streaming", node_with_custom_streaming)
        .add_edge(START, "node_with_custom_streaming")
        .add_edge("node_with_custom_streaming", END)
        .compile()
    )

    inputs = {"query": "hello world", "answer": "", "progress": []}

    print("--- 1. 单独使用 custom 流模式 ---")
    try:
        for chunk in graph.stream(inputs, stream_mode="custom"):
            print(f"自定义数据块: {chunk}")
    except Exception as e:
        print(f"错误: {e}")
        print(
            "说明: 在 Graph API 中,自定义流数据需在节点中通过 get_stream_writer 发送"
        )

    print("\n" + "=" * 50 + "\n")

    print("--- 2. 单独使用 updates 流模式 ---")
    for chunk in graph.stream(inputs, stream_mode="updates"):
        print(f"状态更新: {chunk}")

    print("\n" + "=" * 50 + "\n")

    print("--- 3. 同时使用 custom 和 updates 流模式 ---")
    try:
        for mode, chunk in graph.stream(inputs, stream_mode=["custom", "updates"]):
            print(f"[{mode}]: {chunk}")
    except Exception as e:
        print(f"错误: {e}")
        print("说明: 请确认 LangGraph 版本支持多模式流")


if __name__ == "__main__":
    main()

"""
【输出示例】
=== LangGraph 自定义数据流式传输演示 ===

--- 1. 单独使用 custom 流模式 ---
自定义数据块: {'custom_key': '开始处理查询'}
自定义数据块: {'progress': '步骤1: 分析查询内容', 'status': 'running'}
自定义数据块: {'progress': '步骤2: 生成结果', 'status': 'running'}
自定义数据块: {'progress': '步骤3: 完成处理', 'status': 'completed'}
自定义数据块: {'custom_key': '查询处理完成'}

==================================================

--- 2. 单独使用 updates 流模式 ---
状态更新: {'node_with_custom_streaming': {'answer': '处理结果: HELLO WORLD', 'progress': ['处理完成']}}

==================================================

--- 3. 同时使用 custom 和 updates 流模式 ---
[custom]: {'custom_key': '开始处理查询'}
[custom]: {'progress': '步骤1: 分析查询内容', 'status': 'running'}
[custom]: {'progress': '步骤2: 生成结果', 'status': 'running'}
[custom]: {'progress': '步骤3: 完成处理', 'status': 'completed'}
[custom]: {'custom_key': '查询处理完成'}
[updates]: {'node_with_custom_streaming': {'answer': '处理结果: HELLO WORLD', 'progress': ['处理完成']}}
"""
2.4 Checkpointer 与 thread_id
要让图保存状态,通常有三步:
- 创建一个 checkpointer,例如
InMemorySaver()、SqliteSaver(...)。 - 编译图时传入:
builder.compile(checkpointer=checkpointer)。 - 调用图时传入
config={"configurable": {"thread_id": "..."}}。
thread_id 很容易被误解。它不是 Python 线程 ID,也不表示操作系统线程;在 LangGraph 语境里,它更像是状态空间的隔离 ID 。同一个 thread_id 下,图可以接上历史状态;换一个新的 thread_id,就是另一条独立会话或任务链。
从故障中恢复时,还会看到一个很常见的写法:
graph.invoke(None, config={"configurable": {"thread_id": "user-001"}})这里传 None 的意思不是"没有输入",而是告诉图:不要重新初始化一份新状态,而是沿用这个 thread 最近保存的状态继续推进。 当然,真实项目里是否可以这样恢复,还取决于你的节点是否幂等、错误是否已修复、checkpoint 是否已经保存到了可靠后端。
2.5 历史状态
持久化还带来一个直接收益:你可以查看某条 thread 的状态历史。常见 API 是:
graph.get_state(config):获取最近一次状态快照。graph.get_state_history(config):获取历史状态快照序列。
这些状态快照可以帮助你回答几个排障问题:
- 当前图最后停在什么状态?
- 下一步准备执行哪个节点?
- 中间某一步到底写入了哪些字段?
- 如果要做时间回溯,应该从哪一个 checkpoint 开始?
这和第 23 章讲过的 StateSnapshot 是一条线:values 让你看到当前状态,next 让你知道下一步,config / parent_config 帮你串起 checkpoint 链,interrupts 用来记录等待处理的人机中断。
2.6 短期记忆:Checkpointer
在 LangGraph 语境里,最常先接触到的是 Checkpointer。
这里说的 Checkpointer,主要做两件事:
- 按
thread_id保存图的执行状态 - 让同一个线程下的多次调用可以继续沿用之前的状态
所以 Checkpointer 更像是:线程内、会话内、工作流运行期的短期记忆。
这和你前面学过"消息历史""短期记忆"的主线,是能够串起来的。区别在于,这里不是单独记消息,而是记整张图的状态快照。
2.7 长期记忆:Store / BaseStore
只用 Checkpointer 还不够,因为它更偏"同一条线程内部的连续状态"。那如果我们想跨线程、跨会话保存长期信息呢?
这就轮到 Store 出场了。
官方 Persistence 文档里把它解释得很清楚:Checkpointer 保存线程内状态,Store 用来保存跨线程共享的长期信息。
所以两者最核心的区别可以这样记:
- Checkpointer:保存图在某条 thread 里的运行状态
- Store / BaseStore:保存跨 thread、跨会话仍然要长期保留的数据
例如:
- 用户偏好
- 长期业务事实
- 跨会话共享的知识片段
这些都更适合放 Store,而不是硬塞进单条 thread 的 checkpoint 链里。
内存检查点案例
python
"""
【案例】内存检查点 InMemorySaver:编译图时传入 checkpointer,用 thread_id 区分会话,演示 get_state / get_state_history / 二次 invoke。

对应教程章节:第 25 章 - LangGraph 高级特性 → 2、状态持久化(Persistence)

知识点速览:
- compile(checkpointer=...) 后,每次 invoke 会在检查点中留下快照;config["configurable"]["thread_id"] 标识一条「对话线程」。
- get_state(config) 取当前线程最新状态;get_state_history(config) 取历史快照序列(用于调试或时间回溯)。
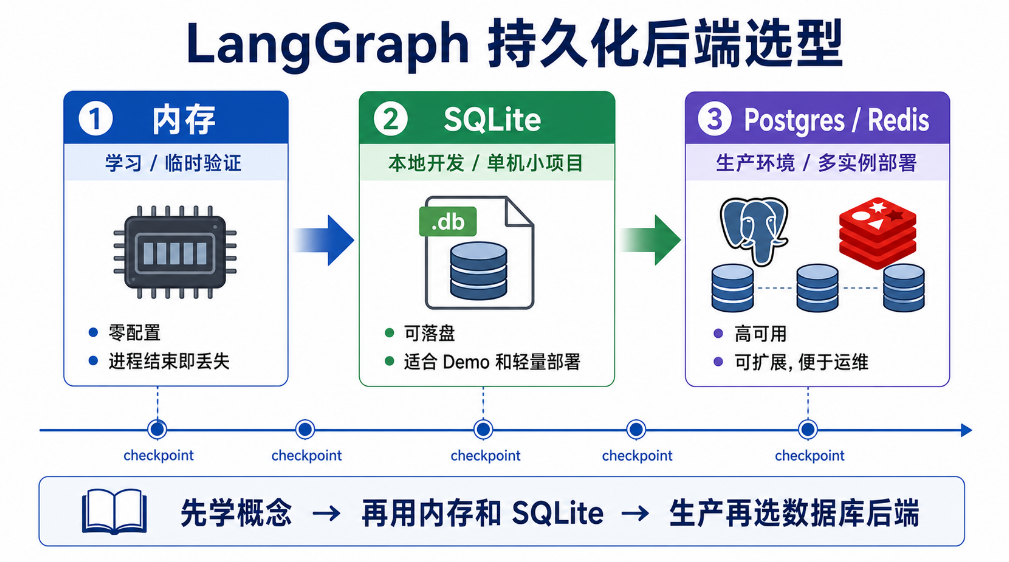
- `InMemorySaver` 数据仅在进程内存中,进程结束即丢失;它最适合先帮助你理解"checkpoint 到底是什么"。
- 本例最值得观察的是:Persistence 不只是"把结果存起来",而是把图每一步的状态历史都保留下来,为后面的 Time-Travel 打基础。
"""

from typing import Annotated

import operator
from langgraph.checkpoint.memory import InMemorySaver
from langgraph.graph import StateGraph, START, END
from typing_extensions import TypedDict


class PersistenceDemoState(TypedDict):
    # operator.add:列表/数值等按「相加」语义合并(列表相当于拼接)
    messages: Annotated[list, operator.add]
    step_count: Annotated[int, operator.add]


def step_one(state: PersistenceDemoState) -> dict:
    print("执行步骤 1")
    return {
        "messages": ["执行了步骤 1"],
        "step_count": 1,
    }


def step_two(state: PersistenceDemoState) -> dict:
    print("执行步骤 2")
    return {
        "messages": ["执行了步骤 2"],
        "step_count": 1,
    }


def step_three(state: PersistenceDemoState) -> dict:
    print("执行步骤 3")
    return {
        "messages": ["执行了步骤 3"],
        "step_count": 1,
    }


def create_graph():
    builder = StateGraph(PersistenceDemoState)

    builder.add_node("step_one", step_one)
    builder.add_node("step_two", step_two)
    builder.add_node("step_three", step_three)

    builder.add_edge(START, "step_one")
    builder.add_edge("step_one", "step_two")
    builder.add_edge("step_two", "step_three")
    builder.add_edge("step_three", END)

    return builder


def main():
    print("=== LangGraph 1.0 内存持久化存储演示 ===\n")

    graph = create_graph()
    app = graph.compile(checkpointer=InMemorySaver())

    config = {"configurable": {"thread_id": "user_13811112222"}}

    print("1. 首次执行工作流:")
    result = app.invoke(
        {
            "messages": ["开始执行"],
            "step_count": 0,
        },
        config,
    )

    print(f"执行结果 result: {result}\n")

    print("2. 检查存储的状态:")
    saved_state = app.get_state(config)
    print(f"保存的状态: {saved_state.values}")
    print(f"下一个节点: {saved_state.next}\n")

    # 正序遍历:从最早到最晚的检查点快照
    history = app.get_state_history(config)
    for checkpoint in history:
        print("=" * 50)
        print(f"当前状态: {checkpoint.values}")

    print("=" * 80)
    print("3. 恢复执行工作流:")
    # 工作流若已结束,再次 invoke(None, config) 通常直接返回已落盘的结果
    result2 = app.invoke(None, config)
    print(f"恢复执行结果: {result2}\n")

    print("=== 演示结束 ===")


if __name__ == "__main__":
    main()

"""
【输出示例】
=== LangGraph 1.0 内存持久化存储演示 ===

1. 首次执行工作流:
执行步骤 1
执行步骤 2
执行步骤 3
执行结果 result: {'messages': ['开始执行', '执行了步骤 1', '执行了步骤 2', '执行了步骤 3'], 'step_count': 3}

2. 检查存储的状态:
保存的状态: {'messages': ['开始执行', '执行了步骤 1', '执行了步骤 2', '执行了步骤 3'], 'step_count': 3}
下一个节点: ()

==================================================
当前状态: {'messages': ['开始执行', '执行了步骤 1', '执行了步骤 2', '执行了步骤 3'], 'step_count': 3}
==================================================
当前状态: {'messages': ['开始执行', '执行了步骤 1', '执行了步骤 2'], 'step_count': 2}
==================================================
当前状态: {'messages': ['开始执行', '执行了步骤 1'], 'step_count': 1}
==================================================
当前状态: {'messages': ['开始执行'], 'step_count': 0}
==================================================
当前状态: {'messages': [], 'step_count': 0}
================================================================================
3. 恢复执行工作流:
恢复执行结果: {'messages': ['开始执行', '执行了步骤 1', '执行了步骤 2', '执行了步骤 3'], 'step_count': 3}

=== 演示结束 ===
"""
SQLite检查点案例:
python
"""
【案例】SQLite 检查点 SqliteSaver:把检查点写入本地 .db 文件,进程重启仍可恢复同 thread_id 的会话。

对应教程章节:第 25 章 - LangGraph 高级特性 → 2、状态持久化(Persistence)

知识点速览:
- 依赖包:项目根目录 `requirements.txt` 已包含 `langgraph-checkpoint-sqlite`;全量安装用 `pip install -r requirements.txt`,或单独 `pip install langgraph-checkpoint-sqlite`。生产环境更常用 Postgres(`langgraph-checkpoint-postgres`)等实现。
- SqliteSaver(conn=...) 与 sqlite3.connect 配合;数据库文件路径需本机可写,目录需事先存在。
- 与 InMemorySaver 用法相同:`compile(checkpointer=...)`、`invoke(..., config)`、`get_state(config)`,区别主要在于存储介质。
- 这个案例更像"从学习版持久化走向接近真实部署版"的过渡,重点是理解后端替换而不是 API 换了一套。
"""

import sqlite3
import operator
from pathlib import Path
from typing import Annotated, TypedDict

from langgraph.checkpoint.sqlite import SqliteSaver
from langgraph.graph import StateGraph, START, END


class MyState(TypedDict):
    messages: Annotated[list, operator.add]


def node_1(state: MyState):
    return {"messages": ["abc", "def"]}


def main():
    # 默认写在项目旁,避免硬编码 Windows 盘符
    db_dir = Path(__file__).resolve().parent / "sqlite_checkpoints"
    db_dir.mkdir(parents=True, exist_ok=True)
    db_path = db_dir / "sqlite_data.db"

    conn = sqlite3.connect(database=str(db_path), check_same_thread=False)
    sqlite_db = SqliteSaver(conn=conn)

    builder = StateGraph(MyState)
    builder.add_node("node_1", node_1)

    builder.add_edge(START, "node_1")
    builder.add_edge("node_1", END)

    graph = builder.compile(checkpointer=sqlite_db)

    # 同一 thread_id 表示同一会话;多次执行会累积检查点,调试时可删 .db 或换 thread_id
    config = {"configurable": {"thread_id": "user-001"}}

    initial_state = graph.get_state(config)
    print(f"Initial state: {initial_state}")

    result = graph.invoke({"messages": []}, config)
    print(f"Result: {result}")

    print()
    print("====================查看执行后的状态====================")
    final_state = graph.get_state(config)
    print()
    print(f"Final state: {final_state}")

    conn.close()


if __name__ == "__main__":
    main()

"""
【输出示例】
Initial state: StateSnapshot(values={}, next=(), config={'configurable': {'thread_id': 'user-001'}}, metadata=None, created_at=None, parent_config=None, tasks=(), interrupts=())
Result: {'messages': ['abc', 'def']}

====================查看执行后的状态====================

Final state: StateSnapshot(values={'messages': ['abc', 'def']}, next=(), config={'configurable': {'thread_id': 'user-001', 'checkpoint_ns': '', 'checkpoint_id': '1f1272f0-d724-675e-8001-bb885d01bb16'}}, metadata={'source': 'loop', 'step': 1, 'parents': {}}, created_at='2026-03-24T03:10:46.773535+00:00', parent_config={'configurable': {'thread_id': 'user-001', 'checkpoint_ns': '', 'checkpoint_id': '1f1272f0-d723-6a48-8000-d3aac2954c9d'}}, tasks=(), interrupts=())
"""
人机协作
实际代码里,interrupt 常见长这样:
python
from langgraph.types import Command, interrupt

def review_node(state: TransferState):
    user_review = interrupt({
        "title": "转账审核",
        "recipient": state["recipient"],
        "amount": state["amount"],
        "memo": state["memo"],
    })
    return {
        "approved": bool(user_review.get("approved")),
        "amount": user_review.get("amount", state["amount"]),
    }

first = graph.invoke(initial_state, config=config)
final = graph.invoke(Command(resume={"approved": True, "amount": 80}), config=config)