环境准备
在开始安装 Nginx 之前,请确保你的系统满足以下编译和运行依赖:
- 操作系统:CentOS 7 / 8(本文以 CentOS 7 为例)
- GCC 编译器:用于编译 Nginx 源码
- PCRE 库:支持正则表达式(Rewrite 模块需要)
- zlib 库:支持 Gzip 压缩
- OpenSSL 库:支持 HTTPS
通过以下命令一键安装所需依赖:
bash
sudo yum install -y gcc gcc-c++ pcre pcre-devel zlib zlib-devel openssl openssl-devel提示:如果系统未安装
wget,可额外执行sudo yum install -y wget。
-
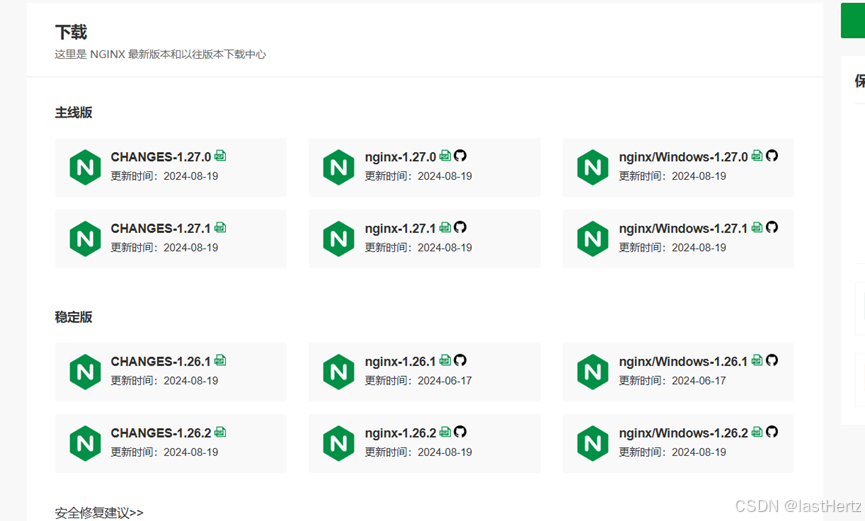
首先打开下载网址 https://www.nginx.org.cn/product
-
找到需要安装的 Nginx 的版本(这边以 Nginx 1.27 为例子)
-
在下载页面中,第二列提供的是 Linux 环境的安装包,第三列为 Windows 环境的安装包
-
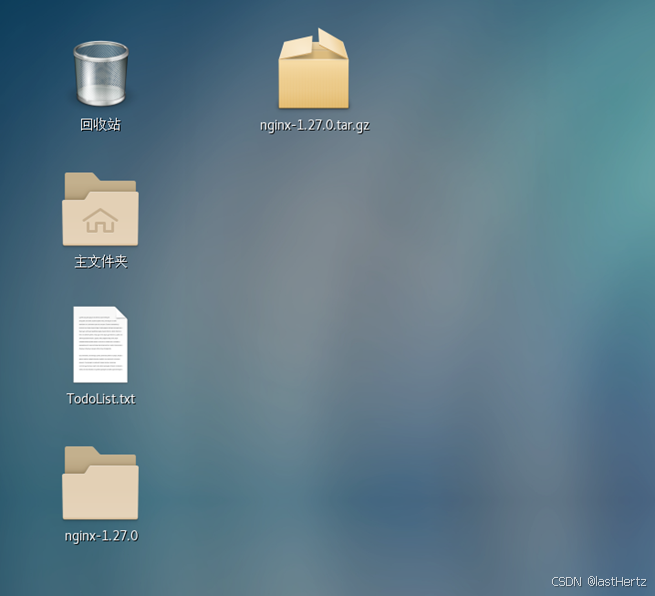
在 Linux 中存放后为 nginx-1.27.0.tar.gz 文件
-
进入 Nginx 压缩包所在的目录下,输入
tar -zxvf nginx-1.27.0.tar.gz解压我们刚才所放置的 Nginx 文件 -
使用 ./configure 命令执行配置文件
- 第4步的补充: 有可能出现报错
sh
已加载插件:fastestmirror, langpacks Loading mirror speeds from cached hostfile Could
not retrieve mirrorlist
http://mirrorlist.centos.org/?release=7&arch=x86_64&repo=os&infra=stock error
was 14: curl#6 - "Could not resolve host: mirrorlist.centos.org; 未知的错误"
One of the configured repositories failed (未知),
and yum doesn't have enough cached data to continue. At this point the only safe
thing yum can do is fail. There are a few ways to work
"fix" this: 1. Contact the upstream for the repository and
get them to fix the problem. 2. Reconfigure the baseurl/etc.
for the repository, to point to a working upstream.
This is most often useful if you are using a newer distribution
release than is supported by the repository (and the packages
for the previous distribution release still work). 3. Run the
command with the repository temporarily disabled
yum --disablerepo=<repoid> ... 4. Disable the repository permanently,
so yum won't use it by default. Yum will then just ignore the repository
until you permanently enable it again or use --enablerepo for temporary
usage: yum-config-manager --disable <repoid> or subscription-manager
repos --disable=<repoid> 5. Configure the failing repository to be skipped,
if it is unavailable. Note that yum will try to contact the repo. when it
runs most commands, so will have to try and fail each time (and thus. yum will
be be much slower). If it is a very temporary problem though, this is often
a nice compromise: yum-config-manager --save --setopt=<repoid>.skip_if_unavailable=true
Cannot find a valid baseurl for repo: base/7/x86_64- 这个时候我们更换镜像源
- 备份原有的 CentOS-Base.repo 文件:
sudo cp /etc/yum.repos.d/CentOS-Base.repo /etc/yum.repos.d/CentOS-Base.repo.bak - 下载新的镜像源配置文件,例如可以使用阿里云的 CentOS 镜像源:
sh
sudo wget -O /etc/yum.repos.d/CentOS-Base.repo http://mirrors.aliyun.com/repo/Centos-7.repo- 更新 yum 缓存:
sh
sudo yum makecache- 完成以上步骤后,再来运行 ./configure 来运行配置文件
sh
[root@localhost nginx-1.27.0]# make install make: *** 没有规则可以创建目标"install"。 停止。 [root@localhost nginx-1.27.0]# make make: *** 没有规则可以创建"default"需要的目标"build"。 停止。 [root@localhost nginx-1.27.0]#启动与验证
编译安装完成后,下一步就是启动 Nginx 并验证服务是否正常运行。
启动 Nginx 服务
根据你的系统服务管理方式,选择合适的启动方式。
方式一:直接运行 Nginx 二进制文件
源码编译安装后,Nginx 默认安装在 /usr/local/nginx,可执行文件位于 /usr/local/nginx/sbin/nginx。直接执行即可启动:
bash
sudo /usr/local/nginx/sbin/nginx启动后没有任何输出即表示成功。可以通过以下命令查看 Nginx 是否正在运行:
bash
ps aux | grep nginx应能看到 master process 和 worker process 两条记录。
方式二:配置 systemd 服务管理(推荐,适用于 CentOS 7/8)
为 Nginx 创建 systemd 服务单元文件,便于使用 systemctl 管理启停。
bash
sudo vi /etc/systemd/system/nginx.service写入以下内容:
ini
[Unit]
Description=The NGINX HTTP and reverse proxy server
After=network.target remote-fs.target nss-lookup.target

[Service]
Type=forking
PIDFile=/usr/local/nginx/logs/nginx.pid
ExecStartPre=/usr/local/nginx/sbin/nginx -t
ExecStart=/usr/local/nginx/sbin/nginx
ExecReload=/usr/local/nginx/sbin/nginx -s reload
ExecStop=/bin/kill -s QUIT $MAINPID
PrivateTmp=true

[Install]
WantedBy=multi-user.target
保存退出后,重载 systemd 并启动 Nginx:
bash
sudo systemctl daemon-reload
sudo systemctl start nginx
设置开机自启
若使用 systemd 管理服务,可通过以下命令将 Nginx 设置为开机自动启动:
bash
sudo systemctl enable nginx若要取消开机自启,执行:
bash
sudo systemctl disable nginx如果使用的是直接运行方式,可将启动命令追加到 /etc/rc.local 中(需确保该文件有可执行权限):
bash
echo "/usr/local/nginx/sbin/nginx" | sudo tee -a /etc/rc.local
sudo chmod +x /etc/rc.d/rc.local
验证安装是否成功
1. 使用 curl 命令测试
bash
curl -I http://localhost若返回 HTTP/1.1 200 OK 及 Server: nginx/... 字样,则说明 Nginx 已成功运行。
也可以获取完整页面内容:
bash
curl http://localhost2. 通过浏览器访问
在浏览器地址栏输入服务器的 IP 地址或域名,如果出现"Welcome to nginx!"的页面(默认欢迎页),则说明安装成功。
若无法访问,请检查防火墙是否放行了 80 端口:
bash
sudo firewall-cmd --permanent --add-port=80/tcp
sudo firewall-cmd --reload
或关闭防火墙进行临时测试(仅用于调试,不建议在生产环境直接关闭):
bash
sudo systemctl stop firewalld以上步骤完成后,Nginx 即已成功安装并运行在你的服务器上。
常见问题与解决
在安装和初次运行 Nginx 时可能会遇到一些典型问题,本节整理了文中出现及常见的几个问题及其解决方法。
1. yum 镜像源错误
使用 CentOS 7 时,执行 ./configure 前若出现 Could not resolve host: mirrorlist.centos.org 等错误,说明官方镜像源已无法使用。
解决方法:更换为阿里云等国内可用镜像源。
bash
# 备份原有仓库
sudo cp /etc/yum.repos.d/CentOS-Base.repo /etc/yum.repos.d/CentOS-Base.repo.bak

# 下载阿里云镜像源
sudo wget -O /etc/yum.repos.d/CentOS-Base.repo http://mirrors.aliyun.com/repo/Centos-7.repo

# 更新 yum 缓存
sudo yum makecache
更新完毕后再重新安装依赖或执行 ./configure 即可。
2. make install 失败
运行 make install 时报 没有规则可以创建目标"install" 或 没有规则可以创建"default"需要的目标"build",通常是因为 ./configure 未成功生成完整的 Makefile。
解决方法:重新执行完整的配置、编译与安装流程。
bash
# 回到 Nginx 源码目录
cd nginx-1.27.0

# 清理可能残留的中间文件
sudo make clean

# 重新配置(可添加所需模块参数)
./configure

# 编译并安装
sudo make && sudo make install
当 ./configure 末尾显示 Configuration summary 时,即表示配置成功,随后 make 才会正确生成。
3. 端口被占用(80 或 443)
启动 Nginx 时可能出现 bind() to 0.0.0.0:80 failed (98: Address already in use),说明 80(或 443)端口已被其他服务(如 Apache)占用。
解决方法:
bash
# 查看占用 80 端口的进程
sudo lsof -i :80
# 或
sudo netstat -tlnp | grep :80

# 停止占用进程,例如停掉 httpd
sudo systemctl stop httpd

# 然后启动 Nginx
sudo systemctl start nginx
若希望保留原有服务,也可以修改 Nginx 配置监听其他端口(如 8080):
bash
# 编辑配置文件(路径可能为 /usr/local/nginx/conf/nginx.conf)
sudo vi /usr/local/nginx/conf/nginx.conf

# 修改 listen 80; 为 listen 8080;修改后重新载入配置:sudo nginx -s reload
4. 访问时返回 403 Forbidden
通过浏览器访问 Nginx 页面时出现 403 错误,多见于文件权限不足或 SELinux 策略限制。
解决方法:
bash
# 1. 赋予 Nginx 根目录正确权限
sudo chown -R nginx:nginx /usr/local/nginx/html

# 2. 临时关闭 SELinux 确认是否由 SELinux 导致(测试用)
sudo setenforce 0

# 3. 如果确实是 SELinux 原因,建议通过 chcon 添加安全上下文,而非永久关闭
sudo chcon -R -t httpd_sys_content_t /usr/local/nginx/html
正式生产环境中,不建议直接关闭 SELinux,应通过 chcon 或 semanage 配置合理的策略。