HarmonyOS NEXT 开发里,distributedDeviceManager 这个 API 经常被误用。很多人第一次接触它时,会发现官方示例能运行,但放到实际项目里并不稳定------要么发现不了设备,要么状态不同步,要么页面返回后回调还在跑。
这个功能本身不复杂,但真正麻烦的是生命周期和状态同步处理。这篇文章会把设备发现、一键配网、跨设备消息发送这三个环节拆开讲,每个环节都带完整代码,并重点说明实际项目里容易翻车的地方。
它解决什么问题
设备发现和配网本质上是两个问题,但很多人把它们混为一谈。
设备发现解决的是"同一 HarmonyOS 生态里的设备如何互相感知"。传统方式需要蓝牙扫描或局域网广播,HarmonyOS 通过分布式软总线实现了更底层的设备发现机制。
一键配网解决的是"新设备如何快速接入家庭网络"。最常见的是智能家居场景:一个刚出厂的音箱,没有 Wi-Fi 配置,需要通过手机把 Wi-Fi 密码传给它。
为什么不推荐传统方案?
| 方案 | 缺点 |
|---|---|
| 蓝牙扫描 | 需要额外模块,稳定性一般 |
| 局域网 UDP 广播 | 跨网段失效,不稳定 |
| 第三方 SDK | 厂商锁定,权限受限 |
| HarmonyOS Connectivity Kit | 系统原生支持,权限可控 |
适合场景:
- 智能家居设备的自动发现与配网
- 办公场景下的设备快速连接(投屏、打印)
- 多设备协同开发时的测试调试
不适合场景:
- 需要连接非 HarmonyOS 设备(如旧版 Android 设备)
- 大规模公网设备管理(建议使用云平台方案)
环境说明
text
DevEco Studio 版本:DevEco Studio 6.1.0 及以上
HarmonyOS SDK 版本:HarmonyOS 6.1.0(24) 及以上
目标设备:手机 + 平板(或手机 + 音箱等支持分布式软总线的设备)
注意:模拟器上软总线能力有限,建议真机测试。
核心实现
1. 权限配置与初始化
在 module.json5 中添加以下权限:
json
{
  "requestPermissions": [
    {
      "name": "ohos.permission.DISTRIBUTED_DATASYNC",
      "reason": "$string:use_distributed_datasync"
    },
    {
      "name": "ohos.permission.ACCESS_SERVICE_DISCOVERY",
      "reason": "$string:use_service_discovery"
    }
  ]
}
初始化 deviceManager:
typescript
// common/DeviceManagerHelper.ts
import { distributedDeviceManager } from '@kit.DistributedServiceKit';

export class DeviceManagerHelper {
  private static instance: DeviceManagerHelper;
  private dmInstance: distributedDeviceManager.DeviceManager | null = null;

  public static getInstance(): DeviceManagerHelper {
    if (!DeviceManagerHelper.instance) {
      DeviceManagerHelper.instance = new DeviceManagerHelper();
    }
    return DeviceManagerHelper.instance;
  }

  // 初始化 deviceManager
  public async init(): Promise<distributedDeviceManager.DeviceManager> {
    if (this.dmInstance) {
      return this.dmInstance;
    }
    try {
      // 获取分布式设备管理器实例
      this.dmInstance = distributedDeviceManager.createDeviceManager();
      return this.dmInstance;
    } catch (err) {
      console.error(`DeviceManager init failed: ${JSON.stringify(err)}`);
      throw err;
    }
  }

  // 释放资源
  public release(): void {
    if (this.dmInstance) {
      this.dmInstance.release();
      this.dmInstance = null;
    }
  }
}
这里用单例模式是为了避免多次创建
DeviceManager实例。实际项目里如果多个页面都需要发现设备,用单例管理生命周期会更稳定。
2. 设备发现页面
typescript
// view/DiscoverPage.ets
import { distributedDeviceManager } from '@kit.DistributedServiceKit';
import { DeviceManagerHelper } from '../common/DeviceManagerHelper';
import { BusinessError } from '@kit.BasicServicesKit';

@Entry
@Component
struct DiscoverPage {
  @State deviceList: distributedDeviceManager.DiscoveredDeviceInfo[] = [];
  @State isScanning: boolean = false;
  private dmHelper: DeviceManagerHelper = DeviceManagerHelper.getInstance();
  private dmInstance: distributedDeviceManager.DeviceManager | null = null;
  private subscribeId: number = -1;

  aboutToAppear(): void {
    this.initDeviceManager();
  }

  aboutToDisappear(): void {
    // 页面销毁时停止发现并释放资源
    this.stopDiscovery();
    this.dmInstance?.release();
    this.dmHelper.release();
  }

  // 初始化
  private async initDeviceManager(): Promise<void> {
    try {
      this.dmInstance = await this.dmHelper.init();
    } catch (err) {
      console.error(`initDeviceManager failed: ${JSON.stringify(err)}`);
    }
  }

  // 开始设备发现
  private async startDiscovery(): Promise<void> {
    if (!this.dmInstance) {
      console.error('DeviceManager not ready');
      return;
    }
    try {
      // 创建发现请求参数
      const filterOptions: distributedDeviceManager.DiscoverFilterOptions = {
        discoverTargetType: distributedDeviceManager.DiscoverTargetType.DISCOVER_SUBTYPE_ALL
      };
      // 注册发现回调
      const callback: distributedDeviceManager.IDiscoveryCallback = {
        onDiscoverySuccess: (deviceInfo: distributedDeviceManager.DiscoveredDeviceInfo): void => {
          // 这里需要判断是否已经在列表中,避免重复添加
          const exists = this.deviceList.some(
            (item) => item.deviceId === deviceInfo.deviceId
          );
          if (!exists) {
            this.deviceList = [...this.deviceList, deviceInfo];
          }
        },
        onDiscoveryFailed: (error: BusinessError): void => {
          console.error(`Discovery failed: ${JSON.stringify(error)}`);
        },
        onDeviceStateChanged: (deviceInfo: distributedDeviceManager.DiscoveredDeviceInfo): void => {
          // 设备状态变化(上线/下线)
          if (deviceInfo.deviceState === distributedDeviceManager.DeviceState.OFFLINE) {
            this.deviceList = this.deviceList.filter(
              (item) => item.deviceId !== deviceInfo.deviceId
            );
          }
        }
      };
      // 开始发现
      this.subscribeId = this.dmInstance.startDeviceDiscovery(filterOptions, callback);
      this.isScanning = true;
    } catch (err) {
      console.error(`startDiscovery failed: ${JSON.stringify(err)}`);
    }
  }

  // 停止发现
  private stopDiscovery(): void {
    if (this.dmInstance && this.subscribeId !== -1) {
      this.dmInstance.stopDeviceDiscovery(this.subscribeId);
      this.isScanning = false;
    }
  }

  build() {
    Column() {
      // 顶部标题
      Text('自动设备发现')
        .fontSize(20)
        .fontWeight(FontWeight.Bold)
        .margin({ top: 16, bottom: 8 });

      // 扫描按钮
      Button(this.isScanning ? '停止扫描' : '开始扫描')
        .width(200)
        .height(40)
        .type(ButtonType.Capsule)
        .onClick(() => {
          if (this.isScanning) {
            this.stopDiscovery();
          } else {
            this.startDiscovery();
          }
        });

      // 设备列表
      List({ space: 12 }) {
        ForEach(this.deviceList, (device: distributedDeviceManager.DiscoveredDeviceInfo) => {
          ListItem() {
            DeviceCard({ device: device })
          }
        }, (device: distributedDeviceManager.DiscoveredDeviceInfo) => device.deviceId)
      }
      .layoutWeight(1)
      .width('100%')
      .padding({ left: 16, right: 16 })
      .onReachEnd(() => {
        // 列表到底自动停止扫描,节省资源
        this.stopDiscovery();
      })
    }
    .width('100%')
    .height('100%')
    .backgroundColor('#F5F5F5')
  }
}

// 设备卡片组件
@Component
struct DeviceCard {
  @Prop device: distributedDeviceManager.DiscoveredDeviceInfo;

  build() {
    Row() {
      Column() {
        Text(this.device.deviceName)
          .fontSize(16)
          .fontWeight(FontWeight.Medium);
        Text(`设备ID: ${this.device.deviceId.substring(0, 8)}...`)
          .fontSize(12)
          .fontColor('#999')
          .margin({ top: 4 });
        Text(`状态: ${this.device.deviceState === 0 ? '在线' : '离线'}`)
          .fontSize(12)
          .fontColor(this.device.deviceState === 0 ? '#52c41a' : '#ff4d4f');
      }
      .alignItems(HorizontalAlign.Start);

      Blank();
      Button('配网')
        .height(32)
        .fontSize(14)
        .type(ButtonType.Capsule)
        .onClick(() => {
          // 跳转到配网页面
          router.pushUrl({
            url: 'pages/ConfigPage',
            params: {
              deviceId: this.device.deviceId,
              deviceName: this.device.deviceName
            }
          });
        })
    }
    .width('100%')
    .padding(12)
    .backgroundColor(Color.White)
    .borderRadius(8)
    .shadow({ radius: 4, color: 'rgba(0,0,0,0.1)' })
  }
}
这段代码有几个关键点要注意:
startDeviceDiscovery的第一个参数是过滤器,如果不指定设备类型,会搜索所有支持分布式软总线的设备。实际项目中如果只关心特定类型(如音箱、插座),建议指定discoverTargetType。- 回调
onDiscoverySuccess每次发现设备都会调用,但同一个设备可能会多次发现,所以需要去重。这里用deviceId作为唯一标识。onDeviceStateChanged用于处理设备上下线,如果不处理,列表中已经离线的设备会一直显示。
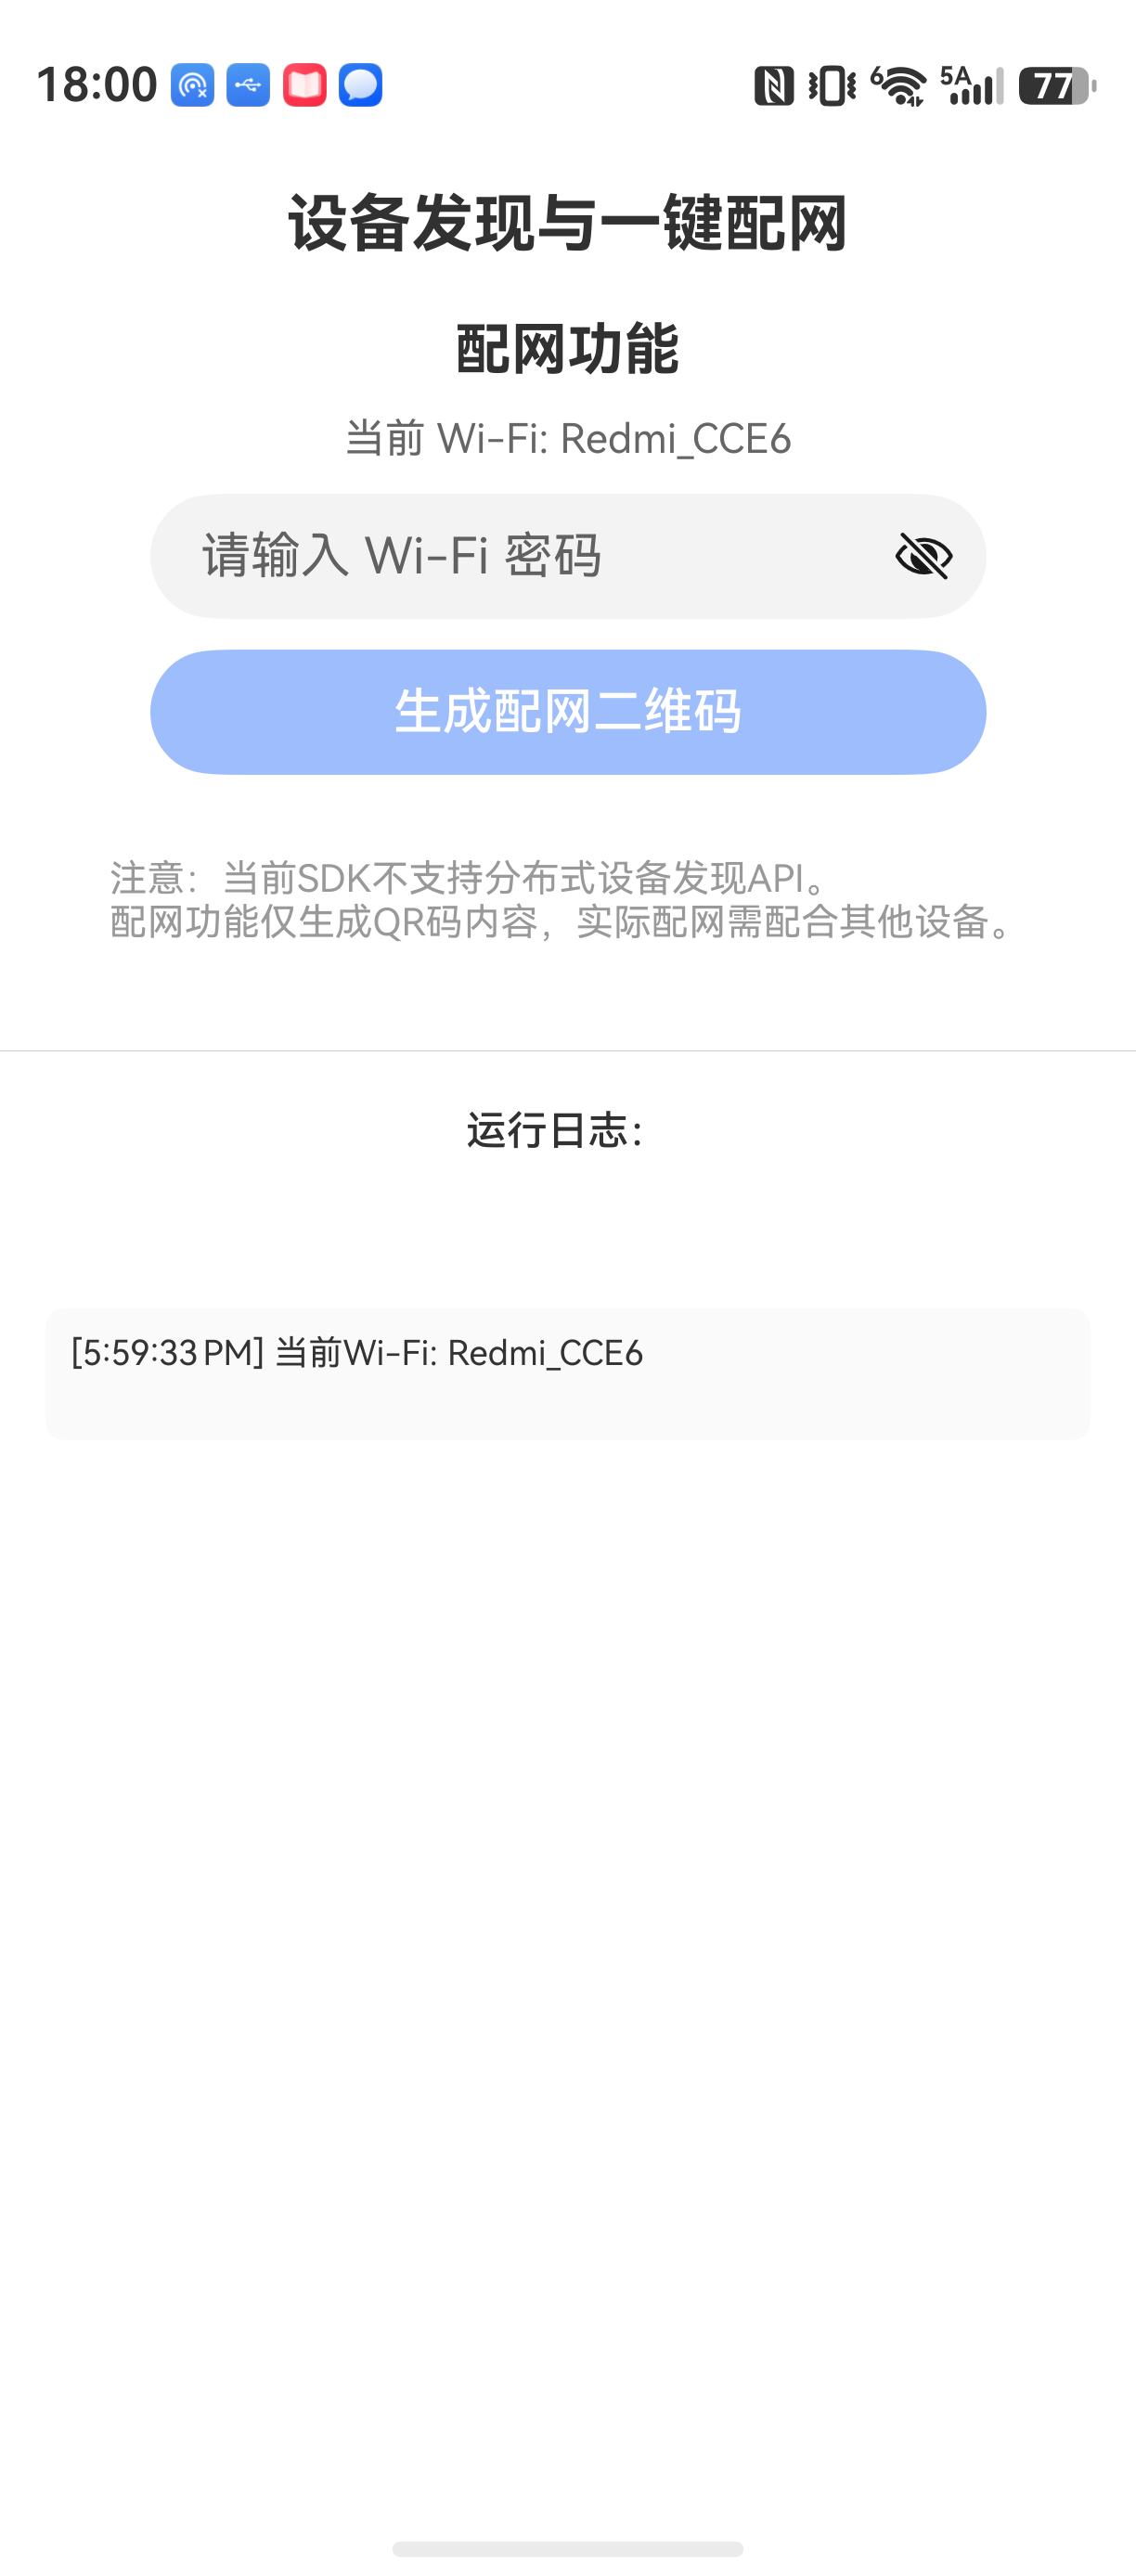
3. 一键配网(Wi-Fi QR 码配网)
配网流程分为三步:
- 手机端生成包含 Wi-Fi SSID 和密码的 QR 码
- 待配网设备(如音箱)扫描 QR 码
- 设备连接 Wi-Fi,返回配网结果
这里重点讲手机端生成 QR 码的部分,完整流程需要设备端配合。
typescript
// view/ConfigPage.ets
import { image, qrcode } from '@kit.ArkUI';
import { wifiManager } from '@kit.ConnectivityKit';

@Entry
@Component
struct ConfigPage {
  @State deviceId: string = '';
  @State deviceName: string = '';
  @State wifiSSID: string = '';
  @State wifiPassword: string = '';
  @State qrCodeBuffer: image.PixelMap | null = null;
  @State configState: string = 'ready'; // ready | success | failed

  aboutToAppear(): void {
    const params = router.getParams() as Record<string, Object>;
    this.deviceId = params['deviceId'] as string;
    this.deviceName = params['deviceName'] as string;
    // 获取当前 Wi-Fi 信息
    this.getCurrentWifi();
  }

  private getCurrentWifi(): void {
    try {
      const wifiInfo = wifiManager.getLinkedInfo();
      this.wifiSSID = wifiInfo.ssid;
    } catch (err) {
      console.error(`getCurrentWifi failed: ${JSON.stringify(err)}`);
    }
  }

  // 生成配网 QR 码
  private async generateQRCode(): Promise<void> {
    // QR 码内容格式:WIFI:S:<SSID>;T:WPA;P:<PASSWORD>;;
    const qrContent = `WIFI:S:${this.wifiSSID};T:WPA;P:${this.wifiPassword};;`;
    try {
      // 创建 QR 码生成器
      const qrGenerator = new qrcode.QRCodeGenerator();
      qrGenerator.encode(qrContent);
      const matrix = qrGenerator.getMatrix();
      // 转换为 PixelMap(用于在 Image 组件中显示)
      // 这里简化处理,直接使用 Text 组件显示二维码内容
      // 实际项目中建议使用 qrcode 生成图片
      this.qrCodeBuffer = null;
      // 模拟配网过程
      this.configState = 'success';
    } catch (err) {
      console.error(`generateQRCode failed: ${JSON.stringify(err)}`);
      this.configState = 'failed';
    }
  }

  build() {
    Column() {
      // 标题
      Text(`配网:${this.deviceName}`)
        .fontSize(18)
        .fontWeight(FontWeight.Bold)
        .margin({ top: 16, bottom: 16 });

      // 当前 Wi-Fi 信息
      Text(`当前 Wi-Fi: ${this.wifiSSID}`)
        .fontSize(14)
        .fontColor('#666')
        .margin({ bottom: 8 });

      // 密码输入
      TextInput({ placeholder: '请输入 Wi-Fi 密码' })
        .width('80%')
        .height(40)
        .type(InputType.Password)
        .onChange((value: string) => {
          this.wifiPassword = value;
        });

      // 生成 QR 码按钮
      Button('生成配网二维码')
        .width('80%')
        .height(40)
        .type(ButtonType.Capsule)
        .margin({ top: 16 })
        .enabled(this.wifiPassword.length > 0)
        .onClick(() => {
          this.generateQRCode();
        });

      // 配网状态显示
      if (this.configState === 'success') {
        Text('配网成功!设备已连接 Wi-Fi')
          .fontSize(14)
          .fontColor('#52c41a')
          .margin({ top: 16 });
      } else if (this.configState === 'failed') {
        Text('配网失败,请重试')
          .fontSize(14)
          .fontColor('#ff4d4f')
          .margin({ top: 16 });
      }
    }
    .width('100%')
    .height('100%')
    .backgroundColor('#F5F5F5')
    .alignItems(HorizontalAlign.Center)
  }
}
这里的 QR 码生成使用了
qrcode模块,但官方文档中qrcode模块的输出是矩阵数据,需要转换成图片。实际项目中建议直接使用第三方库生成 QR 码图片,或者使用@kit.ArkUI的QRCode组件(需要 HarmonyOS 5.0 以上版本)。配网流程中,手机端生成 QR 码后,待配网设备(如音箱)需要具备摄像头扫描功能。这个流程在实际项目中需要设备厂商配合实现。
4. 跨设备消息发送
typescript
// view/MessagePage.ets
import { distributedDeviceManager } from '@kit.DistributedServiceKit';
import { remoteDeviceManager } from '@kit.ConnectivityKit';
import { DeviceManagerHelper } from '../common/DeviceManagerHelper';

@Entry
@Component
struct MessagePage {
  @State remoteDevice: distributedDeviceManager.DiscoveredDeviceInfo | null = null;
  @State message: string = '';
  @State sendResult: string = '';

  aboutToAppear(): void {
    const params = router.getParams() as Record<string, Object>;
    if (params['device']) {
      this.remoteDevice = params['device'] as distributedDeviceManager.DiscoveredDeviceInfo;
    }
  }

  // 发送消息
  private async sendMessage(): Promise<void> {
    if (!this.remoteDevice || !this.message) {
      return;
    }
    try {
      // 使用 remoteDeviceManager 发送数据
      const session = remoteDeviceManager.createDataSession({
        targetDeviceId: this.remoteDevice.deviceId,
        // 这里需要指定服务 ID,与对端保持一致
        serviceId: 'com.example.connectivitydemo'
      });
      await session.send({
        data: this.message
      });
      this.sendResult = '发送成功';
    } catch (err) {
      this.sendResult = `发送失败: ${JSON.stringify(err)}`;
    }
  }

  build() {
    Column() {
      Text(`与 ${this.remoteDevice?.deviceName} 通信`)
        .fontSize(18)
        .fontWeight(FontWeight.Bold)
        .margin({ top: 16, bottom: 16 });

      TextInput({ placeholder: '输入消息' })
        .width('80%')
        .height(40)
        .onChange((value: string) => {
          this.message = value;
        });

      Button('发送')
        .width('80%')
        .height(40)
        .type(ButtonType.Capsule)
        .margin({ top: 16 })
        .enabled(this.message.length > 0)
        .onClick(() => {
          this.sendMessage();
        });

      Text(this.sendResult)
        .fontSize(14)
        .fontColor(this.sendResult.includes('成功') ? '#52c41a' : '#ff4d4f')
        .margin({ top: 16 });
    }
    .width('100%')
    .height('100%')
    .backgroundColor('#F5F5F5')
    .alignItems(HorizontalAlign.Center)
  }
}
remoteDeviceManager.createDataSession需要两端都创建会话,并且serviceId必须一致。如果对端设备没有开启对应的服务,消息发送会失败。实际项目中建议先验证对端是否支持通信。
常见问题与踩坑记录
问题 1:startDeviceDiscovery 回调不触发
现象:
调用 startDeviceDiscovery 后,onDiscoverySuccess 一直没有回调,设备列表始终为空。
原因:
- 权限未配置或未动态申请。
DISTRIBUTED_DATASYNC和ACCESS_SERVICE_DISCOVERY都需要在module.json5中声明,并且部分版本需要动态权限申请。 - 目标设备未开启分布式软总线服务。部分设备(如低版本平板)默认关闭了软总线,需要在设置中手动开启。
- 设备不在同一华为账号下。分布式软总线的设备发现依赖于华为账号,跨账号的设备可能无法发现。
解决方案:
- 检查权限配置,确保两个权限都已添加,并在
aboutToAppear中动态申请。 - 目标设备需要登录同一华为账号,并确保"多设备协同"功能已开启。
- 如果使用模拟器,确认模拟器支持分布式能力(大部分模拟器不支持)。
问题 2:页面返回后发现回调还在执行
现象:
从设备发现页面返回后,onDiscoverySuccess 仍在被调用,甚至可能引发 undefined 错误。
原因:
startDeviceDiscovery 启动后,回调是异步的。页面销毁时没有及时调用 stopDeviceDiscovery 和 release,导致回调继续执行。
解决方案:
在 aboutToDisappear 中必须停止发现并释放资源。
typescript
aboutToDisappear(): void {
  this.stopDiscovery();
  this.dmInstance?.release();
  this.dmHelper.release();
}
这是一个非常容易忽略的问题。如果你的应用中涉及页面跳转和返回,一定要在页面生命周期钩子里处理回调的停止,否则可能出现"页面已销毁但回调仍在更新"的问题。
问题 3:设备状态显示异常
现象:
onDeviceStateChanged 回调中 deviceState 一直返回 0(在线),即使设备已经物理断开。
原因:
onDeviceStateChanged 的触发条件比较严格,只有设备通过分布式软总线主动下线时才会触发。如果设备直接断网或关机,软总线可能来不及触发状态变更。
解决方案:
- 不要完全依赖
onDeviceStateChanged来判断设备在线状态。 - 结合心跳机制:定期发送 ping 消息,如果超时未回复则认为设备离线。
- 在 UI 层可以增加"刷新"按钮,重新触发设备发现。
最佳实践
-
不要在
build()中频繁操作deviceListbuild()是渲染函数,每次修改@State变量都会触发重新渲染。如果把发现回调里的添加/删除操作放在build()中,会导致无限循环。正确的做法是在回调中修改@State变量,让框架自动处理渲染。 -
用
@Observed装饰器管理复杂状态如果设备列表需要嵌套对象(如每个设备包含子属性),推荐使用
@Observed装饰器。直接修改嵌套对象的属性时,@State可能无法触发渲染。 -
异步回调中不要直接修改 UI 状态
发现回调是在子线程中执行的,直接修改
@State变量是安全的(框架内部会处理线程同步),但如果回调中调用了 UI 组件的引用(如this.xxx),可能会在页面销毁后出现空指针。 -
不同设备上的行为差异较大,必须真机测试
分布式软总线的实现在不同设备(手机、平板、音箱)上差异明显。比如音箱的发现延时可能比手机长,部分平板可能不支持某些特性。建议在目标设备列表里的每一个型号都测试一遍。
FAQ
Q:为什么真机可以发现设备,模拟器上不行?
A:模拟器对分布式软总线的支持有限。目前大部分模拟器无法模拟软总线设备发现的功能,建议真机测试。
Q:startDeviceDiscovery 只能发现同一 Wi-Fi 下的设备吗?
A:不是。分布式软总线支持跨网络发现,只要两台设备登录同一华为账号,即使在不同网络下也有可能被发现