1. 链接脚本u-boot.lds详解
要分析 U-Boot 的启动流程,首先要找到"入口",即第一行程序在哪里。程序的链接是由链接脚本来决定的,所以通过链接脚本可以找到程序的入口。如果没有编译过 U-Boot,链接脚本位于 arch/arm/cpu/u-boot.lds。但是,这个文件并不是最终使用的链接脚本,最终的链接脚本是在这个链接脚本的基础上生成的。编译一下 U-Boot,编译完成以后就会在 U-Boot 根目录下生成 u-boot.lds 文件,如图所示:

只有编译 u-boot 以后才会在根目录下出现 u-boot.lds 文件!
打开 u-boot.lds,内容如下:
1 OUTPUT_FORMAT("elf32-littlearm", "elf32-littlearm", "elf32-littlearm")
2 OUTPUT_ARCH(arm)
3 ENTRY(_start)
4 SECTIONS
5 {
6 . = 0x00000000;
7 . = ALIGN(4);
8 .text :
9 {
10 *(.__image_copy_start)
11 *(.vectors)
12 arch/arm/cpu/armv7/start.o (.text*)
13 *(.text*)
14 }
15 . = ALIGN(4);
16 .rodata : { *(SORT_BY_ALIGNMENT(SORT_BY_NAME(.rodata*))) }
17 . = ALIGN(4);
18 .data : {
19 *(.data*)
20 }
21 . = ALIGN(4);
22 . = .;
23 . = ALIGN(4);
24 .u_boot_list : {
25 KEEP(*(SORT(.u_boot_list*)));
26 }
27 . = ALIGN(4);
28 .image_copy_end :
29 {
30 *(.__image_copy_end)
31 }
32 .rel_dyn_start :
33 {
34 *(.__rel_dyn_start)
35 }
36 .rel.dyn : {
37 *(.rel*)
38 }
39 .rel_dyn_end :
40 {
41 *(.__rel_dyn_end)
42 }
43 .end :
44 {
45 *(.__end)
46 }
47 _image_binary_end = .;
48 . = ALIGN(4096);
49 .mmutable : {
50 *(.mmutable)
51 }
52 .bss_start __rel_dyn_start (OVERLAY) : {
53 KEEP(*(.__bss_start));
54 __bss_base = .;
55 }
56 .bss __bss_base (OVERLAY) : {
57 *(.bss*)
58 . = ALIGN(4);
59 __bss_limit = .;
60 }
61 .bss_end __bss_limit (OVERLAY) : {
62 KEEP(*(.__bss_end));
63 }
64 .dynsym _image_binary_end : { *(.dynsym) }
65 .dynbss : { *(.dynbss) }
66 .dynstr : { *(.dynstr*) }
67 .dynamic : { *(.dynamic*) }
68 .plt : { *(.plt*) }
69 .interp : { *(.interp*) }
70 .gnu.hash : { *(.gnu.hash) }
71 .gnu : { *(.gnu*) }
72 .ARM.exidx : { *(.ARM.exidx*) }
73 .gnu.linkonce.armexidx : { *(.gnu.linkonce.armexidx.*) }
74 }
第 3 行为代码当前入口点:_start, _start 在文件 arch/arm/lib/vectors.S 中有定义,如图所示:
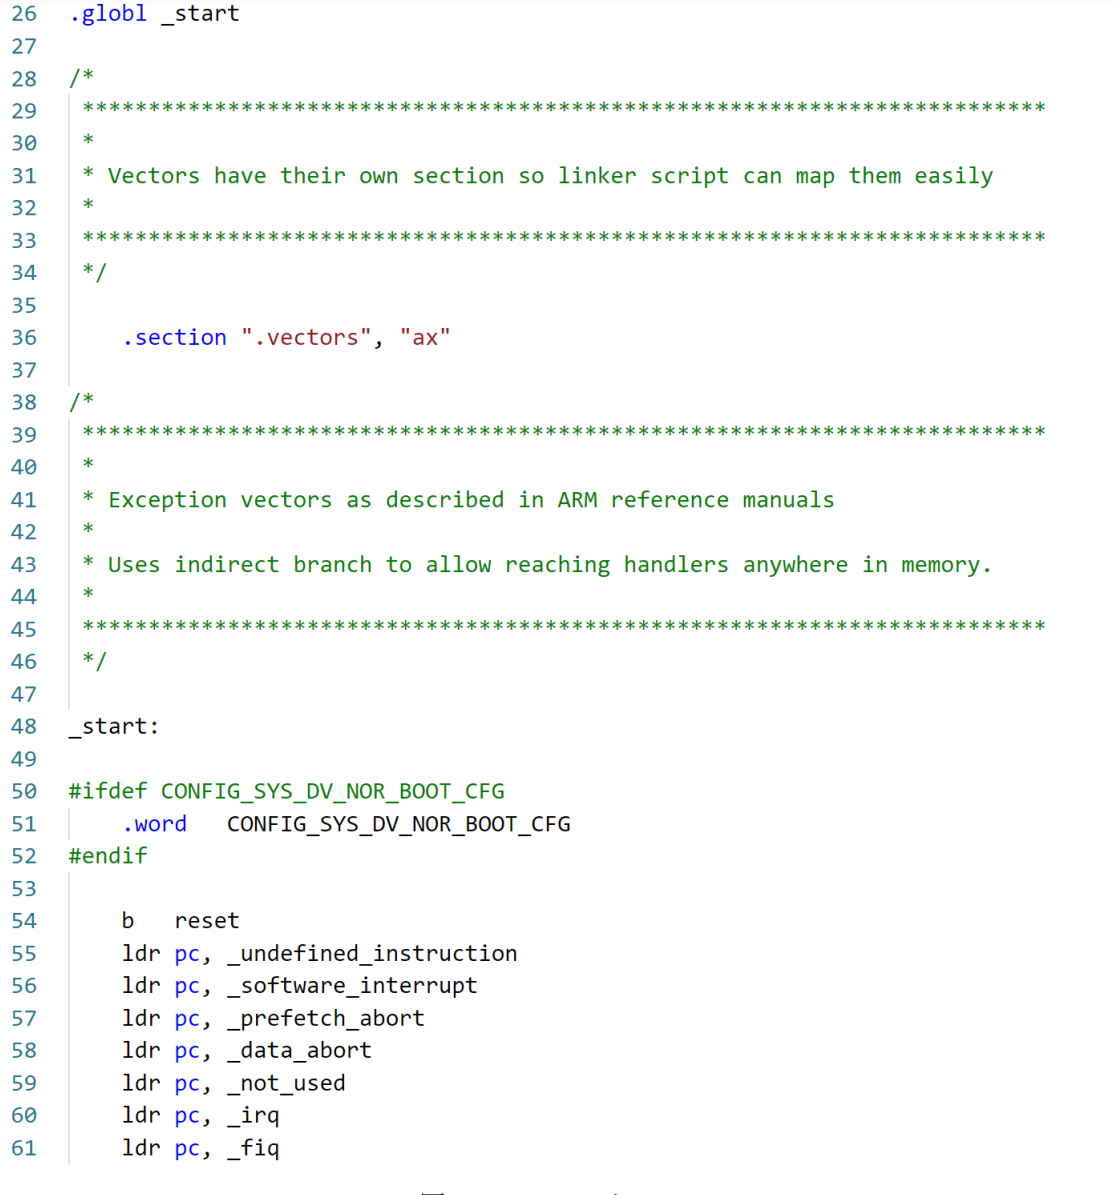
从图中的代码可以看出,_start 后面就是中断向量表,从图中的".section ".vectors", "ax"可以得到,此代码存放在.vectors 段里面。
使用如下命令在 uboot 中查找"__image_copy_start":
grep -nR "__image_copy_start"搜索结果如图所示:

打开 u-boot.map,找到如图所示位置:
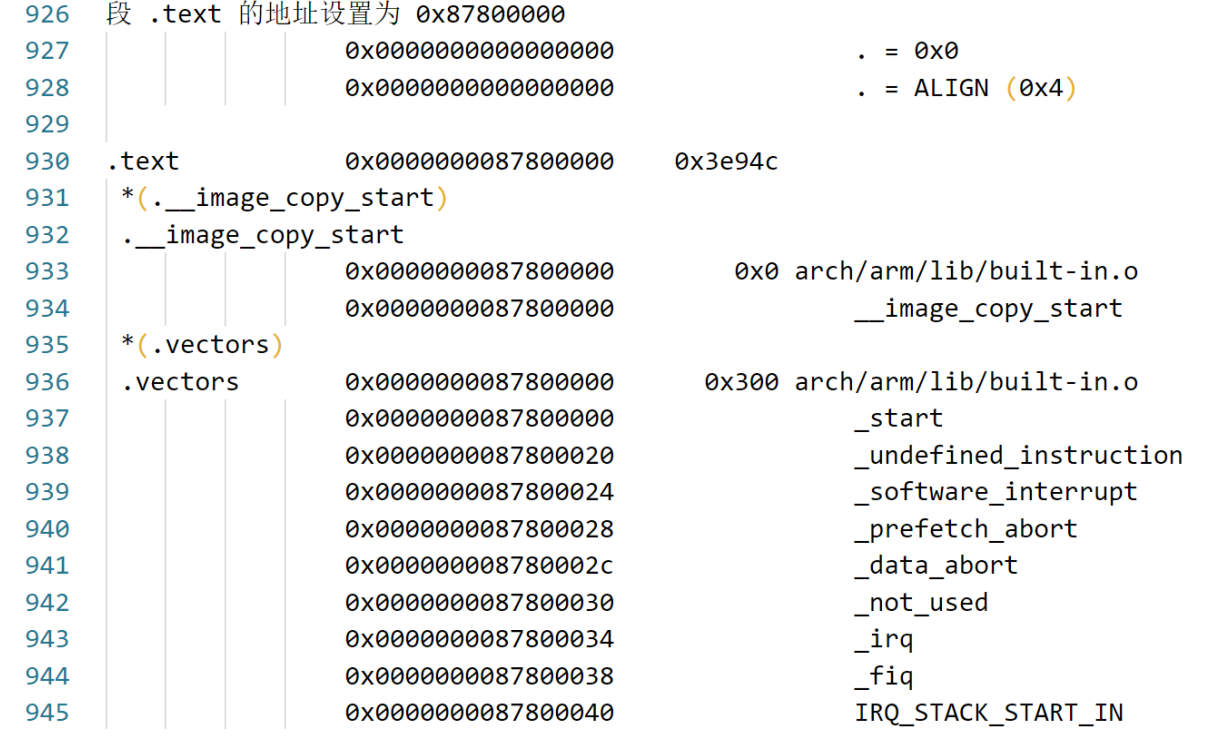
u-boot.map 文件分析
u-boot.map 是 U-Boot 的映射文件,可以从此文件看到某个文件或者函数链接到了哪个地址。从图的 932 行可以看到 __image_copy_start 为 0X87800000,而 .text 的起始地址也是 0X87800000。
继续回到示例代码中,第 11 行是 vectors 段,vectors 段保存中断向量表,从图中我们知道了 vectors.S 的代码是存在 vectors 段中的。从图可以看出,vectors 段的起始地址也是 0X87800000,说明整个 U-Boot 的起始地址就是 0X87800000,这也是裸机例程的链接起始地址选择 0X87800000 原因,目的就是为了和 U-Boot 一致。
第 12 行将 arch/arm/cpu/armv7/start.s 编译出来的代码放到中断向量表后面。
第 13 行为 .text 段,其他的代码段就放到这里。
在 u-boot.lds 中有一些跟地址有关的"变量"需要我们注意一下,后面分析 U-Boot 源码的时候会用到,这些变量要最终编译完成才能确定的!!!比如我编译完成以后这些"变量"的值如表所示:
| 变量名 | 地址数值 | 功能描述 |
|---|---|---|
| __image_copy_start | 0x87800000 | uboot 拷贝的首地址 |
| __image_copy_end | 0x8785dd54 | uboot 拷贝的结束地址 |
| __rel_dyn_start | 0x8785dd54 | .rel.dyn 段起始地址 |
| __rel_dyn_end | 0x878668f4 | .rel.dyn 段结束地址 |
| __image_binary_end | 0x878668f4 | 镜像结束地址 |
| __bss_start | 0x8785dd54 | bss 段起始地址 |
| __bss_end | 0x878a8e74 | bss 段结束地址 |
表中的"变量"值可以在 u-boot.map 文件中查找,表中除了__image_copy_start 以外,其他的变量值每次编译的时候可能会变化,如果修改了 uboot 代码、修改了 uboot 配置、选用不同的优化等级等等都会影响到这些值。所以,一切以实际值为准!
2、U-Boot 启动流程详解
1) reset 函数源码详解
从 u-boot.lds 中我们已经知道了入口点是arch/arm/lib/vectors.S 文件中的 _start,代码如下:
38 /*
39 *************************************************************
40 *
41 * Exception vectors as described in ARM reference manuals
42 *
43 * Uses indirect branch to allow reaching handlers anywhere in
44 * memory.
45 **************************************************************
46 */
47
48 _start:
49
50 #ifdef CONFIG_SYS_DV_NOR_BOOT_CFG
51 .word CONFIG_SYS_DV_NOR_BOOT_CFG
52 #endif
53
54 b reset
55 ldr pc, _undefined_instruction
56 ldr pc, _software_interrupt
57 ldr pc, _prefetch_abort
58 ldr pc, _data_abort
59 ldr pc, _not_used
60 ldr pc, _irq
61 ldr pc, _fiq
第 48 行_start 开始的是中断向量表,其中 54~61 行就是中断向量表,和裸机例程里面一样。
54 行跳转到 reset 函数里面,reset 函数在arch/arm/cpu/armv7/start.S 里面,代码如下:
22 /*****************************************************************
23 *
24 * Startup Code (reset vector)
25 *
26 * Do important init only if we don't start from memory!
27 * Setup memory and board specific bits prior to relocation.
28 * Relocate armboot to ram. Setup stack.
29 *
30 *****************************************************************/
31
32 .globl reset
33 .globl save_boot_params_ret
34
35 reset:
36 /* Allow the board to save important registers */
37 b save_boot_params
第 35 行就是 reset 函数。
第 37 行从 reset 函数跳转到了 save_boot_params 函数,而 save_boot_params 函数同样定义在 start.S 里面,定义如下:
91 /******************************************************************
92 *
93 * void save_boot_params(u32 r0, u32 r1, u32 r2, u32 r3)
94 * __attribute__((weak));
95 *
96 * Stack pointer is not yet initialized at this moment
97 * Don't save anything to stack even if compiled with -O0
98 *
99 ******************************************************************/
100 ENTRY(save_boot_params)
101 b save_boot_params_ret @ back to my caller
save_boot_params 函数也是只有一句跳转语句,跳转到 save_boot_params_ret 函数,save_boot_params_ret 函数代码如下:
38 save_boot_params_ret:
39 /*
40 * disable interrupts (FIQ and IRQ), also set the cpu to SVC32
41 * mode, except if in HYP mode already
42 */
43 mrs r0, cpsr
44 and r1, r0,#0x1f @ mask mode bits
45 teq r1, #0x1a @ test for HYP mode
46 bicne r0, r0, #0x1f @ clear all mode bits
47 orrne r0, r0, #0x13 @ set SVC mode
48 orr r0, r0, #0xc0 @ disable FIQ and IRQ
49 msr cpsr,r0
第 43 行,mrs r0, cpsr 指令读取寄存器 cpsr 中的值,并保存到 r0 寄存器中。
第 44 行,and r1, r0, #0x1f 将寄存器 r0 中的值与 0x1f 进行与运算,结果保存到 r1 寄存器中,目的就是提取 cpsr 的 bit0~bit4 这 5 位,这 5 位为 M4:0,用来设置处理器的工作模式,如表所示:
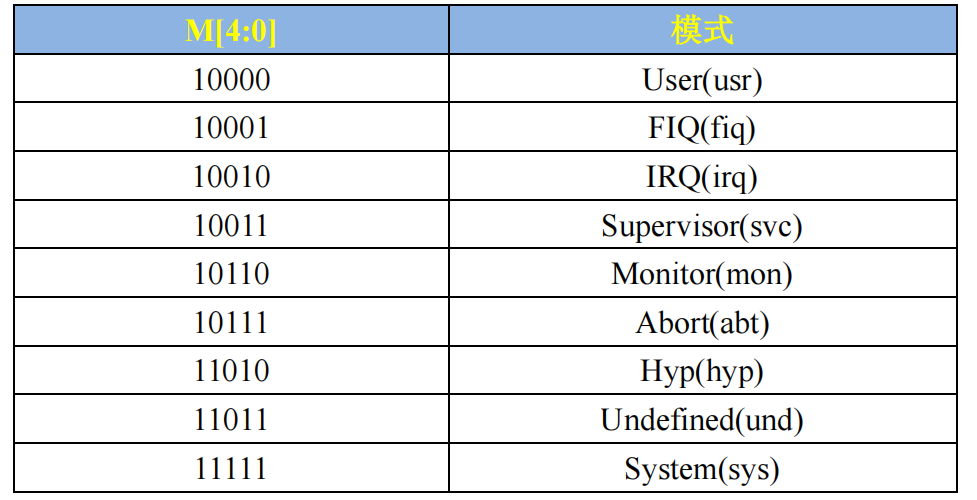
第 45 行,teq r1, #0x1a 判断 r1 寄存器的值是否等于 0x1a(二进制 0b11010),也就是判断当前处理器模式是否处于 Hyp 模式。
第 46 行,bicne r0, r0, #0x1f 如果 r1 和 0x1a 不相等(ne 表示不相等),也就是 CPU 不处于 Hyp 模式的话,就将 r0 寄存器的 bit0~bit5 进行清零,其实就是清除模式位。
第 47 行,orrne r0, r0, #0x13 如果处理器不处于 Hyp 模式的话,就将 r0 寄存器的值与 0x13 进行或运算,0x13=0b10011,也就是设置处理器进入 SVC 模式。
第 48 行,orr r0, r0, #0xc0 将 r0 寄存器的值再与 0xc0 进行或运算,那么 r0 寄存器此时的值就是 0xd3。CPSR 的 I 位和 F 位分别控制 IRQ 和 FIQ 这两个中断的开关,设置为 1 就关闭了 FIQ 和 IRQ!
第 49 行,msr cpsr, r0 将 r0 寄存器写回到 cpsr 寄存器中。完成设置 CPU 处于 SVC32 模式,并且关闭 FIQ 和 IRQ 这两个中断。
继续执行下面的代码:
51 /*
52 * Setup vector:
53 * (OMAP4 spl TEXT_BASE is not 32 byte aligned.
54 * Continue to use ROM code vector only in OMAP4 spl)
55 */
56 #if !(defined(CONFIG_OMAP44XX) && defined(CONFIG_SPL_BUILD))
57 /* Set V=0 in CP15 SCTLR register - for VBAR to point to vector */
58 mrc p15, 0, r0, c1, c0, 0 @ Read CP15 SCTLR Register
59 bic r0, #CR_V @ V = 0
60 mcr p15, 0, r0, c1, c0, 0 @ Write CP15 SCTLR Register
61
62 /* Set vector address in CP15 VBAR register */
63 ldr r0, =_start
64 mcr p15, 0, r0, c12, c0, 0 @Set VBAR
65 #endif
第 56 行,#if !(defined(CONFIG_OMAP44XX) && defined(CONFIG_SPL_BUILD)) 如果没有定义 CONFIG_OMAP44XX 和 CONFIG_SPL_BUILD 的话条件成立,此处条件成立。
第 58 行,mrc p15, 0, r0, c1, c0, 0 读取 CP15 中 c1 寄存器的值到 r0 寄存器中,根据前面可知,这里是读取 SCTLR 寄存器的值。
第 59 行,bic r0, #CR_V 中的 CR_V 在 arch/arm/include/asm/system.h 中有如下所示定义:
c
#define CR_V (1 << 13) /* Vectors relocated to 0xffff0000 */因此这一行的目的就是清除 SCTLR 寄存器中的 bit13,SCTLR 寄存器结构如图所示:
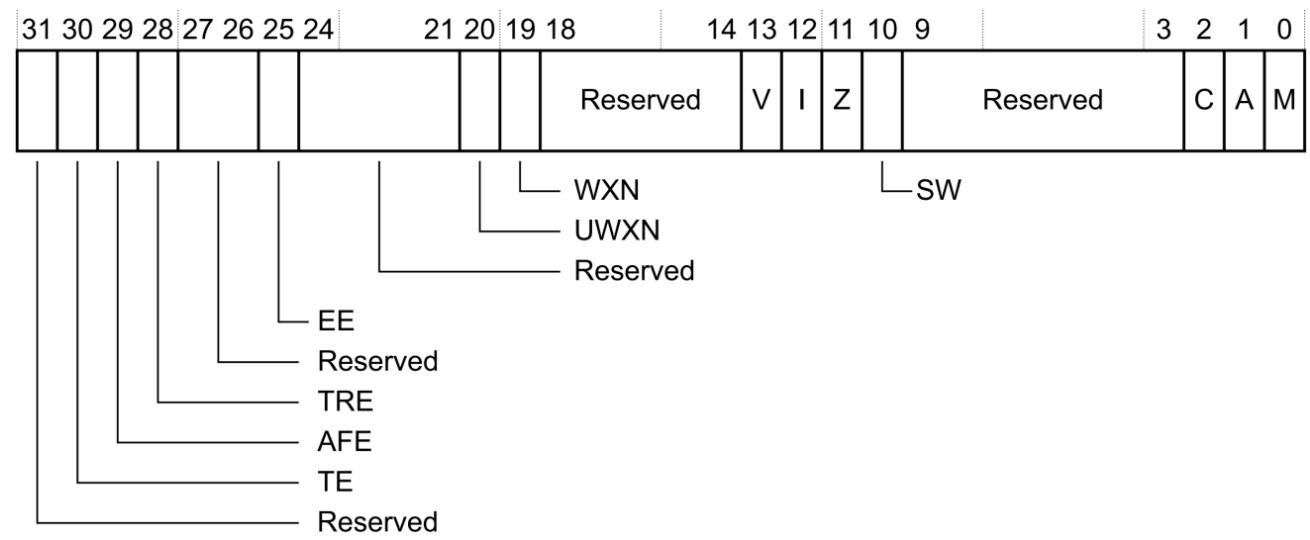
从图可以看出,bit13 为 V 位,此位是向量表控制位,当为 0 的时候向量表基地址为 0X00000000,软件可以重定位向量表。为 1 的时候向量表基地址为 0XFFFF0000,软件不能重定位向量表。这里将 V 清零,目的就是为了接下来的向量表重定位。
第 60 行 mcr p15, 0, r0, c1, c0, 0 将 r0 寄存器的值重写写入到寄存器 SCTLR 中。
第 63 行 ldr r0, =_start 设置 r0 寄存器的值为 _start,_start 就是整个 U-Boot 的入口地址,其值为 0X87800000,相当于 U-Boot 的起始地址,因此 0x87800000 也是向量表的起始地址。
第 64 行 mcr p15, 0, r0, c12, c0, 0 将 r0 寄存器的值(向量表值)写入到 CP15 的 c12 寄存器中,也就是 VBAR 寄存器。因此第 58~64 行就是设置向量表重定位的。
代码继续往下执行:
67 /* the mask ROM code should have PLL and others stable */
68 #ifndef CONFIG_SKIP_LOWLEVEL_INIT
69 bl cpu_init_cp15
70 bl cpu_init_crit
71 #endif
72
73 bl _main
第 68 行 #ifndef CONFIG_SKIP_LOWLEVEL_INIT 如果没有定义 CONFIG_SKIP_LOWLEVEL_INIT 的话条件成立。我们没有定义 CONFIG_SKIP_LOWLEVEL_INIT,因此条件成立,执行下面的语句。
示例代码中的内容比较简单,就是分别调用函数cpu_init_cp15、cpu_init_crit 和 _main。
函数 cpu_init_cp15 用来设置 CP15 相关的内容,比如关闭 MMU 等,此函数同样在 start.S 文件中定义的,代码如下:
105 /*****************************************************************
106 *
107 * cpu_init_cp15
108 *
109 * Setup CP15 registers (cache, MMU, TLBs). The I-cache is turned on
110 * unless CONFIG_SYS_ICACHE_OFF is defined.
111 *
112 *****************************************************************/
113 ENTRY(cpu_init_cp15)
114 /*
115 * Invalidate L1 I/D
116 */
117 mov r0, #0 @ set up for MCR
118 mcr p15, 0, r0, c8, c7, 0 @ invalidate TLBs
119 mcr p15, 0, r0, c7, c5, 0 @ invalidate icache
120 mcr p15, 0, r0, c7, c5, 6 @ invalidate BP array
121 mcr p15, 0, r0, c7, c10,4 @ DSB
122 mcr p15, 0, r0, c7, c5, 4 @ ISB
123
124 /*
125 * disable MMU stuff and caches
126 */
127 mrc p15, 0, r0, c1, c0, 0
128 bic r0, r0, #0x00002000 @ clear bits 13 (--V-)
129 bic r0, r0, #0x00000007 @ clear bits 2:0 (-CAM)
130 orr r0, r0, #0x00000002 @ set bit 1 (--A-) Align
131 orr r0, r0, #0x00000800 @ set bit 11 (Z---) BTB
132 #ifdef CONFIG_SYS_ICACHE_OFF
133 bic r0, r0, #0x00001000 @ clear bit 12 (I) I-cache
134 #else
135 orr r0, r0, #0x00001000 @ set bit 12 (I) I-cache
136 #endif
137 mcr p15, 0, r0, c1, c0, 0
138
......
255
256 mov pc, r5 @ back to my caller
257 ENDPROC(cpu_init_cp15)
函数 cpu_init_cp15 都是一些和 CP15 有关的内容,我们不用关心,有兴趣的可以详细看一下。
函数 cpu_init_crit 也是定义在 start.S 文件中,函数内容如下:
260 /*****************************************************************
261 *
262 * CPU_init_critical registers
263 *
264 * setup important registers
265 * setup memory timing
266 *
267 *****************************************************************/
268 ENTRY(cpu_init_crit)
269 /*
270 * Jump to board specific initialization...
271 * The Mask ROM will have already initialized
272 * basic memory. Go here to bump up clock rate and handle
273 * wake up conditions.
274 */
275 b lowlevel_init @ go setup pll,mux,memory
276 ENDPROC(cpu_init_crit)
可以看出函数 cpu_init_crit 内部仅仅是调用了函数 lowlevel_init,接下来就是详细的分析一下 lowlevel_init 和 _main 这两个函数。
2) lowlevel_init 函数详解
函数 lowlevel_init 在文件 arch/arm/cpu/armv7/lowlevel_init.S 中定义,内容如下:
14 #include <asm-offsets.h>
15 #include <config.h>
16 #include <linux/linkage.h>
17
18 ENTRY(lowlevel_init)
19 /*
20 * Setup a temporary stack. Global data is not available yet.
21 */
22 ldr sp, =CONFIG_SYS_INIT_SP_ADDR
23 bic sp, sp, #7 /* 8-byte alignment for ABI compliance */
24 #ifdef CONFIG_SPL_DM
25 mov r9, #0
26 #else
27 /*
28 * Set up global data for boards that still need it. This will be
29 * removed soon.
30 */
31 #ifdef CONFIG_SPL_BUILD
32 ldr r9, =gdata
33 #else
34 sub sp, sp, #GD_SIZE
35 bic sp, sp, #7
36 mov r9, sp
37 #endif
38 #endif
39 /*
40 * Save the old lr(passed in ip) and the current lr to stack
41 */
42 push {ip, lr}
43
44 /*
45 * Call the very early init function. This should do only the
46 * absolute bare minimum to get started. It should not:
47 *
48 * - set up DRAM
49 * - use global_data
50 * - clear BSS
51 * - try to start a console
52 *
53 * For boards with SPL this should be empty since SPL can do all
54 * of this init in the SPL board_init_f() function which is
55 * called immediately after this.
56 */
57 bl s_init
58 pop {ip, pc}
59 ENDPROC(lowlevel_init)
第 22 行设置 sp 指向 CONFIG_SYS_INIT_SP_ADDR,CONFIG_SYS_INIT_SP_ADDR 在 include/configs/mx6ullevk.h 文件中,在 mx6ullevk.h 中有如下所示定义:
234 #define CONFIG_SYS_INIT_RAM_ADDR IRAM_BASE_ADDR
235 #define CONFIG_SYS_INIT_RAM_SIZE IRAM_SIZE
236
237 #define CONFIG_SYS_INIT_SP_OFFSET \
238 (CONFIG_SYS_INIT_RAM_SIZE - GENERATED_GBL_DATA_SIZE)
239 #define CONFIG_SYS_INIT_SP_ADDR \
240 (CONFIG_SYS_INIT_RAM_ADDR + CONFIG_SYS_INIT_SP_OFFSET)
示例代码中的 IRAM_BASE_ADDR 和 IRAM_SIZE 在文件 arch/arm/include/asm/arch-mx6/imx-regs.h 中有定义,如下所示,其实就是 IMX6UL/IM6ULL 内部 ocram 的首地址和大小。
71 #define IRAM_BASE_ADDR 0x00900000
......
408 #if !(defined(CONFIG_MX6SX) || defined(CONFIG_MX6UL) || \
409 defined(CONFIG_MX6SLL) || defined(CONFIG_MX6SL))
410 #define IRAM_SIZE 0x00040000
411 #else
412 #define IRAM_SIZE 0x00020000
413 #endif
如果 408 行的条件成立的话 IRAM_SIZE=0X40000,当定义了 CONFIG_MX6SX、CONFIG_MX6UL、CONFIG_MX6SLL 和 CONFIG_MX6SL 中的任意一个的话条件就不成立,在 .config 中定义了 CONFIG_MX6UL,所以条件不成立,因此 IRAM_SIZE=0X20000=128KB。
结合示例代码,可以得到如下值:
CONFIG_SYS_INIT_RAM_ADDR = IRAM_BASE_ADDR = 0x00900000CONFIG_SYS_INIT_RAM_SIZE = 0x00020000 = 128KB
还需要知道 GENERATED_GBL_DATA_SIZE 的值,在文件 include/generated/generic-asm-offsets.h 中有定义,如下:
1 #ifndef __GENERIC_ASM_OFFSETS_H__
2 #define __GENERIC_ASM_OFFSETS_H__
3 /*
4 * DO NOT MODIFY.
5 *
6 * This file was generated by Kbuild
7 */
8
9 #define GENERATED_GBL_DATA_SIZE 256
10 #define GENERATED_BD_INFO_SIZE 80
11 #define GD_SIZE 248
12 #define GD_BD 0
13 #define GD_MALLOC_BASE 192
14 #define GD_RELOCADDR 48
15 #define GD_RELOC_OFF 68
16 #define GD_START_ADDR_SP 64
17
18 #endif
从代码中可以看到 GENERATED_GBL_DATA_SIZE=256,GENERATED_GBL_DATA_SIZE 的含义为 (sizeof(struct global_data) + 15) & ~15。
综上所述,CONFIG_SYS_INIT_SP_ADDR 值如下:
CONFIG_SYS_INIT_SP_OFFSET = 0x00020000 -- 256 = 0x1FF00CONFIG_SYS_INIT_SP_ADDR = 0x00900000 + 0X1FF00 = 0X0091FF00
结果如下图所示:
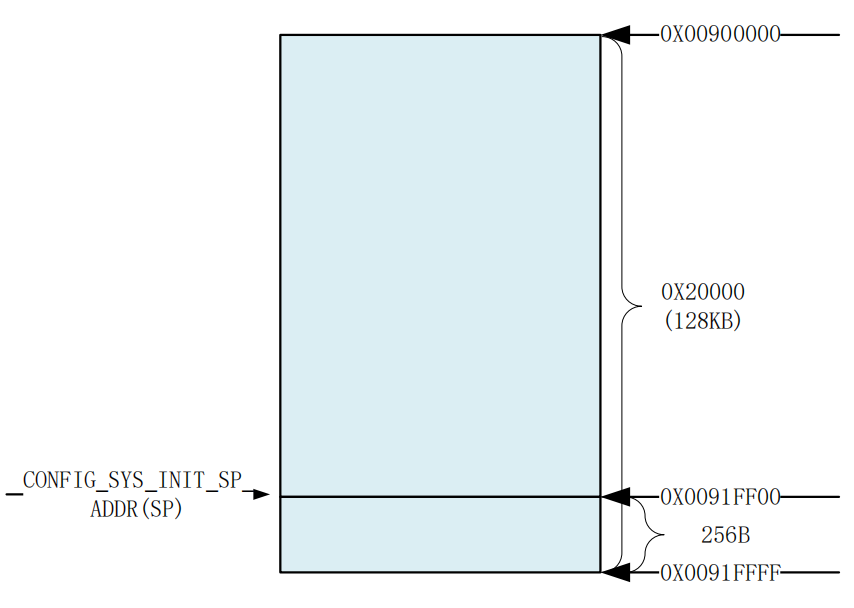
此时 sp 指向 0X91FF00,这属于 IMX6UL/IMX6ULL 的内部 RAM。
继续回到文件 lowlevel_init.S,第 23 行对 sp 指针做 8 字节对齐处理!
第 34 行,sp 指针减去 GD_SIZE,GD_SIZE 同样在 generic-asm-offsets.h 中定义,大小为 248,见示例代码第 11 行。
第 35 行对 sp 做 8 字节对齐,此时 sp 的地址为 0X0091FF00-248=0X0091FE08,此时 sp 位置如图所示:
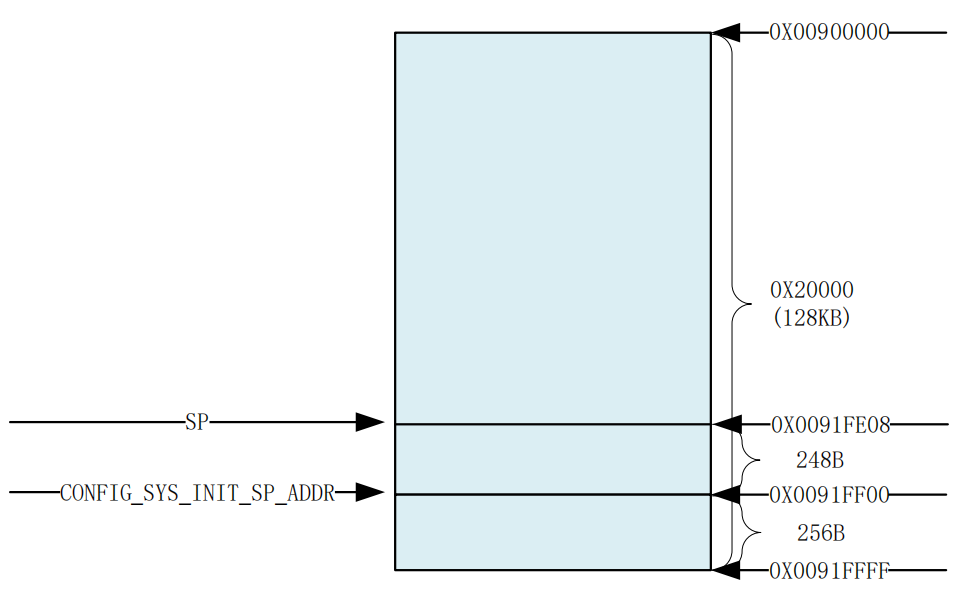
第 36 行将 sp 地址保存在 r9 寄存器中。
第 42 行将 ip 和 lr 压栈。
第 57 行调用函数 s_init,得,又来了一个函数。
第 58 行将第 42 行入栈的 ip 和 lr 进行出栈,并将 lr 赋给 pc。
3) s_init 函数详解
在上一小节中,我们知道 lowlevel_init 函数后面会调用 s_init 函数,s_init 函数定义在文件 arch/arm/cpu/armv7/mx6/soc.c 中,如下所示:
808 void s_init(void)
809 {
810 struct anatop_regs *anatop = (struct anatop_regs *)ANATOP_BASE_AD
DR;
811 struct mxc_ccm_reg *ccm = (struct mxc_ccm_reg *)CCM_BASE_ADDR;
812 u32 mask480;
813 u32 mask528;
814 u32 reg, periph1, periph2;
815
816 if (is_cpu_type(MXC_CPU_MX6SX) || is_cpu_type(MXC_CPU_MX6UL) ||
817 is_cpu_type(MXC_CPU_MX6ULL) || is_cpu_type(MXC_CPU_MX6SLL))
818 return;
819
820 /* Due to hardware limitation, on MX6Q we need to gate/ungate
821 * all PFDs to make sure PFD is working right, otherwise, PFDs
822 * may not output clock after reset, MX6DL and MX6SL have added
823 * 396M pfd workaround in ROM code, as bus clock need it
824 */
825
826 mask480 = ANATOP_PFD_CLKGATE_MASK(0) |
827 ANATOP_PFD_CLKGATE_MASK(1) |
828 ANATOP_PFD_CLKGATE_MASK(2) |
829 ANATOP_PFD_CLKGATE_MASK(3);
830 mask528 = ANATOP_PFD_CLKGATE_MASK(1) |
831 ANATOP_PFD_CLKGATE_MASK(3);
832
833 reg = readl(&ccm->cbcmr);
834 periph2 = ((reg & MXC_CCM_CBCMR_PRE_PERIPH2_CLK_SEL_MASK)
835 >> MXC_CCM_CBCMR_PRE_PERIPH2_CLK_SEL_OFFSET);
836 periph1 = ((reg & MXC_CCM_CBCMR_PRE_PERIPH_CLK_SEL_MASK)
837 >> MXC_CCM_CBCMR_PRE_PERIPH_CLK_SEL_OFFSET);
838
839 /* Checking if PLL2 PFD0 or PLL2 PFD2 is using for periph clock */
840 if ((periph2 != 0x2) && (periph1 != 0x2))
841 mask528 |= ANATOP_PFD_CLKGATE_MASK(0);
842
843 if ((periph2 != 0x1) && (periph1 != 0x1) &&
844 (periph2 != 0x3) && (periph1 != 0x3))
845 mask528 |= ANATOP_PFD_CLKGATE_MASK(2);
846
847 writel(mask480, &anatop->pfd_480_set);
848 writel(mask528, &anatop->pfd_528_set);
849 writel(mask480, &anatop->pfd_480_clr);
850 writel(mask528, &anatop->pfd_528_clr);
851 }
在第 816 行会判断当前 CPU 类型,如果 CPU 为 MX6SX、MX6UL、MX6ULL 或 MX6SLL 中的任意一种,那么就会直接返回,相当于 s_init 函数什么都没做。所以对于 I.MX6UL/I.MX6ULL 来说,s_init 就是个空函数。
从 s_init 函数退出以后进入函数 lowlevel_init,但是 lowlevel_init 函数也执行完成了,返回到了函数 cpu_init_crit,函数 cpu_init_crit 也执行完成了,最终返回到 save_boot_params_ret,函数调用路径如图所示:
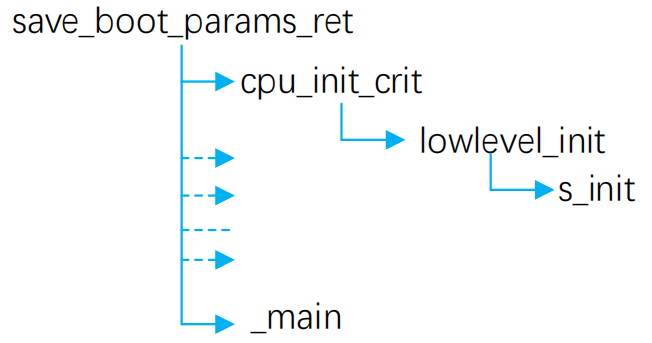
从图可知,接下来要执行的是 save_boot_params_ret 中的 _main 函数,接下来分析 _main 函数。
4) _main 函数详解
_main 函数定义在文件 arch/arm/lib/crt0.S 中,函数内容如下:
63 /*
64 * entry point of crt0 sequence
65 */
66
67 ENTRY(_main)
68
69 /*
70 * Set up initial C runtime environment and call board_init_f(0).
71 */
72
73 #if defined(CONFIG_SPL_BUILD) && defined(CONFIG_SPL_STACK)
74 ldr sp, =(CONFIG_SPL_STACK)
75 #else
76 ldr sp, =(CONFIG_SYS_INIT_SP_ADDR)
77 #endif
78 #if defined(CONFIG_CPU_V7M) /* v7M forbids using SP as BIC destinatio
n */
79 mov r3, sp
80 bic r3, r3, #7
81 mov sp, r3
82 #else
83 bic sp, sp, #7 /* 8-byte alignment for ABI compliance */
84 #endif
85 mov r0, sp
86 bl board_init_f_alloc_reserve
87 mov sp, r0
88 /* set up gd here, outside any C code */
89 mov r9, r0
90 bl board_init_f_init_reserve
91
92 mov r0, #0
93 bl board_init_f
94
95 #if ! defined(CONFIG_SPL_BUILD)
96
97 /*
98 * Set up intermediate environment (new sp and gd) and call
99 * relocate_code(addr_moni). Trick here is that we'll return
100 * 'here' but relocated.
101 */
102
103 ldr sp, [r9, #GD_START_ADDR_SP] /* sp = gd->start_addr_sp */
104 #if defined(CONFIG_CPU_V7M) /* v7M forbids using SP as BIC destinatio
n */
105 mov r3, sp
106 bic r3, r3, #7
107 mov sp, r3
108 #else
109 bic sp, sp, #7 /* 8-byte alignment for ABI compliance */
110 #endif
111 ldr r9, [r9, #GD_BD] /* r9 = gd->bd */
112 sub r9, r9, #GD_SIZE /* new GD is below bd */
113
114 adr lr, here
115 ldr r0, [r9, #GD_RELOC_OFF] /* r0 = gd->reloc_off */
116 add lr, lr, r0
117 #if defined(CONFIG_CPU_V7M)
118 orr lr, #1 /* As required by Thumb-only */
119 #endif
120 ldr r0, [r9, #GD_RELOCADDR] /* r0 = gd->relocaddr */
121 b relocate_code
122 here:
123 /*
124 * now relocate vectors
125 */
126
127 bl relocate_vectors
128
129 /* Set up final (full) environment */
130
131 bl c_runtime_cpu_setup /* we still call old routine here */
132 #endif
133 #if !defined(CONFIG_SPL_BUILD) || defined(CONFIG_SPL_FRAMEWORK)
134 # ifdef CONFIG_SPL_BUILD
135 /* Use a DRAM stack for the rest of SPL, if requested */
136 bl spl_relocate_stack_gd
137 cmp r0, #0
138 movne sp, r0
139 movne r9, r0
140 # endif
141 ldr r0, =__bss_start /* this is auto-relocated! */
142
143 #ifdef CONFIG_USE_ARCH_MEMSET
144 ldr r3, =__bss_end /* this is auto-relocated! */
145 mov r1, #0x00000000 /* prepare zero to clear BSS */
146
147 subs r2, r3, r0 /* r2 = memset len */
148 bl memset
149 #else
150 ldr r1, =__bss_end /* this is auto-relocated! */
151 mov r2, #0x00000000 /* prepare zero to clear BSS */
152
153 clbss_l:cmp r0, r1 /* while not at end of BSS */
154 #if defined(CONFIG_CPU_V7M)
155 itt lo
156 #endif
157 strlo r2, [r0] /* clear 32-bit BSS word */
158 addlo r0, r0, #4 /* move to next */
159 blo clbss_l
160 #endif
161
162 #if ! defined(CONFIG_SPL_BUILD)
163 bl coloured_LED_init
164 bl red_led_on
165 #endif
166 /* call board_init_r(gd_t *id, ulong dest_addr) */
167 mov r0, r9 /* gd_t */
168 ldr r1, [r9, #GD_RELOCADDR] /* dest_addr */
169 /* call board_init_r */
170 #if defined(CONFIG_SYS_THUMB_BUILD)
171 ldr lr, =board_init_r /* this is auto-relocated! */
172 bx lr
173 #else
174 ldr pc, =board_init_r /* this is auto-relocated! */
175 #endif
176 /* we should not return here. */
177 #endif
178
179 ENDPROC(_main)
第 76 行,设置 sp 指针为 CONFIG_SYS_INIT_SP_ADDR,也就是 sp 指向 0X0091FF00。
第 83 行,sp 做 8 字节对齐。
第 85 行,读取 sp 到寄存器 r0 里面,此时 r0=0X0091FF00。
第 86 行,调用函数 board_init_f_alloc_reserve,此函数有一个参数,参数为 r0 中的值,也就是 0X0091FF00,此函数定义在文件 common/init/board_init.c 中,内容如下:
56 ulong board_init_f_alloc_reserve(ulong top)
57 {
58 /* Reserve early malloc arena */
59 #if defined(CONFIG_SYS_MALLOC_F)
60 top -= CONFIG_SYS_MALLOC_F_LEN;
61 #endif
62 /* LAST : reserve GD (rounded up to a multiple of 16 bytes) */
63 top = rounddown(top-sizeof(struct global_data), 16);
64
65 return top;
66 }
函数 board_init_f_alloc_reserve 主要是留出早期的 malloc 内存区域和 gd 内存区域,其中 CONFIG_SYS_MALLOC_F_LEN=0X400(在文件 include/generated/autoconf.h 中定义),sizeof(struct global_data)=248(GD_SIZE 值),完成以后的内存分布如图所示:
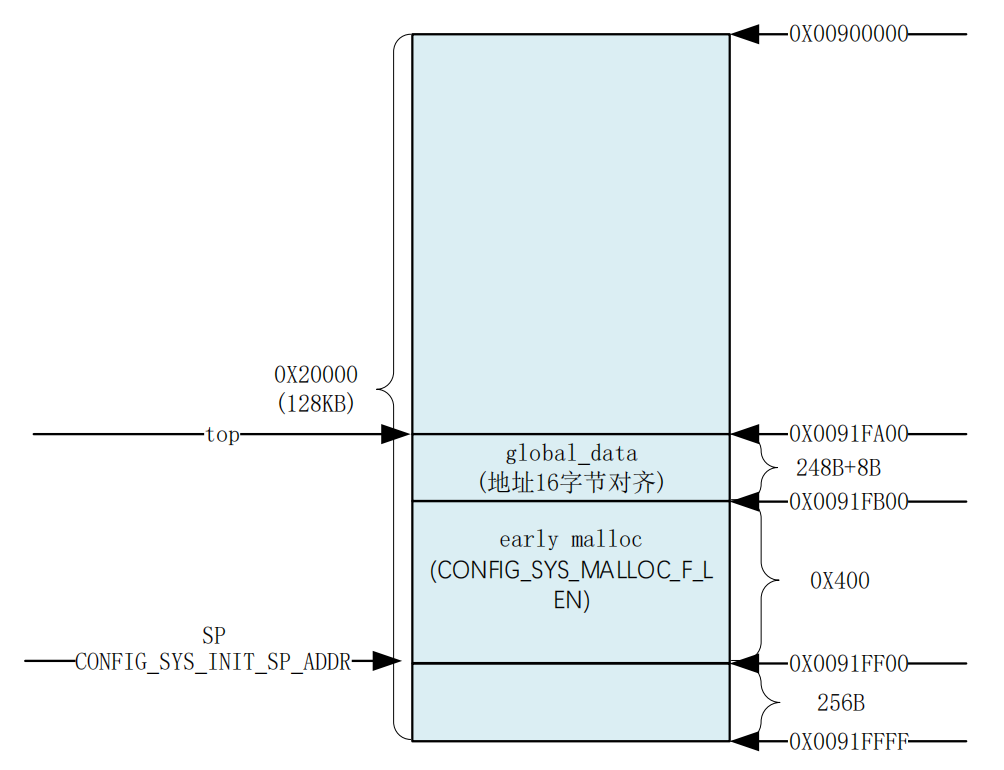
函数 board_init_f_alloc_reserve 是有返回值的,返回值为新的 top 值,从图 32.2.4.1 可知,此时 top=0X0091FA00。
继续回到示例代码 32.2.4.1 中,第 87 行,将 r0 写入到 sp 里面,r0 保存着函数 board_init_f_alloc_reserve 的返回值,所以这一句也就是设置 sp=0X0091FA00。
第 89 行,将 r0 寄存器的值写到寄存器 r9 里面,因为 r9 寄存器存放着全局变量 gd 的地址,在文件 arch/arm/include/asm/global_data.h 中有如图所示宏定义:

从图可以看出,U-Boot 中定义了一个指向 gd_t 的指针 gd,gd 存放在寄存器 r9 里面,因此 gd 是个全局变量。gd_t 是个结构体,在 include/asm-generic/global_data.h 里面有定义,gd_t 定义如下:
27 typedef struct global_data {
28 bd_t *bd;
29 unsigned long flags;
30 unsigned int baudrate;
31 unsigned long cpu_clk; /* CPU clock in Hz! */
32 unsigned long bus_clk;
33 /* We cannot bracket this with CONFIG_PCI due to mpc5xxx */
34 unsigned long pci_clk;
35 unsigned long mem_clk;
36 #if defined(CONFIG_LCD) || defined(CONFIG_VIDEO)
37 unsigned long fb_base; /* Base address of framebuffer mem */
38 #endif
......
121 #ifdef CONFIG_DM_VIDEO
122 ulong video_top; /* Top of video frame buffer area */
123 ulong video_bottom; /* Bottom of video frame buffer area */
124 #endif
125 } gd_t;
因此这一行代码就是设置 gd 所指向的位置,也就是 gd 指向 0X0091FA00。
继续回到示例代码中,第 90 行调用函数 board_init_f_init_reserve,此函数在文件 common/init/board_init.c 中有定义,函数内容如下:
110 void board_init_f_init_reserve(ulong base)
111 {
112 struct global_data *gd_ptr;
113 #ifndef _USE_MEMCPY
114 int *ptr;
115 #endif
116
117 /*
118 * clear GD entirely and set it up.
119 * Use gd_ptr, as gd may not be properly set yet.
120 */
121
122 gd_ptr = (struct global_data *)base;
123 /* zero the area */
124 #ifdef _USE_MEMCPY
125 memset(gd_ptr, '\0', sizeof(*gd));
126 #else
127 for (ptr = (int *)gd_ptr; ptr < (int *)(gd_ptr + 1); )
128 *ptr++ = 0;
129 #endif
130 /* set GD unless architecture did it already */
131 #if !defined(CONFIG_ARM)
132 arch_setup_gd(gd_ptr);
133 #endif
134 /* next alloc will be higher by one GD plus 16-byte alignment */
135 base += roundup(sizeof(struct global_data), 16);
136
137 /*
138 * record early malloc arena start.
139 * Use gd as it is now properly set for all architectures.
140 */
141
142 #if defined(CONFIG_SYS_MALLOC_F)
143 /* go down one 'early malloc arena' */
144 gd->malloc_base = base;
145 /* next alloc will be higher by one 'early malloc arena' size */
146 base += CONFIG_SYS_MALLOC_F_LEN;
147 #endif
148 }
可以看出,此函数用于初始化 gd,其实就是清零处理。另外,此函数还设置了 gd->malloc_base 为 gd 基地址+gd 大小=0X0091FA00+248=0X0091FAF8,在做 16 字节对齐,最终 gd->malloc_base=0X0091FB00,这个也就是 early malloc 的起始地址。
继续回到示例代码中,第 92 行设置 R0 为 0。
第 93 行,调用 board_init_f 函数,此函数定义在文件 common/board_f.c 中!主要用来初始化 DDR,定时器,完成代码拷贝等等,此函数我们后面再详细的分析。
第 103 行,重新设置环境(sp 和 gd)、获取 gd->start_addr_sp 的值赋给 sp,在函数 board_init_f 中会初始化 gd 的所有成员变量,其中 gd->start_addr_sp=0X9EF44E90,所以这里相当于设置 sp=gd->start_addr_sp=0X9EF44E90。0X9EF44E90 是 DDR 中的地址,说明新的 sp 和 gd 将会存放到 DDR 中,而不是内部的 RAM 了。GD_START_ADDR_SP=64,参考示例代码。
第 109 行,sp 做 8 字节对齐。
第 111 行,获取 gd->bd 的地址赋给 r9,此时 r9 存放的是老的 gd,这里通过获取 gd->bd 的地址来计算出新的 gd 的位置。GD_BD=0,参考示例代码。
第 112 行,新的 gd 在 bd 下面,所以 r9 减去 gd 的大小就是新的 gd 的位置,获取到新的 gd 的位置以后赋值给 r9。
第 114 行,设置 lr 寄存器为 here,这样后面执行其他函数返回的时候就返回到了第 122 行的 here 位置处。
第 115 行,读取 gd->reloc_off 的值复制给 r0 寄存器,GD_RELOC_OFF=68,参考示例代码。
第 116 行,lr 寄存器的值加上 r0 寄存器的值,重新赋值给 lr 寄存器。因为接下来要重定位代码,也就是把代码拷贝到新的地方去(现在的 uboot 存放的起始地址为 0X87800000,下面要将 uboot 拷贝到 DDR 最后面的地址空间出,将 0X87800000 开始的内存空出来),其中就包括 here,因此 lr 中的 here 要使用重定位后的位置。
第 120 行,读取 gd->relocaddr 的值赋给 r0 寄存器,此时 r0 寄存器就保存着 uboot 要拷贝的目的地址,为 0X9FF47000。GD_RELOCADDR=48,参考示例代码。
第 121 行,调用函数 relocate_code,也就是代码重定位函数,此函数负责将 uboot 拷贝到新的地方去,此函数定义在文件 arch/arm/lib/relocate.S 中稍后会详细分析此函数。
继续回到示例代码第 127 行,调用函数 relocate_vectors,对中断向量表做重定位,此函数定义在文件 arch/arm/lib/relocate.S 中,稍后会详细分析此函数。
继续回到示例代码第 131 行,调用函数 c_runtime_cpu_setup,此函数定义在文件 arch/arm/cpu/armv7/start.S 中,函数内容如下:
77 ENTRY(c_runtime_cpu_setup)
78 /*
79 * If I-cache is enabled invalidate it
80 */
81 #ifndef CONFIG_SYS_ICACHE_OFF
82 mcr p15, 0, r0, c7, c5, 0 @ invalidate icache
83 mcr p15, 0, r0, c7, c10, 4 @ DSB
84 mcr p15, 0, r0, c7, c5, 4 @ ISB
85 #endif
86
87 bx lr
88
89 ENDPROC(c_runtime_cpu_setup)
第 141 行,清除 BSS 段。
第 167 行,设置函数 board_init_r 的两个参数,函数 board_init_r 声明如下:
board_init_r(gd_t *id, ulong dest_addr)
第一个参数是 gd,因此读取 r9 保存到 r0 里面。
第 168 行,设置函数 board_init_r 的第二个参数是目的地址,因此 r1= gd->relocaddr。
第 174 行、调用函数 board_init_r,此函数定义在文件common/board_r.c中,稍后会详细的分析此函数。
5)board_init_f****函数详解
_main 中会调用 board_init_f 函数,board_init_f 函数主要有两个工作:
- 初始化一系列外设,比如串口、定时器,或者打印一些消息等。
- 初始化 gd 的各个成员变量,uboot 会将自己重定位到 DRAM 最后面的地址区域,也就是将自己拷贝到 DRAM 最后面的内存区域中。这么做的目的是给 Linux 腾出空间,防止 Linux kernel 覆盖掉 uboot,将 DRAM 前面的区域完整的空出来。在拷贝之前肯定要给 uboot 各部分分配好内存位置和大小,比如 gd 应该存放到哪个位置,malloc 内存池应该存放到哪个位置等等。这些信息都保存在 gd 的成员变量中,因此要对 gd 的这些成员变量做初始化。最终形成一个完整的内存"分配图",在后面重定位 uboot 的时候就会用到这个内存"分配图"。
此函数定义在文件 common/board_f.c 中定义,代码如下:
1035 void board_init_f(ulong boot_flags)
1036 {
1037 #ifdef CONFIG_SYS_GENERIC_GLOBAL_DATA
1038 /*
1039 * For some archtectures, global data is initialized and used
1040 * before calling this function. The data should be preserved.
1041 * For others, CONFIG_SYS_GENERIC_GLOBAL_DATA should be defined
1042 * and use the stack here to host global data until relocation.
1043 */
1044 gd_t data;
1045
1046 gd = &data;
1047
1048 /*
1049 * Clear global data before it is accessed at debug print
1050 * in initcall_run_list. Otherwise the debug print probably
1051 * get the wrong vaule of gd->have_console.
1052 */
1053 zero_global_data();
1054 #endif
1055
1056 gd->flags = boot_flags;
1057 gd->have_console = 0;
1058
1059 if (initcall_run_list(init_sequence_f))
1060 hang();
1061
1062 #if !defined(CONFIG_ARM) && !defined(CONFIG_SANDBOX) && \
1063 !defined(CONFIG_EFI_APP)
1064 /* NOTREACHED - jump_to_copy() does not return */
1065 hang();
1066 #endif
1067 }
因为没有定义 CONFIG_SYS_GENERIC_GLOBAL_DATA,所以第 1037~1054 行代码无效。
第 1056 行,初始化 gd->flags = boot_flags = 0。
第 1057 行,设置 gd->have_console = 0。
重点在第 1059 行!通过函数 initcall_run_list 来运行初始化序列 init_sequence_f 里面的一系列函数。init_sequence_f 也定义在文件 common/board_f.c 中,由于 init_sequence_f 的内容比较长,里面有大量的条件编译代码,这里为了缩小篇幅,将条件编译部分删除掉了,去掉条件编译以后的 init_sequence_f 定义如下:
/*****************去掉条件编译语句后的 init_sequence_f***************/
1 static init_fnc_t init_sequence_f[] = {
2 setup_mon_len,
3 initf_malloc,
4 initf_console_record,
5 arch_cpu_init, /* basic arch cpu dependent setup */
6 initf_dm,
7 arch_cpu_init_dm,
8 mark_bootstage, /* need timer, go after init dm /
9 board_early_init_f,
10 timer_init, / initialize timer /
11 board_postclk_init,
12 get_clocks,
13 env_init, / initialize environment */
14 init_baud_rate, /* initialze baudrate settings */
15 serial_init, /* serial communications setup */
16 console_init_f, /* stage 1 init of console */
17 display_options, /* say that we are here */
18 display_text_info, /* show debugging info if required */
19 print_cpuinfo, /* display cpu info (and speed) /
20 show_board_info,
21 INIT_FUNC_WATCHDOG_INIT
22 INIT_FUNC_WATCHDOG_RESET
23 init_func_i2c,
24 announce_dram_init,
25 / TODO: unify all these dram functions? /
26 dram_init, / configure available RAM banks */
27 post_init_f,
28 INIT_FUNC_WATCHDOG_RESET
29 testdram,
30 INIT_FUNC_WATCHDOG_RESET
31 INIT_FUNC_WATCHDOG_RESET
32 /*
33 * Now that we have DRAM mapped and working, we can
34 * relocate the code and continue running from DRAM.
35 *
36 * Reserve memory at end of RAM for (top down in that order):
37 * - area that won't get touched by U-Boot and Linux (optional)
38 * - kernel log buffer
39 * - protected RAM
40 * - LCD framebuffer
41 * - monitor code
42 * - board info struct
43 */
44 setup_dest_addr,
45 reserve_round_4k,
46 reserve_mmu,
47 reserve_trace,
48 reserve_uboot,
49 reserve_malloc,
50 reserve_board,
51 setup_machine,
52 reserve_global_data,
53 reserve_fdt,
54 reserve_arch,
55 reserve_stacks,
56 setup_dram_config,
57 show_dram_config,
58 display_new_sp,
59 INIT_FUNC_WATCHDOG_RESET
60 reloc_fdt,
61 setup_reloc,
62 NULL,
63 };
接下来分析以上函数执行完以后的结果:
第 2 行,setup_mon_len 函数设置 gd 的 mon_len 成员变量,此处为 __bss_end - _start,也就是整个代码的长度。0X878A8E74 - 0x87800000 = 0XA8E74,这个就是代码长度。
第 3 行,initf_malloc 函数初始化 gd 中跟 malloc 有关的成员变量,比如 malloc_limit,此函数会设置 gd->malloc_limit = CONFIG_SYS_MALLOC_F_LEN = 0X400。malloc_limit 表示 malloc 内存池大小。
第 4 行,initf_console_record,如果定义了宏 CONFIG_CONSOLE_RECORD 和宏 CONFIG_SYS_MALLOC_F_LEN 的话此函数就会调用函数 console_record_init,但是 IMX6ULL 的 uboot 没有定义宏 CONFIG_CONSOLE_RECORD,所以此函数直接返回 0。
第 5 行,arch_cpu_init 函数。
第 6 行,initf_dm 函数,驱动模型的一些初始化。
第 7 行,arch_cpu_init_dm 函数未实现。
第 8 行,mark_bootstage 函数应该是和启动阶段标记有关的。
第 9 行,board_early_init_f 函数,板子相关的早期的一些初始化设置,I.MX6ULL 用来初始化串口的 IO 配置。
第 10 行,timer_init,初始化定时器,Cortex-A7 内核有一个定时器,这里初始化的就是 Cortex-A 内核的那个定时器。通过这个定时器来为 uboot 提供时间。就跟 Cortex-M 内核 Systick 定时器一样。
第 11 行,board_postclk_init,对于 I.MX6ULL 来说是设置 VDDSOC 电压。
第 12 行,get_clocks 函数用于获取一些时钟值,I.MX6ULL 获取的是 sdhc_clk 时钟,也就是 SD 卡外设的时钟。
第 13 行,env_init 函数是和环境变量有关的,设置 gd 的成员变量 env_addr,也就是环境变量的保存地址。
第 14 行,init_baud_rate 函数用于初始化波特率,根据环境变量 baudrate 来初始化 gd->baudrate。
第 15 行,serial_init,初始化串口。
第 16 行,console_init_f,设置 gd->have_console 为 1,表示有个控制台,此函数也将前面暂存在缓冲区中的数据通过控制台打印出来。
第 17 行,display_options,通过串口输出一些信息,如图所示。

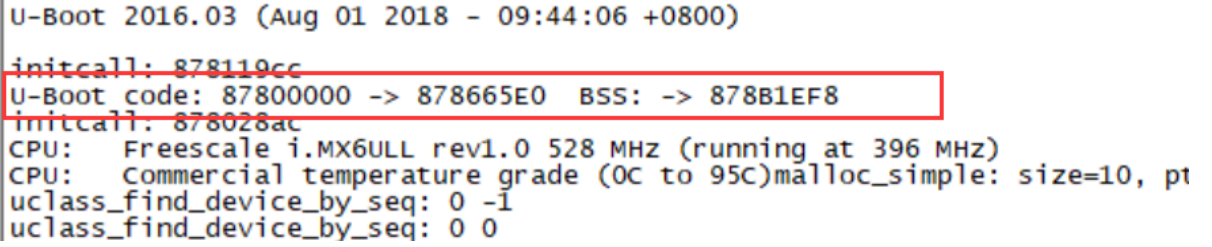
第 18 行,display_text_info,打印一些文本信息,如果开启 U-Boot 的 DEBUG 功能的话就会输出 text_base、bss_start、bss_end,形式如下:
c
debug("U-Boot code: %08lX -> %08lX BSS: -> %08lX\n", text_base, bss_start, bss_end);结果如图所示:
第 19 行,print_cpuinfo 函数用于打印 CPU 信息,结果如图所示:

第 20 行,show_board_info 函数用于打印板子信息,会调用 checkboard 函数,结果如图所示:

第 21 行,INIT_FUNC_WATCHDOG_INIT,初始化看门狗,对于 I.MX6ULL 来说是空函数。
第 22 行,INIT_FUNC_WATCHDOG_RESET,复位看门狗,对于 I.MX6ULL 来说是空函数。
第 23 行,init_func_i2c 函数用于初始化 I2C,初始化完成以后会输出如图所示信息:
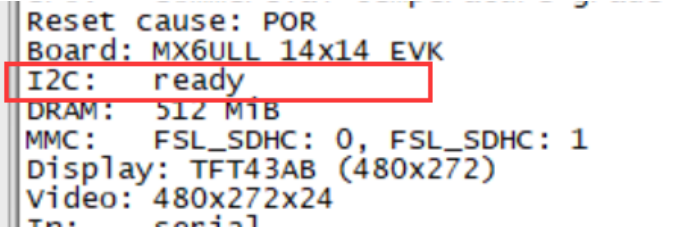
第 26 行,dram_init,并非真正的初始化 DDR,只是设置 gd->ram_size 的值。
第 27 行,post_init_f,此函数用来完成一些测试,初始化 gd->post_init_f_time 成员变量。该函数主要用于在初始化序列完成后执行一些后处理操作,比如性能测试、系统状态验证等。
第 29 行,testdram,测试 DRAM,空函数。对于大多数平台,这个函数通常为空实现,主要用于 DRAM 测试的占位符,如果需要测试 DRAM 可以在此函数中添加测试代码。
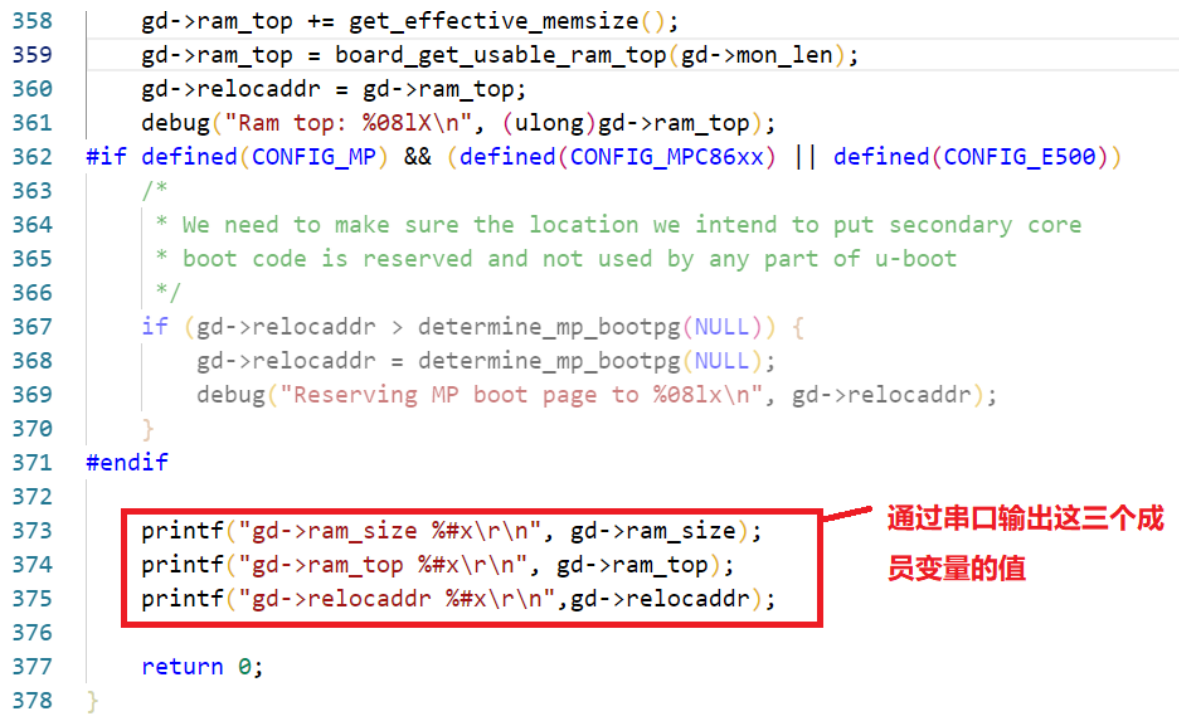
第 44 行,setup_dest_addr 函数,设置目的地址,设置 gd->ram_size、gd->ram_top、gd->relocaddr 这三个的值。接下来我们会遇到很多跟数值有关的设置,如果直接看代码分析的话就太费时间了,我可以修改 uboot 代码,直接将这些值通过串口打印出来,比如这里我们修改文件 common/board_f.c,因为 setup_dest_addr 函数定义在文件 common/board_f.c 中,在 setup_dest_addr 函数输入如图所示内容:
设置好以后重新编译 uboot,然后烧写到 SD 卡中,选择 SD 卡启动,重启开发板,打开 SecureCRT,uboot 会输出如图所示信息:

从图可以看出:
gd->ram_size = 0X20000000 //ram 大小为 0X20000000=512MB
gd->ram_top = 0XA0000000 //ram 最高地址为 0X80000000+0X20000000=0XA0000
000
gd->relocaddr = 0XA0000000 //重定位后最高地址为 0XA0000000
第 45 行,reserve_round_4k 函数用于对 gd->relocaddr 做 4KB 对齐,因为 gd->relocaddr=0XA0000000,已经是 4K 对齐了,所以调整后不变。
第 46 行,reserve_mmu,留出 MMU 的 TLB 表的位置,分配 MMU 的 TLB 表内存以后会对 gd->relocaddr 做 64K 字节对齐。完成以后 gd->arch.tlb_size、gd->arch.tlb_addr 和 gd->relocaddr 如图所示:

从图可以看出:
gd->arch.tlb_size= 0X4000 //MMU 的 TLB 表大小
gd->arch.tlb_addr=0X9FFF0000 //MMU 的 TLB 表起始地址,64KB 对齐以后
gd->relocaddr=0X9FFF0000 //relocaddr 地址
第 47 行,reserve_trace 函数,留出跟踪调试的内存!
第 48 行,reserve_uboot, 留出重定位后的 uboot 所占用的内存区域,uboot 所占用大小由gd->mon_len 所指定,留出 uboot 的空间以后还要对 gd->relocaddr 做 4K 字节对齐,并且重新设置 gd->start_addr_sp,结果如图所示:

从图可以看出:
gd->mon_len = 0XA8EF4
gd->start_addr_sp = 0X9FF47000
gd->relocaddr = 0X9FF47000
第 49 行,reserve_malloc,留出 malloc 区域,调整 gd->start_addr_sp 位置,malloc 区域由宏 TOTAL_MALLOC_LEN 定义,宏定义如下:
#define TOTAL_MALLOC_LEN (CONFIG_SYS_MALLOC_LEN + CONFIG_ENV_SIZE)mx6ull_alientek_emmc.h 文件中定义宏CONFIG_SYS_MALLOC_LEN 为 16MB=0X1000000,宏CONFIG_ENV_SIZE=8KB=0X2000,因此TOTAL_MALLOC_LEN=0X1002000。调整以后 gd->start_addr_sp 如图所示:

从图可以看出:
TOTAL_MALLOC_LEN=0X1002000
gd->start_addr_sp=0X9EF45000 //0X9FF47000-16MB-8KB=0X9EF45000
第 50 行,reserve_board 函数,留出板子 bd 所占的内存区,bd 是结构体 bd_t,bd_t 大小为 80 字节,结果如图所示:

从图可以看出:
gd->start_addr_sp=0X9EF44FB0
gd->bd=0X9EF44FB0
第 51 行,setup_machine,设置机器 ID,Linux 启动的时候会和这个机器 ID 匹配,如果匹配的话 Linux 就会启动正常。这是以前老版本的 U-Boot 和 Linux 使用的,新版本使用设备树了,因此此函数无效。
第 52 行,reserve_global_data 函数,保留出 gd_t 的内存区域,gd_t 结构体大小为 248B,结果如图所示:

gd->start_addr_sp=0X9EF44EB8 //0X9EF44FB0-248=0X9EF44EB8
gd->new_gd=0X9EF44EB8
第 53 行,reserve_fdt,留出设备树相关的内存区域。
第 54 行,reserve_arch 是个空函数。
第 55 行,reserve_stacks,留出栈空间,先对 gd->start_addr_sp 减去 16,然后做 16 字节对齐。如果使能 IRQ 的话还要留出 IRQ 相应的内存,具体工作是由 arch/arm/lib/stack.c 文件中的函数 arch_reserve_stacks 完成。结果如图所示:

在本 uboot 中并没有使用到 IRQ,所以不会留出 IRQ 相应的内存区域,此时:
gd->start_addr_sp=0X9EF44E90
第 56 行,setup_dram_config 函数设置 dram 信息,就是设置 gd->bd->bi_dram0.start 和 gd->bd->bi_dram0.size,后面会传递给 linux 内核,告诉 linux DRAM 的起始地址和大小。结果如图所示:

从图可以看出,DRAM 的起始地址为0X80000000,大小为 0X20000000(512MB)。
第 57 行,show_dram_config 函数,用于显示 DRAM 的配置,如图所示:
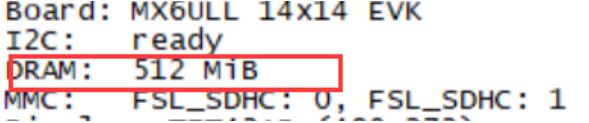
第 58 行,display_new_sp 函数,显示新的 sp 位置,也就是 gd->start_addr_sp,不过要定义宏 DEBUG,结果如图所示:
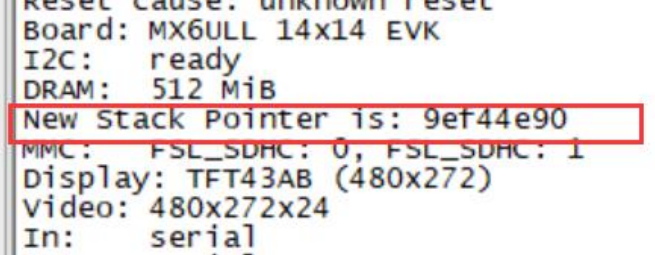
图中的 gd->start_addr_sp 值和我们前面分析的最后一次修改的值一致。
第 60 行,reloc_fdt 函数用于重定位 fdt,没有用到。
第 61 行,setup_reloc,设置 gd 的其他一些成员变量,供后面重定位的时候使用,并且将以前的 gd 拷贝到 gd->new_gd 处。需要使能 DEBUG 才能看到相应的信息输出,如图所示:

从图可以看出,uboot 重定位后的偏移为 0X18747000,重定位后的新地址为 0X9FF4700,新的 gd 首地址为 0X9EF44EB8,最终的 sp 为 0X9EF44E90。
至此,board_init_f 函数就执行完成了,最终的内存分配如图所示:
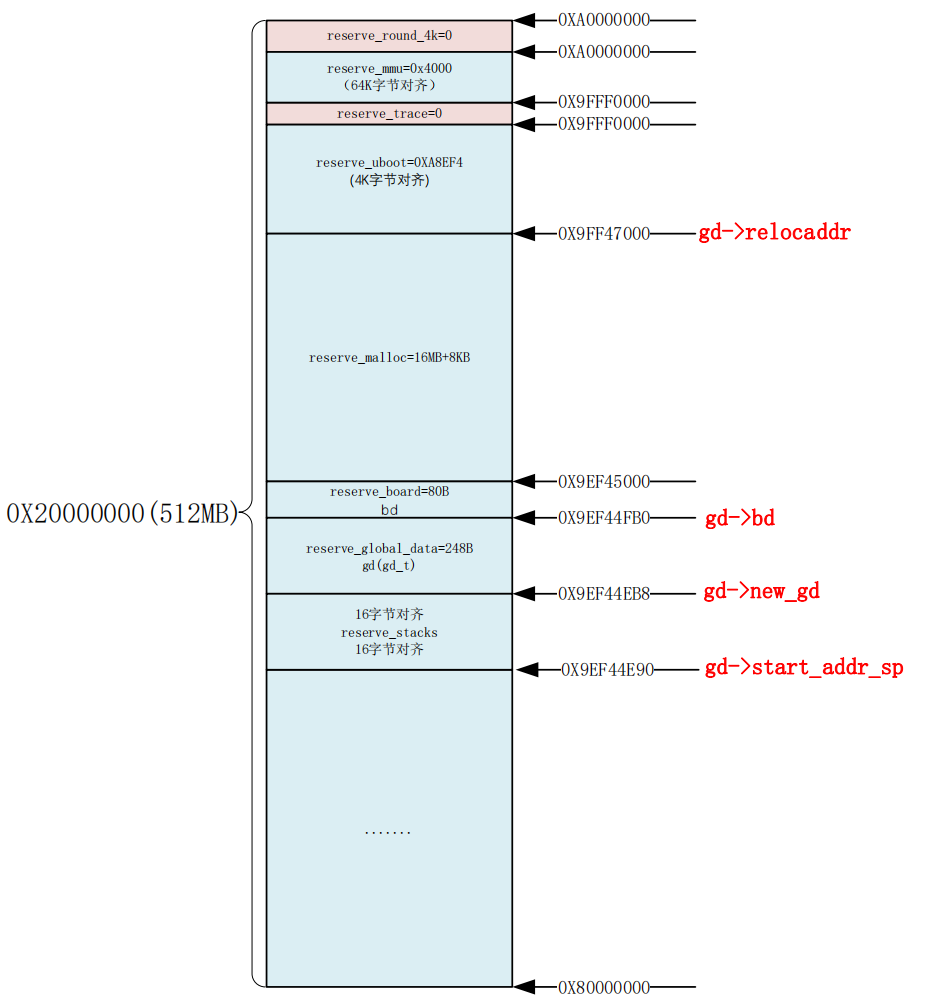
6) relocate_code 函数详解
relocate_code 函数是用于代码拷贝的,此函数定义在文件 arch/arm/lib/relocate.S 中,代码如下:
/*
 * void relocate_code(addr_moni)
 *
 * This function relocates the monitor code.
 *
 * NOTE:
 * To prevent the code below from containing references with an
 * R_ARM_ABS32 relocation record type, we never refer to linker-
 * defined symbols directly. Instead, we declare literals which
 * contain their relative location with respect to relocate_code,
 * and at run time, add relocate_code back to them.
*/
79 ENTRY(relocate_code)
80 ldr r1, =__image_copy_start /* r1 <- SRC &__image_copy_start /
81 subs r4, r0, r1 / r4 <- relocation offset /
82 beq relocate_done / skip relocation /
83 ldr r2, =__image_copy_end / r2 <- SRC &__image_copy_end /
84
85 copy_loop:
86 ldmia r1!, {r10-r11} / copy from source address [r1] /
87 stmia r0!, {r10-r11} / copy to target address [r0] /
88 cmp r1, r2 / until source end address [r2] /
89 blo copy_loop
90
91 /
92 * fix .rel.dyn relocations
93 /
94 ldr r2, =__rel_dyn_start / r2 <- SRC &__rel_dyn_start /
95 ldr r3, =__rel_dyn_end / r3 <- SRC &__rel_dyn_end /
96 fixloop:
97 ldmia r2!, {r0-r1} / (r0,r1) <- (SRC location,fixup) /
98 and r1, r1, #0xff
99 cmp r1, #23 / relative fixup? /
100 bne fixnext
101
102 / relative fix: increase location by offset /
103 add r0, r0, r4
104 ldr r1, [r0]
105 add r1, r1, r4
106 str r1, [r0]
107 fixnext:
108 cmp r2, r3
109 blo fixloop
110
111 relocate_done:
112
113 #ifdef XSCALE
114 /
115 * On xscale, icache must be invalidated and write buffers
116 * drained, even with cache disabled - 4.2.7 of xscale core
117 developer's manual /
118 mcr p15, 0, r0, c7, c7, 0 / invalidate icache /
119 mcr p15, 0, r0, c7, c10, 4 / drain write buffer /
120 #endif
121
122 / ARMv4- don't know bx lr but the assembler fails to see that */
123
124 #ifdef ARM_ARCH_4
125 mov pc, lr
126 #else
127 bx lr
128 #endif
129
130 ENDPROC(relocate_code)
第 80 行 :ldr r1, =__image_copy_start,将 __image_copy_start 的地址加载到 r1 寄存器中。__image_copy_start = 0X87800000,所以 r1 寄存器保存的是 U-Boot 代码的源起始地址。
第 81 行 :r0=0X9FF47000,这个地址就是 uboot 拷贝的目标首地址。r4=r0-r1=0X9FF47000-0X87800000=0X18747000,因此 r4 保存偏移量。
第 82 行 :beq relocate_done,如果第 81 行的减法结果为 0(即 r0 - r1 = 0),说明源地址和目标地址相同,不需要进行拷贝,直接跳转到 relocate_done 标签处结束函数。
第 83 行 :ldr r2, =__image_copy_end,将 __image_copy_end 的地址加载到 r2 寄存器中。__image_copy_end = 0x8785dd54,所以 r2 保存的是拷贝结束地址。
第 84 行,函数 copy_loop 完成代码拷贝工作!从 r1,也就是__image_copy_start 开始,读取 uboot 代码保存到 r10 和 r11中,一次就只拷贝这 2 个 32 位的数据。拷贝完成以后 r1 的值会更新,保存下一个要拷贝的数据地址。
第 87 行,将 r10 和 r11 的数据写到 r0 开始的地方,也就是目的地址。写完以后 r0 的值会更新,更新为下一个要写入的数据地址。
第 88 行,比较 r1 是否和 r2 相等,也就是检查是否拷贝完成,如果不相等的话说明没有拷贝完成,没有拷贝完成的话就跳转到copy_loop 接着拷贝,直至拷贝完成。
接下来的第 94 行~109 行是重定位.rel.dyn 段,.rel.dyn 段是存放.text 段中需要重定位地址的集合。重定位就是 uboot 将自身拷贝到 DRAM 的另一个地放去继续运行(DRAM 的高地址处)。
我们知道,一个可执行的 bin 文件,其链接地址和运行地址要相等,也就是链接到哪个地址,在运行之前就要拷贝到哪个地址去。现在我们重定位以后,运行地址就和链接地址不同了,这
样寻址的时候不会出问题吗?为了分析这个问题,我们需要在 mx6ull_alientek_emmc.c 中输入如下所示内容:
1 static int rel_a = 0;
2
3 void rel_test(void)
4 {
5 rel_a = 100;
6 printf("rel_test\r\n");
7 }
最后还需要在 mx6ullevk.c 文件中的 board_init 函数里面调用 rel_test 函数,否则 rel_reset 不会被编译进 uboot。修改完成后的 mx6ullevk.c 如图所示:
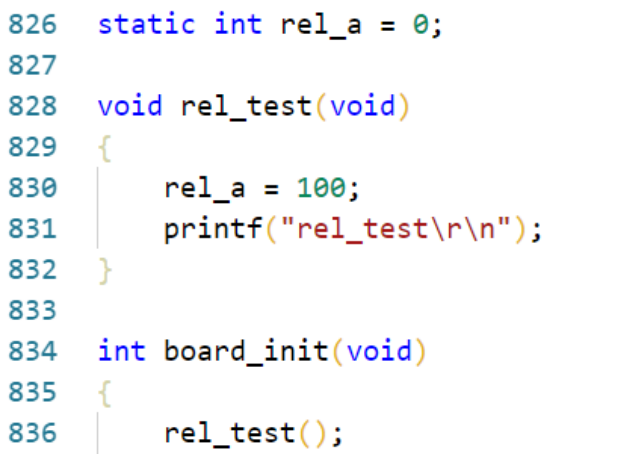
board_init 函数会调用 rel_test,rel_test 会调用全局变量 rel_a,使用如下命令编译 uboot:
./mx6ull_alientek_emmc.sh
编译完成以后,使用 arm-linux-gnueabihf-objdump 将 u-boot 进行反汇编,得到 u-boot.dis 这 个汇编文件,命令如下:
arm-linux-gnueabihf-objdump -D -m arm u-boot > u-boot.dis
在 u-boot.dis 文件中找到 rel_a、rel_rest 和 board_init,相关内容如下所示:
1 87804184 <rel_test>:
2 87804184: e59f300c ldr r3, [pc, #12] ; 87804198 <rel_test+0x14>
3 87804188: e3a02064 mov r2, #100 ; 0x64
4 8780418c: e59f0008 ldr r0, [pc, #8] ; 8780419c <rel_test+0x18>
5 87804190: e5832000 str r2, [r3]
6 87804194: ea00d668 b 87839b3c <printf>
7 87804198: 8785da50 ; <UNDEFINED> instruction: 0x8785da50
8 8780419c: 878426a2 strhi r2, [r4, r2, lsr #13]
9
10 878041a0 <board_init>:
11 878041a0: e92d4010 push {r4, lr}
12 878041a4: ebfffff6 bl 87804184 <rel_test>
13
14 ......
15
16 8785da50 <rel_a>:
17 8785da50: 00000000 andeq r0, r0, r0
第 12 行是 borad_init 调用 rel_test 函数,用到了 bl 指令,而 bl 指令是位置无关指令,bl 指令是相对寻址的(pc+offset),因此 uboot 中函数调用是与绝对位置无关的。
再来看一下函数 rel_test 对于全局变量 rel_a 的调用,第 2 行设置 r3 的值为 pc+12 地址处的值,因为 ARM 流水线的原因,pc 寄存器的值为当前地址+8,因此 pc=0X87804184+8=0X8780418C,r3=0X8780418C+12=0X87804198,第 7 行就是0X87804198 这个地址,0X87804198 处的值为 0X8785DA50。根据第 17 行可知,0X8785DA50 正是变量 rel_a 的地址,最终r3=0X8785DA50。
第 3 行,r2=100。
第 5 行,将 r2 内的值写到 r3 地址处,也就是设置地址 0X8785DA50 的值为 100,这不就是示例代码代码中的第 5 行:rel_a = 100。
总结一下 rel_a=100 的汇编执行过程:
①、在函数 rel_test 末尾处有一个地址为 0X87804198 的内存空间(示例代码第 7 行),此内存空间保存着变量 rel_a 的地址。
②、函数 rel_test 要想访问变量 rel_a,首先访问末尾的 0X87804198 来获取变量 rel_a 的地址,而访问 0X87804198 是通过偏移来访问的,很明显是个位置无关的操作。
③、通过 0X87804198 获取到变量 rel_a 的地址,对变量 rel_a进行操作。
④、可以看出,函数 rel_test 对变量 rel_a 的访问没有直接进行,而是使用了一个第三方偏移地址 0X87804198,专业术语叫做 Label。这个第三方偏移地址就是实现重定位后运行不会出错的重要原因!
uboot 重定位后偏移为 0X18747000,那么重定位后函数 rel_test 的首地址就是 0X87804184 +0X18747000=0X9FF4B184。保存变量 rel_a 地址的 Label 就是 0X9FF4B184+8+12=0X9FF4B198(既:0X87804198+0X18747000),变量 rel_a 的地址就为 0X8785DA50+0X18747000=0X9FFA4A50。重定位后函数 rel_test 要想正常访问变量 rel_a 就得设置 0X9FF4B198(重定位后的 Label)地址出的值为 0X9FFA4A50(重定位后的变量 rel_a 地址)。这样就解决了重定位后链接地址和运行地址不一致的问题。
可以看出,uboot 对于重定位后链接地址和运行地址不一致的解决方法就是采用位置无关码,在使用 ld 进行链接的时候使用选项"-pie"生成位置无关的可执行文件。在文件 arch/arm/config.mk 下有如下代码:
82 # needed for relocation
83 LDFLAGS_u-boot += -pie
第 83 行就是设置 uboot 链接选项,加入了"-pie"选项,编译链接 uboot 的时候就会使用到"-pie",如图所示:
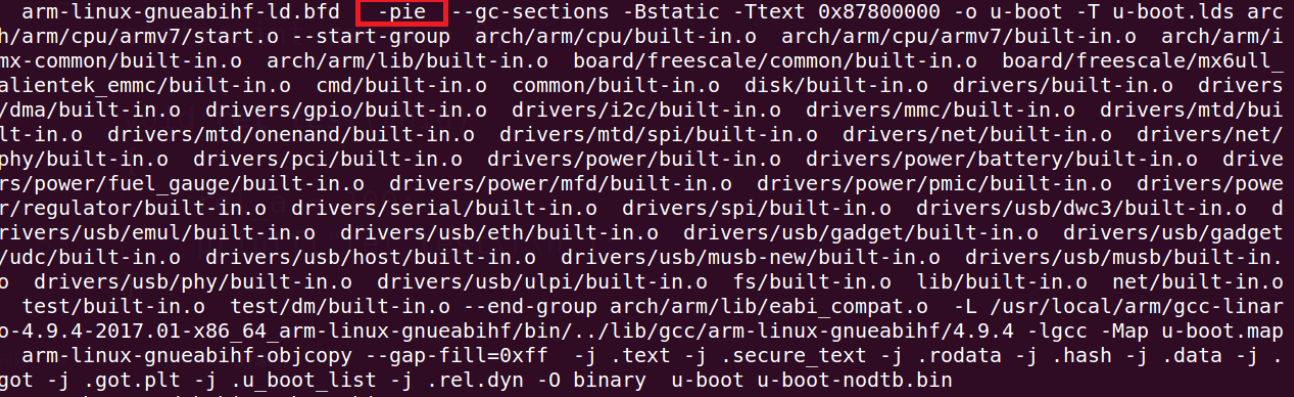
使用"-pie"选项以后会生成一个.rel.dyn 段,uboot 就是靠这个.rel.dyn 来解决重定位问题的,在 u-bot.dis 的.rel.dyn 段中有如下所示内容:
1 Disassembly of section .rel.dyn:
2
3 8785da44 <__rel_dyn_end-0x8ba0>:
4 8785da44: 87800020 strhi r0, [r0, r0, lsr #32]
5 8785da48: 00000017 andeq r0, r0, r7, lsl r0
6 ......
7 8785dfb4: 87804198 ; <UNDEFINED> instruction: 0x87804198
8 8785dfb8: 00000017 andeq r0, r0, r7, lsl r0
先来看一下.rel.dyn 段的格式,类似第 7 行和第 8 行这样的是一组,也就是两个 4 字节数据为一组。高 4 字节是 Label 地址标识 0X17,低 4 字节就是 Label 的地址,首先判断 Label 地址标识是否正确,也就是判断高 4 字节是否为 0X17,如果是的话低 4 字节就是 Label 地址值。
第 7 行值为 0X87804198,第 8 行为 0X00000017,说明第 7 行的 0X87804198 是个 Label, 这个正是示例代码中存放变量 rel_a 地址的那个 Label。根据前面的分析,只要将地址0X87804198+offset 处的值改为重定位后的变量 rel_a 地址即可。我们猜测的是否正确,看一下 uboot 对.rel.dyn 段的重定位即可(示例代码代码中的第 94~109 行),.rel.dyn 段的重定位代码如下:
91 /*
92 * fix .rel.dyn relocations
93 */
94 ldr r2, =__rel_dyn_start /* r2 <- SRC &__rel_dyn_start */
95 ldr r3, =__rel_dyn_end /* r3 <- SRC &__rel_dyn_end */
96 fixloop:
97 ldmia r2!, {r0-r1} /* (r0,r1) <- (SRC location,fixup) */
98 and r1, r1, #0xff
99 cmp r1, #23 /* relative fixup? */
100 bne fixnext
101
102 /* relative fix: increase location by offset */
103 add r0, r0, r4
104 ldr r1, [r0]
105 add r1, r1, r4
106 str r1, [r0]
107 fixnext:
108 cmp r2, r3
109 blo fixloop
第 94 行,r2=__rel_dyn_start,也就是.rel.dyn 段的起始地址。
第 95 行,r3=__rel_dyn_end,也就是.rel.dyn 段的终止地址。
第 97 行,从.rel.dyn 段起始地址开始,每次读取两个 4 字节的数据存放到 r0 和 r1 寄存器中,r0 存放低 4 字节的数据,也就是 Label 地址;r1 存放高 4 字节的数据,也就是 Label 标志。
第 98 行,r1 中给的值与 0xff 进行与运算,其实就是取 r1 的低 8 位。
第 99 行,判断 r1 中的值是否等于 23(0X17)。
第 100 行,如果 r1 不等于 23 的话就说明不是描述 Label 的,执行函数 fixnext,否则的话继续执行下面的代码。
第 103 行,r0 保存着 Label 值,r4 保存着重定位后的地址偏移,r0+r4 就得到了重定位后的 Label 值。此时 r0 保存着重定位后的 Label 值,相当于 0X87804198+0X18747000=0X9FF4B198。
第 104,读取重定位后 Label 所保存的变量地址,此时这个变量地址还是重定位前的(相当于 rel_a 重定位前的地址0X8785DA50),将得到的值放到 r1 寄存器中。
第 105 行,r1+r4 即可得到重定位后的变量地址,相当于 rel_a 重定位后的 0X8785DA50+0X18747000=0X9FFA4A50。
第 106 行,重定位后的变量地址写入到重定位后的 Label 中,相等于设置地址 0X9FF4B198 处的值为 0X9FFA4A50。
第 108 行,比较 r2 和 r3,查看.rel.dyn 段重定位是否完成。
第 109 行,如果 r2 和 r3 不相等,说明.rel.dyn 重定位还未完成,因此跳到 fixloop 继续重定位.rel.dyn 段。
可以看出,uboot 中对.rel.dyn 段的重定位方法和我们猜想的一致。.rel.dyn 段的重定位比较复杂一点,有点绕,因为涉及到链接地址和运行地址的问题。
7)relocate_vectors****函数详解
函数 relocate_vectors 用于重定位向量表,此函数定义在文件 relocate.S 中,函数源码如下:
27 ENTRY(relocate_vectors)
28
29 #ifdef CONFIG_CPU_V7M
30 /*
31 * On ARMv7-M we only have to write the new vector address
32 * to VTOR register.
33 */
34 ldr r0, [r9, #GD_RELOCADDR] /* r0 = gd->relocaddr */
35 ldr r1, =V7M_SCB_BASE
36 str r0, [r1, V7M_SCB_VTOR]
37 #else
38 #ifdef CONFIG_HAS_VBAR
39 /*
40 * If the ARM processor has the security extensions,
41 * use VBAR to relocate the exception vectors.
42 */
43 ldr r0, [r9, #GD_RELOCADDR] /* r0 = gd->relocaddr */
44 mcr p15, 0, r0, c12, c0, 0 /* Set VBAR */
45 #else
46 /*
47 * Copy the relocated exception vectors to the
48 * correct address
49 * CP15 c1 V bit gives us the location of the vectors:
50 * 0x00000000 or 0xFFFF0000.
51 */
52 ldr r0, [r9, #GD_RELOCADDR] /* r0 = gd->relocaddr */
53 mrc p15, 0, r2, c1, c0, 0 /* V bit (bit[13]) in CP15 c1 */
54 ands r2, r2, #(1 << 13)
55 ldreq r1, =0x00000000 /* If V=0 */
56 ldrne r1, =0xFFFF0000 /* If V=1 */
57 ldmia r0!, {r2-r8,r10}
58 stmia r1!, {r2-r8,r10}
59 ldmia r0!, {r2-r8,r10}
60 stmia r1!, {r2-r8,r10}
61 #endif
62 #endif
63 bx lr
64
65 ENDPROC(relocate_vectors)
第 29 行,如果定义了 CONFIG_CPU_V7M 的话就执行第 30~36 行的代码,这是 Cortex-M 内核单片机执行的语句,因此对于 I.MX6ULL 来说是无效的。
第 38 行,如果定义了 CONFIG_HAS_VBAR 的话就执行此语句,这个是向量表偏移,Cortex-A7 是支持向量表偏移的。而且,在.config 里面定义了 CONFIG_HAS_VBAR,因此会执行这个分支。
第 43 行,r0=gd->relocaddr,也就是重定位后 uboot 的首地址,向量表肯定是从这个地址开始存放的。
第 44 行,将 r0 的值写入到 CP15 的 VBAR 寄存器中,也就是将新的向量表首地址写入到寄存器 VBAR 中,设置向量表偏移。
8) board_init_r****函数详解
前面讲解了 board_init_f 函数,在此函数里面会调用一系列的函数来初始化一些外设和 gd 的成员变量。但是board_init_f 并没有初始化所有的外设,还需要做一些后续工作, 这些后续工作就是由函数 board_init_r 来完成的,board_init_r 函数定义在文件 common/board_r.c 中,代码如下:
991 void board_init_r(gd_t *new_gd, ulong dest_addr)
992 {
993 #ifdef CONFIG_NEEDS_MANUAL_RELOC
994 int i;
995 #endif
996
997 #ifdef CONFIG_AVR32
998 mmu_init_r(dest_addr);
999 #endif
1000
1001 #if !defined(CONFIG_X86) && !defined(CONFIG_ARM) && !defined(CONFIG
_ARM64)
1002 gd = new_gd;
1003 #endif
1004
1005 #ifdef CONFIG_NEEDS_MANUAL_RELOC
1006 for (i = 0; i < ARRAY_SIZE(init_sequence_r); i++)
1007 init_sequence_r[i] += gd->reloc_off;
1008 #endif
1009
1010 if (initcall_run_list(init_sequence_r))
1011 hang();
1012
1013 /* NOTREACHED - run_main_loop() does not return */
1014 hang();
1015 }
第 1010 行调用 initcall_run_list 函数来执行初始化序列 init_sequence_r,init_sequence_r 是一个函数集合,init_sequence_r 也定义在文件 common/board_r.c 中,由于 init_sequence_f 的内容比较长,里面有大量的条件编译代码,这里为了缩小篇幅,将条件编译部分删除掉了,去掉条件编译以后的 init_sequence_r 定义如下:
1 init_fnc_t init_sequence_r[] = {
2 initr_trace,
3 initr_reloc,
4 initr_caches,
5 initr_reloc_global_data,
6 initr_barrier,
7 initr_malloc,
8 initr_console_record,
9 bootstage_relocate,
10 initr_bootstage,
11 board_init, /* Setup chipselects */
12 stdio_init_tables,
13 initr_serial,
14 initr_announce,
15 INIT_FUNC_WATCHDOG_RESET
16 INIT_FUNC_WATCHDOG_RESET
17 INIT_FUNC_WATCHDOG_RESET
18 power_init_board,
19 initr_flash,
20 INIT_FUNC_WATCHDOG_RESET
21 initr_nand,
22 initr_mmc,
23 initr_env,
24 INIT_FUNC_WATCHDOG_RESET
25 initr_secondary_cpu,
26 INIT_FUNC_WATCHDOG_RESET
27 stdio_add_devices,
28 initr_jumptable,
29 console_init_r, /* fully init console as a device */
30 INIT_FUNC_WATCHDOG_RESET
31 interrupt_init,
32 initr_enable_interrupts,
33 initr_ethaddr,
34 board_late_init,
35 INIT_FUNC_WATCHDOG_RESET
36 INIT_FUNC_WATCHDOG_RESET
37 INIT_FUNC_WATCHDOG_RESET
38 initr_net,
39 INIT_FUNC_WATCHDOG_RESET
40 run_main_loop,
41 };
第 2 行,initr_trace 函数,如果定义了宏 CONFIG_TRACE 的话就会调用函数 trace_init,初始化和调试跟踪有关的内容。
第 3 行,initr_reloc 函数用于设置 gd->flags,标记重定位完成。
第 4 行,initr_caches 函数用于初始化 cache,使能 cache。
第 5 行,initr_reloc_global_data 函数,初始化重定位后 gd 的一些成员变量。
第 6 行,initr_barrier 函数,I.MX6ULL 未用到。
第 7 行,initr_malloc 函数,初始化 malloc。
第 8 行,initr_console_record 函数,初始化控制台相关的内容,I.MX6ULL 未用到,空函数。
第 9 行,bootstage_relocate 函数,启动状态重定位。
第 10 行,initr_bootstage 函数,初始化 bootstage 什么的。
第 11 行,board_init 函数,板级初始化,包括 74XX 芯片,I2C、FEC、USB 和 QSPI 等。
这里执行的是 mx6ull_alientek_emmc.c 文件中的 board_init 函数。
第 12 行,stdio_init_tables 函数,stdio 相关初始化。
第 13 行,initr_serial 函数,初始化串口。
第 14 行,initr_announce 函数,与调试有关,通知已经在 RAM 中运行。
第 18 行,power_init_board 函数,初始化电源芯片。
第 19 行,initr_flash 函数,对于 I.MX6ULL 而言,没有定义宏 CONFIG_SYS_NO_FLASH 的话函数 initr_flash 才有效。但是 mx6_common.h 中定义了宏 CONFIG_SYS_NO_FLASH,所以此函数无效。
第 21 行,initr_nand 函数,初始化 NAND,如果使用 NAND 版本核心板的话就会初始化 NAND。
第 22 行,initr_mmc 函数,初始化 EMMC,如果使用 EMMC 版本核心板的话就会初始化EMMC,串口输出如图所示信息:

从图可以看出,此时有两个 EMCM 设备,FSL_SDHC:0 和 FSL_SDHC:1。
第 23 行,initr_env 函数,初始化环境变量。
第 25 行,initr_secondary_cpu 函数,初始化其他 CPU 核,I.MX6ULL 只有一个核,因此此函数没用。
第 27 行,stdio_add_devices 函数,各种输入输出设备的初始化,如 LCD driver,I.MX6ULL 使用 drv_video_init 函数初始化 LCD。会输出如图所示信息:

第 28 行,initr_jumptable 函数,初始化跳转表。
第 29 行,console_init_r 函数,控制台初始化,初始化完成以后此函数会调用 stdio_print_current_devices 函数来打印出当前的控制台设备,如图所示:
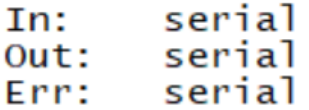
第 31 行,interrupt_init 函数,初始化中断。
第 32 行,initr_enable_interrupts 函数,使能中断。
第 33 行,initr_ethaddr 函数,初始化网络地址,也就是获取 MAC 地址。读取环境变量"ethaddr"的值。
第 34 行,board_late_init 函数,板子后续初始化,此函数定义在文件 mx6ull_alientek_emmc.c 中,如果环境变量存储在 EMMC 或者 SD 卡中的话此函数会调用 board_late_mmc_env_init 函数初始化 EMMC/SD。会切换到正在时候用的 emmc 设备,代码如图所示:
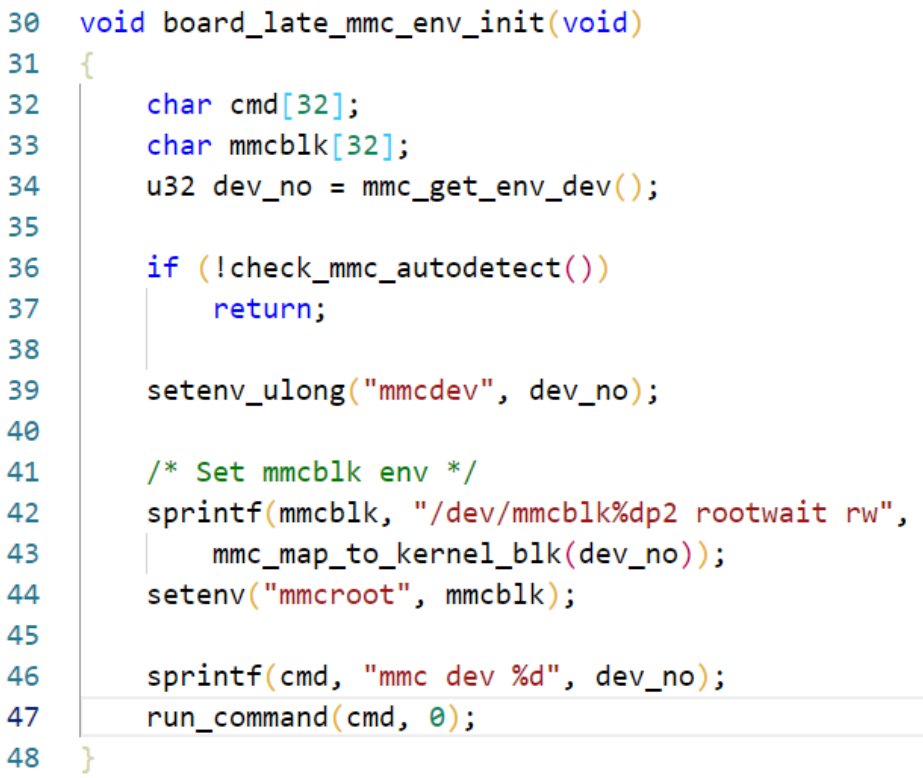
图中的第 46 行和第 47 行就是运行"mmc dev xx"命令,用于切换到正在使用的 EMMC 设备,串口输出信息如图所示:

第 38 行,initr_net 函数,初始化网络设备,函数调用顺序为:initr_net->eth_initialize->board_eth_init(),串口输出如图所示信息:

第 40 行,run_main_loop 行,主循环,处理命令。
9)run_main_loop****函数详解
uboot 启动以后会进入 3 秒倒计时,如果在 3 秒倒计时结束之前按下按下回车键,那么就 会进入 uboot 的命令模式,如果倒计时结束以后都没有按下回车键,那么就会自动启动 Linux 内核,这个功能就是由 run_main_loop 函数来完成的。run_main_loop 函数定义在文件 common/board_r.c 中,函数内容如下:
753 static int run_main_loop(void)
754 {
755 #ifdef CONFIG_SANDBOX
756 sandbox_main_loop_init();
757 #endif
758 /* main_loop() can return to retry autoboot, if so just run it again
*/
759 for (;;)
760 main_loop();
761 return 0;
762 }
第 759 行和第 760 行是个死循环,"for(;;)"和"while(1)"功能一样,死循环里面就一个 main_loop 函数,main_loop 函数定义在文件 common/main.c 里面,代码如下:
43 /* We come here after U-Boot is initialised and ready to process comma
nds */
44 void main_loop(void)
45 {
46 const char *s;
47
48 bootstage_mark_name(BOOTSTAGE_ID_MAIN_LOOP, "main_loop");
49
50 #ifndef CONFIG_SYS_GENERIC_BOARD
51 puts("Warning: Your board does not use generic board. Please read\
n");
52 puts("doc/README.generic-board and take action. Boards not\n");
53 puts("upgraded by the late 2014 may break or be removed.\n");
54 #endif
55
56 #ifdef CONFIG_VERSION_VARIABLE
57 setenv("ver", version_string); /* set version variable */
58 #endif /* CONFIG_VERSION_VARIABLE */
59
60 cli_init();
61
62 run_preboot_environment_command();
63
64 #if defined(CONFIG_UPDATE_TFTP)
65 update_tftp(0UL, NULL, NULL);
66 #endif /* CONFIG_UPDATE_TFTP */
67
68 s = bootdelay_process();
69 if (cli_process_fdt(&s))
70 cli_secure_boot_cmd(s);
71
72 autoboot_command(s);
73
74 cli_loop();
75 }
第 48 行,调用 bootstage_mark_name 函数,打印出启动进度。
第 57 行,如果定义了宏 CONFIG_VERSION_VARIABLE 的话就会执行函数 setenv,设置换将变量 ver 的值为 version_string,也就是设置版本号环境变量。version_string 定义在文件 cmd/version.c 中,定义如下:
const char __weak version_string\[\] = U_BOOT_VERSION_STRING;
U_BOOT_VERSION_STRING 是个宏,定义在文件 include/version.h,如下:
#define U_BOOT_VERSION_STRING U_BOOT_VERSION " (" U_BOOT_DATE " - " \
U_BOOT_TIME " " U_BOOT_TZ ")" CONFIG_IDENT_STRING
U_BOOT_VERSION 定义在文件 include/generated/version_autogenerated.h 中,文件 version_autogenerated.h 内如如下:
1 #define PLAIN_VERSION "2016.03"
2 #define U_BOOT_VERSION "U-Boot " PLAIN_VERSION
3 #define CC_VERSION_STRING "arm-linux-gnueabihf-gcc (Linaro GCC 4.9-201
7.01) 4.9.4"
4 #define LD_VERSION_STRING "GNU ld (Linaro_Binutils-2017.01) 2.24.0.201
41017 Linaro 2014_11-3-git"
可以看出,U_BOOT_VERSION 为"U-boot 2016.03",U_BOOT_DATE、U_BOOT_TIME 和 U_BOOT_TZ 这定义在文件include/generated/timestamp_autogenerated.h 中,如下所示:
1 #define U_BOOT_DATE "Apr 25 2019"
2 #define U_BOOT_TIME "21:10:53"
3 #define U_BOOT_TZ "+0800"
4 #define U_BOOT_DMI_DATE "04/25/2019"
宏 CONFIG_IDENT_STRING 为空,所以 U_BOOT_VERSION_STRING 为"U-Boot 2016.03 (Apr 25 2019 - 21:10:53 +0800)",进入 uboot 命令模式,输入命令"version"查看版本号, 如图 32.2.9.1 所示:

图中的第一行就是 uboot 版本号,和我们分析的一致。
接着回到示例代码中,第 60 行,cli_init 函数,跟命令初始化有关,初始化 hush shell 相关的变量。
第 62 行,run_preboot_environment_command 函数,获取环境变量 perboot 的内容,perboot 是一些预启动命令,一般不使用这个环境变量。
第 68 行,bootdelay_process 函数,此函数会读取环境变量 bootdelay 和 bootcmd 的内容, 然后将 bootdelay 的值赋值给全局变量 stored_bootdelay,返回值为环境变量 bootcmd 的值。
第 69 行,如果定义了 CONFIG_OF_CONTROL 的话函数 cli_process_fdt 就会实现,如果没有定义CONFIG_OF_CONTROL 的话函数 cli_process_fdt 直接返回一个 false。在本 uboot 中没有定义 CONFIG_OF_CONTROL,因此 cli_process_fdt 函数返回值为 false。
第 72 行,autoboot_command 函数,此函数就是检查倒计时是否结束?倒计时结束之前有没有被打断?此函数定义在文件 common/autoboot.c 中,内容如下:
380 void autoboot_command(const char *s)
381 {
382 debug("### main_loop: bootcmd=\"%s\"\n", s ? s : "<UNDEFINED>");
383
384 if (stored_bootdelay != -1 && s && !abortboot(stored_bootdelay))
{
385 #if defined(CONFIG_AUTOBOOT_KEYED) && !defined(CONFIG_AUTOBOOT_KEYED
_CTRLC)
386 int prev = disable_ctrlc(1); /* disable Control C checking *
/
387 #endif
388
389 run_command_list(s, -1, 0);
390
391 #if defined(CONFIG_AUTOBOOT_KEYED) && !defined(CONFIG_AUTOBOOT_KEYED
_CTRLC)
392 disable_ctrlc(prev); /* restore Control C checking */
393 #endif
394 }
395
396 #ifdef CONFIG_MENUKEY
397 if (menukey == CONFIG_MENUKEY) {
398 s = getenv("menucmd");
399 if (s)
400 run_command_list(s, -1, 0);
401 }
402 #endif /* CONFIG_MENUKEY */
403 }
可以看出,autoboot_command 函数里面有很多条件编译,条件编译一多就不利于我们阅读程序!宏 CONFIG_AUTOBOOT_KEYED、CONFIG_AUTOBOOT_KEYED_CTRLC 和 CONFIG_MENUKEY 这三个宏在 I.MX6ULL 里面没有定义,所以示例代码进行精简,得到如下代码:
1 void autoboot_command(const char *s)
2 {
3 if (stored_bootdelay != -1 && s && !abortboot(stored_bootdelay)) {
4 run_command_list(s, -1, 0);
5 }
6 }
当一下三条全部成立的话,就会执行函数 run_command_list。
①、stored_bootdelay 不等于-1。
②、s 不为空。
③、函数 abortboot 返回值为 0。
stored_bootdelay 等于环境变量 bootdelay 的值;s 是环境变量 bootcmd 的值,一般不为空,
因此前两个成立,就剩下了函数 abortboot 的返回值,abortboot 函数也定义在文件 common/autoboot.c 中,内容如下:
283 static int abortboot(int bootdelay)
284 {
285 #ifdef CONFIG_AUTOBOOT_KEYED
286 return abortboot_keyed(bootdelay);
287 #else
288 return abortboot_normal(bootdelay);
289 #endif
290 }
因为宏 CONFIG_AUTOBOOT_KEYE 未定义,因此执行函数 abortboot_normal,好吧,绕来绕去的!接着来看函数 abortboot_normal,此函数也定义在文件 common/autoboot.c 中,内容如下:
225 static int abortboot_normal(int bootdelay)
226 {
227 int abort = 0;
228 unsigned long ts;
229
230 #ifdef CONFIG_MENUPROMPT
231 printf(CONFIG_MENUPROMPT);
232 #else
233 if (bootdelay >= 0)
234 printf("Hit any key to stop autoboot: %2d ", bootdelay);
235 #endif
236
237 #if defined CONFIG_ZERO_BOOTDELAY_CHECK
238 /*
239 * Check if key already pressed
240 * Don't check if bootdelay < 0
241 */
242 if (bootdelay >= 0) {
243 if (tstc()) { /* we got a key press */
244 (void) getc(); /* consume input */
245 puts("\b\b\b 0");
246 abort = 1; /* don't auto boot */
247 }
248 }
249 #endif
250
251 while ((bootdelay > 0) && (!abort)) {
252 --bootdelay;
253 /* delay 1000 ms */
254 ts = get_timer(0);
255 do {
256 if (tstc()) { /* we got a key press */
257 abort = 1; /* don't auto boot */
258 bootdelay = 0; /* no more delay */
259 # ifdef CONFIG_MENUKEY
260 menukey = getc();
261 # else
262 (void) getc(); /* consume input */
263 # endif
264 break;
265 }
266 udelay(10000);
267 } while (!abort && get_timer(ts) < 1000);
268
269 printf("\b\b\b%2d ", bootdelay);
270 }
271
272 putc('\n');
273
274 #ifdef CONFIG_SILENT_CONSOLE
275 if (abort)
276 gd->flags &= ~GD_FLG_SILENT;
277 #endif
278
279 return abort;
280 }
函数 abortboot_normal 同样很多条件编译,删除掉条件编译相关代码后 abortboot_normal 函数内容如下:
1 static int abortboot_normal(int bootdelay)
2 {
3 int abort = 0;
4 unsigned long ts;
5
6 if (bootdelay >= 0)
7 printf("Hit any key to stop autoboot: %2d ", bootdelay);
8
9 while ((bootdelay > 0) && (!abort)) {
10 --bootdelay;
11 /* delay 1000 ms */
12 ts = get_timer(0);
13 do {
14 if (tstc()) { /* we got a key press */
15 abort = 1; /* don't auto boot */
16 bootdelay = 0; /* no more delay */
17 (void) getc(); /* consume input */
18 break;
19 }
20 udelay(10000);
21 } while (!abort && get_timer(ts) < 1000);
22
23 printf("\b\b\b%2d ", bootdelay);
24 }
25 putc('\n');
26 return abort;
27 }
第 3 行的变量 abort 是函数 abortboot_normal 的返回值,默认值为 0。
第 7 行通过串口输出"Hit any key to stopautoboot"字样,如图所示:

第 9~21 行就是倒计时的具体实现。
第 14 行判断键盘是否有按下,也就是是否打断了倒计时,如果键盘按下的话就执行相应的分支。比如设置 abort 为 1,设置 bootdelay 为 0 等,最后跳出倒计时循环。
第 26 行,返回 abort 的值,如果倒计时自然结束,没有被打断 abort 就为 0,否则的话 abort 的值就为 1。
回到示例代码 32.2.9.6 的 autoboot_command 函数中,如果倒计时自然结束那么就执行函数
run_command_list,此函数会执行参数 s 指定的一系列命令,也就是环境变量 bootcmd 的命令,
bootcmd 里面保存着默认的启动命令,因此 linux 内核启动!这个就是 uboot 中倒计时结束以后
自动启动 linux 内核的原理。如果倒计时结束之前按下了键盘上的按键,那么 run_command_list 函数就不会执行,相当于 autoboot_command 是个空函数。
回到"遥远"的示例代码中的 main_loop 函数中,如果倒计时结束之前按下按键,
那么就会执行第 74 行的 cli_loop 函数,这个就是命令处理函数,负责接收好处理输入的命令。
10) cli_loop****函数详解
cli_loop 函数是 uboot 的命令行处理函数,我们在 uboot 中输入各种命令,进行各种操作就
是有 cli_loop 来处理的,此函数定义在文件 common/cli.c 中,函数内容如下:
202 void cli_loop(void)
203 {
204 #ifdef CONFIG_SYS_HUSH_PARSER
205 parse_file_outer();
206 /* This point is never reached */
207 for (;;);
208 #else
209 cli_simple_loop();
210 #endif /*CONFIG_SYS_HUSH_PARSER*/
211 }
在文件 include/configs/mx6_common.h 中有定义宏 CONFIG_SYS_HUSH_PARSER,而配置头文件 mx6ullevk.h 里面会引用 mx_common.h 这个头文件,因此宏 CONFIG_SYS_HUSH_PARSER 有定义。
第 205 行调用函数 parse_file_outer。
第 207 行是个死循环,永远不会执行到这里。
函数 parse_file_outer 定义在文件 common/cli_hush.c 中,去掉条件编译内容以后的函数内容如下:
1 int parse_file_outer(void)
2 {
3 int rcode;
4 struct in_str input;
5
6 setup_file_in_str(&input);
7 rcode = parse_stream_outer(&input, FLAG_PARSE_SEMICOLON);
8 return rcode;
9 }
第 6 行调用函数 setup_file_in_str 初始化变量 input 的成员变量。
第 7 行调用函数 parse_stream_outer,这个函数就是 hush shell 的命令解释器,负责接收命令行输入,然后解析并执行相应的命令,函数 parse_stream_outer 定义在文件 common/cli_hush.c 中,精简版的函数内容如下:
1 static int parse_stream_outer(struct in_str *inp, int flag)
2 {
3 struct p_context ctx;
4 o_string temp=NULL_O_STRING;
5 int rcode;
6 int code = 1;
7 do {
8 ......
9 rcode = parse_stream(&temp, &ctx, inp,
10 flag & FLAG_CONT_ON_NEWLINE ? -1 : '\n');
11 ......
12 if (rcode != 1 && ctx.old_flag == 0) {
13 ......
14 run_list(ctx.list_head);
15 ......
16 } else {
17 ......
18 }
19 b_free(&temp);
20 /* loop on syntax errors, return on EOF */
21 } while (rcode != -1 && !(flag & FLAG_EXIT_FROM_LOOP) &&
22 (inp->peek != static_peek || b_peek(inp)));
23 return 0;
24 }
第 7~21 行中的 do-while 循环就是处理输入命令的。
第 9 行调用函数 parse_stream 进行命令解析。
第 14 行调用 run_list 函数来执行解析出来的命令。
函数 run_list 会经过一系列的函数调用,最终通过调用cmd_process 函数来处理命令,过程如下:
1 static int run_list(struct pipe *pi)
2 {
3 int rcode=0;
4
5 rcode = run_list_real(pi);
6 ......
7 return rcode;
8 }
9
10 static int run_list_real(struct pipe *pi)
11 {
12 char *save_name = NULL;
13 ......
14 int if_code=0, next_if_code=0;
15 ......
16 rcode = run_pipe_real(pi);
17 ......
18 return rcode;
19 }
20
21 static int run_pipe_real(struct pipe *pi)
22 {
23 int i;
24
25 int nextin;
26 int flag = do_repeat ? CMD_FLAG_REPEAT : 0;
27 struct child_prog *child;
28 char *p;
29 ......
30 if (pi->num_progs == 1) child = & (pi->progs[0]);
31 ......
32 return rcode;
33 } else if (pi->num_progs == 1 && pi->progs[0].argv != NULL) {
34 ......
35 /* Process the command */
36 return cmd_process(flag, child->argc, child->argv,
37 &flag_repeat, NULL);
38 }
39
40 return -1;
41 }
第 5 行,run_list 调用 run_list_real 函数。
第 16 行,run_list_real 函数调用 run_pipe_real 函数。
第 36 行,run_pipe_real 函数调用 cmd_process 函数。
最终通过函数 cmd_process 来处理命令,接下来就是分析 cmd_process 函数。
11) cmd_process****函数详解
在学习 cmd_process 之前先看一下 uboot 中命令是如何定义的。uboot 使用宏 U_BOOT_CMD 来定义命令,宏 U_BOOT_CMD 定义在文件 include/command.h 中,定义如下:
#define U_BOOT_CMD(_name, _maxargs, _rep, _cmd, _usage, _help) \
 U_BOOT_CMD_COMPLETE(_name, _maxargs, _rep, _cmd, _usage, _help, NULL)
可以看出 U_BOOT_CMD 是 U_BOOT_CMD_COMPLETE 的特例,将 U_BOOT_CMD_COMPLETE 的最后一个参数设置成 NULL 就是 U_BOOT_CMD。宏 U_BOOT_CMD_COMPLETE 如下:
#define U_BOOT_CMD_COMPLETE(_name, _maxargs, _rep, _cmd, _usage, _help,
_comp) \
 ll_entry_declare(cmd_tbl_t, _name, cmd) = \
 U_BOOT_CMD_MKENT_COMPLETE(_name, _maxargs, _rep, _cmd, \
 _usage, _help, _comp);
宏 U_BOOT_CMD_COMPLETE 又用到了 ll_entry_declare 和 U_BOOT_CMD_MKENT_COMPLETE。ll_entry_declar 定义在文件 include/linker_lists.h 中,定义如下:
#define ll_entry_declare(_type, _name, _list) \
 _type _u_boot_list_2_##_list##_2_##_name __aligned(4) \
 __attribute__((unused, \
 section(".u_boot_list_2_"#_list"_2_"#_name)))
_type 为 cmd_tbl_t,因此 ll_entry_declare 就是定义了一个 cmd_tbl_t 变量,这里用到了 C 语言中的"##"连接符符。其中的"##_list"表示用_list 的值来替换,"##_name"就是用_name 的值来替换。
宏 U_BOOT_CMD_MKENT_COMPLETE 定义在文件 include/command.h 中,内容如下:
#define U_BOOT_CMD_MKENT_COMPLETE(_name, _maxargs, _rep, _cmd, \
 _usage, _help, _comp) \
 { #_name, _maxargs, _rep, _cmd, _usage, \
 _CMD_HELP(_help) _CMD_COMPLETE(_comp) }
上述代码中的"#"表示将_name 传递过来的值字符串化,U_BOOT_CMD_MKENT_COMPLETE 又用到了宏_CMD_HELP 和_CMD_COMPLETE,这两个宏的定义如下:
1 #ifdef CONFIG_AUTO_COMPLETE
2 # define _CMD_COMPLETE(x) x,
3 #else
4 # define _CMD_COMPLETE(x)
5 #endif
6 #ifdef CONFIG_SYS_LONGHELP
7 # define _CMD_HELP(x) x,
8 #else
9 # define _CMD_HELP(x)
10 #endif
可以看出,如果定义了宏 CONFIG_AUTO_COMPLETE 和 CONFIG_SYS_LONGHELP 的话,_CMD_COMPLETE 和_CMD_HELP 就是取自身的值,然后在加上一个','。CONFIG_AUTO_COMPLETE 和 CONFIG_SYS_LONGHELP 这两个宏有定义在文件 mx6_common.h 中。
U_BOOT_CMD宏的流程我们已经清楚了(一个U_BOOT_CMD宏就如此的绕来绕去的),
我们就以一个具体的命令为例,来看一下 U_BOOT_CMD 经过展开以后究竟是个什么模样的。
以命令 dhcp 为例,dhcp 命令定义如下:
U_BOOT_CMD(
 dhcp, 3, 1, do_dhcp,
 "boot image via network using DHCP/TFTP protocol",
 "[loadAddress] [[hostIPaddr:]bootfilename]"
);
将其展开,结果如下:
U_BOOT_CMD(
 dhcp, 3, 1, do_dhcp,
 "boot image via network using DHCP/TFTP protocol",
 "[loadAddress] [[hostIPaddr:]bootfilename]"
);
1、将 U_BOOT_CMD 展开后为:
U_BOOT_CMD_COMPLETE(dhcp, 3, 1, do_dhcp,
 "boot image via network using DHCP/TFTP protocol",
 "[loadAddress] [[hostIPaddr:]bootfilename]",
 NULL)

2、将 U_BOOT_CMD_COMPLETE 展开后为:
ll_entry_declare(cmd_tbl_t, dhcp, cmd) = \
U_BOOT_CMD_MKENT_COMPLETE(dhcp, 3, 1, do_dhcp, \
 "boot image via network using DHCP/TFTP protocol", \
 "[loadAddress] [[hostIPaddr:]bootfilename]", \
 NULL);

3、将 ll_entry_declare 和 U_BOOT_CMD_MKENT_COMPLETE 展开后为:
cmd_tbl_t _u_boot_list_2_cmd_2_dhcp __aligned(4) \
 __attribute__((unused,section(.u_boot_list_2_cmd_2_dhcp))) \

 { "dhcp", 3, 1, do_dhcp, \
 "boot image via network using DHCP/TFTP protocol", \
 "[loadAddress] [[hostIPaddr:]bootfilename]",\
 NULL}
从示例代码可以看出,dhcp 命令最终展开结果为:
1 cmd_tbl_t _u_boot_list_2_cmd_2_dhcp __aligned(4) \
2 __attribute__((unused,section(.u_boot_list_2_cmd_2_dhcp))) \

3 { "dhcp", 3, 1, do_dhcp, \
4 "boot image via network using DHCP/TFTP protocol", \
5 "[loadAddress] [[hostIPaddr:]bootfilename]",\
6 NULL}
第 1 行定义了一个 cmd_tbl_t 类型的变量,变量名为_u_boot_list_2_cmd_2_dhcp,此变量 4 字节对齐。
第 2 行,使用__attribute__关键字设置变量_u_boot_list_2_cmd_2_dhcp 存储在.u_boot_list_2_cmd_2_dhcp 段中。u-boot.lds 链接脚本中有一个名为".u_boot_list"的段,所有.u_boot_list 开头的段都存放到.u_boot.list 中,如图所示:
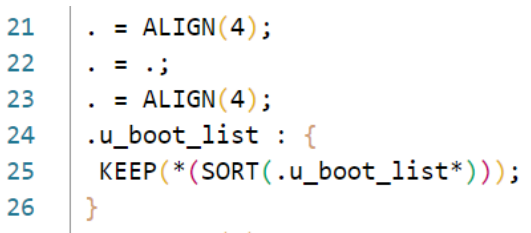
因此,第 2 行就是设置变量_u_boot_list_2_cmd_2_dhcp 的存储位置。
第 3~6 行,cmd_tbl_t 是个结构体,因此第 3-6 行是初始化 cmd_tbl_t 这个结构体的各个成员变量。cmd_tbl_t 结构体定义在文件 include/command.h 中,内容如下:
30 struct cmd_tbl_s {
31 char *name; /* Command Name */
32 int maxargs; /* maximum number of arguments */
33 int repeatable; /* autorepeat allowed? */
34 /* Implementation function */
35 int (*cmd)(struct cmd_tbl_s *, int, int, char * const []);
36 char *usage; /* Usage message (short) */
37 #ifdef CONFIG_SYS_LONGHELP
38 char *help; /* Help message (long) */
39 #endif
40 #ifdef CONFIG_AUTO_COMPLETE
41 /* do auto completion on the arguments */
42 int (*complete)(int argc, char * const argv[], char last_char,
int maxv, char *cmdv[]);
43 #endif
44 };
45
46 typedef struct cmd_tbl_s cmd_tbl_t;
结合实例代码,可以得出变量_u_boot_list_2_cmd_2_dhcp 的各个成员的值如下所示:
_u_boot_list_2_cmd_2_dhcp.name = "dhcp"
_u_boot_list_2_cmd_2_dhcp.maxargs = 3
_u_boot_list_2_cmd_2_dhcp.repeatable = 1
_u_boot_list_2_cmd_2_dhcp.cmd = do_dhcp
_u_boot_list_2_cmd_2_dhcp.usage = "boot image via network using DHCP/TFTP protocol
"
_u_boot_list_2_cmd_2_dhcp.help = "[loadAddress] [[hostIPaddr:]bootfilename]"
_u_boot_list_2_cmd_2_dhcp.complete = NULL
当我们在 uboot 的命令行中输入"dhcp"这个命令的时候,最终执行的是 do_dhcp 这个函数。总结一下,uboot 中使用 U_BOOT_CMD 来定义一个命令,最终的目的就是为了定义一个 cmd_tbl_t 类型的变量,并初始化这个变量的各个成员。uboot 中的每个命令都存储在.u_boot_list 段中,每个命令都有一个名为 do_xxx(xxx 为具体的命令名)的函数,这个 do_xxx 函数就是具体的命令处理函数。
了解了 uboot 中命令的组成以后,再来看一下 cmd_process 函数的处理过程,cmd_process
函数定义在文件 common/command.c 中,函数内容如下:
500 enum command_ret_t cmd_process(int flag, int argc,
501 char * const argv[],int *repeatable, ulong *ticks)
502 {
503 enum command_ret_t rc = CMD_RET_SUCCESS;
504 cmd_tbl_t *cmdtp;
505
506 /* Look up command in command table */
507 cmdtp = find_cmd(argv[0]);
508 if (cmdtp == NULL) {
509 printf("Unknown command '%s' - try 'help'\n", argv[0]);
510 return 1;
511 }
512
513 /* found - check max args */
514 if (argc > cmdtp->maxargs)
515 rc = CMD_RET_USAGE;
516
517 #if defined(CONFIG_CMD_BOOTD)
518 /* avoid "bootd" recursion */
519 else if (cmdtp->cmd == do_bootd) {
520 if (flag & CMD_FLAG_BOOTD) {
521 puts("'bootd' recursion detected\n");
522 rc = CMD_RET_FAILURE;
523 } else {
524 flag |= CMD_FLAG_BOOTD;
525 }
526 }
527 #endif
528
529 /* If OK so far, then do the command */
530 if (!rc) {
531 if (ticks)
532 *ticks = get_timer(0);
533 rc = cmd_call(cmdtp, flag, argc, argv);
534 if (ticks)
535 *ticks = get_timer(*ticks);
536 *repeatable &= cmdtp->repeatable;
537 }
538 if (rc == CMD_RET_USAGE)
539 rc = cmd_usage(cmdtp);
540 return rc;
541 }
第 507 行,调用函数 find_cmd 在命令表中找到指定的命令,find_cmd 函数内容如下:
118 cmd_tbl_t *find_cmd(const char *cmd)
119 {
120 cmd_tbl_t *start = ll_entry_start(cmd_tbl_t, cmd);
121 const int len = ll_entry_count(cmd_tbl_t, cmd);
122 return find_cmd_tbl(cmd, start, len);
123 }
参数 cmd 就是所查找的命令名字,uboot 中的命令表其实就是 cmd_tbl_t 结构体数组,通过函数 ll_entry_start 得到数组的第一个元素,也就是命令表起始地址。通过函数 ll_entry_count 得到数组长度,也就是命令表的长度。最终通过函数 find_cmd_tbl 在命令表中找到所需的命令,每个命令都有一个 name 成员,所以将参数 cmd 与命令表中每个成员的 name 字段都对比一下,如果相等的话就说明找到了这个命令,找到以后就返回这个命令。
回到示例代码的 cmd_process 函数中,找到命令以后肯定就要执行这个命令了, 第 533 行调用函数 cmd_call 来执行具体的命令,cmd_call 函数内容如下:
490 static int cmd_call(cmd_tbl_t *cmdtp, int flag, int argc, char * cons
t argv[])
491 {
492 int result;
493
494 result = (cmdtp->cmd)(cmdtp, flag, argc, argv);
495 if (result)
496 debug("Command failed, result=%d\n", result);
497 return result;
498 }
在前面的分析中我们知道,cmd_tbl_t 的 cmd 成员就是具体的命令处理函数,所以第 494 行调用 cmdtp 的 cmd 成员来处理具体的命令,返回值为命令的执行结果。
cmd_process 中会检测 cmd_tbl 的返回值,如果返回值为 CMD_RET_USAGE 的话就会调用 cmd_usage 函数输出命令的用法,其实就是输出 cmd_tbl_t 的 usage 成员变量。
3、bootz启动Linux****内核过程
1)images****全局变量
不管是 bootz 还是 bootm 命令,在启动 Linux 内核的时候都会用到一个重要的全局变量:images,images 在文件 cmd/bootm.c 中有如下定义:
43 bootm_headers_t images**;** /* pointers to os/initrd/fdt images */
images 是 bootm_headers_t 类型的全局变量,bootm_headers_t 是个 boot 头结构体,在文件 include/image.h 中的定义如下(删除了一些条件编译代码):
304 typedef struct bootm_headers {
305 /*
306 * Legacy os image header, if it is a multi component image
307 * then boot_get_ramdisk() and get_fdt() will attempt to get
308 * data from second and third component accordingly.
309 */
310 image_header_t *legacy_hdr_os; /* image header pointer */
311 image_header_t legacy_hdr_os_copy; /* header copy */
312 ulong legacy_hdr_valid;
313
......
333
334 #ifndef USE_HOSTCC
335 image_info_t os; /* OS 镜像信息 */
336 ulong ep; /* OS 入口点 */
337
338 ulong rd_start, rd_end; /* ramdisk 开始和结束位置 */
339
340 char *ft_addr; /* 设备树地址 */
341 ulong ft_len; /* 设备树长度 */
342
343 ulong initrd_start; /* initrd 开始位置 */
344 ulong initrd_end; /* initrd 结束位置 */
345 ulong cmdline_start; /* cmdline 开始位置 */
346 ulong cmdline_end; /* cmdline 结束位置 */
347 bd_t *kbd;
348 #endif
349
350 int verify; /* getenv("verify")[0] != 'n' */
351
352 #define BOOTM_STATE_START (0x00000001)
353 #define BOOTM_STATE_FINDOS (0x00000002)
354 #define BOOTM_STATE_FINDOTHER (0x00000004)
355 #define BOOTM_STATE_LOADOS (0x00000008)
356 #define BOOTM_STATE_RAMDISK (0x00000010)
357 #define BOOTM_STATE_FDT (0x00000020)
358 #define BOOTM_STATE_OS_CMDLINE (0x00000040)
359 #define BOOTM_STATE_OS_BD_T (0x00000080)
360 #define BOOTM_STATE_OS_PREP (0x00000100)
361 #define BOOTM_STATE_OS_FAKE_GO (0x00000200)/*'Almost' run the OS*/
362 #define BOOTM_STATE_OS_GO (0x00000400)
363 int state;
364
365 #ifdef CONFIG_LMB
366 struct lmb lmb; /* 内存管理相关,不深入研究 */
367 #endif
368 } bootm_headers_t;
第 335 行的 os 成员变量是 image_info_t 类型的,为系统镜像信息。
第 352~362 行这 11 个宏定义表示 BOOT 的不同阶段。
接下来看一下结构体 image_info_t,也就是系统镜像信息结构体,此结构体在文件 include/image.h 中的定义如下:
292 typedef struct image_info {
293 ulong start, end; /* blob 开始和结束位置*/
294 ulong image_start, image_len; /* 镜像起始地址(包括 blob)和长度 */
295 ulong load; /* 系统镜像加载地址*/
296 uint8_t comp, type, os; /* 镜像压缩、类型,OS 类型 */
297 uint8_t arch; /* CPU 架构 */
298 } image_info_t;
全局变量 images 会在 bootz 命令的执行中频繁使用到,相当于 Linux 内核启动的"灵魂"。
2) do_bootz****函数
bootz 命令的执行函数为 do_bootz,在文件 cmd/bootm.c 中有如下定义:
622 int do_bootz(cmd_tbl_t *cmdtp, int flag, int argc, char * const argv
[])
623 {
624 int ret;
625
626 /* Consume 'bootz' */
627 argc--; argv++;
628
629 if (bootz_start(cmdtp, flag, argc, argv, &images))
630 return 1;
631
632 /*
633 * We are doing the BOOTM_STATE_LOADOS state ourselves, so must
634 * disable interrupts ourselves
635 */
636 bootm_disable_interrupts();
637
638 images.os.os = IH_OS_LINUX;
639 ret = do_bootm_states(cmdtp, flag, argc, argv,
640 BOOTM_STATE_OS_PREP | BOOTM_STATE_OS_FAKE_GO |
641 BOOTM_STATE_OS_GO,
642 &images, 1);
643
644 return ret;
645 }
第 629 行,调用 bootz_start 函数。
第 636 行,调用函数 bootm_disable_interrupts 关闭中断。
第 638 行,设置 images.os.os 为 IH_OS_LINUX,也就是设置系统镜像为 Linux,表示我们要启动的是 Linux 系统!后面会用到 images.os.os 来挑选具体的启动函数。
第 639 行,调用函数 do_bootm_states 来执行不同的 BOOT 阶段,这里要执行的 BOOT 阶段有:BOOTM_STATE_OS_PREP 、BOOTM_STATE_OS_FAKE_GO 和 BOOTM_STATE_OS_GO。
3) bootz_start****函数
bootz_srart 函数也定义在文件 cmd/bootm.c 中,函数内容如下:
578 static int bootz_start(cmd_tbl_t *cmdtp, int flag, int argc,
579 char * const argv[], bootm_headers_t *images)
580 {
581 int ret;
582 ulong zi_start, zi_end;
583
584 ret = do_bootm_states(cmdtp, flag, argc, argv,
585 BOOTM_STATE_START, images, 1);
586
587 /* Setup Linux kernel zImage entry point */
588 if (!argc) {
589 images->ep = load_addr;
590 debug("* kernel: default image load address = 0x%08lx\n",
591 load_addr);
592 } else {
593 images->ep = simple_strtoul(argv[0], NULL, 16);
594 debug("* kernel: cmdline image address = 0x%08lx\n",
595 images->ep);
596 }
597
598 ret = bootz_setup(images->ep, &zi_start, &zi_end);
599 if (ret != 0)
600 return 1;
601
602 lmb_reserve(&images->lmb, images->ep, zi_end - zi_start);
603
604 /*
605 * Handle the BOOTM_STATE_FINDOTHER state ourselves as we do not
606 * have a header that provide this informaiton.
607 */
608 if (bootm_find_images(flag, argc, argv))
609 return 1;
610
......
619 return 0;
620 }
第 584 行,调用函数 do_bootm_states,执行 BOOTM_STATE_START 阶段。
第 593 行,设置 images 的 ep 成员变量,也就是系统镜像的入口点,使用 bootz 命令启动系统的时候就会设置系统在 DRAM 中的存储位置,这个存储位置就是系统镜像的入口点,因此 images->ep=0X80800000。
第 598 行,调用 bootz_setup 函数,此函数会判断当前的系统镜像文件是否为 Linux 的镜像文件,并且会打印出镜像相关信息,bootz_setup 函数稍后会讲解。
第 608 行,调用函数 bootm_find_images 查找 ramdisk 和设备树(dtb)文件,但是我们没有用到 ramdisk,因此此函数在这里仅仅用于查找设备树(dtb)文件,此函数稍后也会讲解。
先来看一下 bootz_setup 函数,此函数定义在文件 arch/arm/lib/bootm.c 中,函数内容如下:
370 #define LINUX_ARM_ZIMAGE_MAGIC 0x016f2818
371
372 int bootz_setup(ulong image, ulong *start, ulong *end)
373 {
374 struct zimage_header *zi;
375
376 zi = (struct zimage_header *)map_sysmem(image, 0);
377 if (zi->zi_magic != LINUX_ARM_ZIMAGE_MAGIC) {
378 puts("Bad Linux ARM zImage magic!\n");
379 return 1;
380 }
381
382 *start = zi->zi_start;
383 *end = zi->zi_end;
384
385 printf("Kernel image @ %#08lx [ %#08lx - %#08lx ]\n", image,
386 *start, *end);
387
388 return 0;
389 }
第 370 行,宏 LINUX_ARM_ZIMAGE_MAGIC 就是 ARM Linux 系统魔术数。
第 376 行,从传递进来的参数 image(也就是系统镜像首地址)中获取 zimage 头。zImage 头结构体为 zimage_header。
第 377~380 行,判断 image 是否为 ARM 的 Linux 系统镜像,如果不是的话就直接返回,
并且打印出"Bad Linux ARM zImage magic!",比如我们输入一个错误的启动命令:
bootz 80000000 -- 900000000
因为我们并没有在 0X80000000 处存放 Linux 镜像文件(zImage),因此上面的命令肯定会执行出错的,结果如图所示:

第 382、383 行初始化函数 bootz_setup 的参数 start 和 end。
第 385 行,打印启动信息,如果 Linux 系统镜像正常的话就会输出图所示的信息:

接下来看一下函数 bootm_find_images,此函数定义在文件 common/bootm.c 中,函数内容如下:
225 int bootm_find_images(int flag, int argc, char * const argv[])
226 {
227 int ret;
228
229 /* find ramdisk */
230 ret = boot_get_ramdisk(argc, argv, &images, IH_INITRD_ARCH,
231 &images.rd_start, &images.rd_end);
232 if (ret) {
233 puts("Ramdisk image is corrupt or invalid\n");
234 return 1;
235 }
236
237 #if defined(CONFIG_OF_LIBFDT)
238 /* find flattened device tree */
239 ret = boot_get_fdt(flag, argc, argv, IH_ARCH_DEFAULT, &images,
240 &images.ft_addr, &images.ft_len);
241 if (ret) {
242 puts("Could not find a valid device tree\n");
243 return 1;
244 }
245 set_working_fdt_addr((ulong)images.ft_addr);
246 #endif
......
258 return 0;
259 }
第 230~235 行是跟查找 ramdisk,但是我们没有用到 ramdisk,因此这部分代码不用管。
第 237~244 行是查找设备树(dtb)文件,找到以后就将设备树的起始地址和长度分别写到 images 的 ft_addr 和 ft_len 成员变量中。我们使用 bootz 启动 Linux 的时候已经指明了设备树在 DRAM 中的存储地址,因此 images.ft_addr=0X83000000,长度根据具体的设备树文件而定,比如我现在使用的设备树文件长度为 0X8C81,因此 images.ft_len=0X8C81。
bootz_start 函数就讲解到这里,bootz_start 主要用于初始化 images 的相关成员变量。
4) do_bootm_states****函数
do_bootz 最后调用的就是函数 do_bootm_states,而且在 bootz_start 中也调用了 do_bootm_states 函数,看来 do_bootm_states 函数还是个香饽饽。此函数定义在文件 common/bootm.c 中, 函数代码如下:
591 int do_bootm_states(cmd_tbl_t *cmdtp, int flag, int argc, char * cons
t argv[],
592 int states, bootm_headers_t *images, int boot_progress)
593 {
594 boot_os_fn *boot_fn;
595 ulong iflag = 0;
596 int ret = 0, need_boot_fn;
597
598 images->state |= states;
599
600 /*
601 * Work through the states and see how far we get. We stop on
602 * any error.
603 */
604 if (states & BOOTM_STATE_START)
605 ret = bootm_start(cmdtp, flag, argc, argv);
606
607 if (!ret && (states & BOOTM_STATE_FINDOS))
608 ret = bootm_find_os(cmdtp, flag, argc, argv);
609
610 if (!ret && (states & BOOTM_STATE_FINDOTHER)) {
611 ret = bootm_find_other(cmdtp, flag, argc, argv);
612 argc = 0; /* consume the args */
613 }
614
615 /* Load the OS */
616 if (!ret && (states & BOOTM_STATE_LOADOS)) {
617 ulong load_end;
618
619 iflag = bootm_disable_interrupts();
620 ret = bootm_load_os(images, &load_end, 0);
621 if (ret == 0)
622 lmb_reserve(&images->lmb, images->os.load,
623 (load_end - images->os.load));
624 else if (ret && ret != BOOTM_ERR_OVERLAP)
625 goto err;
626 else if (ret == BOOTM_ERR_OVERLAP)
627 ret = 0;
628 #if defined(CONFIG_SILENT_CONSOLE) && !defined(CONFIG_SILENT_U_BOOT_
ONLY)
629 if (images->os.os == IH_OS_LINUX)
630 fixup_silent_linux();
631 #endif
632 }
633
634 /* Relocate the ramdisk */
635 #ifdef CONFIG_SYS_BOOT_RAMDISK_HIGH
636 if (!ret && (states & BOOTM_STATE_RAMDISK)) {
637 ulong rd_len = images->rd_end - images->rd_start;
638
639 ret = boot_ramdisk_high(&images->lmb, images->rd_start,
640 rd_len, &images->initrd_start, &images->initrd_end);
641 if (!ret) {
642 setenv_hex("initrd_start", images->initrd_start);
643 setenv_hex("initrd_end", images->initrd_end);
644 }
645 }
646 #endif
647 #if defined(CONFIG_OF_LIBFDT) && defined(CONFIG_LMB)
648 if (!ret && (states & BOOTM_STATE_FDT)) {
649 boot_fdt_add_mem_rsv_regions(&images->lmb, images->ft_addr);
650 ret = boot_relocate_fdt(&images->lmb, &images->ft_addr,
651 &images->ft_len);
652 }
653 #endif
654
655 /* From now on, we need the OS boot function */
656 if (ret)
657 return ret;
658 boot_fn = bootm_os_get_boot_func(images->os.os);
659 need_boot_fn = states & (BOOTM_STATE_OS_CMDLINE |
660 BOOTM_STATE_OS_BD_T | BOOTM_STATE_OS_PREP |
661 BOOTM_STATE_OS_FAKE_GO | BOOTM_STATE_OS_GO);
662 if (boot_fn == NULL && need_boot_fn) {
663 if (iflag)
664 enable_interrupts();
665 printf("ERROR: booting os '%s' (%d) is not supported\n",
666 genimg_get_os_name(images->os.os), images->os.os);
667 bootstage_error(BOOTSTAGE_ID_CHECK_BOOT_OS);
668 return 1;
669 }
670
671 /* Call various other states that are not generally used */
672 if (!ret && (states & BOOTM_STATE_OS_CMDLINE))
673 ret = boot_fn(BOOTM_STATE_OS_CMDLINE, argc, argv, images);
674 if (!ret && (states & BOOTM_STATE_OS_BD_T))
675 ret = boot_fn(BOOTM_STATE_OS_BD_T, argc, argv, images);
676 if (!ret && (states & BOOTM_STATE_OS_PREP))
677 ret = boot_fn(BOOTM_STATE_OS_PREP, argc, argv, images);
678
679 #ifdef CONFIG_TRACE
680 /* Pretend to run the OS, then run a user command */
681 if (!ret && (states & BOOTM_STATE_OS_FAKE_GO)) {
682 char *cmd_list = getenv("fakegocmd");
683
684 ret = boot_selected_os(argc, argv, BOOTM_STATE_OS_FAKE_GO,
685 images, boot_fn);
686 if (!ret && cmd_list)
687 ret = run_command_list(cmd_list, -1, flag);
688 }
689 #endif
690
691 /* Check for unsupported subcommand. */
692 if (ret) {
693 puts("subcommand not supported\n");
694 return ret;
695 }
696
697 /* Now run the OS! We hope this doesn't return */
698 if (!ret && (states & BOOTM_STATE_OS_GO))
699 ret = boot_selected_os(argc, argv, BOOTM_STATE_OS_GO,
700 images, boot_fn);
......
712 return ret;
713 }
函数 do_bootm_states 根据不同的 BOOT 状态执行不同的代码段,通过如下代码来判断 BOOT 状态:
states & BOOTM_STATE_XXX
在 do_bootz 函数中会用到 BOOTM_STATE_OS_PREP 、BOOTM_STATE_OS_FAKE_GO 和 BOOTM_STATE_OS_GO 这三个 BOOT 状态,bootz_start 函数中会用到 BOOTM_STATE_START 这个 BOOT 状态。为了精简代码,方便分析,因此我们将示例代码中的函数 do_bootm_states 进行精简,只留下下面这 4 个 BOOT 状态对应的处理代码:
BOOTM_STATE_OS_PREP
BOOTM_STATE_OS_FAKE_GO
BOOTM_STATE_OS_GO
BOOTM_STATE_START
精简以后的 do_bootm_states 函数如下所示:
591 int do_bootm_states(cmd_tbl_t *cmdtp, int flag, int argc, char * cons
t argv[],
592 int states, bootm_headers_t *images, int boot_progress)
593 {
594 boot_os_fn *boot_fn;
595 ulong iflag = 0;
596 int ret = 0, need_boot_fn;
597
598 images->state |= states;
599
600 /*
601 * Work through the states and see how far we get. We stop on
602 * any error.
603 */
604 if (states & BOOTM_STATE_START)
605 ret = bootm_start(cmdtp, flag, argc, argv);
......
654
655 /* From now on, we need the OS boot function */
656 if (ret)
657 return ret;
658 boot_fn = bootm_os_get_boot_func(images->os.os);
659 need_boot_fn = states & (BOOTM_STATE_OS_CMDLINE |
660 BOOTM_STATE_OS_BD_T | BOOTM_STATE_OS_PREP |
661 BOOTM_STATE_OS_FAKE_GO | BOOTM_STATE_OS_GO);
662 if (boot_fn == NULL && need_boot_fn) {
663 if (iflag)
664 enable_interrupts();
665 printf("ERROR: booting os '%s' (%d) is not supported\n",
666 genimg_get_os_name(images->os.os), images->os.os);
667 bootstage_error(BOOTSTAGE_ID_CHECK_BOOT_OS);
668 return 1;
669 }
670
......
676 if (!ret && (states & BOOTM_STATE_OS_PREP))
677 ret = boot_fn(BOOTM_STATE_OS_PREP, argc, argv, images);
678
679 #ifdef CONFIG_TRACE
680 /* Pretend to run the OS, then run a user command */
681 if (!ret && (states & BOOTM_STATE_OS_FAKE_GO)) {
682 char *cmd_list = getenv("fakegocmd");
683
684 ret = boot_selected_os(argc, argv, BOOTM_STATE_OS_FAKE_GO,
685 images, boot_fn);
686 if (!ret && cmd_list)
687 ret = run_command_list(cmd_list, -1, flag);
688 }
689 #endif
690
691 /* Check for unsupported subcommand. */
692 if (ret) {
693 puts("subcommand not supported\n");
694 return ret;
695 }
696
697 /* Now run the OS! We hope this doesn't return */
698 if (!ret && (states & BOOTM_STATE_OS_GO))
699 ret = boot_selected_os(argc, argv, BOOTM_STATE_OS_GO,
700 images, boot_fn);
......
712 return ret;
713 }
第 604、605 行,处理 BOOTM_STATE_START 阶段,bootz_start 会执行这一段代码,这里调用函数 bootm_start,此函数定义在文件 common/bootm.c 中,函数内容如下:
69 static int bootm_start(cmd_tbl_t *cmdtp, int flag, int argc,
70 char * const argv[])
71 {
72 memset((void *)&images, 0, sizeof(images)); /* 清空 images */
73 images.verify = getenv_yesno("verify");/* 初始化 verfify 成员 */
74
75 boot_start_lmb(&images);
76
77 bootstage_mark_name(BOOTSTAGE_ID_BOOTM_START, "bootm_start");
78 images.state = BOOTM_STATE_START;/* 设置状态为 BOOTM_STATE_START */
79
80 return 0;
81 }
接着回到示例代码中,继续分析函数 do_bootm_states。第 658 行非常重要!通过
函数 bootm_os_get_boot_func 来查找系统启动函数,参数 images->os.os 就是系统类型,根据这个系统类型来选择对应的启动函数,在 do_bootz 中设置 images.os.os=IH_OS_LINUX。函数返回值就是找到的系统启动函数,这里找到的 Linux 系统启动函数为 do_bootm_linux。因此 boot_fn=do_bootm_linux,后面执行 boot_ fn 函数的地方实际上是执行的 do_bootm_linux 函数。
第 676 行,处理 BOOTM_STATE_OS_PREP 状态,调用函数 do_bootm_linux,do_bootm_linux 也是调用 boot_prep_linux 来完成具体的处理过程。boot_prep_linux 主要用于处理环境变量 bootargs,bootargs 保存着传递给 Linux kernel 的参数。
第 679~689 行是处理 BOOTM_STATE_OS_FAKE_GO 状态的,但是要我们没用使能 TRACE 功能,因此宏 CONFIG_TRACE 也就没有定义,所以这段程序不会编译。
第 699 行,调用函数 boot_selected_os 启动 Linux 内核,此函数第 4 个参数为 Linux 系统镜像头,第 5 个参数就是 Linux 系统启动函数 do_bootm_linux。boot_selected_os 函数定义在文件 common/bootm_os.c 中,函数内容如下:
476 int boot_selected_os(int argc, char * const argv[], int state,
477 bootm_headers_t *images, boot_os_fn *boot_fn)
478 {
479 arch_preboot_os();
480 boot_fn(state, argc, argv, images);
......
490 return BOOTM_ERR_RESET;
491 }
第 480 行调用 boot_fn 函数,也就是 do_bootm_linux 函数来启动 Linux 内核。
5) bootm_os_get_boot_func****函数
do_bootm_states 会调用 bootm_os_get_boot_func 来查找对应系统的启动函数,此函数定义在文件 common/bootm_os.c 中,函数内容如下:
493 boot_os_fn *bootm_os_get_boot_func(int os)
494 {
495 #ifdef CONFIG_NEEDS_MANUAL_RELOC
496 static bool relocated;
497
498 if (!relocated) {
499 int i;
500
501 /* relocate boot function table */
502 for (i = 0; i < ARRAY_SIZE(boot_os); i++)
503 if (boot_os[i] != NULL)
504 boot_os[i] += gd->reloc_off;
505
506 relocated = true;
507 }
508 #endif
509 return boot_os[os];
510 }
第 495~508 行是条件编译,在本 uboot 中没有用到,因此这段代码无效,只有 509 行有效。
在 509 行中 boot_os 是个数组,这个数组里面存放着不同的系统对应的启动函数。boot_os 也定义在文件 common/bootm_os.c 中,如下所示:
435 static boot_os_fn *boot_os[] = {
436 [IH_OS_U_BOOT] = do_bootm_standalone,
437 #ifdef CONFIG_BOOTM_LINUX
438 [IH_OS_LINUX] = do_bootm_linux,
439 #endif
......
465 #ifdef CONFIG_BOOTM_OPENRTOS
466 [IH_OS_OPENRTOS] = do_bootm_openrtos,
467 #endif
468 };
第 438 行就是 Linux 系统对应的启动函数:do_bootm_linux。
6) do_bootm_linux****函数
经过前面的分析,我们知道了 do_bootm_linux 就是最终启动 Linux 内核的函数,此函数定义在文件 arch/arm/lib/bootm.c,函数内容如下:
339 int do_bootm_linux(int flag, int argc, char * const argv[],
340 bootm_headers_t *images)
341 {
342 /* No need for those on ARM */
343 if (flag & BOOTM_STATE_OS_BD_T || flag & BOOTM_STATE_OS_CMDLINE)
344 return -1;
345
346 if (flag & BOOTM_STATE_OS_PREP) {
347 boot_prep_linux(images);
348 return 0;
349 }
350
351 if (flag & (BOOTM_STATE_OS_GO | BOOTM_STATE_OS_FAKE_GO)) {
352 boot_jump_linux(images, flag);
353 return 0;
354 }
355
356 boot_prep_linux(images);
357 boot_jump_linux(images, flag);
358 return 0;
359 }
第 351 行,如果参数 flag 等于 BOOTM_STATE_OS_GO 或者 BOOTM_STATE_OS_FAKE_GO 的话就执行 boot_jump_linux 函数。boot_selected_os 函数在调用 do_bootm_linux 的时候会将 flag 设置为 BOOTM_STATE_OS_GO。
第 352 行,执行函数 boot_jump_linux,此函数定义在文件 arch/arm/lib/bootm.c 中,函数内容如下:
272 static void boot_jump_linux(bootm_headers_t *images, int flag)
273 {
274 #ifdef CONFIG_ARM64
......
292 #else
293 unsigned long machid = gd->bd->bi_arch_number;
294 char *s;
295 void (*kernel_entry)(int zero, int arch, uint params);
296 unsigned long r2;
297 int fake = (flag & BOOTM_STATE_OS_FAKE_GO);
298
299 kernel_entry = (void (*)(int, int, uint))images->ep;
300
301 s = getenv("machid");
302 if (s) {
303 if (strict_strtoul(s, 16, &machid) < 0) {
304 debug("strict_strtoul failed!\n");
305 return;
306 }
307 printf("Using machid 0x%lx from environment\n", machid);
308 }
309
310 debug("## Transferring control to Linux (at address %08lx)" \
311 "...\n", (ulong) kernel_entry);
312 bootstage_mark(BOOTSTAGE_ID_RUN_OS);
313 announce_and_cleanup(fake);
314
315 if (IMAGE_ENABLE_OF_LIBFDT && images->ft_len)
316 r2 = (unsigned long)images->ft_addr;
317 else
318 r2 = gd->bd->bi_boot_params;
319
......
328 kernel_entry(0, machid, r2);
329 }
330 #endif
331 }
第 274~292 行是 64 位 ARM 芯片对应的代码,Cortex-A7 是 32 位芯片,因此用不到。
第 293 行,变量 machid 保存机器 ID,如果不使用设备树的话这个机器 ID 会被传递给 Linux 内核,Linux 内核会在自己的机器 ID 列表里面查找是否存在与 uboot 传递进来的 machid 匹配的项目,如果存在就说明 Linux 内核支持这个机器,那么 Linux 就会启动!如果使用设备树的话这个 machid 就无效了,设备树存有一个"兼容性"这个属性,Linux 内核会比较"兼容性"属性的值(字符串)来查看是否支持这个机器。
第 295 行,函数 kernel_entry,看名字"内核_进入",说明此函数是进入 Linux 内核的,也就是最终的大 boos!!此函数有三个参数:zero,arch,params,第一个参数 zero 同样为 0;第二个参数为机器 ID;第三个参数 ATAGS 或者设备树(DTB)首地址,ATAGS 是传统的方法,用于传递一些命令行信息啥的,如果使用设备树的话就要传递设备树(DTB)。
第 299 行,获取 kernel_entry 函数,函数 kernel_entry 并不是 uboot 定义的,而是 Linux 内核定义的,Linux 内核镜像文件的第一行代码就是函数 kernel_entry,而 images->ep 保存着 Linux 内核镜像的起始地址,起始地址保存的正是 Linux 内核第一行代码!
第 313 行,调用函数 announce_and_cleanup 来打印一些信息并做一些清理工作,此函数定义在文件 arch/arm/lib/bootm.c 中,函数内容如下:
72 static void announce_and_cleanup(int fake)
73 {
74 printf("\nStarting kernel ...%s\n\n", fake ?
75 "(fake run for tracing)" : "");
76 bootstage_mark_name(BOOTSTAGE_ID_BOOTM_HANDOFF, "start_kernel");
......
87 cleanup_before_linux();
88 }
第 74 行,在启动 Linux 之前输出"Starting kernel ..."信息,如图所示:
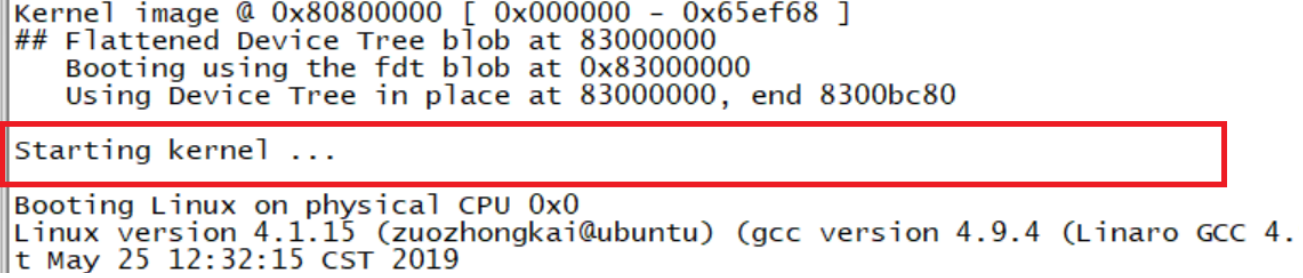
第 87 行调用 cleanup_before_linux 函数做一些清理工作。
继续回到示例代码的函数 boot_jump_linux,第 315~318 行是设置寄存器 r2 的值?为什么要设置 r2 的值呢?Linux 内核一开始是汇编代码,因此函数 kernel_entry 就是个汇编函数。向汇编函数传递参数要使用 r0、r1 和 r2(参数数量不超过 3 个的时候),所以 r2 寄存器就是函数 kernel_entry 的第三个参数。
第 316 行,如果使用设备树的话,r2 应该是设备树的起始地址,而设备树地址保存在 images 的 ftd_addr 成员变量中。
第 317 行,如果不使用设备树的话,r2 应该是 uboot 传递给 Linux 的参数起始地址,也就是环境变量 bootargs 的值,
第 328 行,调用 kernel_entry 函数进入 Linux 内核,此行将一去不复返,uboot 的使命也就完成了,它可以安息了!
总结一下 bootz 命令的执行过程,如图所示:
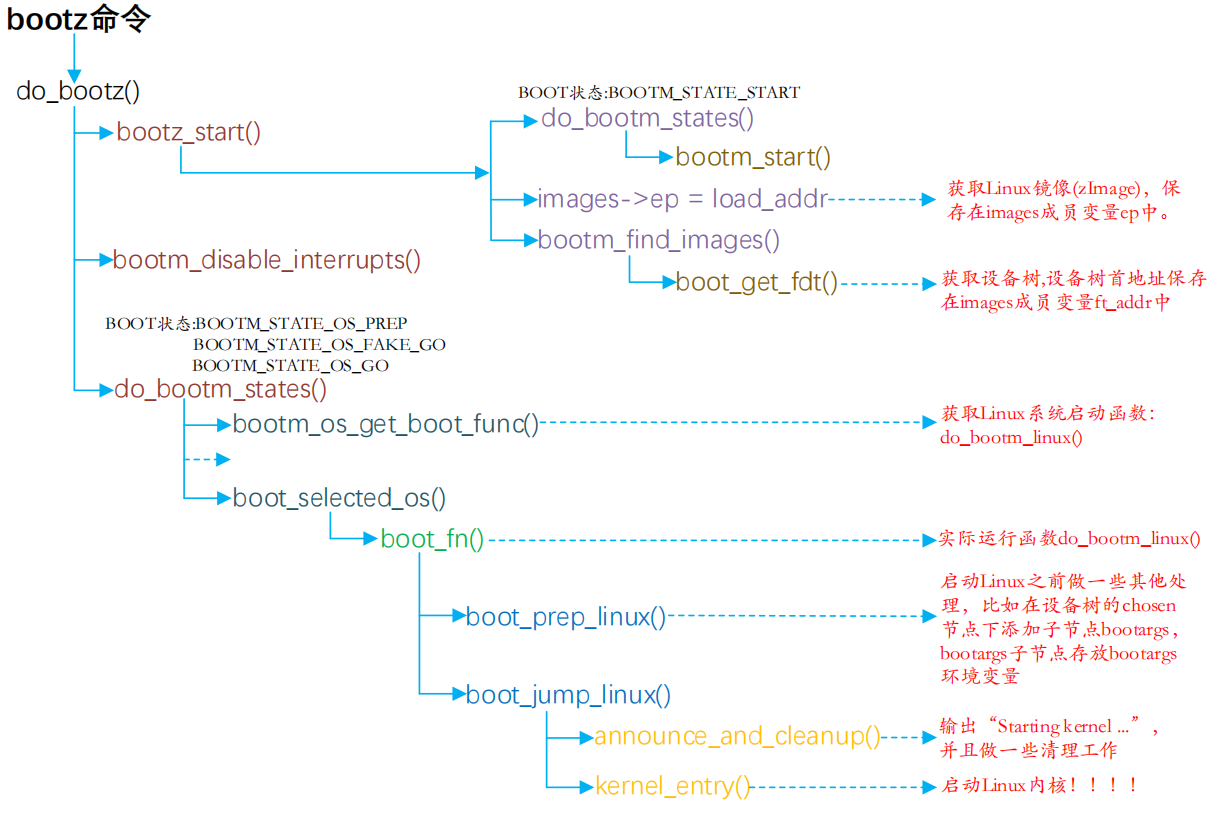
到这里 uboot 的启动流程我们就讲解完成了!!!
千里之行始于足下,所有你羡慕的人都曾经痛苦过,挫败过。脚踏实地,一步一个脚印,一点一滴的积累,最终你也会成为你所羡慕的人。
觉得有帮助的话,打赏一下呗。。