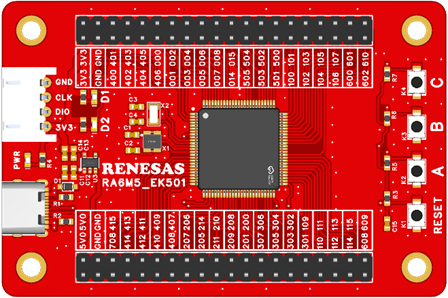
开发板官网(https://www.edevkit.com/)
本系列教程目录:
IIC 触摸驱动实验
本章目标:
- 了解 RA6M5 处理器的 IIC 模块
- 学会使用 RASC 配置 IIC 模块,使用 API 读写数据。
硬件设计(略,参见配套硬件原理图)
软件设计
新建工程
复制一份"29 SPI_LCD"修改文件夹名"30 IIC_Touch",双击打开 EBF_RA6M5.uvprojx 工程,通过 Keil 的新建文件新建 i2c_touch.c 和 i2c_touch.h 保存到工程目录下的 src 文件夹中。
FSP 配置
Keil 界面选择 "Tools"→"RA Smart Configurator" 打开 RASC 界面。
根据原理图触摸驱动模块引脚分布,包括一组 I2C 引脚,还需要 TP_RST、TP_INT 两个控制引脚。
配置 I2C 引脚。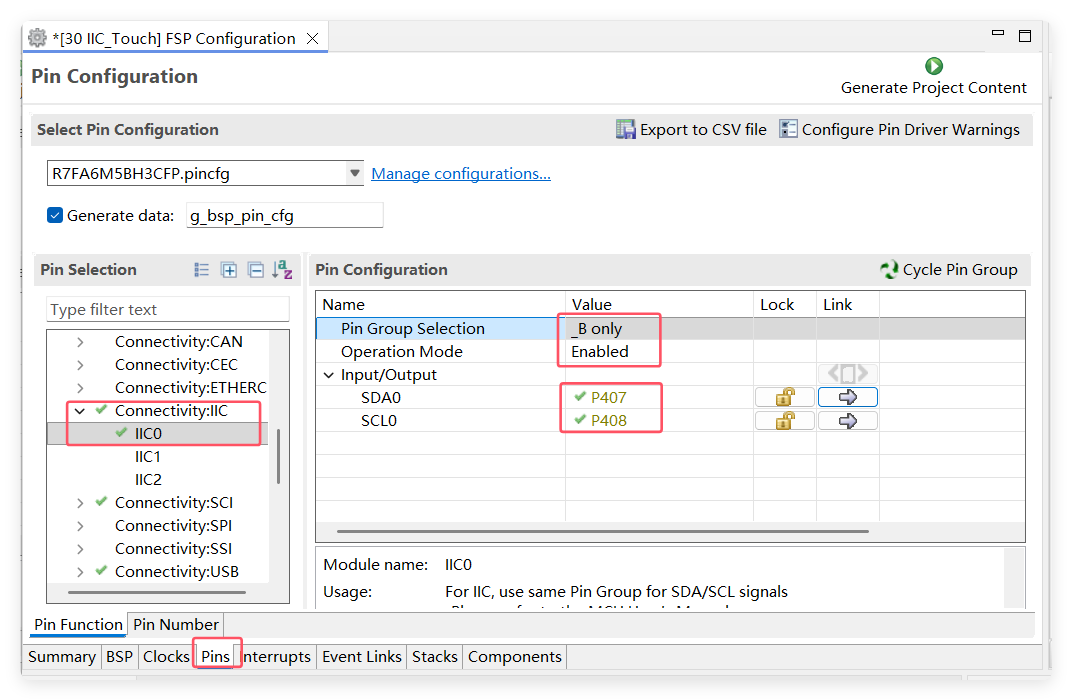
配置 TP_RST 为输出模式,TP_INT 为输入模式。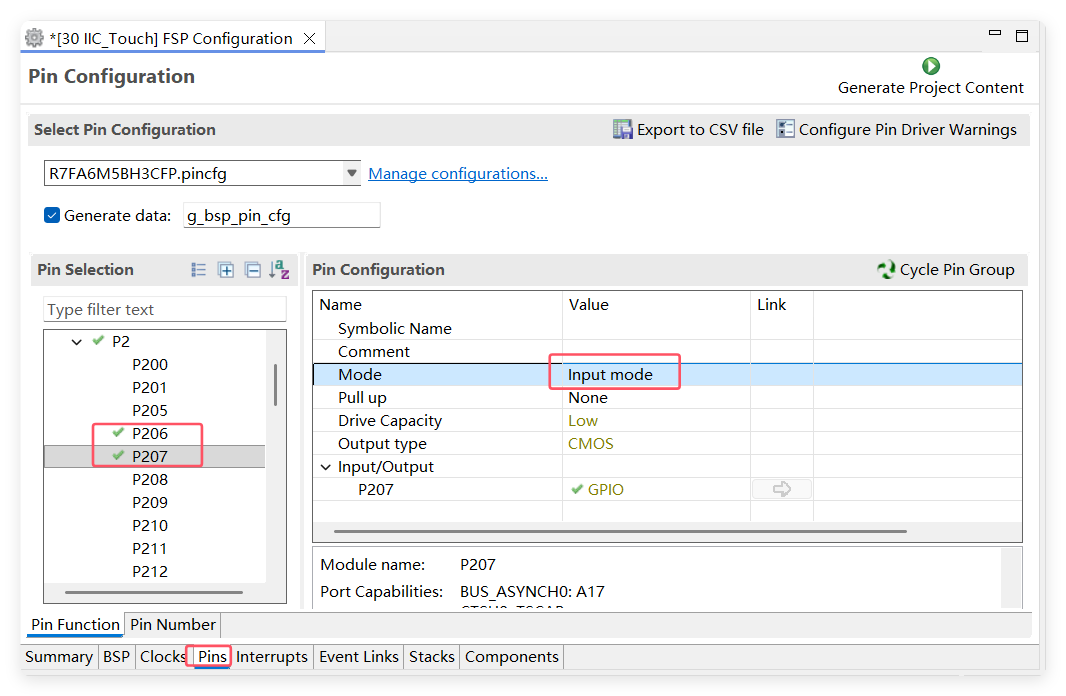
添加 I2C Stack 模块。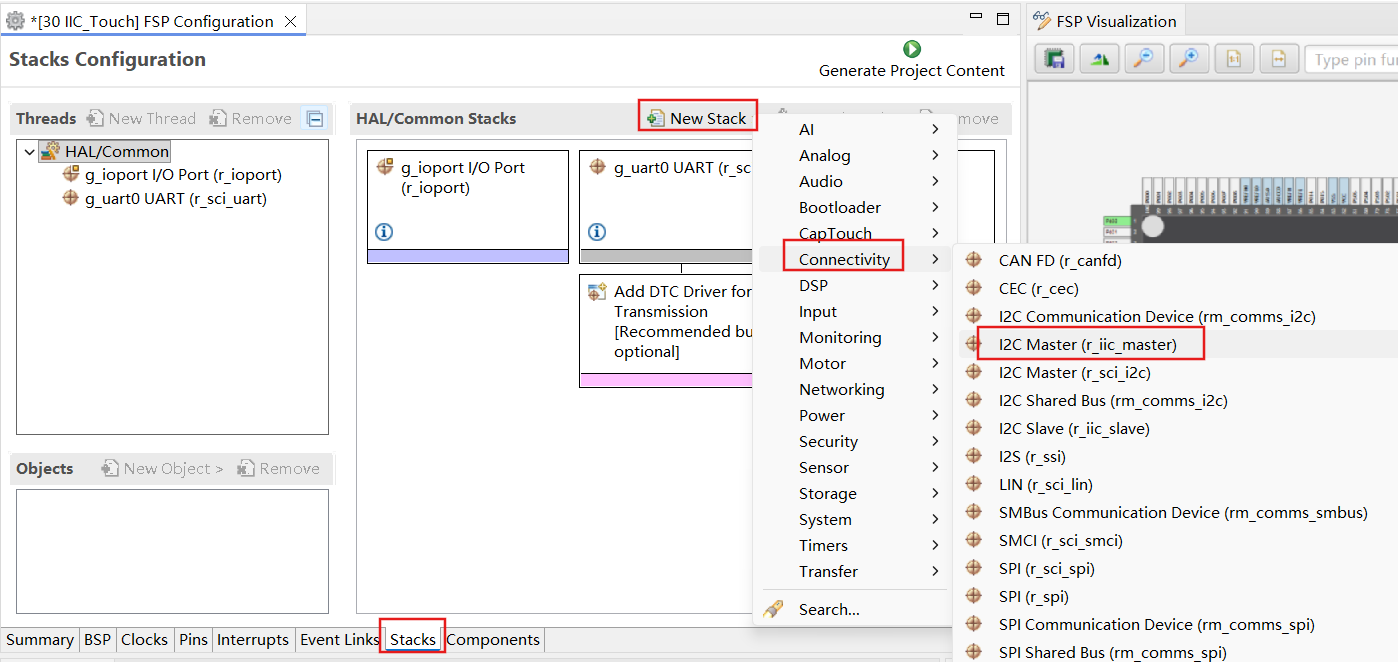
配置 I2C Stack 参数。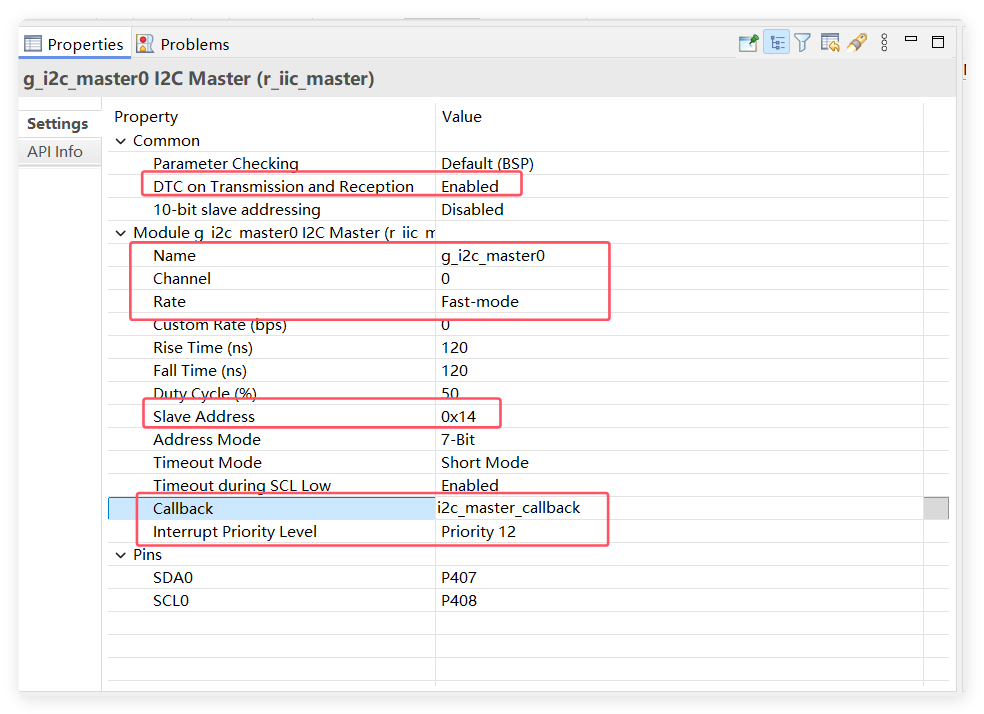
配置 I2C 的 DTC 发送接收模块。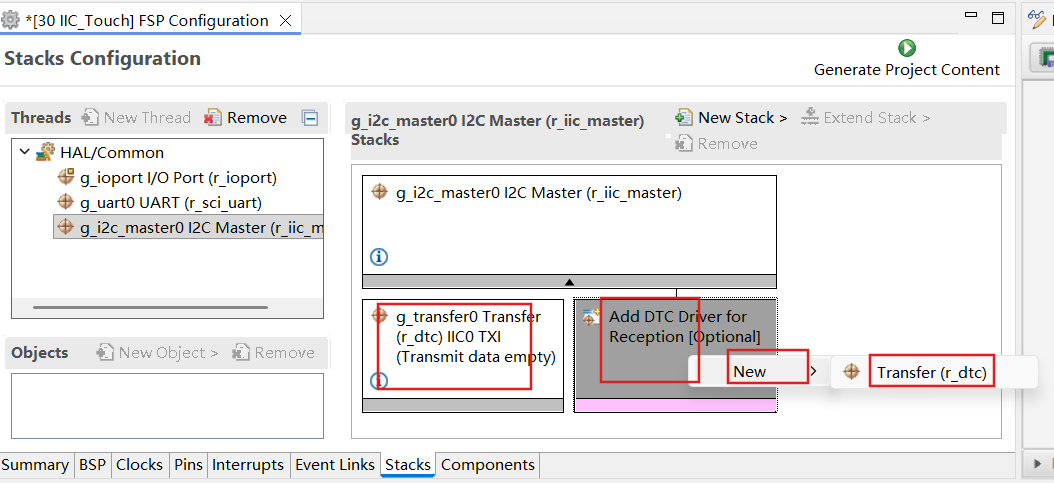
配置完成之后可以按下快捷键 "Ctrl + S" 保存,最后点击 "Generate Project Content" 按钮,让软件自动生成配置代码即可。
程序设计
初始化 IIC 模块,在循环中通过 I2C 读取触摸芯片的数据寄存器,判断是否有触摸点并打印到串口。
-
打开 I2C 设备
fsp_err_t R_IIC_MASTER_Open(i2c_master_ctrl_t * const p_ctrl,
i2c_master_cfg_t const * const p_cfg); -
读 I2C 数据
fsp_err_t R_IIC_MASTER_Read(i2c_master_ctrl_t * const p_ctrl,
uint8_t * const p_dest,
uint32_t const bytes,
bool const restart); -
写 I2C 数据
fsp_err_t R_IIC_MASTER_Write(i2c_master_ctrl_t * const p_ctrl,
uint8_t * const p_src,
uint32_t const bytes,
bool const restart); -
设置 I2C 从机地址
fsp_err_t R_IIC_MASTER_SlaveAddressSet(i2c_master_ctrl_t * const p_ctrl,
uint32_t const slave,
i2c_master_addr_mode_t const addr_mode);
程序编写
i2c_touch.h 头文件定义 I2C 初始化、读写函数。
#ifndef BSP_TP_I2C_H
#define BSP_TP_I2C_H

#include "hal_data.h"

typedef struct CSTPOINT
{
    uint8_t state;
    uint16_t x;
    uint16_t y;
    uint8_t pressure;
    uint8_t num;

} CstPoint;

void CST328_Init(void);

void I2C_ByteWrite(unsigned char address, unsigned char byte);

void I2C_BufferRead(unsigned char* ptr_read,unsigned char address1,unsigned char address2,unsigned char byte);

#endif
i2c_touch.c 中实现读写函数。
#include "i2c_touch.h"

i2c_master_event_t g_i2c_callback_event;
static volatile bool iic_complete = false;

unsigned int timeout_ms = 500;

void CST328_Init(void)
{
    fsp_err_t err = FSP_SUCCESS;
    err =R_IIC_MASTER_Open(&g_i2c_master0_ctrl, &g_i2c_master0_cfg);
  assert(FSP_SUCCESS == err);

    R_IOPORT_PinWrite(&g_ioport_ctrl, BSP_IO_PORT_02_PIN_06, BSP_IO_LEVEL_HIGH);//rst
    R_IOPORT_PinWrite(&g_ioport_ctrl, BSP_IO_PORT_02_PIN_07, BSP_IO_LEVEL_HIGH);//int
    R_BSP_SoftwareDelay(50, BSP_DELAY_UNITS_MILLISECONDS);//50ms
    R_IOPORT_PinWrite(&g_ioport_ctrl, BSP_IO_PORT_02_PIN_06, BSP_IO_LEVEL_LOW);//rst
    R_BSP_SoftwareDelay(50, BSP_DELAY_UNITS_MILLISECONDS);//5ms
    R_IOPORT_PinWrite(&g_ioport_ctrl, BSP_IO_PORT_02_PIN_06, BSP_IO_LEVEL_HIGH);//rst
    R_BSP_SoftwareDelay(200, BSP_DELAY_UNITS_MILLISECONDS);//200ms
    R_IOPORT_PinWrite(&g_ioport_ctrl, BSP_IO_PORT_02_PIN_07, BSP_IO_LEVEL_HIGH);//int
}

/**
* @brief 以单字节的方式到I2C
* @param
*   @arg address:写地址
*   @arg byte:写的数据
* @retval  无
*/
void I2C_ByteWrite(unsigned char address, unsigned char byte)
{
    iic_complete = false;
    unsigned char send_buffer[2] = {};

    send_buffer[0] = address;
    send_buffer[1] = byte;
    R_IIC_MASTER_Write(&g_i2c_master0_ctrl, &send_buffer[0], 2, true); //每当写完数据 false 总线拉高

    while ((I2C_MASTER_EVENT_TX_COMPLETE != g_i2c_callback_event) && timeout_ms)
    {
        R_BSP_SoftwareDelay(1U, BSP_DELAY_UNITS_MILLISECONDS);
        timeout_ms--;
    }
    timeout_ms = 500;
}
/**
* @brief 读取I2C
* @param
*   @arg ptr_read:读取缓冲区指针
*   @arg address:地址
*     @arg byte:读取的字节数
* @retval  无
*/
void I2C_BufferRead(unsigned char* ptr_read,unsigned char address1,unsigned char address2,unsigned char byte)
{
    unsigned char send_buffer[2] = {};

    send_buffer[0] = address1;
    send_buffer[1] = address2;
    R_IIC_MASTER_Write(&g_i2c_master0_ctrl, &send_buffer[0], 2, true);
    while ((I2C_MASTER_EVENT_TX_COMPLETE != g_i2c_callback_event) && timeout_ms)
    {
            R_BSP_SoftwareDelay(400U, BSP_DELAY_UNITS_MICROSECONDS);
            timeout_ms--;
    }
    timeout_ms = 500;

    R_BSP_SoftwareDelay(200U, BSP_DELAY_UNITS_MICROSECONDS);

    R_IIC_MASTER_Read(&g_i2c_master0_ctrl, ptr_read, byte, false);

}

void i2c_master_callback(i2c_master_callback_args_t * p_args)
{
    (void)(p_args);
}

void cst_read_point(CstPoint *cstPoint)
{
    static uint8_t i2cReadBuf[6] = {0};

    //读触摸数据
    I2C_BufferRead(i2cReadBuf, 0xD0, 0x00, 6);

    //判断是否有触摸按下
    if( (i2cReadBuf[0] & 0x0f) == 0x06 )
    {
        cstPoint->state = 1;
    }
    else
    {
        cstPoint->state = 0;
    }

    //获取点x坐标
    cstPoint->x = (uint16_t)(((uint16_t)i2cReadBuf[1] << 4) | ((i2cReadBuf[3] & 0xF0) >> 4));
    //获取点y坐标
    cstPoint->y = (uint16_t)(((uint16_t)i2cReadBuf[2] << 4) | (i2cReadBuf[3] & 0x0F));
    //获取点压力
    cstPoint->pressure = i2cReadBuf[4];
    //获取点个数
    cstPoint->num = i2cReadBuf[5];

}
在 hal_entry.c 文件中添加测试代码。
CstPoint cstPoint;
void hal_entry(void)
{
    /* TODO: add your own code here */

    led_Init(); // LED 初始化
  uart0_Init();

    printf("start LCD test\r\n");

    //设置白色背景颜色
    LCD_Fill(0,0,240,320,0x00);

    LCD_6x8Str(0,1, (unsigned char*)"SPI LCD 6x8 string");
    LCD_8x16Str(0,2, (unsigned char*)"SPI LCD 8x16 string");

    while(1)
    {
        LED1_TOGGLE();
        R_BSP_SoftwareDelay(1, BSP_DELAY_UNITS_SECONDS); //延时1秒

        cst_read_point(&cstPoint);
        if(cstPoint.state == 1)
        {
            printf("point: x=%d, y=%d", cstPoint.x, cstPoint.y);
        }
    }


#if BSP_TZ_SECURE_BUILD
    /* Enter non-secure code */
    R_BSP_NonSecureEnter();
#endif
}
下载验证
连接下载器,将程序编译并下载到开发板之后,按下复位按键来复位开发板,程序启动初始化完。
点击屏幕,检测到触摸点会向串口打印点的 x、y 坐标数据。