一、负载均衡
1.什么是负载均衡
负载均衡:Load Balance,简称LB,是一种服务或基于硬件设备实现的高可用反向代理技术,负载均衡将特定的业务(web服务,网络流量等)分担给指定的一个或多个后端特定的服务器或设备,从而提高了公司业务的并发处理能力,保证了业务的高可用性,方便业务的水平动态扩展。
原理解释:
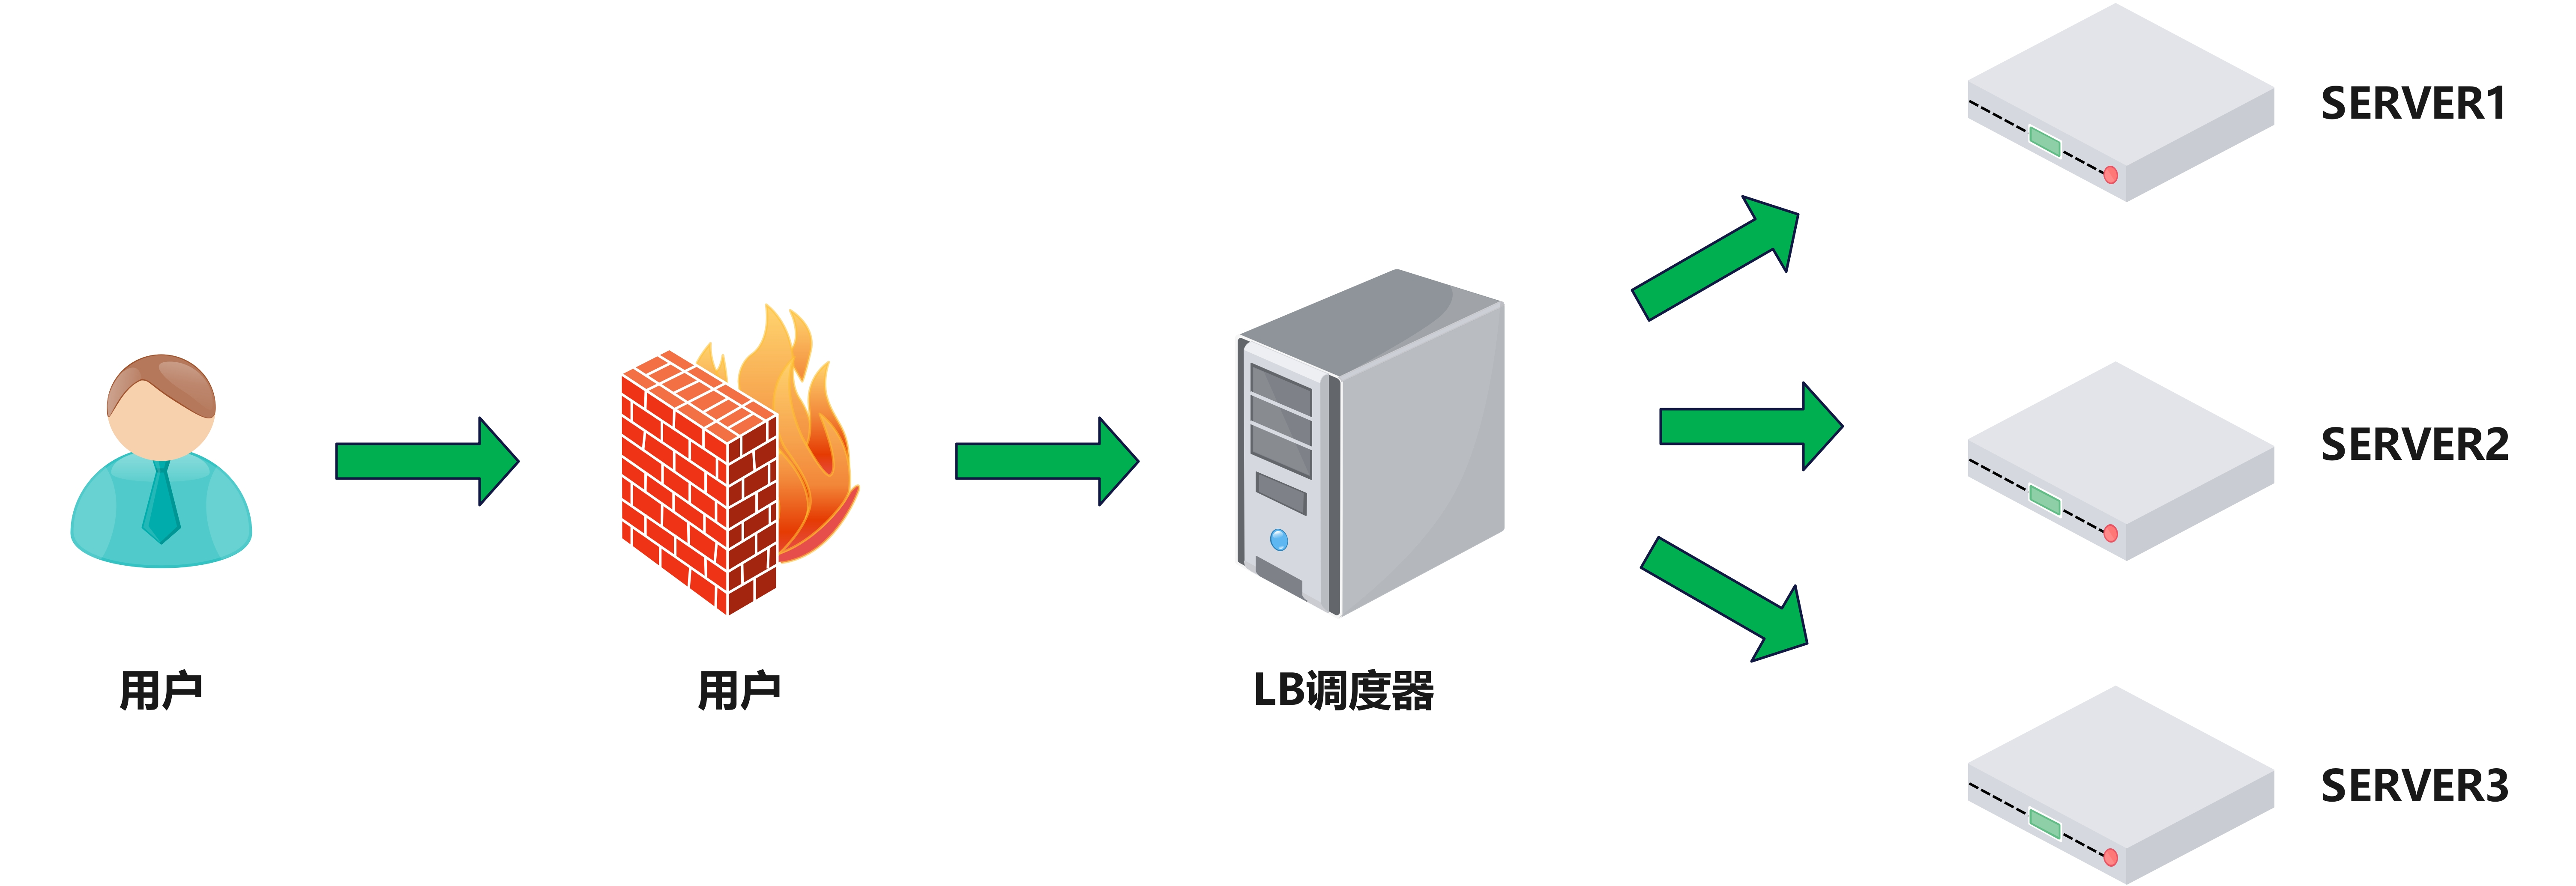
简单来说负载均衡就是别让一个人累死,大家分摊着干。把海量的用户请求,按照一定的规则(算法) ,分散到后端的多个服务器上,确保大家干的活差不多一样多,谁也别闲着,谁也别累垮。
例子:
你开了一家面馆,生意十分火爆,但是只有一位厨师在做面,这位厨师就是咱的服务器。中午高峰期,100个人同时点单,厨师一个人做面,忙不过来,累到冒烟,此时咱的服务器宕机了,然后这100个客户等了半个多小时也没吃上饭,也就是咱的网页打不开。
这种情况下咱该怎么办?
这种情况应该立刻雇佣3个厨师,也就是在部署3个服务器一起做面,分摊任务。
问题出现:
在客户点单过后,应该把单子给谁,如果全部给1号厨师,另外几个闲着,就跟没雇佣一样
解决方法:
于是你就充当服务员,也就是负载均衡器,站在厨房门口,拿着手里的单子,将订单分别传给几位厨师,让几位厨师干的活都差不多
2.为什么要用负载均衡
(1)Web服务器的动态水平扩展-->对用户无感知
负载均衡把后端服务器的扩、缩、容、封装得严严实实,用户根本不知道后面是多了一台还是少了一台。也就是用户在使用服务的时候感知不到后端服务的变化
(2)增加业务并发访问及处理能力-->解决单服务器瓶颈问题
不仅是"解决瓶颈",更准确说是**"把1个100斤的担子,变成10个10斤的担子"**,将海量的请求转变成多个小请求,单台机器的CPU/内存上限就此被打破。
(3)节约公网IP地址-->降低IT支出成本
这在云服务商卖IP贵的时代尤其香。以前10台服务器要10个公网IP,现在只要1个公网IP挂给LB,后边10台用内网IP私聊,更加节约成本。
(4)隐藏内部服务器IP-->提高内部服务器安全性
这是安全的第一道防线。黑客只能攻击到LB这个"门卫",永远不知道后厨也就是数据库/应用服务器在哪里,即使LB被攻破,后端核心数据依然在内网隔离。
(5)配置简单-->固定格式的配置文件
HAProxy的配置是"声明式"的,结构清晰。只要懂得frontend 和 backend,就能够正确配置
(6)功能丰富-->支持四层和七层,支持动态下线主机
"动态下线主机"很重要,配合健康检查,后端出问题自动踢出去 ,好了自动加回来,这是人工运维做不到的。
(7)性能较强-->并发数万甚至数十万
单台HAProxy确实扛住数万到数十万的并发连接,这是Nginx在纯四层转发上都比不了的。
总的来说,引入负载均衡,本质上不是解决'流量大'的问题,而是解决'架构脆弱'的问题。它通过横向扩展(加机器)代替了纵向升级(换更强机器),让我们的系统具备了弹性------流量来了能随时扩,服务器挂了能自动切,版本升级能不停服。同时它还顺带帮我们省了公网IP、隐藏了后端风险。
3.负载均衡的类型
(1)四层负载均衡
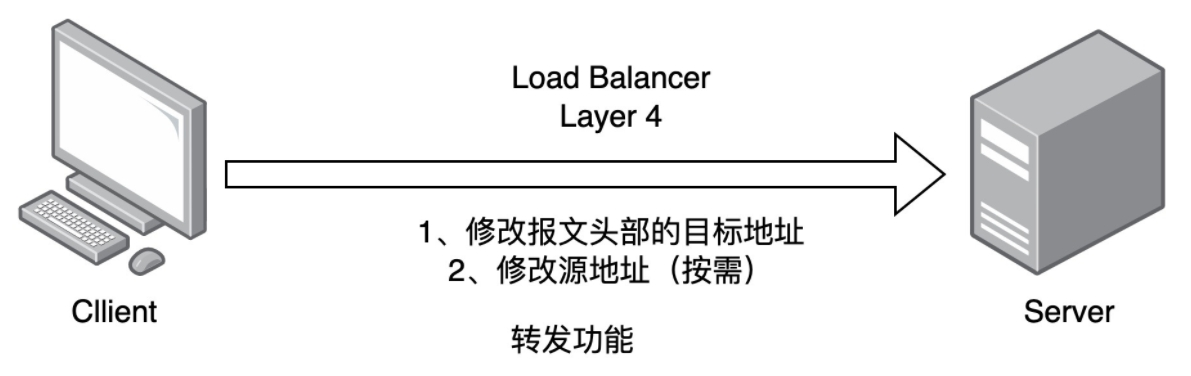
原理:不分析数据内容。第四层(传输层) :主要管 IP地址 + 端口号 (如 192.168.1.10:80)。协议代表:TCP/UDP。
简单来说就是在快递分拣中心里,传送带上过来一个包裹(网络数据包)。四层负载均衡器根本不看里面是衣服还是手机 ,只飞快地瞄了一眼快递单上的 "收货地址(IP)+ 收货人电话(端口)" 。然后它直接原封不动地把这个包裹扔给对应片区的快递员(后端服务器)。
底层技术:它工作在操作系统内核(比如Linux的IPVS),通过修改数据包里的目标IP和MAC地址(NAT或DR模式)进行转发。
特点:快! 因为不解包,不查看内容,只是机械地"改地址转发",几乎没有计算开销。
四层负载过程:
通过ip+port决定负载均衡的去向。 对流量请求进行NAT处理,转发至后台服务器。 记录tcp、udp流量分别是由哪台服务器处理,后续该请求连接的流量都通过该服务器处理。
支持四层的软件:
lvs:重量级四层负载均衡器。
Nginx:轻量级四层负载均衡器,可缓存。(nginx四层是通过upstream模块)
Haproxy:模拟四层转发。
使用场景:
数据库集群(MySQL、PostgreSQL):只关心能不能连上数据库的3306端口,不关心SQL语句长啥样。
缓存数据库(Redis、Memcached):只认端口,转发要快。
长连接业务(游戏服务器、IM即时通讯、TCP长连接):连接一旦建立就不怎么断开,用四层最省心。
纯TCP/UDP转发:任何非HTTP的协议,必须用四层。
(2)七层负载均衡
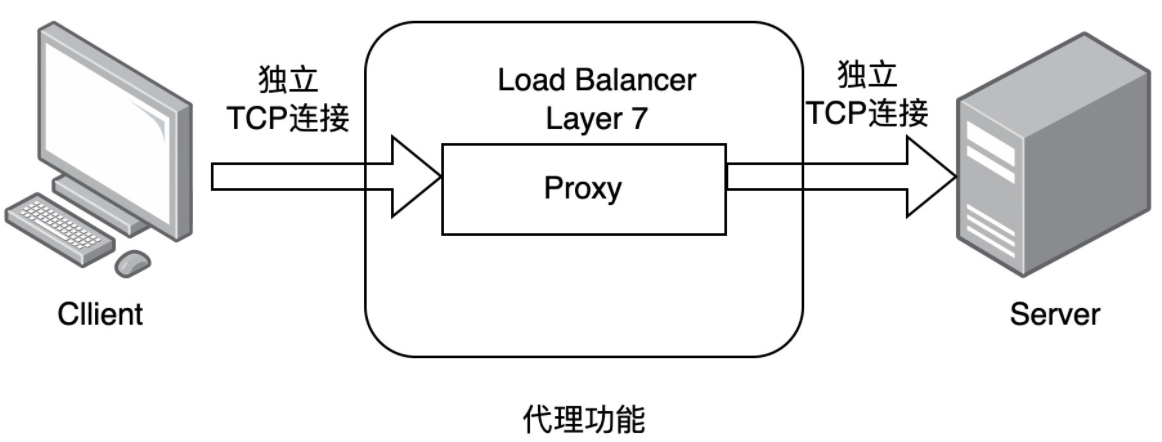
原理:第七层(应用层) :主要管 数据内容 (比如网页请求的具体地址、Cookie、头信息)。协议代表:HTTP/HTTPS。
通过虚拟ur|或主机ip进行流量识别,根据应用层信息进行解析,决定是否需要进行负载均衡。 代理后台服务器与客户端建立连接,如nginx可代理前后端,与前端客户端tcp连接,与后端服务器建立 tcp连接。
底层技术:它工作在用户态(比如HAProxy、Nginx),需要先与客户端建立TCP连接,接收完整个HTTP请求报文,解析头部后,再与后端服务器建立新连接转发。
特点:可以做精细化路由和内容改写。但因为要拆包、读包、再打包,性能开销比四层大一些。
使用场景:
Web网站分流 :把 www.xxx.com/image 的图片请求转发给图片服务器集群;把 www.xxx.com/video 的视频请求转发给视频服务器集群。
灰度发布/金丝雀发布:给1%的用户Cookie打上特殊标记,把这1%的人转发到新版本服务器,其余99%去老版本。
会话保持(Session粘滞):通过读取用户Cookie,确保同一个用户永远被转发到同一台后端服务器(防止掉线)。
路径重写/重定向:根据请求内容修改URL或插入HTTP头信息。
(3)四层与七层的区别
所谓的四到七层负载均衡,就是在对后台的服务器进行负载均衡时,依据四层的信息或七层的信息来决****定怎么样转发流量
四层的负载均衡,就是通过发布三层的IP地址(VIP),然后加四层的端口号,来决定哪些流量需要做负 载均衡,对需要处理的流量进行NAT处理,转发至后台服务器,并记录下这个TCP或者UDP的流量是由哪 台服务器处理的,后续这个连接的所有流量都同样转发到同一台服务器处理
七层的负载均衡,就是在四层的基础上(没有四层是绝对不可能有七层的),再考虑应用层的特征,比如同一个Web服务器的负载均衡,除了根据VIP加80端口辨别是否需要处理的流量,还可根据七层的 URL、浏览器类别、语言来决定是否要进行负载均衡。
1.分层位置:四层负载均衡在传输层及以下,七层负载均衡在应用层及以下
2.性能 :四层负载均衡架构无需解析报文消息内容,在网络吞吐量与处理能力上较高:七层可支持解析应用 层报文消息内容,识别URL、Cookie、HTTP header等信息。
3.原理 :四层负载均衡是基于ip+port;七层是基于虚拟的URL或主机IP等。
4.功能类比:四层负载均衡类似于路由器;七层类似于代理服务器。
5.安全性:四层负载均衡无法识别DDoS攻击;七层可防御SYN Cookie/Flood攻击
简单来说四层和七层的本质区别,在于【决策依据】不同。
四层只看【IP和端口】,不关心业务内容,像高速公路收费站,只管车来车往,所以效率极高;
七层会解析【HTTP报文内容】,能根据URL、Cookie做精细路由,像机场航站楼的导引员,能精准把旅客分流到不同登机口。
生产上通常组合使用:用四层(LVS)扛最底层的海量攻击和流量,再用七层HAProxy/Nginx做业务层面的精细化分发。
二、HAproxy企业级实战
1.什么是HAproxy
HA(高可用)+Proxy(代理)
HA:高可用,擅长保证服务不中断,后端服务器挂掉,能够自动踢出,自己挂掉则可以跟备用机(Keepalived服务)进行主备切换
Proxy(代理),用户不直接找后端服务器,而是先找到代理,代理再替用户去找后端,代理就是中间人。
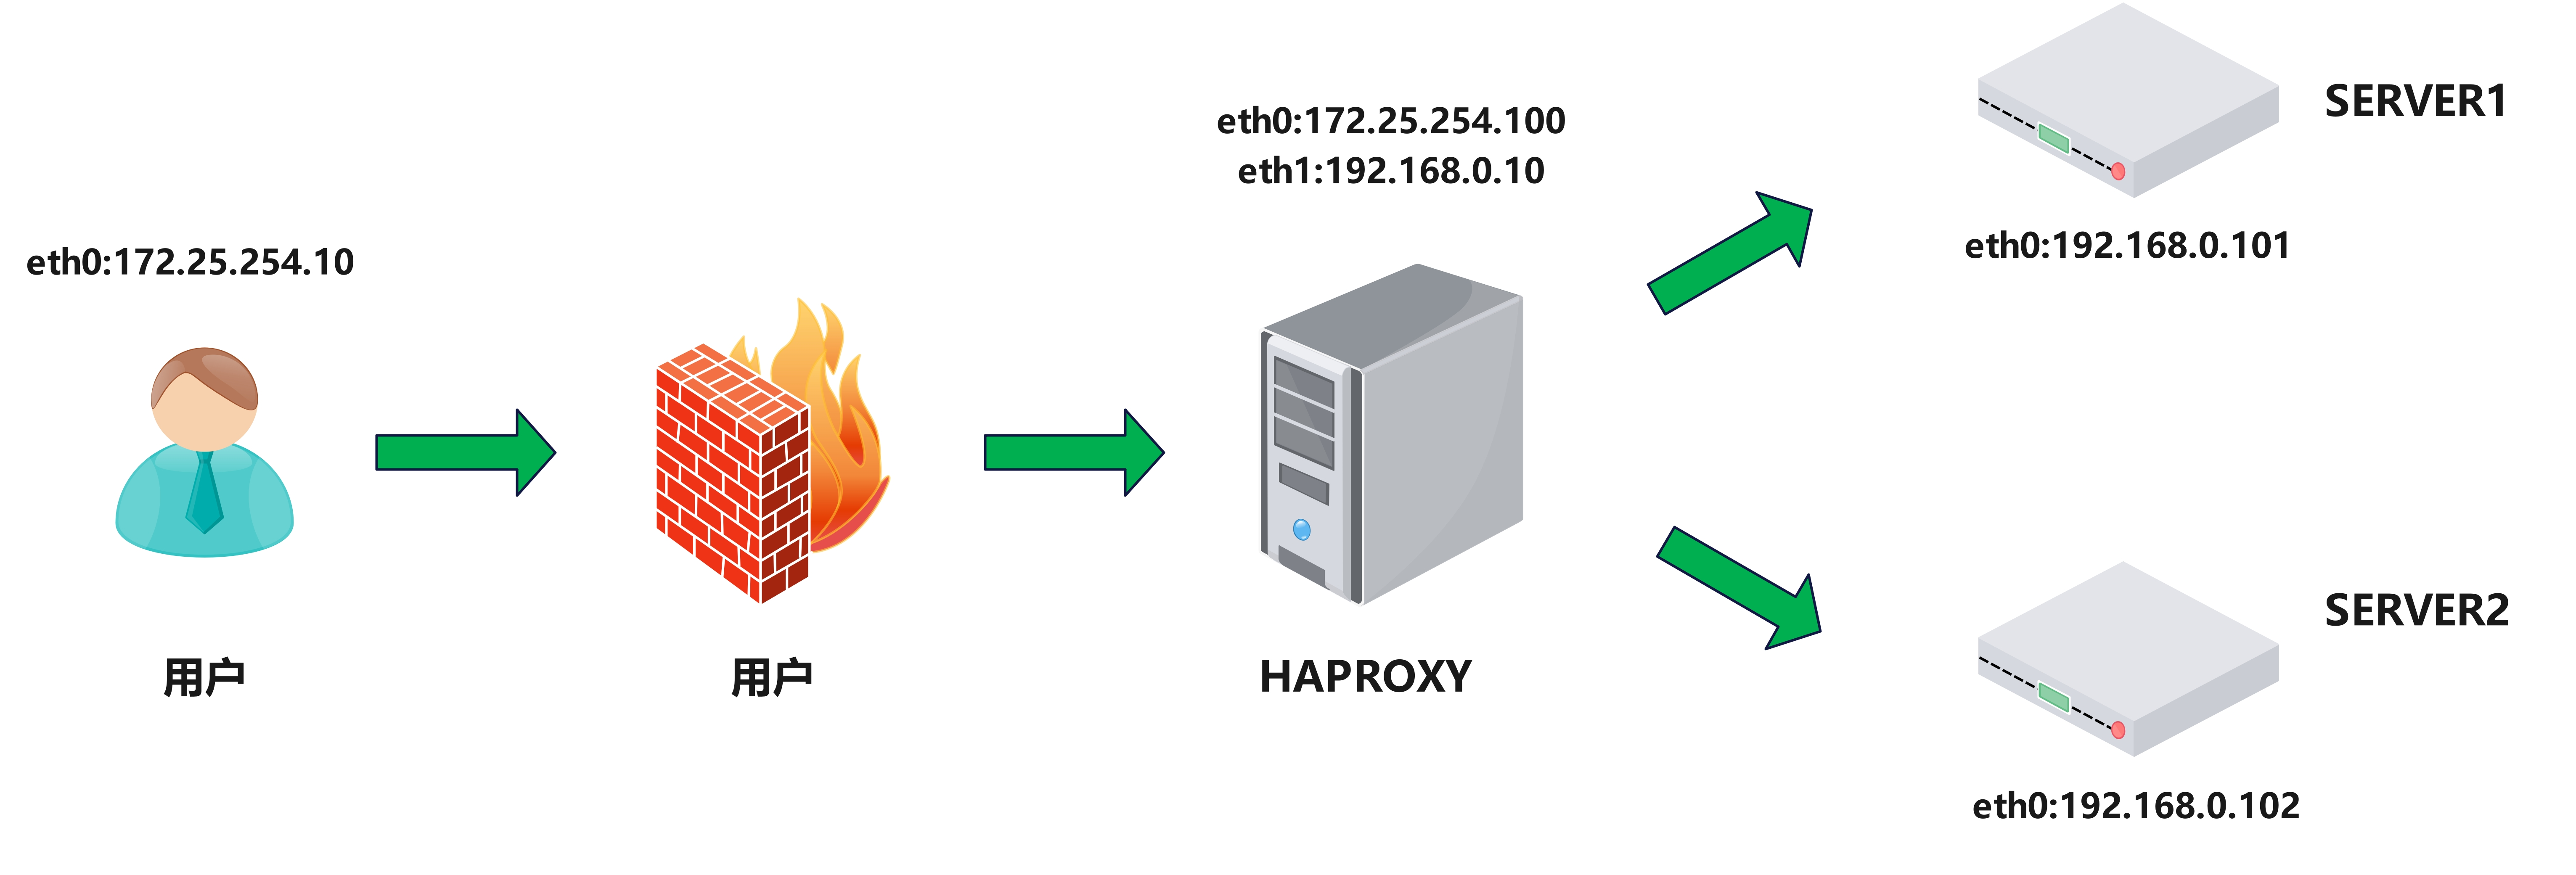
所以说HAProxy 就是一个装在 Linux 系统里的"流量转发软件"。你告诉它"前门开哪个端口,后门连哪些服务器",它就会老老实实地站在中间,把所有进来的请求,按你定的规矩分给后边的服务器。且HAproxy比LVS聪明,比Nginx专一。LVS 只会四层转发,而 HAProxy 四层七层通吃。Nginx 本职是Web服务器(展示网页),顺带做负载均衡;而 HAProxy 天生就是纯粹干负载均衡的,在处理TCP(比如数据库、Redis)和大量长连接时,比 Nginx 更专业、更稳。
2.HAproxy基本配置信息
官方文档:http://cbonte.github.io/haproxy-dconv/
HAProxy 的配置文件haproxy.cfg由两大部分组成,分别是:
global:全局配置段
(1)进程及安全配置相关的参数
(2)性能调整相关参数
(3)Debug参数
global配置参数说明
bash
global
log 127.0.0.1 local2 #定义全局的syslog服务器;日志服务器需要开启UDP协议,最多可以定义两个

chroot /var/lib/haproxy #锁定运行目录

pidfile /var/run/haproxy.pid #指定pid文件

maxconn 100000 #指定最大连接数

user haproxy #指定haproxy的运行用户

group haproxy #指定haproxy的运行组

daemon #指定haproxy以守护进程方式运行

# turn on stats unix socket
stats socket /var/lib/haproxy/stats #指定haproxy的套接字文件

nbproc 2 #指定haproxy的work进程数量,默认是1个

cpu-map 1 0 #指定第一个work绑定第一个cpu核心

cpu-map 2 1 #指定第二个work绑定第二个cpu核心

nbthread 2 #指定haproxy的线程数量,默认每个进程一个线程,此参数与nbproc互斥

maxsslconn 100000 #每个haproxy进程ssl最大连接数,用于haproxy配置了证书的场景下

maxconnrate 100 #指定每个客户端每秒建立连接的最大数量proxies:代理配置段
(1)defaults:为frontend, backend, listen提供默认配置
(2)frontend:前端,相当于nginx中的server {}
(3)backend:后端,相当于nginx中的upstream {}
(4)listen:同时拥有前端和后端配置,配置简单,生产推荐使用
proxies配置参数说明------proxies
|---------|---------|---------------------------------------------------------|
| 参数 | 类型 | 作用 |
| default | proxies | 默认配置项,针对以下的frontend、backend和listen生效,可以多个 name也可以没有name |
| fronted | proxies | 前端servername,类似于Nginx的一个虚拟主机 server和LVS服务集 群。 |
| backend | proxies | 后端服务器组,等于nginx的upstream和LVS中的RS服务器 |
| listen | proxies | 将frontend和backend合并在一起配置,相对于frontend和backend 配置更简洁,生产常用 |
proxies配置参数说明------defaults
bash
defaults
mode http #HAProxy实例使用的连接协议

log global #指定日志地址和记录日志条目的syslog/rsyslog日志设备此处的global表示使用global配置段
中设定的log值。

option httplog #日志记录选项,httplog表示记录与HTTP会话相关的各种属性值包括 HTTP请求、会话状态、连接数、源地址以及连接时间等

option dontlognull #dontlognull表示不记录空会话连接日志

option http-server-close #等待客户端完整HTTP请求的时间,此处为等待10s。

option forwardfor except 127.0.0.0/8 #透传客户端真实IP至后端web服务器在apache配置文件中加入:<br>%{XForwarded-For}i,后在webserver中看日志即可看到地址透传信息

option redispatch #当server Id对应的服务器挂掉后,强制定向到其他健康的服务器,重新派发

option http-keep-alive #开启与客户端的会话保持

retries 3 #连接后端服务器失败次数

timeout http-request 10s #等待客户端请求完全被接收和处理的最长时间

timeout queue 1m #设置删除连接和客户端收到503或服务不可用等提示信息前的等待时间

timeout connect 120s #设置等待服务器连接成功的时间

timeout client 600s #设置允许客户端处于非活动状态,即既不发送数据也不接收数据的时间

timeout server 600s #设置服务器超时时间,即允许服务器处于既不接收也不发送数据的非活动时间

timeout http-keep-alive 60s #session 会话保持超时时间,此时间段内会转发到相同的后端服务器

timeout check 10s #指定后端服务器健康检查的超时时间

maxconn 3000

default-server inter 1000 weight 3
Proxies配置参数说明------frontend
frontend配置参数
bind:指定HAProxy的监听地址,可以是IPV4或IPV6,可以同时监听多个IP或端口,可同时用于listen
字段中
#格式:
bind \
#注意:如果需要绑定在非本机的IP,需要开启内核参数:net.ipv4.ip_nonlocal_bind=1
backlog <backlog> #针对所有server配置,当前端服务器的连接数达到上限后的后援队列长度,注意: 不支持backend
frontend配置示例
haproxy \~# vim /etc/haproxy/haproxy.cfg
...上面内容省略...
bash
frontend lee-webserver-80

     bind 172.25.254.100:80

     mode http

     use_backend lee-webserver-80-RS #调用backend的名称
...下面内容省略...
Proxies配置参数说明------backend
定义一组后端服务器,backend服务器将被frontend进行调用。
注意: backend 的名称必须唯一,并且必须在listen或frontend中事先定义才可以使用,否则服务无法
启动
bash
mode http|tcp #指定负载协议类型,和对应的frontend必须一致
option        #配置选项
server        #定义后端real server,必须指定IP和端口
注意:option后面加 httpchk,smtpchk,mysql-check,pgsql-check,ssl-hello-chk方法,可用于实现更 多应用层检测功能。
server配置
bash
#针对一个server配置
check #对指定real进行健康状态检查,如果不加此设置,默认不开启检查,只有check后面没有其它配置也可以启用检查功能

addr <IP> #可指定的健康状态监测IP,可以是专门的数据网段,减少业务网络的流量

port <num> #指定的健康状态监测端口

inter <num> #健康状态检查间隔时间,默认2000 ms

fall <num> #后端服务器从线上转为线下的检查的连续失效次数,默认为3

rise <num> #后端服务器从下线恢复上线的检查的连续有效次数,默认为2

weight <weight> #默认为1,最大值为256,0(状态为蓝色)表示不参与负载均衡,但仍接受持久连接

backup #将后端服务器标记为备份状态,只在所有非备份主机down机时提供服务,类似Sorry
Server

disabled #将后端服务器标记为不可用状态,即维护状态,除了持久模式将不再接受连接,状态为深黄色,优雅下线,不再接受新用户的请求

redirect prefix http://www.baidu.com/ #将请求临时(302)重定向至其它URL,只适用于http
模式

maxconn <maxconn> #当前后端server的最大并发连接数
3.HAproxy企业实战------socat热更新
(1)什么是socat热更新
什么是热更新?------>在服务或软件不停止更新软件或服务的工作方式,完成对软件的不停工更新,典型的热更新设备,usb,在使用usb进行拔插时,电脑系统是不需要停止工作的,这种设备叫做热拔插设备
简单来说,socat 是一个配合 HAProxy 运行时 API(Runtime API)使用的"万能遥控器"。
它无需重启 HAProxy 服务,就能动态地修改配置、管理后端服务器。就像是在给一辆高速行驶的汽车换轮胎(调整负载均衡策略),socat 就是那套不用停车就能完成操作的专用工具。
socat 本身是 Linux 下的一个多功能网络工具,全称是 Socket CAT。它就像一个"数据管道工",能在两个数据流之间建立通道。在 HAProxy 的场景里,socat 的作用就是连接 HAProxy 开放的本地管理接口(一个 Unix Socket 文件),然后发送各种管理命令。
(2)socat的作用
传统的修改HAproxy配置后需要重启或者重载服务,这会导致业务短暂中断,所有正在处理的连接被断开,影响用户的体验。
socat可以实现"不停机运维"
零中断,高可用:所有操作实时生效,不中断任何现有业务连接。
灵活,动态调整:可以随时按需调整,比如根据流量情况动态修改服务器权重。
安全,精准控制 :通过 Unix Socket 进行本地通信,安全性极高。并且可以设置 user、``operator、admin 三级权限,精细控制不同人员的操作范围
(3)企业实战场景
场景一:动态调整服务器权重(灰度发布/流量调拨)
最常用的场景。比如新上线一台性能更强的服务器,可以动态调高它的权重,让它承载更多流量,而无需重启。
bash
# 将 backend "webcluster-http" 下的 "webserver1" 权重设置为 4
echo "set weight webcluster-http/webserver1 4" | socat stdio /var/lib/haproxy/haproxy.sock
场景二:无缝上下线服务器(故障隔离/机器维护)
当检测到某台后端服务器异常时,可以立即将其"禁用",流量将自动切到其他健康服务器,实现故障隔离
bash
# 禁用 backend "webcluster-http" 下的 "webserver2"
echo "disable server webcluster-http/webserver2" | socat stdio /var/lib/haproxy/haproxy.sock

# 维护完成后,重新启用
echo "enable server webcluster-http/webserver2" | socat stdio /var/lib/haproxy/haproxy.sock
场景三:实现 HTTPS 证书的热更新
从 HAProxy 2.2 版本开始,支持通过 Runtime API 动态更新 SSL 证书,完美解决了证书过期更换必须重启服务的痛点。
场景四:查看实时状态与调试
快速查看后端服务器的实时状态、连接数、权重等信息
bash
# 查看所有服务器的状态
echo "show servers state" | socat stdio /var/lib/haproxy/haproxy.sock
(4)示例
利用socat查看haproxy信息
bash
[root@haproxy ~]# echo "show servers state"  | socat stdio /var/lib/haproxy/stats
1
# be_id be_name srv_id srv_name srv_addr srv_op_state srv_admin_state srv_uweight srv_iweight srv_time_since_last_change srv_check_status srv_check_result srv_check_health srv_check_state srv_agent_state bk_f_forced_id srv_f_forced_id srv_fqdn srv_port srvrecord srv_use_ssl srv_check_port srv_check_addr srv_agent_addr srv_agent_port
2 webcluster 1 haha 192.168.0.10 2 0 1 1 275 6 3 7 6 0 0 0 - 80 - 0 0 - - 0
2 webcluster 2 hehe 192.168.0.20 2 0 1 1 275 6 3 7 6 0 0 0 - 80 - 0 0 - - 0


[root@haproxy ~]# echo "get  weight webcluster/haha" | socat  stdio /var/lib/haproxy/stats
1 (initial 1)

[root@haproxy ~]# echo "get  weight webcluster/hehe" | socat  stdio /var/lib/haproxy/stats
1 (initial 1)
利用socat更改haproxy信息
bash
#直接更改报错
[root@haproxy ~]# echo "set  weight  webcluster/haha 2 " | socat stdio /var/lib/haproxy/stats
Permission denied

#对socket进行授权
[root@haproxy ~]# vim /etc/haproxy/haproxy.cfg
stats socket /var/lib/haproxy/stats mode 600 level admin


[root@haproxy ~]# rm -rf /var/lib/haproxy/*

[root@haproxy ~]# systemctl restart haproxy.service
[root@haproxy ~]# ll /var/lib/haproxy/
bash
#执行权重更改
[root@haproxy ~]# echo "get  weight webcluster/hehe" | socat  stdio /var/lib/haproxy/stats
1 (initial 1)

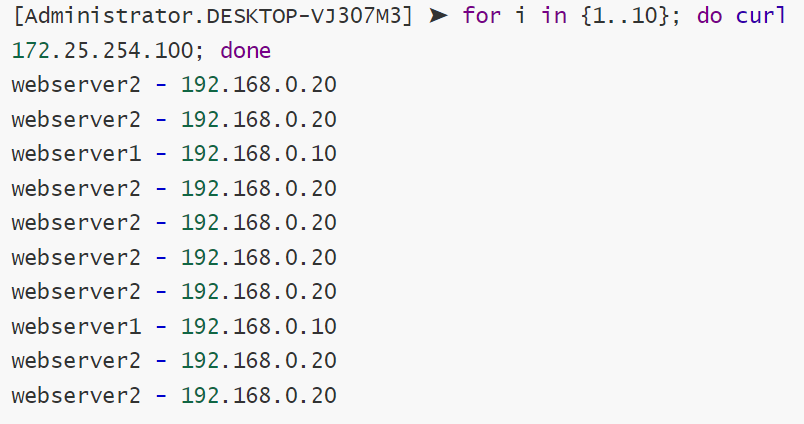
[root@haproxy ~]# echo "set  weight  webcluster/hehe 4 " | socat stdio /var/lib/haproxy/stats

[root@haproxy ~]# echo "get  weight webcluster/hehe" | socat  stdio /var/lib/haproxy/stats
4 (initial 1)
测试
服务器上线和下线
bash
[root@haproxy ~]# echo "disable server webcluster/hehe " | socat stdio /var/lib/haproxy/stats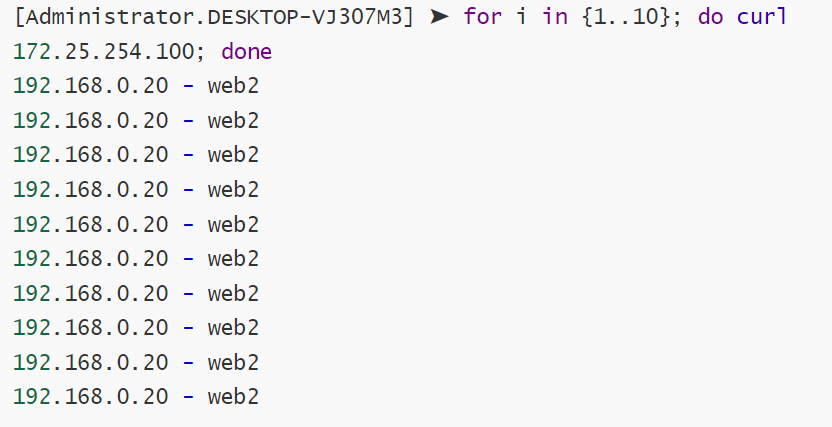
bash
[root@haproxy ~]# echo "enable server webcluster/hehe " | socat stdio /var/lib/haproxy/stats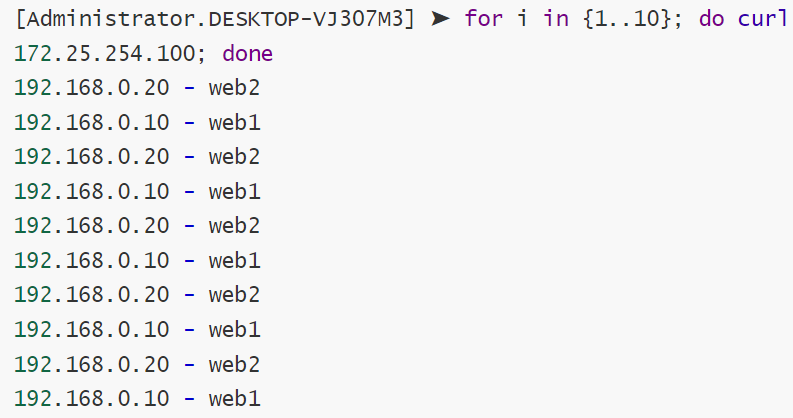
4.HAproxy企业级实战------>算法实验
(1)static-rr(静态轮询)
算法:跟roundrobin一样按权重轮流转,但权重不支持动态修改,必须重启后才生效,如果后端服务器宕机,他不会自动跳过,依旧把服务流量输送过去
bash
[root@haproxy ~]# vim /etc/haproxy/haproxy.cfg
listen webcluster
    bind        *:80
    balance     static-rr
    server haha 192.168.0.10:80 check inter 3s fall 3 rise 5 weight 2
    server hehe 192.168.0.20:80 check inter 3s fall 3 rise 5 weight 1


[root@haproxy ~]# systemctl restart haproxy.service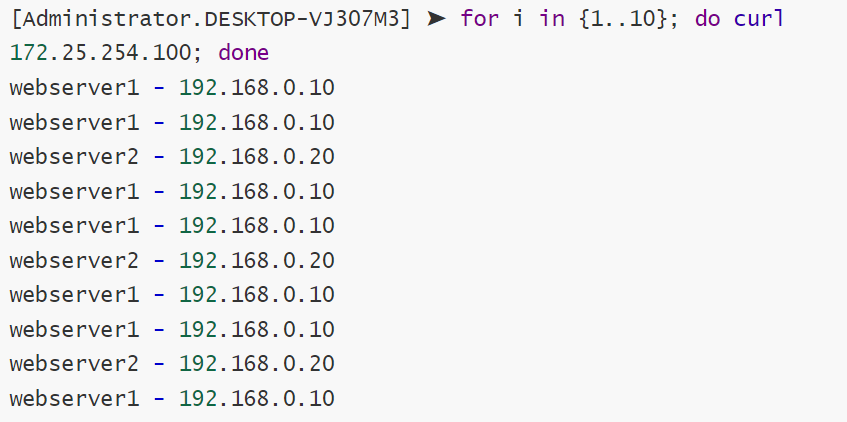
bash
#检测是否支持热更新
[root@haproxy ~]# echo "get  weight webcluster/haha" | socat  stdio /var/lib/haproxy/stats
2 (initial 2)

[root@haproxy ~]# echo "set  weight  webcluster/haha 1  " | socat stdio /var/lib/haproxy/stats       Backend is using a static LB algorithm and only accepts weights '0%' and '100%'
(2)firest(优先填满法)
算法:从列表的第一台服务器开始,一直往这台服务器对链接,直到最大连接数堆满才会去下一台服务器,以此内推。
bash
[root@haproxy ~]# vim /etc/haproxy/haproxy.cfg
listen webcluster
    bind        *:80
    balance     first
    server haha 192.168.0.10:80 maxconn 1 check inter 3s fall 3 rise 5 weight 2
    server hehe 192.168.0.20:80 check inter 3s fall 3 rise 5 weight 1


[root@haproxy ~]# systemctl restart haproxy.service
测试
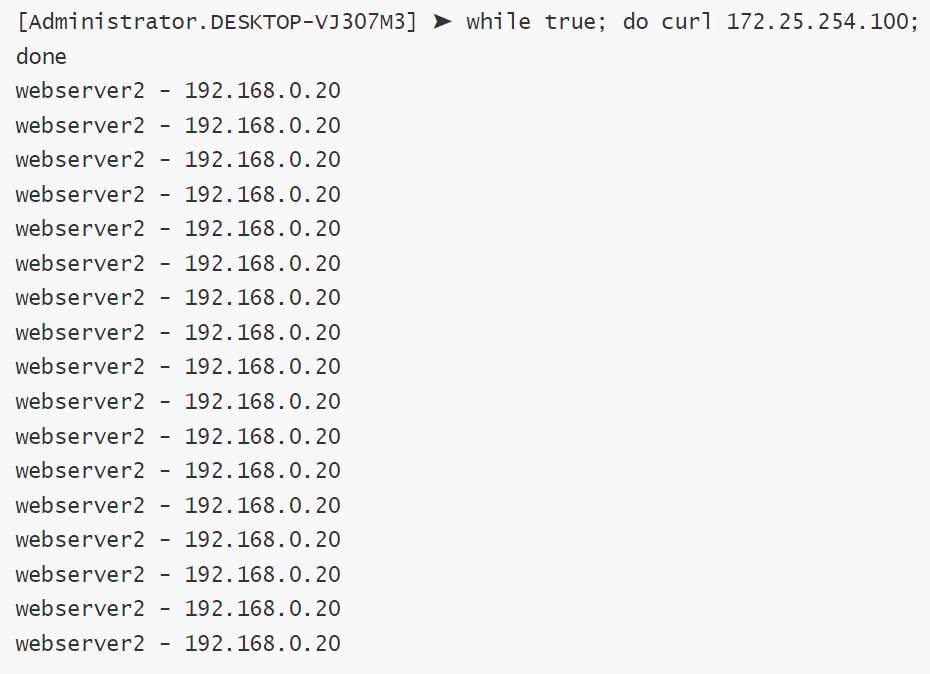
#在其他设立了中建立持续访问并观察
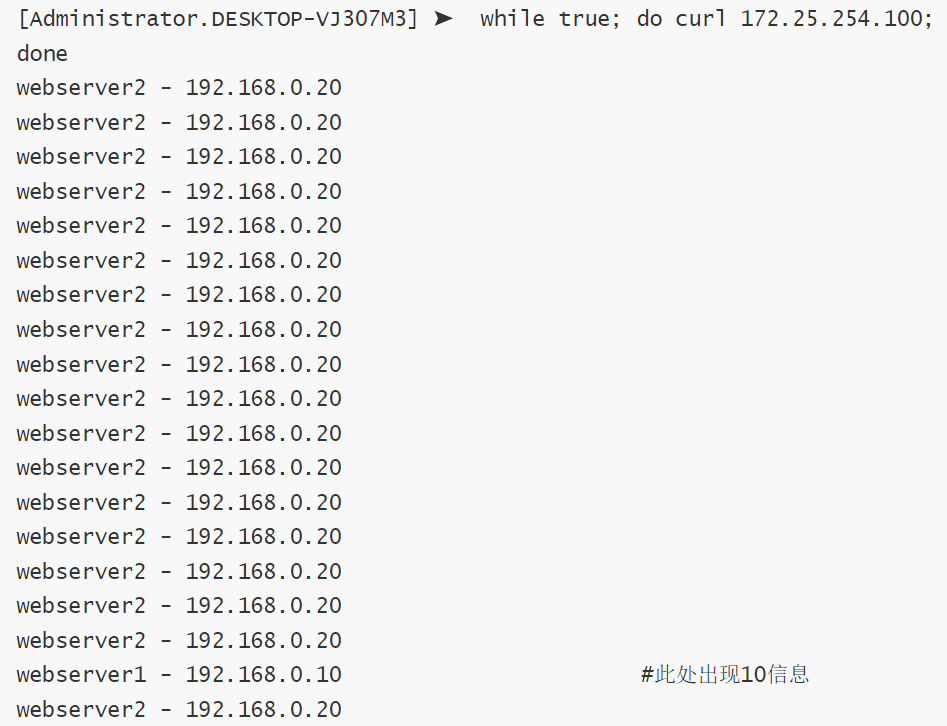
(3)roundrobin(动态轮询)
算法:维护全局计数器,新请求来就计数器+1,然后取余数(%服务器总权重)得到目标机器。支持动态调整权重,实时生效
公式:索引 = (请求计数) % (总权重),配合权重。
bash
[root@haproxy ~]# vim /etc/haproxy/haproxy.cfg
listen webcluster
    bind        *:80
    balance     roundrobin
    server haha 192.168.0.10:80 check inter 3s fall 3 rise 5 weight 2
    server hehe 192.168.0.20:80 check inter 3s fall 3 rise 5 weight 1

[root@haproxy ~]# systemctl restart haproxy.service
测试
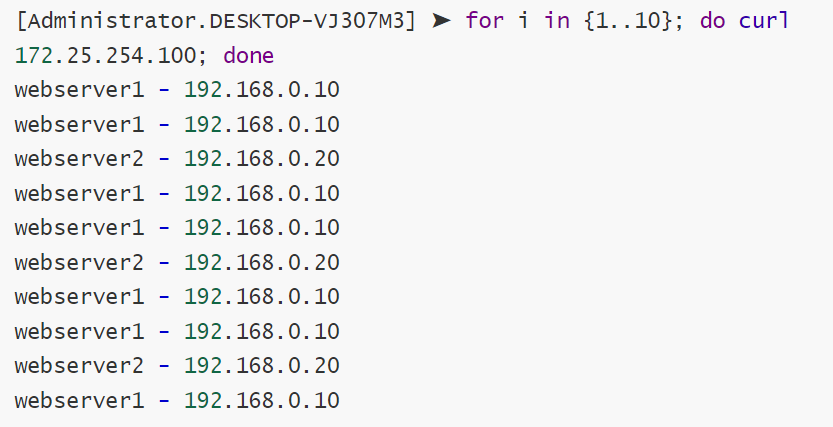
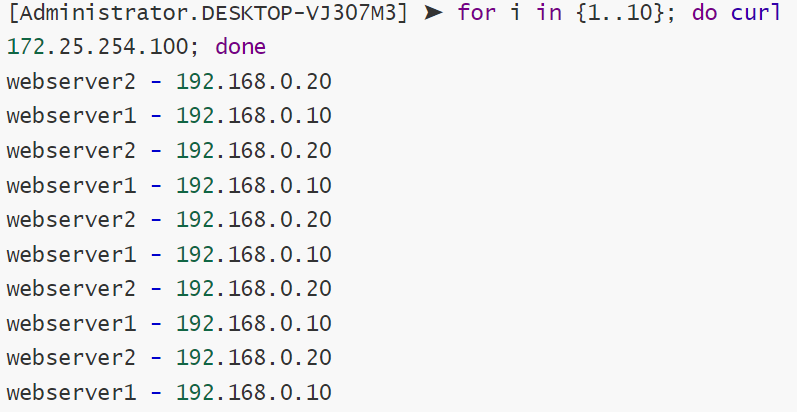
动态权重更新
bash
[root@haproxy ~]# echo "get  weight webcluster/haha" | socat  stdio /var/lib/haproxy/stats
2 (initial 2)

[root@haproxy ~]# echo "set  weight  webcluster/haha 1  " | socat stdio /var/lib/haproxy/stats
[root@haproxy ~]# echo "get  weight webcluster/haha" | socat  stdio /var/lib/haproxy/stats
1 (initial 2)
效果
(4)leastconn(最小连接数)
算法:遍历所有后端服务器,比较他们当前正在处理的连接数,选出连接数最小的一台
bash
[root@haproxy ~]# vim /etc/haproxy/haproxy.cfg
listen webcluster
    bind        *:80
    balance     leastconn
    server haha 192.168.0.10:80 check inter 3s fall 3 rise 5 weight 2
    server hehe 192.168.0.20:80 check inter 3s fall 3 rise 5 weight 1

[root@haproxy ~]# systemctl restart haproxy.service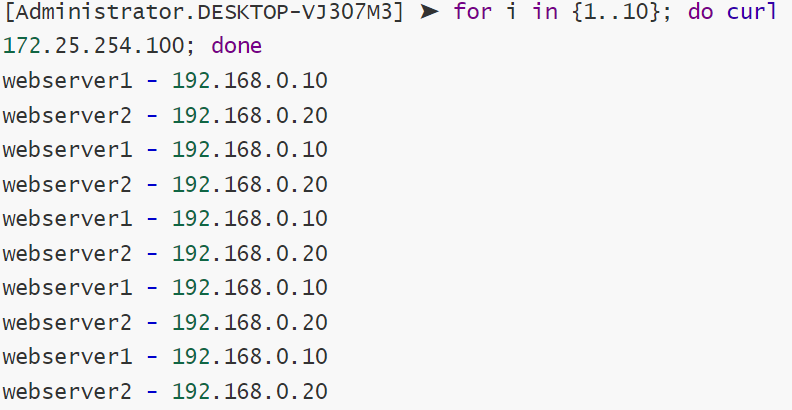
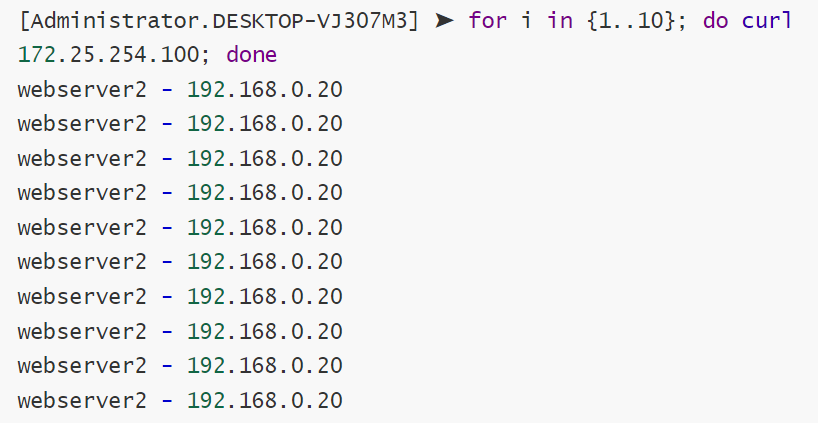
(5)source(源地址哈希)
算法:提取用户的IP,计算哈希值,然后%服务器总数(或者权重总和)
bash
#默认静态算法
[root@haproxy ~]# vim /etc/haproxy/haproxy.cfg
listen webcluster
    bind        *:80
    balance     source
    server haha 192.168.0.10:80 check inter 3s fall 3 rise 5 weight 2
    server hehe 192.168.0.20:80 check inter 3s fall 3 rise 5 weight 1

[root@haproxy ~]# systemctl restart haproxy.service
测试
bash
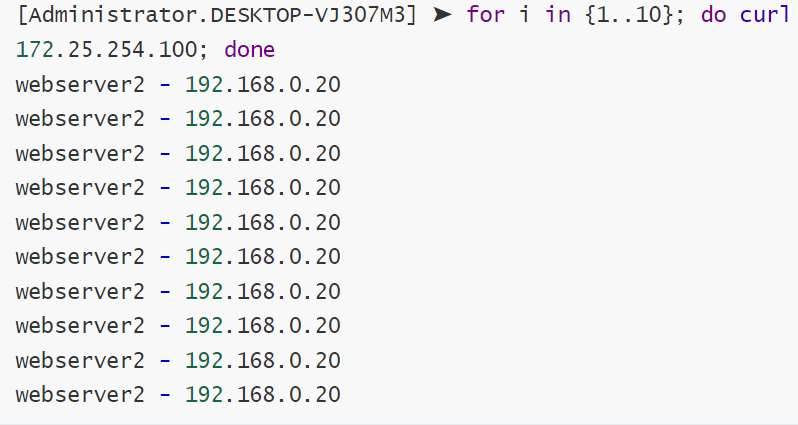
#source动态算法
[root@haproxy ~]# vim /etc/haproxy/haproxy.cfg
listen webcluster
    bind        *:80
    balance     source
    hash-type 	consistent
    server haha 192.168.0.10:80 check inter 3s fall 3 rise 5 weight 2
    server hehe 192.168.0.20:80 check inter 3s fall 3 rise 5 weight 1

[root@haproxy ~]# systemctl restart haproxy.service
测试
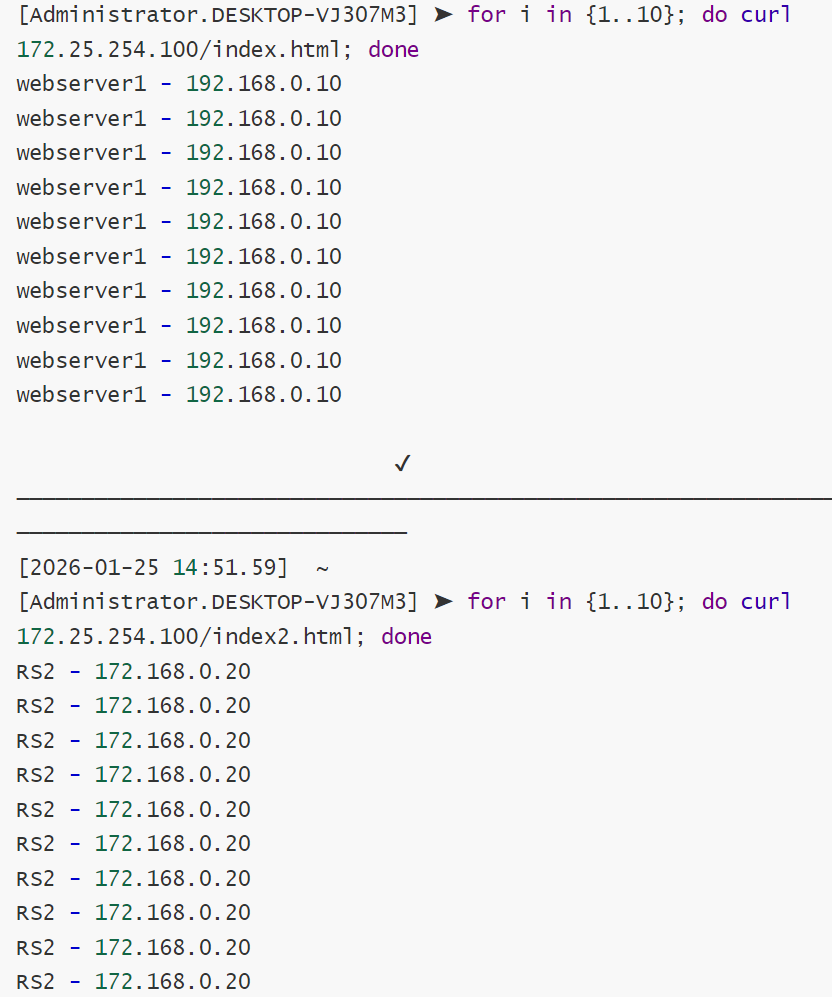
(6)uri(URI哈希)
算法:提取请求路径,计算哈希值,然后%服务器总数
bash
#主备实验环境
[root@webserver1 ~]# echo RS1 - 192.168.0.10 > /var/www/html/index1.html
[root@webserver1 ~]# echo RS1 - 192.168.0.10 > /var/www/html/index2.html
[root@webserver2 ~]# echo RS2 - 192.168.0.20 > /var/www/html/index1.html
[root@webserver2 ~]# echo RS2 - 192.168.0.20 > /var/www/html/index2.html

#设定uri算法
[root@haproxy ~]# vim /etc/haproxy/haproxy.cfg
listen webcluster
    bind        *:80
    balance     uri
    hash-type 	consistent
    server haha 192.168.0.10:80 check inter 3s fall 3 rise 5 weight 2
    server hehe 192.168.0.20:80 check inter 3s fall 3 rise 5 weight 1

[root@haproxy ~]# systemctl restart haproxy.service
测试
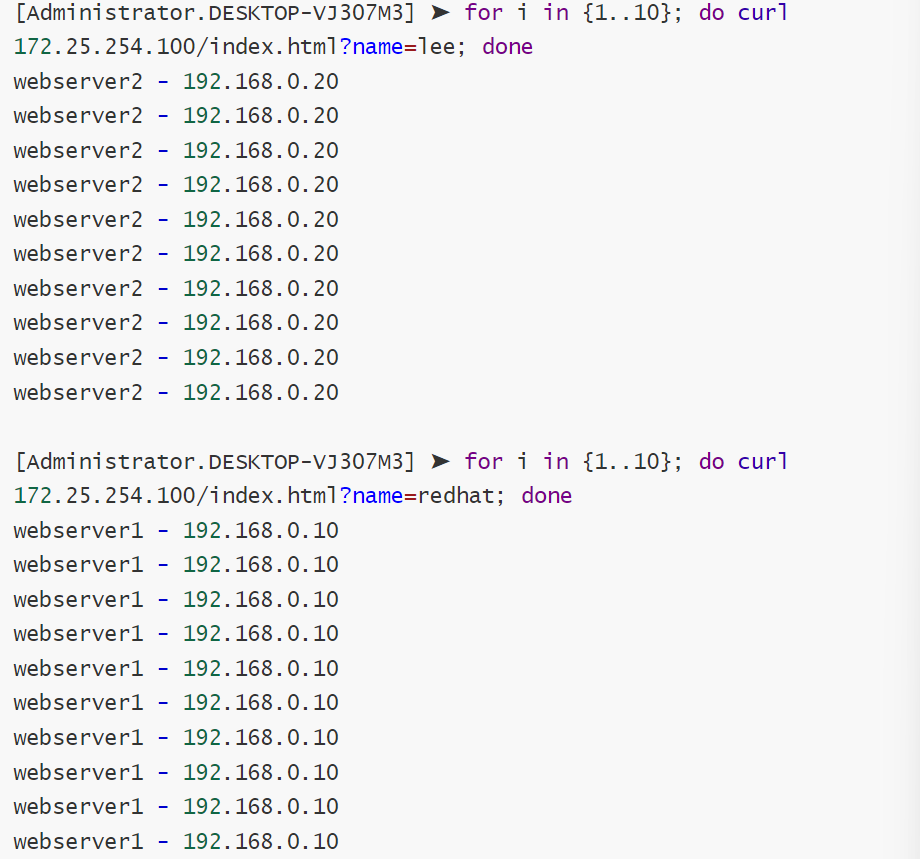
(7)url_param(URL参数哈希)
算法:从请求的URL参数 中,提取指定的参数值,对这个值做哈希,然后 % 服务器总数
bash
#主备实验环境
[root@webserver1 ~]# echo RS1 - 192.168.0.10 > /var/www/html/index1.html
[root@webserver1 ~]# echo RS1 - 192.168.0.10 > /var/www/html/index2.html
[root@webserver2 ~]# echo RS2 - 192.168.0.20 > /var/www/html/index1.html
[root@webserver2 ~]# echo RS2 - 192.168.0.20 > /var/www/html/index2.html

#设定url_param算法
[root@haproxy ~]# vim /etc/haproxy/haproxy.cfg
listen webcluster
    bind        *:80
    balance     url_param name
    hash-type 	consistent
    server haha 192.168.0.10:80 check inter 3s fall 3 rise 5 weight 2
    server hehe 192.168.0.20:80 check inter 3s fall 3 rise 5 weight 1

[root@haproxy ~]# systemctl restart haproxy.service
测试
(8)hdr(HTTP头部哈希)
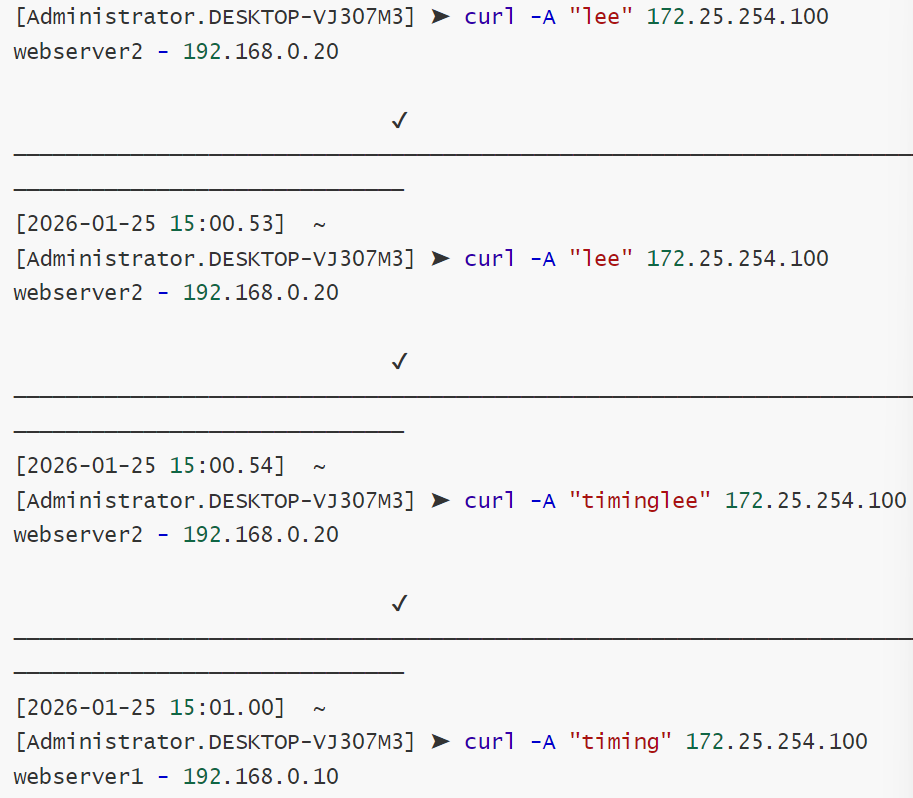
算法:从请求的 HTTP头部 中提取指定字段(比如 Host: www.abc.com 或 User-Agent: iPhone),对该字段的值做哈希,然后 % 服务器总数。
bash
[root@haproxy ~]# vim /etc/haproxy/haproxy.cfg
listen webcluster
    bind        *:80
    balance     hdr(User-Agent)
    hash-type 	consistent
    server haha 192.168.0.10:80 check inter 3s fall 3 rise 5 weight 2
    server hehe 192.168.0.20:80 check inter 3s fall 3 rise 5 weight 1

[root@haproxy ~]# systemctl restart haproxy.service
测试
5.HAproxy企业级实战------>基于cookie的会话保持
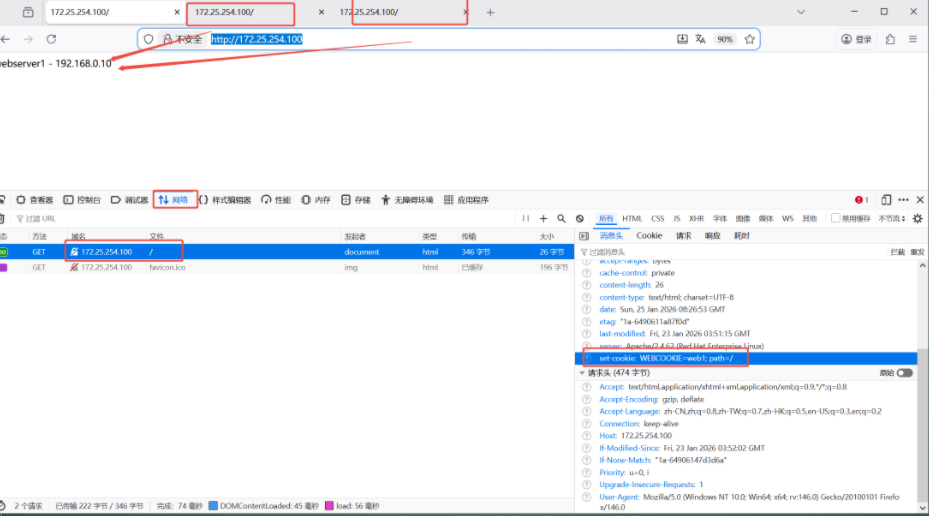
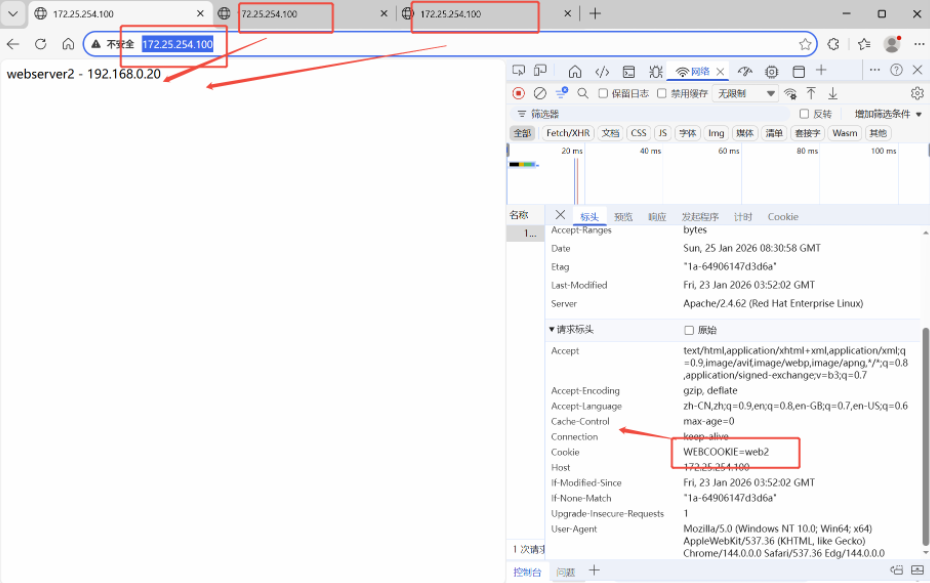
原理:HAProxy在第一次响应时,在HTTP头里插入一个 Set-Cookie(比如 SRVID=A)。后续请求浏览器带着这个Cookie来,HAProxy直接解析Cookie,强行把请求发给指定的那台服务器。
如果在haprorxy中设定算法为source,在同一台客户端主机中,无论使用什么浏览器访问的最终服务器是同一个可以使用cookie值进行优化,让同一台客户端中同一个浏览器中访问的是同一个服务器不同浏览器访问的是不同的服务器
相比仅依赖IP地址的 source 算法,基于Cookie的会话保持通过浏览器存储的专属标识来精准识别每个用户,彻底规避了公司或学校共用同一公网IP导致所有流量被误判挤向单台服务器的尴尬;同时不需要担忧用户网络切换(如WiFi转4G导致IP变化),能稳稳维持会话不断;即便后端某台服务器意外宕机,HAProxy也能自动清除指向它的旧Cookie并为用户重新派发新标签,完美避免了 source 算法因服务器数量变动导致哈希重算而引发的用户大面积掉线问题
bash
#配合基于cookie的会话保持方法
[root@haproxy ~]# vim /etc/haproxy/haproxy.cfg
listen webcluster
    bind        *:80
    balance     roundrobin
    hash-type   consistent
    cookie WEBCOOKIE insert nocache indirect
    server haha 192.168.0.10:80 cookie web1 check inter 3s fall 3 rise 5 weight 2
    server hehe 192.168.0.20:80 cookie web2 check inter 3s fall 3 rise 5 weight 1

[root@haproxy ~]# systemctl restart haproxy.service
测试
firefox
edge
6.HAproxy企业实战------>HAproxy状态页
(1)什么是状态页
不需要翻复杂的日志,也不用敲命令行,只要在浏览器里打开一个特定的网址,就能看到 "此时此刻,后厨到底干得怎么样" 的全部实时数据。
(2)状态页的作用
状态页主要用来排错,状态页就是HAProxy的"体检报告单"和"实时监控器",不用动脑猜那一部分出了问题,只用眼睛看,就知道流量分得健不健康。
(3)实战演练
bash
[root@haproxy ~]# vim /etc/haproxy/haproxy.cfg
listen stats
    mode        http
    bind 0.0.0.0:4321
    stats       enable
    log         global
#   stats       refresh
    stats uri   /status
    stats auth  lee:lee
[root@haproxy ~]# systemctl restart haproxy.service
登录测试
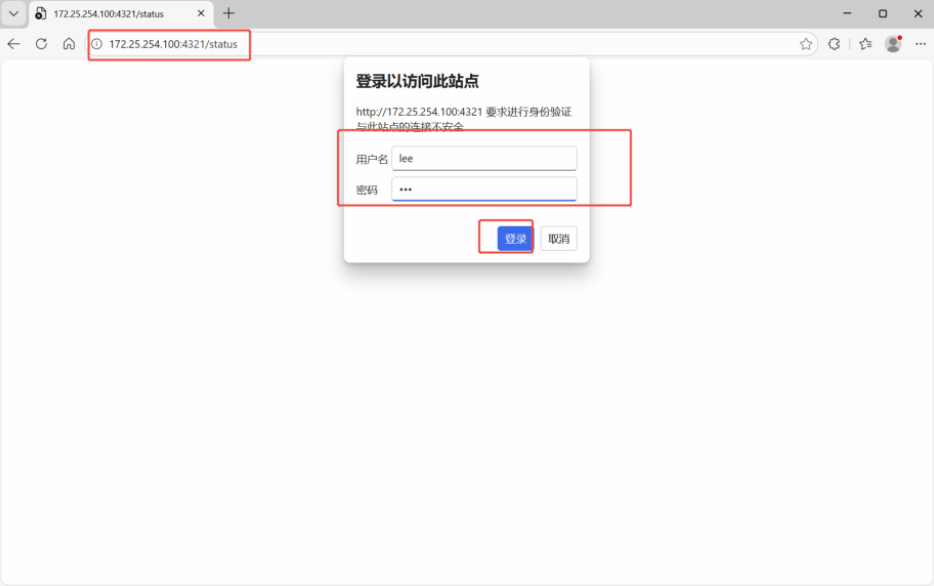
开启自动刷新
bash
[root@haproxy ~]# vim /etc/haproxy/haproxy.cfg
listen stats
    mode        http
    bind 0.0.0.0:4321
    stats       enable
    log         global
    stats       refresh   1
    stats uri   /status
    stats auth  lee:lee
[root@haproxy ~]# systemctl restart haproxy.service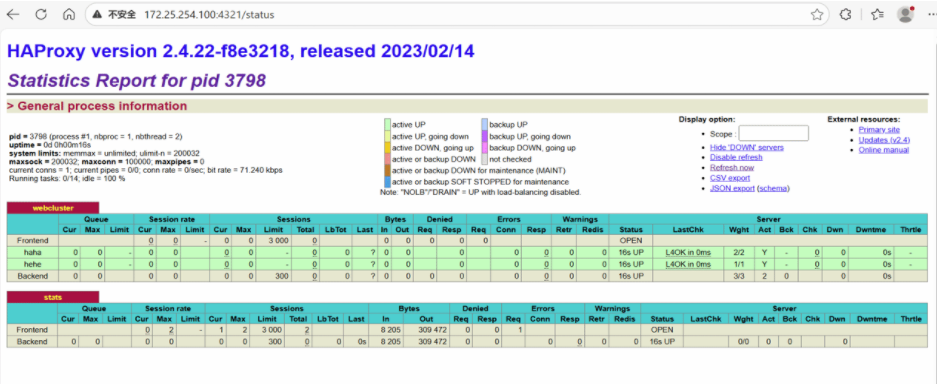
模拟设备下线
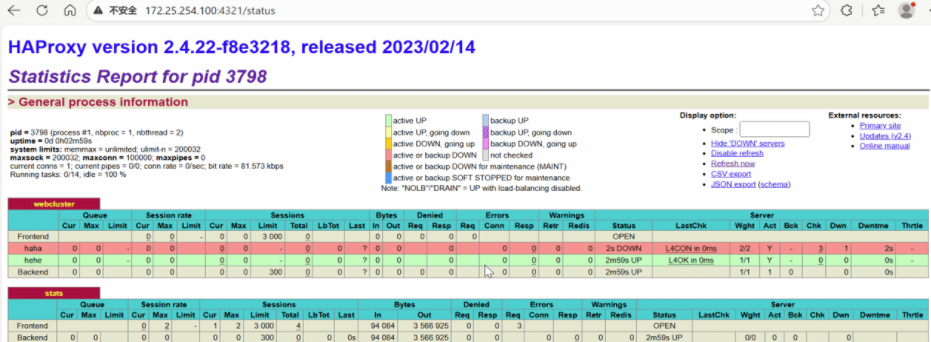
7.HAproxy企业实战------>IP透传
(1)什么是IP透传
HAProxy要把"用户的真实身份证(源IP)"完整无缺地传给后端的服务器,不能让后端觉得是HAProxy本人在访问它。
(2)七层IP透传
当haproxy工作在七层的时候,也可以透传客户端真实IP至后端服务器
实验环境
bash
#实验环境
[root@haproxy ~]# vim /etc/haproxy/haproxy.cfg
listen webcluster
    bind        *:80
    balance     roundrobin
    server haha 192.168.0.10:80 check inter 3s fall 3 rise 5 weight 1
    server hehe 192.168.0.20:80 check inter 3s fall 3 rise 5 weight 1

[root@haproxy ~]# systemctl restart haproxy.service
测试环境
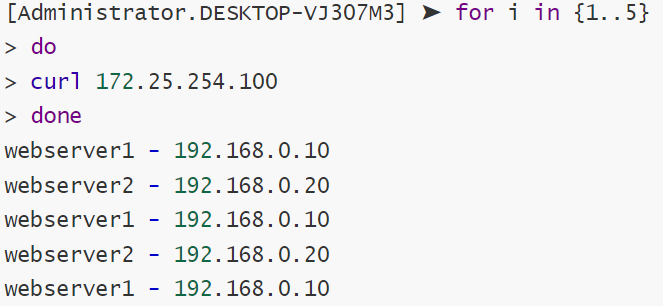
在rs主机中默认是未开启透传功能的
bash
[root@webserver2 ~]# cat /etc/httpd/logs/access_log
192.168.0.100 - - [26/Jan/2026:10:03:03 +0800] "GET / HTTP/1.1" 200 26 "-" "curl/7.65.0"
192.168.0.100 - - [26/Jan/2026:10:03:03 +0800] "GET / HTTP/1.1" 200 26 "-" "curl/7.65.0"
开启IP透传的方式
bash
[root@haproxy ~]# vim /etc/haproxy/haproxy.cfg
defaults
    mode                    http
    log                     global
    option                  httplog
    option                  dontlognull
    option http-server-close
    option forwardfor       except 127.0.0.0/8				#开启haproxy透传功能
    option                  redispatch
    retries                 3
    timeout http-request    10s
    timeout queue           1m
    timeout connect         10s
    timeout client          1m
    timeout server          1m
    timeout http-keep-alive 10s
    timeout check           10s
    maxconn                 3000
在rs中设定采集透传IP
bash
[root@webserver2 ~]#  vim /etc/httpd/conf/httpd.conf
201     LogFormat "%h %l %u %t \"%r\" %>s %b \"%{X-Forwarded-For}i\" \"%{Referer}i\" \"%{User-Agent}i    \"" combined

[root@webserver2 ~]# systemctl restart httpd
测试
bash
[root@webserver2 ~]# cat /etc/httpd/logs/access_log
192.168.0.100 - - [26/Jan/2026:10:10:29 +0800] "GET / HTTP/1.1" 200 26 "172.25.254.1" "-" "curl/7.65.0"
192.168.0.100 - - [26/Jan/2026:10:10:30 +0800] "GET / HTTP/1.1" 200 26 "172.25.254.1" "-" "curl/7.65.0"
192.168.0.100 - - [26/Jan/2026:10:10:30 +0800] "GET / HTTP/1.1" 200 26 "172.25.254.1" "-" "curl/7.65.0"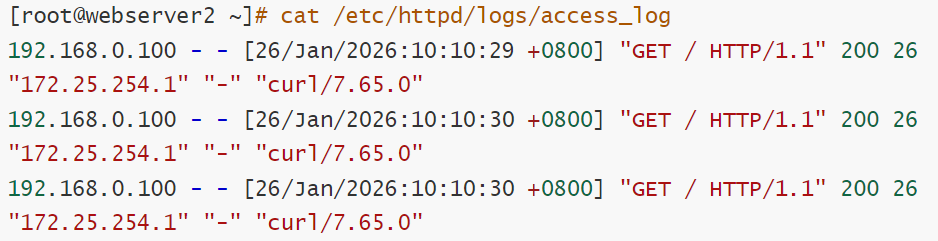
(3)四层IP透传
环境设置
bash
#RS1中部署apache
[root@webserver1 ~]# dnf install httpd -y
[root@webserver1 ~]# echo RS2 - 192.168.0.10 > /var/www/html/index.html
[root@webserver1 ~]# systemctl enable --now httpd


#在RS2中部署nginx
#部署nginx
[root@webserver2 ~]# dnf install nginx -y
[root@webserver2 ~]# echo RS2 - 192.168.0.20 > /usr/share/nginx/html/index.html
[root@webserver2 ~]# systemctl enable --now nginx
测试
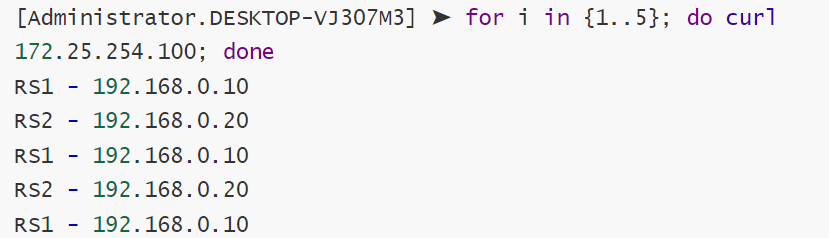
启用apache的四层访问控制
bash
[root@node1 ~]# vim /etc/httpd/conf.modules.d/10-proxy_h2.conf
LoadModule proxy_http2_module modules/mod_proxy_http2.so
LoadModule remoteip_module modules/mod_remoteip.so


[root@node1 ~]# vim /etc/httpd/conf/httpd.conf
RemoteIPProxyProtocol on
RemoteIPTrustedProxy 192.168.0.0/24
[root@node1 ~]# systemctl restart httpd
启用nginx的四层访问控制
bash
[root@webserver2 ~]# vim /etc/nginx/nginx.conf
    server {
        listen       80 proxy_protocol;			#启用四层访问控制
        listen       [::]:80;
        server_name  _;
        root         /usr/share/nginx/html;

        # Load configuration files for the default server block.
        include /etc/nginx/default.d/*.conf;

        error_page 404 /404.html;
        location = /404.html {
        }

[root@webserver2 ~]# systemctl restart nginx.service
测试
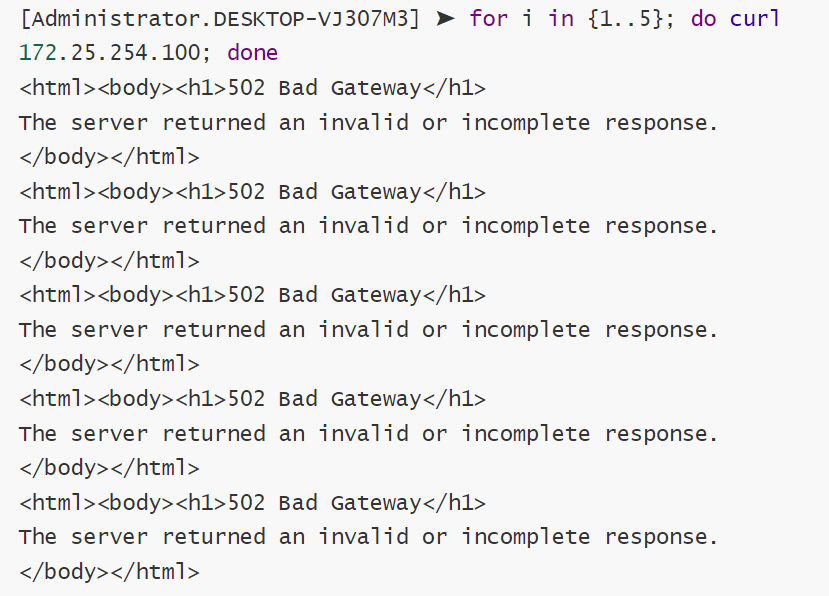
出现上述报错标识nginx只支持四层访问
#设定haproxy访问4层
bash
[root@haproxy ~]# vim /etc/haproxy/haproxy.cfg
listen webcluster
    bind        *:80
    mode        tcp				#四层访问
    balance     roundrobin
    server haha 192.168.0.10:80 send-proxy check inter 3s fall 3 rise 5 weight 1
    server hehe 192.168.0.20:80 send-proxy check inter 3s fall 3 rise 5 weight 1

[root@haproxy ~]# systemctl restart haproxy.service
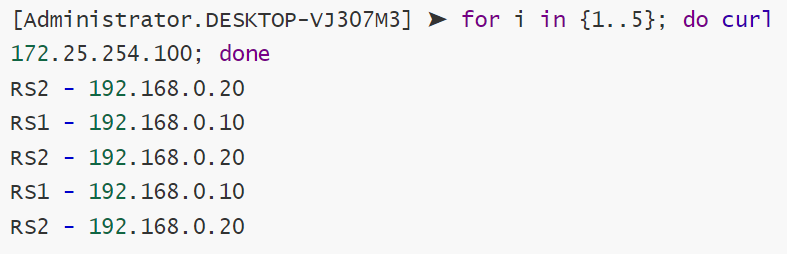
测试四层访问
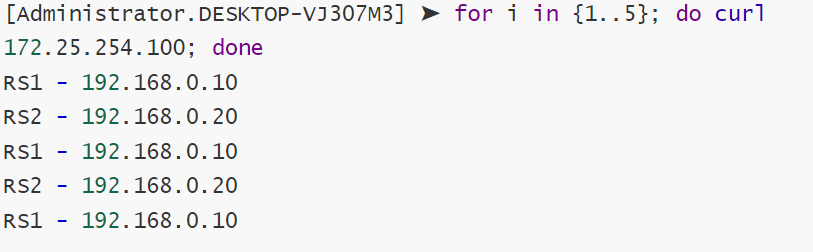
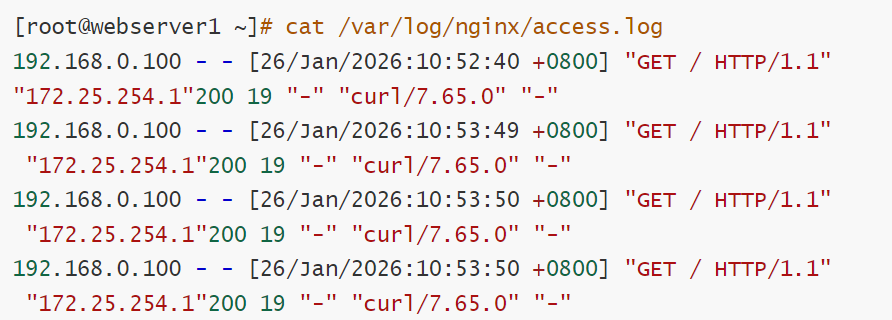
设置四层IP透传
bash
[root@webserver1&2 ~]# vim /etc/nginx/nginx.conf

    log_format  main  '$remote_addr - $remote_user [$time_local] "$request" '
                      '"$proxy_protocol_addr"'			#采集透传信息
                      '$status $body_bytes_sent "$http_referer" '
                      '"$http_user_agent" "$http_x_forwarded_for"';


[root@webserver1&2 ~]# systemctl restart nginx.service
测试
8.HAproxy企业级实战------>ACL
(1)什么是ACL
访问控制列表(ACL,Access Control Lists)
是一种基于包过滤的访问控制技术
它可以根据设定的条件对经过服务器传输的数据包进行过滤(条件匹配)即对接收到的报文进行匹配和过 滤,基于请求报文头部中的源地址、源端口、目标地址、目标端口、请求方法、URL、文件后缀等信息内 容进行匹配并执行进一步操作,比如允许其通过或丢弃。
简单来说它的工作就是盯着每个进来的网络请求,检查它身上贴的各种"标签",然后根据你定好的规矩,告诉HAProxy该把这个请求送到哪里去,或者直接扔掉。
拆开看就三步
第一步------>定规矩:写个规矩,比如去往/图片/这个路径的请求
第二步------>看标签:HAProxy会检查每个请求的"标签",比如它的路径 、来源IP 、请求方法(是GET还是POST)等。
第三步------>做动作:如果请求符合你定的规矩,就执行相应的动作,比如转发到A服务器 ,或者直接拒绝。
举个🌰:
区分开"看图片"和"看网页"
规矩 :如果请求的路径是 /images/ 开头。
动作:就把它送到专门存图片的服务器(图片服务器)。其他的请求,就送到普通网站服务器。这样分工,效率更高。
拉黑捣乱的人
规矩 :如果请求的来源IP是 192.168.1.100。
动作:直接把这个请求拦截下来,拒绝访问。其他人不受影响。
(2)ACL配置选项
bash
#用acl来定义或声明一个acl
acl <aclname> <criterion> [flags] [operator] [<value>]
acl   名称      匹配规范   匹配模式 具体操作符 操作对象类型
(3)ACL-Name名称
bash
acl test path_end -m sub /a
#ACL名称,可以使用大字母A-Z、小写字母a-z、数字0-9、冒号:、点.、中横线和下划线,并且严格区分
大小写,比如:my_acl和My_Acl就是两个完全不同的acl5.8.1.2 ACL-criterion
(4)ACL访问控制
实验素材
#在浏览器或者curl主机中设定本地解析
在windows中设定解析
#在Linux中设定解析

设定基础的haproxy实验配置
bash
[root@haproxy ~]# vim /etc/haproxy/haproxy.cfg
frontend webcluster
    bind            *:80
    mode            http
    use_backend     webserver-80-web1

backend webserver-80-web1
    server web1 192.168.0.10:80 check inter 3s fall 3 rise 5

backend webserver-80-web2
    server web2 192.168.0.20:80 check inter 3s fall 3 rise 5


[root@haproxy ~]# systemctl restart haproxy.service
基础ACL示例
#在访问的网址中,所有以.com 结尾的访问10,其他访问20
bash
[root@haproxy ~]# vim /etc/haproxy/haproxy.cfg
frontend webcluster
    bind            *:80
    mode            http

    acl test hdr_end(host) -i .com			#acl列表

    use_backend  webserver-80-web1 if test	#acl列表访问匹配
    default_backend webserver-80-web2		#acl列表访问不匹配

backend webserver-80-web1
    server web1 192.168.0.10:80 check inter 3s fall 3 rise 5

backend webserver-80-web2
    server web2 192.168.0.20:80 check inter 3s fall 3 rise 5
测试


基于头部访问

bash
[root@haproxy ~]# vim /etc/haproxy/haproxy.cfg
frontend webcluster
    bind            *:80
    mode            http

    acl test hdr_end(host) -i .com			#acl列表

    acl head hdr_beg(host) -i bbs.
    use_backend  webserver-80-web1 if head
    default_backend webserver-80-web2

backend webserver-80-web1
    server web1 192.168.0.10:80 check inter 3s fall 3 rise 5

backend webserver-80-web2
    server web2 192.168.0.20:80 check inter 3s fall 3 rise 5
#base参数acl
bash
[root@haproxy ~]# vim /etc/haproxy/haproxy.cfg
frontend webcluster
    bind            *:80
    mode            http

    acl pathdir base_dir -i /lee
    use_backend  webserver-80-web1 if pathdir
    default_backend webserver-80-web2		#acl列表访问不匹配

backend webserver-80-web1
    server web1 192.168.0.10:80 check inter 3s fall 3 rise 5

backend webserver-80-web2
    server web2 192.168.0.20:80 check inter 3s fall 3 rise 5


[root@webserver1+2 ~]# mkdir -p /var/www/html/lee/
[root@webserver1+2 ~]#  mkdir -p /var/www/html/lee/test/


[root@webserver1 ~]# echo lee - 192.168.0.10  > /var/www/html/lee/index.html
[root@webserver1 ~]# echo lee/test - 192.168.0.10 > /var/www/html/lee/test/index.html
[root@webserver2 ~]# echo lee - 192.168.0.20  > /var/www/html/lee/index.html
[root@webserver2 ~]# echo lee/test - 192.168.0.10 > /var/www/html/lee/test/index.html
测试



#acl禁止列表黑名单
bash
[root@haproxy ~]# vim /etc/haproxy/haproxy.cfg
frontend webcluster
    bind            *:80
    mode            http

    acl test hdr_end(host) -i .com			#acl列表

    use_backend  webserver-80-web1 if test	#acl列表访问匹配
    default_backend webserver-80-web2		#acl列表访问不匹配

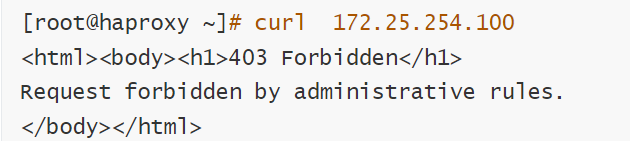
	acl invalid_src src 172.25.254.1
    http-request deny if invalid_src

backend webserver-80-web1
    server web1 192.168.0.10:80 check inter 3s fall 3 rise 5

backend webserver-80-web2
    server web2 192.168.0.20:80 check inter 3s fall 3 rise 5
测试

#禁止列表白名单
bash
[root@haproxy ~]# vim /etc/haproxy/haproxy.cfg
frontend webcluster
    bind            *:80
    mode            http

    acl test hdr_end(host) -i .com			#acl列表

    use_backend  webserver-80-web1 if test	#acl列表访问匹配
    default_backend webserver-80-web2		#acl列表访问不匹配

	acl invalid_src src 172.25.254.1
    http-request deny if ! invalid_src

backend webserver-80-web1
    server web1 192.168.0.10:80 check inter 3s fall 3 rise 5

backend webserver-80-web2
    server web2 192.168.0.20:80 check inter 3s fall 3 rise 5
测试

(5)ACL企业示例
ACL匹配域名设定
#匹配完全域名
bash
[root@haproxy ~]# vim /etc/haproxy/haproxy.cfg
frontend webcluster
    bind        *:80
    mode        http

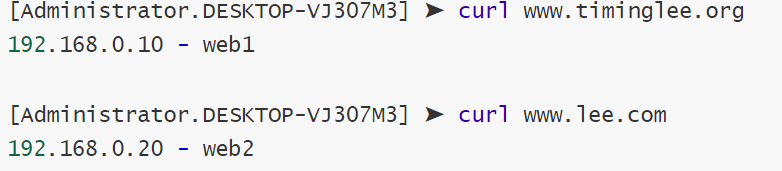
    acl host hdr_dom(host)   www.timinglee.org

    use_backend webserver1 if host
    default_backend webserverdefault

backend webserver1
    server web1 192.168.0.10:80 check inter 2s fall 2  rise 3
backend webserverdefault
    server web2 192.168.0.20:80 check inter 2s fall 2  rise 3
测试
#匹配前缀
bash
frontend webcluster
    bind        *:80
    mode        http

    acl host hdr_beg(host)   bbs

    use_backend webserver1 if host
    default_backend webserverdefault

backend webserver1
    server web1 192.168.0.10:80 check inter 2s fall 2  rise 3
backend webserverdefault
    server web2 192.168.0.20:80 check inter 2s fall 2  rise 3
测试
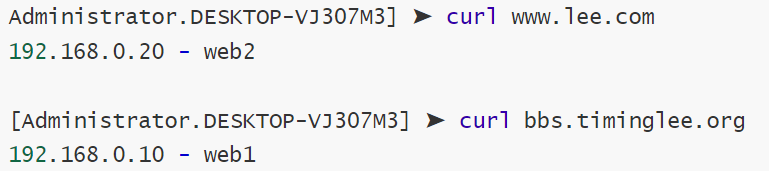
匹配后缀
bash
[root@haproxy ~]# vim /etc/haproxy/haproxy.cfg
frontend webcluster
    bind        *:80
    mode        http

    acl host hdr_end(host)   .com

    use_backend webserver1 if host
    default_backend webserverdefault

backend webserver1
    server web1 192.168.0.10:80 check inter 2s fall 2  rise 3
backend webserverdefault
    server web2 192.168.0.20:80 check inter 2s fall 2  rise 3
测试

ACL示例------基于源IP或子网调度访问
基于src源
bash
[root@haproxy ~]# vim /etc/haproxy/haproxy.cfg
frontend webcluster
    bind        *:80
    mode        http

    acl client  src 192.168.0.0/24

    use_backend webserver1 if client
    default_backend webserverdefault

backend webserver1
    server web1 192.168.0.10:80 check inter 2s fall 2  rise 3
backend webserverdefault
    server web2 192.168.0.20:80 check inter 2s fall 2  rise 3
测试


基于dst目的地
bash
[root@haproxy ~]# vim /etc/haproxy/haproxy.cfg
frontend webcluster
    bind        *:80
    mode        http

    acl dest  dst 172.25.254.100

    use_backend webserver1 if dest
    default_backend webserverdefault

backend webserver1
    server web1 192.168.0.10:80 check inter 2s fall 2  rise 3
backend webserverdefault
    server web2 192.168.0.20:80 check inter 2s fall 2  rise 3
测试


ACL设定的访问控制
bash
[root@haproxy ~]# vim /etc/haproxy/haproxy.cfg
frontend webcluster
    bind        *:80
    mode        http

    acl bad_src  src 172.25.254.0/24		#黑名单
    acl good_src src 172.25.254.0/24		#白名单

    http-request deny if  bad_src			#黑名单
    http-request deny if ! good_src			#白名单
    default_backend webserverdefault

backend webserver1
    server web1 192.168.0.10:80 check inter 2s fall 2  rise 3
backend webserverdefault
    server web2 192.168.0.20:80 check inter 2s fall 2  rise 3
#测试黑名单

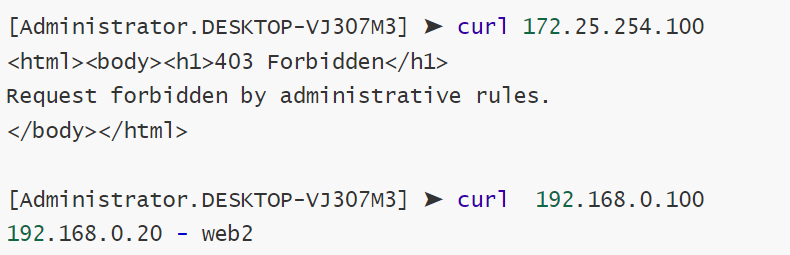
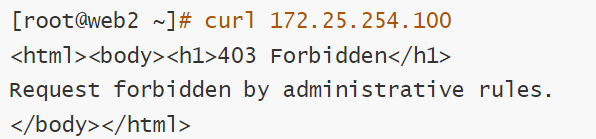
匹配浏览器类型
bash
[root@haproxy ~]# vim /etc/haproxy/haproxy.cfg
frontend webcluster
    bind        *:80
    mode        http

    acl user_agent_block hdr_sub(User-Agent) -i curl wget
    acl user_agent  hdr_sub(User-Agent) -i firefox

    http-request deny if  user_agent_block
    use_backend webserver1 if user_agent
    default_backend webserverdefault

backend webserver1
    server web1 192.168.0.10:80 check inter 2s fall 2  rise 3
backend webserverdefault
    server web2 192.168.0.20:80 check inter 2s fall 2  rise 3
测试


基于文件后缀名实现动静分离
bash
frontend webcluster
    bind        *:80
    mode        http

    acl url_static  path_end -i .jpg .png .css .js .html
    acl url_php     path_end -i .php

    use_backend webserverdefault  if url_static
    use_backend webserver1 if url_php
    default_backend webserverdefault

backend webserver1
    server web1 192.168.0.10:80 check inter 2s fall 2  rise 3
backend webserverdefault
    server web2 192.168.0.20:80 check inter 2s fall 2  rise 3
测试
在浏览器中分别访问
172.25.254.100/index.html -- > 172.25.254.20 - rs2
172.25.254.100/index.php ----> 172.25.254.10 的php页面
9.HAproxy企业级实战------>HAproxy四层负载
环境设定
#部署mariadb数据库
bash
[root@webserver1+2 ~]# dnf install mariadb-server mariadb  -y
[root@webserver1+1 ~]# vim /etc/my.cnf.d/mariadb-server.cnf
[mysqld]
server_id=10			#设定数据库所在主机的id标识,在20上设定id为20
datadir=/var/lib/mysql
socket=/var/lib/mysql/mysql.sock
log-error=/var/log/mariadb/mariadb.log
pid-file=/run/mariadb/mariadb.pid
#建立远程登陆用户并授权
bash
[root@webserver2+1 ~]# mysql
Welcome to the MariaDB monitor.  Commands end with ; or \g.
Your MariaDB connection id is 3
Server version: 10.5.27-MariaDB MariaDB Server

Copyright (c) 2000, 2018, Oracle, MariaDB Corporation Ab and others.

Type 'help;' or '\h' for help. Type '\c' to clear the current input statement.

MariaDB [(none)]>  CREATE USER 'lee'@'%' identified by 'lee';
Query OK, 0 rows affected (0.001 sec)

MariaDB [(none)]> CREATE USER 'root'@'%' identified by 'lee';
Query OK, 0 rows affected (0.000 sec)
测试
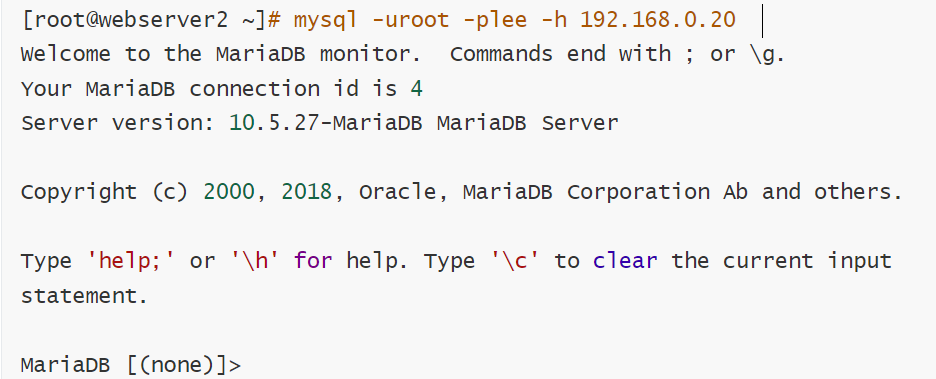
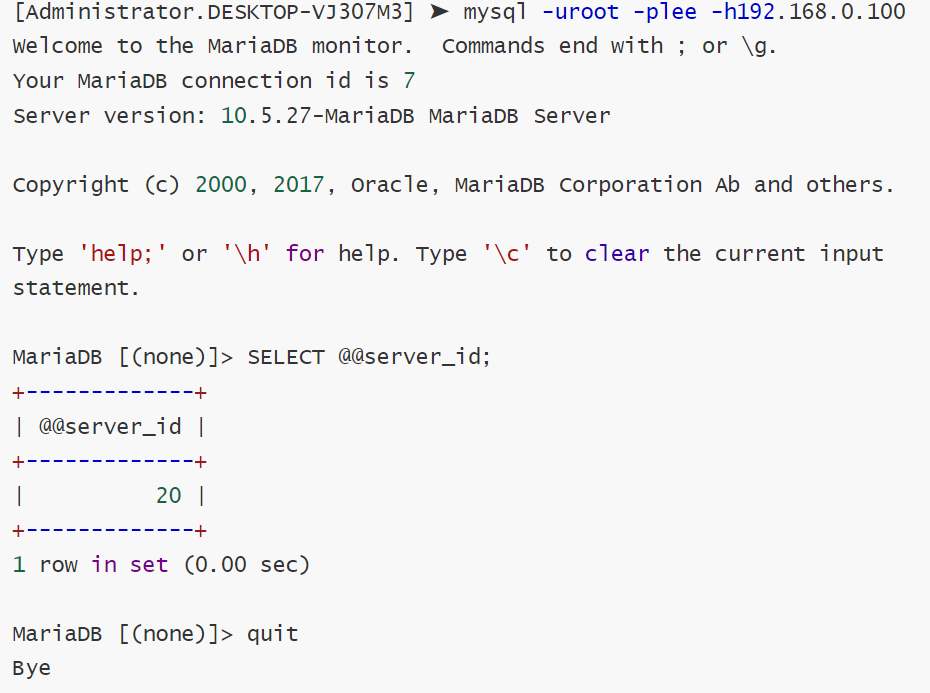
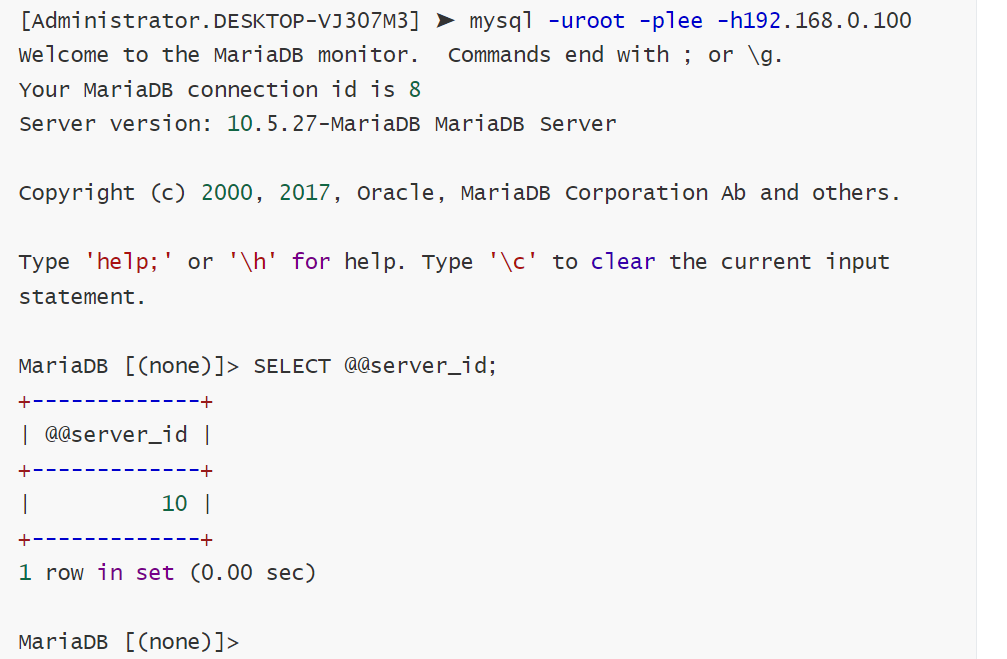
四层负载操作
bash
[root@haproxy ~]# vim /etc/haproxy/haproxy.cfg
listen mariadbcluster
    bind        *:6663
    mode        tcp
    balance     roundrobin
    server haha 192.168.0.10:3306  check inter 3s fall 3 rise 5 weight 1
    server hehe 192.168.0.20:3306  check inter 3s fall 3 rise 5 weight 1
[root@haproxy ~]# vim /etc/haproxy/haproxy.cfg
#检测端口
bash
[root@haproxy ~]# netstat -antlupe  | grep haproxy
tcp        0      0 0.0.0.0:6663            0.0.0.0:*               LISTEN      0          44430      2136/haproxy
tcp        0      0 0.0.0.0:80              0.0.0.0:*               LISTEN      0          44429      2136/haproxy
tcp        0      0 0.0.0.0:4321            0.0.0.0:*               LISTEN      0          44431      2136/haproxy
测试
backup参数
bash
[root@haproxy ~]# vim /etc/haproxy/haproxy.cfg
listen mariadbcluster
    bind        *:3306
    mode        tcp
    balance     roundrobin
    server haha 192.168.0.10:3306  check inter 3s fall 3 rise 5 weight 1
    server hehe 192.168.0.20:3306  check inter 3s fall 3 rise 5 weight 1 backup
测试
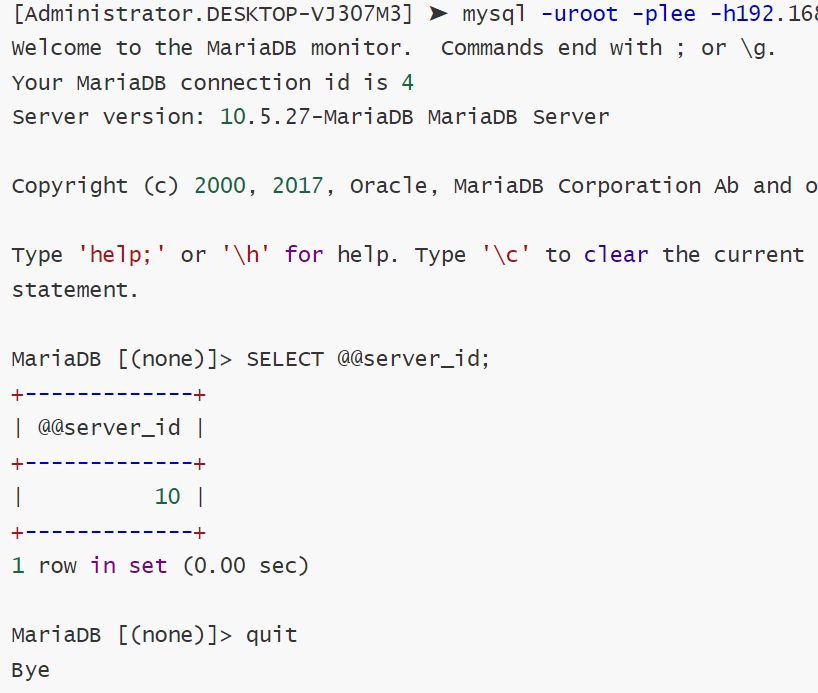
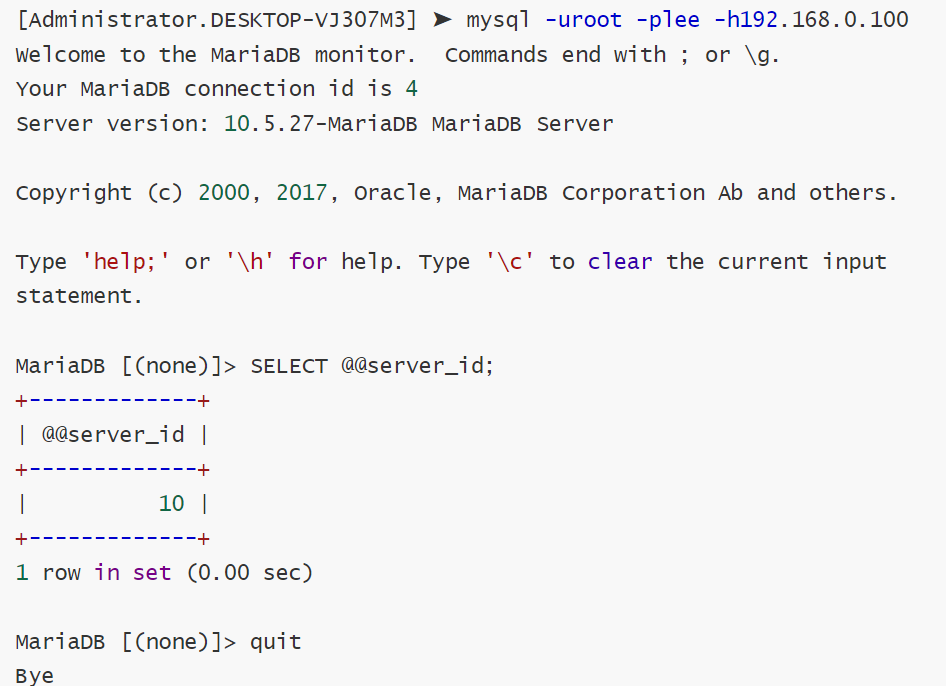
#关闭10的mariadb并等待1分钟
bash
[root@webserver1 ~]# systemctl stop mariadb
#标识haproxy 没有完成故障转换,需要等待
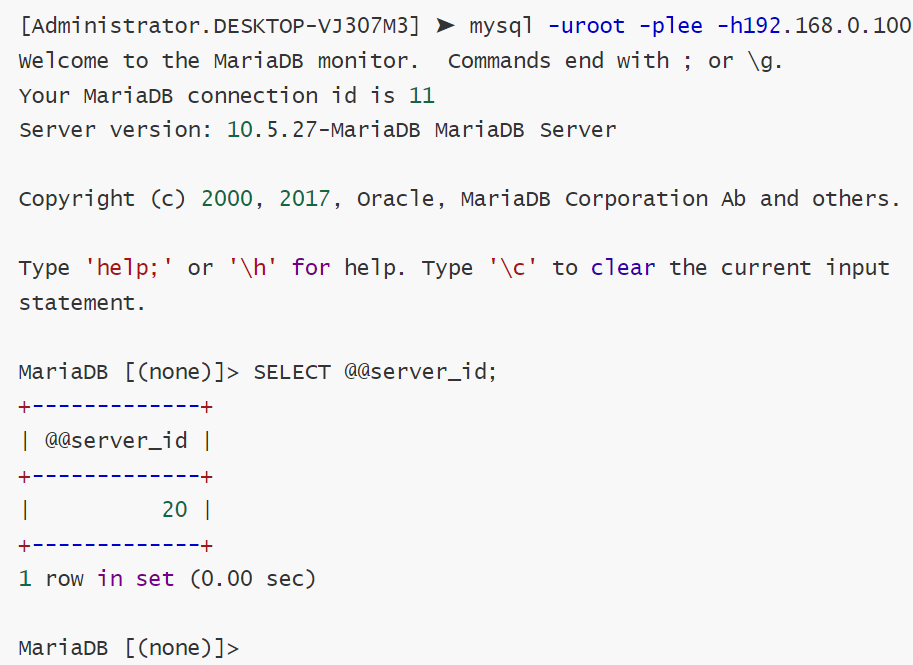
#还原故障主机等待片刻
bash
[root@webserver1 ~]# systemctl start mariadb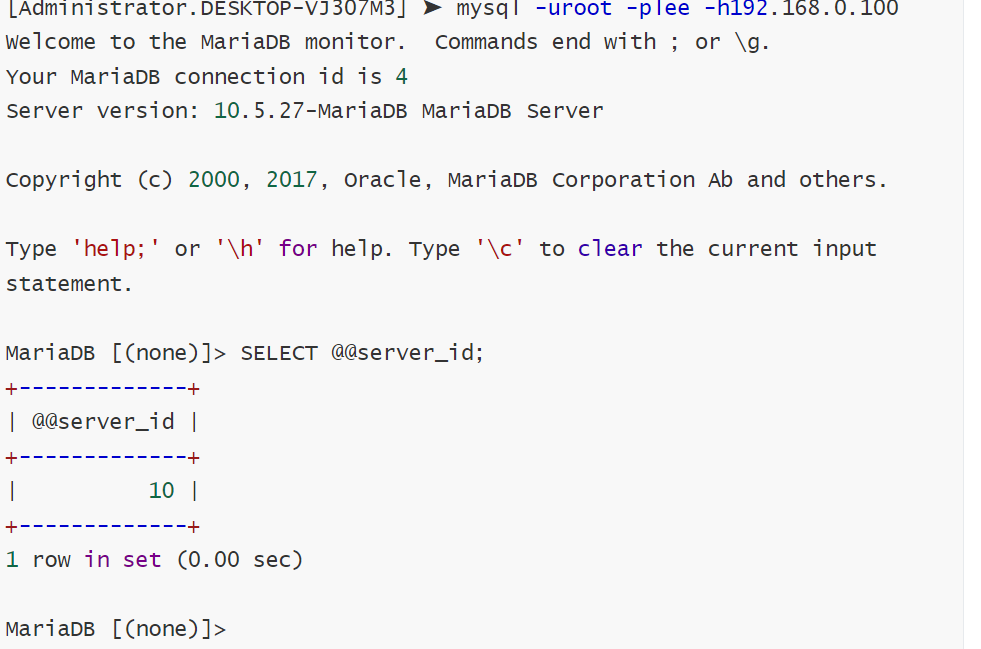
10.HAproxy企业级实战------HAproxy全站加密
(1)什么是全站加密
以前,用户和网站之间传的是"明信片"(明文HTTP),路上谁都能偷看。而全站加密 ,就是强制所有用户都使用"密码箱"(HTTPS)来寄送包裹 ,而HAProxy就是这个负责在门口开箱验货(解密)并重新打包的保安。
简单来说 HAProxy全站加密就是在入口统一强制开启HTTPS,并集中负责解密工作,让用户访问更安全,让后端服务器跑得更轻松。
(2)实战
制作证书
bash
[root@haproxy ~]# mkdir /etc/haproxy/certs/
[root@haproxy ~]# openssl req -newkey rsa:2048 -nodes -sha256  -keyout /etc/haproxy/certs/timinglee.org.key -x509 -days 365 -out /etc/haproxy/certs/timinglee.org.crt


You are about to be asked to enter information that will be incorporated
into your certificate request.
What you are about to enter is what is called a Distinguished Name or a DN.
There are quite a few fields but you can leave some blank
For some fields there will be a default value,
If you enter '.', the field will be left blank.
-----
Country Name (2 letter code) [XX]:CN
State or Province Name (full name) []:Shaanxi
Locality Name (eg, city) [Default City]:Xi'an
Organization Name (eg, company) [Default Company Ltd]:timinglee
Organizational Unit Name (eg, section) []:linux
Common Name (eg, your name or your server's hostname) []:www.timinglee.org
Email Address []:admin@timinglee.org
[root@haproxy ~]# ls /etc/haproxy/certs/
timinglee.org.crt  timinglee.org.key

[root@haproxy ~]# cat /etc/haproxy/certs/timinglee.org.{key,crt} > /etc/haproxy/certs/timinglee.pem
全站加密
bash
[root@haproxy ~]# vim /etc/haproxy/haproxy.cfg
frontend webcluster-http
    bind        *:80
    redirect scheme https if ! { ssl_fc }

listen webcluster-https
    bind        *:443 ssl  crt /etc/haproxy/certs/timinglee.pem
    mode        http
    balance     roundrobin
    server haha 192.168.0.10:80  check inter 3s fall 3 rise 5 weight 1
    server hehe 192.168.0.20:80  check inter 3s fall 3 rise 5 weight 1


[root@haproxy ~]# systemctl restart haproxy.service
测试
bash
[Administrator.DESKTOP-VJ307M3] ➤ curl -v -k -L http://172.25.254.100
*   Trying 172.25.254.100:80...
* TCP_NODELAY set
* Connected to 172.25.254.100 (172.25.254.100) port 80 (#0)
> GET / HTTP/1.1
> Host: 172.25.254.100
> User-Agent: curl/7.65.0
> Accept: */*
>
* Mark bundle as not supporting multiuse
< HTTP/1.1 302 Found
< content-length: 0
< location: https://172.25.254.100/					#转换信息体现
< cache-control: no-cache
<
* Connection #0 to host 172.25.254.100 left intact
* Issue another request to this URL: 'https://172.25.254.100/'
*   Trying 172.25.254.100:443...
* TCP_NODELAY set
* Connected to 172.25.254.100 (172.25.254.100) port 443 (#1)
* ALPN, offering http/1.1
* Cipher selection: ALL:!EXPORT:!EXPORT40:!EXPORT56:!aNULL:!LOW:!RC4:@STRENGTH
* successfully set certificate verify locations:
*   CAfile: /etc/pki/tls/certs/ca-bundle.crt
  CApath: none
* TLSv1.2 (OUT), TLS header, Certificate Status (22):
* TLSv1.2 (OUT), TLS handshake, Client hello (1):
* TLSv1.2 (IN), TLS handshake, Server hello (2):
* TLSv1.2 (IN), TLS handshake, Certificate (11):
* TLSv1.2 (IN), TLS handshake, Server key exchange (12):
* TLSv1.2 (IN), TLS handshake, Server finished (14):
* TLSv1.2 (OUT), TLS handshake, Client key exchange (16):
* TLSv1.2 (OUT), TLS change cipher, Change cipher spec (1):
* TLSv1.2 (OUT), TLS handshake, Finished (20):
* TLSv1.2 (IN), TLS change cipher, Change cipher spec (1):
* TLSv1.2 (IN), TLS handshake, Finished (20):
* SSL connection using TLSv1.2 / ECDHE-RSA-AES256-GCM-SHA384
* ALPN, server did not agree to a protocol
* Server certificate:
*  subject: C=CN; ST=Shaanxi; L=Xi'an; O=timinglee; OU=linux; CN=www.timinglee.org; emailAddress=admin@timinglee.org
*  start date: Jan 26 08:38:57 2026 GMT
*  expire date: Jan 26 08:38:57 2027 GMT
*  issuer: C=CN; ST=Shaanxi; L=Xi'an; O=timinglee; OU=linux; CN=www.timinglee.org; emailAddress=admin@timinglee.org
*  SSL certificate verify result: self signed certificate (18), continuing anyway.
> GET / HTTP/1.1
> Host: 172.25.254.100
> User-Agent: curl/7.65.0
> Accept: */*
>
* Mark bundle as not supporting multiuse
< HTTP/1.1 200 OK
< date: Mon, 26 Jan 2026 08:48:34 GMT
< server: Apache/2.4.62 (Red Hat Enterprise Linux)
< last-modified: Fri, 23 Jan 2026 03:52:02 GMT
< etag: "1a-64906147d3d6a"
< accept-ranges: bytes
< content-length: 26
< content-type: text/html; charset=UTF-8
<
webserver2 - 192.168.0.20
* Connection #1 to host 172.25.254.100 left intact