Logstash的安装和Elasticsearch的整合
1. yum安装Logstash
YUMedit
Download and install the public signing key:
sh
sudo rpm --import https://artifacts.elastic.co/GPG-KEY-elasticsearchAdd the following in your /etc/yum.repos.d/ directory in a file with a .repo suffix, for example logstash.repo
sh
[logstash-7.x]
name=Elastic repository for 7.x packages
baseurl=https://artifacts.elastic.co/packages/7.x/yum
gpgcheck=1
gpgkey=https://artifacts.elastic.co/GPG-KEY-elasticsearch
enabled=1
autorefresh=1
type=rpm-md
And your repository is ready for use. You can install it with:
sh
sudo yum install logstash2. 安装JDK并配置环境变量
shell
export JAVA_HOME=/opt/jdk1.8.0_171
export JRE_HOME=${JAVA_HOME}/jre
export CLASSPATH=.:${JAVA_HOME}/lib:${JRE_HOME}/lib:$CLASSPATH
export JAVA_PATH=${JAVA_HOME}/bin:${JRE_HOME}/bin
export PATH=$PATH:${JAVA_PATH}
3. 运行测试
shell
[root@localhost ~]# /usr/share/logstash/bin/logstash -e 'input { stdin {}} output { stdout {codec => rubydebug}}'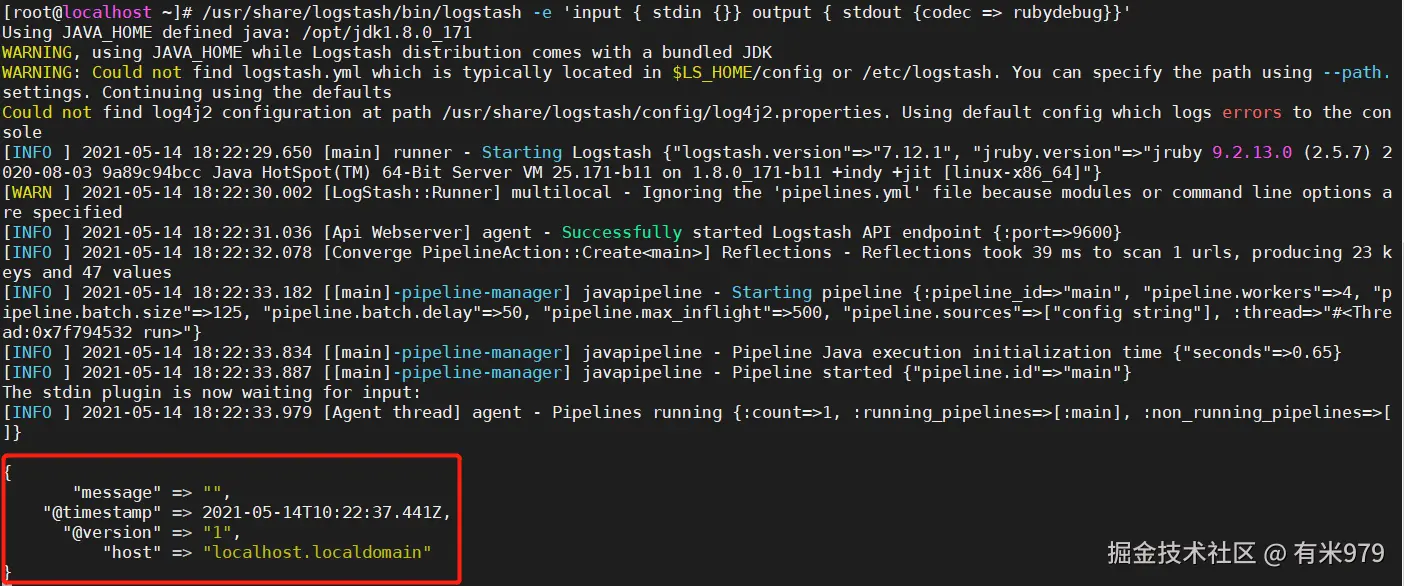
得到这样的一个结果说明运行成功
4. 连接Mysql数据库
5. 安装logstash-input-jdbc插件和准备Mysql的Jar包
logstash-input-jdbc插件是logstash 的一个个插件。
下载地址Releases · logstash-plugins/logstash-input-jdbc · GitHub
上传插件到logstash根目录下的plugins文件夹(如果没有手动创建)
shell
[root@localhost logstash]# mkdir plugins
[root@localhost ~]# mv logstash-input-jdbc-4.3.19.tar.gz /usr/share/logstash/plugins/
我这边测试用的是Mysql 8.0 上传jar包 mysql-connector-java-8.0.24.jar
6. yum安装ES
官方安装教程:Install Elasticsearch with RPM \| Elasticsearch Guide [7.12 | Elastic](https://link.juejin.cn?target=https%3A%2F%2Fwww.elastic.co%2Fguide%2Fen%2Felasticsearch%2Freference%2F7.12%2Frpm.html%23rpm-repo "https://www.elastic.co/guide/en/elasticsearch/reference/7.12/rpm.html#rpm-repo")
bash
centos7.x 安装elasticsearch7.x步骤

1: 增加用户
# 增加用户
useradd -d /home/es -m es

# 设置密码
passwd es

2:使用root用户上传es安装包并解压
# 解压
tar -zxvf elasticsearch-7.0.0-linux-x86_64.tar.gz

# 修改权限信息
chmod -R 777 elasticsearch-7.0.0-linux-x86_64

3:使用root用户修改配置文件

# 修改limits.conf 增加下面两行内容
vi /etc/security/limits.conf

* soft memlock unlimited
* hard memlock unlimited


# 编辑limits.conf配置文件, 添加如下内容
vi /etc/security/limits.conf
* soft nofile 65536
* hard nofile 131072

# 修改90-nproc.conf 配置文件  这个好像没用
vi /etc/security/limits.d/90-nproc.conf

把soft nproc 1024
修改为:
soft nproc 4096


# 修改配置文件sysctl.conf 添加下面配置
vi /etc/sysctl.conf
vm.max_map_count=655360

并执行命令生效
sysctl -p


# 在elasticsearch.yml中配置bootstrap.system_call_filter为false,注意要在Memory下面
vi config/elasticsearch.yml
node.name: node-1
bootstrap.memory_lock: false
bootstrap.system_call_filter: false

# 修改elasticsearch.yml中的hosts配置
network.host: 0.0.0.0 #所有所有ip可以访问
http.port: 9200
cluster.initial_master_nodes: ["node-1"]
de.name: node-1

4:切换用户
su yehua

5: 启动
# 前台启动
bin/elasticsearch
# 后台启动
bin/elasticsearch -d

6:访问验证
http://ip:9200
ElasticSearch启动报错,bootstrap checks failed
ini
修改elasticsearch.yml配置文件,允许外网访问。

vim config/elasticsearch.yml
# 增加

network.host: 0.0.0.0

启动失败,检查没有通过,报错

[2018-05-18T17:44:59,658][INFO ][o.e.b.BootstrapChecks    ] [gFOuNlS] bound or publishing to a non-loopback address, enforcing bootstrap checks
ERROR: [2] bootstrap checks failed
[1]: max file descriptors [4096] for elasticsearch process is too low, increase to at least [65536]

[2]: max virtual memory areas vm.max_map_count [65530] is too low, increase to at least [262144]


[1]: max file descriptors [65535] for elasticsearch process is too low, increase to at least [65536]

编辑 /etc/security/limits.conf,追加以下内容;
* soft nofile 65536
* hard nofile 65536
此文件修改后需要重新登录用户,才会生效


[2]: max virtual memory areas vm.max_map_count [65530] is too low, increase to at least [262144]

编辑 /etc/sysctl.conf,追加以下内容:
vm.max_map_count=655360
保存后,执行:
sysctl -p

重新启动,成功。
max virtual memory areas vm.max_map_count 65530 is too low, increase to at least 262144
编辑 /etc/sysctl.conf,追加以下内容: vm.max_map_count=655360 保存后,执行: sysctl -p
重新启动,成功。