实验环境:Nginx 代理节点
172.25.254.100,后端节点172.25.254.10、172.25.254.20。文中域名均用于实验解析,生产环境应替换为实际域名,并在发布前检查配置中的证书、密码和内网地址。*tips:个人学习记录,仅作为记录
一、实验环境与执行规范
Nginx 采用源码方式安装到 /usr/local/nginx,配置文件集中在 /usr/local/nginx/conf/,虚拟主机配置放在 conf.d/,上游服务配置放在 upstream/,四层代理配置放在 tcp/ 和 udp/。
所有配置修改完成后,先进行语法检查,再执行平滑重载:
bash
nginx -t
nginx -s reload
涉及二进制替换、证书变更或监听端口调整时,必须额外检查进程、监听端口和访问结果:
bash
ps aux | grep nginx
ss -lntup | grep nginx
curl -I http://目标地址
二、源码编译安装与 systemd 管理
1. 安装依赖并编译
bash
wget https://nginx.org/download/nginx-1.28.1.tar.gz
tar zxf nginx-1.28.1.tar.gz
cd nginx-1.28.1

dnf install gcc openssl-devel.x86_64 pcre2-devel.x86_64 zlib-devel -y

./configure \
  --prefix=/usr/local/nginx \
  --user=nginx \
  --group=nginx \
  --with-http_ssl_module \
  --with-http_v2_module \
  --with-http_realip_module \
  --with-http_stub_status_module \
  --with-http_gzip_static_module \
  --with-pcre \
  --with-stream \
  --with-stream_ssl_module \
  --with-stream_realip_module

make
make install
创建专用运行用户并启动 Nginx:
bash
useradd -s /sbin/nologin -M nginx
export PATH=$PATH:/usr/local/nginx/sbin
nginx
ps aux | grep nginx
2. 编写 systemd 服务文件
ini
# /lib/systemd/system/nginx.service
[Unit]
Description=The NGINX HTTP and reverse proxy server
After=syslog.target network-online.target remote-fs.target nss-lookup.target
Wants=network-online.target

[Service]
Type=forking
ExecStartPre=/usr/local/nginx/sbin/nginx -t
ExecStart=/usr/local/nginx/sbin/nginx
ExecReload=/usr/local/nginx/sbin/nginx -s reload
ExecStop=/bin/kill -s QUIT $MAINPID
PrivateTmp=true

[Install]
WantedBy=multi-user.target
加载服务文件并设置开机启动:
bash
systemctl daemon-reload
systemctl enable --now nginx
systemctl status nginx源码安装时,ExecStartPre 使用绝对路径执行 nginx -t,可以在服务启动前阻止错误配置生效。
三、平滑升级与版本回滚
平滑升级的核心是保留旧 master 进程,在新二进制启动并确认正常后,再逐步回收旧 worker 进程。实验中使用 Nginx 1.29.4 编译新二进制,编译参数保持与旧版本一致。
bash
wget https://nginx.org/download/nginx-1.29.4.tar.gz
tar zxf nginx-1.29.4.tar.gz
cd nginx-1.29.4

./configure \
  --prefix=/usr/local/nginx \
  --user=nginx \
  --group=nginx \
  --with-http_ssl_module \
  --with-http_v2_module \
  --with-http_realip_module \
  --with-http_stub_status_module \
  --with-http_gzip_static_module \
  --with-pcre \
  --with-stream \
  --with-stream_ssl_module \
  --with-stream_realip_module

make
cp objs/nginx /usr/local/nginx/sbin/nginx.new -p
替换二进制前先备份当前版本:
bash
cd /usr/local/nginx/sbin
cp nginx nginx.old -p
cp nginx.new nginx -p
向旧 master 进程发送 USR2,启动新版本 master;确认新旧进程同时存在后,使用 WINCH 回收旧 worker:
bash
kill -USR2 旧版本master_PID
ps aux | grep nginx
kill -WINCH 旧版本master_PID
验证新版本及编译参数:
bash
nginx -V
ls -l /usr/local/nginx/logs/
如果新版本出现问题,可恢复旧二进制并向旧 master 发送 HUP,然后再回收新版本进程:
bash
cp nginx.old nginx -pf
kill -HUP 旧版本master_PID
kill -WINCH 新版本master_PID
nginx -V
升级前必须确认配置文件兼容性,并保留旧二进制、旧配置和回滚命令,不能把线上回滚建立在临时重新编译的基础上。
四、配置文件管理与并发优化
1. 配置文件与平滑重载
主配置文件为 /usr/local/nginx/conf/nginx.conf,推荐将虚拟主机拆分到独立目录:
nginx
http {
    include       mime.types;
    default_type  application/octet-stream;
    include       "/usr/local/nginx/conf/conf.d/*.conf";
    include       "/usr/local/nginx/conf/upstream/*.conf";
}
每次改动后执行:
bash
nginx -t
nginx -s reload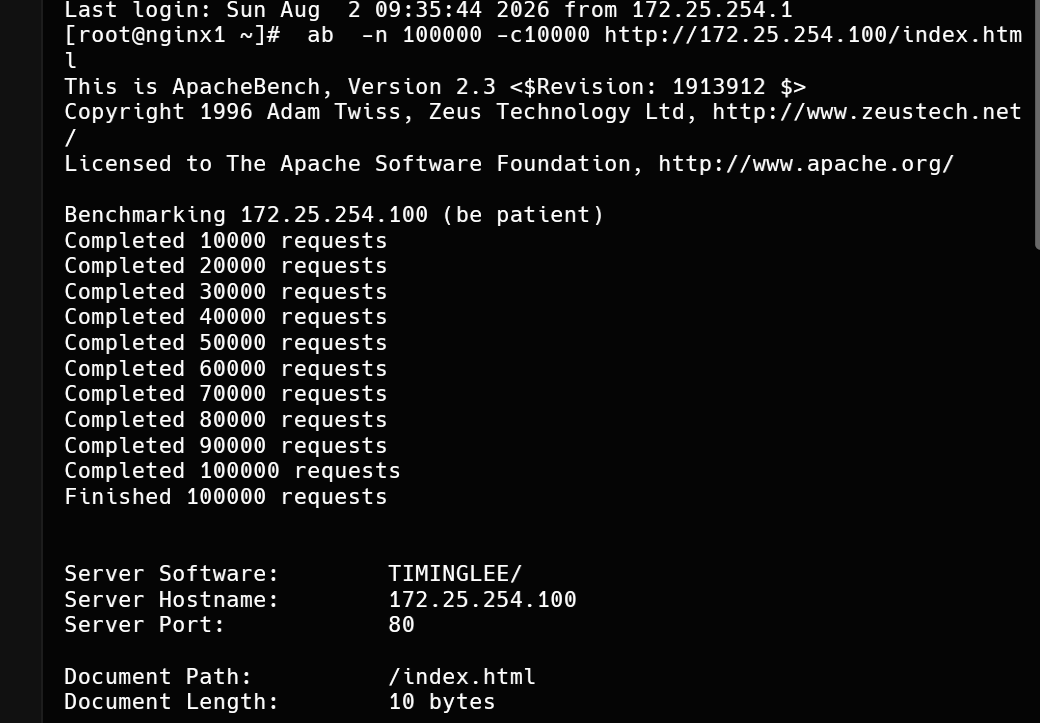
图 1:Nginx 配置文件管理及优化参数实验截图
2. worker 与事件模型
nginx
worker_processes auto;
worker_cpu_affinity 0001 0010 0100 1000;

events {
    worker_connections 10000;
    use epoll;
    accept_mutex on;
    multi_accept on;
}
worker_processes auto 根据 CPU 数量创建 worker;worker_connections 控制单个 worker 的连接上限。并发测试时,如果出现 socket: Too many open files,还需要检查系统文件描述符限制:
bash
vim /etc/security/limits.conf

*       -       nofile  100000
*       -       noproc  100000
root    -       nofile  100000

sudo -u nginx ulimit -n
Nginx 参数和系统限制必须一起调整,仅提高 worker_connections 不能绕过操作系统的资源限制。
五、静态站点、root、alias 与下载服务
1. root 与 alias
root 会把请求 URI 拼接到指定目录后面。例如:
nginx
server {
    listen 80;
    server_name lee.timinglee.org;

    location / {
        root /webdata/nginx/timinglee.org/lee/html;
    }

    location /lee {
        root /webdata/nginx/timinglee.org/lee/html;
    }
}
访问 /lee/ 时,Nginx 会按照 root + URI 查找文件,实际路径会包含 /lee。
alias 用于将匹配到的 location 直接映射到指定文件或目录,路径语义与 root 不同:
nginx
server {
    listen 80;
    server_name lee.timinglee.org;

    location /passwd {
        alias /etc/passwd;
    }

    location /passwd/ {
        alias /mnt/;
    }
}
使用 alias 时,要特别注意 location 是否带结尾斜杠,以及目标是文件还是目录。路径映射错误通常会表现为 404 或意外暴露文件。
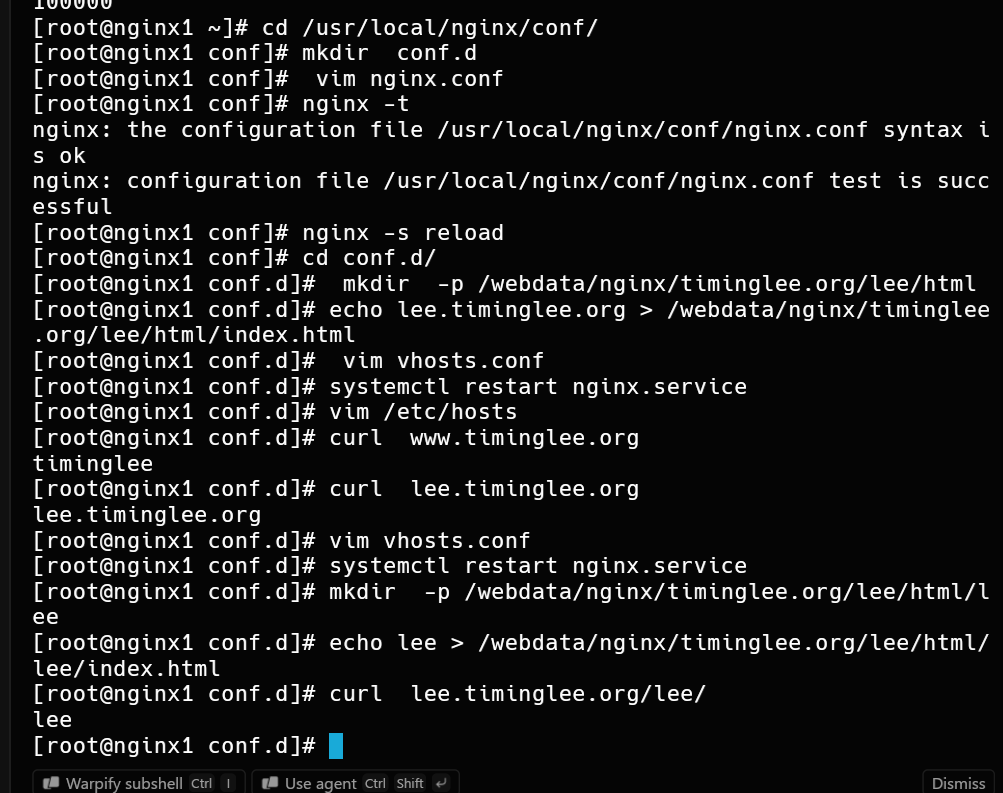
图 2:location 中 root 指令实验截图
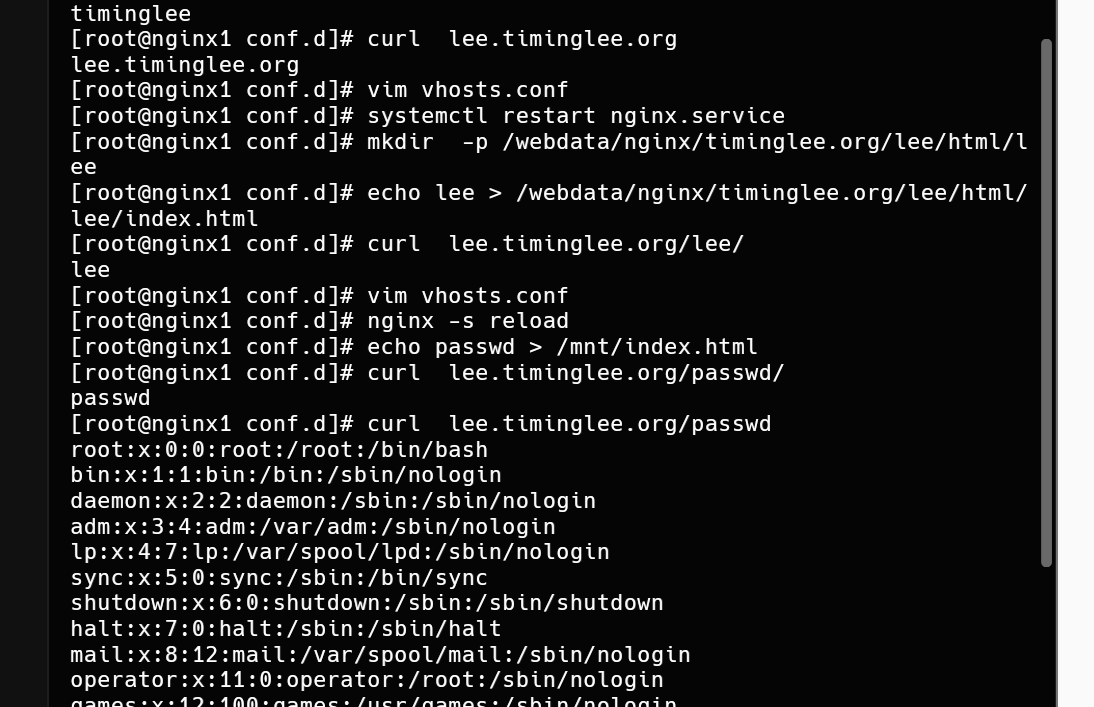
图 3:location 中 alias 指令实验截图
2. 建立下载服务器
nginx
server {
    listen 80;
    server_name lee.timinglee.org;

    location /download {
        root /usr/local/nginx;
        autoindex on;
        limit_rate 1024k;
        autoindex_exact_size off;
        autoindex_localtime on;
        autoindex_format html;
    }
}
准备下载目录并重载配置:
bash
mkdir -p /usr/local/nginx/download
cp /etc/passwd /usr/local/nginx/download/
dd if=/dev/zero of=/usr/local/nginx/download/bigfile bs=1M count=100
nginx -t && nginx -s reload
autoindex on:开启目录列表。limit_rate 1024k:限制单连接下载速度。autoindex_exact_size off:以更易读的单位显示文件大小。autoindex_localtime on:使用本地时间显示文件时间。autoindex_format:设置目录列表格式。
生产环境不应直接把敏感目录作为下载根目录,也不应把 /etc/passwd 这类系统文件作为演示之外的下载内容。
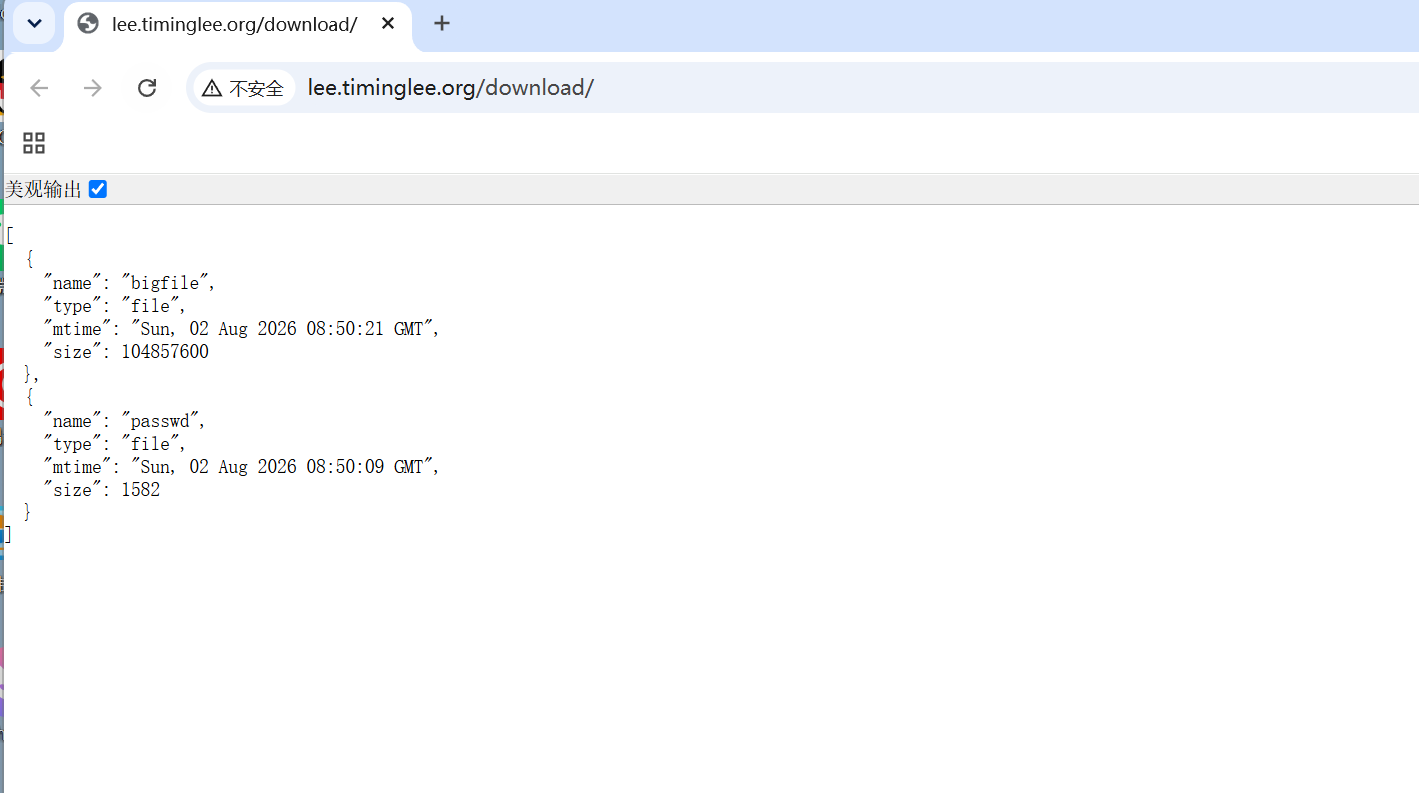
图 4:Nginx 下载服务器实验截图
3. Gzip 压缩
nginx
http {
    gzip on;
    gzip_comp_level 4;
    gzip_disable "MSIE [1-6]\\.";
    gzip_min_length 1024k;
    gzip_types text/plain application/javascript application/x-javascript
               text/css application/xml text/javascript application/x-httpd-php
               image/gif image/png;
    gzip_vary on;
    gzip_static on;
}
使用 curl --head --compressed 检查响应头:
bash
curl --head --compressed lee.timinglee.org/bigfile.txt返回 Content-Encoding: gzip 说明响应使用了压缩。gzip_min_length 会影响小文件是否压缩,实际值应根据 CPU、带宽和文件类型测试后确定;gzip_static on 还需要准备对应的预压缩文件。
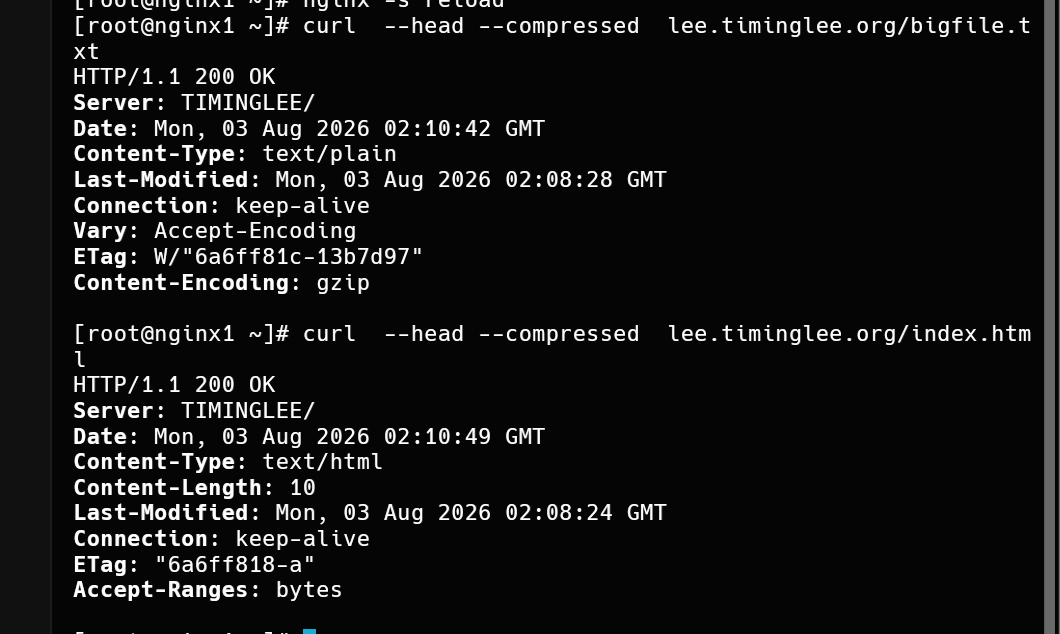
图 5:Nginx 压缩功能实验截图
4. 状态页
编译时启用 --with-http_stub_status_module,然后通过独立 location 提供状态信息:
nginx
server {
    listen 80;
    server_name lee.timinglee.org;

    location /nginx_status {
        stub_status;
        auth_basic "auth login";
        auth_basic_user_file /usr/local/nginx/conf/.htpasswd;
        allow 172.25.254.0/24;
        deny all;
    }
}
状态页必须配合访问控制,不能直接暴露到公网。实验中通过网段限制和 Basic Auth 同时保护:
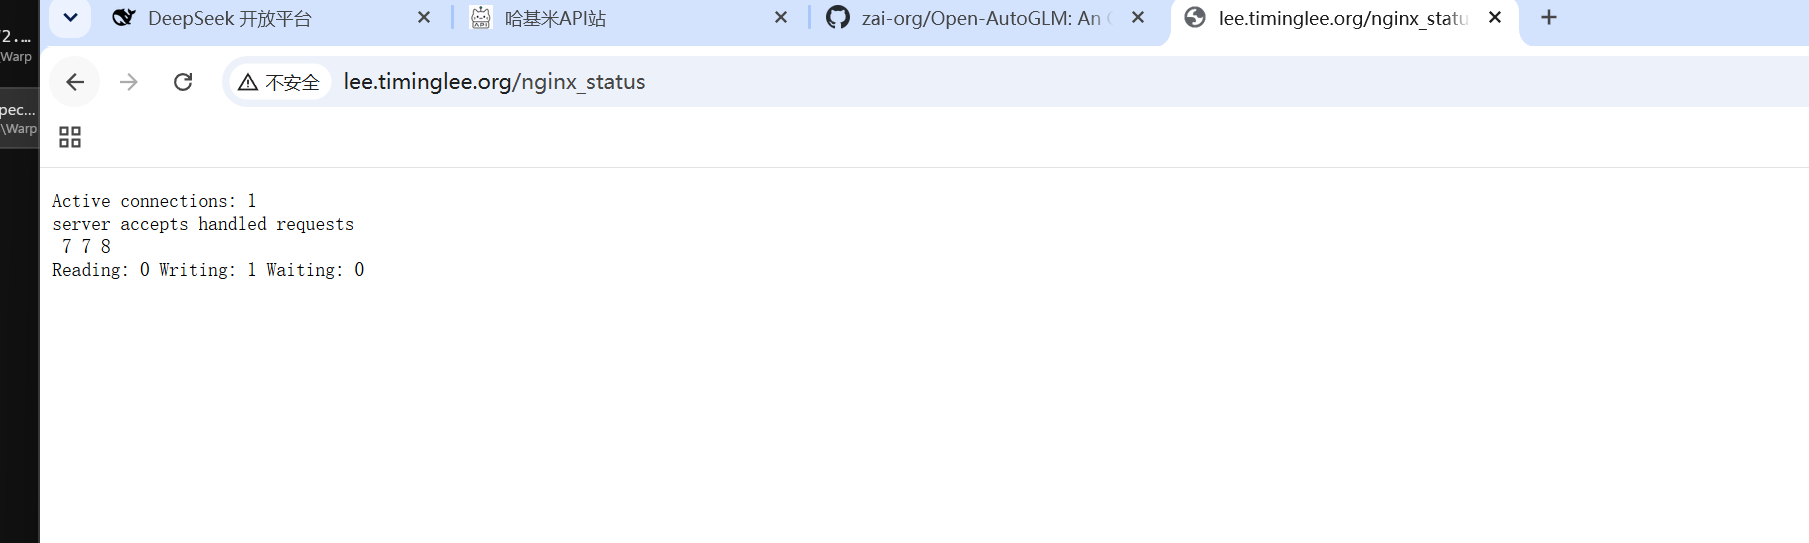
图 6:Nginx 状态页实验截图
六、Location 匹配、文件检测与变量
1. Location 匹配规则
常用匹配方式如下:
| 写法 | 含义 | 示例 |
|---|---|---|
location /path |
普通前缀匹配 | location /lee |
location = /path |
精确匹配 | location = /null |
location ^~ /path |
前缀匹配后不再检查正则 | location ^~ /static |
location ~ pattern |
区分大小写的正则匹配 | location ~ \\.php$ |
location ~* pattern |
不区分大小写的正则匹配 | location ~* \\.jpg$ |
Nginx 的匹配过程可以概括为:先检查精确匹配,再选择最长前缀;如果最长前缀没有 ^~,继续按配置顺序检查正则,命中第一个正则后结束;正则未命中时使用最长前缀。
nginx
location = /null {
    return 200 "exact";
}

location ^~ /static {
    return 200 "prefix";
}

location ~* \\.(php|jsp)$ {
    return 200 "application";
}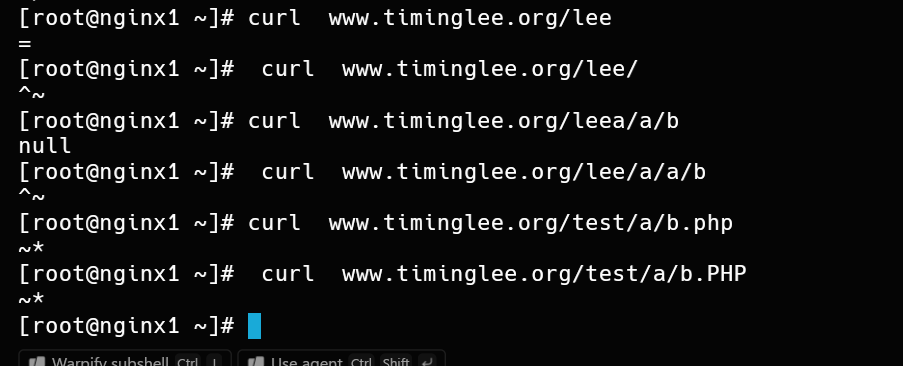
图 7:Nginx Location 路径匹配符号实验截图
2. try_files 文件检测
nginx
server {
    listen 80;
    server_name lee.timinglee.org;
    root /usr/local/nginx/errorpage;

    error_page 404 405 503 502 /error;
    error_log logs/timinglee.org/lee.error error;
    try_files $uri $uri.html $uri/index.html /default.html;
}
try_files 按顺序检查文件或目录,全部不存在时跳转到最后一个参数。它适合处理静态文件、目录首页和统一兜底页面,但需要确认 root、alias 与备用页面路径一致。
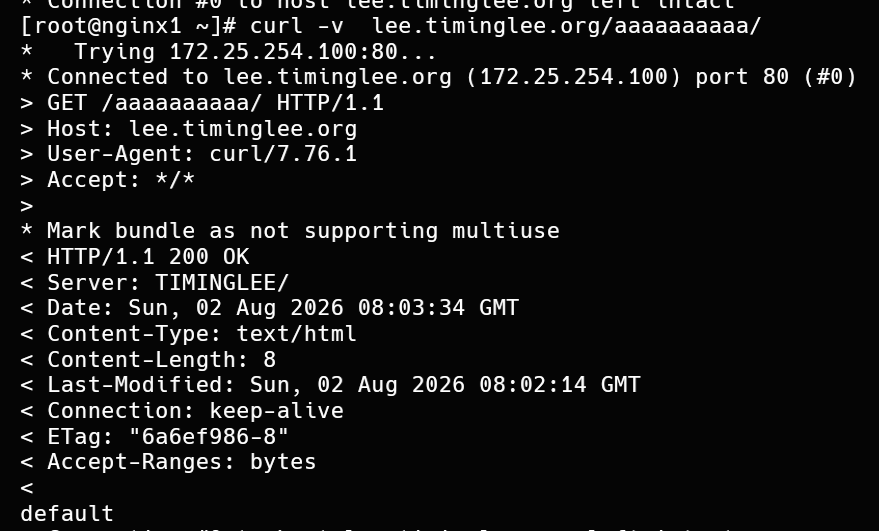
图 8:Nginx 文件检测实验截图
3. 内建变量与自定义变量
使用 echo 指令观察变量时,需要在编译阶段加入 echo-nginx-module:
bash
./configure \
  --prefix=/usr/local/nginx \
  --with-http_ssl_module \
  --with-stream \
  --add-module=/root/echo-nginx-module-0.64
make
cp objs/nginx /usr/local/nginx/sbin/ -p
实验中常用的内建变量包括:
nginx
location /vars {
    default_type text/html;
    echo $remote_addr;
    echo $args;
    echo $is_args;
    echo $document_root;
    echo $document_uri;
    echo $host;
    echo $remote_port;
    echo $remote_user;
    echo $request_method;
    echo $request_filename;
    echo $request_uri;
    echo $scheme;
    echo $server_protocol;
    echo $server_addr;
    echo $server_name;
    echo $server_port;
    echo $http_user_agent;
    echo $sent_http_content_type;
}
自定义变量使用 set 指令:
nginx
location /vars {
    set $test lee;
    echo $test;

    set $web_port $server_port;
    echo $web_port;
}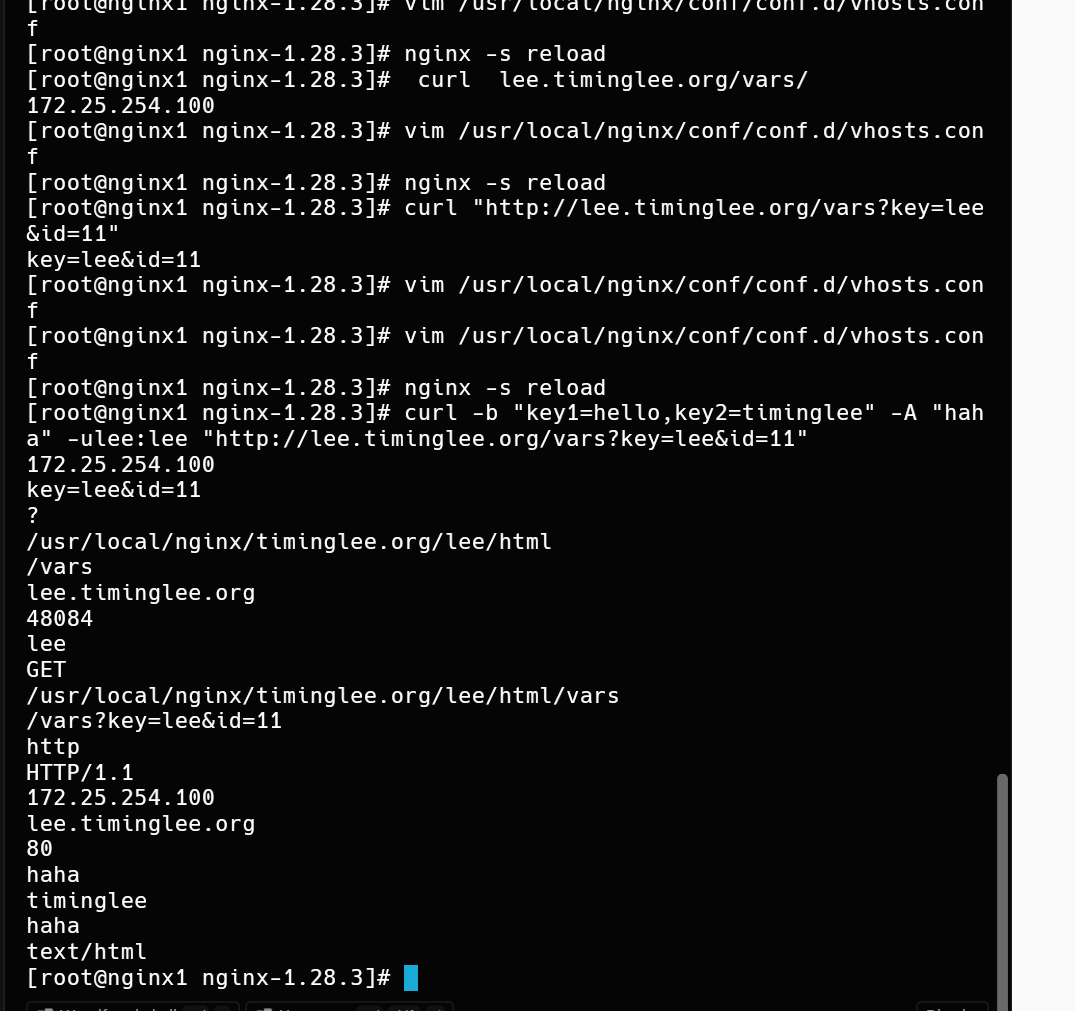
图 9:Nginx 变量实验截图
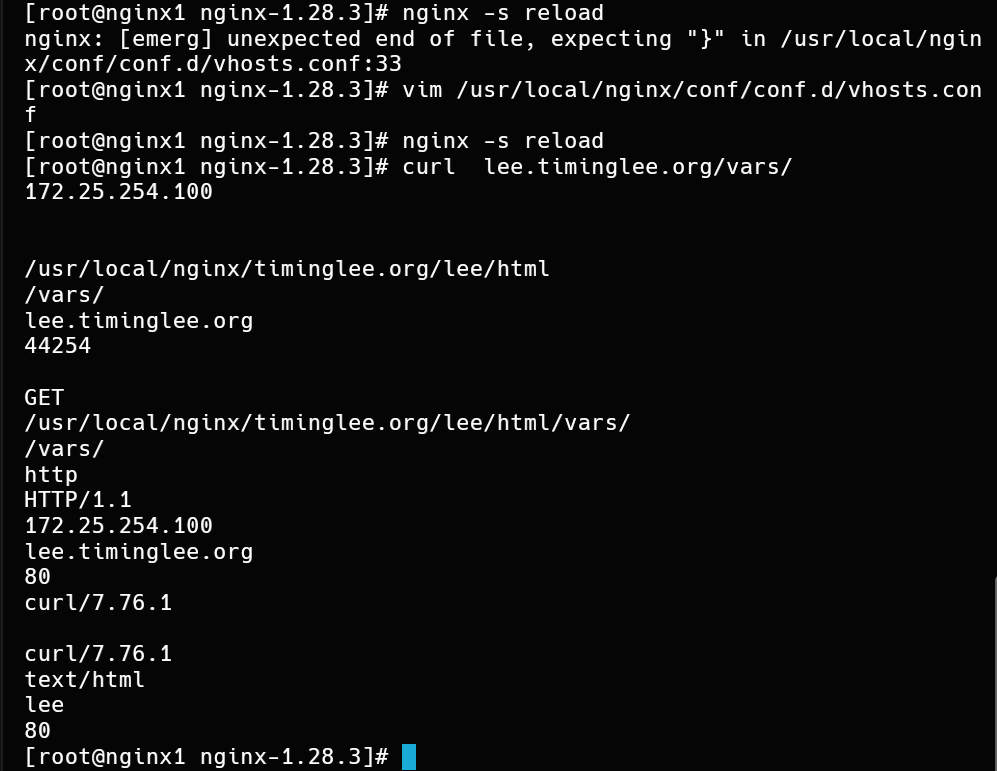
图 10:Nginx 自定义变量实验截图
七、网页重写与全站加密
1. 重写指令与 flag
常用指令包括 if、set、return、rewrite 和 break。其中 rewrite 的 flag 会改变请求后续处理方式:
redirect:返回 302 临时重定向。permanent:返回 301 永久重定向。break:完成当前 location 内的重写,不再继续执行当前层级后续重写。last:完成重写后重新进行 location 匹配。
nginx
location / {
    if ($http_user_agent ~* firefox) {
        return 200 "test if messages";
    }
}

location /temporary {
    rewrite ^/(.*)$ http://www.example.com redirect;
}

location /permanent {
    rewrite ^/(.*)$ http://www.example.com permanent;
}
if 在 Nginx 中有明确的使用边界,复杂业务逻辑不应堆积在 if 中。能够使用独立 location、map 或后端处理时,优先采用边界更清晰的方案。
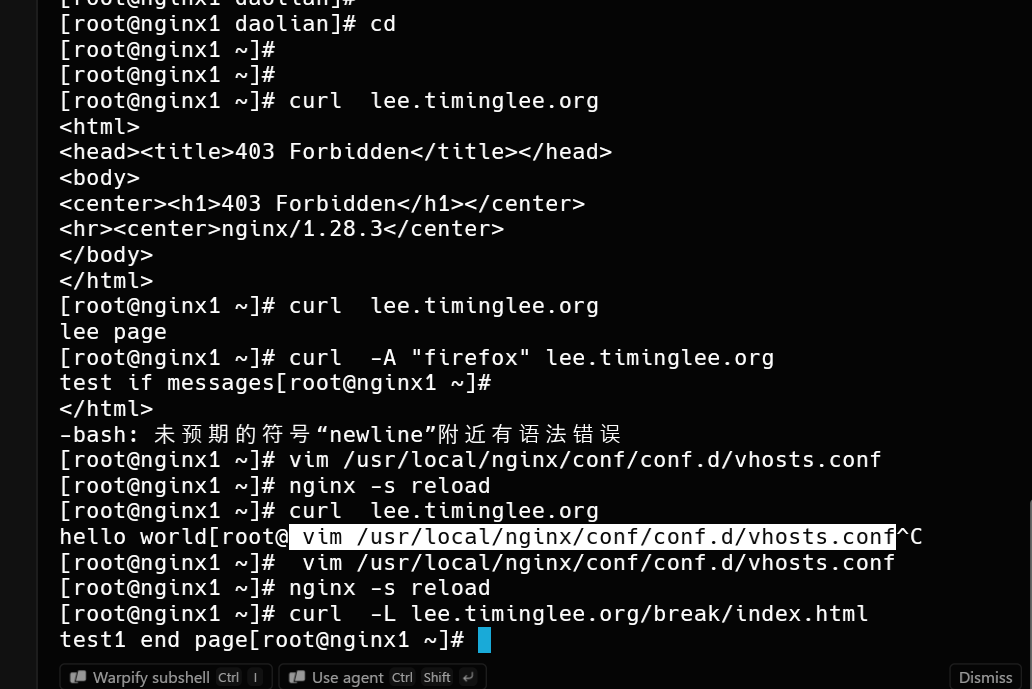
图 11:网页重写实验截图
2. HTTP 自动跳转 HTTPS
生成实验用自签名证书:
bash
mkdir -p /usr/local/nginx/certs
openssl req -newkey rsa:2048 -nodes -sha256 \
  -keyout /usr/local/nginx/certs/timinglee.org.key \
  -x509 -days 365 \
  -out /usr/local/nginx/certs/timinglee.org.crt
配置 HTTP 和 HTTPS,并把 HTTP 请求重定向到 HTTPS:
nginx
server {
    listen 80;
    listen 443 ssl;

    server_name lee.timinglee.org;
    root /webdir/timinglee.org/lee/html;

    ssl_certificate     /usr/local/nginx/certs/timinglee.org.crt;
    ssl_certificate_key /usr/local/nginx/certs/timinglee.org.key;
    ssl_session_cache shared:sslcache:20m;
    ssl_session_timeout 10m;

    location / {
        if ($scheme = http) {
            rewrite ^/(.*)$ https://$host/$1 redirect;
        }
    }
}
验证跳转:
bash
curl -I http://lee.timinglee.org/test1/实验环境可以使用自签名证书;生产环境应使用受信任的证书,并进一步配置 TLS 版本、密码套件、证书更新和 HSTS 策略。
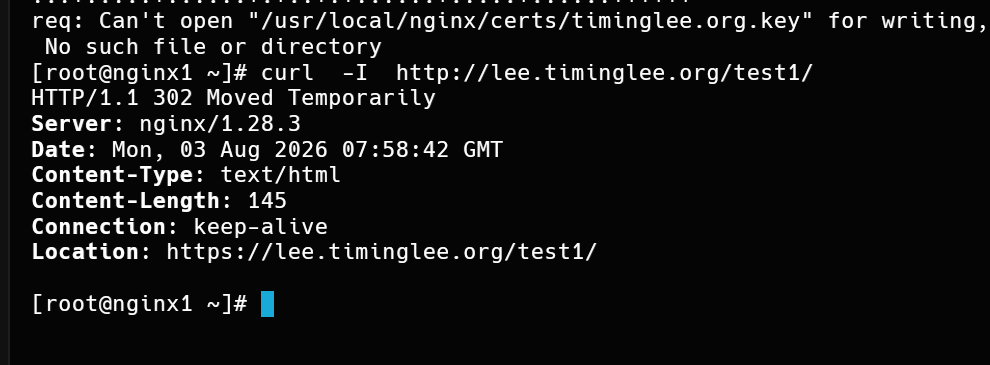
图 12:Nginx 全站加密实验截图
八、访问认证、错误处理与防盗链
1. Basic Auth 用户认证
创建认证文件时不要把真实密码写入公开文章:
bash
htpasswd -cm /usr/local/nginx/conf/.htpasswd admin在受保护 location 中启用认证:
nginx
server {
    listen 80;
    server_name lee.timinglee.org;

    location /admin {
        root /usr/local/nginx/html;
        auth_basic "login passwd";
        auth_basic_user_file /usr/local/nginx/conf/.htpasswd;
    }
}
验证未认证请求应返回 401,携带正确凭据后才能访问:
bash
curl lee.timinglee.org/admin/
curl -u admin:实际密码 http://lee.timinglee.org/admin/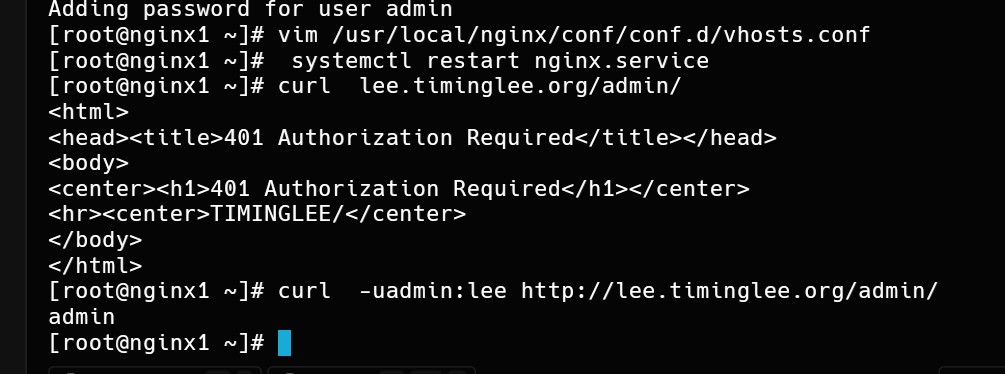
图 13:Nginx 服务访问用户认证实验截图
2. 自定义错误页面与错误日志
nginx
server {
    listen 80;
    server_name lee.timinglee.org;

    error_page 404 405 503 502 /error;
    error_log logs/timinglee.org/lee.error error;

    location /error {
        alias /usr/local/nginx/errorpage/errormessage;
    }
}
错误日志目录需要提前创建并保证 Nginx 运行用户具有合适权限:
bash
mkdir -p /usr/local/nginx/logs/timinglee.org
mkdir -p /usr/local/nginx/errorpage
echo "页面暂时无法访问" > /usr/local/nginx/errorpage/errormessage
nginx -t && nginx -s reload
访问不存在路径后,同时检查客户端响应和错误日志:
bash
curl lee.timinglee.org/lee/
cat /usr/local/nginx/logs/timinglee.org/lee.error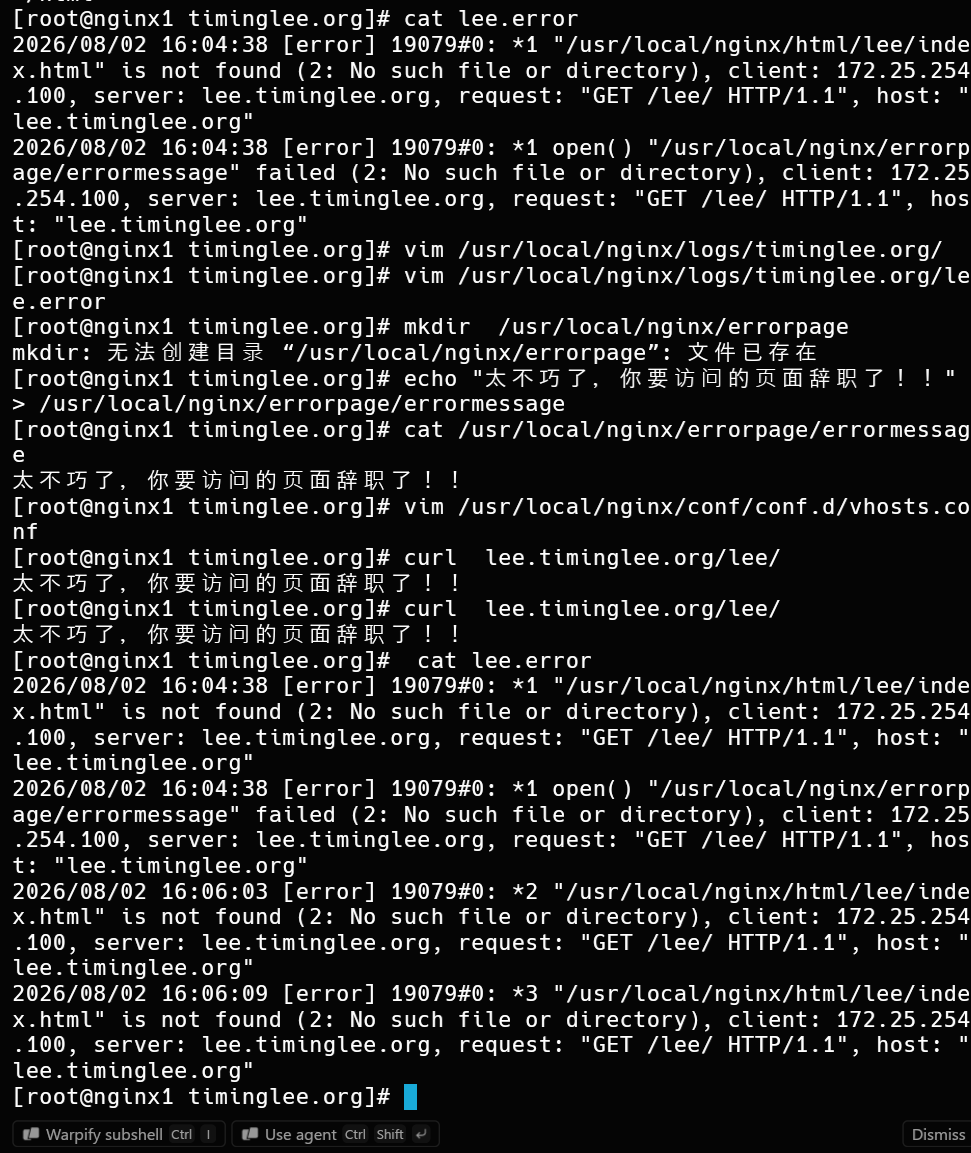
图 14:错误日志和自定义错误界面实验截图
3. 防盗链
nginx
server {
    listen 80;
    server_name lee.timinglee.org;

    location /img {
        valid_referers none blocked server_names *.timinglee.org ~/.baidu/.;
        if ($invalid_referer) {
            rewrite ^/ http://lee.timinglee.org/daolian/daolian.png;
        }
    }
}
防盗链只能作为简单的 Referer 检查,不能替代鉴权、签名 URL 或对象存储访问控制。需要同时考虑 Referer 缺失、伪造和搜索引擎访问等情况。
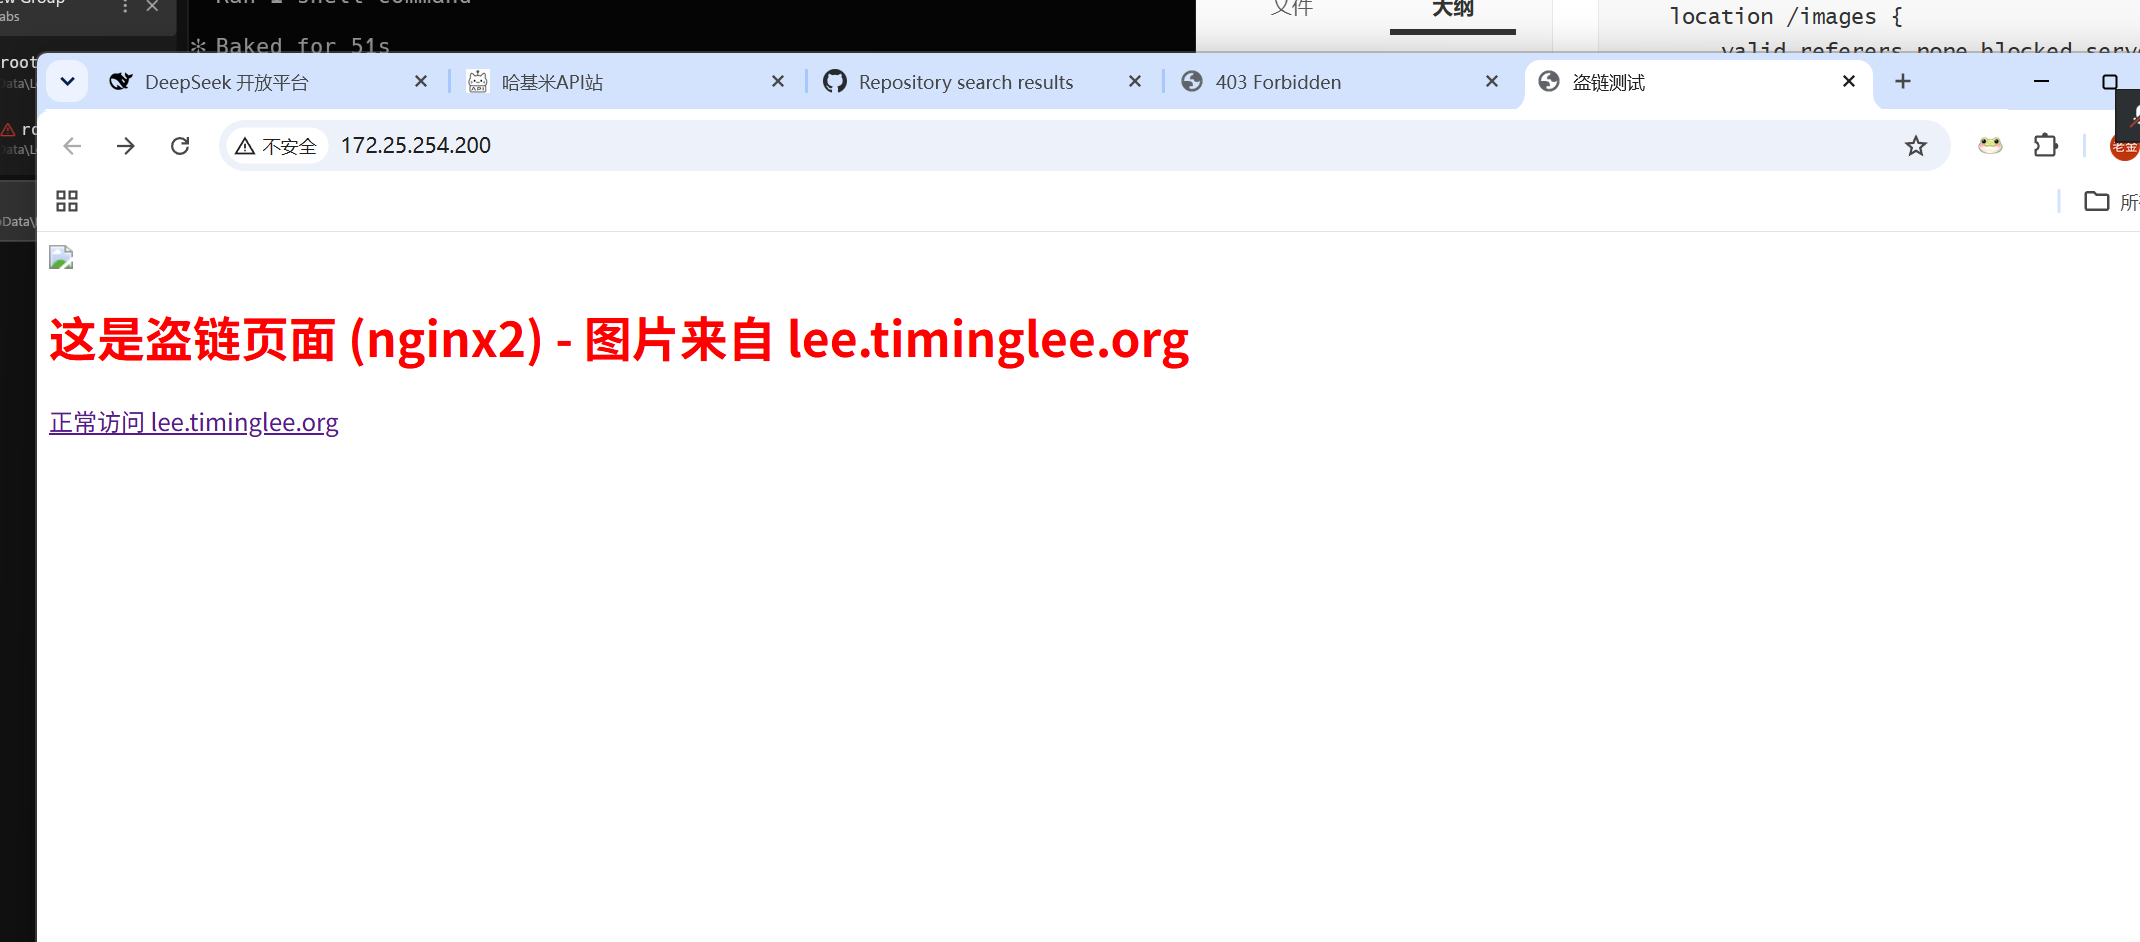
图 15:Nginx 防盗链实验截图
九、反向代理、动静分离与负载均衡
1. 基本反向代理
后端节点先分别部署 Web 服务,再由 Nginx 根据路径或域名代理:
nginx
server {
    listen 80;
    server_name lee.timinglee.org;

    location / {
        proxy_pass http://172.25.254.10:80;
    }

    location /web {
        proxy_pass http://172.25.254.20:80;
    }
}
默认情况下,代理响应中的部分后端头部不会直接透传。实验中使用以下指令观察差异:
nginx
location / {
    proxy_pass http://172.25.254.10:80;
    proxy_hide_header ETag;
    proxy_pass_header Server;
    proxy_set_header X-Forwarded-For $remote_addr;
}
后端 Apache 需要把 X-Forwarded-For 写入访问日志,才能在后端记录客户端来源地址。生产配置还应补充 Host、X-Real-IP、连接超时和 WebSocket 等场景的专用参数。
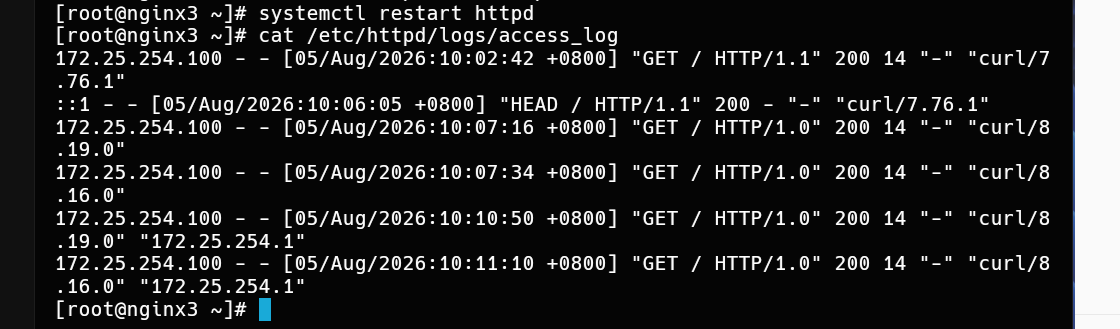
图 16:Nginx 反向代理实验截图
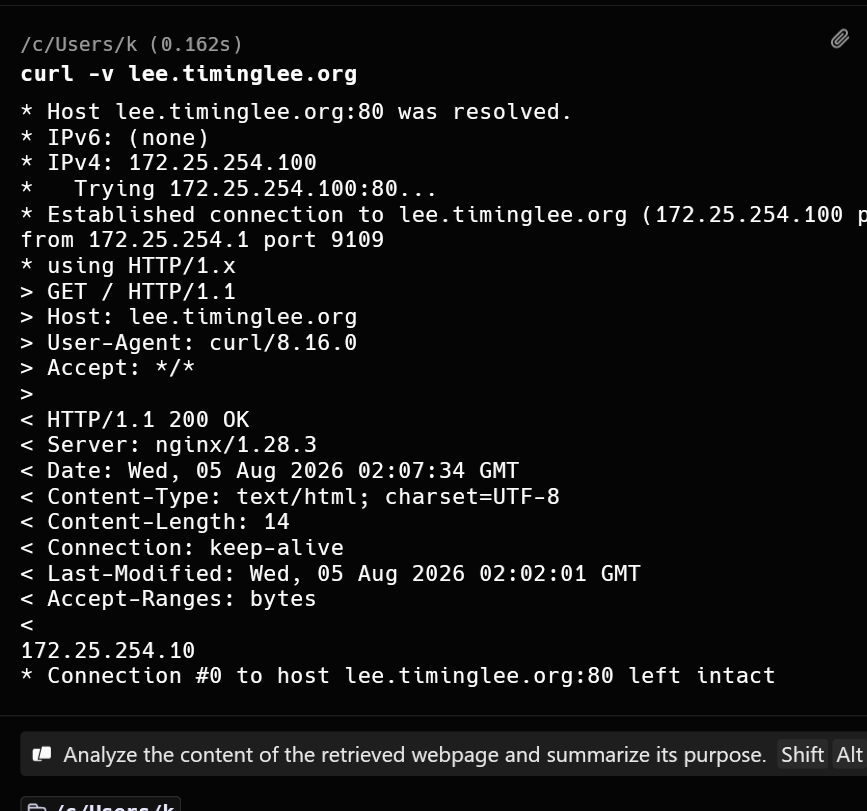
图 17:Nginx 反向代理进阶实验截图
2. 动静分离
将静态资源和动态请求按 URI 后缀分发到不同后端:
nginx
server {
    listen 80;
    server_name lee.timinglee.org;

    location / {
        proxy_pass http://172.25.254.20:80;
    }

    location ~* \\.(php|js)$ {
        proxy_pass http://172.25.254.10:80;
    }
}
实验中由后端 Apache 提供 PHP 页面,Nginx 根据后缀将 PHP、JS 请求转发到指定节点。实际部署时应明确静态文件范围,避免把上传文件、任意脚本后缀误判为可执行动态请求。
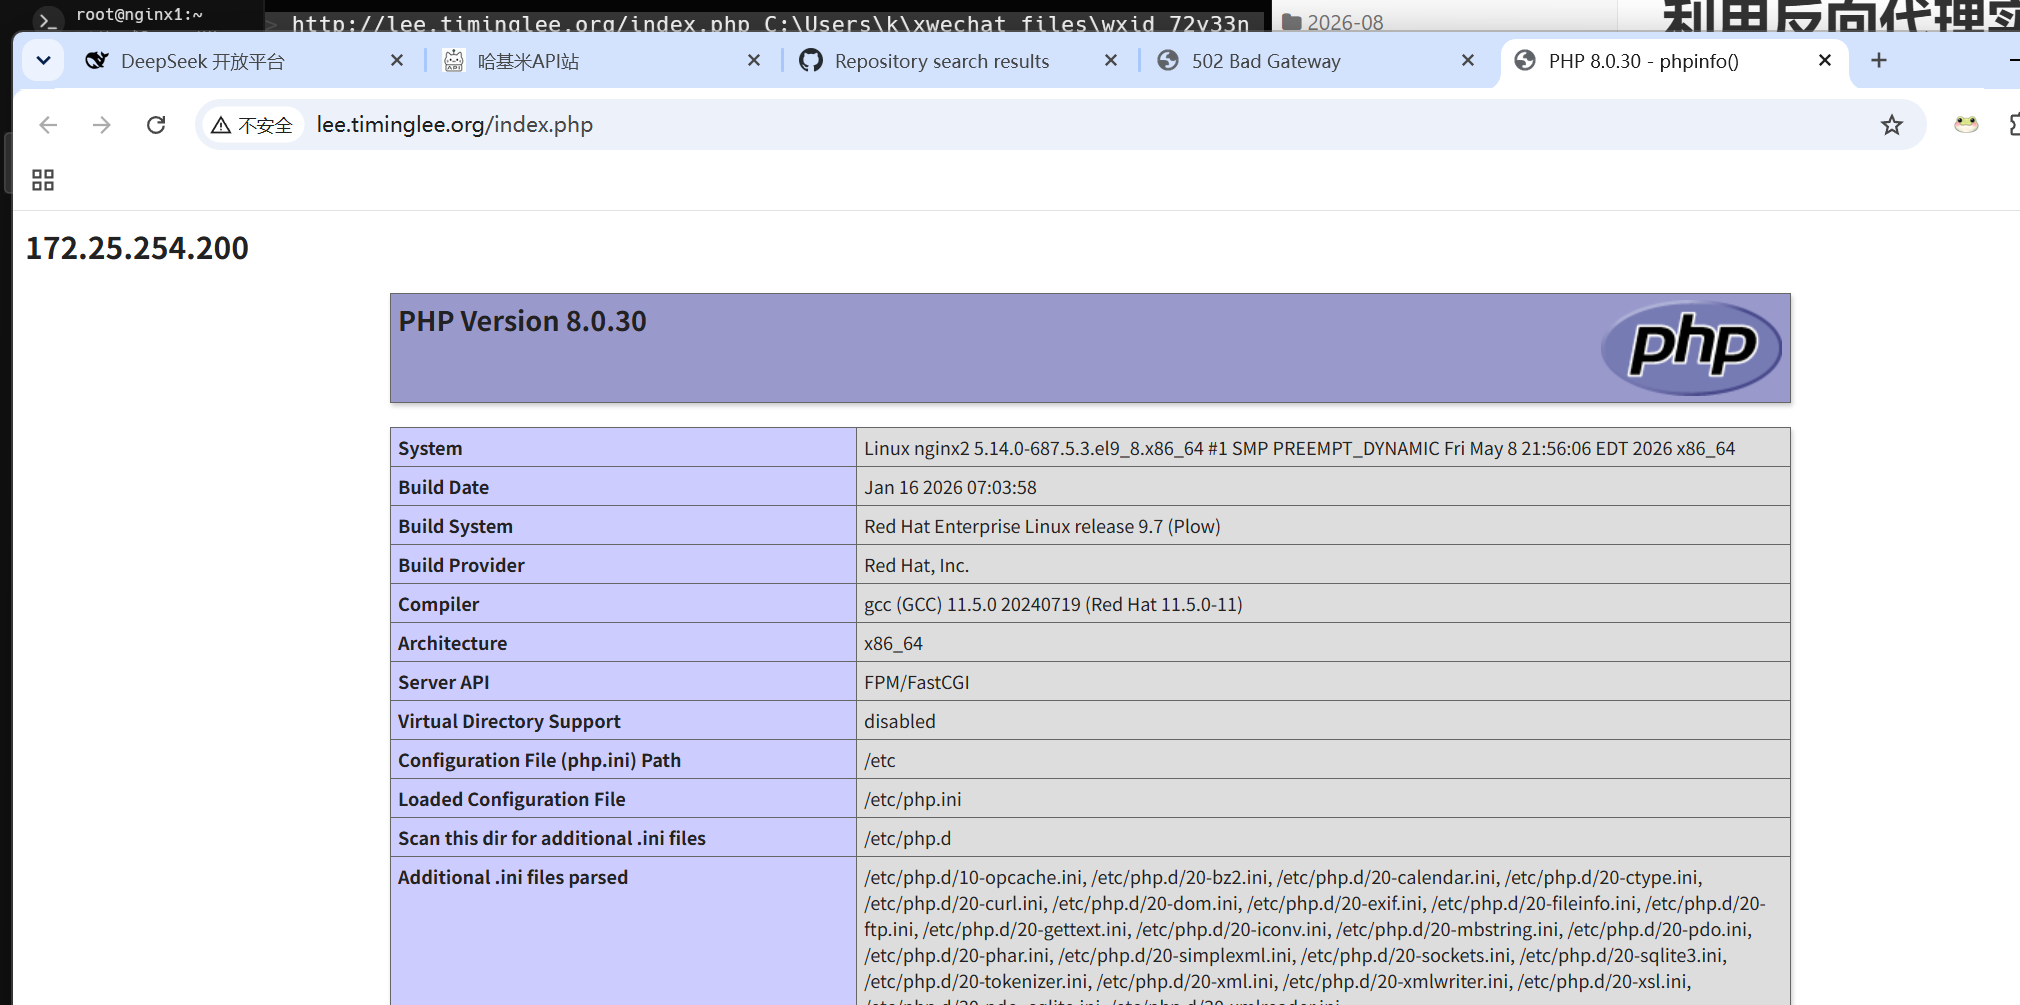
图 18:Nginx 反向代理实现动静分离实验截图
3. 反向代理负载均衡
通过 upstream 管理后端节点:
nginx
upstream webserver {
    server 172.25.254.10:80 weight=1 fail_timeout=15s max_fails=3;
    server 172.25.254.20:80 weight=1 fail_timeout=15s max_fails=3;
    server 172.25.254.100:8888 backup;
}

server {
    listen 80;
    server_name www.timinglee.org;

    location / {
        proxy_pass http://webserver;
    }
}
其中:
weight控制相对权重。max_fails与fail_timeout控制失败节点的临时摘除。backup只在主节点不可用时接收请求。
实验中连续访问 www.timinglee.org,响应内容在两个后端节点之间切换;停止后端 Apache 后,流量切换到备用服务。
4. 负载均衡算法
Nginx 常用的调度方式包括默认轮询、least_conn、ip_hash、hash 和基于 Cookie 的哈希:
nginx
upstream webserver {
    # least_conn;
    # ip_hash;
    # hash $request_uri consistent;
    hash $cookie_lee;

    server 172.25.254.10:80 weight=1 fail_timeout=15s max_fails=3;
    server 172.25.254.20:80 weight=1 fail_timeout=15s max_fails=3;
}
算法选择需要结合业务特征:
- 普通无状态请求可使用轮询或
least_conn。 - 需要客户端固定后端时,可考虑
ip_hash,但要注意代理层和 NAT 导致的客户端地址集中。 - 需要按 URI 或 Cookie 保持稳定映射时,可使用
hash ... consistent。 - 有状态应用优先从应用层解决会话共享,不能只依赖负载均衡算法。
十、缓存加速与压测验证
未启用缓存时,实验使用 ApacheBench 对 PHP 页面进行压测:
bash
ab -n 10000 -c 50 http://lee.timinglee.org/index.php知识库记录的实验结果为:请求耗时 13.678 秒,失败请求 9963,平均每秒请求数 731.10。
启用代理缓存:
nginx
proxy_cache_path /usr/local/nginx/proxy_cache \
    levels=1:2:2 \
    keys_zone=proxycache:20m \
    inactive=120s \
    max_size=1g;

server {
    listen 80;
    server_name lee.timinglee.org;

    location ~* \\.(php|js)$ {
        proxy_pass http://172.25.254.10:80;
        proxy_cache proxycache;
        proxy_cache_key $request_uri;
        proxy_cache_valid 200 302 301 10m;
        proxy_cache_valid any 1m;
    }
}
再次进行相同压测,知识库记录的结果为:请求耗时 4.365 秒,失败请求 0,平均每秒请求数 2290.76。缓存目录出现缓存文件,说明请求已经写入本地缓存。
压测结果只代表该实验环境、请求内容和并发参数下的对比,不应直接当作生产容量指标。上线前还要验证缓存键、登录态、Cookie、POST 请求、缓存失效和敏感响应,避免把用户私有数据缓存给其他用户。
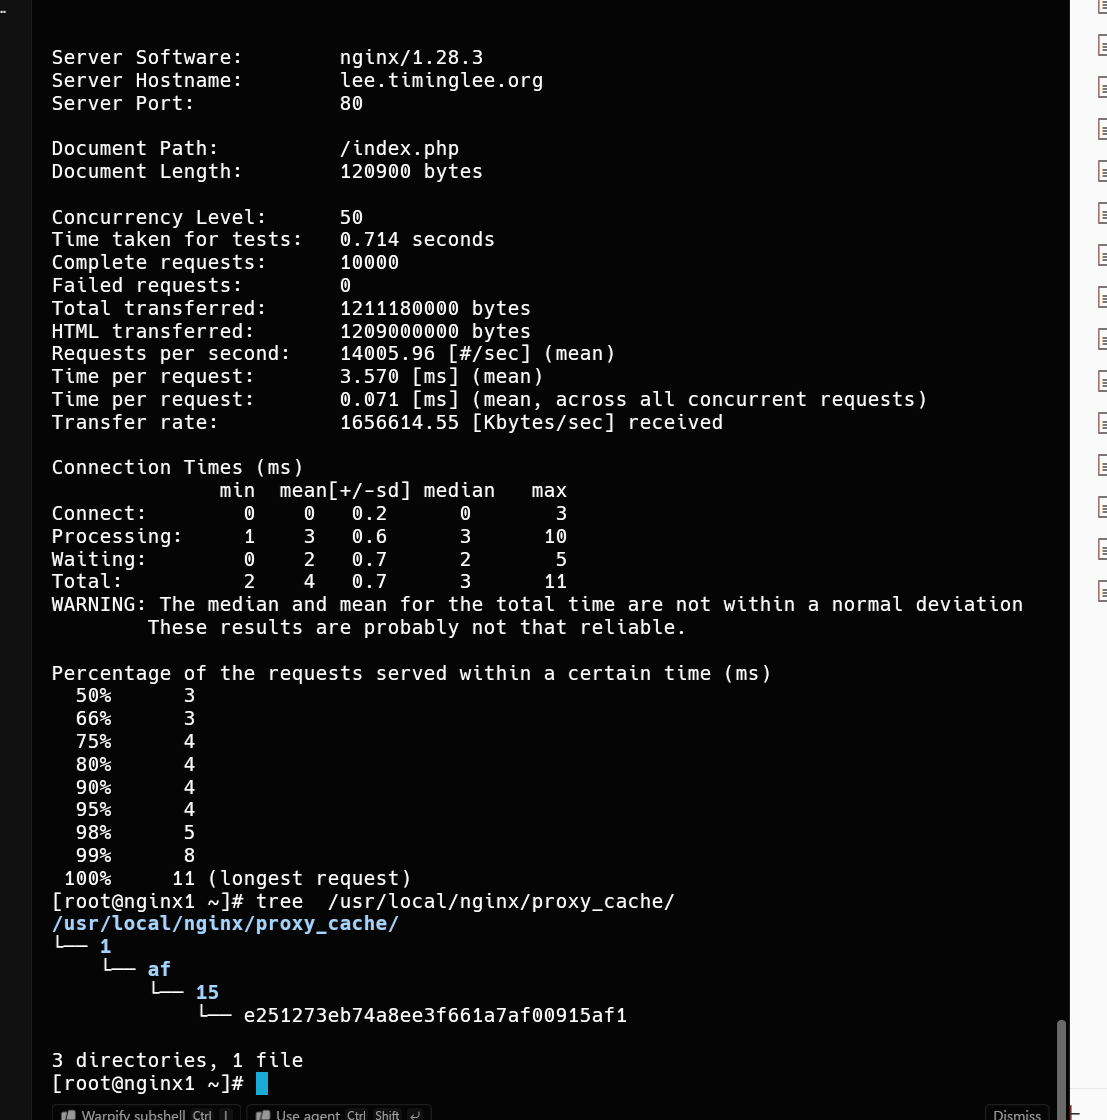
图 19:Nginx 缓存加速实验截图
十一、Nginx 四层 TCP 与 UDP 代理
Nginx 编译时启用 --with-stream 后,可以在四层转发 TCP 和 UDP 流量。本实验使用 MariaDB 验证 TCP 代理,使用 DNS 验证 UDP 代理。
1. TCP 代理 MariaDB
nginx
stream {
    upstream mysql_server {
        server 172.25.254.10:3306 max_fails=3 fail_timeout=30s;
        server 172.25.254.20:3306 max_fails=3 fail_timeout=30s;
    }

    server {
        listen 172.25.254.100:3306;
        proxy_pass mysql_server;
        proxy_connect_timeout 30s;
        proxy_timeout 300s;
    }
}
客户端连接 Nginx 地址后,通过查询后端 server_id 验证请求是否在两个 MariaDB 节点之间切换:
bash
mysql -u用户名 -p -h172.25.254.100
SELECT @@server_id;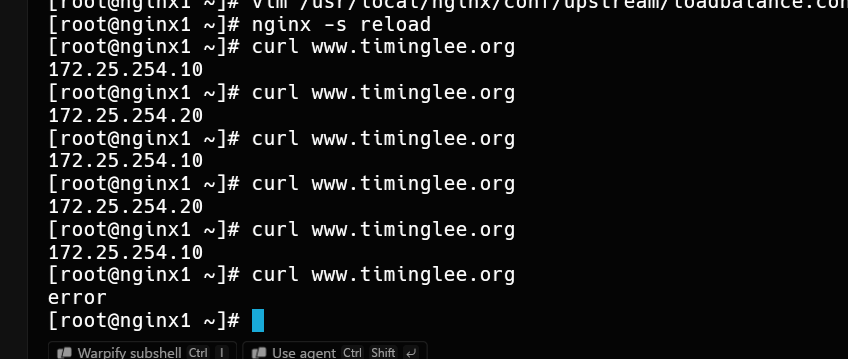
图 20:Nginx 四层负载均衡代理实验截图
2. UDP 代理 DNS
nginx
stream {
    upstream dns_server {
        server 172.25.254.10:53 max_fails=3 fail_timeout=30s;
        server 172.25.254.20:53 max_fails=3 fail_timeout=30s;
    }

    server {
        listen 172.25.254.100:53 udp;
        proxy_pass dns_server;
        proxy_timeout 1s;
        proxy_responses 1;
        error_log logs/dns.log;
    }
}
验证 Nginx 对外提供的 UDP 监听:
bash
dig dns.timinglee.org @172.25.254.100多次查询并观察返回地址,可以验证 DNS 请求在后端节点间切换。四层代理只处理连接或数据报转发,不理解 HTTP 请求内容,因此不能使用七层的 URI、Cookie 和 HTTP Header 路由逻辑。
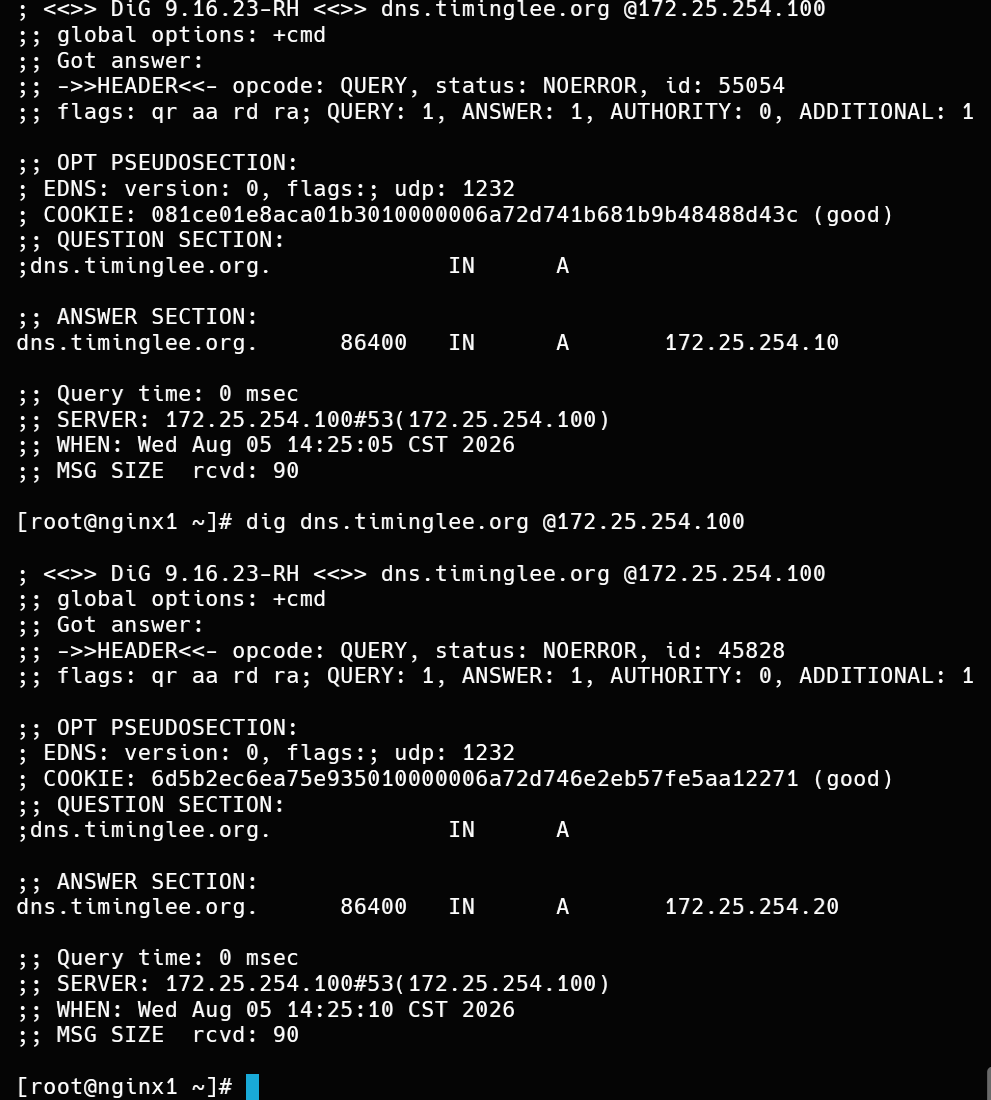
图 21:Nginx UDP 四层负载实验截图
十二、PHP、Memcache、Tomcat 与 OpenResty
本节承接 Nginx 反向代理能力,补充 PHP-FPM、Memcache、Tomcat 和 OpenResty 的部署与整合。实验中的 PHP、Tomcat、缓存节点均通过 Nginx 统一对外提供访问入口。
1. PHP 源码编译与 PHP-FPM
下载 PHP 8.3.30 源码和依赖:
bash
wget https://www.php.net/distributions/php-8.3.30.tar.gz
wget https://mirrors.aliyun.com/rockylinux/9.7/devel/x86_64/os/Packages/o/oniguruma-devel-6.9.6-1.el9.6.x86_64.rpm

tar zxf php-8.3.30.tar.gz
cd php-8.3.30

dnf install gcc systemd-devel-252-51.el9.x86_64 \
  libxml2-devel.x86_64 sqlite-devel.x86_64 libcurl-devel.x86_64 \
  libpng-devel.x86_64 oniguruma-devel-6.9.6-1.el9.6.x86_64.rpm -y
编译时启用 FPM、MySQL、XML、GD、mbstring 等模块:
bash
./configure \
  --prefix=/usr/local/php \
  --with-config-file-path=/usr/local/php/etc \
  --enable-fpm \
  --with-fpm-user=nginx \
  --with-fpm-group=nginx \
  --with-curl \
  --with-iconv \
  --with-mhash \
  --with-zlib \
  --with-openssl \
  --enable-mysqlnd \
  --with-mysqli \
  --with-pdo-mysql \
  --disable-debug \
  --enable-sockets \
  --enable-soap \
  --enable-xml \
  --enable-ftp \
  --enable-gd \
  --enable-exif \
  --enable-mbstring \
  --enable-bcmath \
  --with-fpm-systemd

make && make install
配置 FPM 监听地址、时区和 systemd 管理:
bash
cd /usr/local/php/etc
cp -p php-fpm.conf.default php-fpm.conf
cp php-fpm.d/www.conf.default php-fpm.d/www.conf

# php-fpm.d/www.conf
listen = 0.0.0.0:9000

cp /root/php-8.3.30/php.ini-production /usr/local/php/etc/php.ini
# php.ini
date.timezone = Asia/Shanghai

cp /root/php-8.3.30/sapi/fpm/php-fpm.service /lib/systemd/system/
知识库实验中特别注明:如果 php-fpm.service 中启用了 ProtectSystem=full,PHP-FPM 可能无法写入 Session 文件,需要根据实际目录权限评估后注释该参数。启动并验证:
bash
systemctl daemon-reload
systemctl enable --now php-fpm
ss -lntp | grep 9000
php -m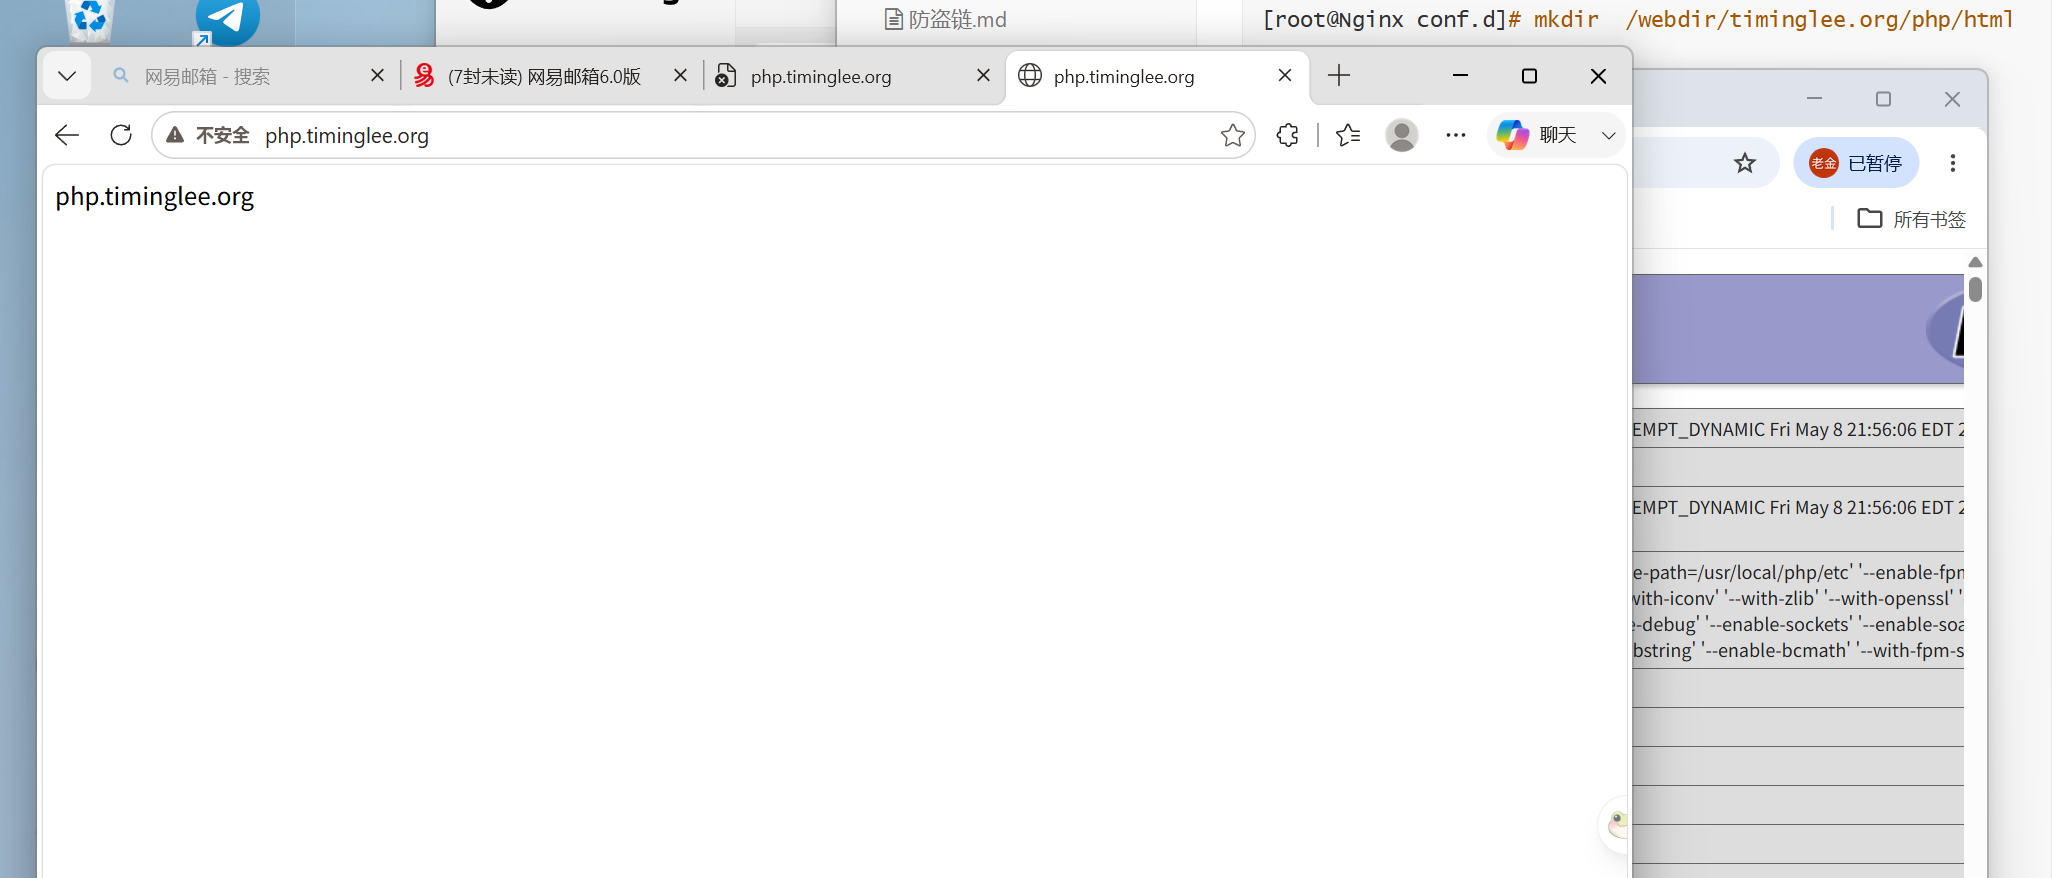
图 22:PHP 源码编译实验截图
2. Nginx 整合 PHP-FPM
准备 PHP 站点目录和测试页面:
bash
mkdir -p /webdir/timinglee.org/php/html
printf 'php.timinglee.org\n' > /webdir/timinglee.org/php/html/index.html
cat > /webdir/timinglee.org/php/html/index.php <<'PHP'
<?php
  phpinfo();
?>
PHP
在 Nginx 中通过 FastCGI 将 PHP 请求转发到 PHP-FPM:
nginx
server {
    listen 80;
    server_name php.timinglee.org;
    root /webdir/timinglee.org/php/html;
    index index.php index.html;

    location ~ \.php$ {
        fastcgi_pass 127.0.0.1:9000;
        fastcgi_index index.php;
        include fastcgi.conf;
    }
}
bash
nginx -t && nginx -s reload
curl http://php.timinglee.org/index.php
排查 PHP 页面时,至少同时检查 Nginx 错误日志、PHP-FPM 进程、9000 端口和 PHP 文件权限。只看到 Nginx 返回 502,不能直接判断是 Nginx 配置错误。
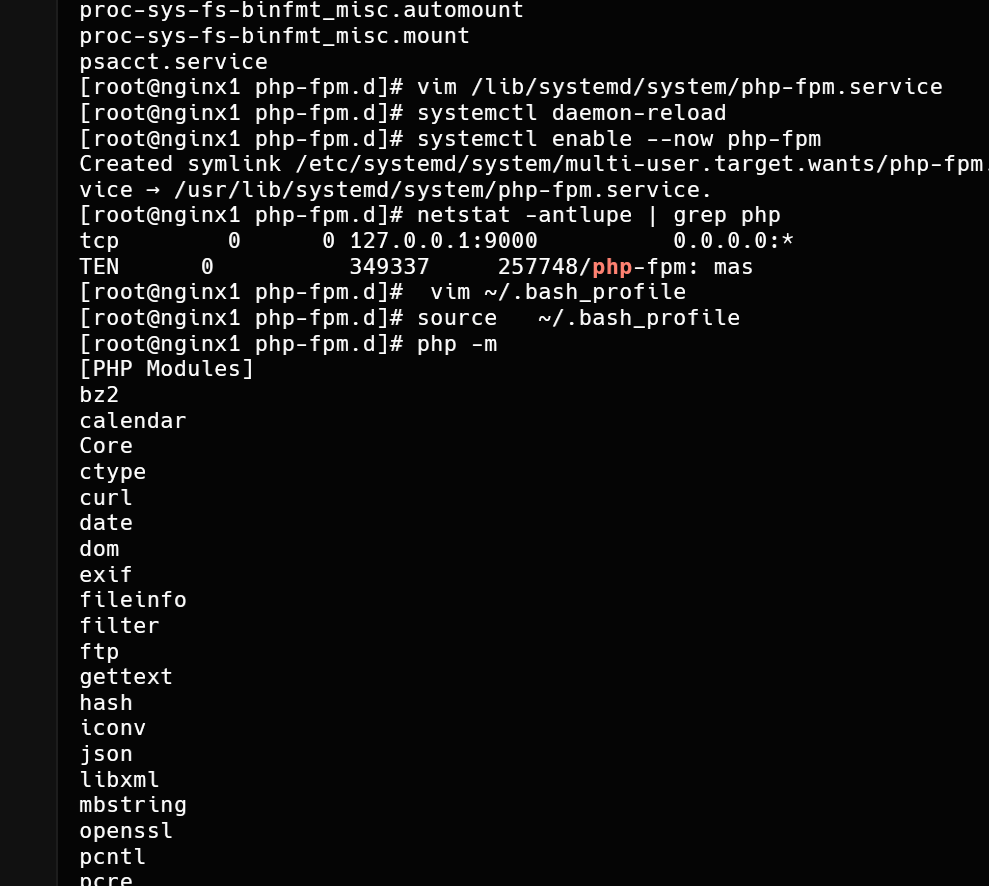
图 23:Nginx 整合 PHP 实验截图
3. Memcache 服务与 PHP 扩展
安装并启动 Memcached:
bash
dnf install memcached.x86_64 -y实验配置使用 11211 端口、1024 个最大连接和 64 MB 缓存:
ini
# /etc/sysconfig/memcached
PORT="11211"
USER="memcached"
MAXCONN="1024"
CACHESIZE="64"
OPTIONS="-l 0.0.0.0,::1"
bash
systemctl enable --now memcached.service
ss -lntp | grep 11211
实验中的 0.0.0.0 便于多节点测试,生产环境应改为业务网卡地址,并通过防火墙限制访问来源。Memcache 不提供持久化存储能力,不应直接承担唯一数据源。
为 PHP 安装 Memcache 扩展:
bash
php -m
tar zxf memcache-8.2.tgz
cd memcache-8.2
dnf install autoconf -y
phpize
./configure && make && make install

# /usr/local/php/etc/php.ini
extension=memcache

systemctl restart php-fpm.service
php -m | grep memcache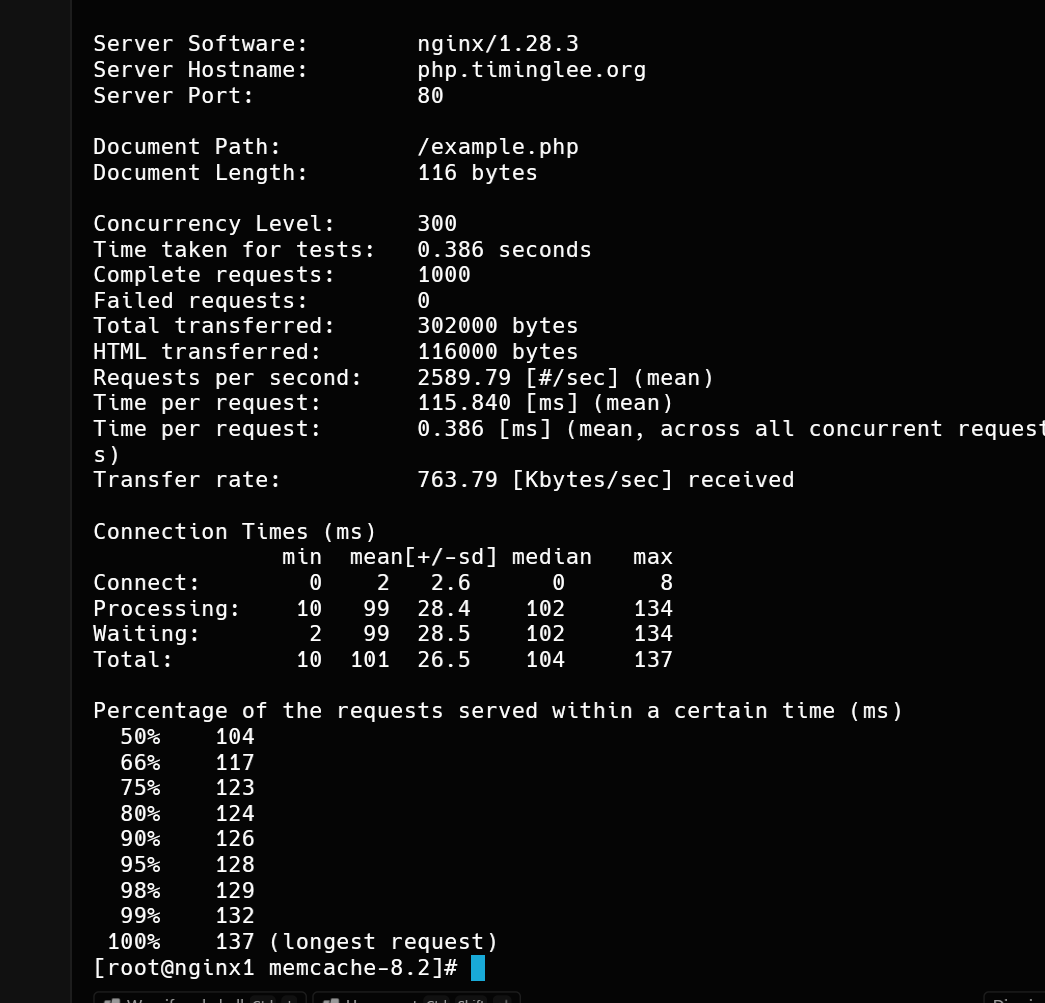
图 24:利用 Memcache 实现 PHP 缓存加速实验截图
4. Nginx、PHP 与 Memcache 组合缓存
Nginx 的 memc 和 srcache 模块不是默认内置模块,需要重新编译 Nginx。重新编译前先备份配置目录和当前二进制:
bash
systemctl stop nginx.service
cp -r /usr/local/nginx/conf /mnt/
cp /usr/local/nginx/sbin/nginx /mnt/nginx.old -p
将 memc-nginx-module 和 srcache-nginx-module 作为动态缓存访问模块加入编译参数:
bash
./configure \
  --prefix=/usr/local/nginx \
  --user=nginx \
  --group=nginx \
  --with-http_ssl_module \
  --with-http_v2_module \
  --with-http_realip_module \
  --with-http_stub_status_module \
  --with-http_gzip_static_module \
  --with-pcre \
  --with-stream \
  --with-stream_ssl_module \
  --with-stream_realip_module \
  --add-module=/root/echo-nginx-module-0.64 \
  --add-module=/root/memc-nginx-module-0.20 \
  --add-module=/root/srcache-nginx-module-0.33

make && make install
配置 Nginx 访问 Memcache,并缓存 PHP 响应:
nginx
upstream memcache {
    server 127.0.0.1:11211;
    keepalive 512;
}

server {
    listen 80;
    server_name php.timinglee.org;
    root /webdir/timinglee.org/php/html;
    index index.php index.html;

    location /memc {
        internal;
        memc_connect_timeout 100ms;
        memc_send_timeout 100ms;
        memc_read_timeout 100ms;
        set $memc_key $query_string;
        set $memc_exptime 300;
        memc_pass memcache;
    }

    location ~ \.php$ {
        set $key $uri$args;
        srcache_fetch GET /memc $key;
        srcache_store PUT /memc $key;
        fastcgi_pass 127.0.0.1:9000;
        fastcgi_index index.php;
        include fastcgi.conf;
    }
}
使用 ApacheBench 对缓存前后的响应进行对比:
bash
ab -n 10000 -c 500 http://php.timinglee.org/example.php缓存键必须包含能够区分响应内容的请求信息。涉及登录用户、Cookie、POST 请求或个性化数据时,不能直接套用公共缓存策略。
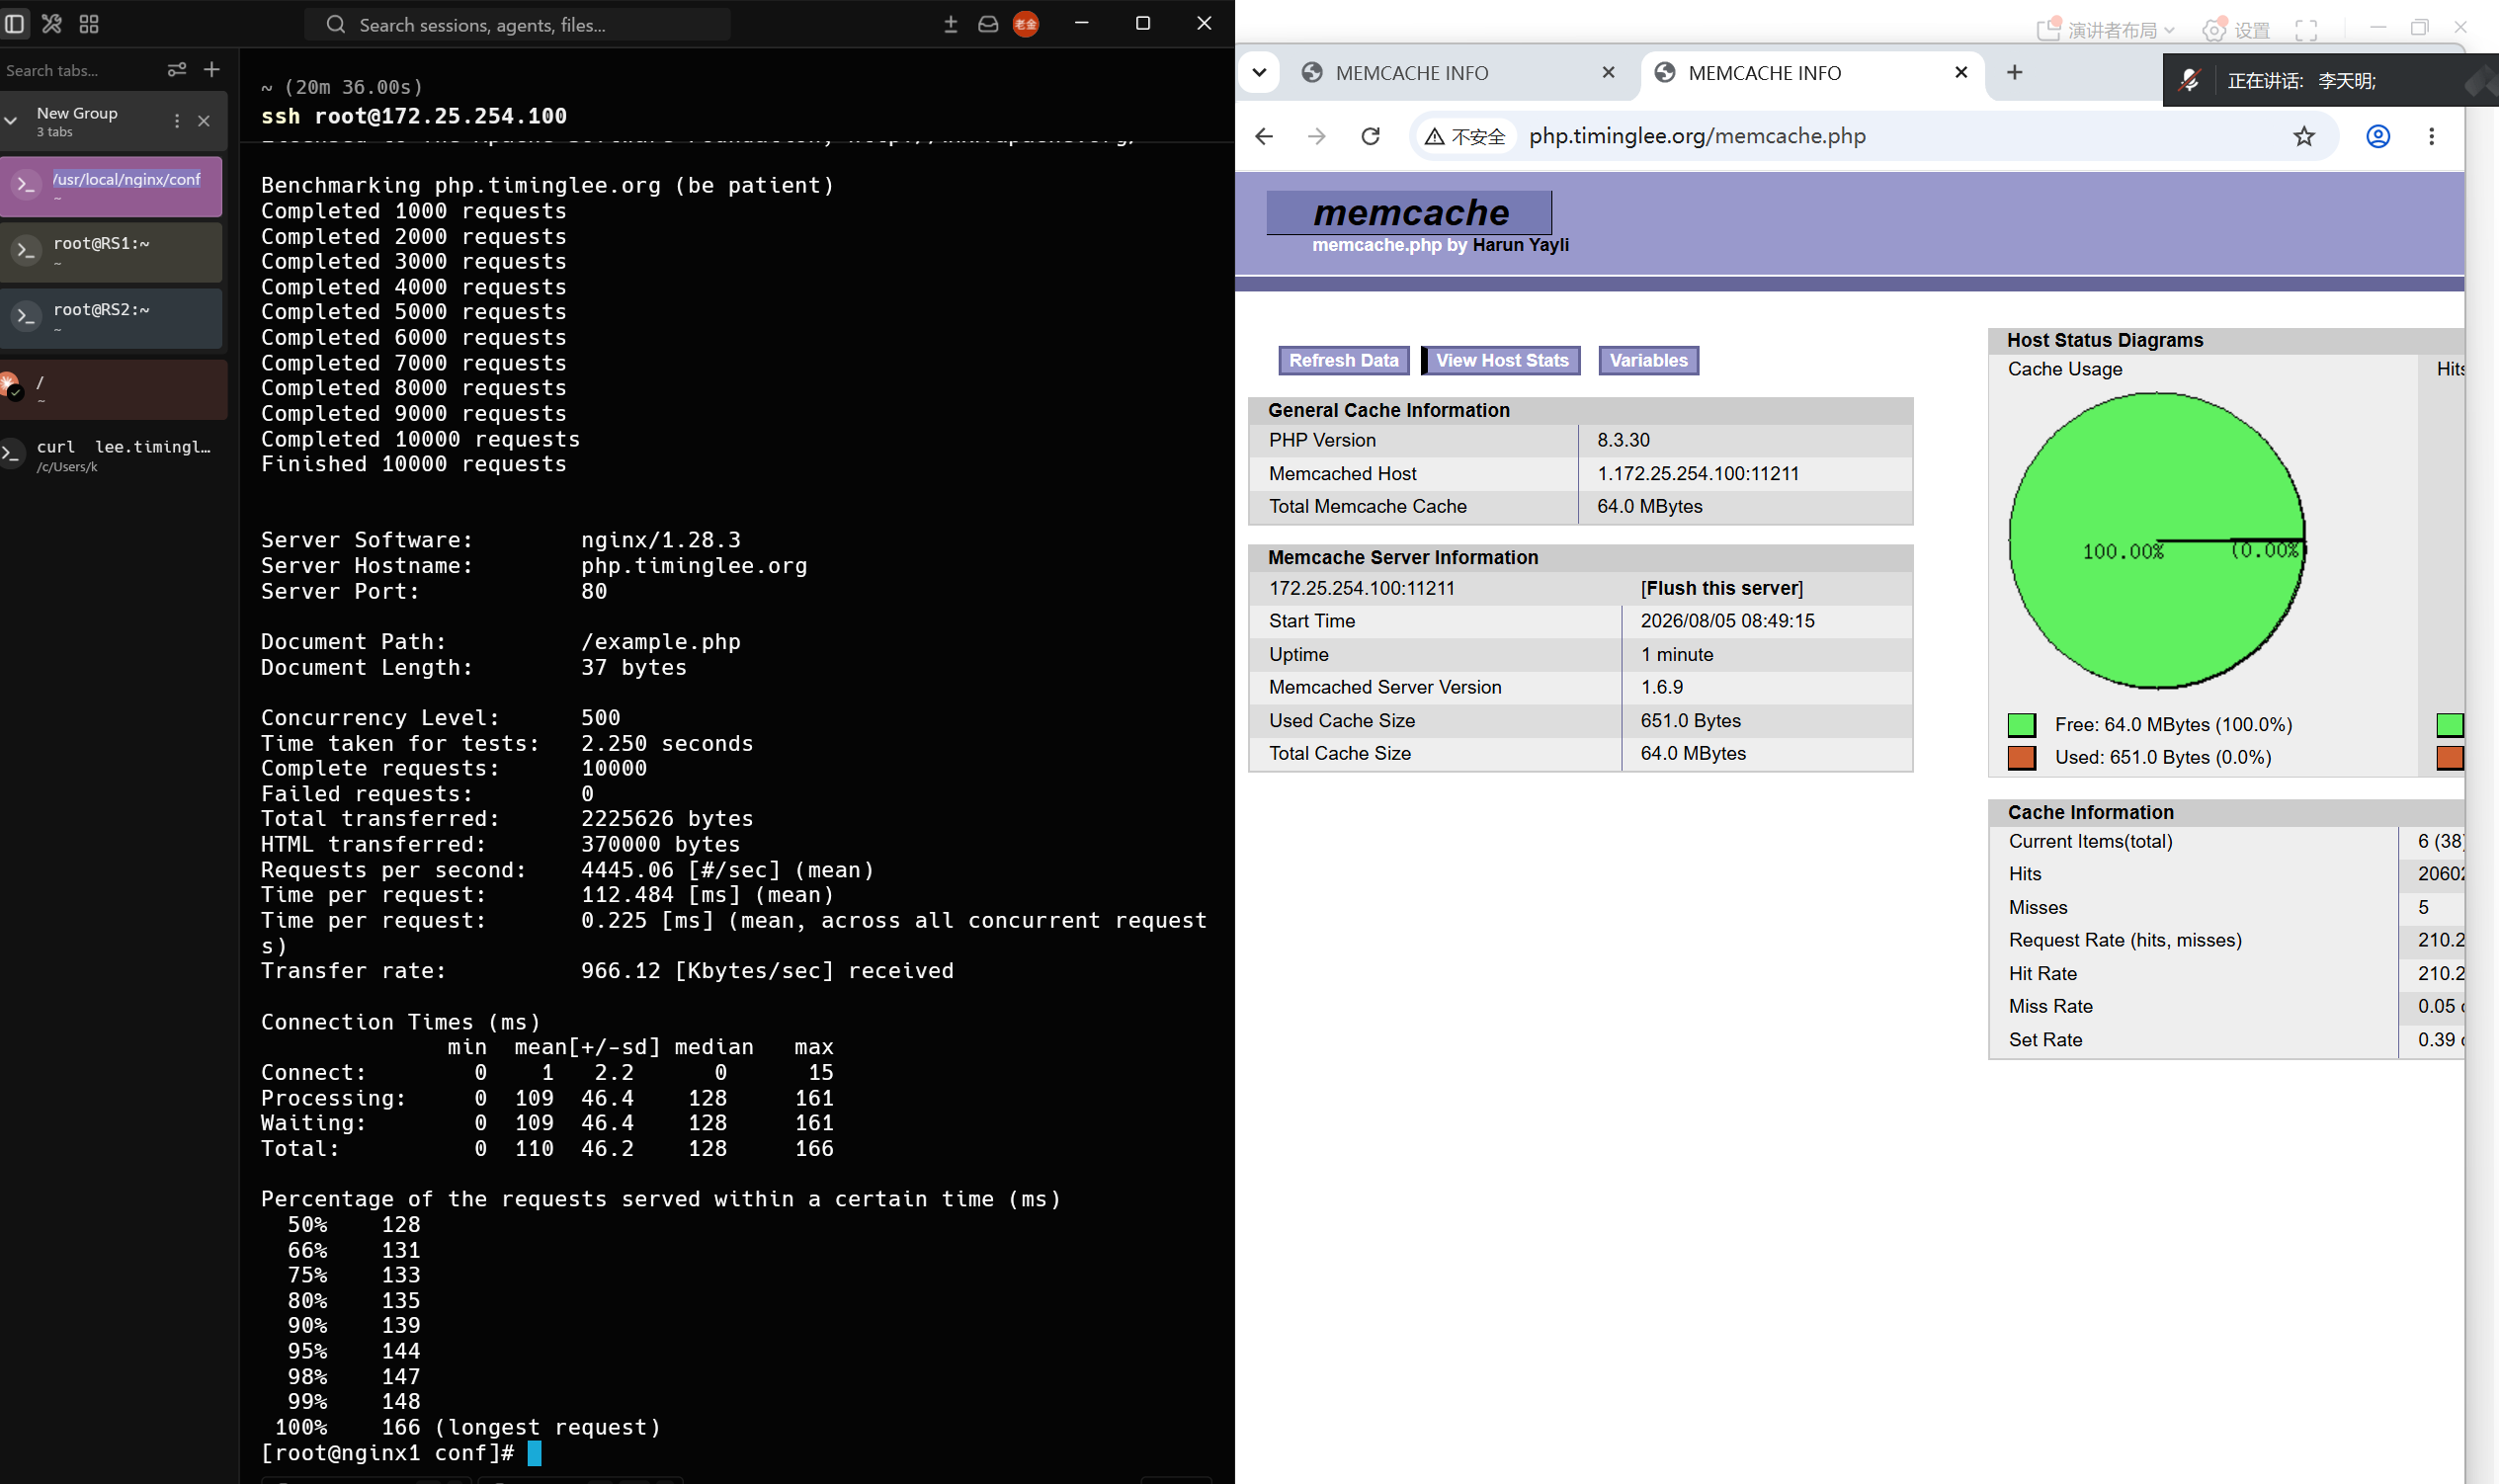
图 25:Nginx 加 Memcache 实现高速缓存实验截图
5. 编译安装 OpenResty
OpenResty 基于 Nginx,并集成 LuaJIT 及相关扩展,适合在 Nginx 请求处理阶段编写更复杂的逻辑。实验采用源码安装:
bash
wget https://openresty.org/download/openresty-1.27.1.2.tar.gz
dnf -yq install gcc pcre-devel openssl-devel perl zlib-devel
useradd -r -s /sbin/nologin nginx

tar zxf openresty-1.27.1.2.tar.gz
cd openresty-1.27.1.2

./configure \
  --prefix=/apps/openresty \
  --user=nginx \
  --group=nginx \
  --with-http_ssl_module \
  --with-http_v2_module \
  --with-http_stub_status_module \
  --with-http_gzip_static_module \
  --with-pcre \
  --with-stream \
  --with-stream_ssl_module \
  --with-stream_realip_module

gmake && gmake install
export PATH=$PATH:/apps/openresty/bin:/apps/openresty/nginx/sbin
openresty -v
openresty
知识库原始记录中 --prefix=/apps/openresty 与 PATH 示例存在路径不一致,本文统一使用 /apps/openresty,避免安装完成后命令找不到。验证默认页面:
bash
echo hello test > /apps/openresty/nginx/html/index.html
curl http://172.25.254.200
图 26:OpenResty 编译安装实验截图
6. Tomcat 安装与 systemd 管理
安装 Java 环境并部署 Tomcat 9:
bash
wget https://dlcdn.apache.org/tomcat/tomcat-9/v9.0.115/bin/apache-tomcat-9.0.115.tar.gz
yum install java-1.8.0-openjdk.x86_64 -y
tar zxf apache-tomcat-9.0.115.tar.gz -C /usr/local
mv /usr/local/apache-tomcat-9.0.115 /usr/local/tomcat
先使用脚本确认 Tomcat 能够启动:
bash
/usr/local/tomcat/bin/startup.sh
ss -lntp | grep 8080
再交给 systemd 管理:
ini
# /usr/local/tomcat/conf/tomcat.conf
JAVA_HOME=/etc/alternatives/jre
ini
# /lib/systemd/system/tomcat.service
[Unit]
Description=Tomcat
After=syslog.target network.target

[Service]
Type=forking
EnvironmentFile=/usr/local/tomcat/conf/tomcat.conf
ExecStart=/usr/local/tomcat/bin/startup.sh
ExecStop=/usr/local/tomcat/bin/shutdown.sh
PrivateTmp=true
User=tomcat
Group=tomcat

[Install]
WantedBy=multi-user.target
bash
useradd -s /sbin/nologin -M tomcat
chown -R tomcat:tomcat /usr/local/tomcat
systemctl daemon-reload
systemctl enable --now tomcat
ss -lntp | grep java
Tomcat 8080 是应用服务端口,8005 是本机关闭端口。对外通常只开放 Nginx 端口,避免直接暴露 Tomcat 管理接口。
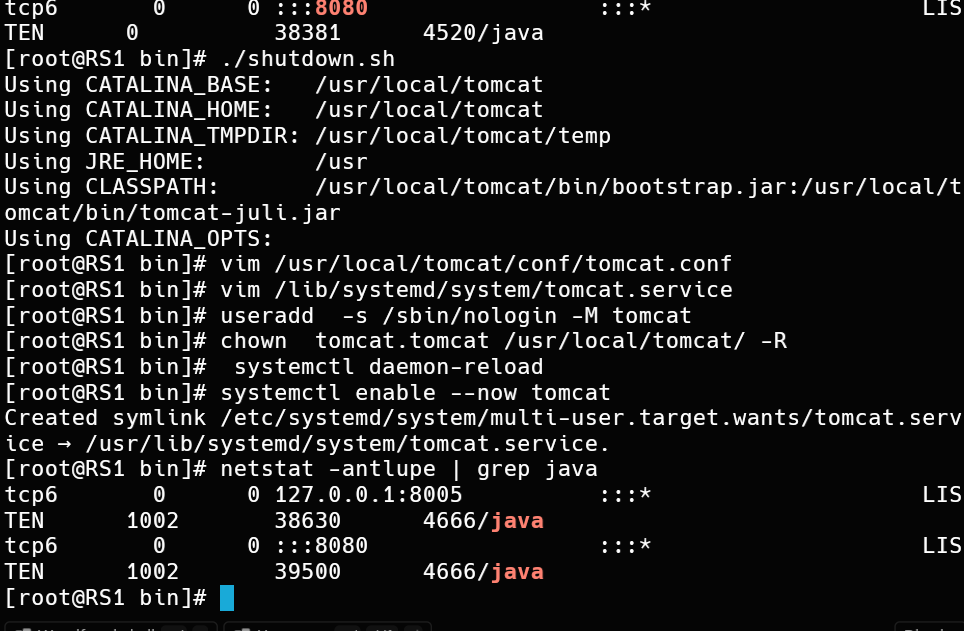
图 27:Tomcat 安装部署实验截图,原文件名:tomact.png
7. Nginx 整合 Tomcat 与会话保持
单体代理场景下,Nginx 将 JSP 请求转发到 Tomcat:
nginx
server {
    listen 80;
    server_name app.timinglee.org;

    location ~* \.jsp$ {
        proxy_pass http://172.25.254.10:8080;
    }
}
当 Tomcat 扩展到两个节点时,可以按照 JSESSIONID 对请求进行一致性分发:
nginx
upstream tomcat {
    hash $cookie_JSESSIONID;
    server 172.25.254.10:8080;
    server 172.25.254.20:8080;
}

server {
    listen 80;
    server_name app.timinglee.org;

    location ~* \.jsp$ {
        proxy_pass http://tomcat;
    }
}
这种方式只能解决请求路由稳定问题,不能替代 Session 共享。客户端 Cookie 丢失、节点故障或扩容都可能导致会话重新建立。
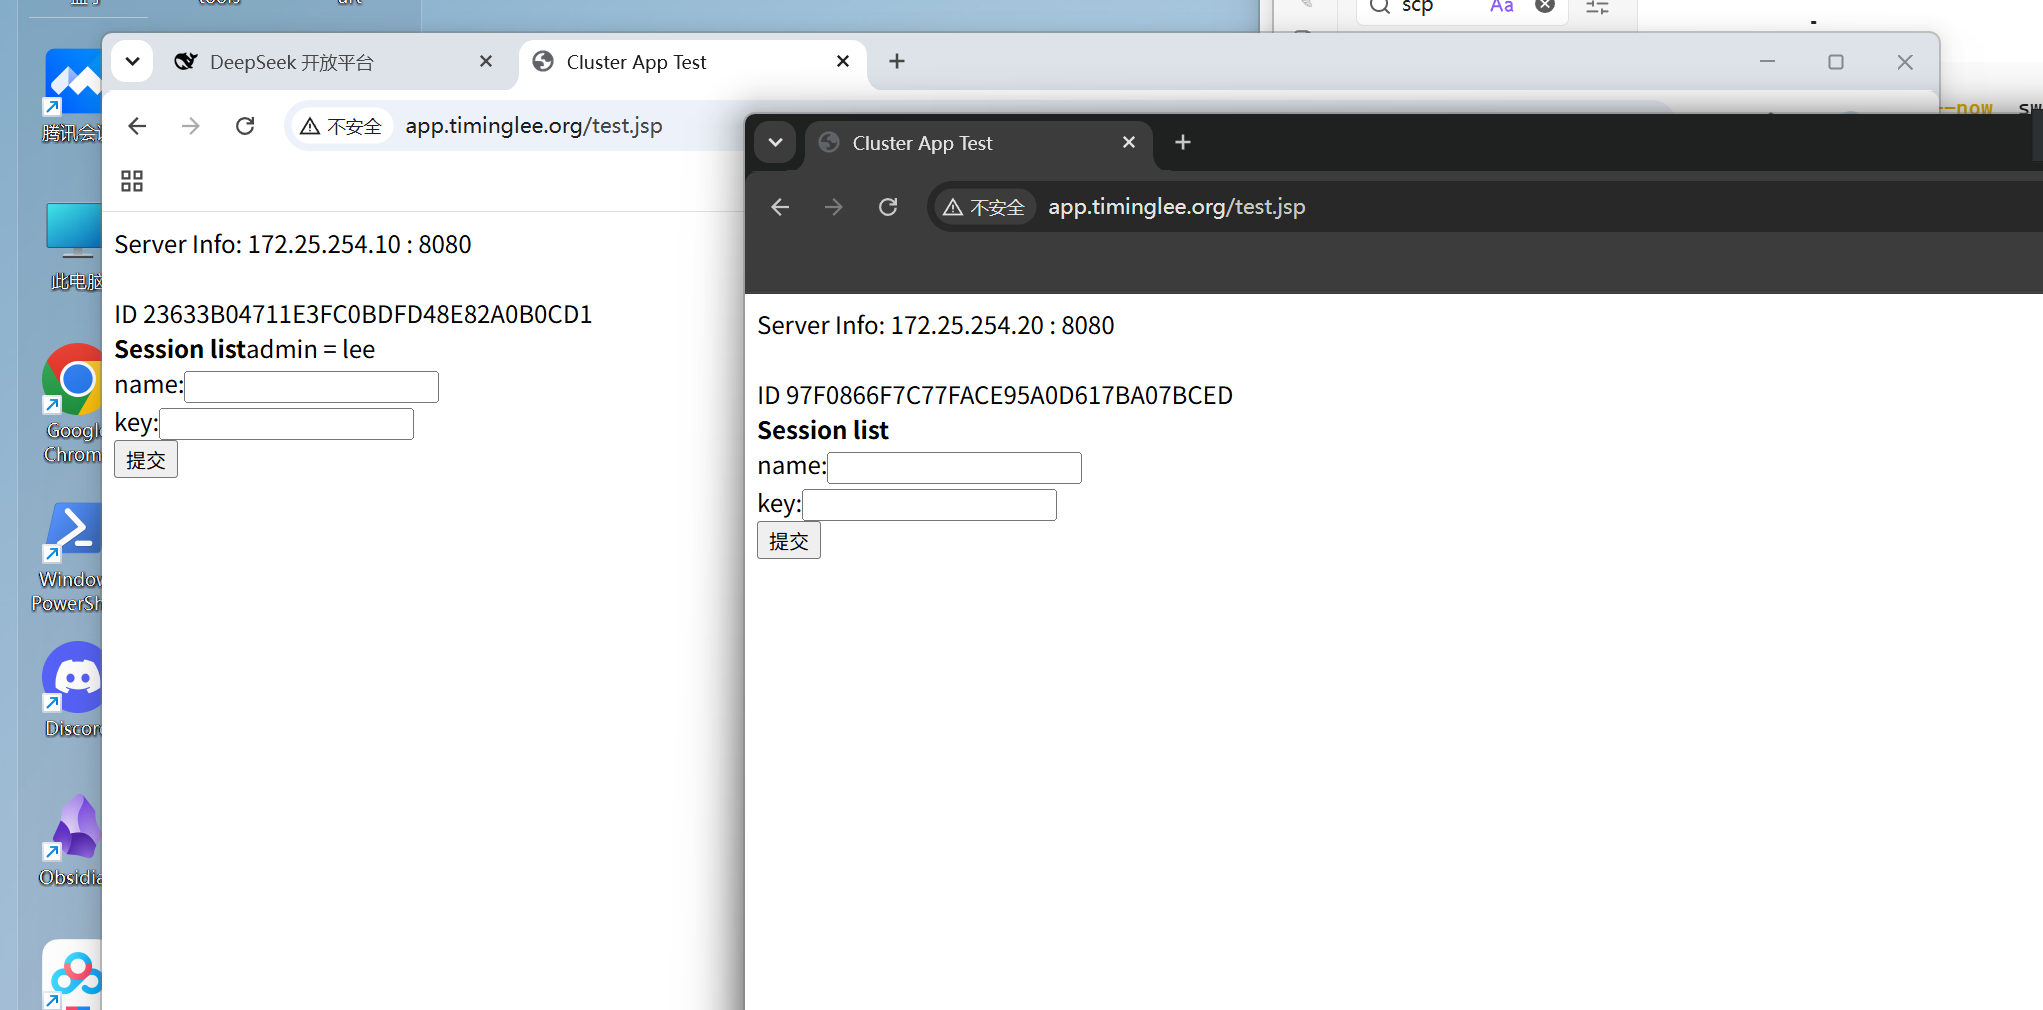
图 28:Nginx 与 Tomcat 负载均衡实验截图
8. Tomcat 使用 Memcache 实现 Session 共享
在两个 Tomcat 节点部署 Session 管理相关 Jar 包,并在两台机器上启动 Memcached:
bash
unzip jar.zip
cd jar
cp * /usr/local/tomcat/lib/
scp * root@172.25.254.20:/usr/local/tomcat/lib/

dnf install memcached -y
systemctl enable --now memcached
在两个 Tomcat 的 context.xml 中配置 Memcached Session Manager。两个节点分别设置对端故障转移节点:
xml
<Context>
    <WatchedResource>WEB-INF/web.xml</WatchedResource>
    <WatchedResource>WEB-INF/tomcat-web.xml</WatchedResource>
    <WatchedResource>${catalina.base}/conf/web.xml</WatchedResource>

    <Manager
        className="de.javakaffee.web.msm.MemcachedBackupSessionManager"
        memcachedNodes="n1:172.25.254.10:11211,n2:172.25.254.20:11211"
        failoverNodes="n1"
        requestUriIgnorePattern=".*\.(ico|png|gif|jpg|css|js)$"
        transcoderFactoryClass="de.javakaffee.web.msm.serializer.kryo.KryoTranscoderFactory" />
</Context>
第二个节点使用 failoverNodes="n2",完成配置后重启两个 Tomcat:
bash
systemctl restart tomcat.service该方案将 Session 备份到 Memcache,重点验证节点切换后 Session 是否仍然存在。Memcache 节点、Jar 包版本、序列化方式和 Tomcat 配置必须保持兼容,不能只复制一份 context.xml 就认为高可用已经完成。
十三、实验检查清单
- 源码安装完成后,确认
nginx -V的编译参数包含业务所需模块。 - 配置修改后,先执行
nginx -t,再执行nginx -s reload。 - 代理节点、后端节点和域名解析必须分开验证,不能只检查 Nginx 本机响应。
root和alias的路径语义不同,location 结尾斜杠必须统一设计。- 状态页、Basic Auth、错误日志和下载目录都要限制访问范围。
- 缓存上线前必须验证 Cookie、登录态、缓存键和失效策略。
- 平滑升级前备份旧二进制,升级后确认新旧 master、worker 和监听端口状态。
- TCP、UDP 四层代理使用
stream配置,HTTP 七层代理使用http、server和location配置。
结语
Nginx 实验的主线可以归纳为:先完成可控的源码安装,再建立清晰的配置目录;随后从静态站点扩展到反向代理、动静分离和负载均衡;最后补充缓存、安全、日志和四层代理。每个功能都必须通过「配置检查、进程状态、监听端口、客户端请求、后端日志」完成闭环验证。