文章目录
-
- [1. unittest 与 pytest 对比](#1. unittest 与 pytest 对比)
- [2. pytest 安装、执行、结果](#2. pytest 安装、执行、结果)
-
- [2.1 pytest 运行用例的方法(核心掌握)](#2.1 pytest 运行用例的方法(核心掌握))
- [2.2 pytest 执行结果的各项意义(简单举例)](#2.2 pytest 执行结果的各项意义(简单举例))
- [2.3 pytest 的用例结果包含的情况及含义(结果截图示例)](#2.3 pytest 的用例结果包含的情况及含义(结果截图示例))
- [3. pytest 用例规则(用例发现规则、用例内容规则)](#3. pytest 用例规则(用例发现规则、用例内容规则))
-
- [3.1 用例发现规则:pytest 如何去找到要执行的用例?](#3.1 用例发现规则:pytest 如何去找到要执行的用例?)
- [3.2 用例内容规则(了解)](#3.2 用例内容规则(了解))
- [4. 配置框架](#4. 配置框架)
-
- [4.1 pytest 有哪些入参,分别是什么意思?](#4.1 pytest 有哪些入参,分别是什么意思?)
- [5. 标记用例:mark](#5. 标记用例:mark)
-
- [5.1 @pytest.mark 用户自定义标记](#5.1 @pytest.mark 用户自定义标记)
- [5.2 @pytest.mark 内置标记](#5.2 @pytest.mark 内置标记)
- [6. fixture 的深度理解](#6. fixture 的深度理解)
-
- [6.1 创建fixture](#6.1 创建fixture)
- [6.2 使用fixture 的方式](#6.2 使用fixture 的方式)
- [6.3 使用fixture 的不同场景](#6.3 使用fixture 的不同场景)
- [6.4 使用conftest.py的应用fixture,实现全局的共享](#6.4 使用conftest.py的应用fixture,实现全局的共享)
- [7. pytest 插件管理(与本章4.1结合 重)](#7. pytest 插件管理(与本章4.1结合 重))
-
- [7.0 pytest 常用插件的使用方式](#7.0 pytest 常用插件的使用方式)
- [7.1 pytest 常用插件 及 对应功能](#7.1 pytest 常用插件 及 对应功能)
-
- [7.1.1 pytest-html 如何使用?生成html报告](#7.1.1 pytest-html 如何使用?生成html报告)
- [7.1.2 pytest-xdist分布式执行用例,多进程](#7.1.2 pytest-xdist分布式执行用例,多进程)
- [7.1.3 pytest-rerunfailures用例执行失败后重新执行](#7.1.3 pytest-rerunfailures用例执行失败后重新执行)
- [7.1.4 pytest-result-log 用例结果记录至日志文件(仅在配置文件中使用,因为配置参数较多)](#7.1.4 pytest-result-log 用例结果记录至日志文件(仅在配置文件中使用,因为配置参数较多))
- [7.1.5 allure-pytest 测试报告美化(企业级测试报告)](#7.1.5 allure-pytest 测试报告美化(企业级测试报告))
- [7.2 allure 装饰用例,自定义测试报告(继本章7.1.5)](#7.2 allure 装饰用例,自定义测试报告(继本章7.1.5))
1. unittest 与 pytest 对比
| unittest | pytest | |
|---|---|---|
| 安装、卸载 | 无需安装 | 手动安装 |
| 升级、降级 | 无法改变版本 | 可以指定版本 |
| 代码风格 | java语言 | python语言 |
| 插件生态 | 只有几个插件 | 1400+插件涵盖各个方面 |
| 备注 | 由python官方维护 | 完全兼容unittest |
2. pytest 安装、执行、结果
python
pip install pytest # 安装
pip install pytest -U # 升级最新版
2.1 pytest 运行用例的方法(核心掌握)
bash
1.pytest的程序运行的方法:
        a.主函数模式
            运行所有case: pytest.main()
            指定模块所有case: pytest.main(['-vs','test_module.py'])
            指定目录所有case:pytest.main(['-vs','./test_manage'])
            指定nodeid执行用例:nodeid由模块名、分隔符、类名、方法名、函数名组成。
                eg:pytest.main(['-vs','./api_testcase/testlogin.py::TestLogin::test_01_login'])
        b.命令行模式
            运行所有:pytest
            执行模块:pytest -vs test_login.py
            执行目录:pytest -vs ./api_testcase
            指定nodeid执行用例: pytest -vs ./api_testcase/testlogin.py::TestLogin::test_01_login
        c.通过读取pytest.ini配置文件运行(最为常用的方式)
            0.pytest.ini是pytest单元测试框架的核心配置文件(不管是主函数模式/命令行模式运行,都会读取该文件)
            1.pytest.ini一般放置在项目的根目录
            2.pytest.ini的编码必须是GBK(最近发现可以)ANSI,可以使用notepad++修改编码格式(不可有中文)
            3.作用:改变pytest的默认的行为
                    [pytest]
                    # 命令行入参全部放置在addopts,以空格间隔
                    addopts = -vs
                    # 测试用例文件夹,
                    testpaths = ../pytest_demo
                    # 文件名
                    python_files = test*.py test_* *_test test*
                    # 类名
                    python_classes = Test* test*
                    # 用例函数
                    python_functions = test_* test*
                    # 控制台实时输出日志(批量运行,耗费性能)
                    log_cli = True
                    # 如case被xfail标记(预期失败),但是实际却成功了,结果会显示xfailed,=True时,结果显示:failed
                    xfail_strict = True
                    # 标记case的模块名称(分组执行,如:冒烟测试:1.用例装饰@pytest.mark.smoke;2.ini配置;3.执行带参数 -m
                    markers =
                            smoke: just do a smoketest
                            login: login api
                            userinfo: user info api
2.2 pytest 执行结果的各项意义(简单举例)
bash
================================================ test session starts =========================================
platform win32 -- Python 3.13.14, pytest-9.1.1, pluggy-1.6.0
rootdir: D:\study\pytest2026-sample
plugins: allure-pytest-2.16.0, anyio-4.14.2
collected 2 items
test_cases.py .F                                                                                    [100%]
================ FAILURES =================================
____________________________ test_fail ___________________________________________
    def test_fail():
>       assert False
E       assert False
test_cases.py:9: AssertionError
============================= short test summary info ===================================================
FAILED test_cases.py::test_fail - assert False
============================== 1 failed, 1 passed in 0.10s =======================================- 执行环境:版本、根目录、用例数量
- 执行过程:文件名称、用例结果、执行进度
- 失败详情:用例内容、断言失败原因提示
- 整体摘要:结果情况、结果数量、花费时间
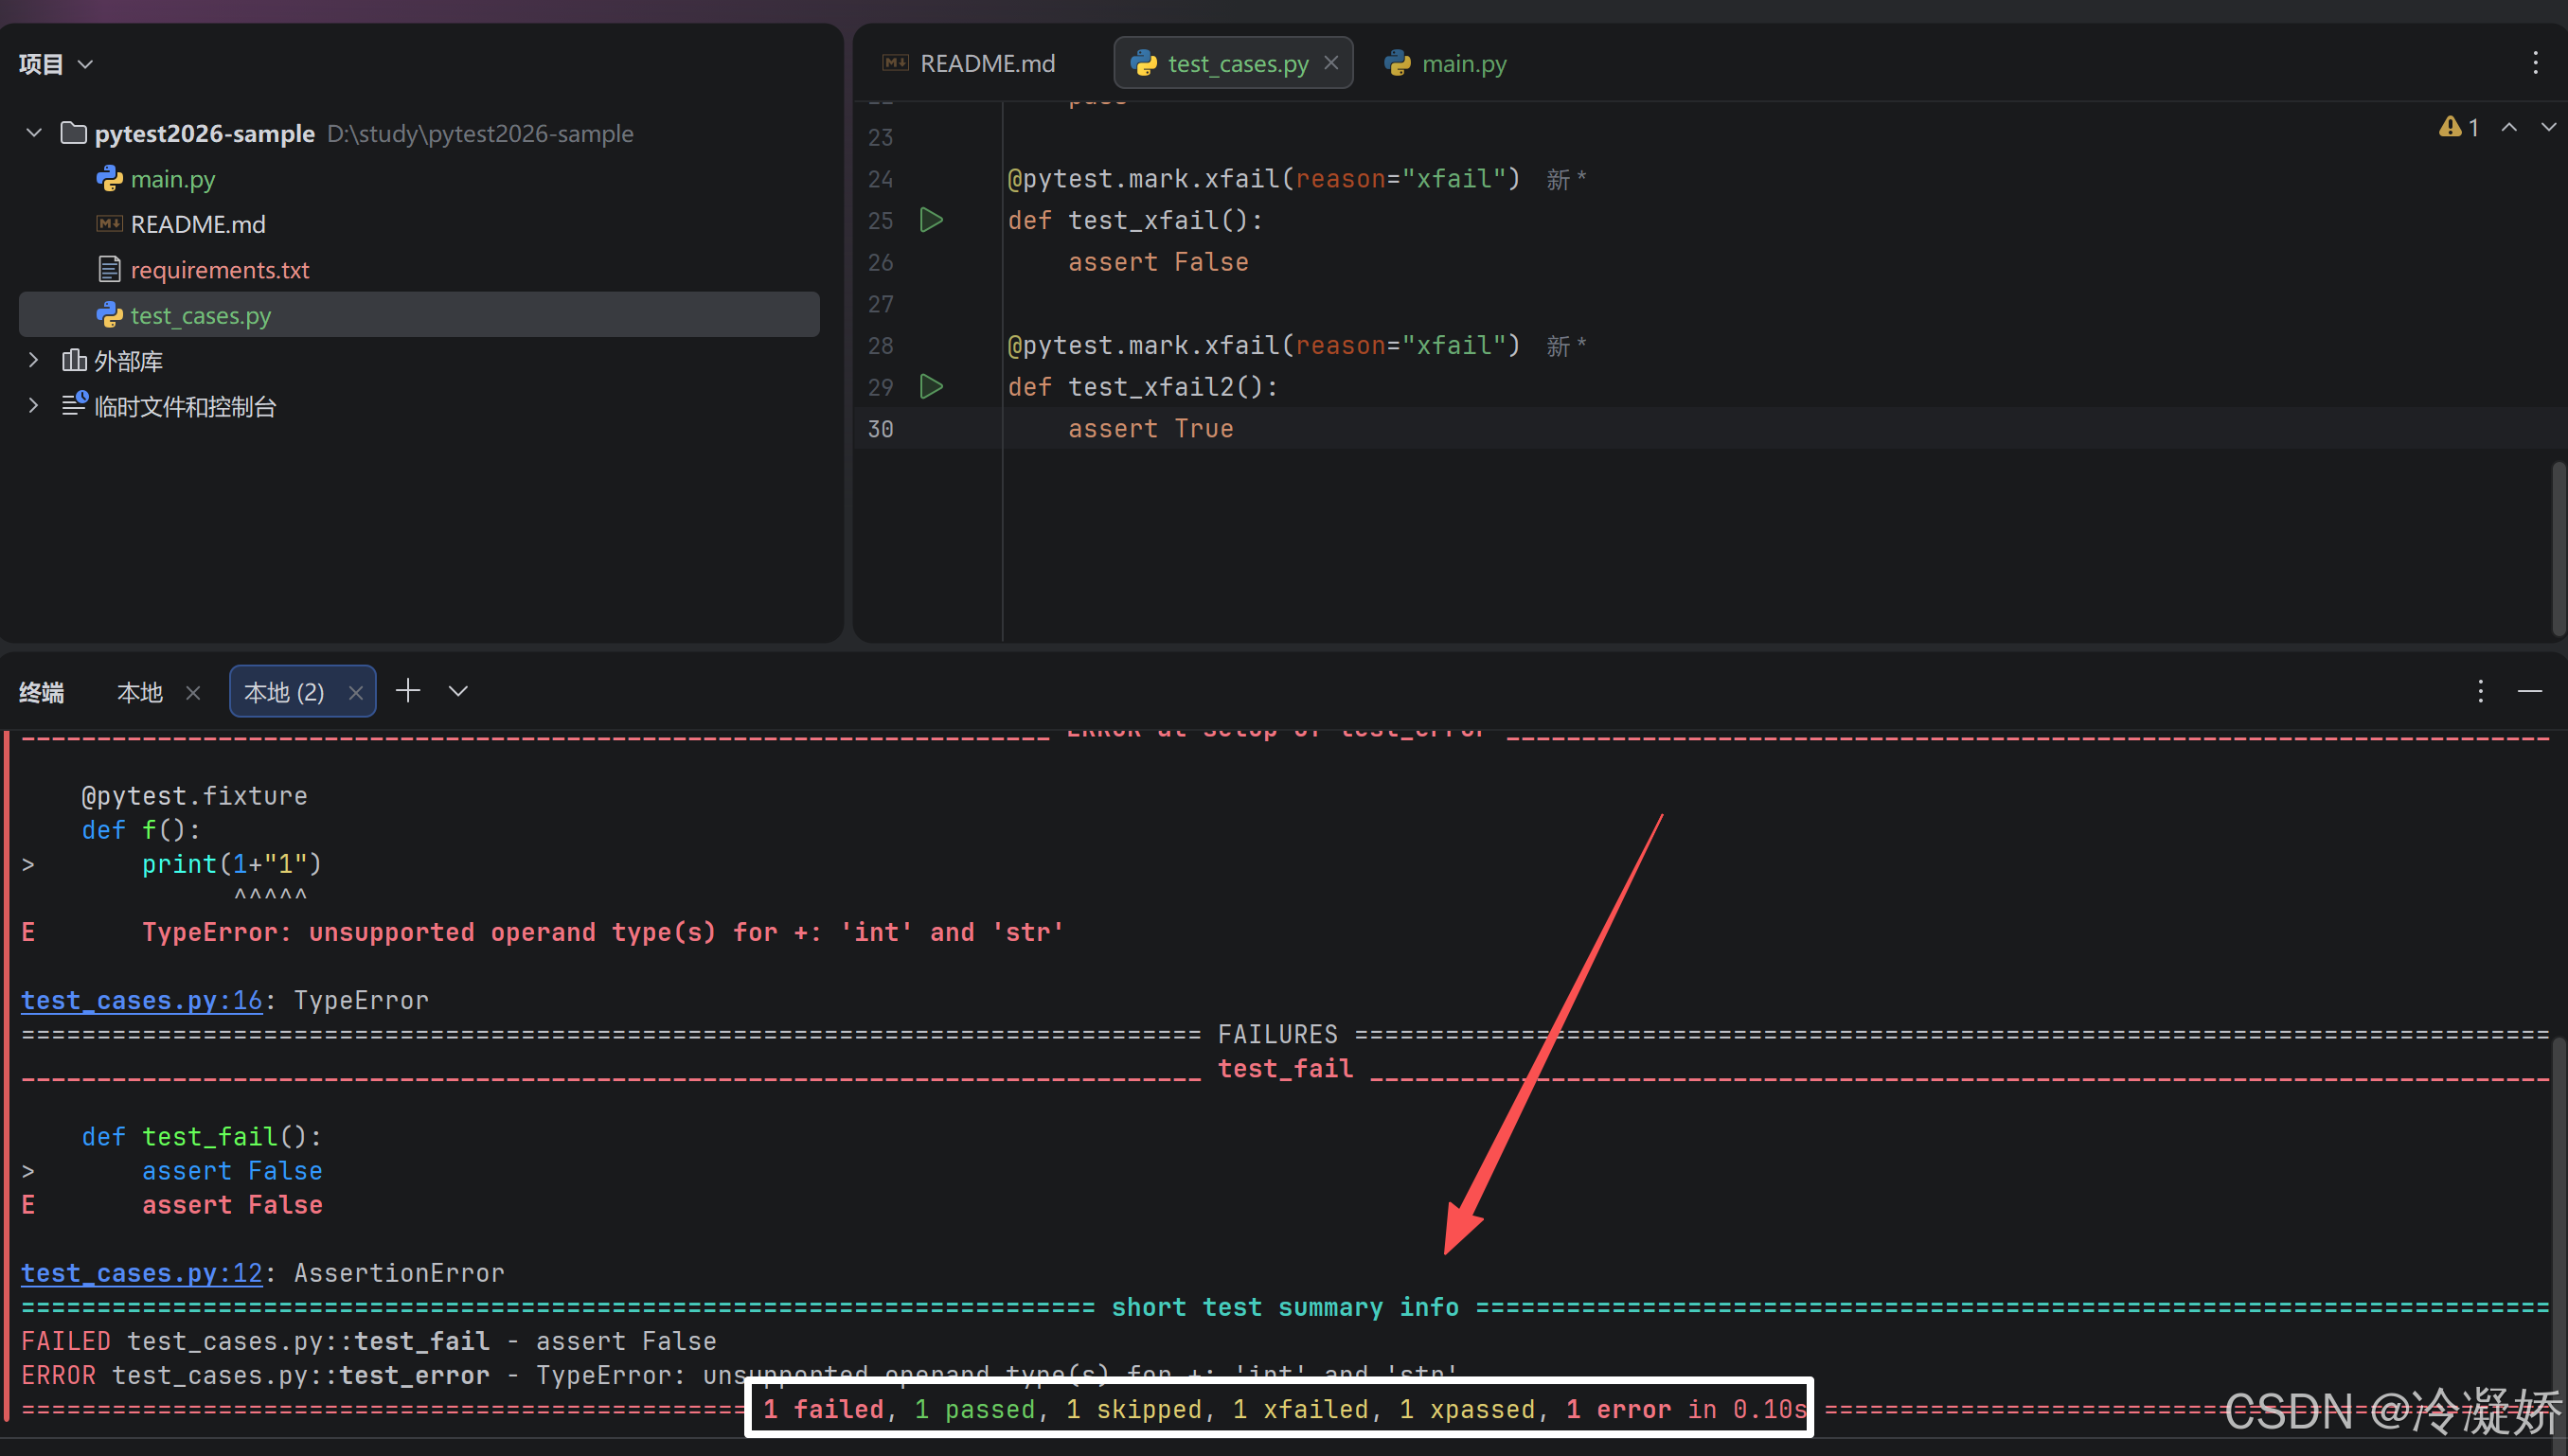
2.3 pytest 的用例结果包含的情况及含义(结果截图示例)
| 缩写 | 单词 | 含义 |
|---|---|---|
| . | passed | 通过 |
| F | failed | 失败(用例执行时报错) |
| E | error | 出错(fixture执行报错) |
| s | skiped | 跳过 |
| X | xpassed | 预期外的通过(不符合预期) |
| x | xfailed | 预期内的失败(符合预期) |
3. pytest 用例规则(用例发现规则、用例内容规则)
3.1 用例发现规则:pytest 如何去找到要执行的用例?
bash
**用例发现**:测试框架在识别、加载用例的过程,称之为:用例发现。
bash
pytest的用例发现步骤:
		1. 遍历所有的目录,例外:.venv, '.'开头的目录及文件不在遍历范围
		2. 打开遍历目录下的所有以'test_开头'或'_test结尾'的py文件
		3. 遍历测试类必须以Test开头,而且,类不允许含有__init__方法
		4. 收集'test'开头的函数或者方法
3.2 用例内容规则(了解)
bash
pytest对用例内容的要求:
		1. 可调用(函数、方法、类、对象)
		2. 名字'test'开头
		3. 没有参数(参数有另外含义)
		4. 没有返回值(默认为None)
4. 配置框架
配置 :可以改变pytest的默认规则。详见:本章 2.1
bash
1. 命令参数
2. ini配置文件--->pytest.ini
pytest.ini是pytest单元测试框架的核心配置文件(不管是主函数模式/命令行模式运行,都会读取该文件),一般放置在项目的根目录。pytest.ini的编码必须是GBK(最近发现可以)ANSI,可以使用notepad++修改编码格式(不可有中文)。
4.1 pytest 有哪些入参,分别是什么意思?
bash
4. 首先了解pytest运行都有哪些常用的入参,各自是什么意思,如何使用?
        -s: 输出调试信息,其中包含在代码中print的内容
        -v: 显示更为详细的信息(相对与-s而已,-vs更详细),备注:-vs这两个参数一起使用
        -n: 支持多线程、更或者分布式运行测试用例
        --reruns {num}: 失败用例重新执行测试设置
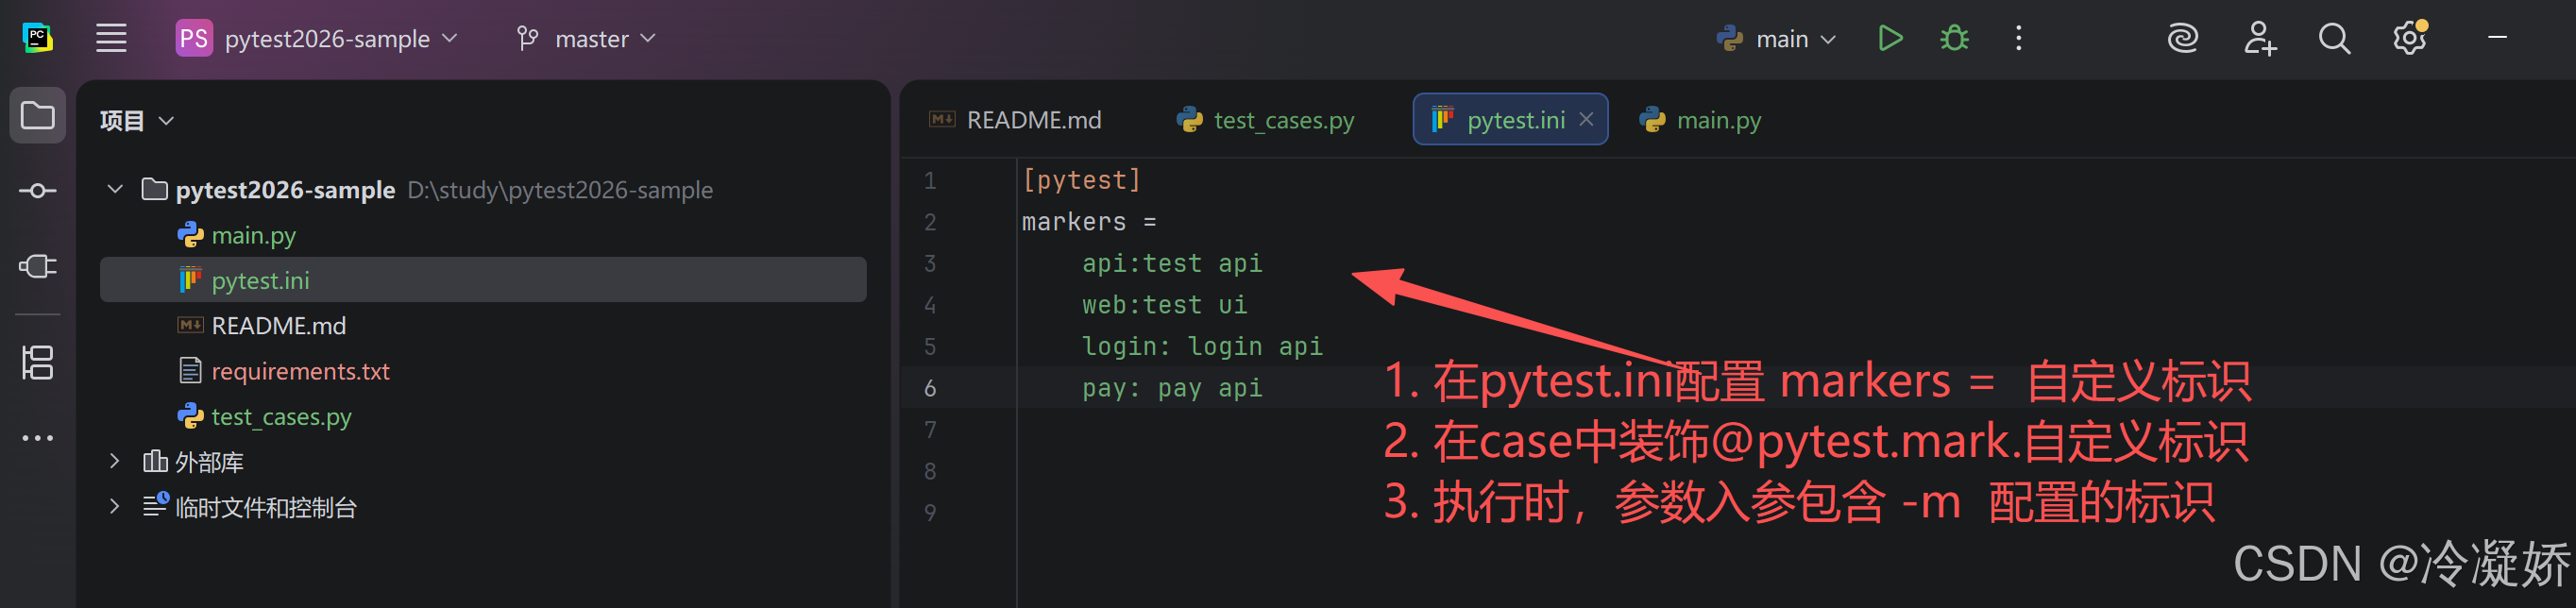
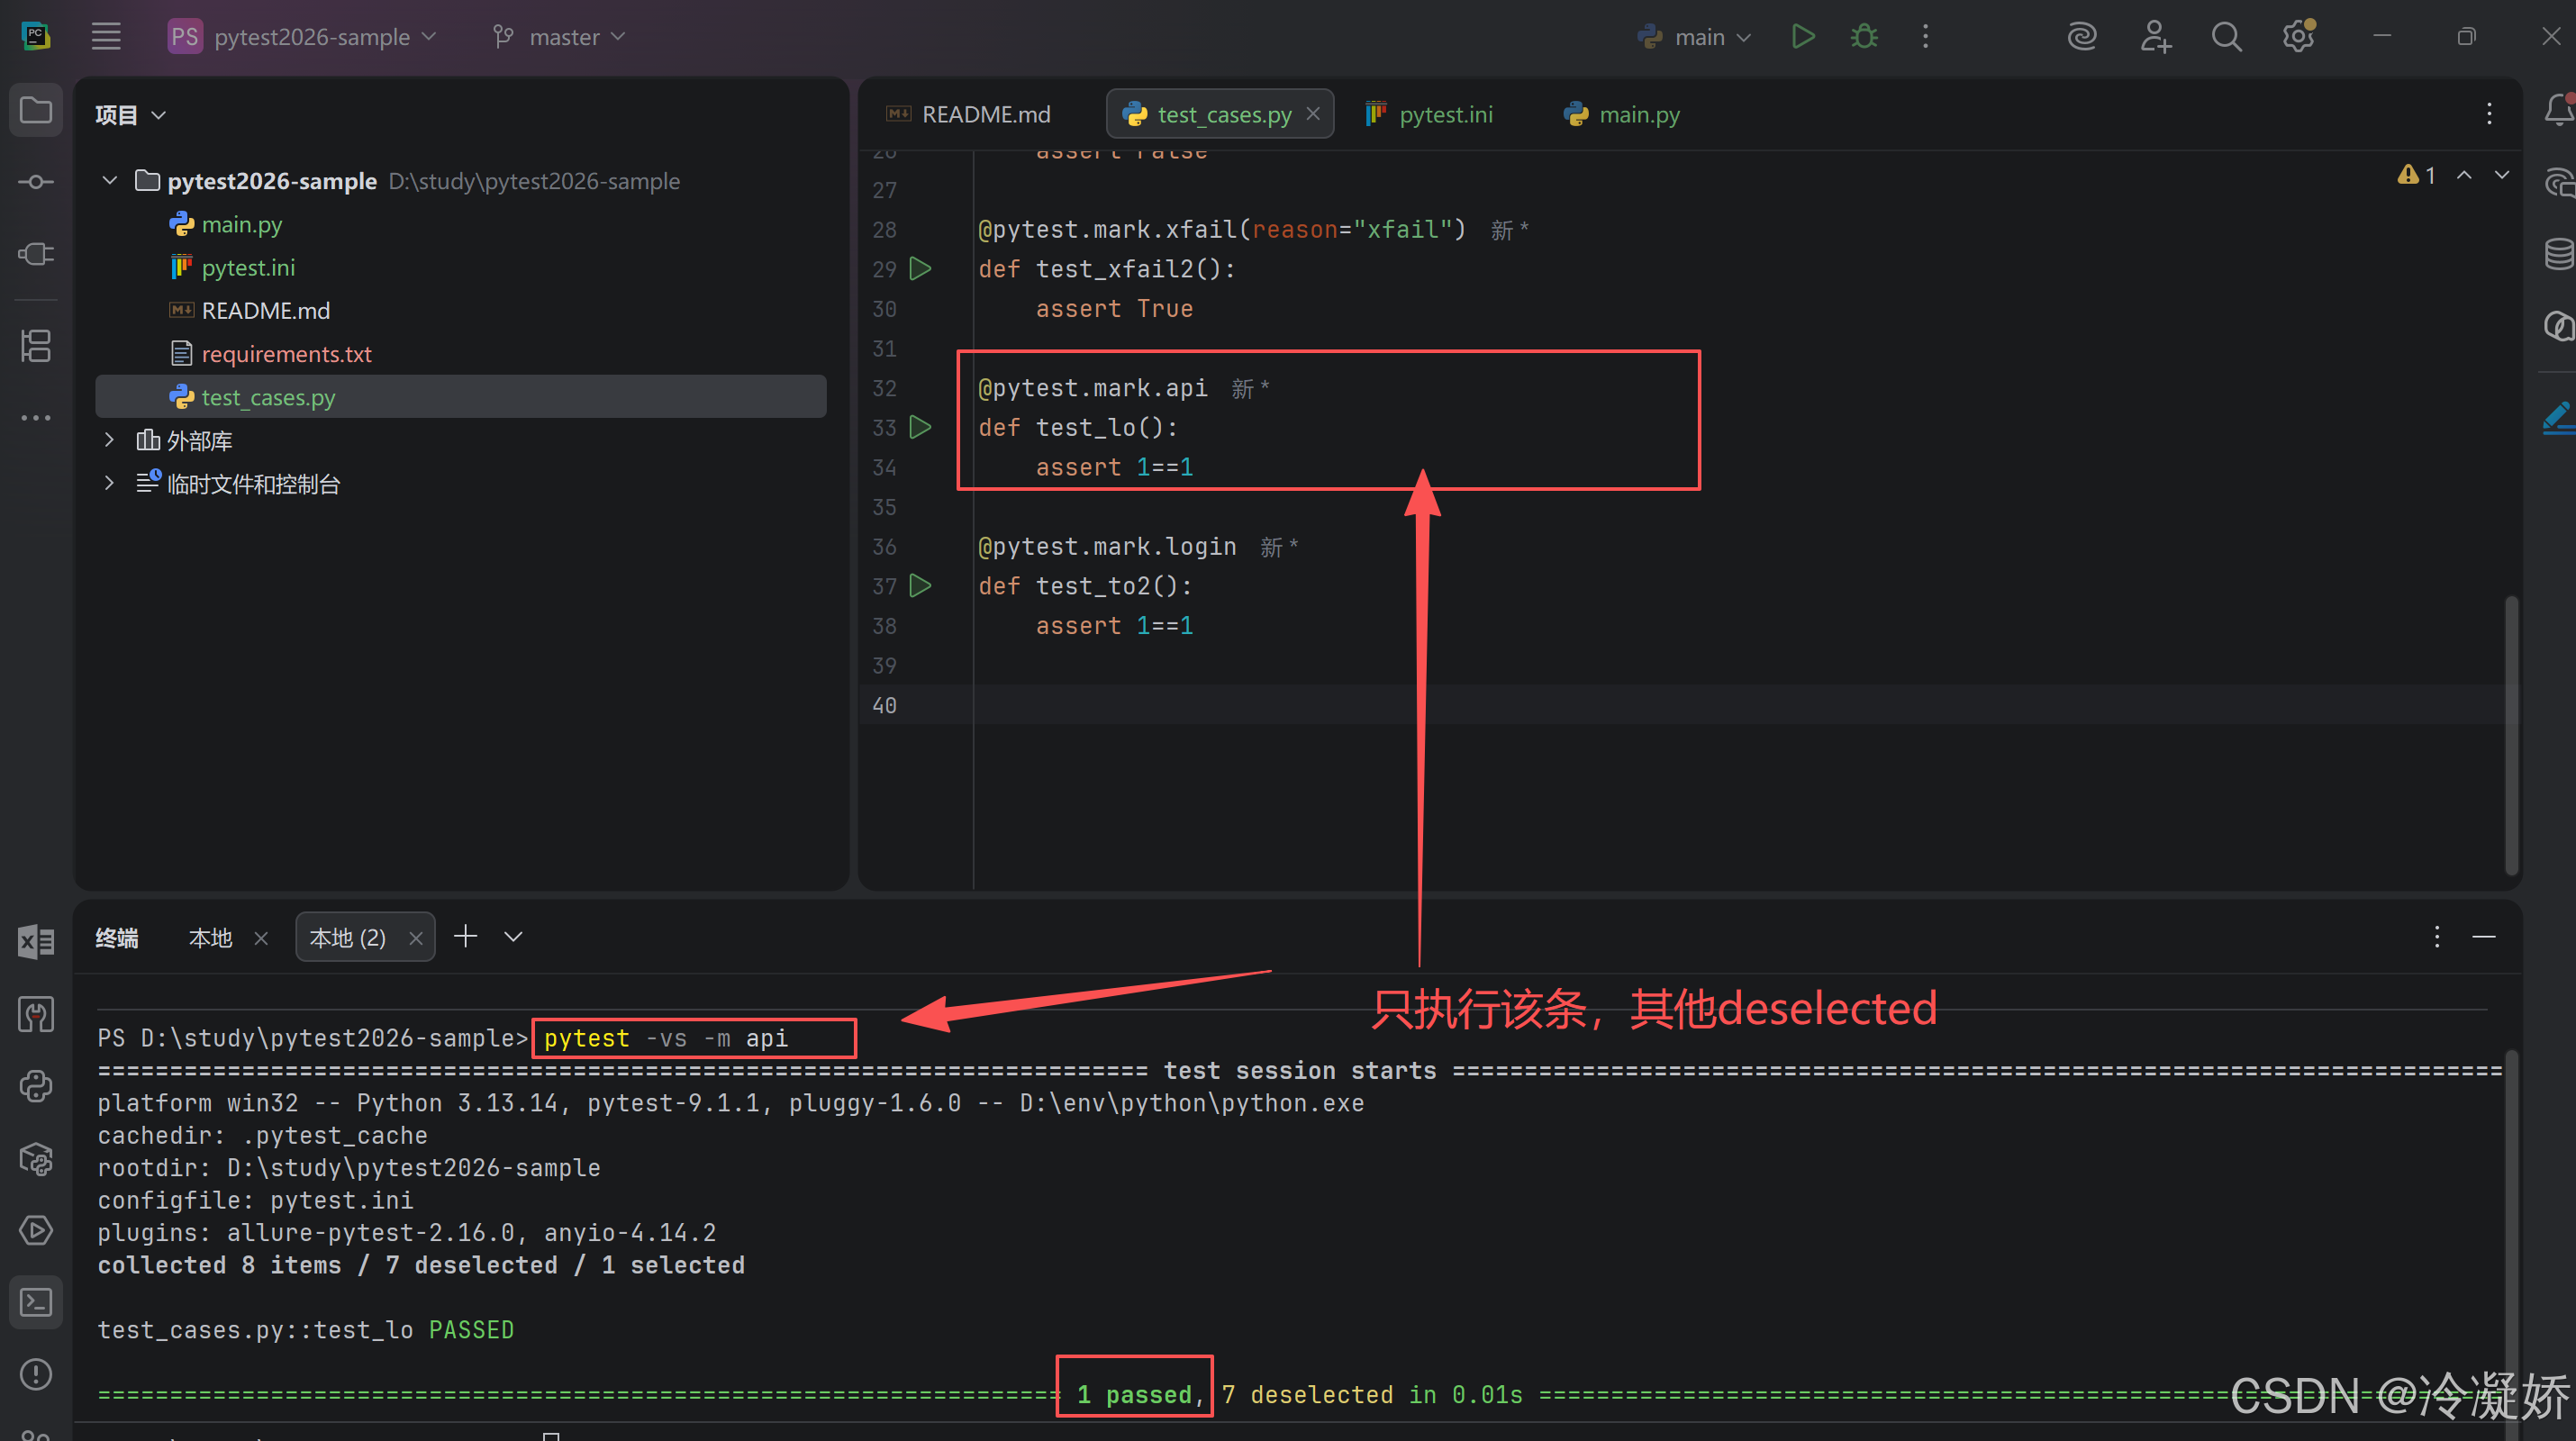
        -m: 指定装饰器装饰的case的运行用例(注意:步骤 1.装饰器装饰case, @pytest.mark.o;
                                             步骤 2.pytest.ini中配置 markers =
                                                                 o: TTT
                                                                 smoke: just a smoke test
                                                                 login: login api
                                             步骤 3.执行时,加上参数 -m 模块)
        -k: 根据测试用例的部分字符串指定要执行测试用例,eg:pytest -vs ./testcase -n 2 -x -k 'test'
        --html path: 生成html报告
        -x: 只要有一个case失败,所有case停止
        --maxfail=2: 出现2个用例失败就停止;即:--maxfail={num}设置用例最大失败次数
        --alluredir path: 临时json报告,再生成allure报告:os.system('allure generate ./temp -o ./report --clean')
 ----------------------------------------------------------------------------------------------------------------------------------------------------------------------------------------------------------------------------------------------------------------------------------
下载allure:https://github.com/allure-framework/allure2/releases
         allure generate : allure命令
                          第一个入参: ./temp, 临时的json格式报告的路径
                          -o:output   后面跟具体输出到的目录
                          --clean:   清空 -o后面跟的目录的原有的报告
5. 标记用例:mark
标记 :让用例与众不同,进而可以让用例被(区别/过滤)执行。
bash
1. 用户自定义标记:只能实现用例筛选,配合 pytest -m 参数 执行。
2. 框架内置标记:除了过滤用例,还可为用例增加特殊的执行效果。
5.1 @pytest.mark 用户自定义标记
5.2 @pytest.mark 内置标记
txt
内置标记:不需要在pytest.ini配置文件中去配置。是pytest自带的。
1. @pytest.mark.skip():无条件跳过
2. @pytest.mark.skipif():有条件跳过
3. @pytest.mark.xfail():预期失败
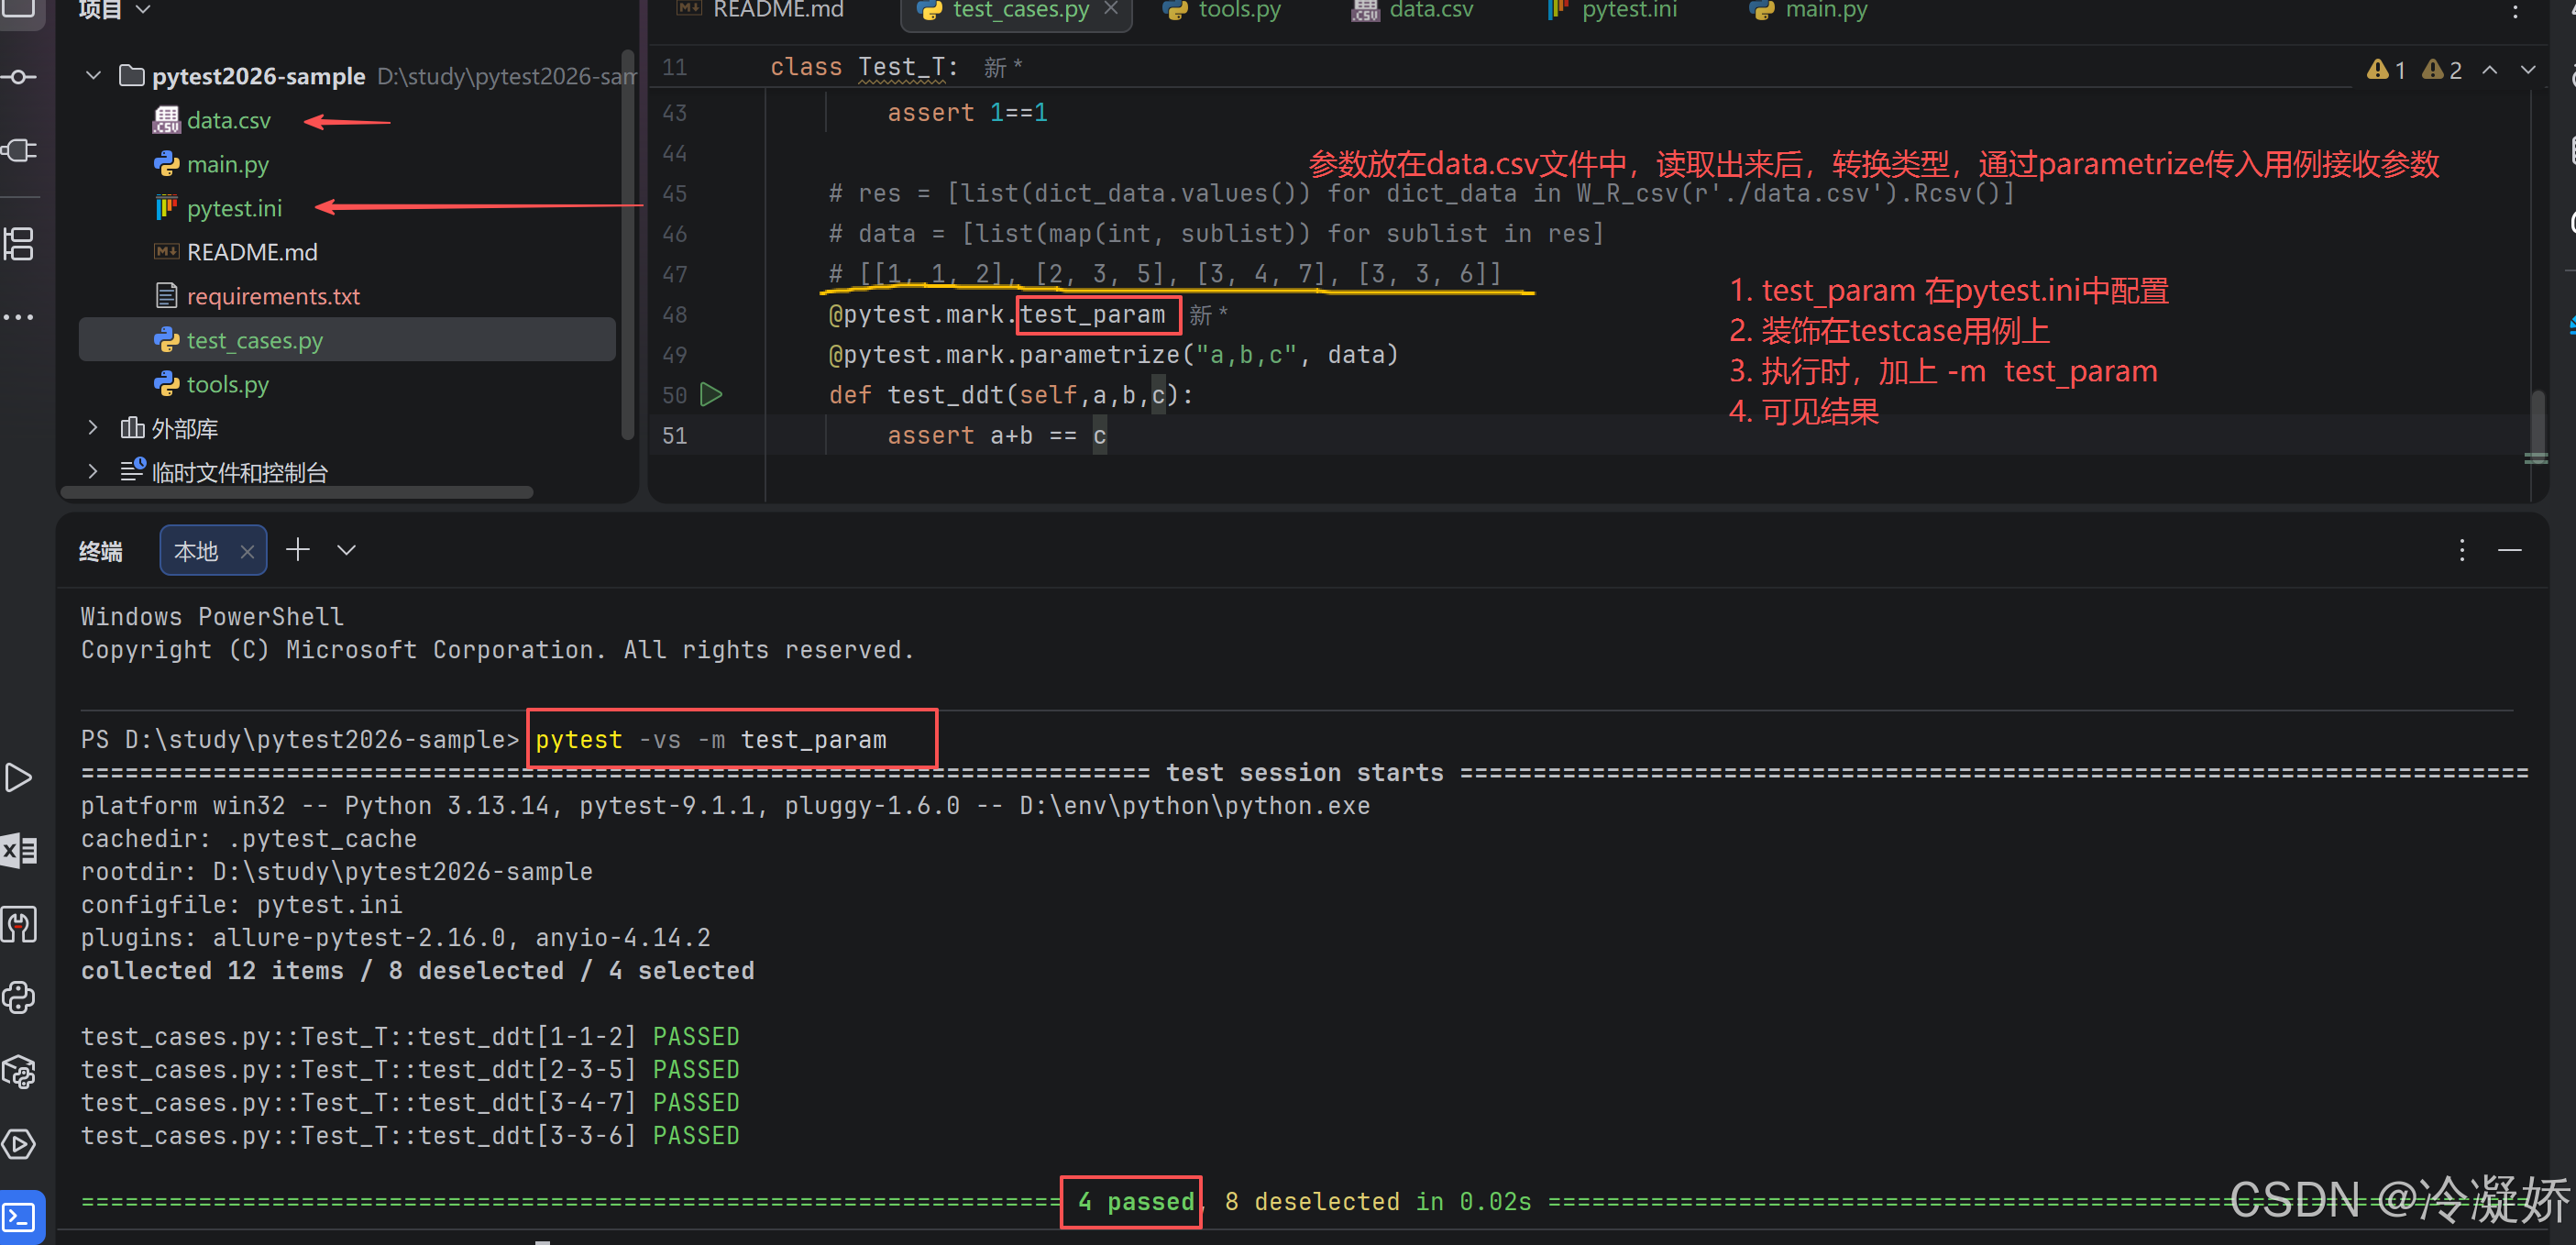
4. @pytest.mark.parametrize():参数化(最用的多的)
5. @pytest.mark.usefixtures():使用fixture
参数化示例:
python
eg:
   @pytest.mark.parametrize('args',['123','456','789'])
   @pytest.mark.o
   def test_todo_02(self,args):
       print('todo----2%s'%args, end='\r\n')

   @pytest.mark.parametrize('name,age',[['代华','12'],['不代华','9']])
   @pytest.mark.o
   def test_todo_03(self,name,age):
       print('todo----2%s,%s' % (name,age), end='\r\n')
截图示例:
6. fixture 的深度理解
6.1 创建fixture
python
import pytest

@pytest.fixture
def f():
    # 前置操作
    print("前置操作")
    yield "返回值"
    # 后置操作
    print("后置操作")
截图示例:加强理解
6.2 使用fixture 的方式
python
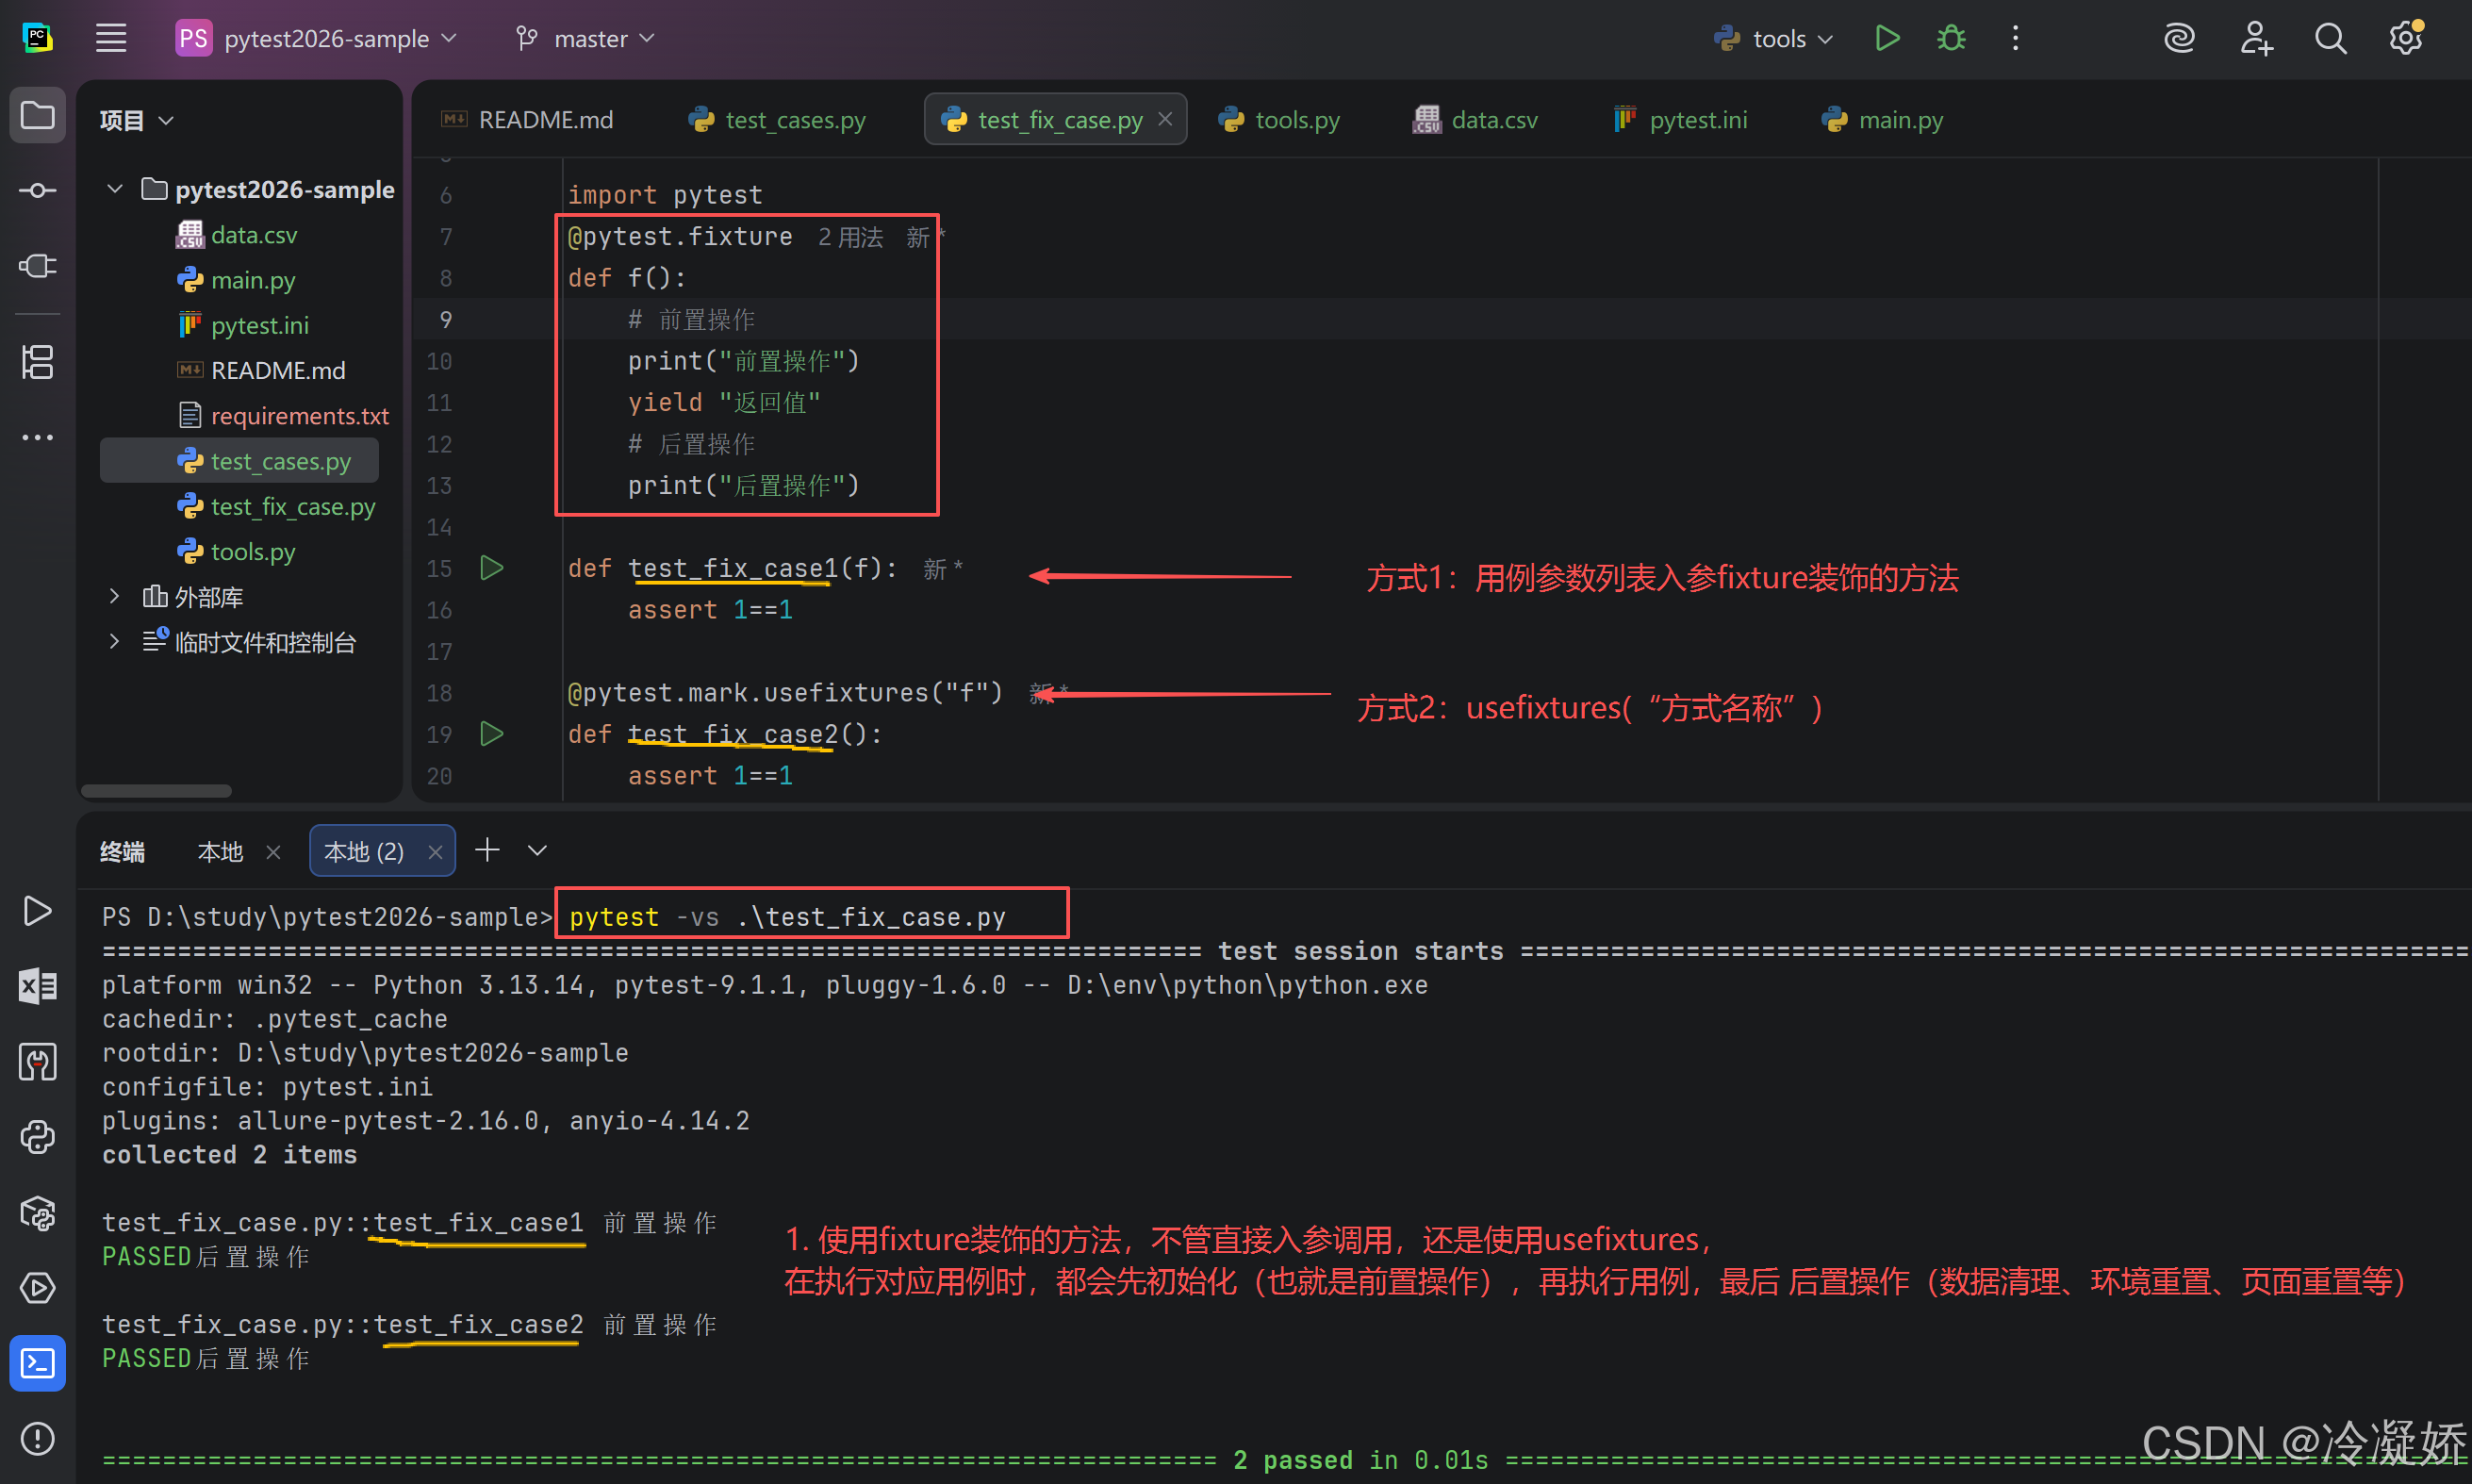
1. 方式一:在用例的参数中,传入fixture装饰的方法名称。
2. 方式二:使用@pytest.mark.usefixtures("fixture方法名称") 装饰用例。
示例:
6.3 使用fixture 的不同场景
python
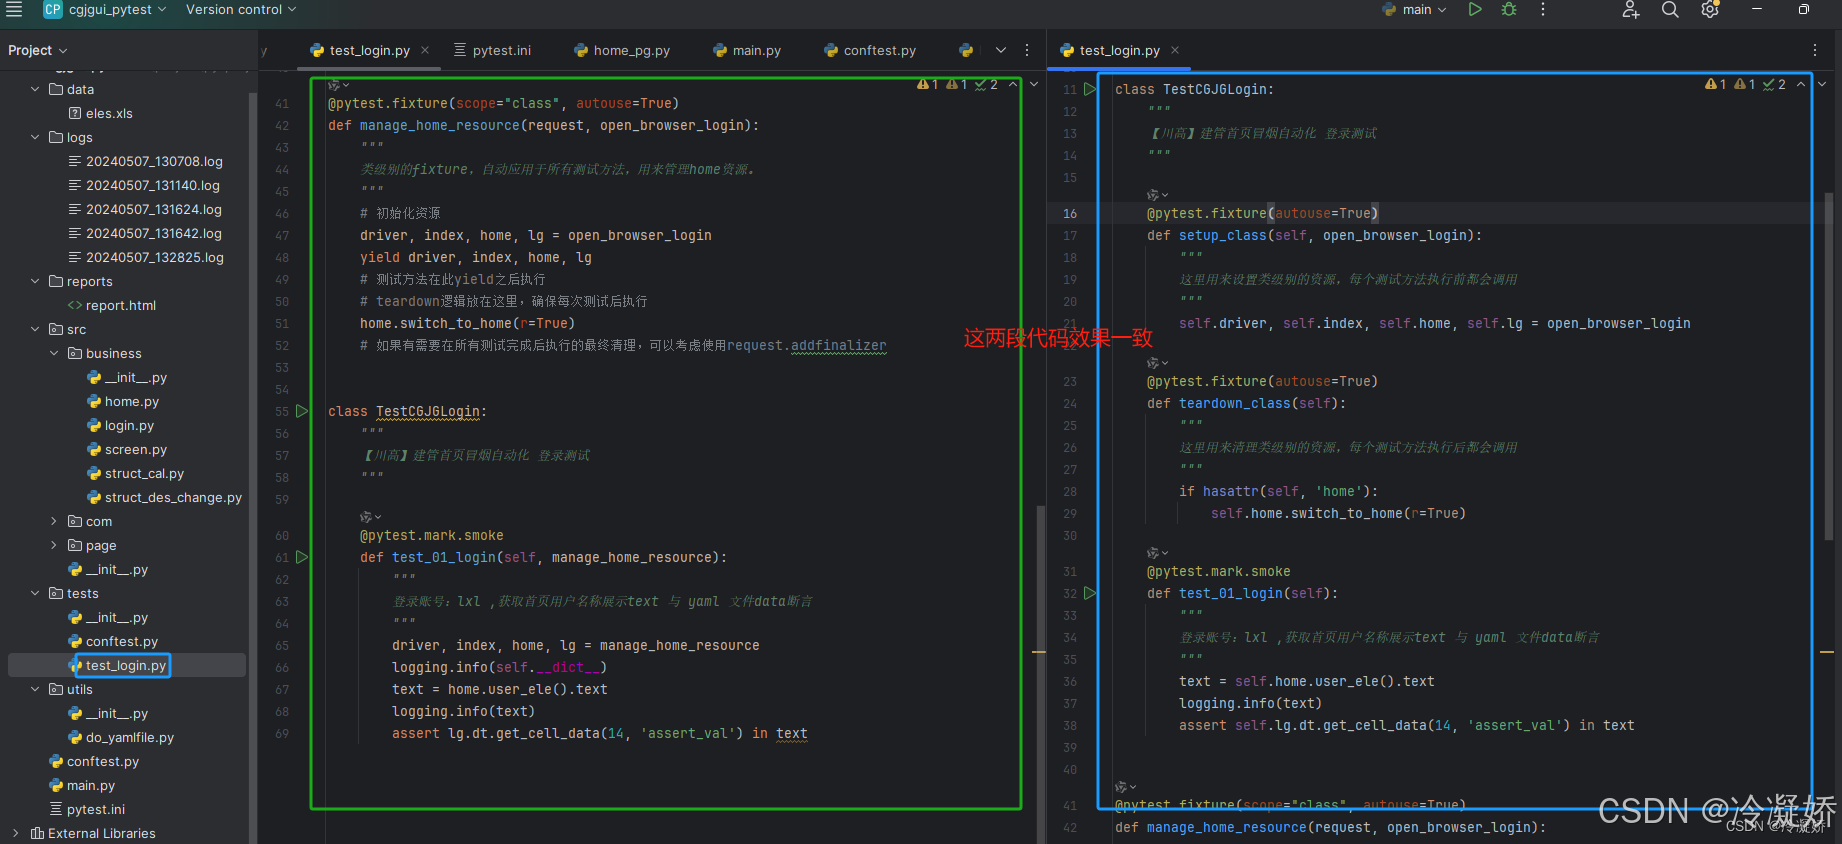
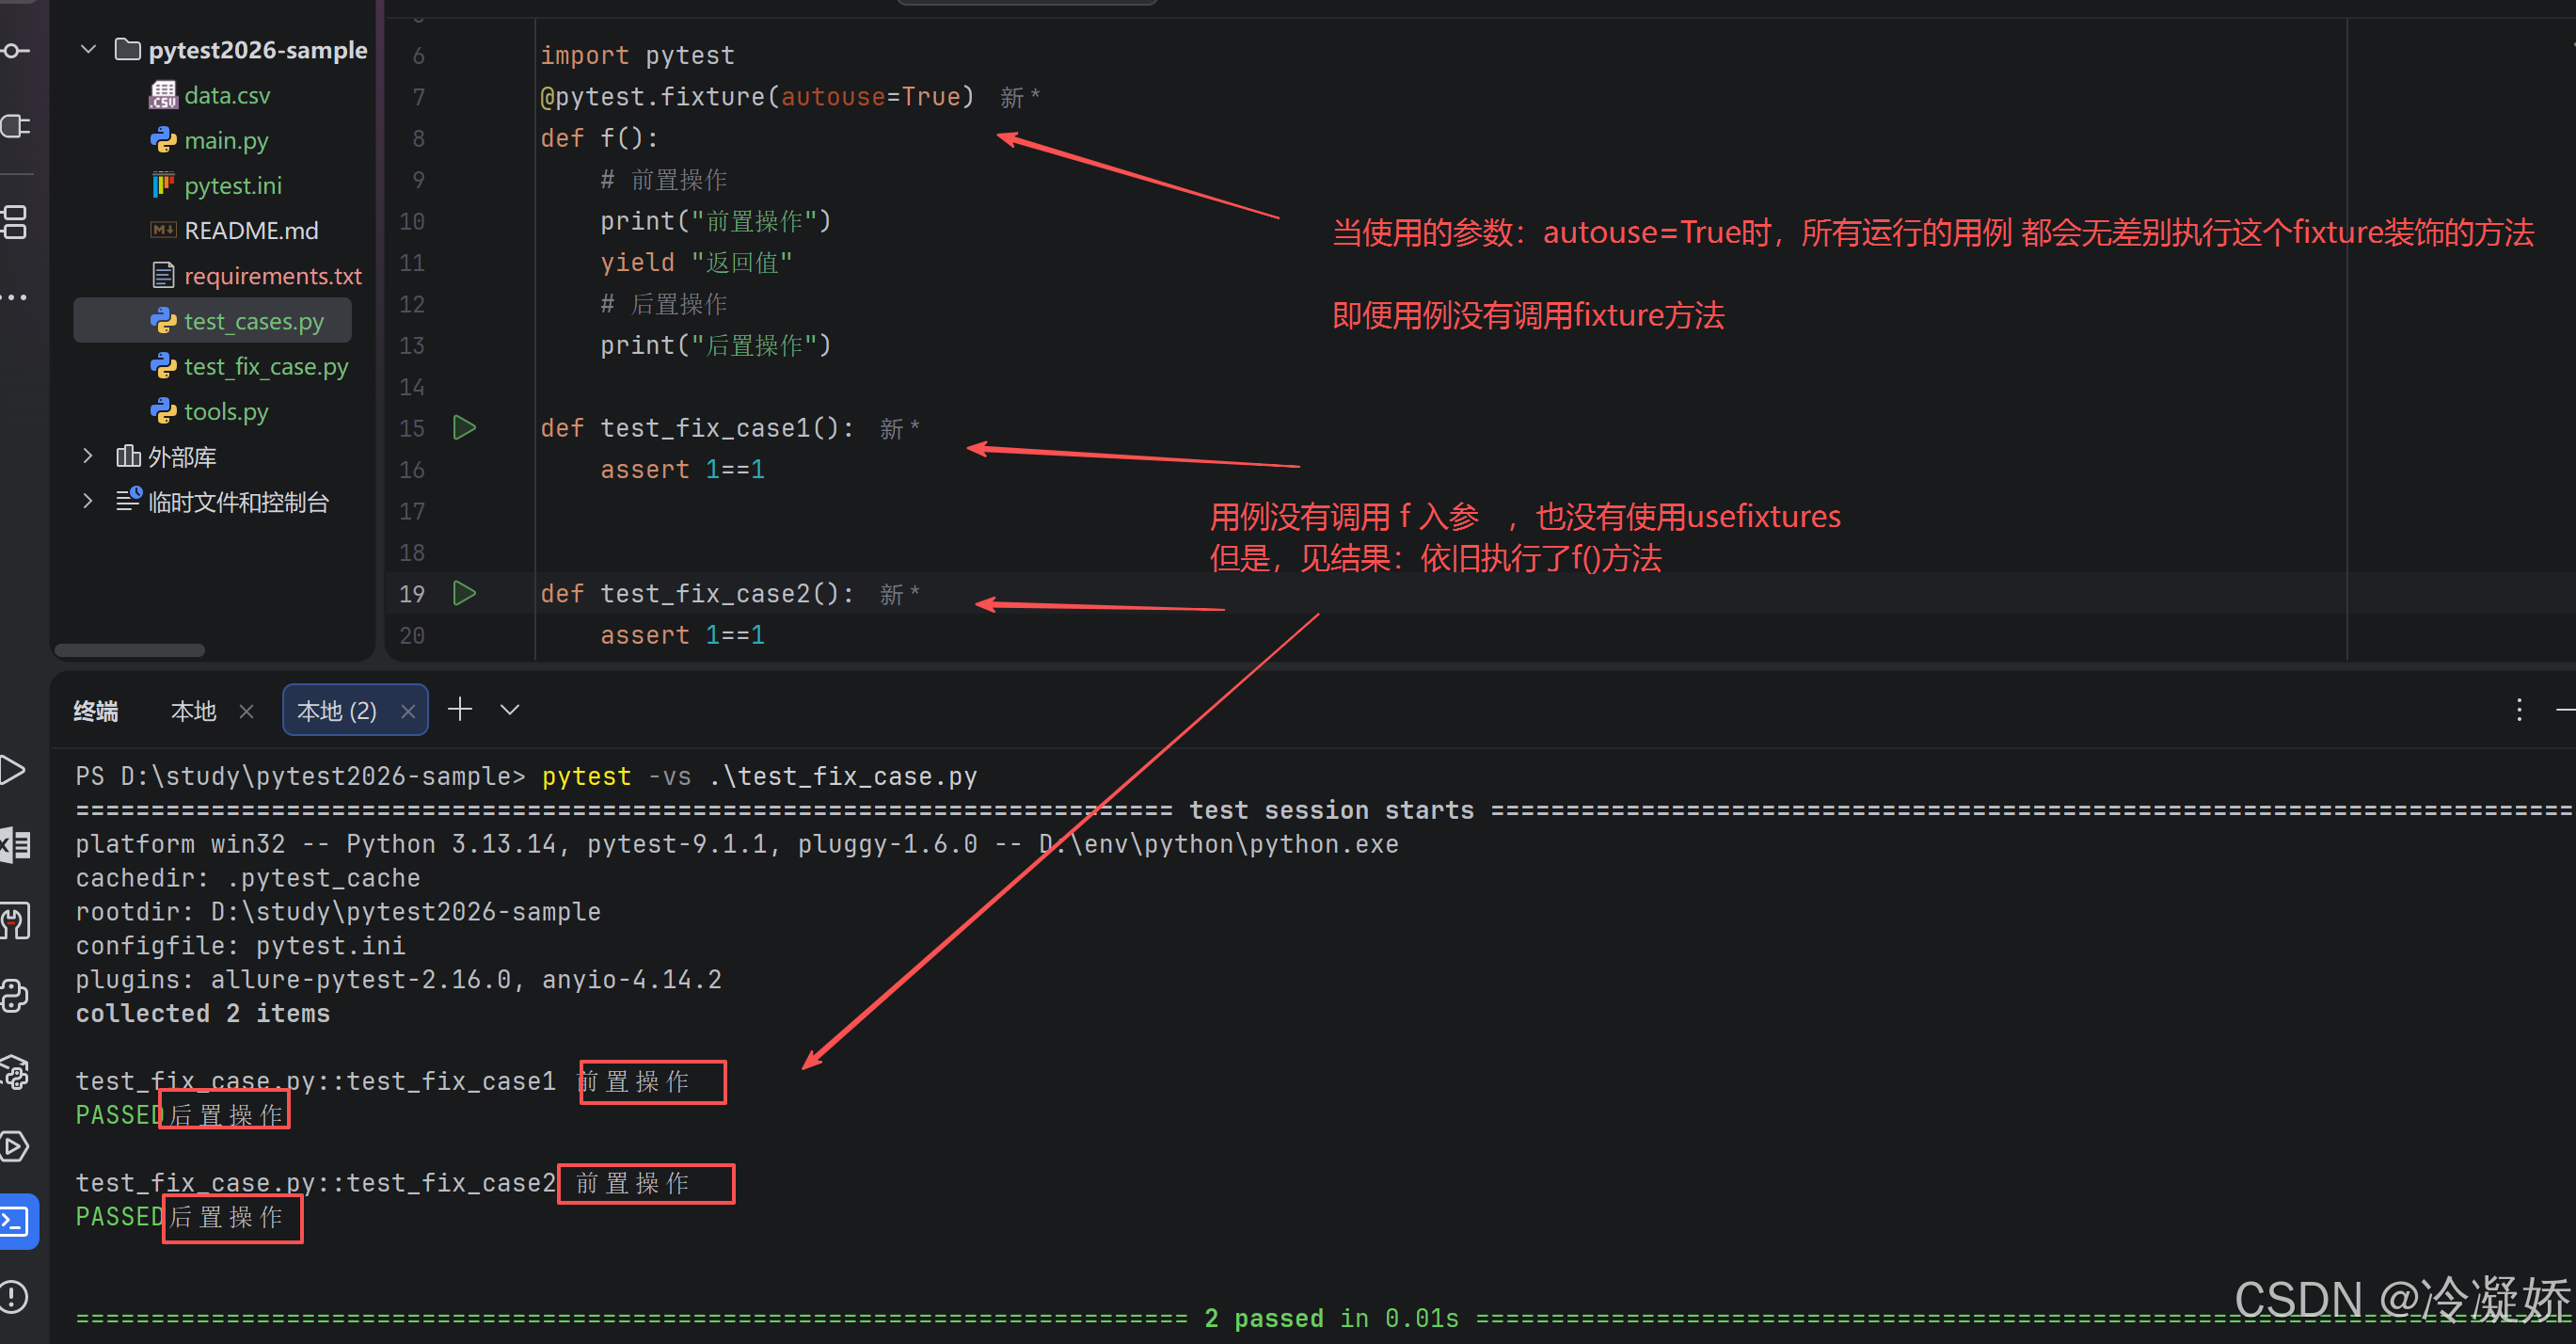
1. 自动使用: autouse = True ,所有同区域下的用例无差别执行
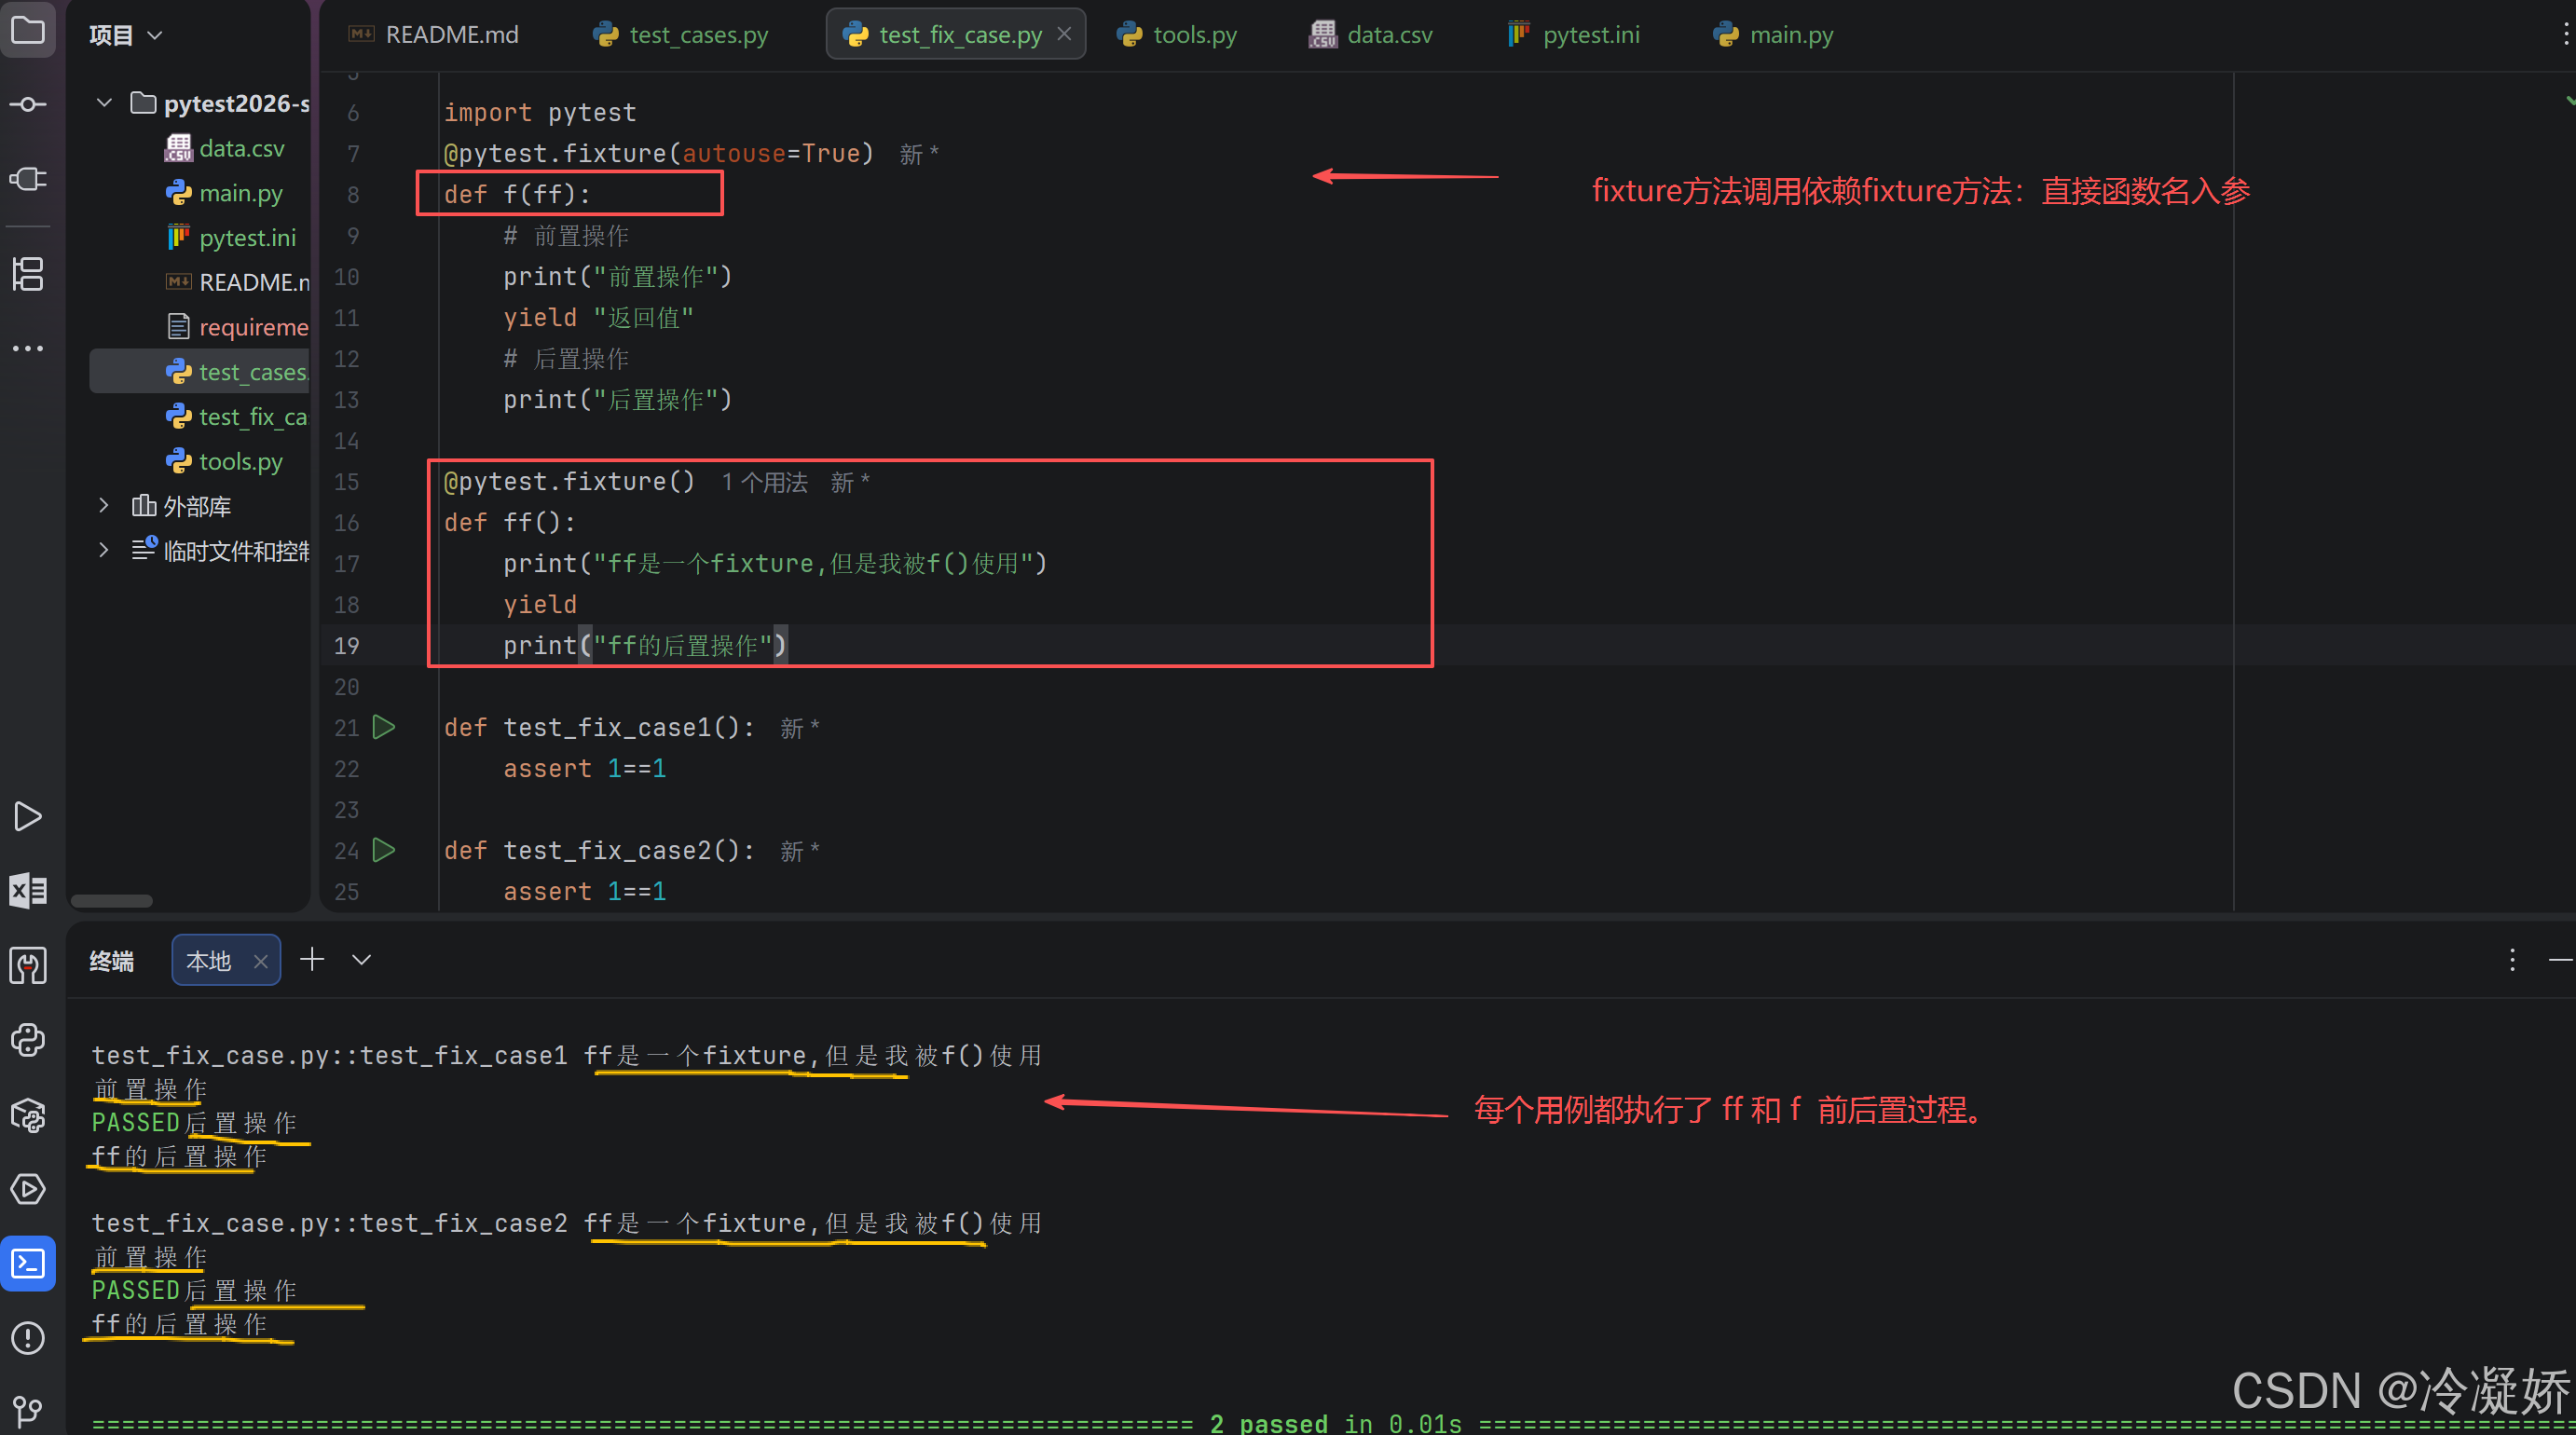
2. 依赖使用: fixture 装饰的函数调用依赖fixture,直接入参,fixture装饰的函数不可使用usefixtures(),只可入参的方式调用依赖
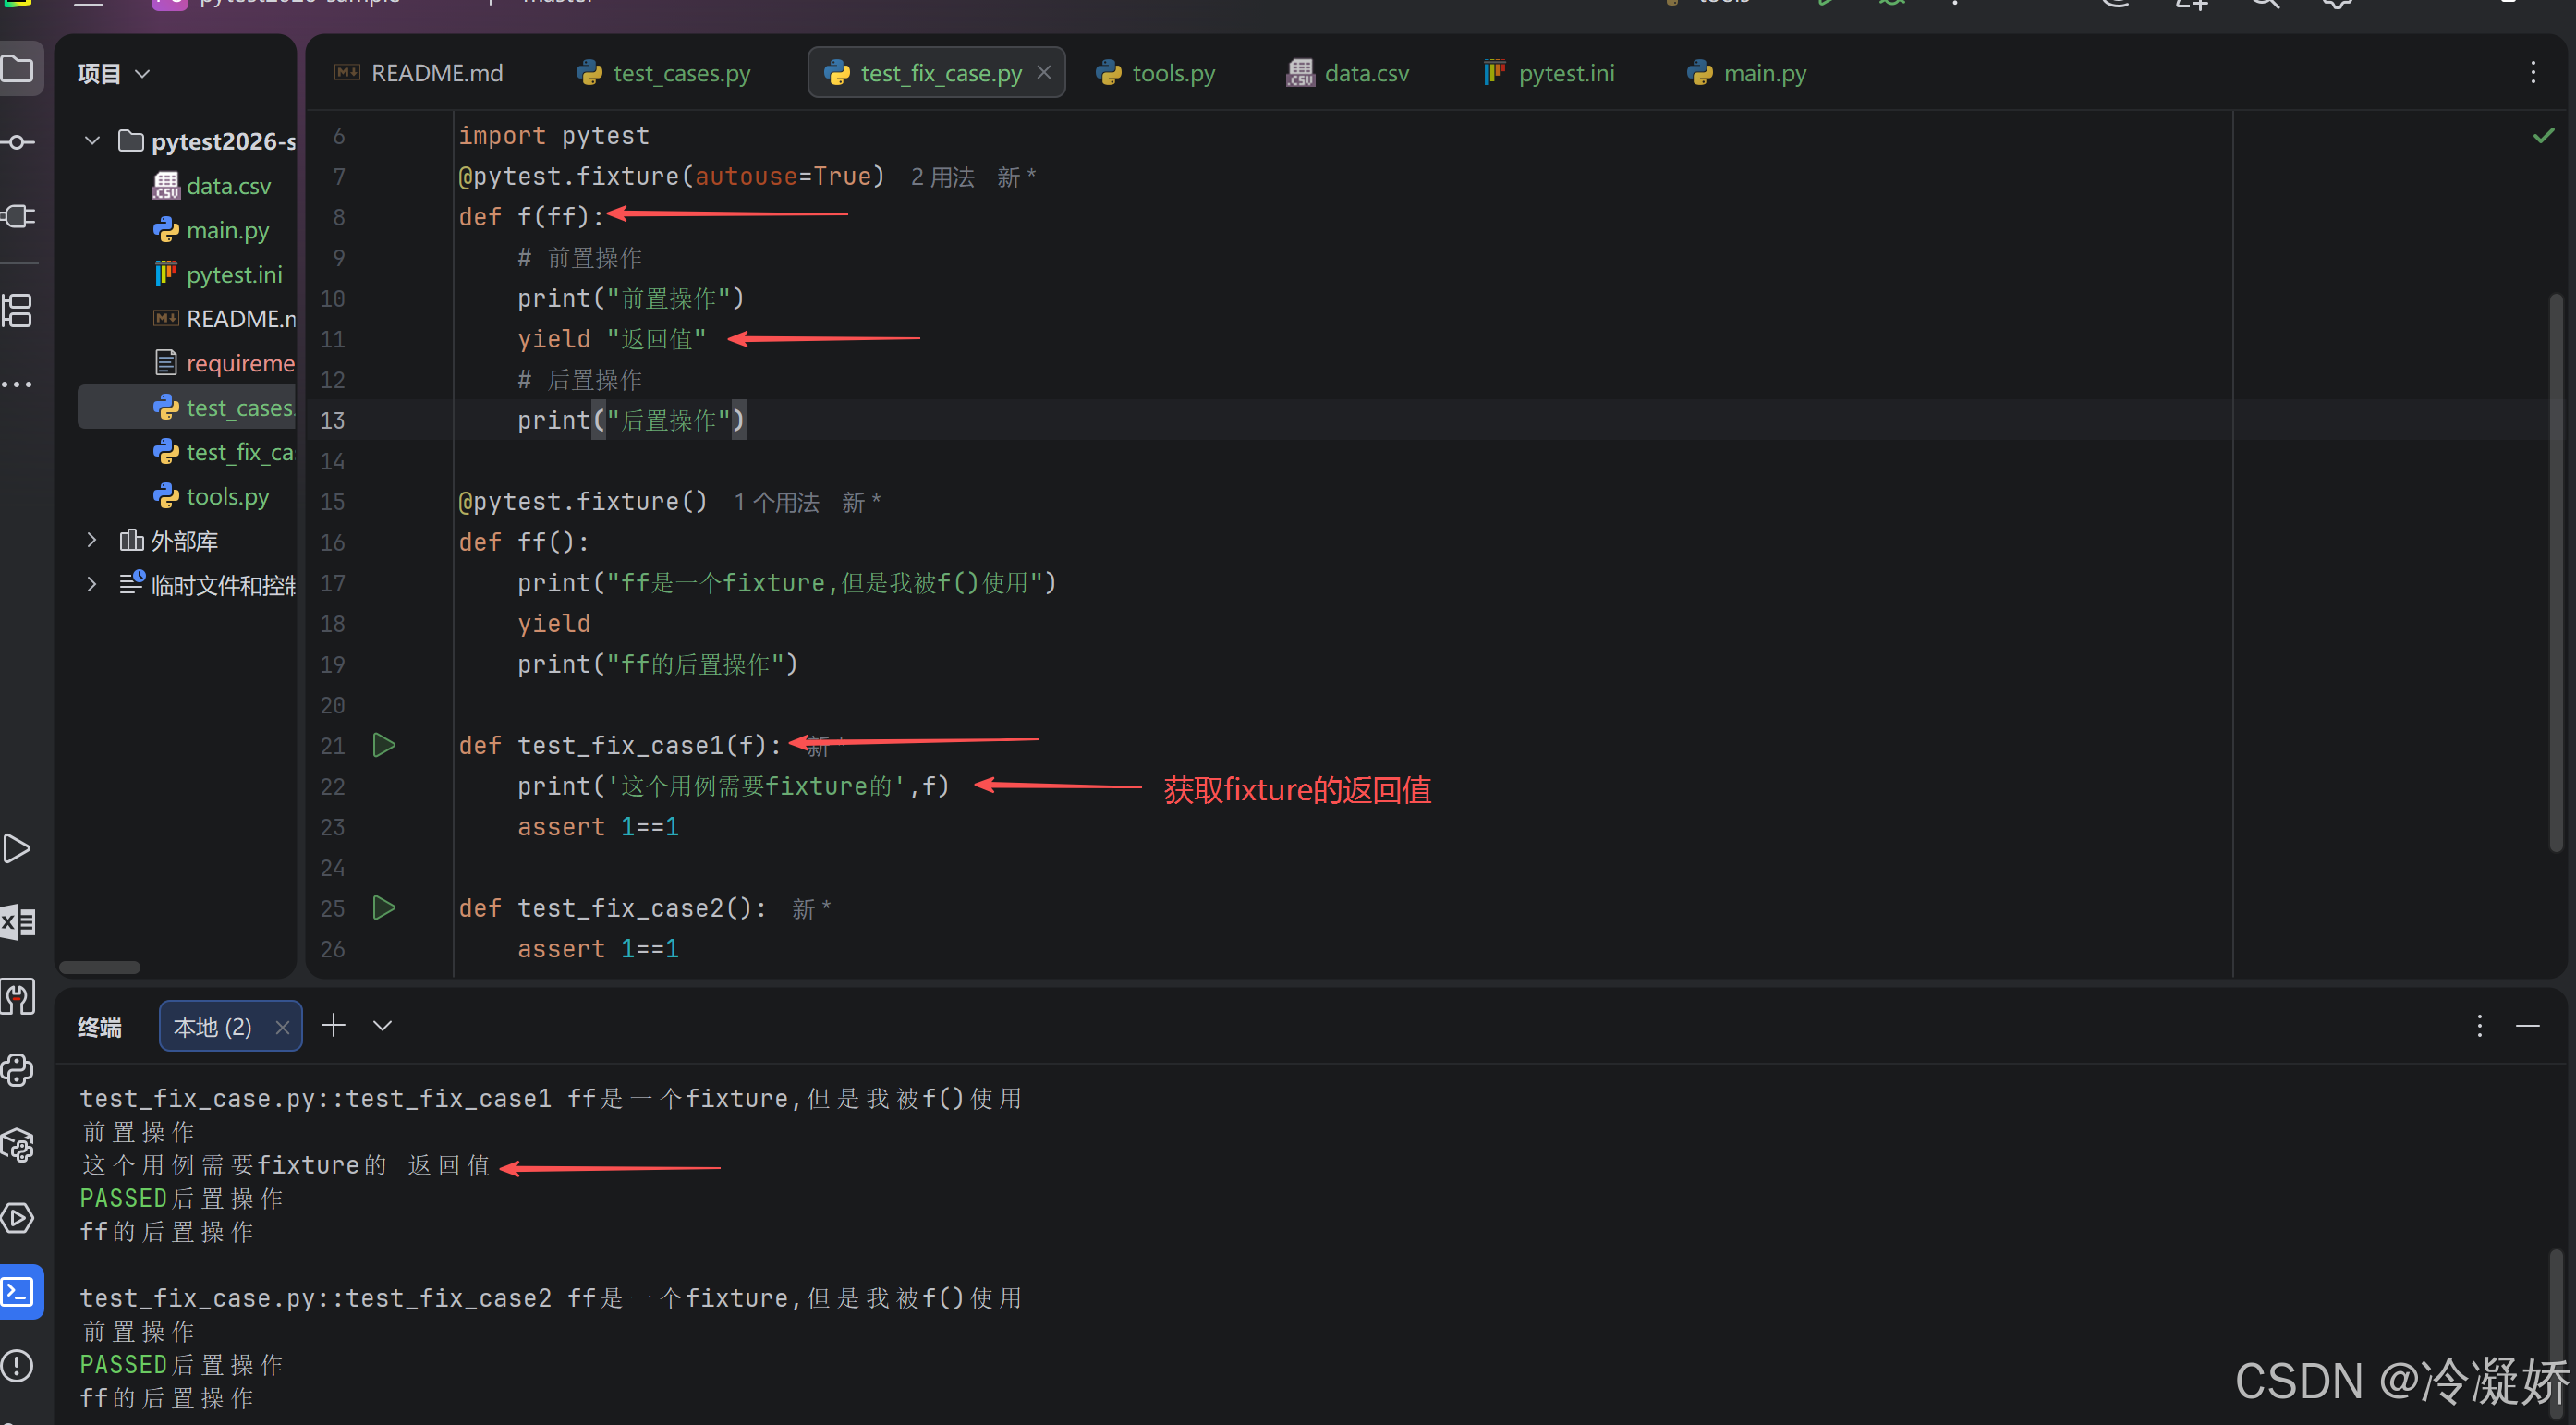
3. 返回内容: yield res 用例如何接收yield后的返回值? fixture装饰的方法的名称传入用例(即:方式一来使用fixture)
4. 范围共享: fixture(scope=范围)
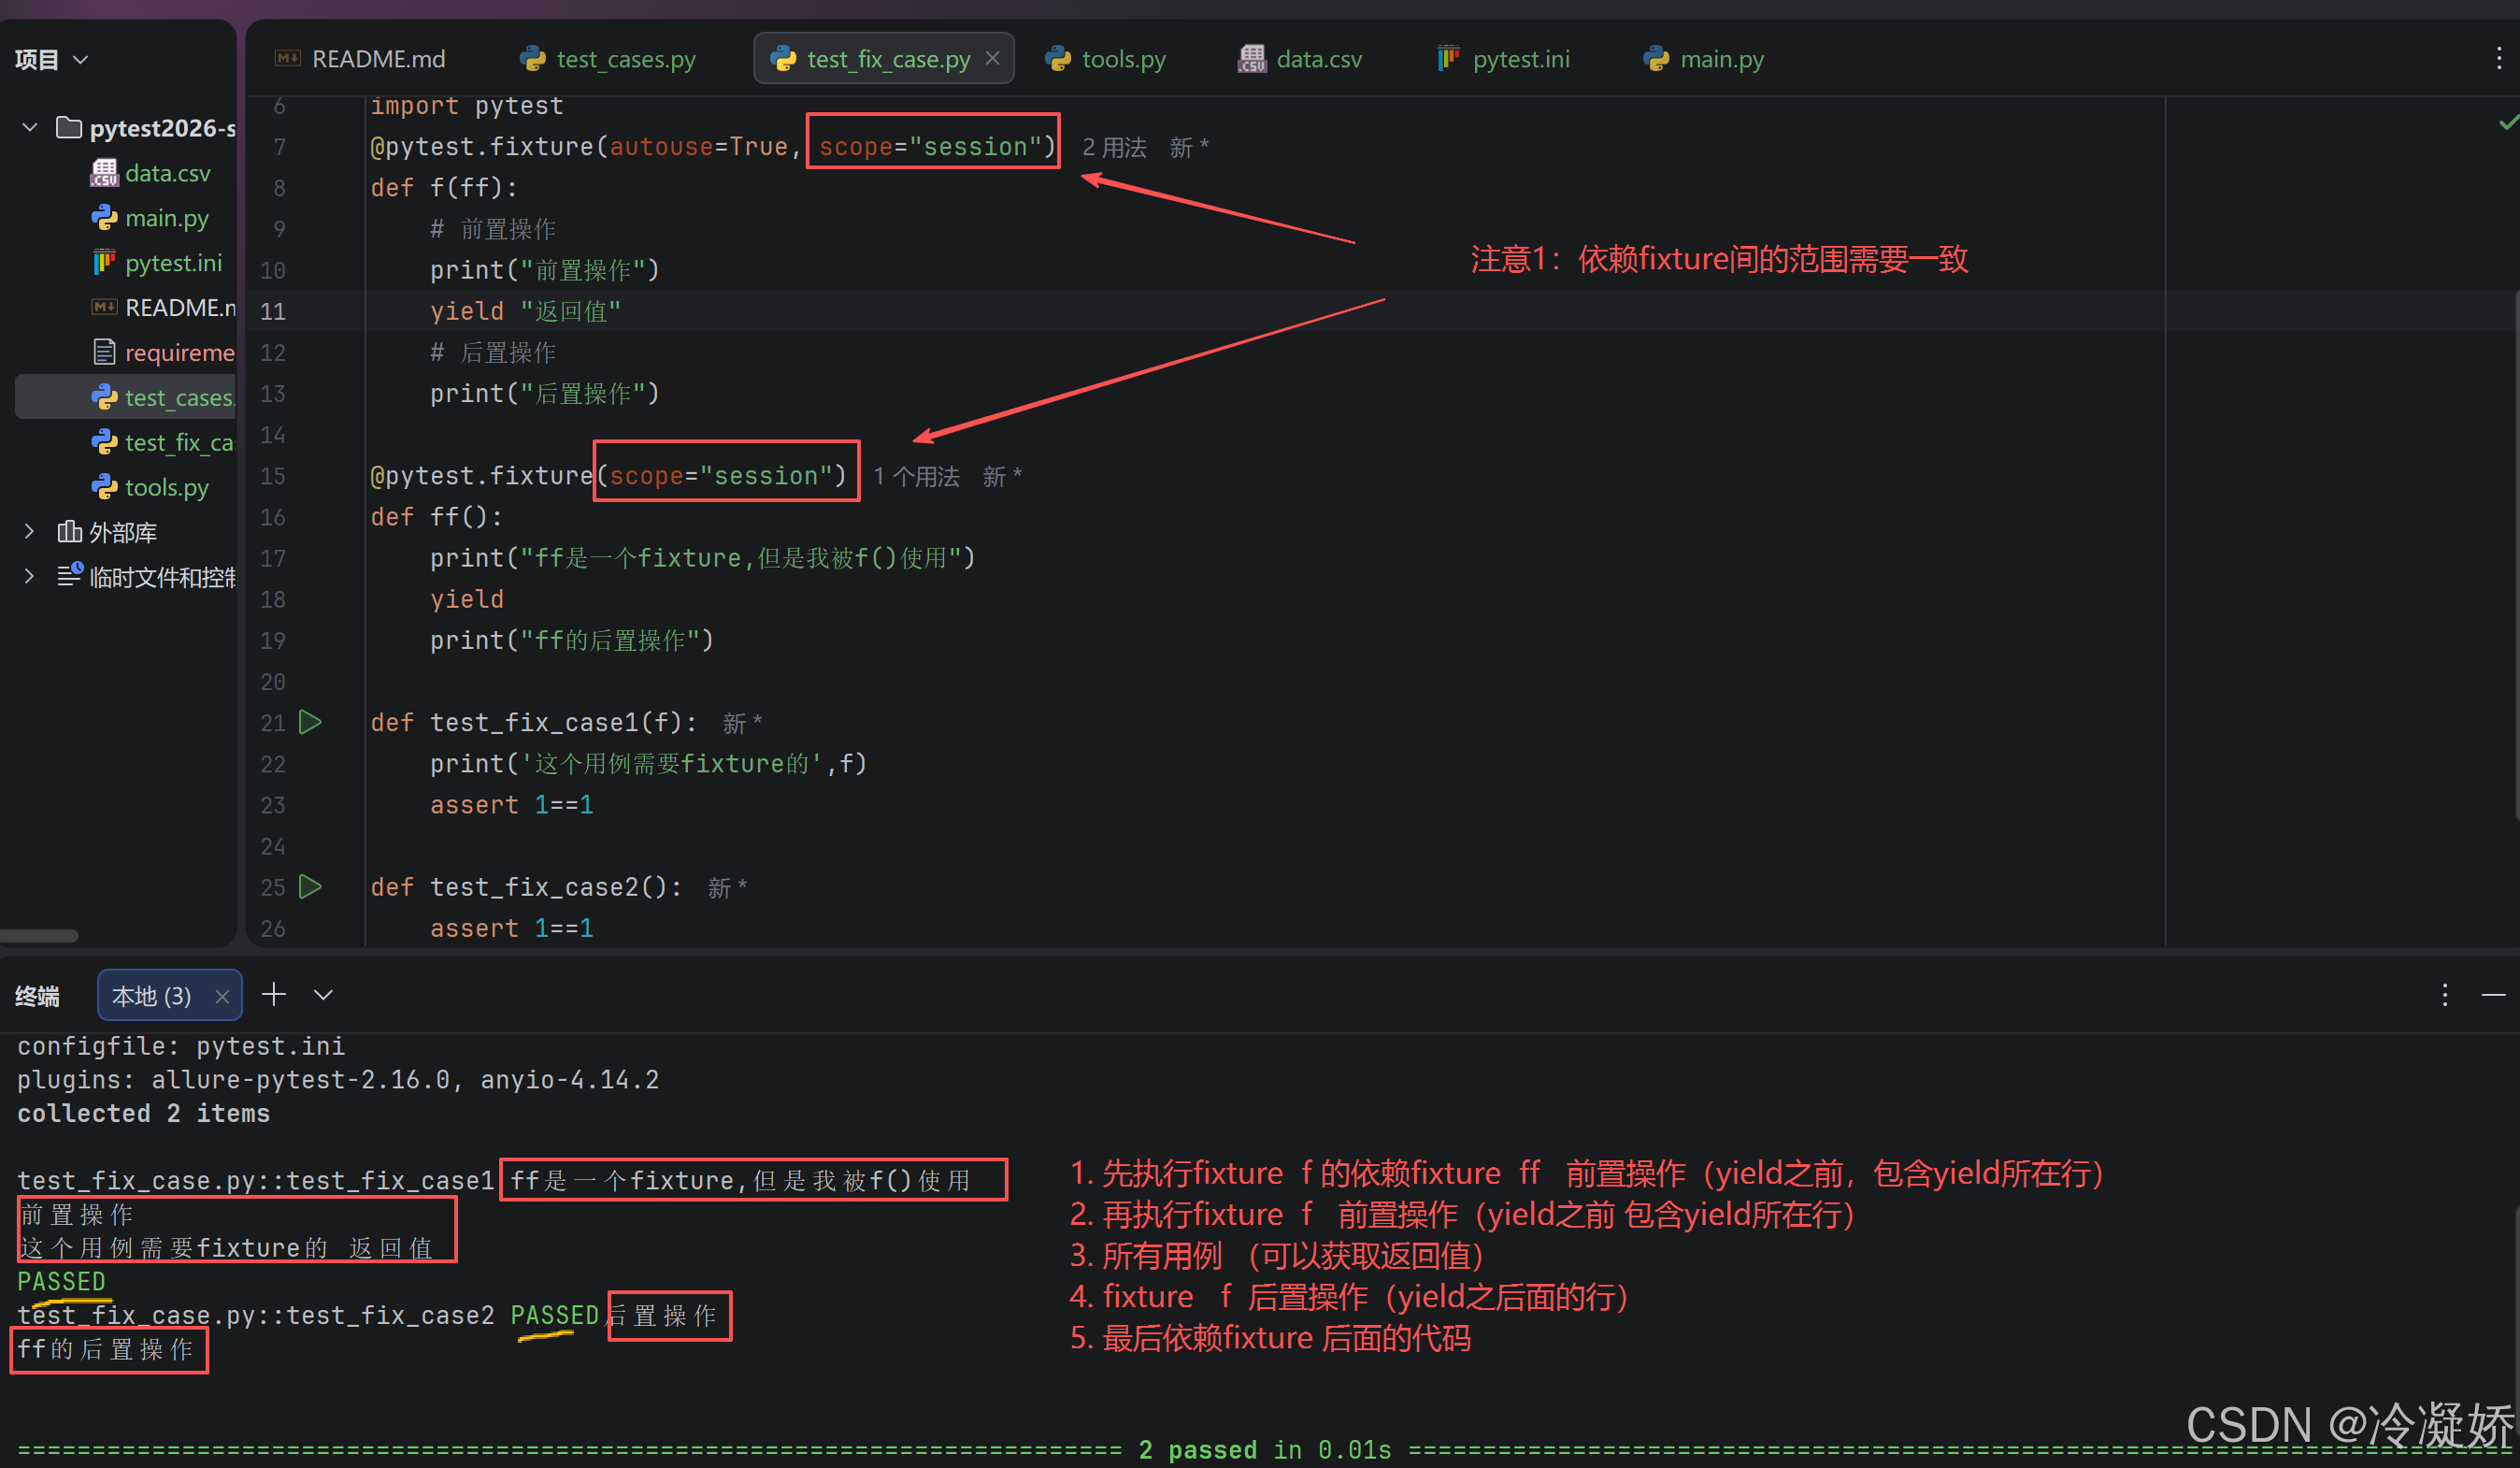
			默认范围:scope = 'function'
			全局范围:scope = 'session',同一命名文件下才可调用,不同test_case.py、test_case2.py实际session也不能全局共享
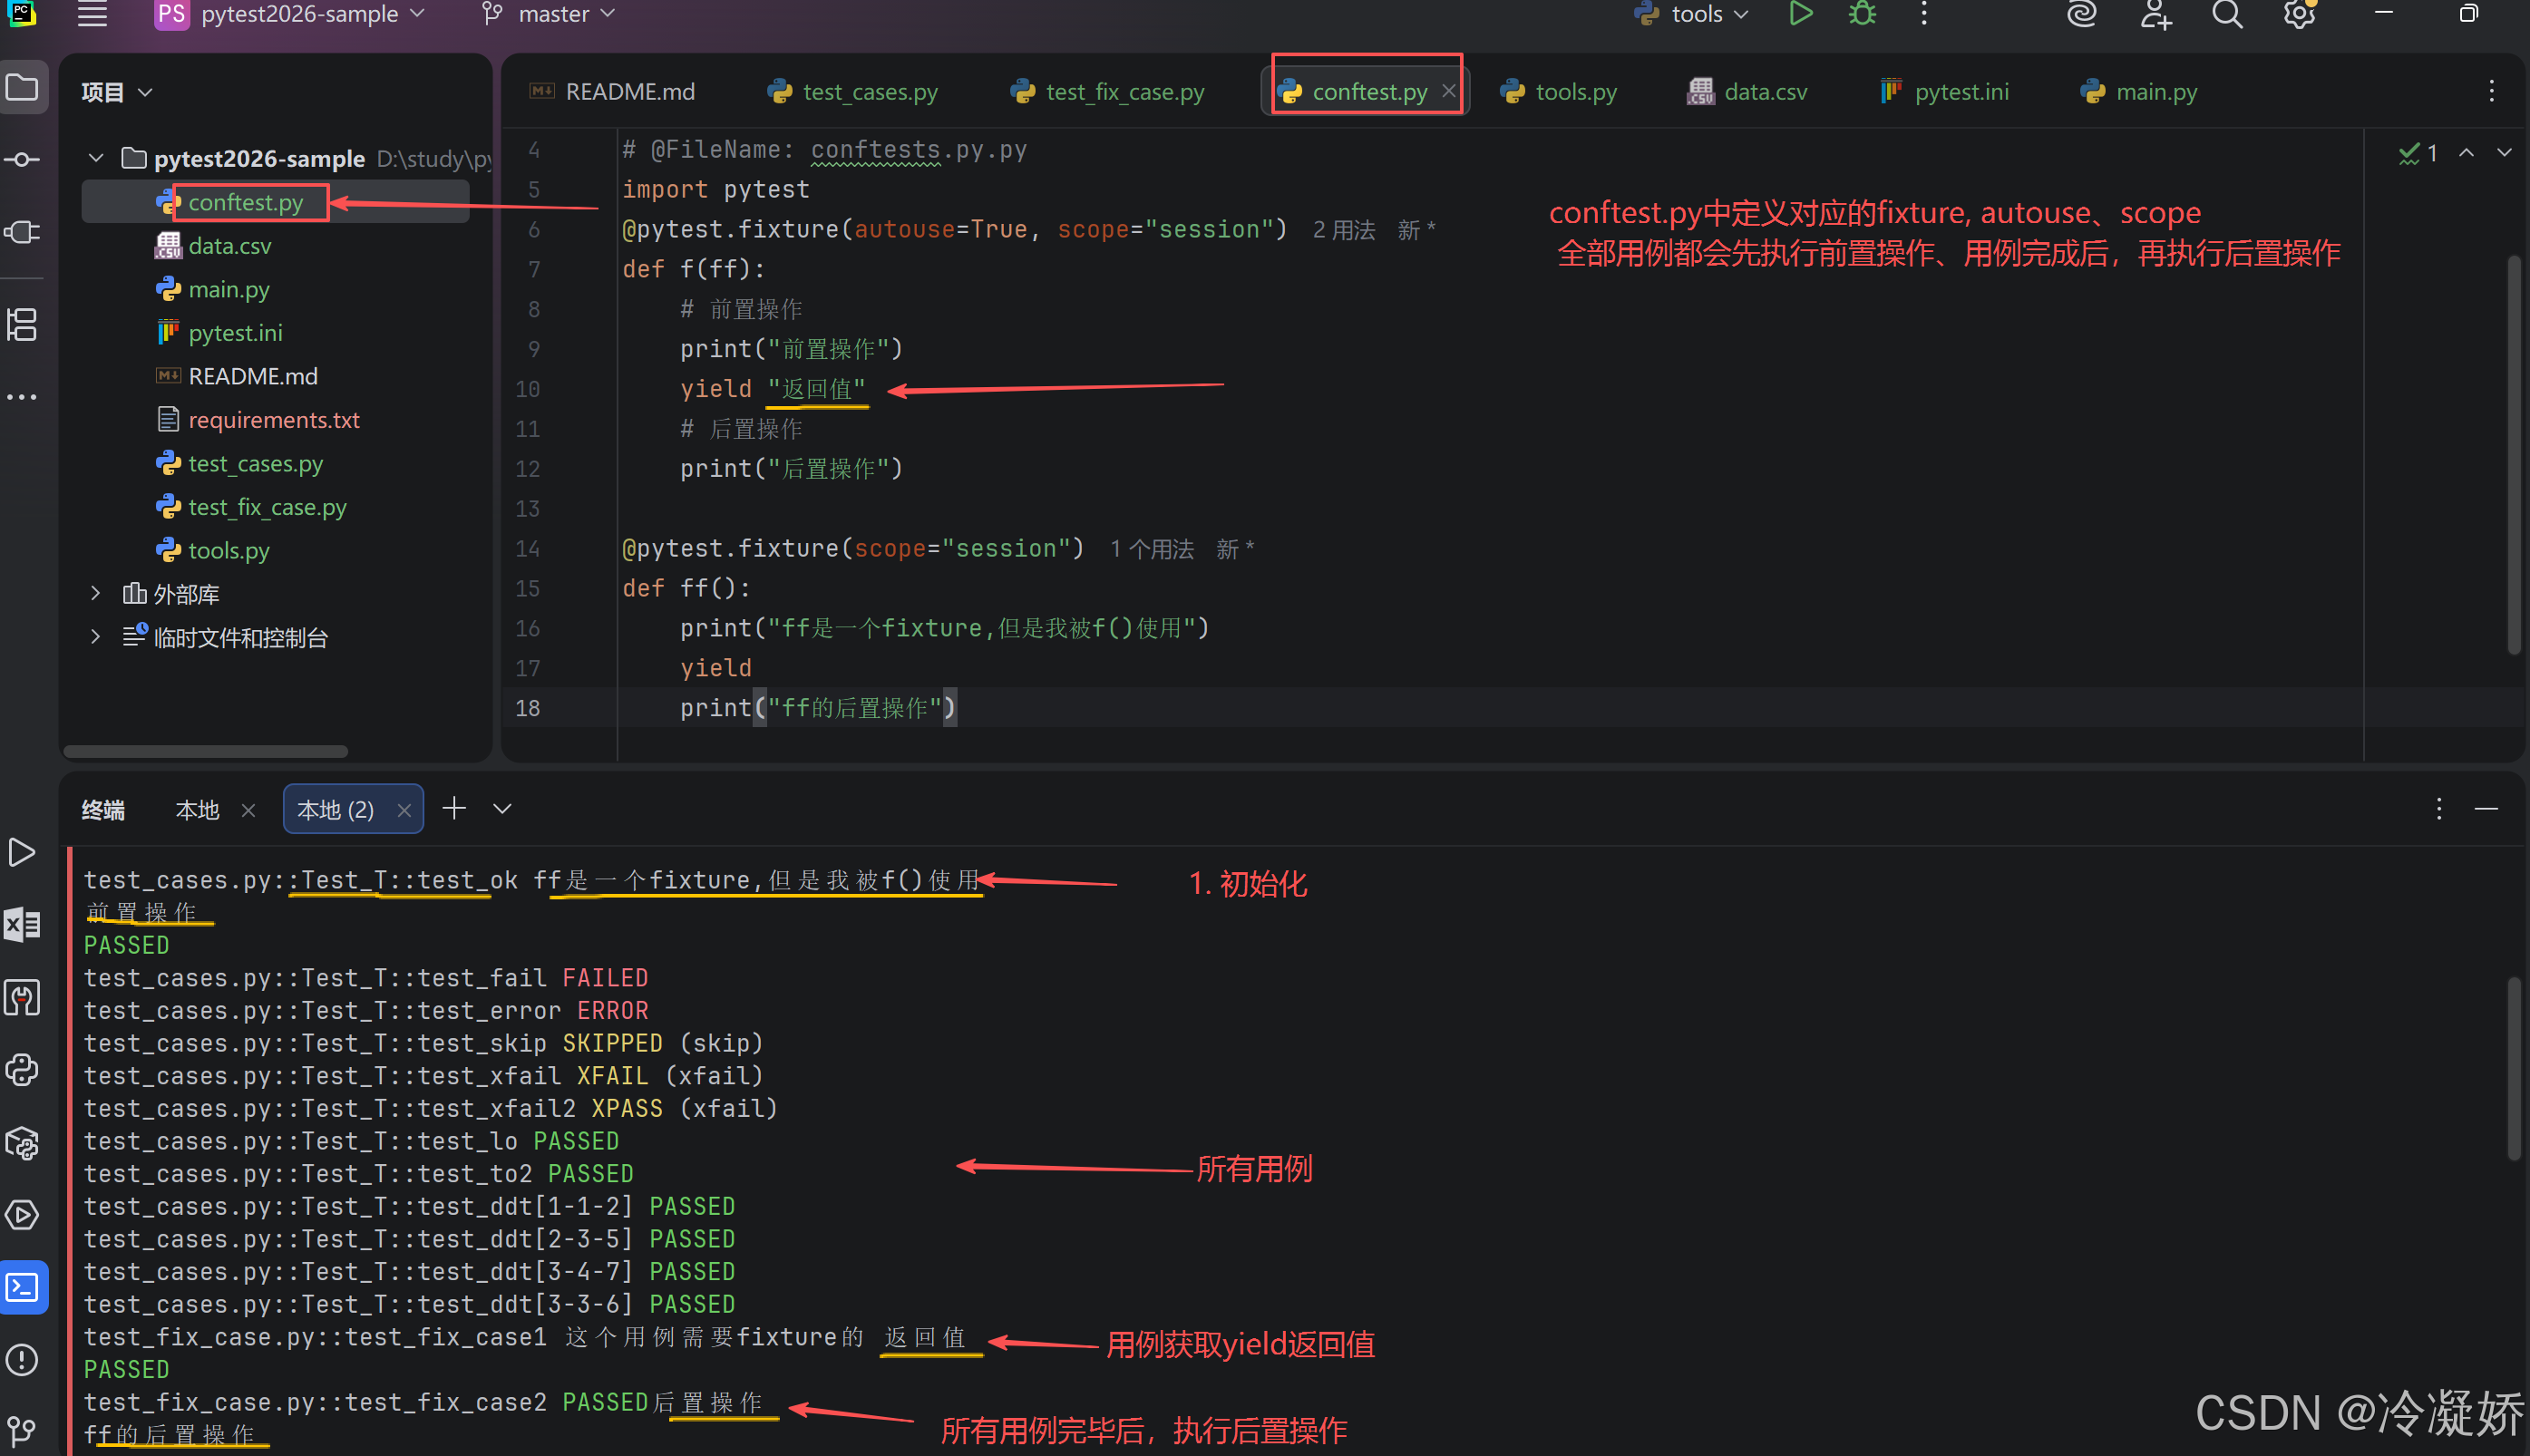
			实现真正的全局范围:scope = 'session' + 使用**conftest.py** 文件
5. 多调用:一个用例函数调用多个fixture
自动使用 的示例:
依赖调用 的示例:
获取返回值 的示例:
依赖共享 的示例:
6.4 使用conftest.py的应用fixture,实现全局的共享
7. pytest 插件管理(与本章4.1结合 重)
pytest插件生态是pytest特别的优势。
python
插件分为两类:
	1. 不需要安装:内置插件
	2. 需要安装:第三方插件
7.0 pytest 常用插件的使用方式
python
插件的启用管理:
	1. 启用:-p xxx插件
	2. 禁用:-p no:xxx插件
插件的使用方式:
	1. 参数
	2. 配置文件
	3. fixture
	4. mark
7.1 pytest 常用插件 及 对应功能
python
常用插件:
pytest-html   #生成html报告  pip install pytest-html
pytest-xdist  # 测试用例的分布式执行。多进程  pip install pytest-xdist
pytest-rerunfailures  # 用例失败重新执行  pip install pytest-rerunfailures
allure-pytest  # 生成较为美观的测试报告  pip install allure-pytest
pytest-repeat  # 指定重复用例执行次数
pytest-result-log # 把用例的执行结果记录到日志文件中  pip install pytest-result-log
pytest-ordering  # 改变用例执行顺序
7.1.1 pytest-html 如何使用?生成html报告
主函数模式:'--html=report.html', '--self-contained-html'
python
pytest.main(['-v', '-s', '--html=report.html', '--self-contained-html'])
# 或者 使用字符串(所有参数用空格分隔)
# pytest.main('-v -s --html=report.html --self-contained-html')命令行模式:
bash
pytest -vs --html=report.html --self-contained-html pytest.ini配置文件模式:
python
[pytest]
;addopts = -vs --alluredir ./temp --clean-alluredir
addopts = -vs --html ./report/report.html --self-contained-html
;addopts = -vs --html ./report/report.html --self-contained-html -m smoke --reruns 3 --headless
testpaths = ./testcase
python_files = test*.py test_* *_test test*
python_classes = Test* test*
python_functions = test_* test*
log_cli = True
log_level = info
log_cli_format = %(asctime)s[%(levelname)s]%(message)s[%(filename)s:%(lineno)s]
log_cli_date_format = %Y-%m-%d %H:%M:%S
log_file = ./log/debug_run.log
log_file_level = info
log_file_format = %(asctime)s[%(levelname)s]%(message)s[%(filename)s:%(lineno)s]
log_file_date_format = %Y-%m-%d %H:%M:%S
xfail_strict = True
markers =
    smoke: just a smoke test
    smoke1: not a test
[env]
pre = http://httpbin.org/
test = http://httpbin.org/
pro = http://httpbin.org/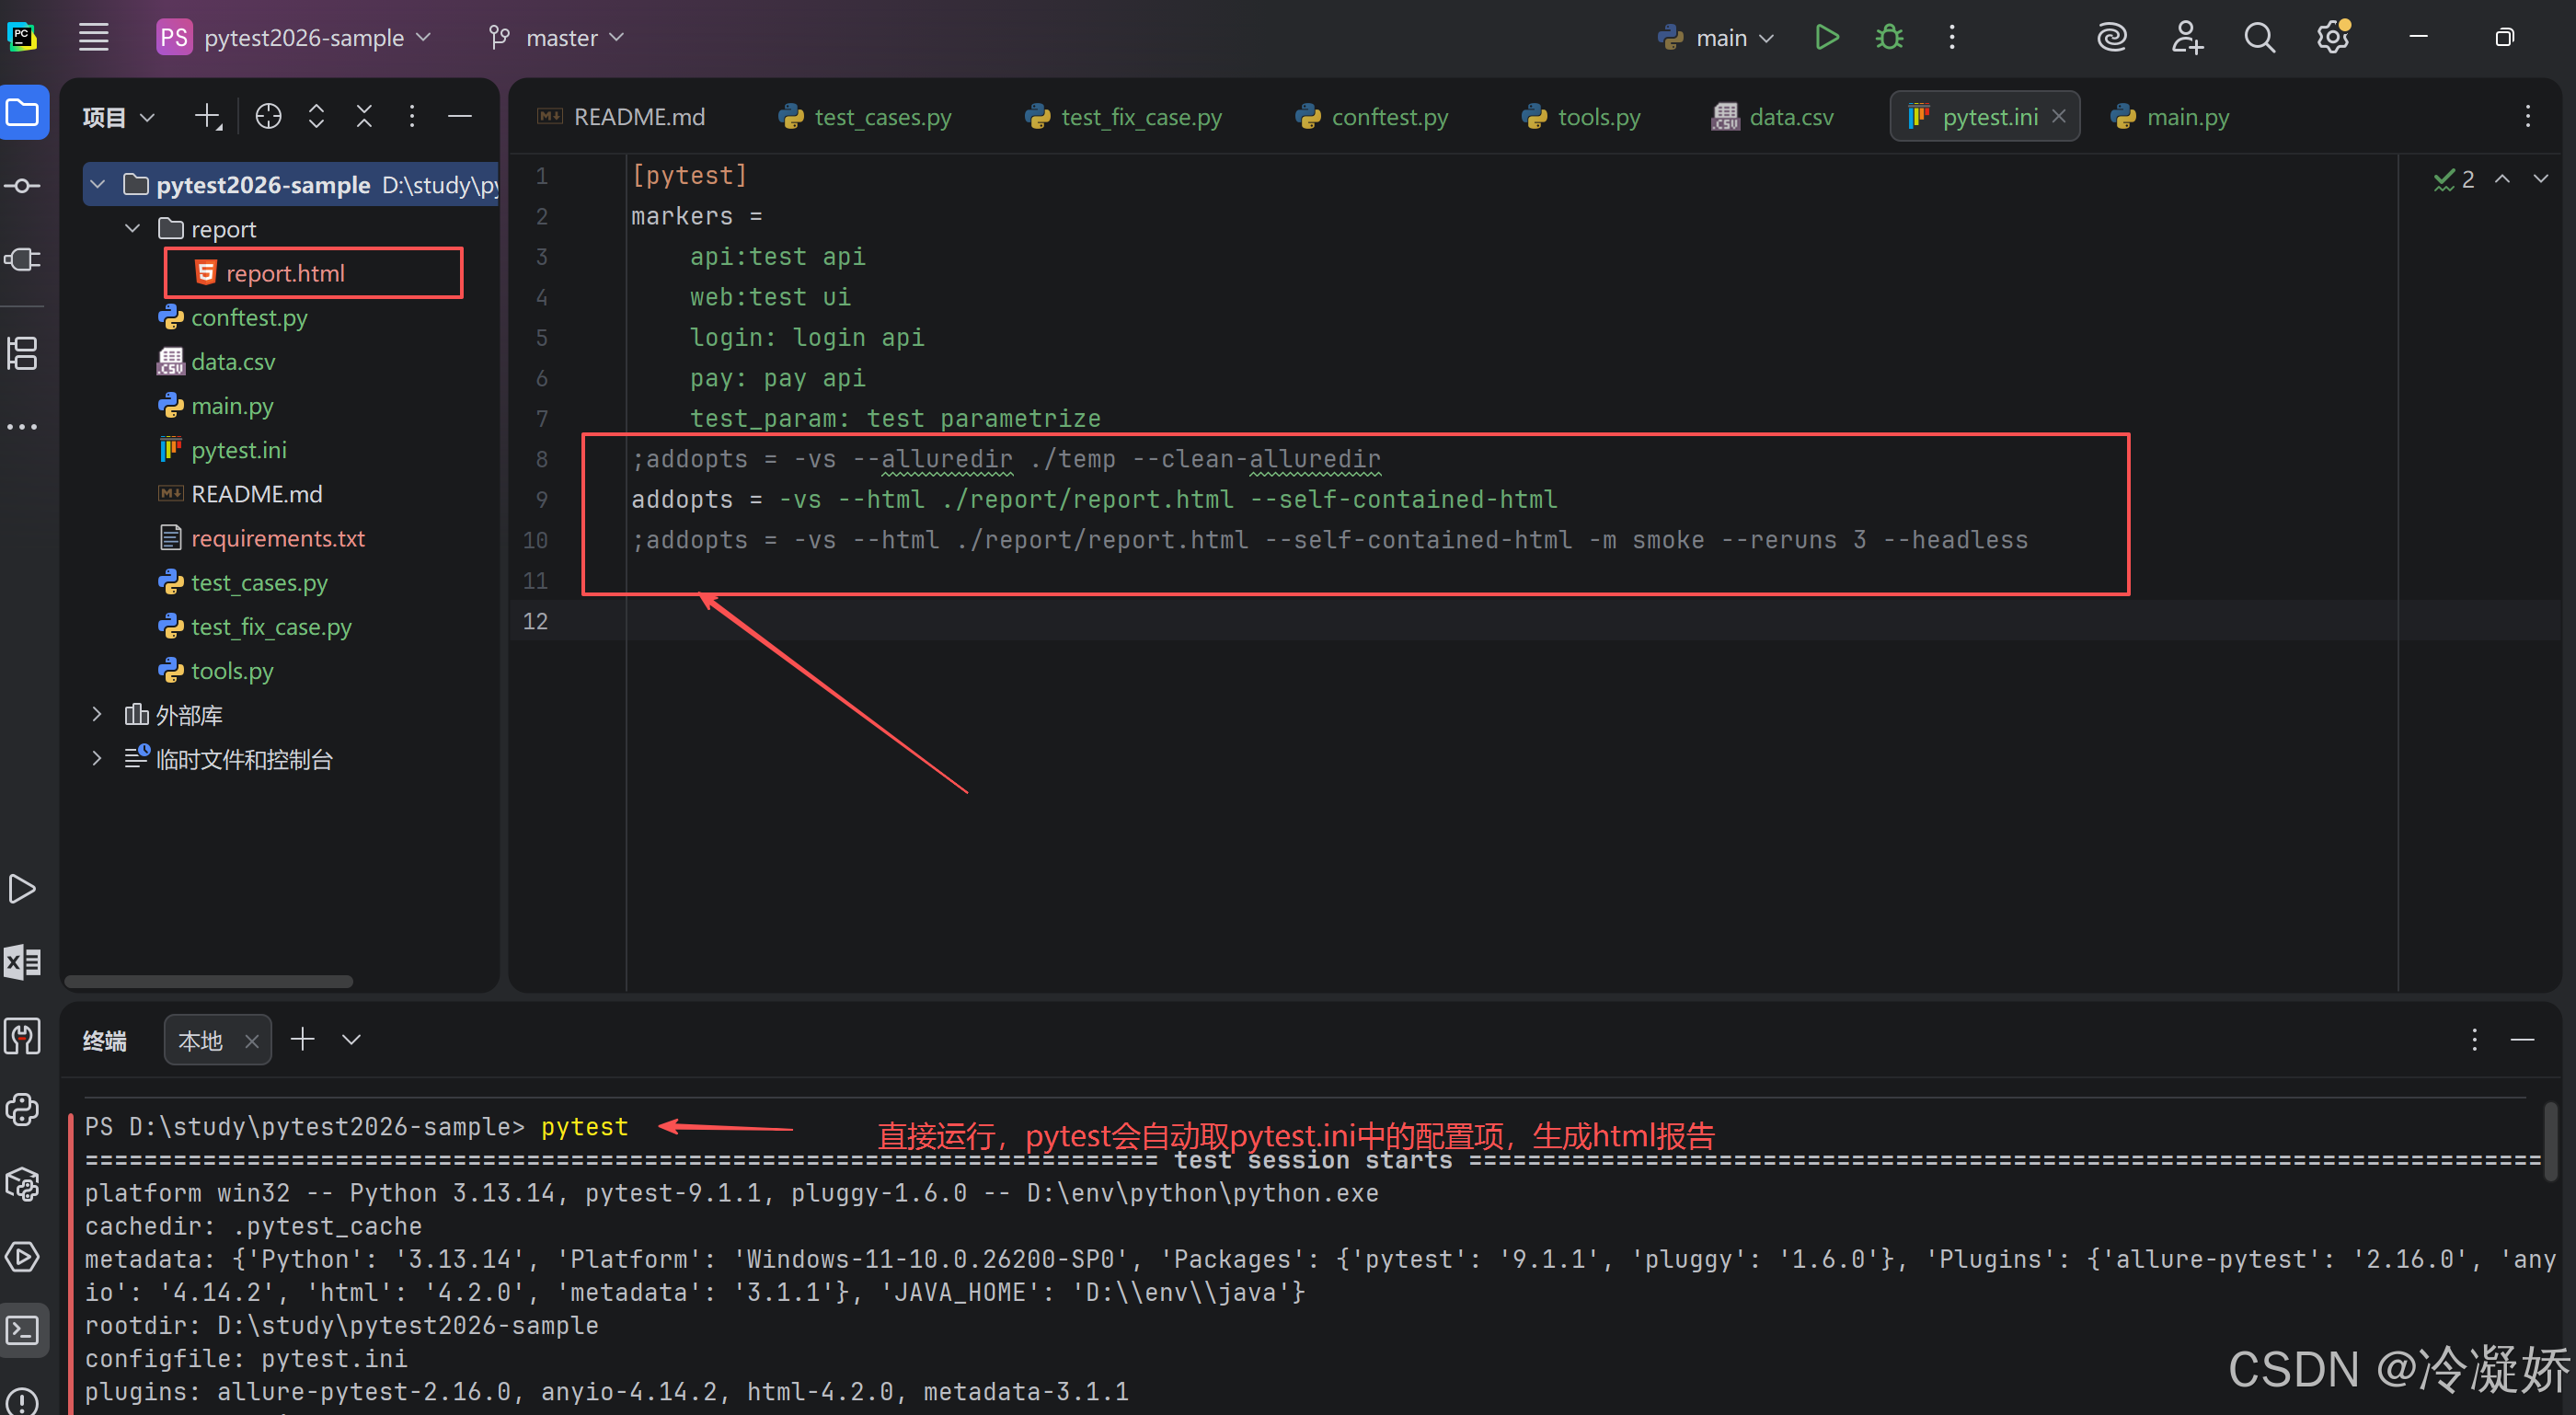
7.1.2 pytest-xdist分布式执行用例,多进程
python
1. 只有在任务本身耗时较长,超出调用成本很多的时候,才有意义
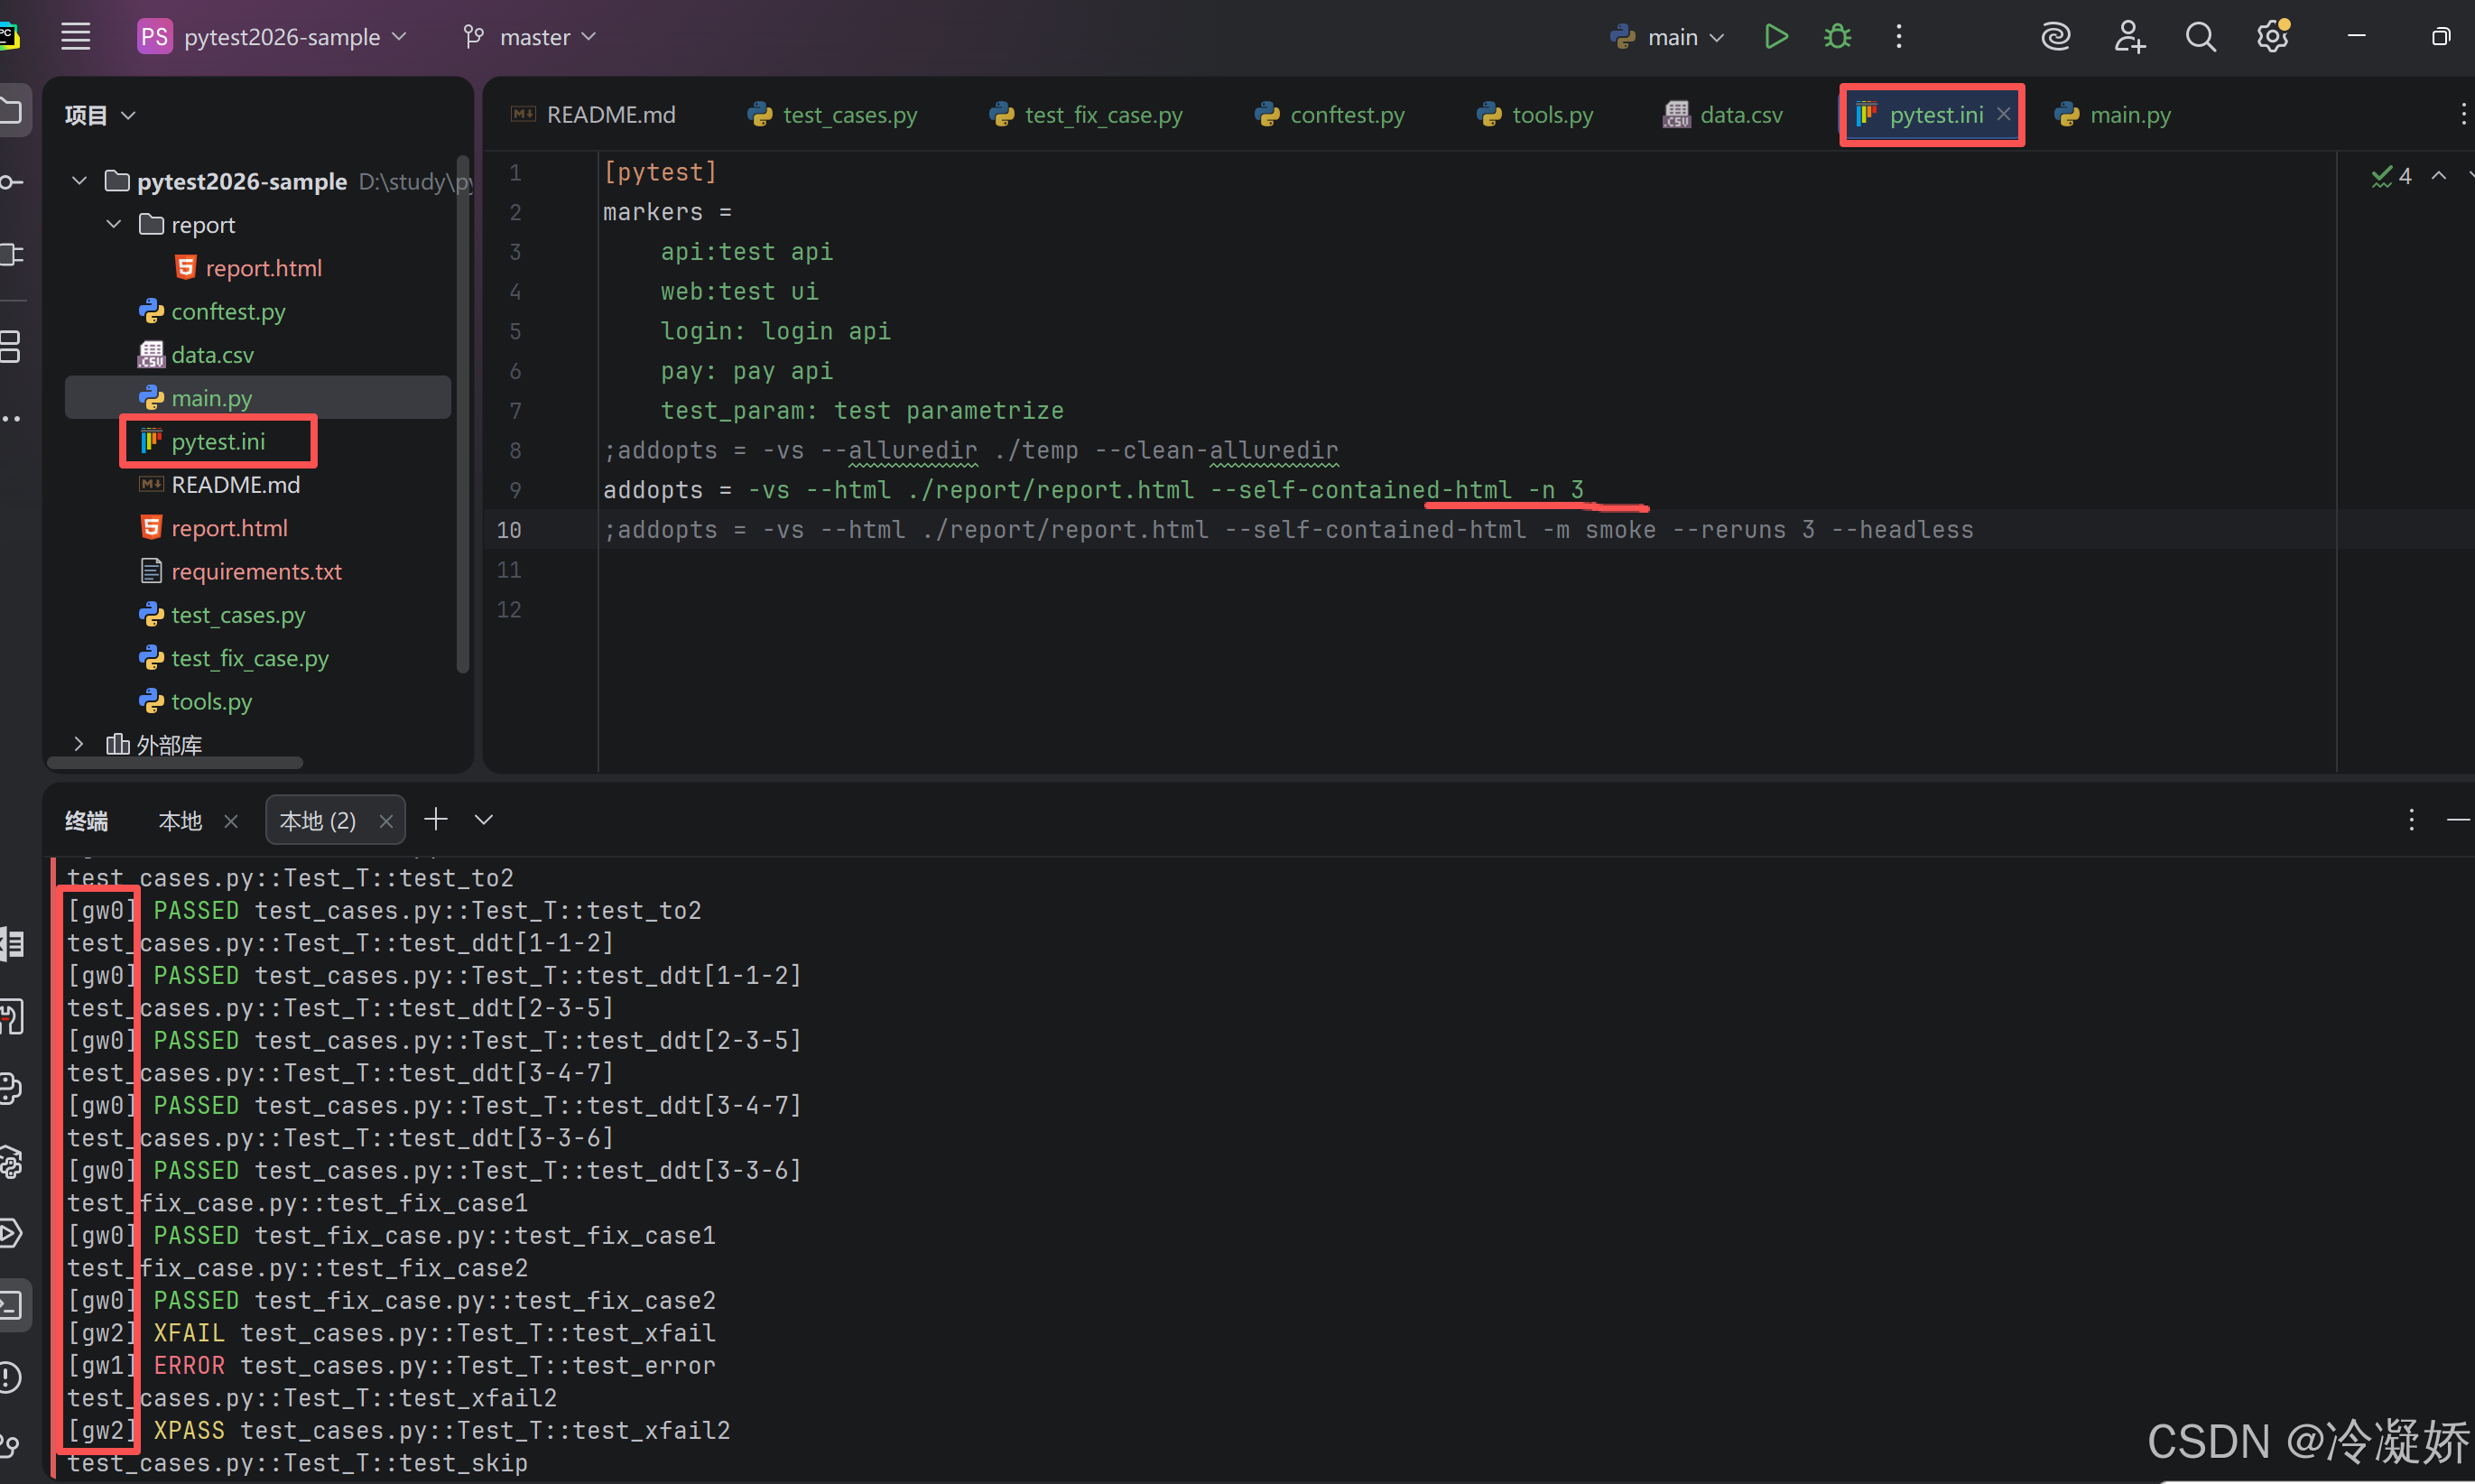
2. 分布式执行,有并发问题:资源竞争、乱序(只有在用例间对执行顺序无要求,即用例间没有依赖,才可分布式执行。)命令行模式:
bash
# 100进程执行
pytest -n 100主函数模式:
bash
pytest.main(['-v', '-s', '--html=report.html', '--self-contained-html','-n=3'])pytest.ini配置文件模式:
bash
addopts = -vs --html ./report/report.html --self-contained-html -n 3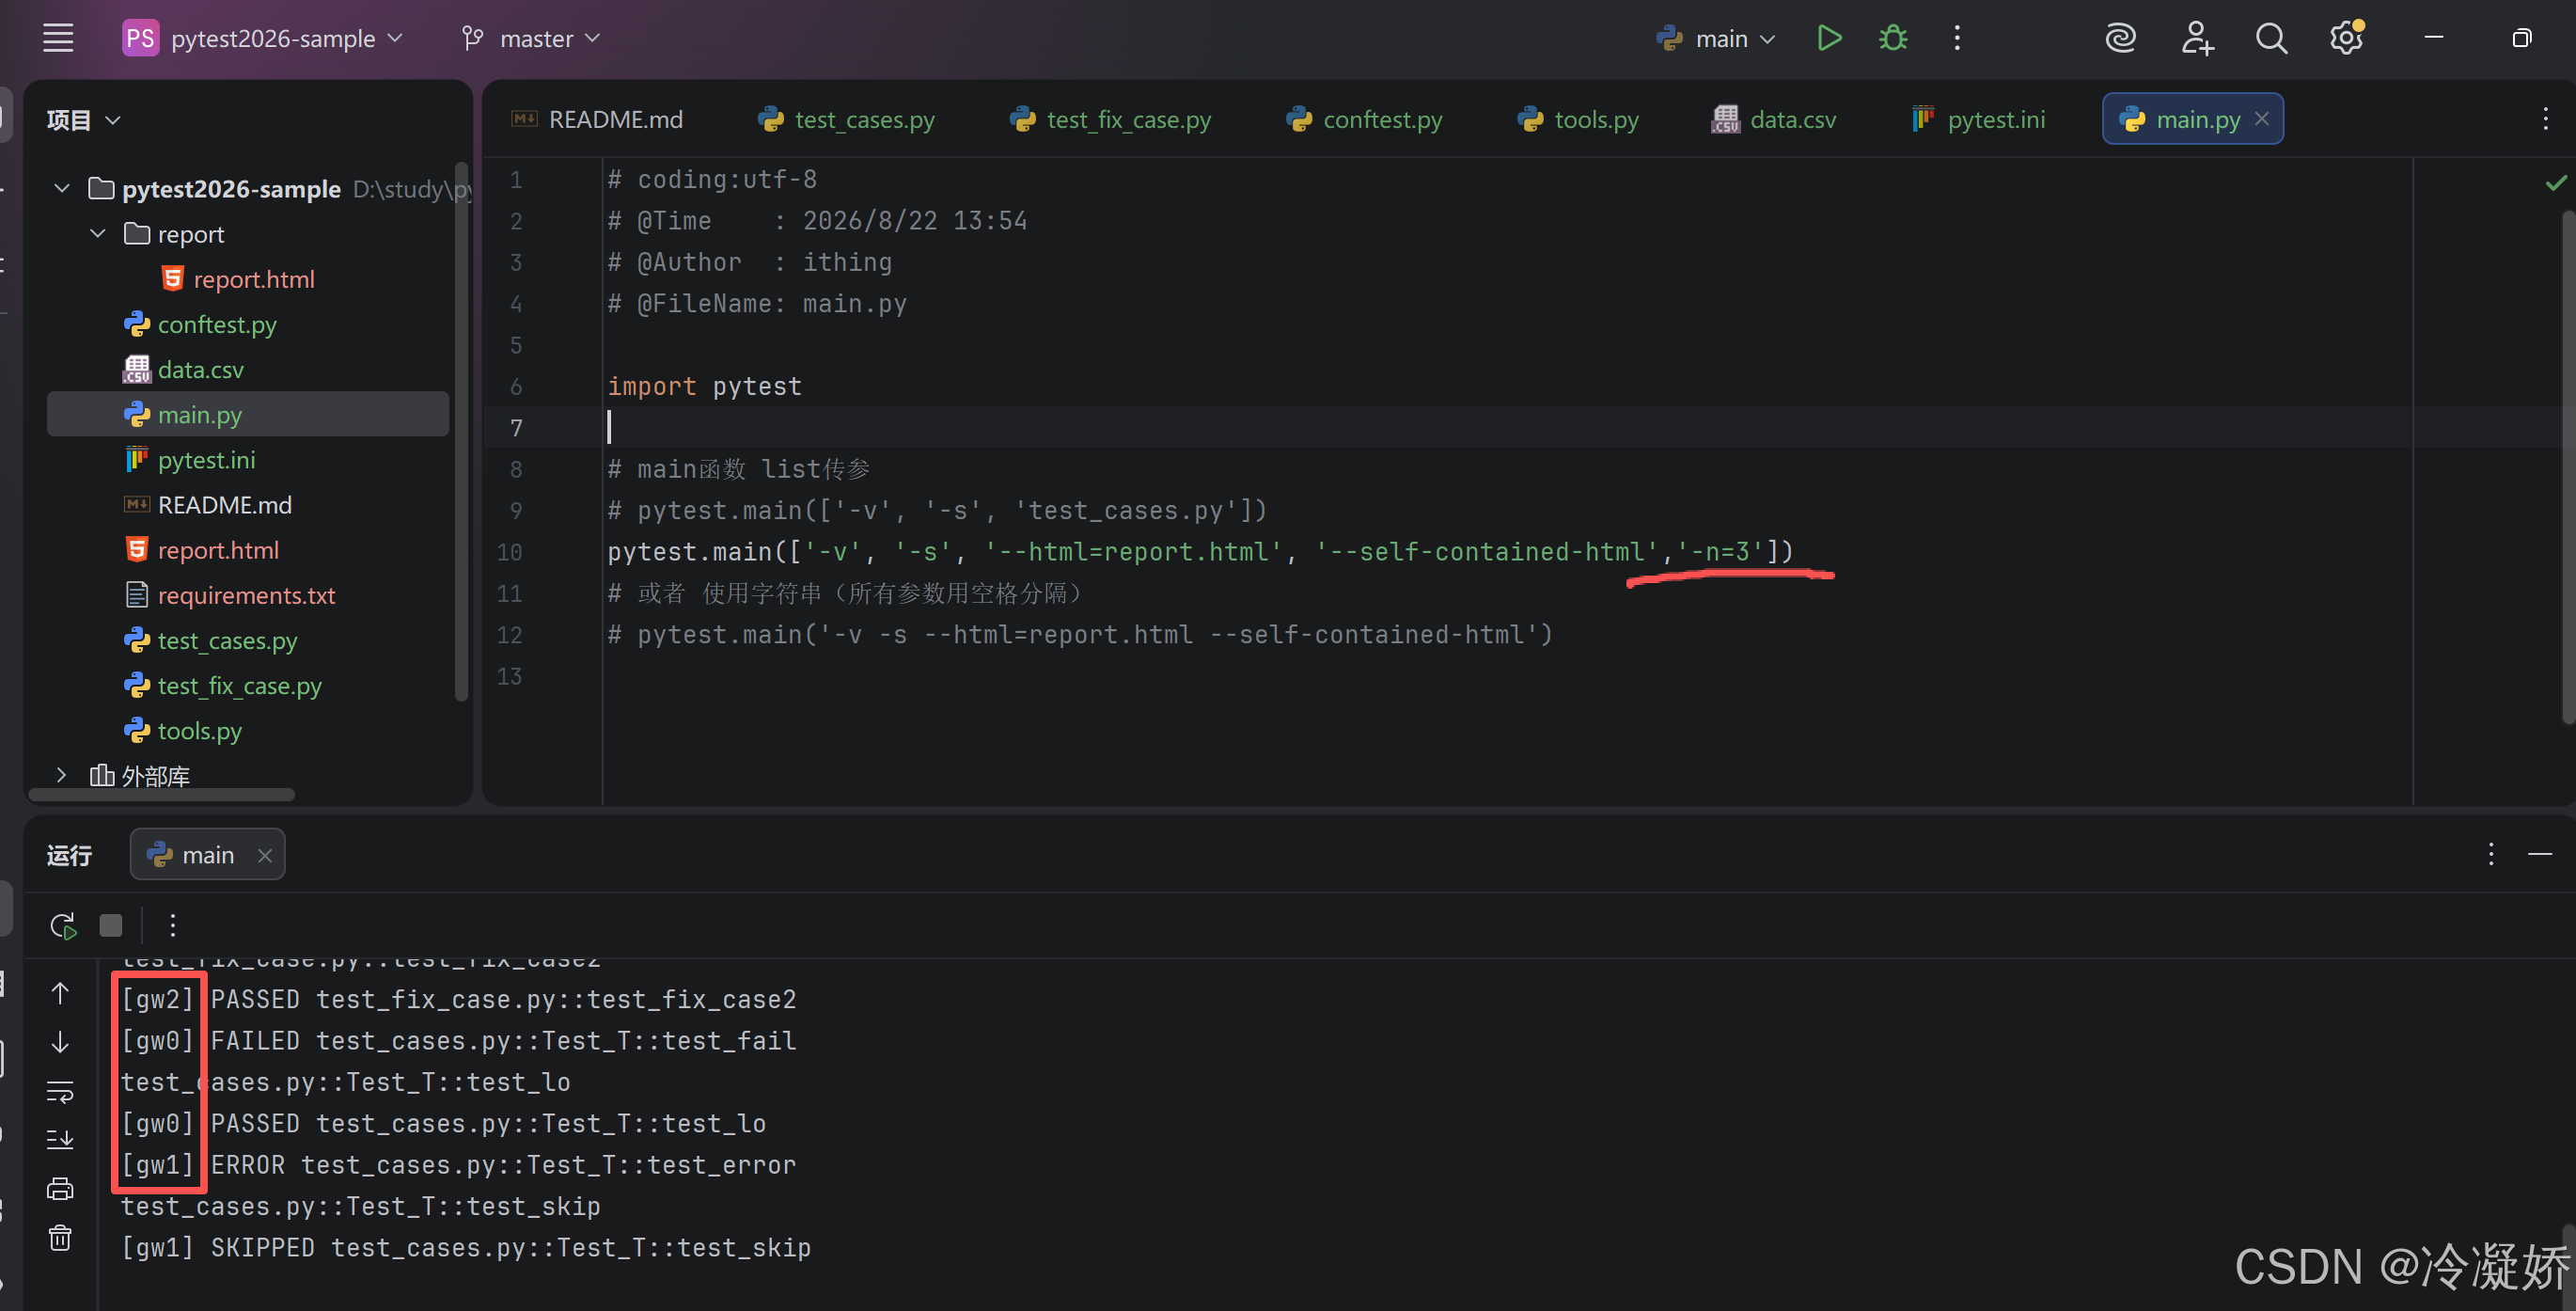
7.1.3 pytest-rerunfailures用例执行失败后重新执行
命令行模式:
bash
# 执行用例失败,重新执行5次
pytest --reruns 5
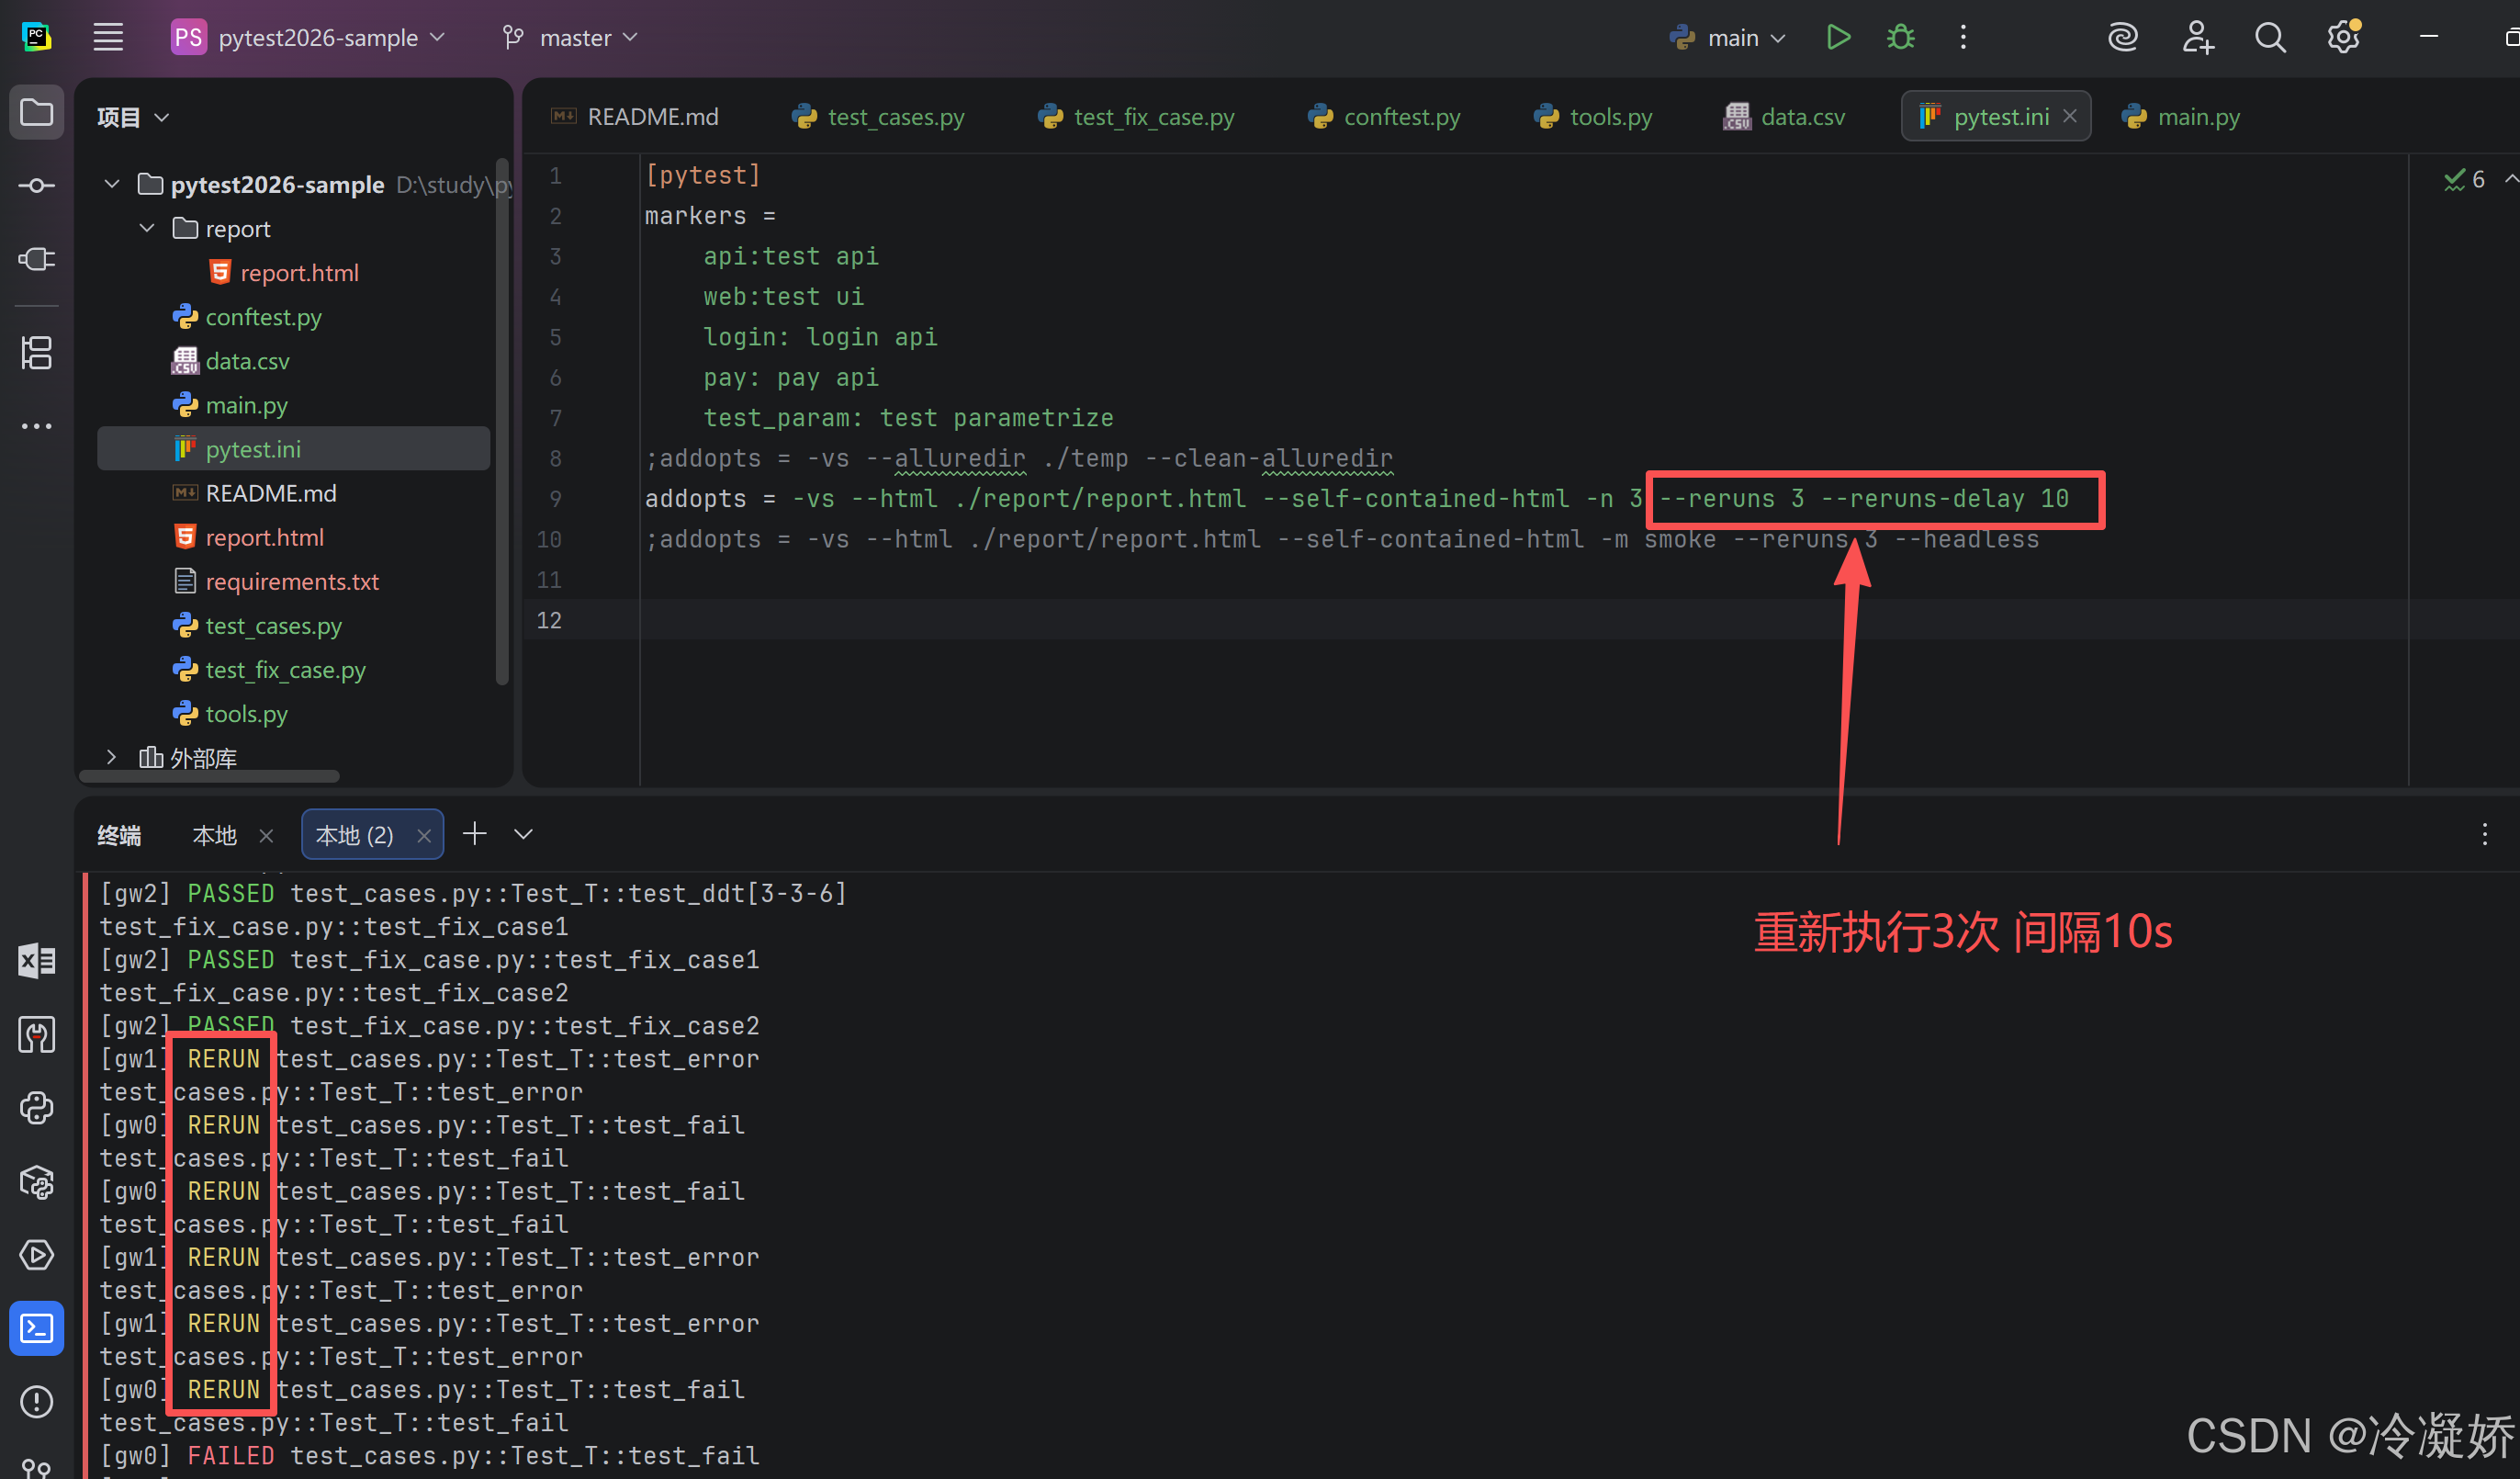
pytest --reruns 5 --reruns-delay 10  # 重新执行间隔时间 10s
主函数模式:
python
pytest.main(['-v', '-s', '--html=report.html', '--self-contained-html','-n=3','--reruns=5'])pytest.ini配置文件模式:
bash
addopts = -vs --html ./report/report.html --self-contained-html -n 3 --reruns 3 --reruns-delay 10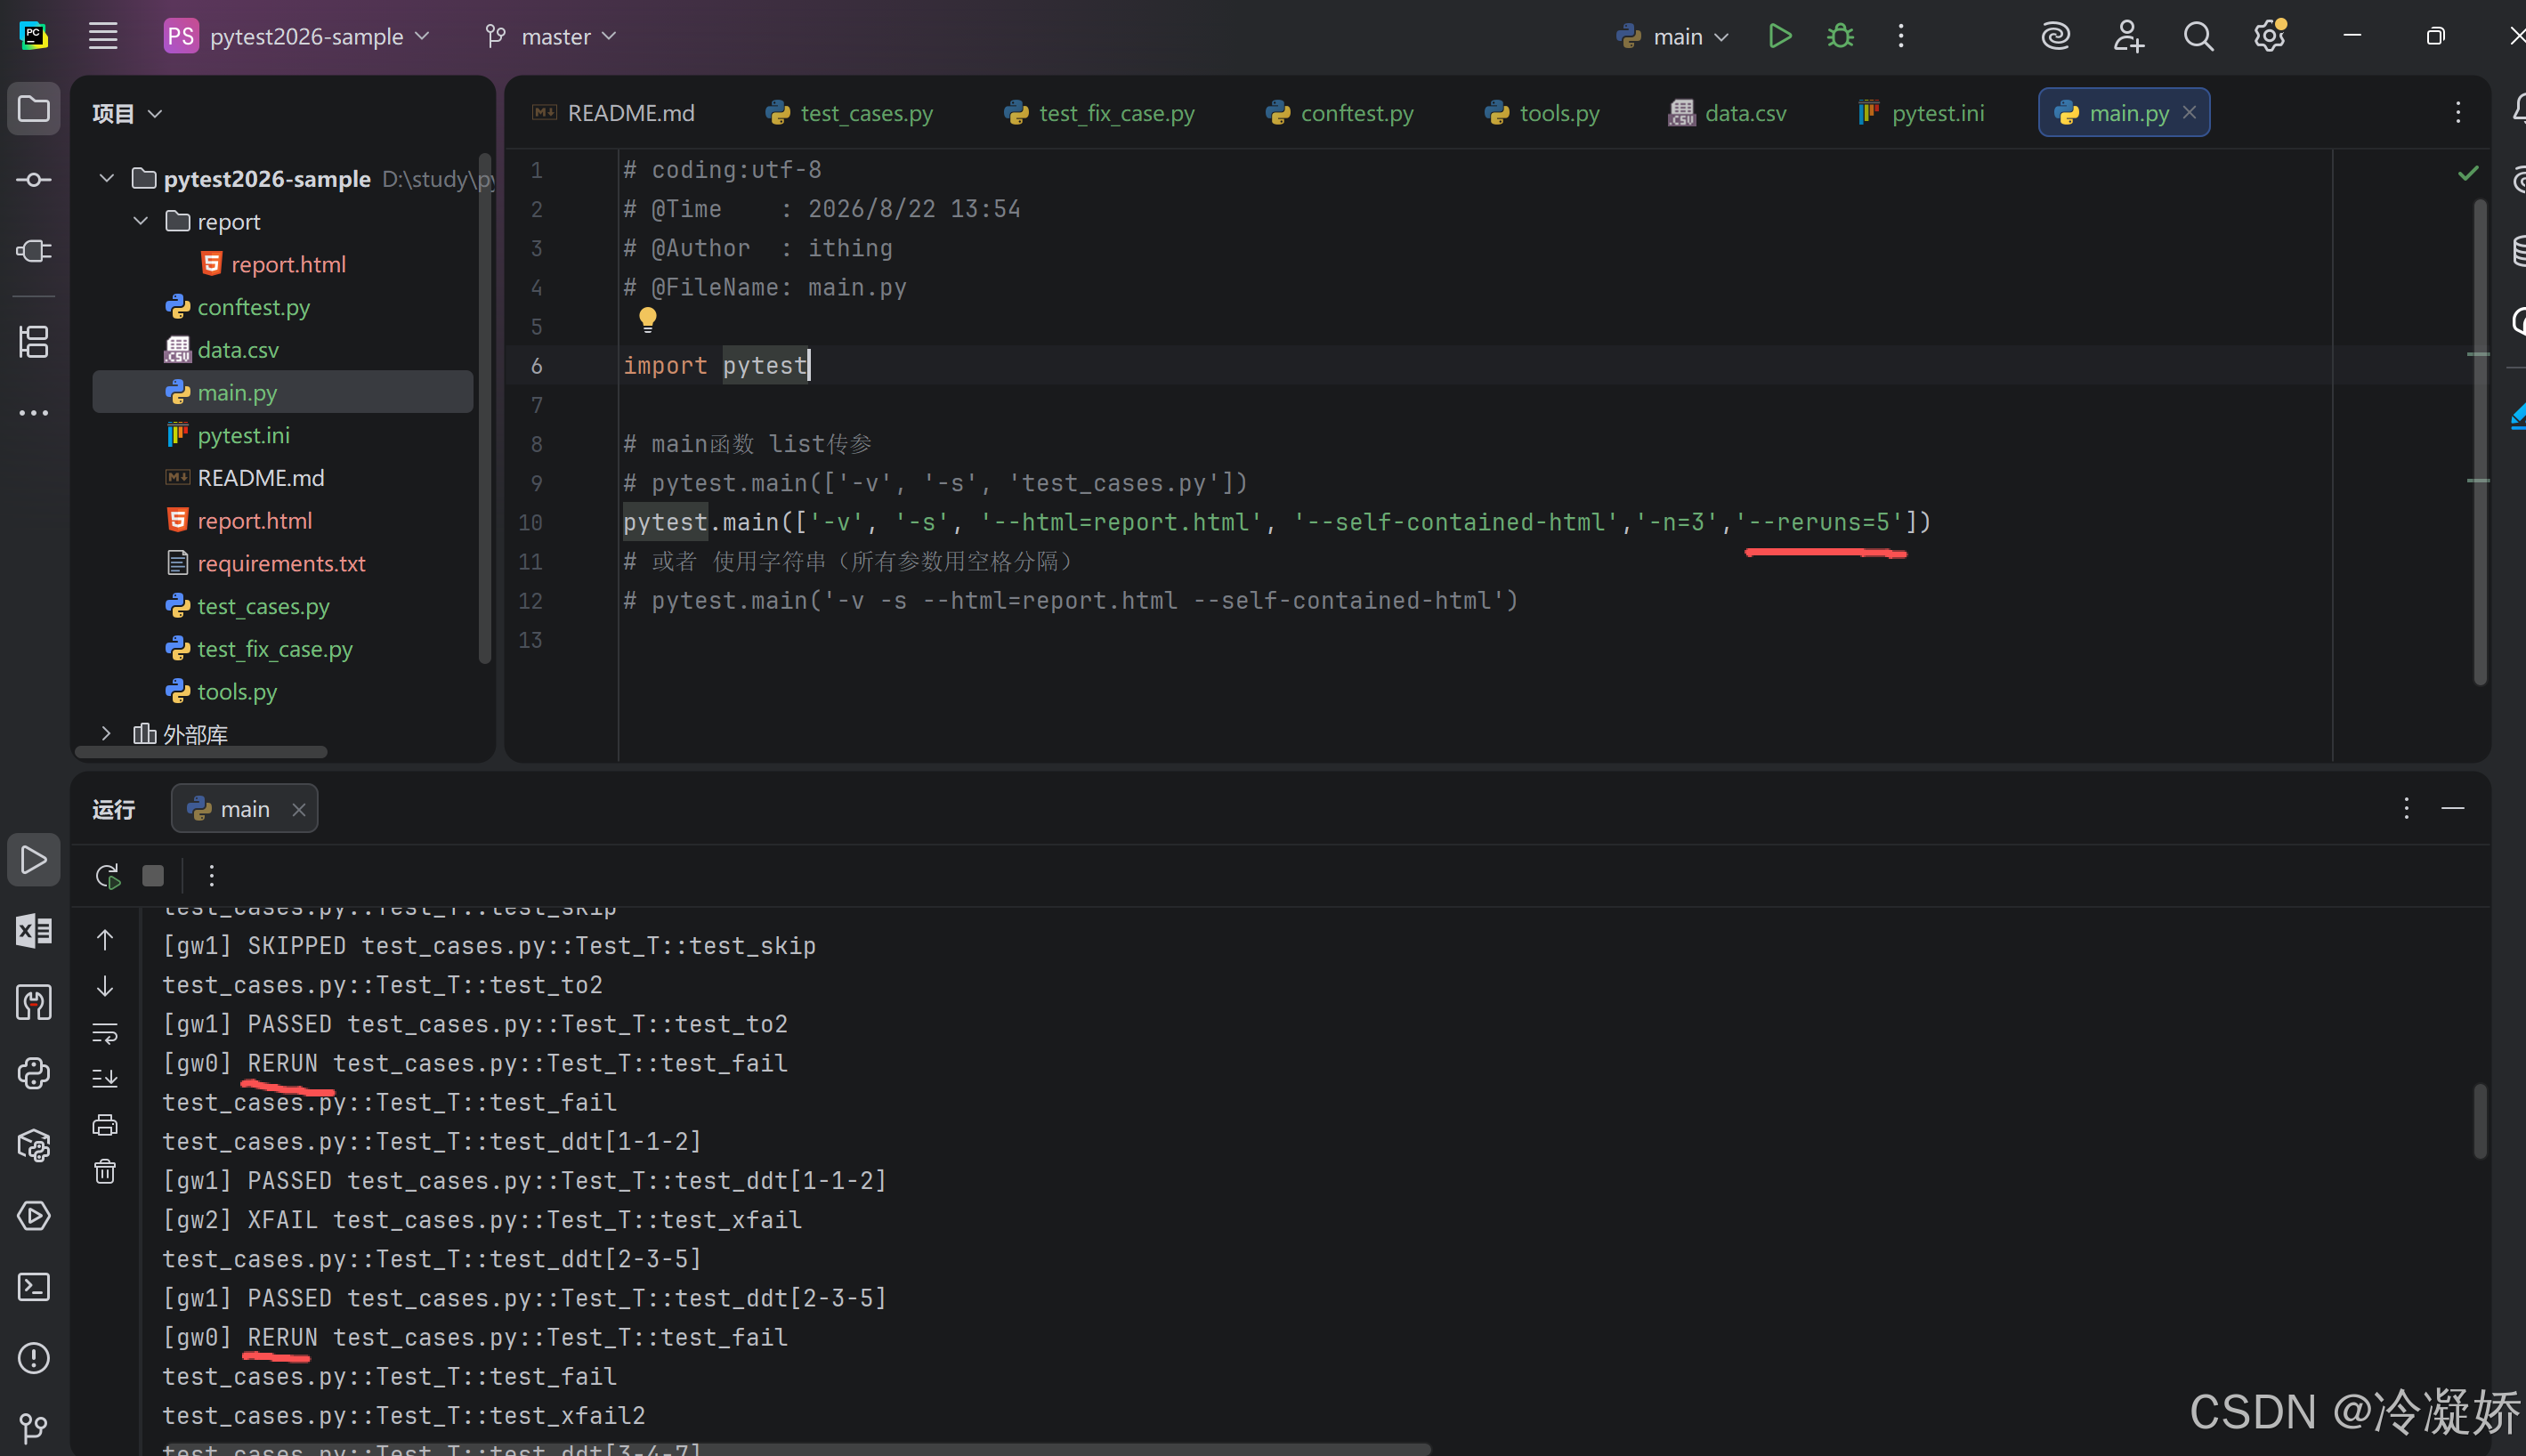
7.1.4 pytest-result-log 用例结果记录至日志文件(仅在配置文件中使用,因为配置参数较多)
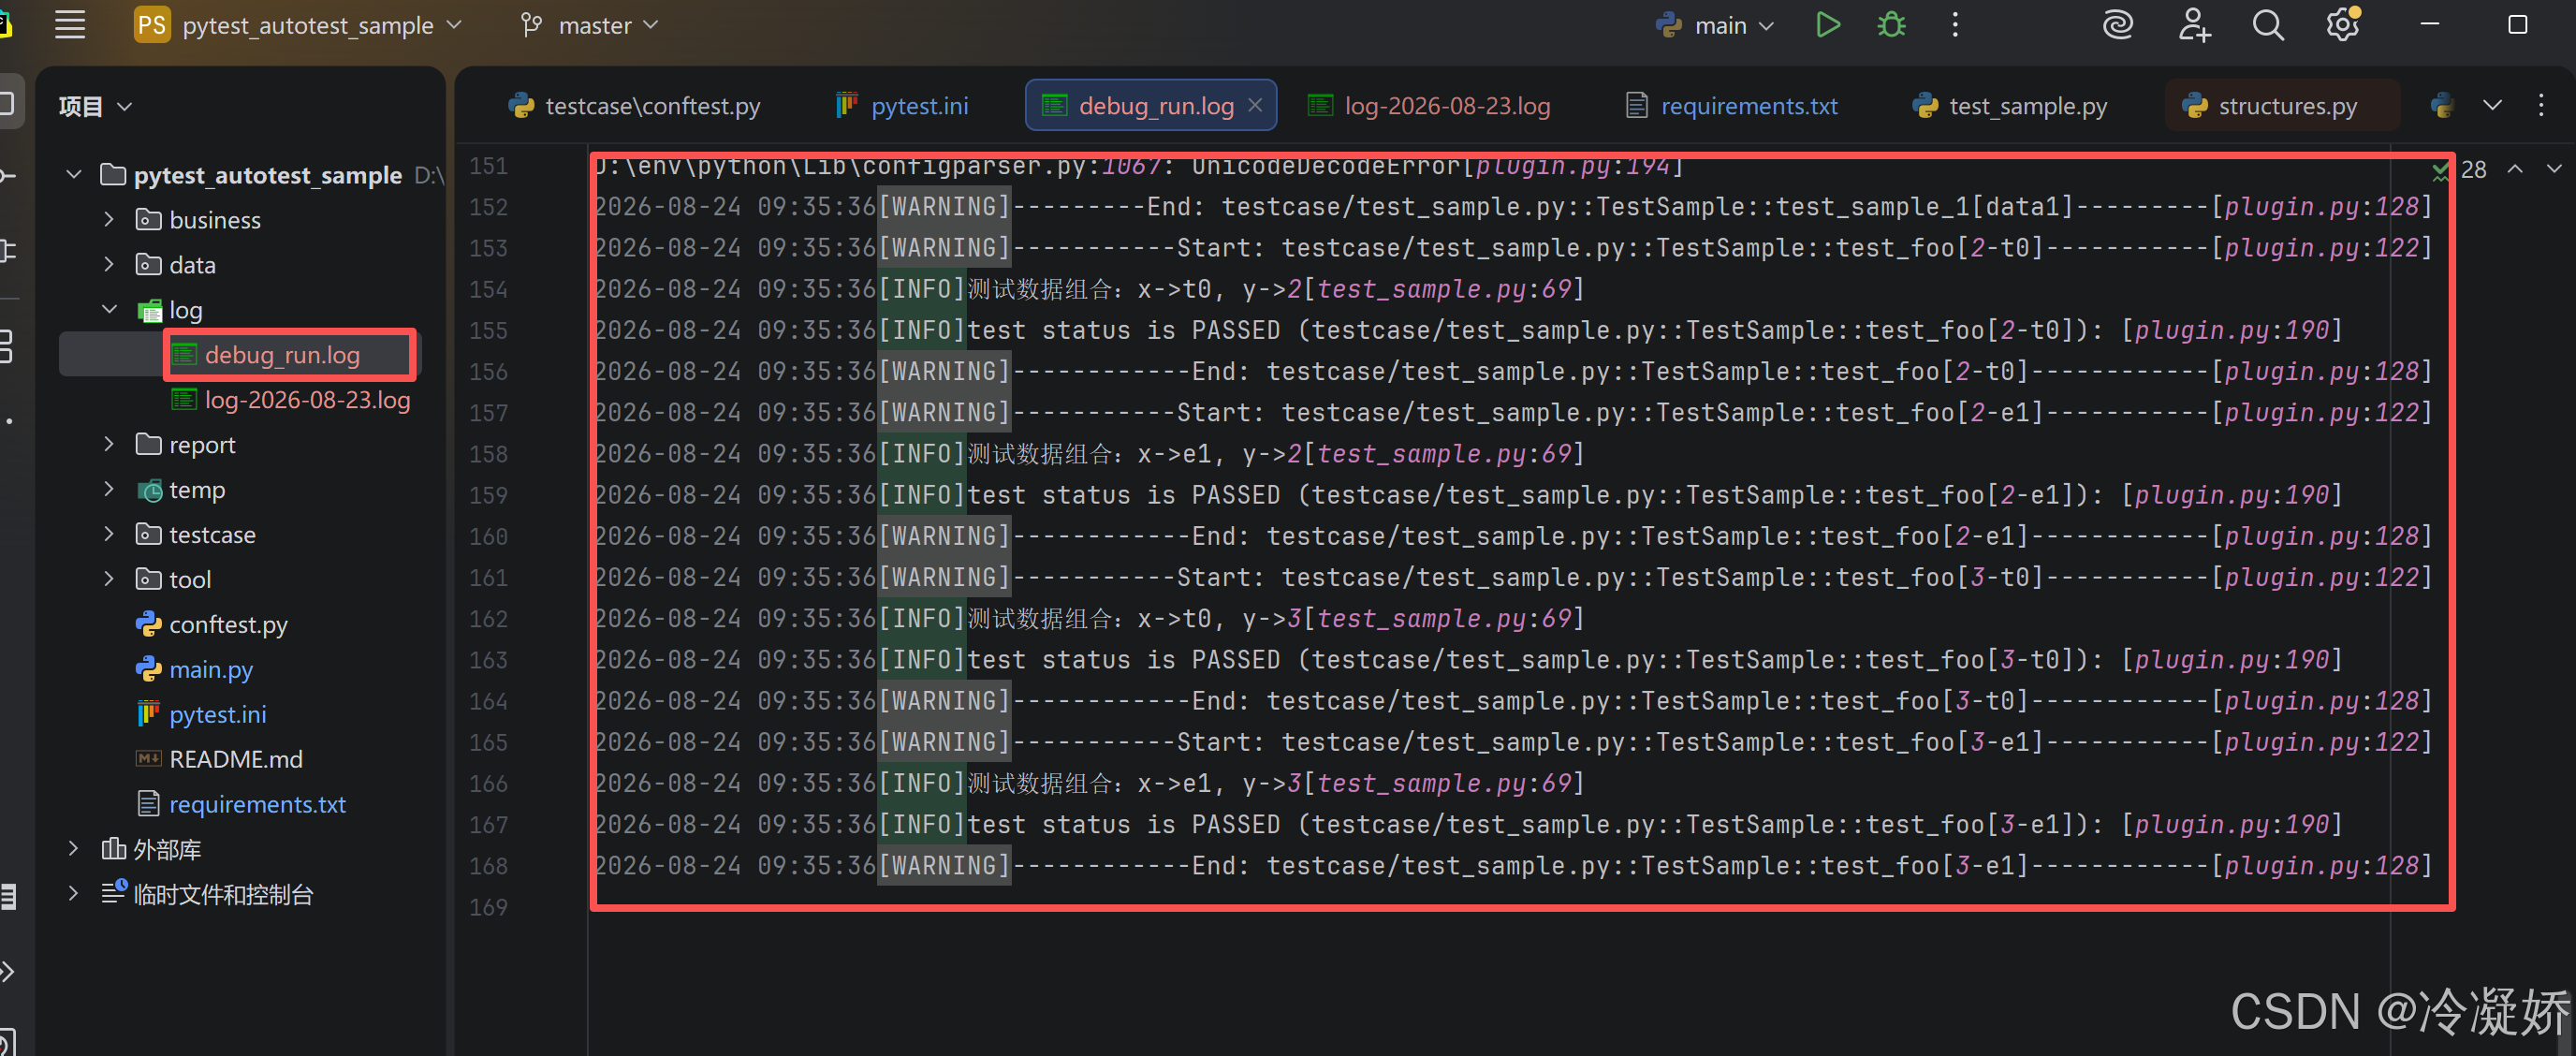
配置文件****pytest.ini中配置:
python
[pytest]
log_file = ./log/debug_run.log
log_file_level = info
log_file_format = %(asctime)s[%(levelname)s]%(message)s[%(filename)s:%(lineno)s]
log_file_date_format = %Y-%m-%d %H:%M:%S
; 记录测试结果
result_log_enable = True
; 记录用例分割线
result_log_separator = 1
; 分割线等级
result_log_level_separator = warning
; 异常信息等级
result_log_level_verbose = info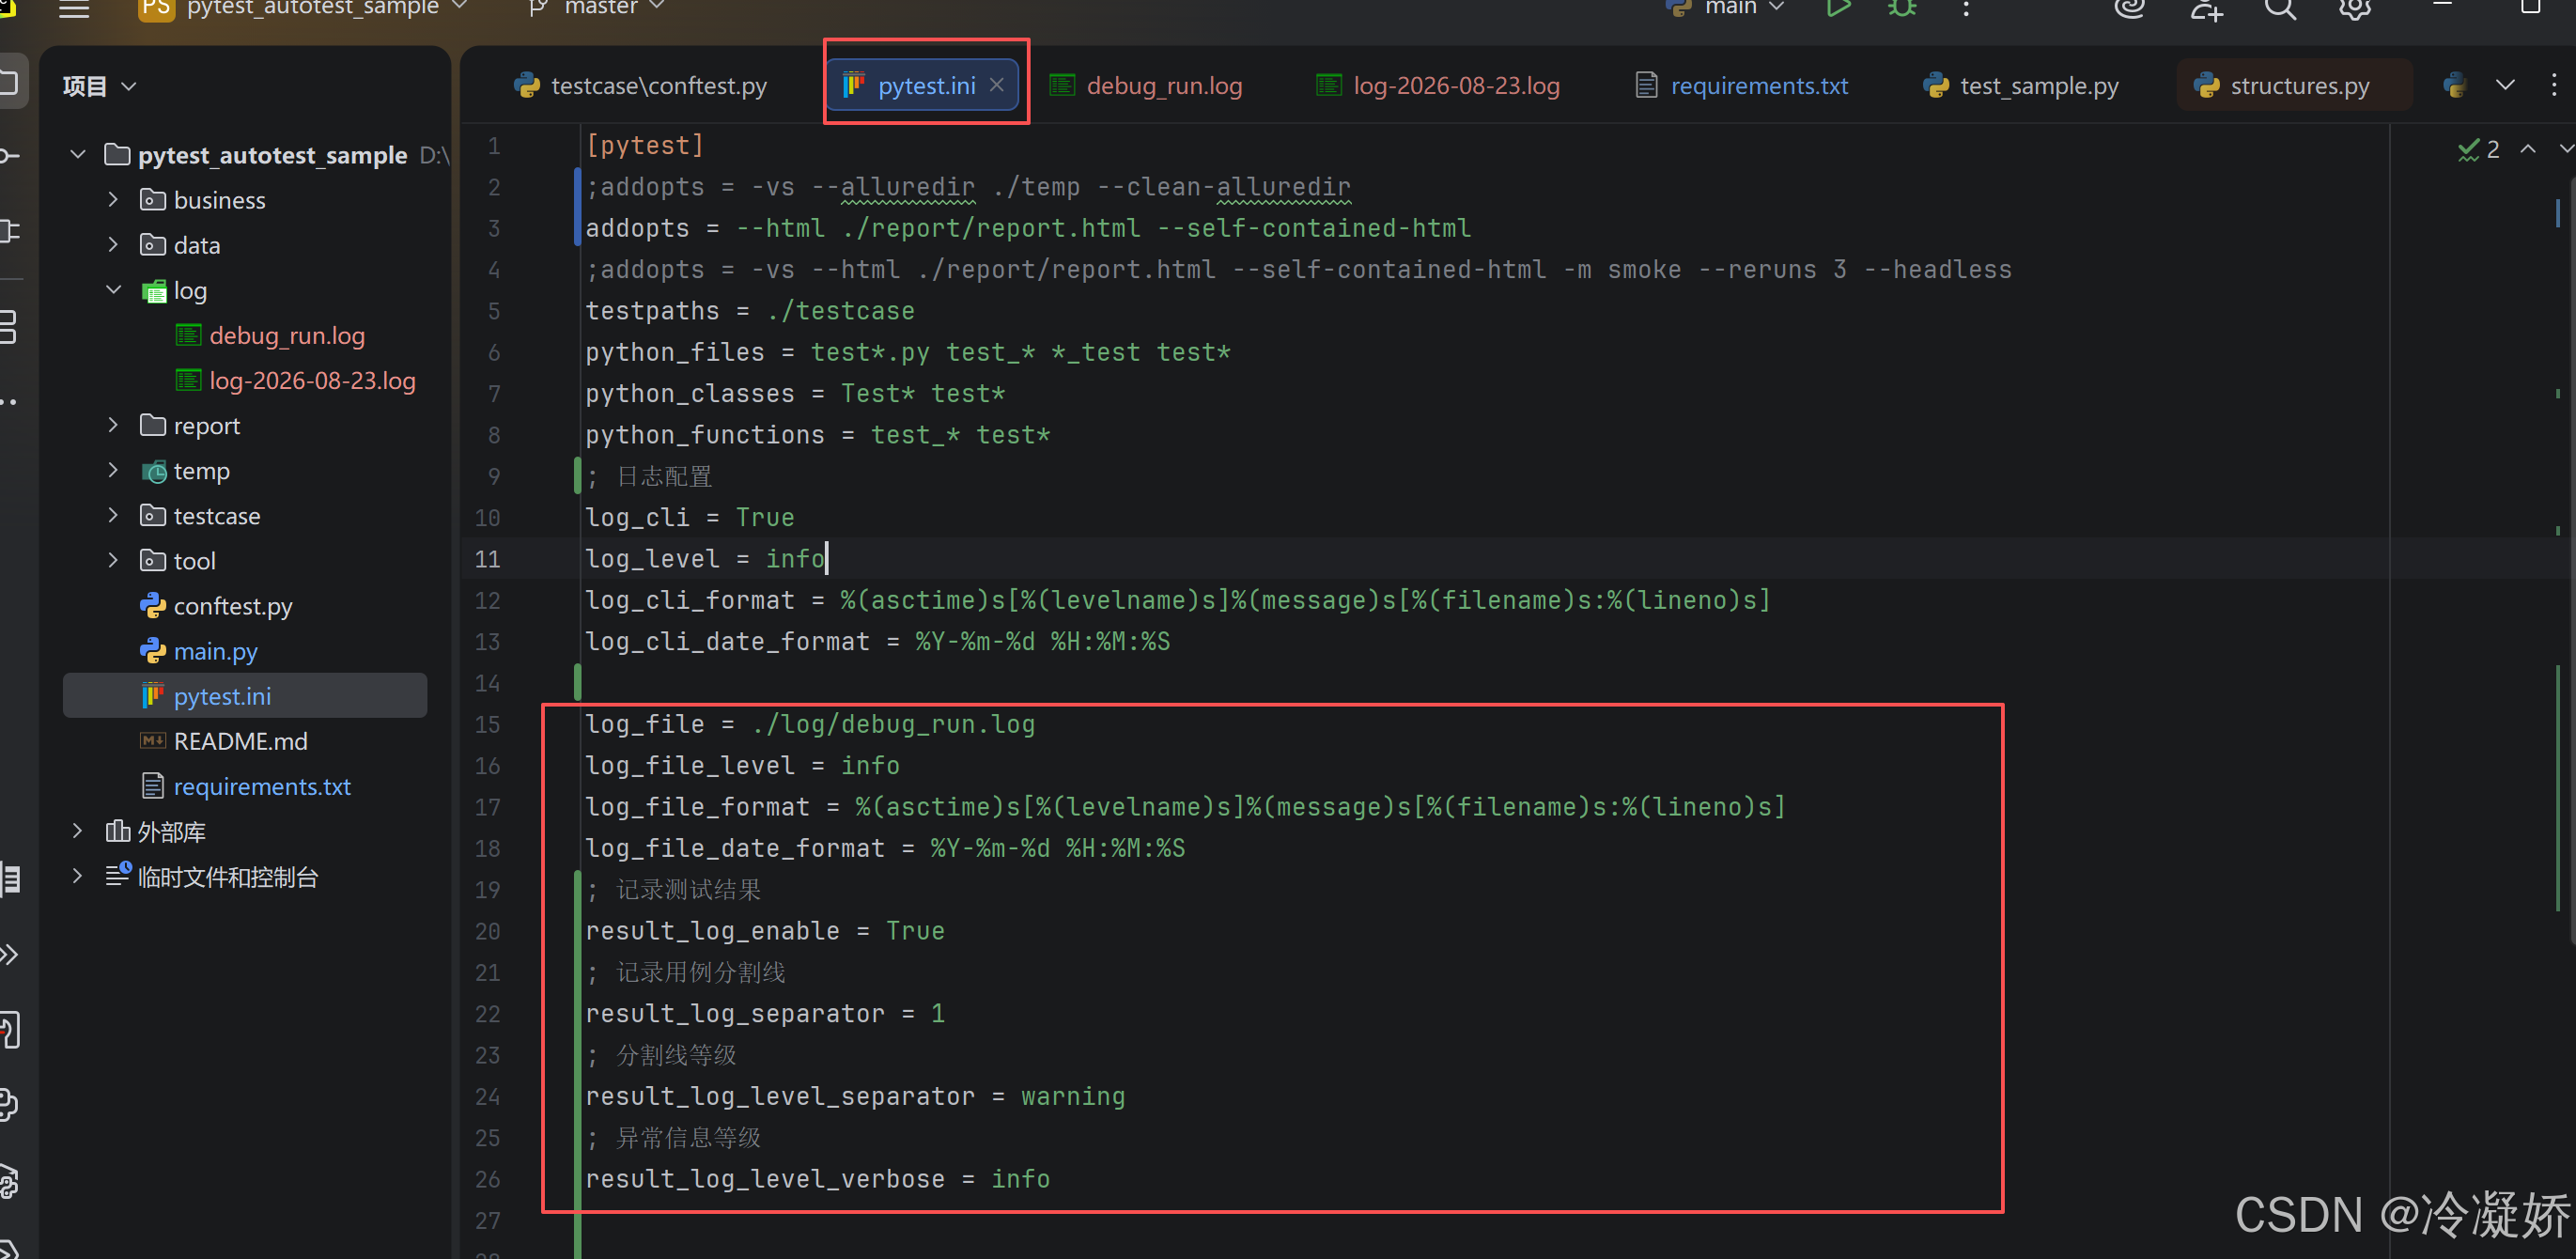
7.1.5 allure-pytest 测试报告美化(企业级测试报告)
txt
allure 本身是一个测试报告框架. 使用allure-pytest 需要先本地安装allure ,否则在生成报告时,识别不到allure命令。
allure-pytest 以allure 开头,说明了allure-pytest 本身是allure的插件。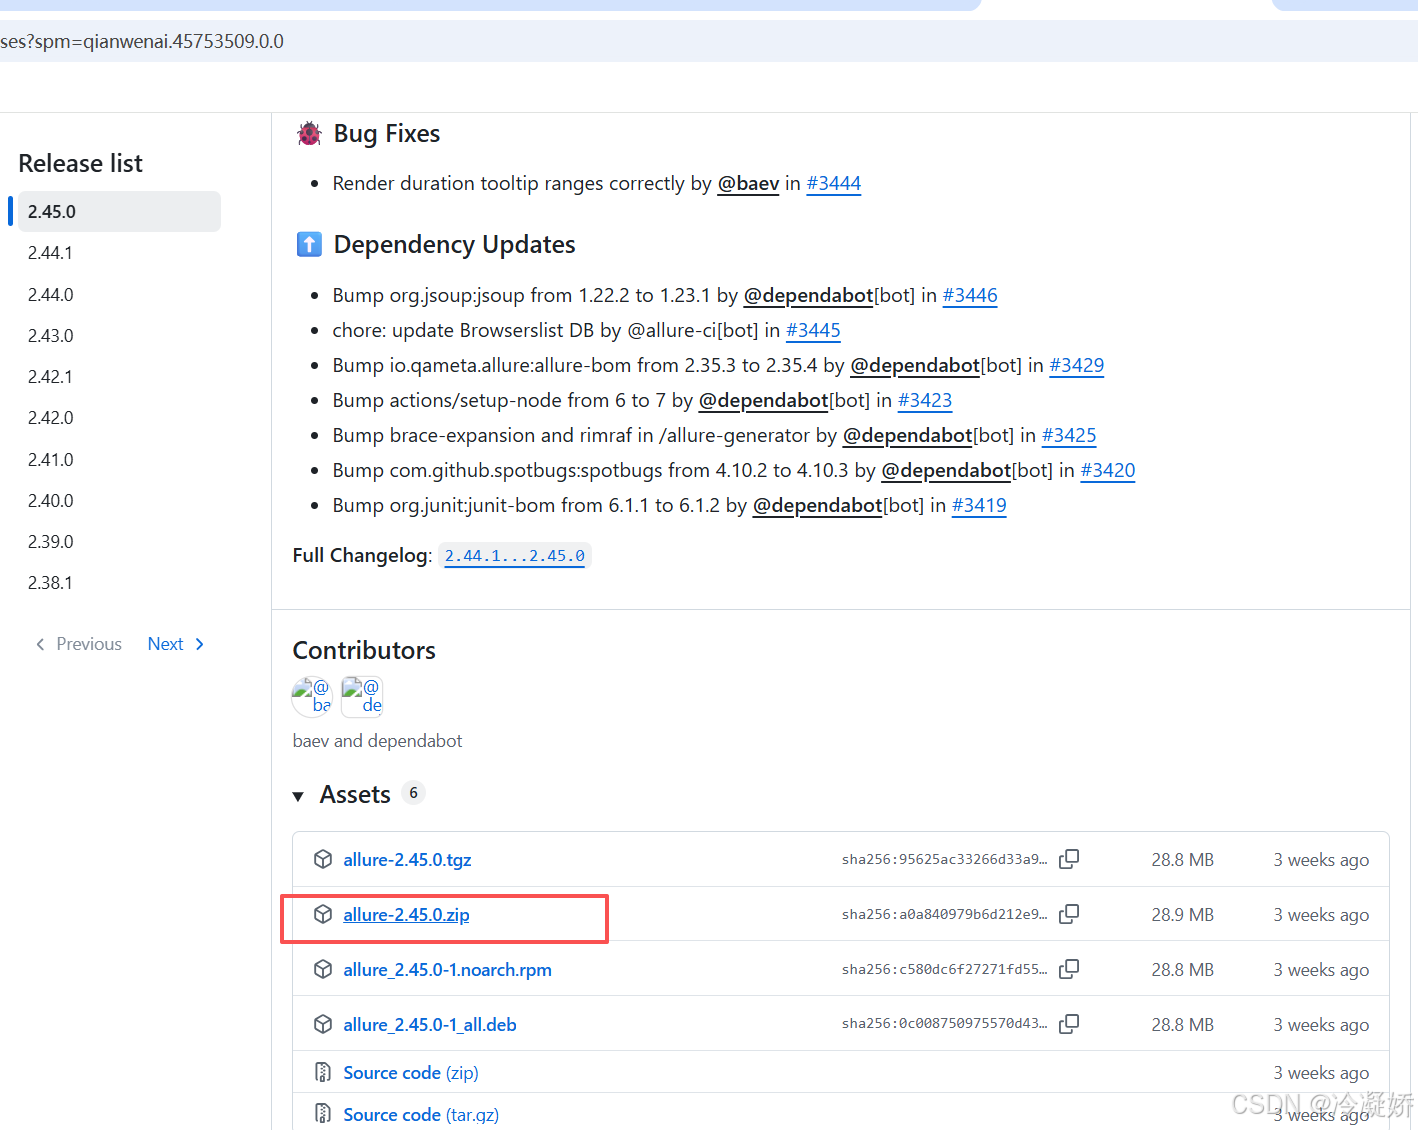
- 前往allure下载最新的 allure-x.x.x.zip 百度网盘也有存储
- 解压至一个固定目录:D:\soft\allure
- 配置D:\soft\allure\allure-2.45.0\bin环境变量PATH,重启环境变量
配置文件模式pytest.ini:
python
[pytest]
; --alluredir 指定临时数据目录  --clean-alluredir 清除原有数据
addopts = --alluredir ./temp --clean-alluredir
配置后,执行用例,不会直接生成报告,只是将数据放在/temp目录下;还需要执行allure命令。
生成报告:
bash
配置文件pytest.ini中 --alluredir path: 临时json报告,
再生成allure报告,需要执行:在主函数附加下面:
os.system('allure generate ./temp -o ./report --clean')

或者,命令行:allure generate ./temp -o ./report --clean
参数示意:
 ./temp 临时的json格式报告的路径
-o:output 后面跟具体输出到的目录
--clean:清空 -o后面跟的目录的原有的报告
7.2 allure 装饰用例,自定义测试报告(继本章7.1.5)
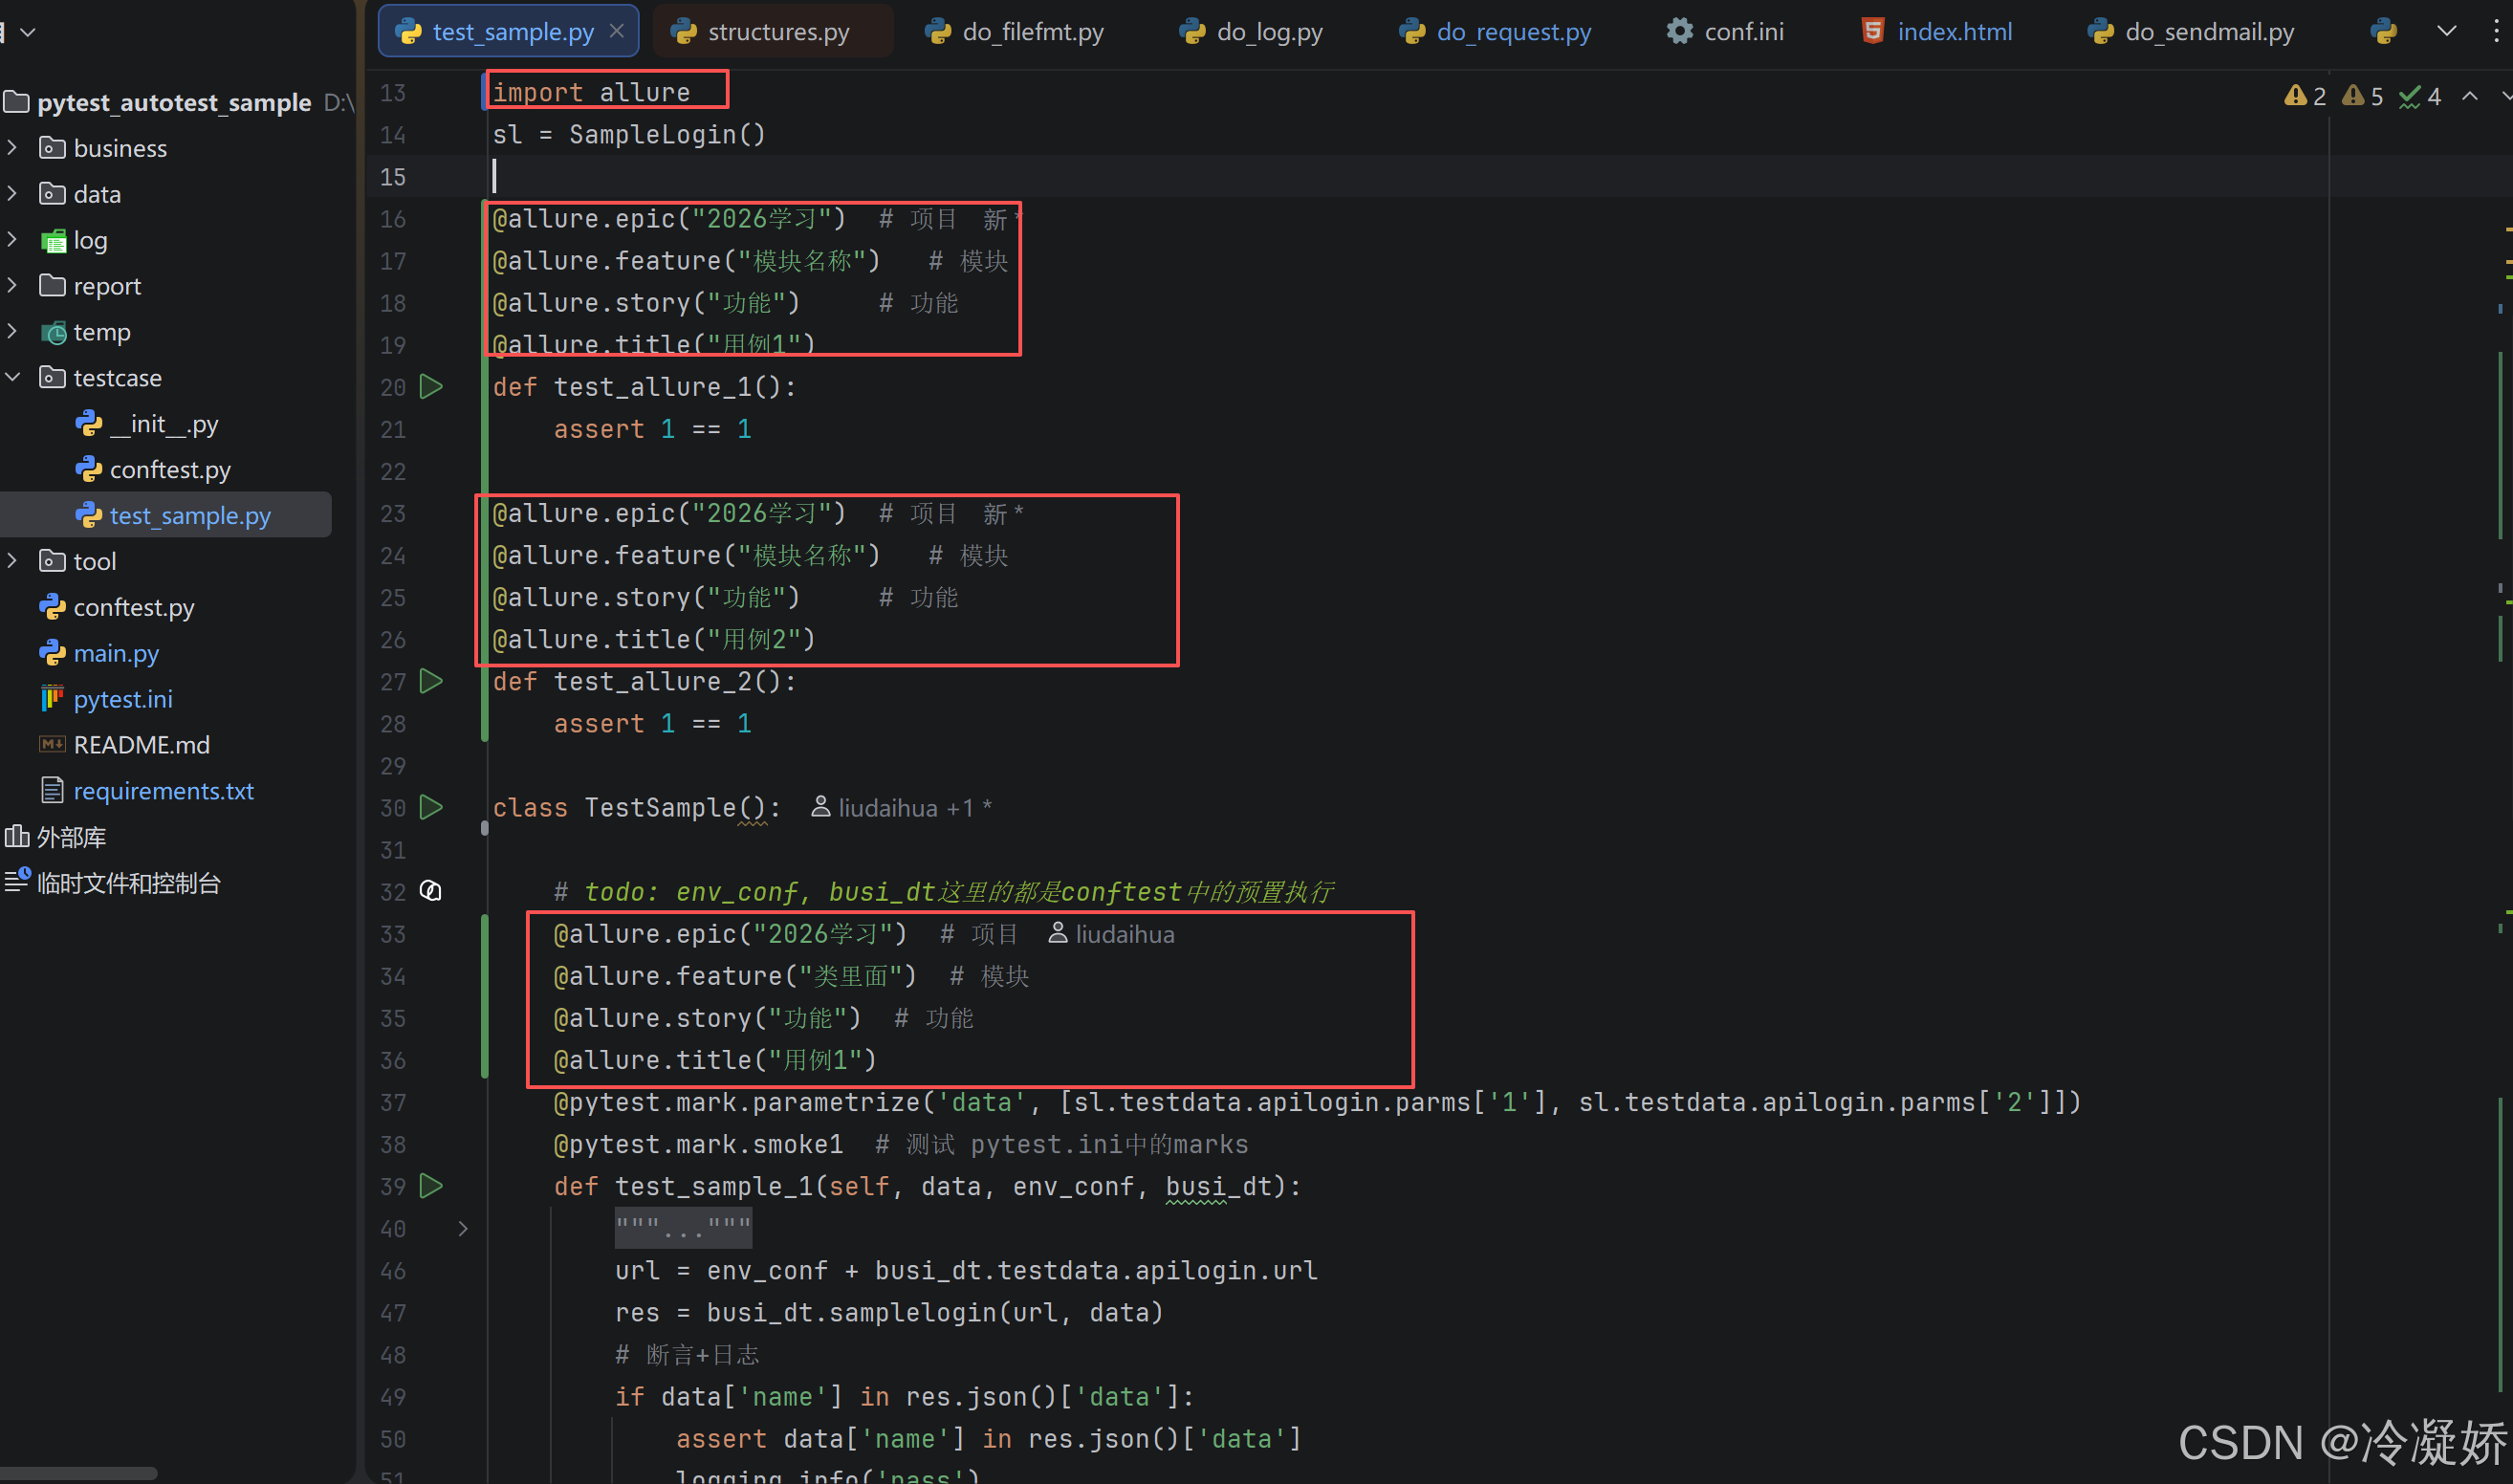
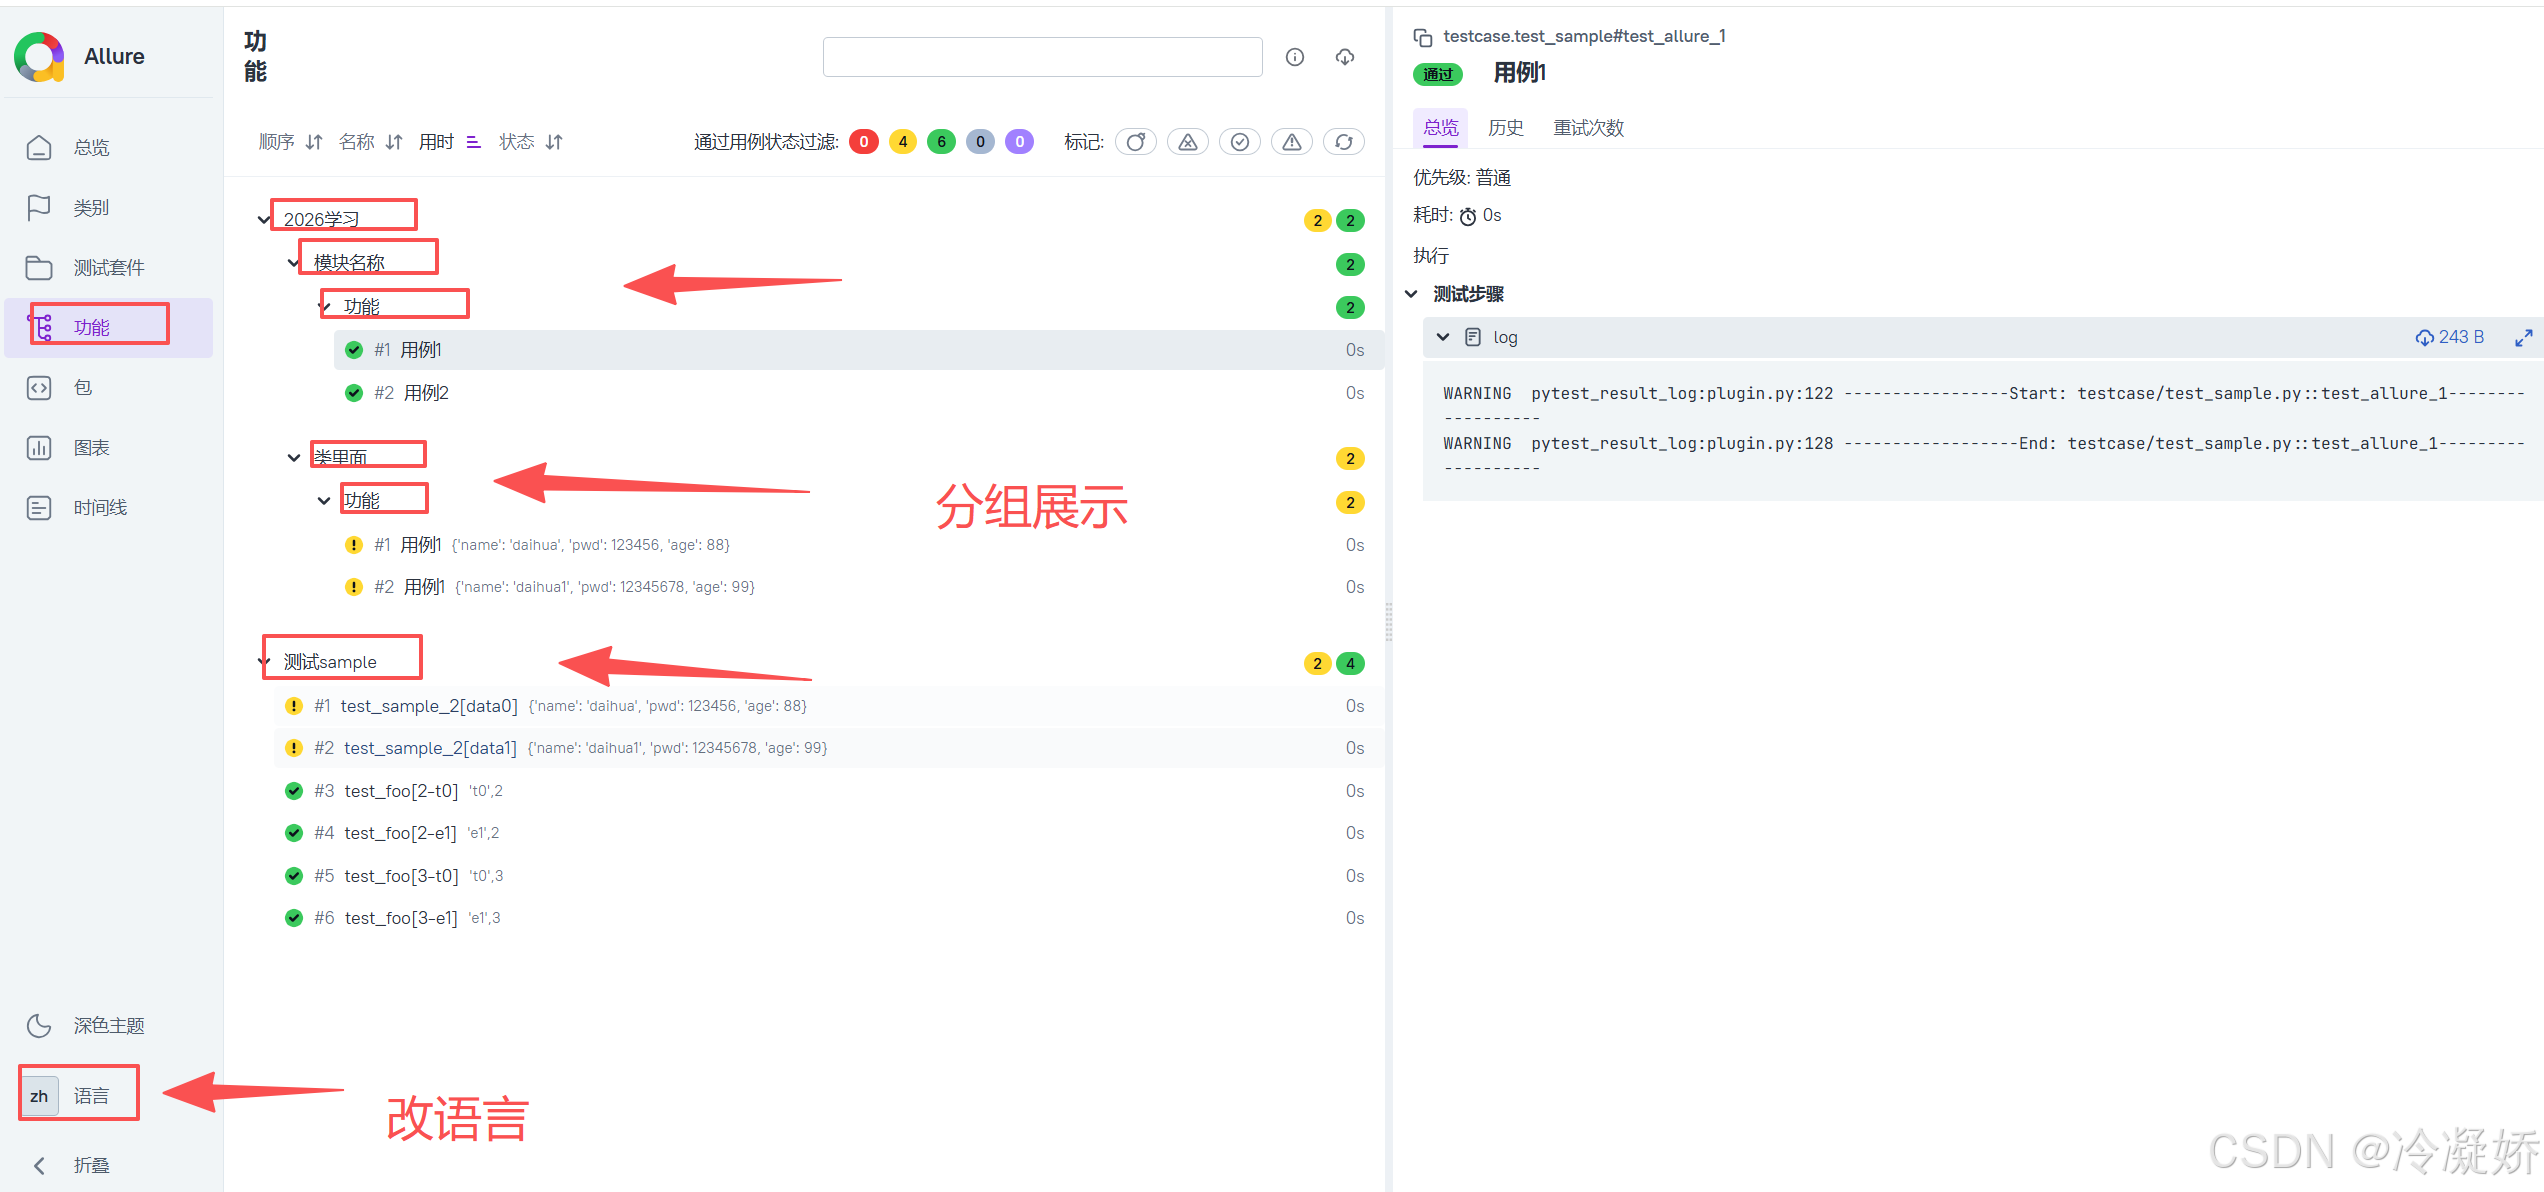
allure支持对用例进行分组和关联
python
使用相同装饰器的用例,自动并入同一组。
@allure.epic      项目
@allure.feature   模块
@allure.story     功能
@allure.title     用例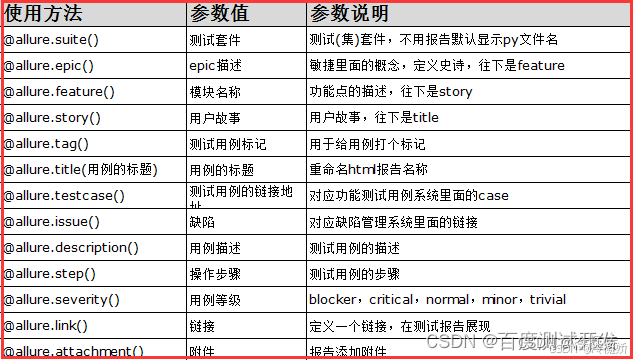
allure装饰用例,分组报告 示例: