本文意在精简和整合IMGUI的官方文档的编辑器扩展部分,抽出重点;我的体会是编辑器扩展处处都是规范,学习的过程就是掌握规范,API,DEMO
一.IMGUI 创建自定义Editor窗口
可通过以下官方定义的固定步骤,实现自定义编辑器窗口
1.实现一个继承EditorWindow的脚本,并放在Editor目录下
2.通过特性实现一个菜单
3.调用EditorWindow.GetWindow创建窗口
4.通过OnGUI绘制窗口内UI
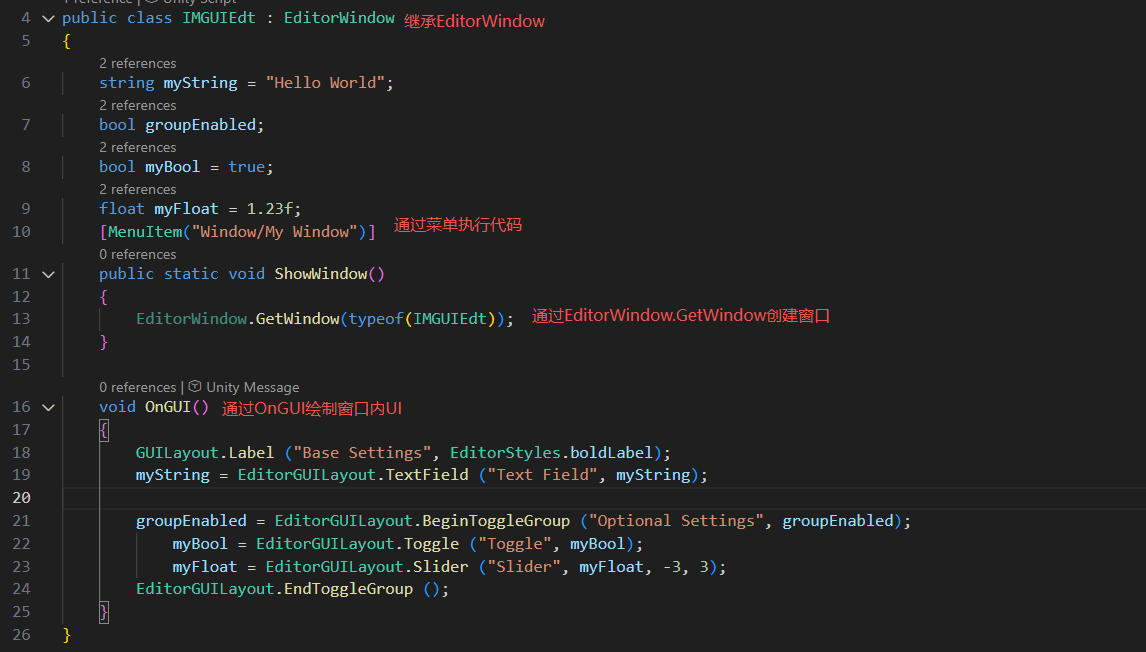
cs
using UnityEngine;
using UnityEditor;
using System.Collections;
public class IMGUIEdt : EditorWindow
{
    string myString = "Hello World";
    bool groupEnabled;
    bool myBool = true;
    float myFloat = 1.23f;
    [MenuItem("Window/My Window")]
    public static void ShowWindow()
    {
        EditorWindow.GetWindow(typeof(IMGUIEdt));
    }

    void OnGUI()
    {
        GUILayout.Label ("Base Settings", EditorStyles.boldLabel);
        myString = EditorGUILayout.TextField ("Text Field", myString);

        groupEnabled = EditorGUILayout.BeginToggleGroup ("Optional Settings", groupEnabled);
            myBool = EditorGUILayout.Toggle ("Toggle", myBool);
            myFloat = EditorGUILayout.Slider ("Slider", myFloat, -3, 3);
        EditorGUILayout.EndToggleGroup ();
    }
}
二.在Inspector定制指定类型在所有 Inspector 中的显示
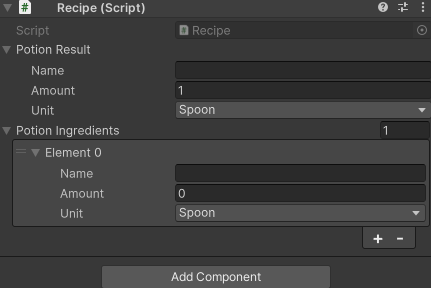
下面DEMO对比一个类在Inspector中得默认显示和定制化显示,默认显示的代码:
cs
using System;
using UnityEngine;
public enum IngredientUnit { Spoon, Cup, Bowl, Piece }
//用于让自定义类在Inspector中显示
[Serializable]
public class Ingredient
{
    public string name;
    public int amount = 1;
    public IngredientUnit unit;
}
public class Recipe : MonoBehaviour
{
    public Ingredient potionResult;
    public Ingredient[] potionIngredients;
}
2.1 特性**CustomPropertyDrawer和继承PropertyDrawer**
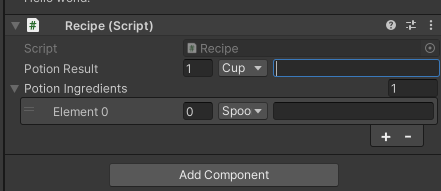
通过特性CustomPropertyDrawer和继承PropertyDrawer,unity显示Ingredient时将不再使用默认绘制方式,而是调用IngredientDrawer的 OnGUI 方法(约定写法)
**注意IngredientDrawer的 OnGUI 和 ****MonoBehaviour的OnGUI**完全不同
MonoBehaviour的OnGUI无参,是Unity的事件函数,每帧调用,参与打包构建;
IngredientDrawer的 OnGUI有参(Rect, SerializedProperty, GUIContent),是编辑器扩展专用方法,仅在Inspector面板绘制该序列化属性时触发,不参与打包构建
定制化显示代码**(这段代码行数不多,但是信息量较大)****:**
cs
using UnityEditor;
using UnityEngine;
//特性CustomPropertyDrawer:约定写法
[CustomPropertyDrawer(typeof(Ingredient))]
public class IngredientDrawer : PropertyDrawer//继承PropertyDrawer:约定写法
{
    //OnGUI函数原型:约定写法, 定义在父类PropertyDrawer中
    public override void OnGUI(Rect position, SerializedProperty property, GUIContent label)
    {
        var a = property.type;
        if (Event.current.type == EventType.Repaint)
        {
            Debug.Log(label.text+"," + position.x +","+ position.y+"," + position.width+","+ position.height);
            // EditorGUI.DrawRect(position, new Color(1, 0, 0, 0.3f));
        }
        EditorGUI.BeginProperty(position, label, property);
            //前缀标签
            position = EditorGUI.PrefixLabel(position, GUIUtility.GetControlID(FocusType.Passive), label);
            //获取缩进
            var indent = EditorGUI.indentLevel;
            //设置缩进
            EditorGUI.indentLevel = 0;
            //获取矩形区域
            var amountRect = new Rect(position.x, position.y, 30, position.height);
            var unitRect = new Rect(position.x + 35, position.y, 50, position.height);
            var nameRect = new Rect(position.x + 90, position.y, position.width - 90, position.height);
            //绘制字段
            EditorGUI.PropertyField(amountRect, property.FindPropertyRelative("amount"), GUIContent.none);
            EditorGUI.PropertyField(unitRect, property.FindPropertyRelative("unit"), GUIContent.none);
            EditorGUI.PropertyField(nameRect, property.FindPropertyRelative("name"), GUIContent.none);
            //还原缩进
            EditorGUI.indentLevel = indent;
        EditorGUI.EndProperty();
    }
}
默认显示:
定制化显示:
2.2 **OnGUI的**Rect参数
通过选中Ingredient类所在脚本所在的对象,会执行OnGUI方法,加上打印信息和绘制position代表的矩形区域,来看效果
cs
    public override void OnGUI(Rect position, SerializedProperty property, GUIContent label)
    {
        Debug.Log(label.text+","+Event.current.type+"," + position.x +","+ position.y+"," + position.width+","+ position.height);
        EditorGUI.DrawRect(position, new Color(1, 0, 0, 0.3f));
    }
这里给出结论:
OnGUI会多次执行,其中position.x和position.y为0的时候,是处于计算布局阶段(Layout);当处于repaint阶段时,Rect所代表的矩形才是真正绘制区域
2.3 通过EventType过滤阶段
无论MonoBehaviour的无参OnGUI或 PropertyDrawer的有参OnGUI,都可能因为各种事件执行。若需要将逻辑放在需要的事件中,可用if (Event.current.type == EventType.XX)判断,这么做还可优化性能
仅在MouseDown事件打印:
cs
    void OnGUI()
    {
        if (Event.current.type == EventType.MouseDown)
        {
            Debug.Log("Mouse Down.");
        }
    }
仅在Repaint事件执行代码:
cs
    public override void OnGUI(Rect position, SerializedProperty property, GUIContent label)
    {
        if (Event.current.type == EventType.Repaint)
        {
            EditorGUI.DrawRect(position, new Color(1, 0, 0, 0.3f));
        }
}参考:EventType
2.4 EditorGUI.BeginProperty
官方说明:BeginProperty和EndProperty自动处理默认标签,预制件覆盖的粗体字体,恢复到预制件右键菜单,如果多对象编辑时属性值不同,则将showMixedValue设为true
自己理解:BeginProperty是让Inspector自定义控件获得Inspector原生控件能力(最主要是右键菜单)。
实际开发中,先无需加BeginProperty开发第一版,开发完后哪些控件缺原生功能,再调用BeginProperty往上加
编辑器扩展创建的控件,若支持右击菜单,要反应过来,其内部调用了BeginProperty
cs
        EditorGUI.BeginProperty(position, label, property);
        //...
        EditorGUI.EndProperty();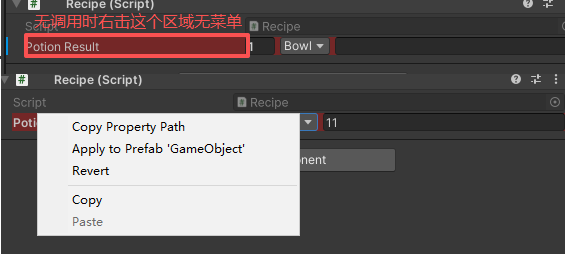
对于判断什么情况下要调用BeginProperty至关重要,首先看下源码,BeginProperty内部调用BeginPropertyInternal,在EditorGUI中搜索这两个函数有若干处调用,也就是有的控件内部会调用BeginProperty,无需重复调用
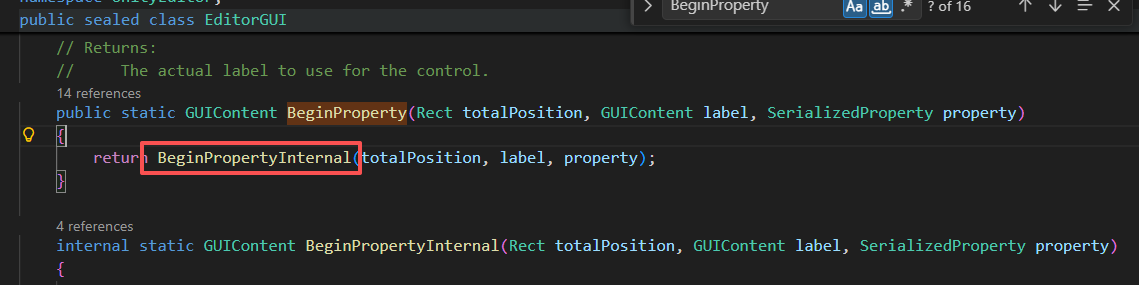
下面列出两种需要加 BeginProperty的情况:
1.创建控件的函数签名中没有 SerializedProperty 参数
调用BeginProperty时需要传SerializedProperty类型参数,因此这种情况函数内部由于没有获取SerializedProperty参数,一定不会调用BeginProperty;
反之,若函数签名中有 SerializedProperty 参数,其内部往往会调用BeginProperty。
2.多个控件放一行,共享一个主标签,这时无需看控件的函数签名了,因为需要BeginProperty来修饰主标签,以及让其中控件被视作整体
2.5 参数SerializedProperty
OnGUI的property的类型是SerializedProperty,它是上下文对象。可将其理解为序列化句柄或序列化访问器,如果翻译成序列化属性容易和C#的get/set属性概念混淆,两者没有关联。
类型名称:type
类型枚举:propertyType
字段名:name
获取子属性(耗性能):
SerializedProperty levelProp = property.FindPropertyRelative("level");
修改值后生效:property.serializedObject.ApplyModifiedProperties();
2.6 GUIUtility.GetControlID
获取unity分配的控件唯一id,用来控制该控件是否接受某些事件,如键盘tab切换控件
不接受事件:
cs
GUIUtility.GetControlID(FocusType.Passive)接受事件:
cs
GUIUtility.GetControlID(FocusType.Keyboard)2.7 EditorGUI.PrefixLabel
绘制一个前缀标签
totalPosition:整个控件的Rect
id:通过GUIUtility.GetControlID(FocusType.Passive)获取的控件id
label:OnGUI的参数label
返回值:控件剩余可用区域
cs
public static Rect PrefixLabel(Rect totalPosition, int id, GUIContent label)2.7 EditorGUI.indentLevel
用来控制缩进,常见写法:
cs
EditorGUI.indentLevel++;
EditorGUI.indentLevel--;

//EditorGUI.indentLevel是全局静态属性,所以在修改它时必须保存和恢复
var indent = EditorGUI.indentLevel;
EditorGUI.indentLevel = 0;
//code here
EditorGUI.indentLevel = indent;
2.8 EditorGUI.PropertyField
用于在编辑器中为SerializedProperty创建一个字段。
cs
var amountRect = new Rect(position.x, position.y, 30, position.height);
EditorGUI.PropertyField(amountRect, property.FindPropertyRelative("amount"), GUIContent.none);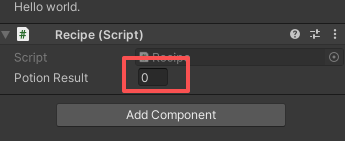
2.9 PropertyAttribute类
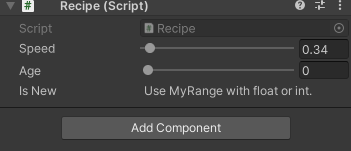
自定义特性继承PropertyAttribute后,可以与ProperyDrawer的子类关联起来,用于控制脚本变量在Inspector中如何显示
cs
using UnityEditor;
using UnityEngine;
public class MyRangeAttribute : PropertyAttribute
{
    public float min;
    public float max;
    public MyRangeAttribute(float min, float max)
    {
        this.min = min;
        this.max = max;
    }
}

[CustomPropertyDrawer(typeof(MyRangeAttribute))]
public class RangeDrawer : PropertyDrawer
{
    public override void OnGUI(Rect position, SerializedProperty property, GUIContent label)
    {
        MyRangeAttribute range = (MyRangeAttribute)attribute;
        if (property.propertyType == SerializedPropertyType.Float)
            EditorGUI.Slider(position, property, range.min, range.max, label);
        else if (property.propertyType == SerializedPropertyType.Integer)
            EditorGUI.IntSlider(position, property, (int) range.min, (int) range.max, label);
        else
            EditorGUI.LabelField(position, label.text, "Use MyRange with float or int.");
    }
}
cs
using System;
using UnityEngine;

public class Recipe : MonoBehaviour
{
    [Range(0f,10f)]
    public float speed = 0f;
    [MyRange(0f,10f)]
    public int age = 0;
    [MyRange(0f,10f)]
    public bool isNew = false;
}
三.在Inspector中自定义整个组件
3.1 定制组件基础
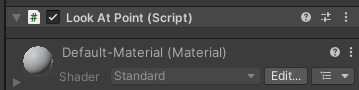
下面demo演示脚本LookAtPoint定制化前后的显示对比
cs
using System;
using UnityEngine;
[ExecuteInEditMode]
public class LookAtPoint : MonoBehaviour
{
    public Vector3 lookAtPoint = Vector3.zero;

    public void Update()
    {
        transform.LookAt(lookAtPoint);
    }
}
LookAtPoint对应的编辑器脚本:LookAtPointEditor
cs
using UnityEngine;
using UnityEditor;

[CustomEditor(typeof(LookAtPoint))]
public class LookAtPointEditor : Editor
{
    public override void OnInspectorGUI()
    {

    }
}
特性CustomEditor用于绑定编辑器类和MonoBehaviour
从Editor类继承表示这个类用于定制inspector
OnInspectorGUI:固定写法,注意要加ovveride:
通常** **CustomEditor+:Editor+OnInspectorGUI一起使用
cs
public override void OnInspectorGUI()前
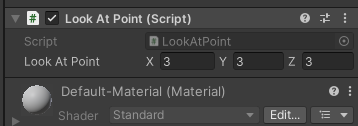
后
3.2 OnEnable,OnDisable
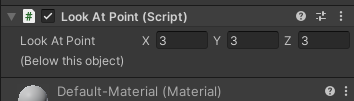
接下来看一个更复杂的demo,选中LookAtPoint所在的gameObject时执行LookAtPointEditor的OnEnable,取消选中该gameObject,执行OnDisable
cs
using UnityEngine;
using UnityEditor;

[CustomEditor(typeof(LookAtPoint))]
[CanEditMultipleObjects]
public class LookAtPointEditor : Editor
{
    SerializedProperty lookAtPoint;

    void OnEnable()
    {
        lookAtPoint = serializedObject.FindProperty("lookAtPoint");
        Debug.Log("#OnEnable");
    }
    void OnDisable()
    {
        Debug.Log("#OnDisable");
    }
    public override void OnInspectorGUI()
    {
        serializedObject.Update();
        EditorGUILayout.PropertyField(lookAtPoint);
        if (lookAtPoint.vector3Value.y > (target as LookAtPoint).transform.position.y)
        {
            EditorGUILayout.LabelField("(Above this object)");
        }
        if (lookAtPoint.vector3Value.y < (target as LookAtPoint).transform.position.y)
        {
            EditorGUILayout.LabelField("(Below this object)");
        }
        serializedObject.ApplyModifiedProperties();
    }
    public void OnSceneGUI()
    {
        var t = (target as LookAtPoint);
        EditorGUI.BeginChangeCheck();
        Vector3 pos = Handles.PositionHandle(t.lookAtPoint, Quaternion.identity);
        if (EditorGUI.EndChangeCheck())
        {
            Undo.RecordObject(target, "Move point");
            t.lookAtPoint = pos;
            t.Update();
        }
    }
}
3.3 Editor.target
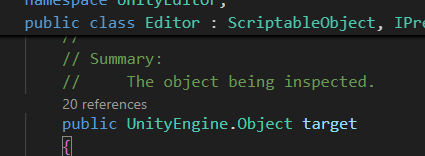
target是CustomEditor(typeof(A))中A的对象引用,使用时需要进行类型转换,之后可以访问类A中的public 成员
cs
var t = (target as LookAtPoint);3.4 Editor.serializedObject
SerializedObject是用来读写对象(MonoBehaviour)可序列化字段的工具类,通过SerializedObject修改字段会自动支持撤销操作、显示出Scene的*表示出现改动、发生预制体覆盖时Inspector中会正确显示。
3.4.1 serializedObject.FindProperty
通过属性名称获取SerializedProperty类型的序列化属性
cs
public SerializedProperty FindProperty(string propertyPath);3.4.2 serializedObject.Update
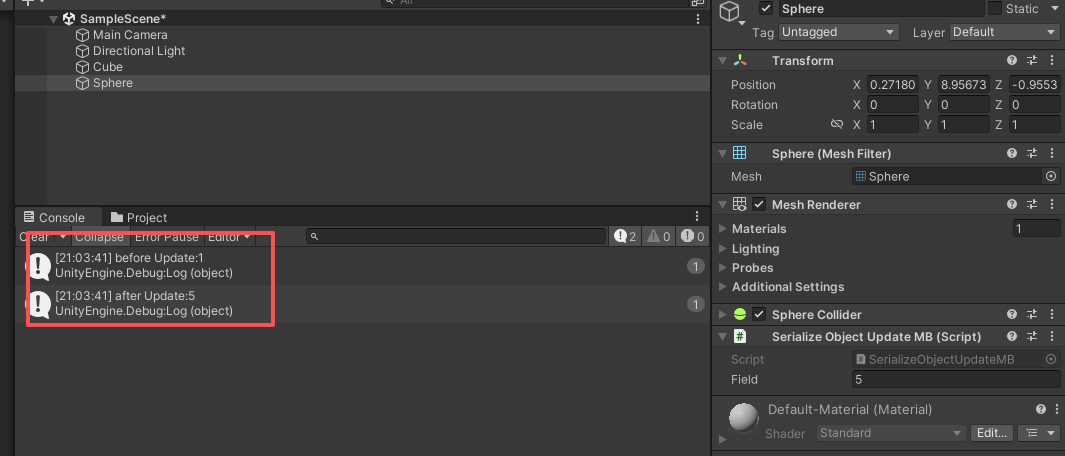
为了同步SerializedProperty的数据,来看下面这个demo(将官方demo简化)
cs
public class SerializeObjectUpdateMB : MonoBehaviour
{
    public int m_Field = 1;
    [MenuItem("Example/SerializedObject Update (MonoBehaviour)")]
    static void UpdateExample()
    {
        var monoBehaviour = FindObjectOfType<SerializeObjectUpdateMB>();
        if (monoBehaviour == null)
        {
            Debug.LogError("No SerializeObjectUpdateMB component found in the scene!");
            return;
        }
        using (var serializedObject = new SerializedObject(monoBehaviour))
        {
            SerializedProperty sp = serializedObject.FindProperty("m_Field");
            monoBehaviour.m_Field = 5;
            Debug.Log("before Update:"+sp.intValue);
            serializedObject.Update();
            Debug.Log("after Update:"+sp.intValue);
        }
    }
}
常见做法是在OnInspectorGUI下第一行加上serializedObject.Update();
但是实测不加未能出现不同步的情况(在inspector中改值和通过代码改值)
3.4.3 serializedObject.ApplyModifiedProperties
通过代码或inspector改的序列化属性需要调用ApplyModifiedProperties才会反馈在inspector上
3.5 OnSceneGUI
负责在Scene视图中绘制交互元素,调用机制和OnInspectorGUI一样,选中关联的gameObject时调用,选中其他gameObject时停止调用
3.6 EditorGUI.BeginChangeCheck和EditorGUI.EndChangeCheck
BeginChangeCheck与EndChangeCheck成对使用,用来检测他们之间的GUI的状态变化,若发生变化EndChangeCheck返回true;常见写法:
cs
        EditorGUI.BeginChangeCheck();
        //GUI code here
        if (EditorGUI.EndChangeCheck())
        {
            Debug.Log("** EndChangeCheck true");
        }
3.7 Handles.PositionHandle
在一个点绘制一个位置控制控件
Handles类用于在Scene视图绘制3D GUI控件
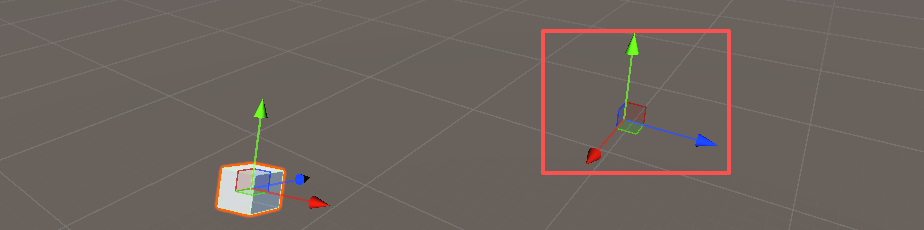
3.8 Undo.RecordObject
记录 RecordObject 函数之后对对象所做的任何更改,以便撤销。注意必须把Undo.RecordObject放在修改对象代码的前面
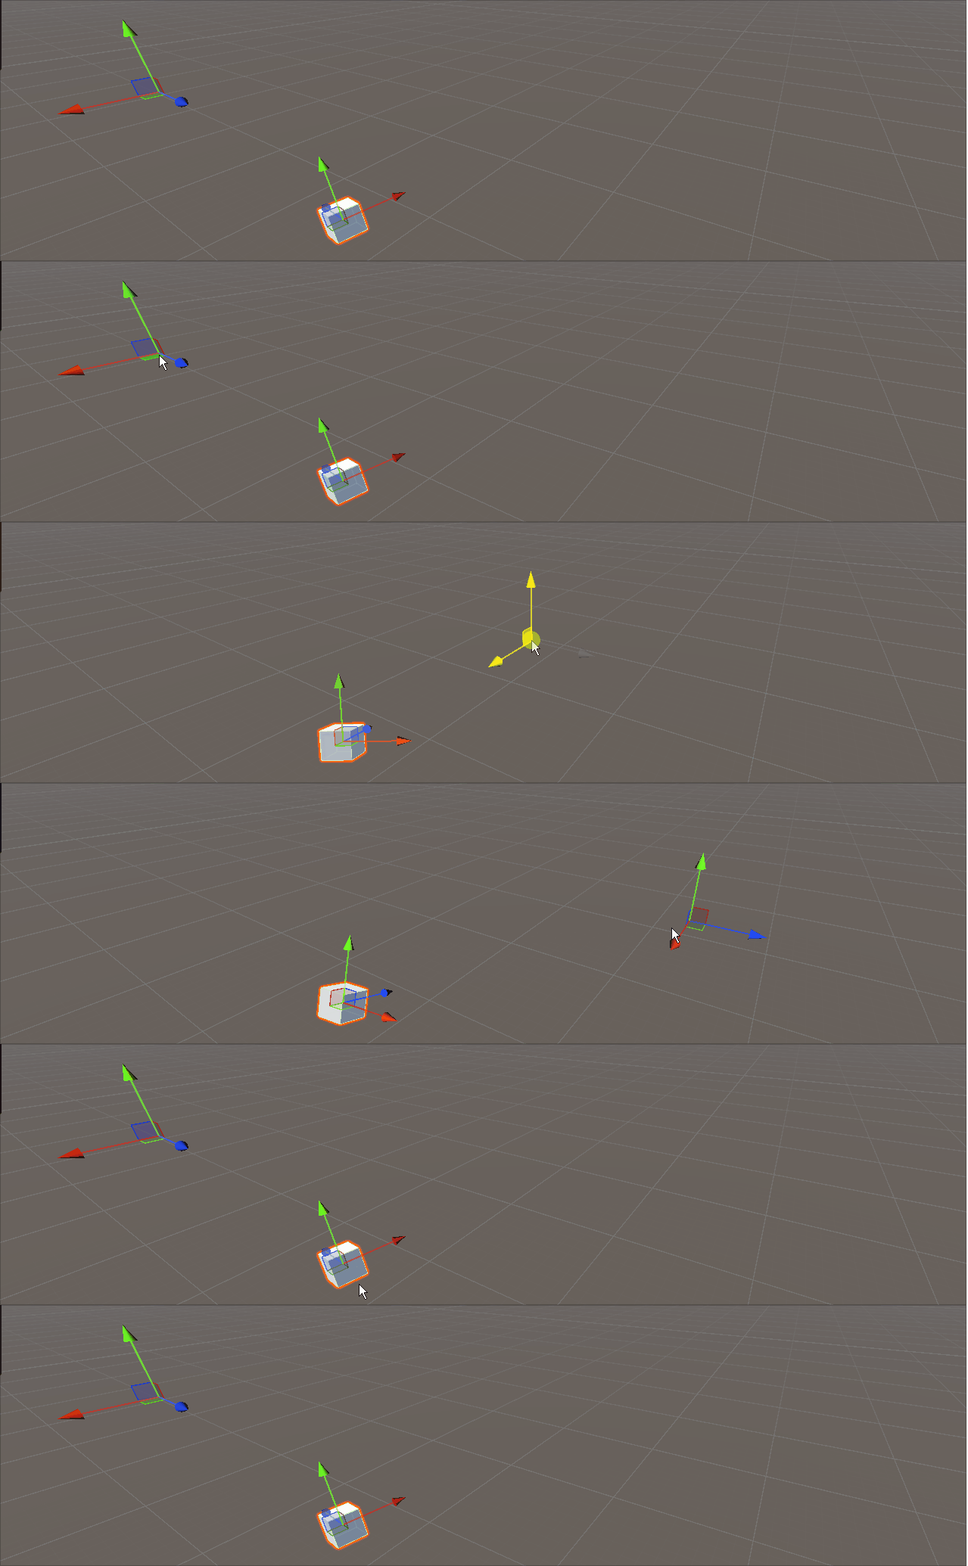
3.9 特性ExecuteInEditMode
加了特性ExecuteInEditMode的MonoBehaviour在编辑模式下也会执行
3.10 特性CanEditMultipleObjects
CanEditMultipleObjects可以选定多个挂了相同脚本的对象并编译,放在继承Editor脚本上面
四.创建树形UI
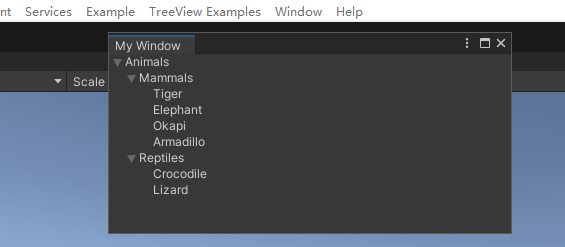
unity提供了编辑器中用于创建树形控件的类TreeView、TreeViewState、TreeViewIte
4.1 TreeView
规范:创建一个继承TreeView的类SimpleTreeView,构造函数中要调用父类的1参构造函数:base(treeViewState),不加的化会报错,因为TreeView没有无参构造函数
构造函数中调用Reload:固定写法,不然BuildRoot不会调用;每次调用 Reload 都会调用 BuildRoot 一次
BuildRoot:TreeView中的抽象函数,SimpleTreeView必须实现,在此创建树形结构
SetupParentsAndChildrenFromDepths:用已设置的顺序和深度值来初始化所有行的通用方法
OnGUI:TreeView创建完成后需要调用OnGUI(Rect rect)在rect区域显示TreeView
4.2 TreeViewItem
TreeViewItem包含有关单个项的数据,代表一行;TreeView 有一个隐藏的根 TreeViewItem,
TreeViewItem 必须以唯一的整数 ID(用于查找项、选择状态、展开状态)进行构造。
depth 属性:表示视觉缩进
4.3 TreeViewState
TreeViewState 包含 TreeView 的可序列化状态信息,可在EditorWindow中持有,并当作参数传给TreeView的构造函数
demo:
SimpleTreeView.cs
cs
using UnityEditor.IMGUI.Controls;
using System.Collections.Generic;
public class SimpleTreeView : TreeView
{
    public SimpleTreeView(TreeViewState treeViewState): base(treeViewState)
    {
        Reload();
    }
    protected override TreeViewItem BuildRoot ()
    {
        var root = new TreeViewItem {id = 0, depth = -1, displayName = "Root"};
        var allItems = new List<TreeViewItem>
        {
            new TreeViewItem {id = 1, depth = 0, displayName = "Animals"},
            new TreeViewItem {id = 2, depth = 1, displayName = "Mammals"},
            new TreeViewItem {id = 3, depth = 2, displayName = "Tiger"},
            new TreeViewItem {id = 4, depth = 2, displayName = "Elephant"},
            new TreeViewItem {id = 5, depth = 2, displayName = "Okapi"},
            new TreeViewItem {id = 6, depth = 2, displayName = "Armadillo"},
            new TreeViewItem {id = 7, depth = 1, displayName = "Reptiles"},
            new TreeViewItem {id = 8, depth = 2, displayName = "Crocodile"},
            new TreeViewItem {id = 9, depth = 2, displayName = "Lizard"},
        };
        SetupParentsAndChildrenFromDepths (root, allItems);
        return root;
    }
}
SimpleTreeViewWindow.cs
cs
using System.Collections.Generic;
using UnityEngine;
using UnityEditor.IMGUI.Controls;
using UnityEditor;
class SimpleTreeViewWindow : EditorWindow
{
    [SerializeField] TreeViewState m_TreeViewState;
    SimpleTreeView m_SimpleTreeView;
    void OnEnable()
    {
        if (m_TreeViewState == null)
            m_TreeViewState = new TreeViewState ();

        m_SimpleTreeView = new SimpleTreeView(m_TreeViewState);
    }
    void OnGUI()
    {
        m_SimpleTreeView.OnGUI(new Rect(0, 0, position.width, position.height));
    }
    [MenuItem ("TreeView Examples/Simple Tree Window")]
    static void ShowWindow ()
    {
        var window = GetWindow<SimpleTreeViewWindow> ();
        window.titleContent = new GUIContent ("My Window");
        window.Show ();
    }
}
五. IMGUI用于编辑器扩展的类
EditorGUI
EditorGUILayout
EditorStyles
SerializedObject
SerializedProperty
GUIContent
PropertyAttribute
PropertyDrawer
Editor
EditorWindow
Undo
Handles
TreeView
TreeViewState
TreeViewItem