前言
渡劫初成,你已看透 CPS 变换与状态机的字节码真身。COROUTINE_SUSPENDED 的信使身份在你眼中不再神秘,BaseContinuationImpl 的恢复循环如掌上观纹。你对协程的理解,已入化境。
然而,真正的造物主,从不满足于使用现成的法器。当标准库的 Dispatchers 无法满足你的特殊需求时,你是否渴望亲手锻造属于自己的调度神兵?
"我有一个对延迟极度敏感的任务,希望能优先执行 ,而不是在
Dispatchers.IO的队列里排队。" "我需要一个令牌桶限流器 ,让协程按照固定速率执行,避免打爆下游服务。" "我的任务必须运行在指定的线程上,因为那个线程绑定了特殊的 OpenGL 上下文或 JNI 资源。"
这些需求,标准的 Dispatchers 无法直接满足。但协程的设计者早已为你留下了造物之门 ------CoroutineDispatcher 的抽象接口。只要你理解其内部的 dispatch 与 limitedParallelism 机制,就能锻造出任意特性的调度神兵。
本讲是渡劫境的中阶修炼,也是整个修仙系列的倒数第二讲。你将:
- 彻底掌握
CoroutineDispatcher的定制方法。 - 亲手实现一个优先级任务队列调度器。
- 锻造一个令牌桶限流调度器,控制协程执行速率。
- 创建线程亲和性调度器,将任务绑定到特定线程。
- 将这些定制调度器与
limitedParallelism结合,构建工业级并发控制。
准备好执掌造化,锻造属于你的调度神兵了吗?我们开始。
操千曲 而后晓声,观千剑 而后识器。虐它千百遍 方能通晓其真意。
自定义 CoroutineDispatcher 的核心接口
需要重写的三个方法
kotlin
abstract class CoroutineDispatcher : AbstractCoroutineContextElement(ContinuationInterceptor), ContinuationInterceptor {
    abstract fun dispatch(context: CoroutineContext, block: Runnable)
    open fun isDispatchNeeded(context: CoroutineContext): Boolean = true
    open fun limitedParallelism(parallelism: Int): CoroutineDispatcher = this
}| 方法 | 作用 | 默认行为 |
|---|---|---|
dispatch |
将任务 Runnable 提交给底层执行器 |
必须实现 |
isDispatchNeeded |
判断是否需要调度(若当前已在目标线程,可返回 false 优化) |
返回 true |
limitedParallelism |
返回一个限制并发数的调度器视图 | 返回自身 |
一个最小化的自定义调度器
kotlin
import kotlinx.coroutines.CoroutineDispatcher
import java.util.concurrent.Executors
import kotlin.coroutines.CoroutineContext

class SingleThreadDispatcher : CoroutineDispatcher() {
    private val executor = Executors.newSingleThreadExecutor { r ->
        Thread(r, "MySingleThread")
    }

    override fun dispatch(context: CoroutineContext, block: Runnable) {
        executor.execute(block)
    }

    fun close() {
        executor.shutdown()
    }
}这个调度器将所有任务串行 执行在一个名为 MySingleThread 的线程上。这是所有自定义调度器的起点。
优先级调度器:让 VIP 任务插队
设计思路
我们需要一个支持优先级的任务队列。Java 标准库提供了 PriorityBlockingQueue,但它是阻塞 队列。协程调度器的 dispatch 方法应非阻塞 ,因此我们使用 PriorityBlockingQueue 配合一个 Worker 线程不断 take 任务执行。
kotlin
import kotlinx.coroutines.CoroutineDispatcher
import java.util.concurrent.PriorityBlockingQueue
import java.util.concurrent.atomic.AtomicBoolean
import kotlin.coroutines.CoroutineContext

class PriorityDispatcher : CoroutineDispatcher() {
    // 优先级任务包装类
    private data class PrioritizedTask(
        val priority: Int,      // 数字越小优先级越高
        val block: Runnable
    ) : Comparable<PrioritizedTask> {
        override fun compareTo(other: PrioritizedTask): Int =
            priority.compareTo(other.priority)
    }

    private val queue = PriorityBlockingQueue<PrioritizedTask>()
    private val worker = Thread {
        while (!Thread.interrupted()) {
            val task = queue.take()
            task.block.run()
        }
    }.apply {
        name = "PriorityDispatcher-Worker"
        start()
    }

    fun dispatch(priority: Int, block: Runnable) {
        queue.put(PrioritizedTask(priority, block))
    }

    override fun dispatch(context: CoroutineContext, block: Runnable) {
        dispatch(Int.MAX_VALUE, block) // 默认最低优先级
    }

    fun close() {
        worker.interrupt()
    }
}
使用示例
kotlin
fun main() = runBlocking {
    val dispatcher = PriorityDispatcher()
    val scope = CoroutineScope(dispatcher)

    // 低优先级任务
    scope.launch {
        println("低优先级任务执行")
    }

    // 手动提交高优先级任务(通过扩展函数)
    fun CoroutineScope.launchWithPriority(priority: Int, block: suspend () -> Unit) {
        launch {
            (coroutineContext[ContinuationInterceptor] as? PriorityDispatcher)
                ?.dispatch(priority) {
                    // 注意:这里需要手动处理挂起,简化起见仅演示
                    runBlocking { block() }
                }
        }
    }

    scope.launchWithPriority(1) {
        println("高优先级任务先执行")
    }

    delay(1000)
    dispatcher.close()
}令牌桶限流调度器:控制执行速率
令牌桶算法简介
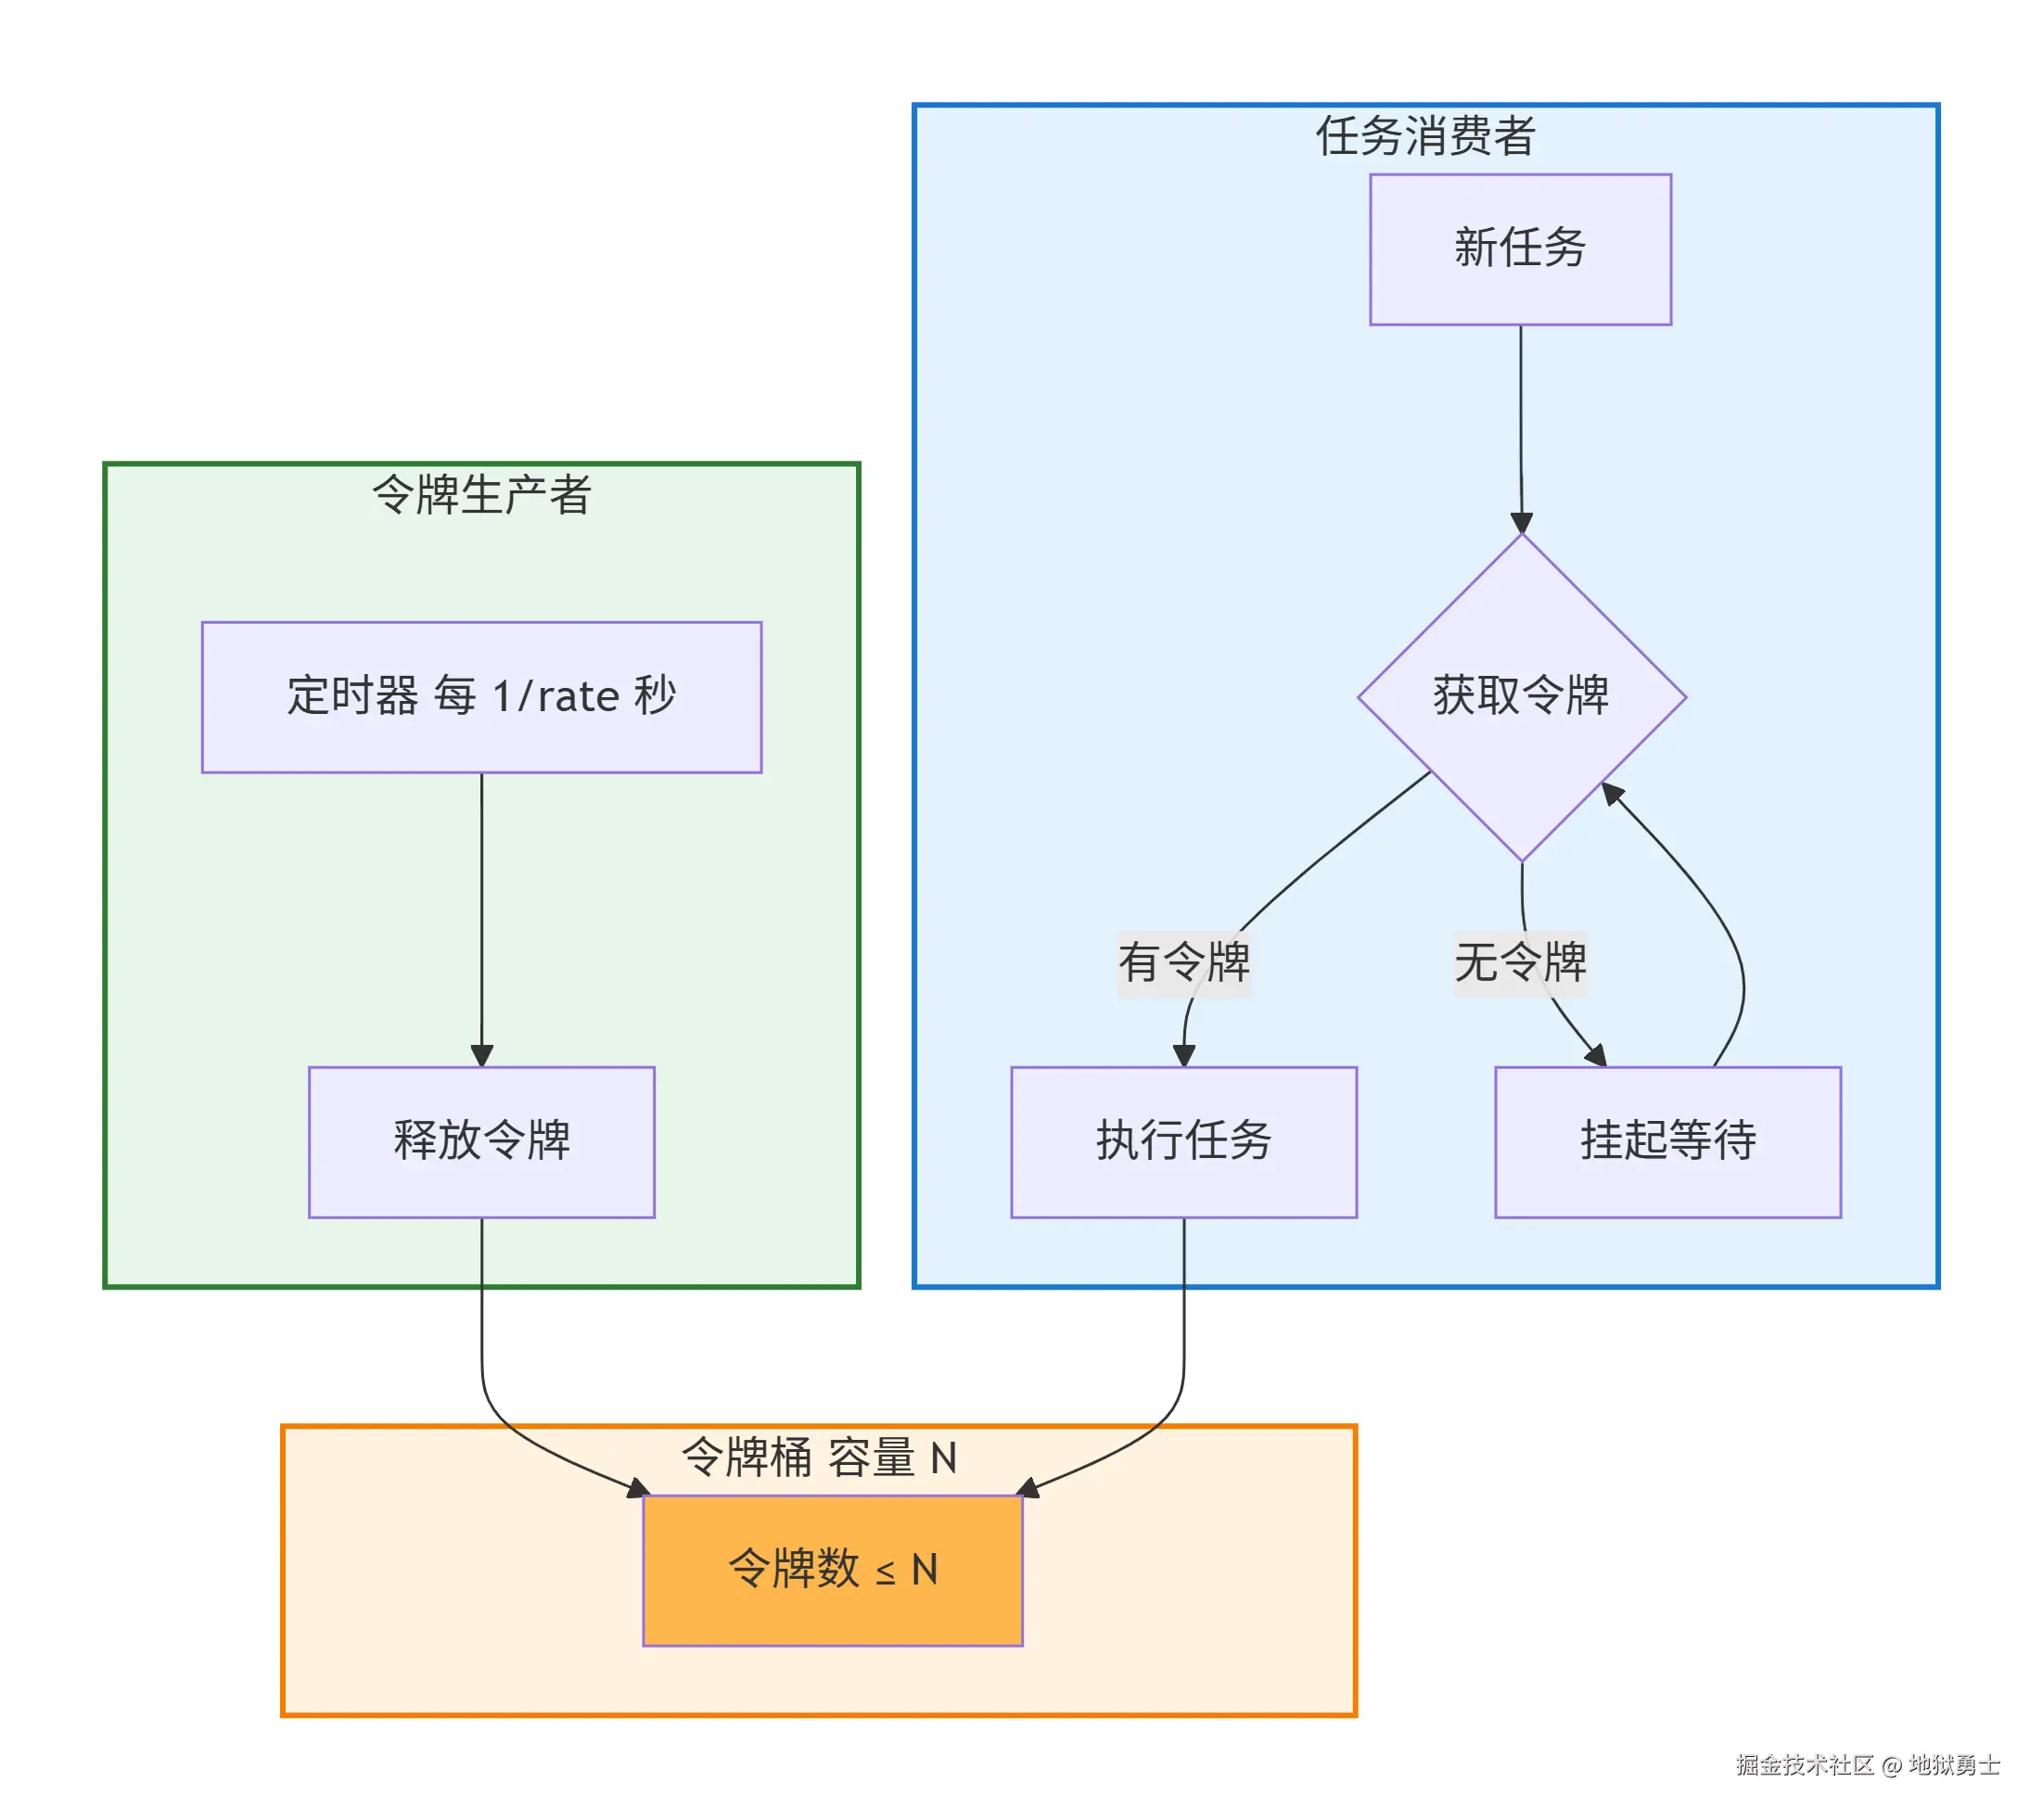
令牌桶 是经典的限流算法:系统以固定速率向桶中放入令牌,每个任务执行前需获取一个令牌。若桶中无令牌,任务需等待。
我们可以利用 Channel 的 RENDEZVOUS 或 BUFFERED 特性来模拟令牌桶。
kotlin
import kotlinx.coroutines.*
import kotlin.coroutines.CoroutineContext

class TokenBucketDispatcher(
    private val permitsPerSecond: Int,      // 每秒产生的令牌数
    private val bucketCapacity: Int = permitsPerSecond // 桶容量
) : CoroutineDispatcher() {
    // 使用 Channel 作为令牌桶,容量为 bucketCapacity
    private val tokenChannel = Channel<Unit>(bucketCapacity)

    init {
        // 启动令牌生产者协程
        GlobalScope.launch {
            val intervalMs = 1000L / permitsPerSecond
            while (true) {
                tokenChannel.trySend(Unit)
                delay(intervalMs)
            }
        }
    }

    override fun dispatch(context: CoroutineContext, block: Runnable) {
        // 在调度器的上下文中启动一个协程来等待令牌
        // 注意:这里简化了实现,实际需要更严谨的线程管理
        GlobalScope.launch {
            tokenChannel.receive() // 获取令牌,若没有则挂起
            block.run()
        }
    }
}
更严谨的实现 :我们可以将任务提交给一个单线程执行器,并在执行前等待令牌。由于 dispatch 必须立即返回,我们可以在 Runnable 的 run 方法中内置令牌等待逻辑。
kotlin
class TokenBucketDispatcher(
    private val rate: Int,
    private val capacity: Int = rate
) : CoroutineDispatcher() {
    private val semaphore = Semaphore(capacity)

    init {
        // 定时释放许可
        GlobalScope.launch {
            val interval = 1000L / rate
            while (true) {
                repeat(rate) {
                    semaphore.tryAcquire() // 尝试清理多余许可
                }
                semaphore.release(rate.coerceAtMost(capacity - semaphore.availablePermits()))
                delay(interval)
            }
        }
    }

    override fun dispatch(context: CoroutineContext, block: Runnable) {
        GlobalScope.launch {
            semaphore.acquire()
            block.run()
        }
    }
}
线程亲和性调度器:绑定任务到指定线程
场景:OpenGL 渲染必须在 GL 线程
Android 的 GLSurfaceView 要求所有 OpenGL 调用必须在同一个线程(GL 线程)上执行。我们可以自定义一个调度器,确保任务始终在某个特定线程上运行。
kotlin
import kotlinx.coroutines.CoroutineDispatcher
import java.util.concurrent.LinkedBlockingQueue
import kotlin.coroutines.CoroutineContext

class AffinityDispatcher(private val targetThread: Thread) : CoroutineDispatcher() {
    private val queue = LinkedBlockingQueue<Runnable>()

    // 如果当前已经在目标线程,则无需调度(优化)
    override fun isDispatchNeeded(context: CoroutineContext): Boolean {
        return Thread.currentThread() != targetThread
    }

    override fun dispatch(context: CoroutineContext, block: Runnable) {
        if (Thread.currentThread() == targetThread) {
            block.run()
        } else {
            queue.put(block)
            // 唤醒目标线程(如果它正在等待)
            synchronized(targetThread) {
                targetThread.notify()
            }
        }
    }

    // 目标线程需要不断消费队列中的任务
    fun processQueue() {
        while (!Thread.interrupted()) {
            val task = try {
                queue.take()
            } catch (e: InterruptedException) {
                return
            }
            task.run()
        }
    }
}使用方式:
kotlin
val glThread = Thread {
    val dispatcher = AffinityDispatcher(Thread.currentThread())
    val scope = CoroutineScope(dispatcher)

    scope.launch {
        // 所有在此 scope 中启动的协程都会运行在 glThread 上
        glRender()
    }

    dispatcher.processQueue() // 开始处理队列
}
glThread.start()与 limitedParallelism 结合:构建工业级调度器
limitedParallelism 是 CoroutineDispatcher 的扩展函数,它可以基于任何调度器创建一个并发限制视图。结合我们自定义的调度器,可以构建出既有特殊调度策略(如优先级),又能限制最大并发的强大法器。
kotlin
val priorityDispatcher = PriorityDispatcher()
val limitedPriorityDispatcher = priorityDispatcher.limitedParallelism(4)

// 现在,最多只有 4 个协程能同时执行,且按优先级排序
val scope = CoroutineScope(limitedPriorityDispatcher)
内部原理 :limitedParallelism 返回一个 LimitedDispatcher,它内部维护一个信号量。任务提交时先获取信号量,然后才转发给原始调度器。
实战:用自定义调度器优化图片上传服务
场景:你有一个图片上传服务,需要:
- 最多同时上传 3 张图片(防止占用过多带宽)。
- 用户可以标记某张图片为"紧急",紧急图片优先上传。
- 上传速率需控制在每秒不超过 10 个请求(令牌桶限流)。
kotlin
class ImageUploadService {
    // 优先级调度器 + 并发限制 = 最多 3 个并发,且按优先级排序
    private val priorityDispatcher = PriorityDispatcher()
    private val uploadDispatcher = priorityDispatcher.limitedParallelism(3)

    // 令牌桶限流器:每秒 10 个令牌
    private val rateLimiter = TokenBucketDispatcher(rate = 10, capacity = 10)

    suspend fun uploadImage(image: File, isUrgent: Boolean = false) {
        val priority = if (isUrgent) 1 else 100
        withContext(uploadDispatcher) {
            // 手动提交到优先级调度器(简化演示)
            // 实际封装后可通过扩展函数优雅调用
        }
        withContext(rateLimiter) {
            // 真正执行上传,受令牌桶限流
            performUpload(image)
        }
    }

    private suspend fun performUpload(image: File) {
        delay(500) // 模拟上传
        println("上传完成:${image.name}")
    }
}常见错误与避坑指南
错误 1:在 dispatch 中执行耗时操作
kotlin
override fun dispatch(context: CoroutineContext, block: Runnable) {
    Thread.sleep(100) // 严重错误!阻塞了调用线程
    executor.execute(block)
}
dispatch 可能被协程调度器的线程调用,必须立即返回。
错误 2:忘记关闭自定义调度器的线程池
kotlin
val dispatcher = SingleThreadDispatcher()
// 使用后忘记 close(),线程残留
务必在适当时机(如 onCleared)调用 close() 释放资源。
错误 3:在 isDispatchNeeded 中返回错误的值
kotlin
override fun isDispatchNeeded(context: CoroutineContext) = false如果返回 false,任务将在当前线程同步执行,可能阻塞 UI 或破坏并发预期。
最佳实践
- 优先考虑组合而非继承 :使用
limitedParallelism和现有调度器组合出新特性。 - 为自定义调度器提供
close方法:释放线程池资源。 - 在
isDispatchNeeded中做性能优化:当任务已在目标线程时避免不必要的队列操作。 - 使用
asCoroutineDispatcher扩展函数 :可将ExecutorService直接转换为CoroutineDispatcher。 - 测试时使用
TestCoroutineDispatcher验证自定义调度器的行为。
总结与下回预告
恭喜,你已执掌造化,能亲手锻造任意特性的调度神兵!渡劫境中阶修炼完成!
本讲核心收获:
- 自定义
CoroutineDispatcher只需实现dispatch方法。 - 优先级调度器通过
PriorityBlockingQueue实现任务排序。 - 令牌桶限流调度器利用
Semaphore或Channel控制速率。 - 线程亲和调度器将任务绑定到指定线程执行。
- 结合
limitedParallelism可构建复杂工业级调度器。
在下一讲------渡劫境·后阶 ,也是本修仙系列的最终章 ------中,我们将汇聚九境全部所学,从零构建一个工业级协程网络请求框架 ,涵盖:自定义调度器、Flow 重试、Channel 任务队列、StateFlow UI 状态、异常处理、单元测试。届时你将真正飞升,成为协程世界的剑仙。
【当前境界修为面板】
| 当前境界 | 修炼技能 | 修炼进度 | 修炼心得 |
|---|---|---|---|
| 渡劫境 · 中阶 | 1、优先级调度诀 2、令牌桶限流术 3、线程亲和调度法 | 当前进度 :70% 修为 :700/1000 下一突破 :[渡劫境 · 后阶] (需领悟:整合九境,构建工业级协程网络框架) |
掌握了dispatch方法,你就掌握了协程调度的终极控制权。造自己的调度神兵。 |
【本讲思考题】
-
表象题 :
limitedParallelism内部是如何实现并发数限制的?它使用了什么同步机制? -
场景题 :你需要设计一个"任务依赖调度器":任务 B 必须在任务 A 完成后才能执行。如何在自定义
CoroutineDispatcher中实现? -
原理题 :
CoroutineDispatcher的isDispatchNeeded默认返回true。如果我们将优先级调度器的isDispatchNeeded改为始终返回false,会发生什么?为什么?
道友,飞升前的最后一道关隘已在眼前。下一讲,我们将汇聚九境修为,铸就无上神兵。渡劫境·后阶见。
欢迎一键四连 (
关注+点赞+收藏+评论)