q-floodfill 填充白边锯齿问题记录
最近在 Canvas 里用 q-floodfill 做油漆桶填充,基础用法很简单:
js
const imageData = ctx.getImageData(
  0,
  0,
  canvas.width,
  canvas.height
);

const flood = new FloodFill(imageData);

flood.fill('#ff0000', x, y, 10);

ctx.putImageData(flood.imageData, 0, 0);
功能能正常用,但实际画起来会发现一个问题:
填充区域和黑色描边之间容易出现一圈白边 / 锯齿。 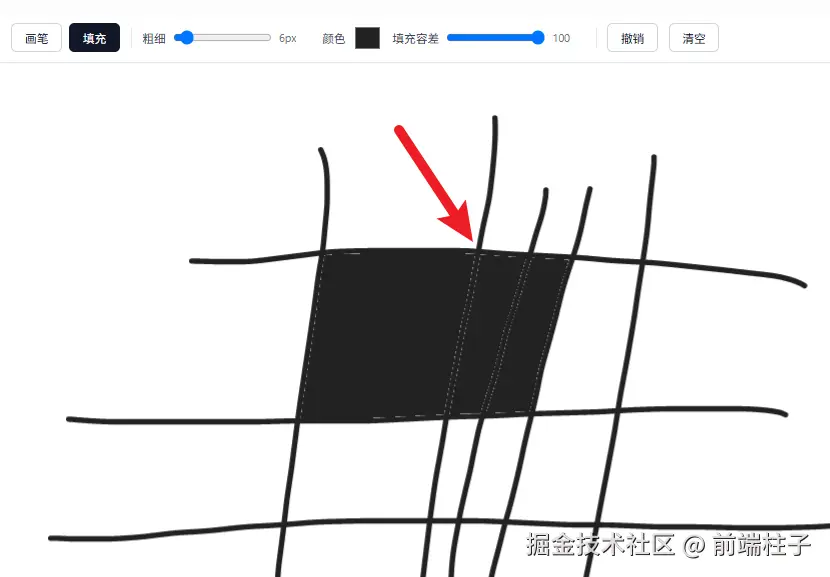
原因
一开始我以为是 tolerance 太小,后来发现主要还是 Canvas 抗锯齿导致的。
Canvas 画线时,边缘不是纯黑像素,而是存在很多半透明像素:
text
透明
10% 黑
40% 黑
80% 黑
100% 黑
而 q-floodfill 主要负责判断:
哪些像素属于同一个连续区域。
它不会专门帮我们处理描边边缘这些半透明抗锯齿像素。
结果就是主体区域填上颜色了,但描边边缘还残留一圈浅色像素。
单纯调大:
js
tolerance效果也不稳定,调太大甚至可能直接穿过边界。
解决思路
我的处理方式是:
text
q-floodfill 正常填充
↓
记录实际填充过的像素
↓
找到填充区域周围的抗锯齿像素
↓
把填充颜色混合到这些边缘像素下面
1. 用 mask 记录填充区域
js
const mask = new Uint8Array(width * height);

const setPixel = flood.setColorAtPixel.bind(flood);

flood.setColorAtPixel = (data, value, x, y) => {
  mask[y * width + x] = 1;
  setPixel(data, value, x, y);
};
执行完:
js
flood.fill(color, x, y, tolerance);之后:
text
mask = 1  已填充
mask = 0  未填充
2. 找边缘像素
遍历没有填充的像素,如果它周围 8 个方向存在已经填充的像素,就把它认为是边缘区域。
js
let adjacent = false;

for (let dy = -1; dy <= 1; dy++) {
  for (let dx = -1; dx <= 1; dx++) {
    const nx = px + dx;
    const ny = py + dy;

    if (
      nx >= 0 &&
      nx < width &&
      ny >= 0 &&
      ny < height &&
      mask[ny * width + nx]
    ) {
      adjacent = true;
      break;
    }
  }
}
3. 处理半透明抗锯齿像素
如果边缘像素满足:
js
0 < alpha && alpha < 1说明它是半透明描边。
这里不能直接替换成填充色,否则黑色描边也会被破坏。
正确做法是:
保留原来的描边,把填充色垫到描边下面。
js
const under = (1 - alpha) * fill.a / 255;
const resultAlpha = alpha + under;

image.data[i] =
  (source[i] * alpha + fill.r * under) / resultAlpha;

image.data[i + 1] =
  (source[i + 1] * alpha + fill.g * under) / resultAlpha;

image.data[i + 2] =
  (source[i + 2] * alpha + fill.b * under) / resultAlpha;

image.data[i + 3] = resultAlpha * 255;
这样原来的:
text
黑线
白边
填充色
就会变成:
text
黑线
抗锯齿黑线 + 填充色
填充色
白边基本就没了。
还有一个透明像素的小坑
Canvas 里两个完全透明的像素,RGB 可能不一样:
js
rgba(255, 255, 255, 0)
rgba(0, 0, 0, 0)
视觉上都是透明的,但颜色比较时可能被认为不一样。
所以我额外改了 isSameColor:
js
const same = flood.isSameColor.bind(flood);

flood.isSameColor = (a, b, limit) => {
  return (
    (a.a === 0 && b.a === 0) ||
    same(a, b, limit)
  );
};
只要两个像素:
js
alpha === 0就直接认为是同色。
最后
这个问题本质上不是 q-floodfill 填错了,而是:
text
Flood Fill
解决区域判断

Canvas 抗锯齿
解决视觉平滑
两者结合时,边缘半透明像素需要额外处理。
最后我的方案就是:
text
q-floodfill
+
mask
+
8 邻域检测
+
Alpha 混合
实测比单纯调 tolerance 稳定很多。
如果画布比较大,还可以继续优化,只处理填充区域附近的范围,避免每次遍历整个 Canvas。 最后展示效果 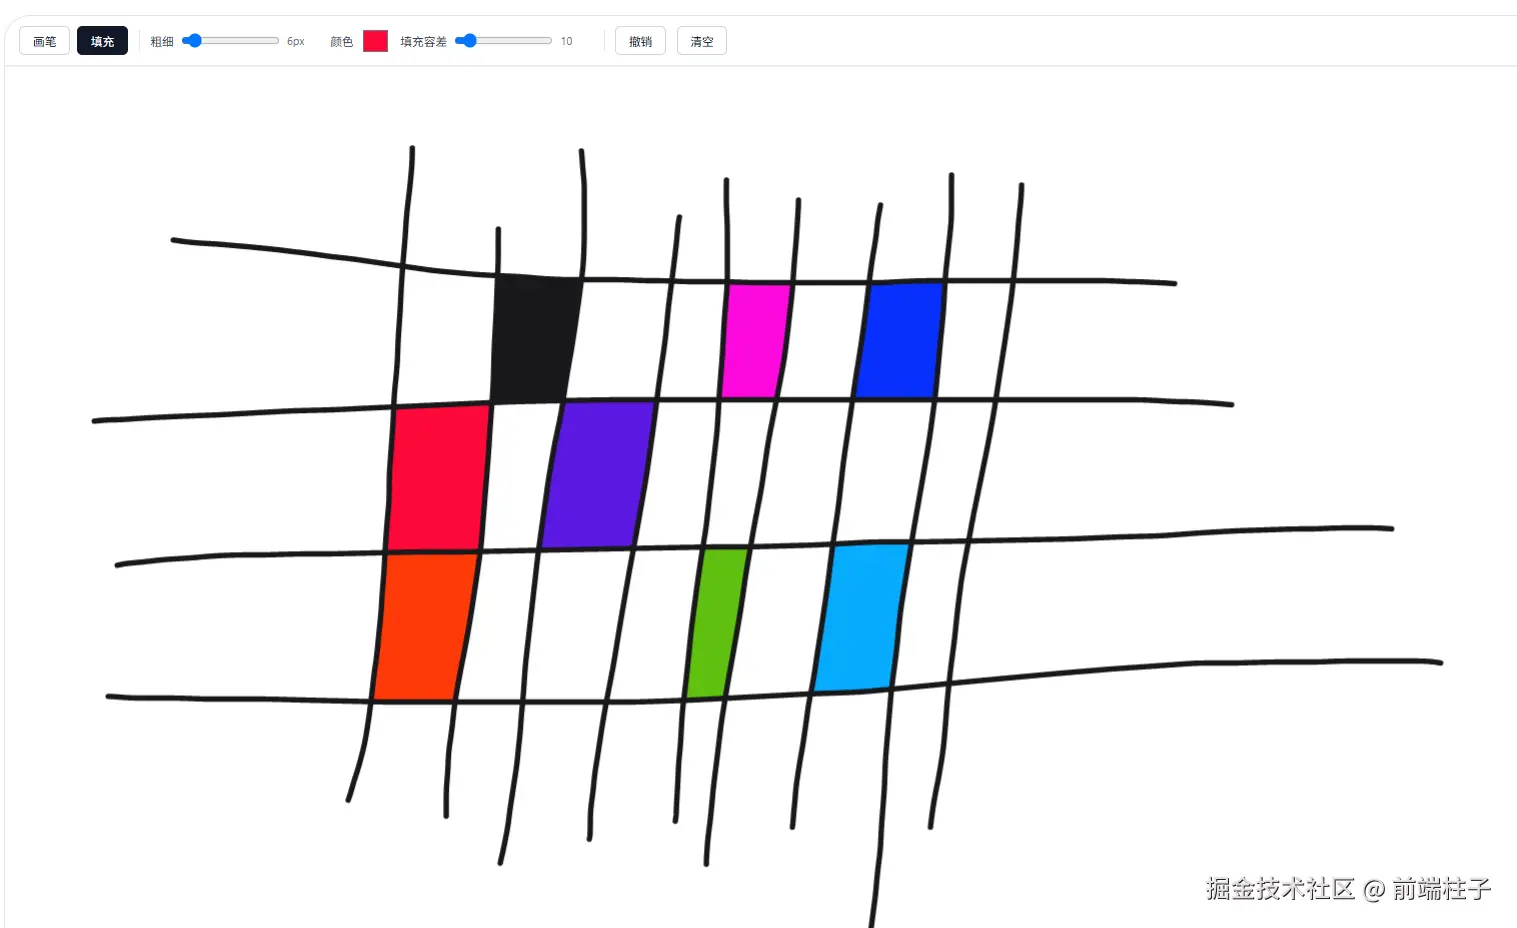 源码附上,如果觉得有用点个赞再走呗
html
<!DOCTYPE html>
<html lang="zh-CN">
<head>
  <meta charset="UTF-8" />
  <meta name="viewport" content="width=device-width,initial-scale=1,user-scalable=no" />
  <title>平滑画笔 + q-floodfill 填充</title>
  <style>
    * { box-sizing: border-box; margin: 0; padding: 0; }
    html, body {
      height: 100%;
      overflow: hidden;
      background: #f0f2f5;
      font-family: system-ui, -apple-system, "Segoe UI", sans-serif;
    }
    #app {
      position: fixed;
      inset: 0;
      display: flex;
      flex-direction: column;
    }
    #toolbar {
      min-height: 56px;
      flex-shrink: 0;
      background: #fff;
      border-bottom: 1px solid #e5e7eb;
      display: flex;
      align-items: center;
      flex-wrap: wrap;
      gap: 12px;
      padding: 10px 16px;
      box-shadow: 0 1px 2px rgba(0, 0, 0, .04);
      z-index: 2;
    }
    #toolbar .group {
      display: flex;
      align-items: center;
      gap: 8px;
    }
    #toolbar label {
      font-size: 13px;
      color: #374151;
    }
    #toolbar input[type="range"] { width: 110px; }
    #toolbar input[type="color"] {
      width: 32px;
      height: 32px;
      border: none;
      padding: 0;
      background: none;
      cursor: pointer;
    }
    #toolbar button {
      height: 32px;
      padding: 0 14px;
      border: 1px solid #d1d5db;
      border-radius: 6px;
      background: #fff;
      color: #111827;
      font-size: 13px;
      cursor: pointer;
    }
    #toolbar button:hover { background: #f3f4f6; }
    #toolbar button.active {
      background: #111827;
      color: #fff;
      border-color: #111827;
    }
    #toolbar button:disabled {
      opacity: .4;
      cursor: not-allowed;
    }
    #toolbar .sep {
      width: 1px;
      height: 24px;
      background: #e5e7eb;
    }
    .value {
      font-size: 12px;
      color: #6b7280;
      min-width: 36px;
    }
    #canvas {
      flex: 1;
      display: block;
      width: 100%;
      height: 100%;
      background: #fff;
      touch-action: none;
      cursor: crosshair;
    }
  </style>
</head>
<body>
<div id="app">
  <div id="toolbar">
    <div class="group">
      <button id="brushBtn" class="active">画笔</button>
      <button id="fillBtn">填充</button>
    </div>

    <div class="sep"></div>

    <div class="group">
      <label>粗细</label>
      <input id="size" type="range" min="1" max="60" value="6" />
      <span id="sizeVal" class="value">6px</span>
    </div>

    <div class="group">
      <label>颜色</label>
      <input id="color" type="color" value="#222222" />
    </div>

    <div class="group">
      <label>填充容差</label>
      <input id="tolerance" type="range" min="0" max="100" value="10" />
      <span id="toleranceVal" class="value">10</span>
    </div>

    <div class="sep"></div>

    <button id="undoBtn" disabled>撤销</button>
    <button id="clearBtn">清空</button>
  </div>

  <canvas id="canvas"></canvas>
</div>

<script type="module">
  // q-floodfill 1.3.1:ESM CDN
  import FloodFill from 'https://cdn.jsdelivr.net/npm/q-floodfill@1.3.1/dist/index.bundle.esm.js';

  /* =========================================================
     1. 平滑函数:等距重采样 → 加权平均 → Chaikin 细分 ×2
     ========================================================= */
  function smoothCutPoints(input) {
    if (input.length < 3) return input.map(p => ({ ...p }));

    const spacing = 4;
    const sampled = [{ ...input[0] }];
    let remaining = spacing;

    for (let i = 1; i < input.length; i++) {
      let start = input[i - 1];
      const end = input[i];
      let distance = Math.hypot(end.x - start.x, end.y - start.y);

      while (distance >= remaining) {
        const ratio = remaining / distance;
        start = {
          x: start.x + (end.x - start.x) * ratio,
          y: start.y + (end.y - start.y) * ratio,
        };
        sampled.push(start);
        distance = Math.hypot(end.x - start.x, end.y - start.y);
        remaining = spacing;
      }
      remaining -= distance;
    }

    const last = input[input.length - 1];
    const tail = sampled[sampled.length - 1];
    if (Math.hypot(last.x - tail.x, last.y - tail.y) > 0.01) {
      sampled.push({ ...last });
    }

    let points = sampled.map((point, index) => {
      if (index === 0 || index === sampled.length - 1) return { ...point };

      let x = 0, y = 0, total = 0;
      for (let offset = -3; offset <= 3; offset++) {
        const neighbor = sampled[index + offset];
        if (!neighbor) continue;
        const weight = 4 - Math.abs(offset);
        x += neighbor.x * weight;
        y += neighbor.y * weight;
        total += weight;
      }
      return { x: x / total, y: y / total };
    });

    for (let pass = 0; pass < 2; pass++) {
      if (points.length < 3) break;
      const refined = [points[0]];

      for (let index = 0; index < points.length - 1; index++) {
        const point = points[index];
        const next = points[index + 1];
        refined.push(
          { x: point.x * 0.75 + next.x * 0.25, y: point.y * 0.75 + next.y * 0.25 },
          { x: point.x * 0.25 + next.x * 0.75, y: point.y * 0.25 + next.y * 0.75 }
        );
      }

      refined.push(points[points.length - 1]);
      points = refined;
    }

    return points;
  }

  /* =========================================================
     2. 画笔 + 填充应用
     ========================================================= */
  (() => {
    const canvas = document.getElementById('canvas');
    const ctx = canvas.getContext('2d', { willReadFrequently: true });

    const brushBtn = document.getElementById('brushBtn');
    const fillBtn = document.getElementById('fillBtn');
    const sizeInput = document.getElementById('size');
    const sizeVal = document.getElementById('sizeVal');
    const colorInput = document.getElementById('color');
    const toleranceInput = document.getElementById('tolerance');
    const toleranceVal = document.getElementById('toleranceVal');
    const undoBtn = document.getElementById('undoBtn');
    const clearBtn = document.getElementById('clearBtn');

    let dpr = window.devicePixelRatio || 1;
    let tool = 'brush';

    // 不能只保存 strokes,因为 flood fill 是像素操作。
    // 统一保存"操作",redraw 时按发生顺序重放:
    // { type:'stroke', points, size, color }
    // { type:'fill', x, y, color, tolerance }
    let actions = [];

    let isDrawing = false;
    let rawPoints = [];
    let smoothedPoints = [];

    function resize() {
      dpr = window.devicePixelRatio || 1;
      const rect = canvas.getBoundingClientRect();
      canvas.width = Math.max(1, Math.floor(rect.width * dpr));
      canvas.height = Math.max(1, Math.floor(rect.height * dpr));
      redraw();
    }

    window.addEventListener('resize', resize);

    function getPoint(e) {
      const rect = canvas.getBoundingClientRect();
      return {
        x: (e.clientX - rect.left) * dpr,
        y: (e.clientY - rect.top) * dpr,
      };
    }

    /* ---------- 绘制原语 ---------- */
    function drawStroke(points, size, color) {
      if (!points || points.length < 2) return;

      ctx.save();
      ctx.strokeStyle = color;
      ctx.fillStyle = color;
      ctx.lineWidth = size;
      ctx.lineCap = 'round';
      ctx.lineJoin = 'round';

      if (points.length === 2) {
        ctx.beginPath();
        ctx.moveTo(points[0].x, points[0].y);
        ctx.lineTo(points[1].x, points[1].y);
        ctx.stroke();
        ctx.restore();
        return;
      }

      ctx.beginPath();
      ctx.moveTo(points[0].x, points[0].y);
      for (let i = 1; i < points.length; i++) {
        ctx.lineTo(points[i].x, points[i].y);
      }
      ctx.stroke();
      ctx.restore();
    }

    /**
     * 使用 q-floodfill 做区域填充,并额外修复抗锯齿边缘产生的白边/透明缝。
     *
     * 思路:
     * 1. q-floodfill 负责找出主体连通区域;
     * 2. mask 记录真正被 flood fill 命中的像素;
     * 3. 再扫描 mask 外围一圈 8 邻域像素;
     * 4. 对半透明抗锯齿像素进行 alpha 混合,让填充色延伸到描边下方。
     */
    function fillRegion(image, color, x, y, tolerance = 10, overlay = false) {
      const { width, height } = image;

      // 备份原始像素数据,后续用于边缘像素的混合计算
      const source = new Uint8ClampedArray(image.data);

      // 掩码:1 表示该像素被 flood fill 覆盖
      const mask = new Uint8Array(width * height);

      const flood = new FloodFill(image);

      // 完全透明像素的 RGB 没有视觉意义,统一视为同色。
      // 使用 bind 保证第三方库方法内部如果依赖 this 也不会出问题。
      const same = flood.isSameColor.bind(flood);
      flood.isSameColor = (a, b, limit) =>
        (a.a === 0 && b.a === 0) || same(a, b, limit);

      // 在 q-floodfill 写像素时同步记录 mask。
      const setPixel = flood.setColorAtPixel.bind(flood);
      flood.setColorAtPixel = (data, value, px, py) => {
        mask[py * width + px] = 1;
        setPixel(data, value, px, py);
      };

      flood.fill(color, x, y, tolerance);

      const fill = flood.colorToRGBA(color);
      const seed = (y * width + x) * 4;
      const transparentSeed = source[seed + 3] === 0;
      const seedMax = Math.max(
        source[seed],
        source[seed + 1],
        source[seed + 2]
      );

      // 处理 flood fill 区域外围一圈抗锯齿边缘。
      for (let p = 0; p < mask.length; p++) {
        const i = p * 4;

        // 主体填充区域已经由 q-floodfill 填好。
        if (mask[p]) continue;

        if (overlay) image.data.fill(0, i, i + 4);

        const px = p % width;
        const py = Math.floor(p / width);

        // 当前像素必须和已填充区域的 8 邻域相邻,才视为候选边缘像素。
        let adjacent = false;
        for (let dy = -1; dy <= 1 && !adjacent; dy++) {
          for (let dx = -1; dx <= 1; dx++) {
            const nx = px + dx;
            const ny = py + dy;

            if (
              nx >= 0 && nx < width &&
              ny >= 0 && ny < height &&
              mask[ny * width + nx]
            ) {
              adjacent = true;
              break;
            }
          }
        }

        if (!adjacent) continue;

        const alpha = source[i + 3] / 255;

        if (transparentSeed && alpha > 0 && alpha < 1) {
          // 透明背景区域:当前像素通常是描边的半透明抗锯齿边缘。
          if (overlay) {
            image.data[i] = source[i] * alpha + fill.r * (1 - alpha);
            image.data[i + 1] = source[i + 1] * alpha + fill.g * (1 - alpha);
            image.data[i + 2] = source[i + 2] * alpha + fill.b * (1 - alpha);
            image.data[i + 3] = fill.a;
            continue;
          }

          // 把填充颜色合成在原描边下方。
          const under = (1 - alpha) * fill.a / 255;
          const resultAlpha = alpha + under;

          // resultAlpha 理论上 > 0;额外保护避免极端输入出现除 0。
          if (resultAlpha > 0) {
            image.data[i] = (source[i] * alpha + fill.r * under) / resultAlpha;
            image.data[i + 1] = (source[i + 1] * alpha + fill.g * under) / resultAlpha;
            image.data[i + 2] = (source[i + 2] * alpha + fill.b * under) / resultAlpha;
            image.data[i + 3] = resultAlpha * 255;
          }
        } else if (source[seed + 3] === 255 && seedMax > 0 && alpha === 1) {
          // 不透明背景区域:尝试修正"种子底色 + 黑色描边"的预混合边缘。
          const coverage = Math.max(
            source[i],
            source[i + 1],
            source[i + 2]
          ) / seedMax;

          if (
            coverage <= 0 ||
            coverage >= 1 ||
            [0, 1, 2].some(channel =>
              Math.abs(
                source[i + channel] - source[seed + channel] * coverage
              ) > 1
            )
          ) {
            continue;
          }

          const amount = fill.a / 255;
          image.data[i] = source[i] * (1 - amount) + fill.r * coverage * amount;
          image.data[i + 1] = source[i + 1] * (1 - amount) + fill.g * coverage * amount;
          image.data[i + 2] = source[i + 2] * (1 - amount) + fill.b * coverage * amount;
          image.data[i + 3] = 255;
        }
      }

      return image;
    }

    /**
     * 从 Canvas 读取 ImageData,使用 fillRegion 填充后写回。
     */
    function applyFloodFill(x, y, color, tolerance = 10) {
      const px = Math.max(0, Math.min(canvas.width - 1, Math.floor(x)));
      const py = Math.max(0, Math.min(canvas.height - 1, Math.floor(y)));

      const imageData = ctx.getImageData(0, 0, canvas.width, canvas.height);
      const result = fillRegion(
        imageData,
        color,
        px,
        py,
        Number(tolerance),
        false
      );

      ctx.putImageData(result, 0, 0);
    }

    function redraw() {
      ctx.clearRect(0, 0, canvas.width, canvas.height);

      for (const action of actions) {
        if (action.type === 'stroke') {
          drawStroke(action.points, action.size, action.color);
        } else if (action.type === 'fill') {
          applyFloodFill(
            action.x,
            action.y,
            action.color,
            action.tolerance
          );
        }
      }

      // 当前正在绘制的笔触预览
      if (tool === 'brush' && smoothedPoints.length >= 2) {
        drawStroke(
          smoothedPoints,
          Number(sizeInput.value) * dpr,
          colorInput.value
        );
      }
    }

    function pushAction(action) {
      actions.push(action);
      if (actions.length > 50) actions.shift();
      updateButtons();
    }

    /* ---------- 工具切换 ---------- */
    function setTool(nextTool) {
      tool = nextTool;
      isDrawing = false;
      rawPoints = [];
      smoothedPoints = [];

      brushBtn.classList.toggle('active', tool === 'brush');
      fillBtn.classList.toggle('active', tool === 'fill');
      canvas.style.cursor = tool === 'fill' ? 'cell' : 'crosshair';
      redraw();
    }

    brushBtn.addEventListener('click', () => setTool('brush'));
    fillBtn.addEventListener('click', () => setTool('fill'));

    /* ---------- 指针事件 ---------- */
    function onDown(e) {
      e.preventDefault();
      const point = getPoint(e);

      // 填充模式:点击一次就是一个完整操作
      if (tool === 'fill') {
        const action = {
          type: 'fill',
          x: point.x,
          y: point.y,
          color: colorInput.value,
          tolerance: Number(toleranceInput.value),
        };

        // 先直接执行,再保存操作,避免为了一次点击重放全部历史
        applyFloodFill(
          action.x,
          action.y,
          action.color,
          action.tolerance
        );

        pushAction(action);
        return;
      }

      canvas.setPointerCapture(e.pointerId);
      isDrawing = true;
      rawPoints = [point];
      smoothedPoints = [];
    }

    function onMove(e) {
      if (tool !== 'brush' || !isDrawing) return;
      e.preventDefault();

      rawPoints.push(getPoint(e));
      if (rawPoints.length >= 3) {
        smoothedPoints = smoothCutPoints(rawPoints);
      }
      redraw();
    }

    function onUp(e) {
      if (tool !== 'brush' || !isDrawing) return;

      isDrawing = false;
      try { canvas.releasePointerCapture(e.pointerId); } catch (_) {}

      const finalPoints = smoothedPoints.length >= 3
        ? smoothedPoints
        : rawPoints.map(p => ({ ...p }));

      if (finalPoints.length >= 2) {
        pushAction({
          type: 'stroke',
          points: finalPoints,
          size: Number(sizeInput.value) * dpr,
          color: colorInput.value,
        });
      }

      rawPoints = [];
      smoothedPoints = [];
      redraw();
    }

    canvas.addEventListener('pointerdown', onDown);
    canvas.addEventListener('pointermove', onMove);
    canvas.addEventListener('pointerup', onUp);
    canvas.addEventListener('pointercancel', onUp);
    canvas.addEventListener('pointerleave', onUp);

    /* ---------- 工具栏 ---------- */
    sizeInput.addEventListener('input', () => {
      sizeVal.textContent = sizeInput.value + 'px';
    });

    toleranceInput.addEventListener('input', () => {
      toleranceVal.textContent = toleranceInput.value;
    });

    clearBtn.addEventListener('click', () => {
      actions = [];
      rawPoints = [];
      smoothedPoints = [];
      redraw();
      updateButtons();
    });

    undoBtn.addEventListener('click', () => {
      actions.pop();
      redraw();
      updateButtons();
    });

    function updateButtons() {
      undoBtn.disabled = actions.length === 0;
    }

    // Ctrl/Cmd + Z
    window.addEventListener('keydown', (e) => {
      if ((e.ctrlKey || e.metaKey) && e.key.toLowerCase() === 'z') {
        e.preventDefault();
        if (actions.length) {
          actions.pop();
          redraw();
          updateButtons();
        }
      }
    });

    resize();
  })();
</script>
</body>
</html>```