文章目录
Containerd介绍
前言
-
早在2016年3月,Docker 1.11的Docker Engine里就包含了containerd,而现在则是把containerd从Docker Engine里彻底剥离出来,作为一个独立的开源项目独立发展,目标是提供一个更加开放、稳定的容器运行基础设施。和原先包含在Docker Engine里containerd相比,独立的containerd将具有更多的功能,可以涵盖整个容器运行时管理的所有需求。
-
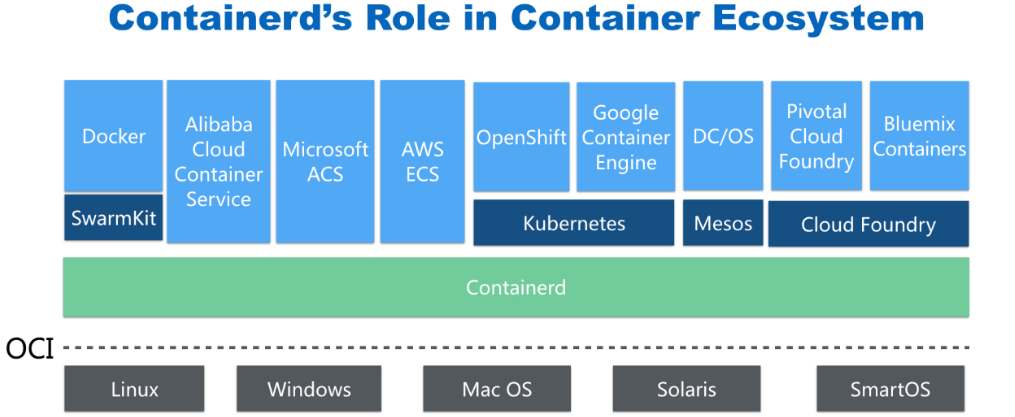
containerd并不是直接面向最终用户的,而是主要用于集成到更上层的系统里,比如Swarm, Kubernetes, Mesos等容器编排系统。
-
containerd以Daemon的形式运行在系统上,通过暴露底层的gRPC API,上层系统可以通过这些API管理机器上的容器。
-
每个containerd只负责一台机器,Pull镜像,对容器的操作(启动、停止等),网络,存储都是由containerd完成。具体运行容器由runC负责,实际上只要是符合OCI规范的容器都可以支持。
-
对于容器编排服务来说,运行时只需要使用containerd+runC,更加轻量,容易管理。
-
独立之后containerd的特性演进可以和Docker Engine分开,专注容器运行时管理,可以更稳定。

Containerd前世今生
2013年docker公司在推出docker产品后,由于其对全球技术产生了一定的影响力,Google公司明显感觉到自己公司内部所使用的Brog系统江湖地位受到的威胁,希望Docker公司能够与自己联合打造一款开源的容器运行时作为Docker核心依赖,但Docker公司拒绝了;接着Google公司联合RedHat、IBM等公司说服Docker公司把其容器核心技术libcontainer捐给中立社区(OCI,Open Container Intiative),并更名为runC。 为了进一步遏制Docker在未来技术市场影响力,避免在容器市场上Docker一家独大,Google公司带领导RedHat、IBM等成立了CNCF(Cloud Native Computing Fundation)基金会,即云原生计算基金会。CNCF的目标很明确,既然在容器应用领域无法与Docker相抗衡,那就做Google更有经验的技术市场------大规模容器编排应用场景,Google公司把自己内部使用的Brog系统开源------Kubernetes,也就是我们今天所说的云原生技术生态。
2016年Docker公司推出了Docker Swarm,意在一统Docker生态,让Docker既可以实现容器应用管理,也可以实现大规模容器编排,经过近1年左右时间的市场验证后,发现在容器编排方面无法独立抗衡kubernetes,所以Docker公司于2017年正式宣布原生支持Kubernetes,至此,Docker在大规模容器编排应用市场败下阵来,但是Docker依然不甘心失败,把Docker核心依赖Containerd捐给了CNCF,依此说明Docker依旧是一个PaaS平台。
2020年CNCF基金会宣布Kubernetes 1.20版本将不再仅支持Docker容器管理工具,此事的起因主要也与Docker捐给CNCF基金会的Containerd有关,早期为了实现Kubernetes能够使用Docker实现容器管理,专门在Kubernetes组件中集成一个shim(垫片)技术,用来将Kubernetes容器运行时接口(CRI,Container Runntime Interface)调用翻译成Docker的API,这样就可以很好地使用Docker了,但是随着Kubernetes在全球技术市场的广泛应用,有更多的容器管理工具的出现,它们都想能够借助于Kubernetes被用户所使用,所以就提出标准化容器运行时接口,只要适配了这个接口就可以集成到Kubernetes生态当中,所以Kubernetes取消了对shim的维护,并且由于Containerd技术的成功,可以实现无缝对接Kubernetes,所以接下来Kubernetes容器运行时的主角是Containerd。
Containerd架构
架构图
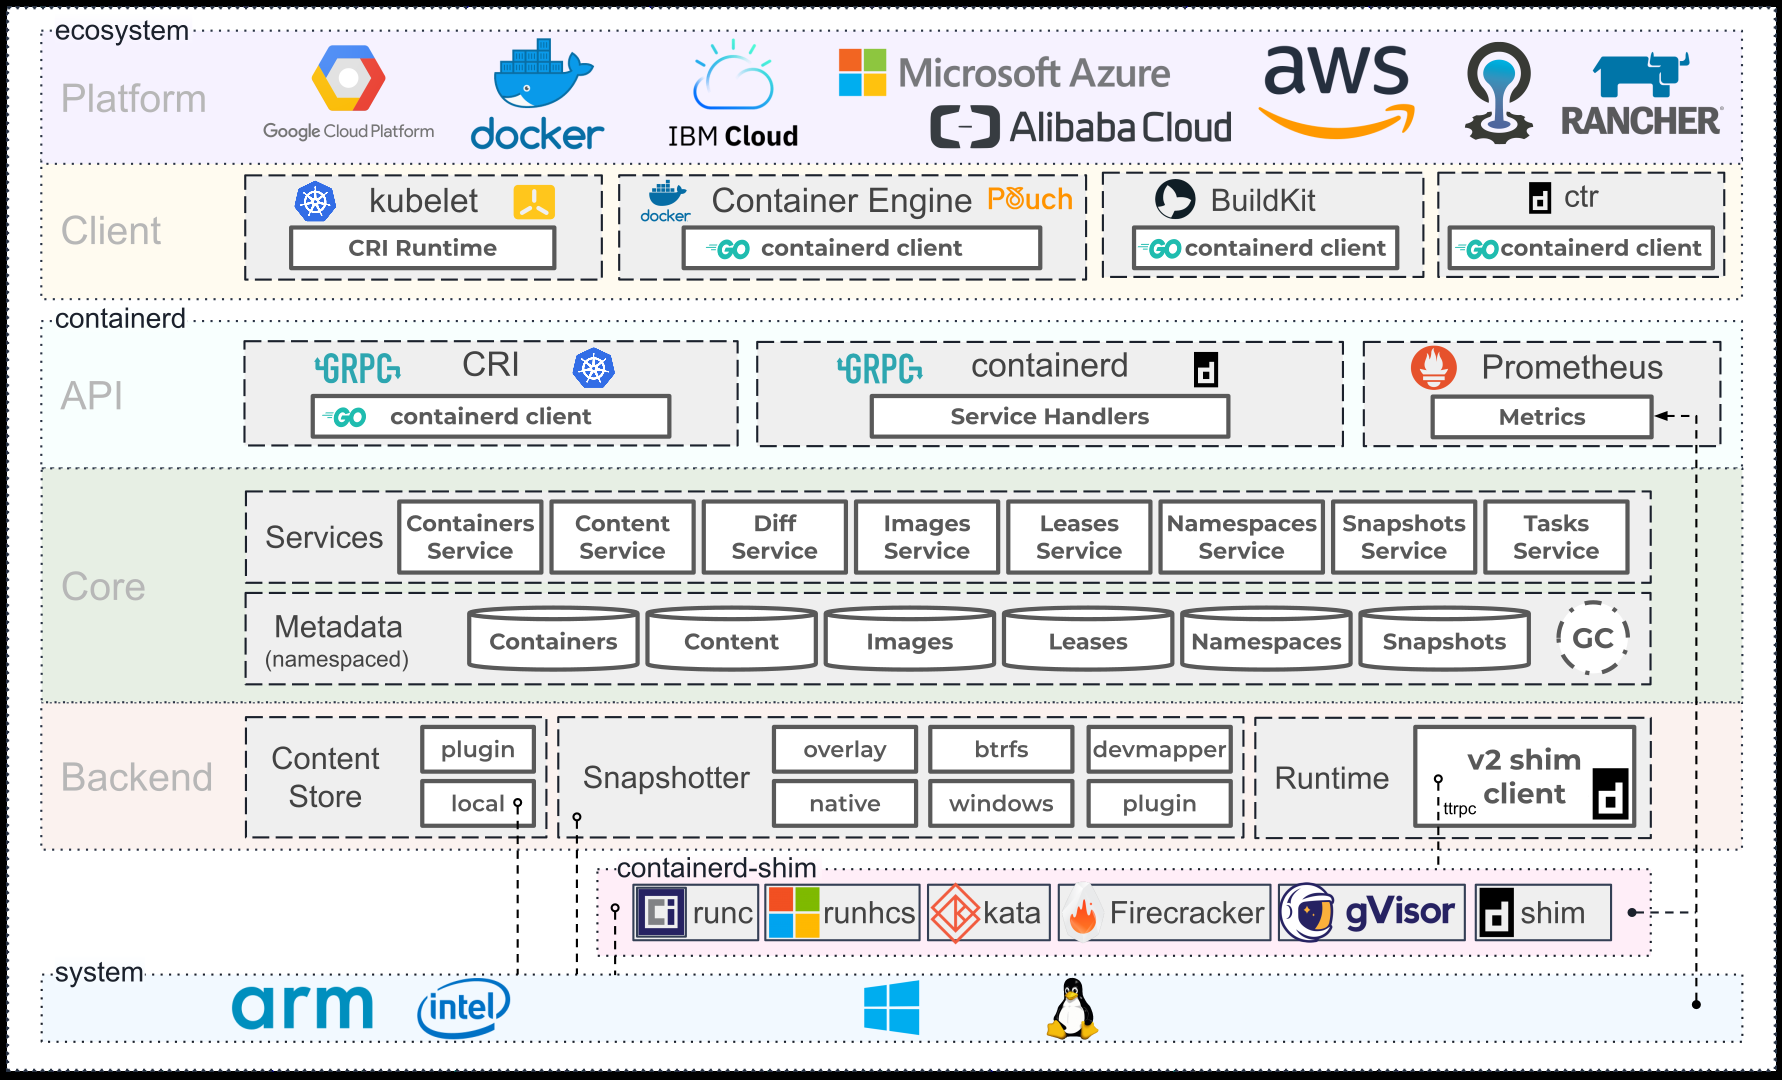
Containerd设计的目的是为了嵌入到Kubernetes中使用,它是一个工业级的容器运行时,不提供给开发人员和终端用户直接使用,这样就避免了与Docker产生竞争,但事实上,Containerd已经实现大多数容器管理功能,例如:容器生命周期管理、容器镜像传输和管理、容器存储与网络管理等。
-
Containerd 采用标准的 C/S 架构
- 服务端通过 GRPC 协议提供稳定的 API
- 客户端通过调用服务端的 API 进行高级的操作
-
为了实现解耦,Containerd 将不同的职责划分给不同的组件,每个组件就相当于一个子系统(subsystem)。连接不同子系统的组件被称为模块。
-
Containerd 两大子系统为:
- Bundle : 在 Containerd 中,Bundle 包含了配置、元数据和根文件系统数据,你可以理解为容器的文件系统。而 Bundle 子系统允许用户从镜像中提取和打包 Bundles。
- Runtime : Runtime 子系统用来执行 Bundles,比如创建容器。
-
其中,每一个子系统的行为都由一个或多个模块协作完成(架构图中的 Core 部分)。每一种类型的模块都以插件的形式集成到 Containerd 中,而且插件之间是相互依赖的。
-
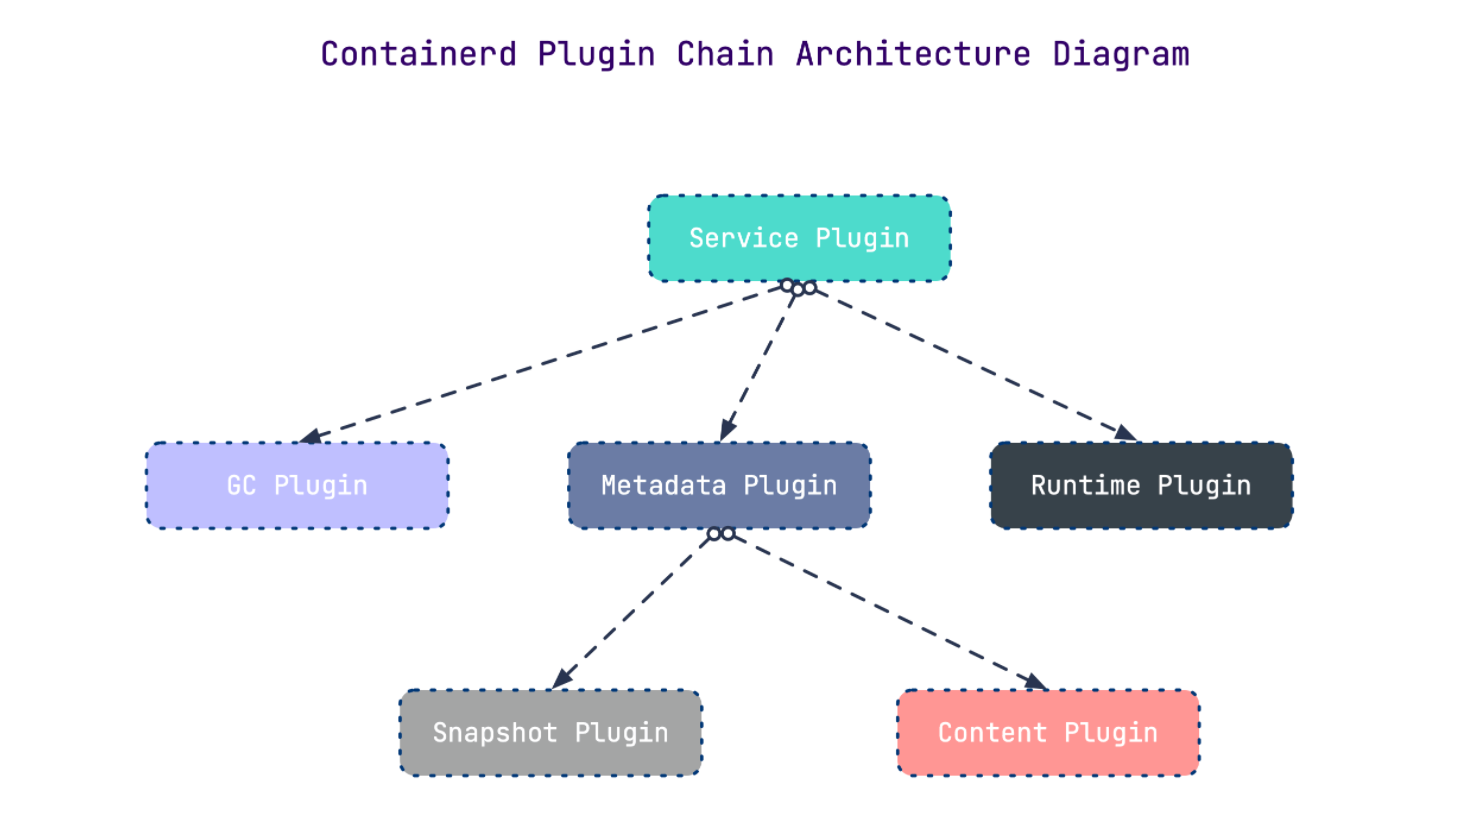
例如,上图中的每一个长虚线的方框都表示一种类型的插件,包括 Service Plugin、Metadata Plugin、GC Plugin、Runtime Plugin 等,其中 Service Plugin 又会依赖 Metadata Plugin、GC Plugin 和 Runtime Plugin。每一个小方框都表示一个细分的插件,例如 Metadata Plugin 依赖 Containers Plugin、Content Plugin 等。
常用插件
- Content Plugin : 提供对镜像中可寻址内容的访问,所有不可变的内容都被存储在这里。
- Snapshot Plugin : 用来管理容器镜像的文件系统快照。镜像中的每一个 layer 都会被解压成文件系统快照,类似于 Docker 中的
graphdriver。 - Metrics : 暴露各个组件的监控指标。
架构缩略图
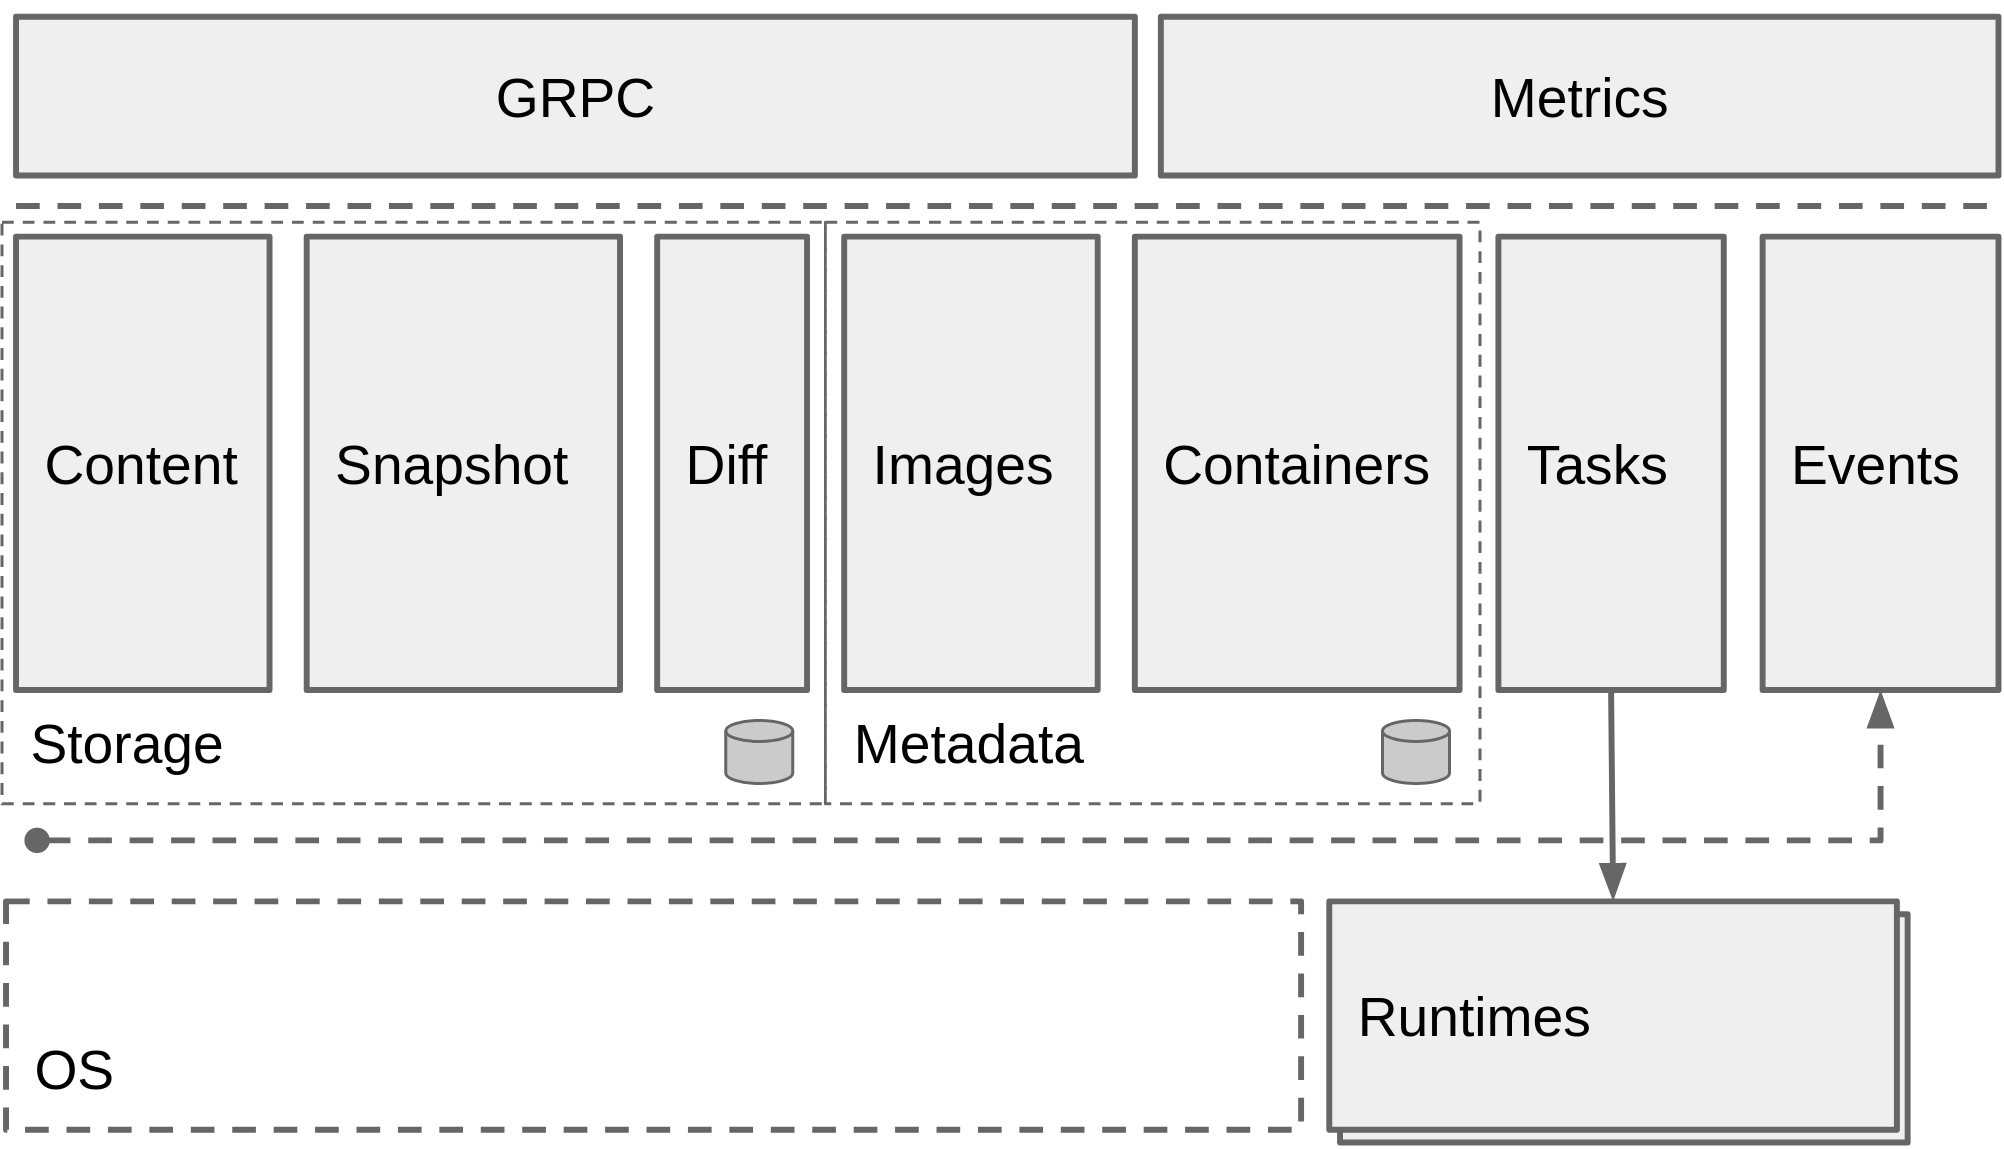
Containerd 被分为三个大块:Storage 、Metadata 和 Runtime
与其它容器运行时工具性能对比
这是使用 bucketbench 对 Docker、crio 和 Containerd 的性能测试结果,包括启动、停止和删除容器,以比较它们所耗的时间:
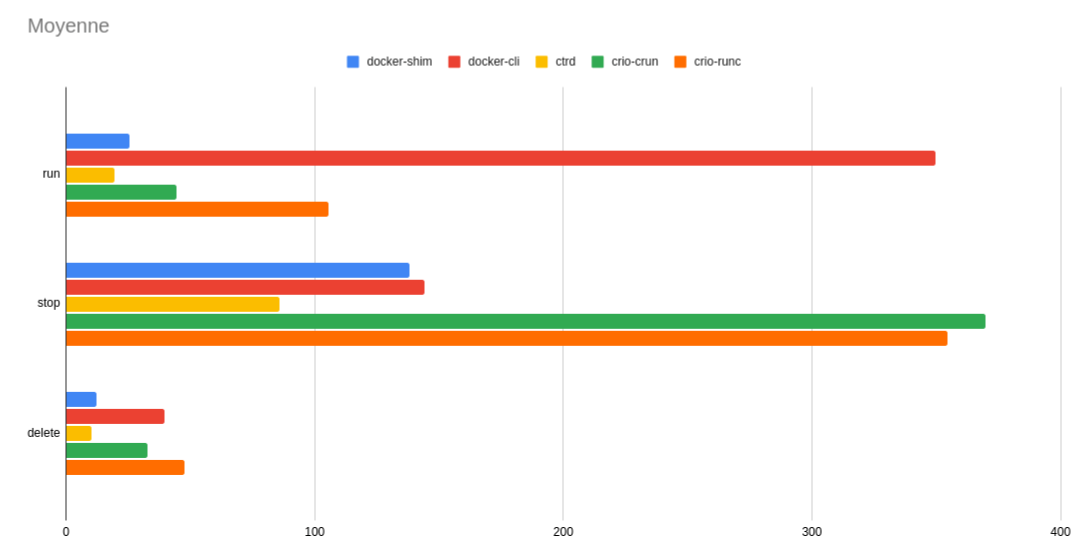
结论: Containerd 在各个方面都表现良好,总体性能优于 Docker 和 crio 。
Containerd安装
操作系统: CentOS Stream 8
YUM方式安装
基于CentOS-Stream-8模板制作.md制作的模板克隆一台虚拟机命名为Containerd
安装必要工具
bash
# 安装yum-utils等工具包,-y自动确认,为配置Docker/Containerd的YUM源做准备
[root@localhost ~]# yum install -y yum-utils device-mapper-persistent-data lvm2 vim
安装Containerd
bash
# 1.获取阿里云YUM源

# 使用yum-config-manager添加阿里云Docker-ce的YUM源,--add-repo指定仓库配置文件地址
[root@localhost ~]# yum-config-manager --add-repo https://mirrors.aliyun.com/docker-ce/linux/centos/docker-ce.repo

# 生成YUM缓存,使新添加的仓库源生效
[root@localhost ~]# yum makecache

# 2.查看YUM源中Containerd软件

# 列出YUM源中所有软件包,grep过滤出containerd相关软件
[root@localhost ~]# yum list | grep containerd
containerd.io.x86_64                                   1.6.32-3.1.el8
docker-ce-stable

# 3.安装Containerd.io软件,即可安装Containerd

# 安装containerd.io软件包,-y自动确认安装
[root@localhost ~]# yum -y install containerd.io

# 4.使用rpm -qa命令查看是否安装

# 查询系统中已安装的rpm软件包,grep过滤containerd确认安装成功
[root@localhost ~]# rpm -qa | grep containerd
containerd.io-1.6.32-3.1.el8.x86_64

# 5.设置containerd服务启动及开机自启动

# 设置containerd开机自启并立即启动,--now表示同时立即启动服务
[root@localhost ~]# systemctl enable containerd --now
# 查看containerd服务的运行状态
[root@localhost ~]# systemctl status containerd

# 6.验证

# 安装Containerd时ctr命令亦可使用,ctr命令主要用于管理容器及容器镜像等。

# 使用ctr命令查看Containerd客户端及服务端相关信息
[root@localhost ~]# ctr version
Client:
Version:  1.6.32
Revision: 8b3b7ca2e5ce38e8f31a34f35b2b68ceb8470d89
Go version: go1.21.10
Server:
Version:  1.6.32
Revision: 8b3b7ca2e5ce38e8f31a34f35b2b68ceb8470d89
UUID: 979940af-68e0-4681-a560-189eeaefbdfc
二进制方式安装
Containerd有两种安装包:
- 第一种是containerd-xxx,这种包用于单机测试没问题,不包含runC,需要提前安装。
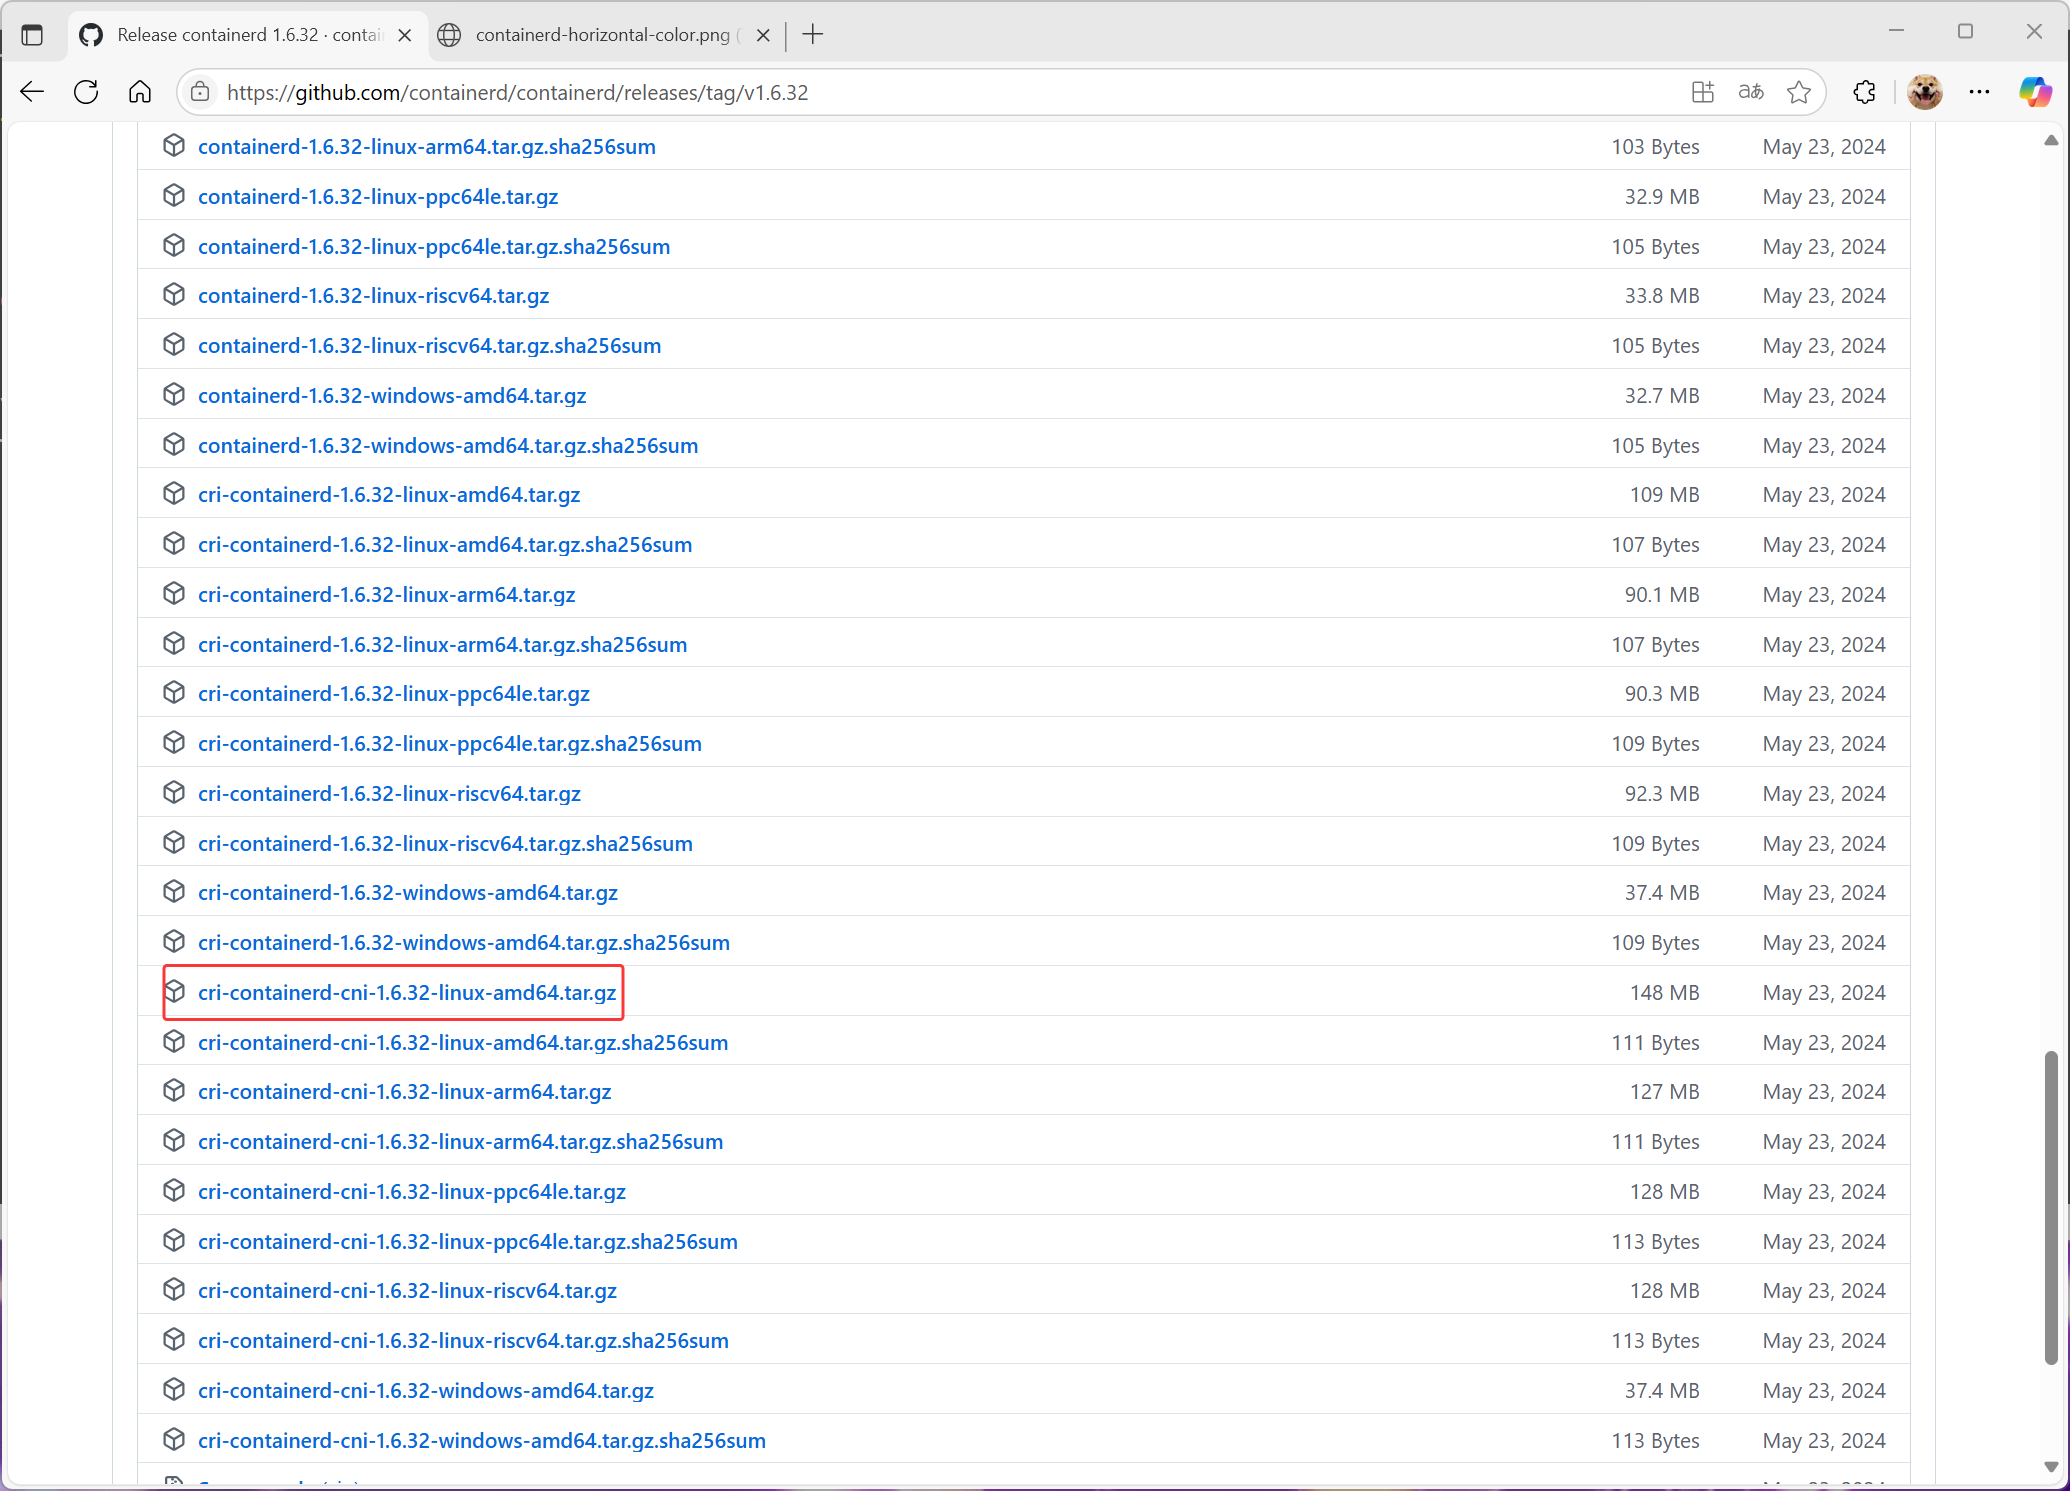
- 第二种是cri-containerd-cni-xxxx,包含runc和k8s里的所需要的相关文件。k8s集群里需要用到此包。虽然包含runC,但是依赖系统中的seccomp(安全计算模式,是一种限制容器调用系统资源的模式。)
安装Containerd
打开github官网,搜索containerd项目
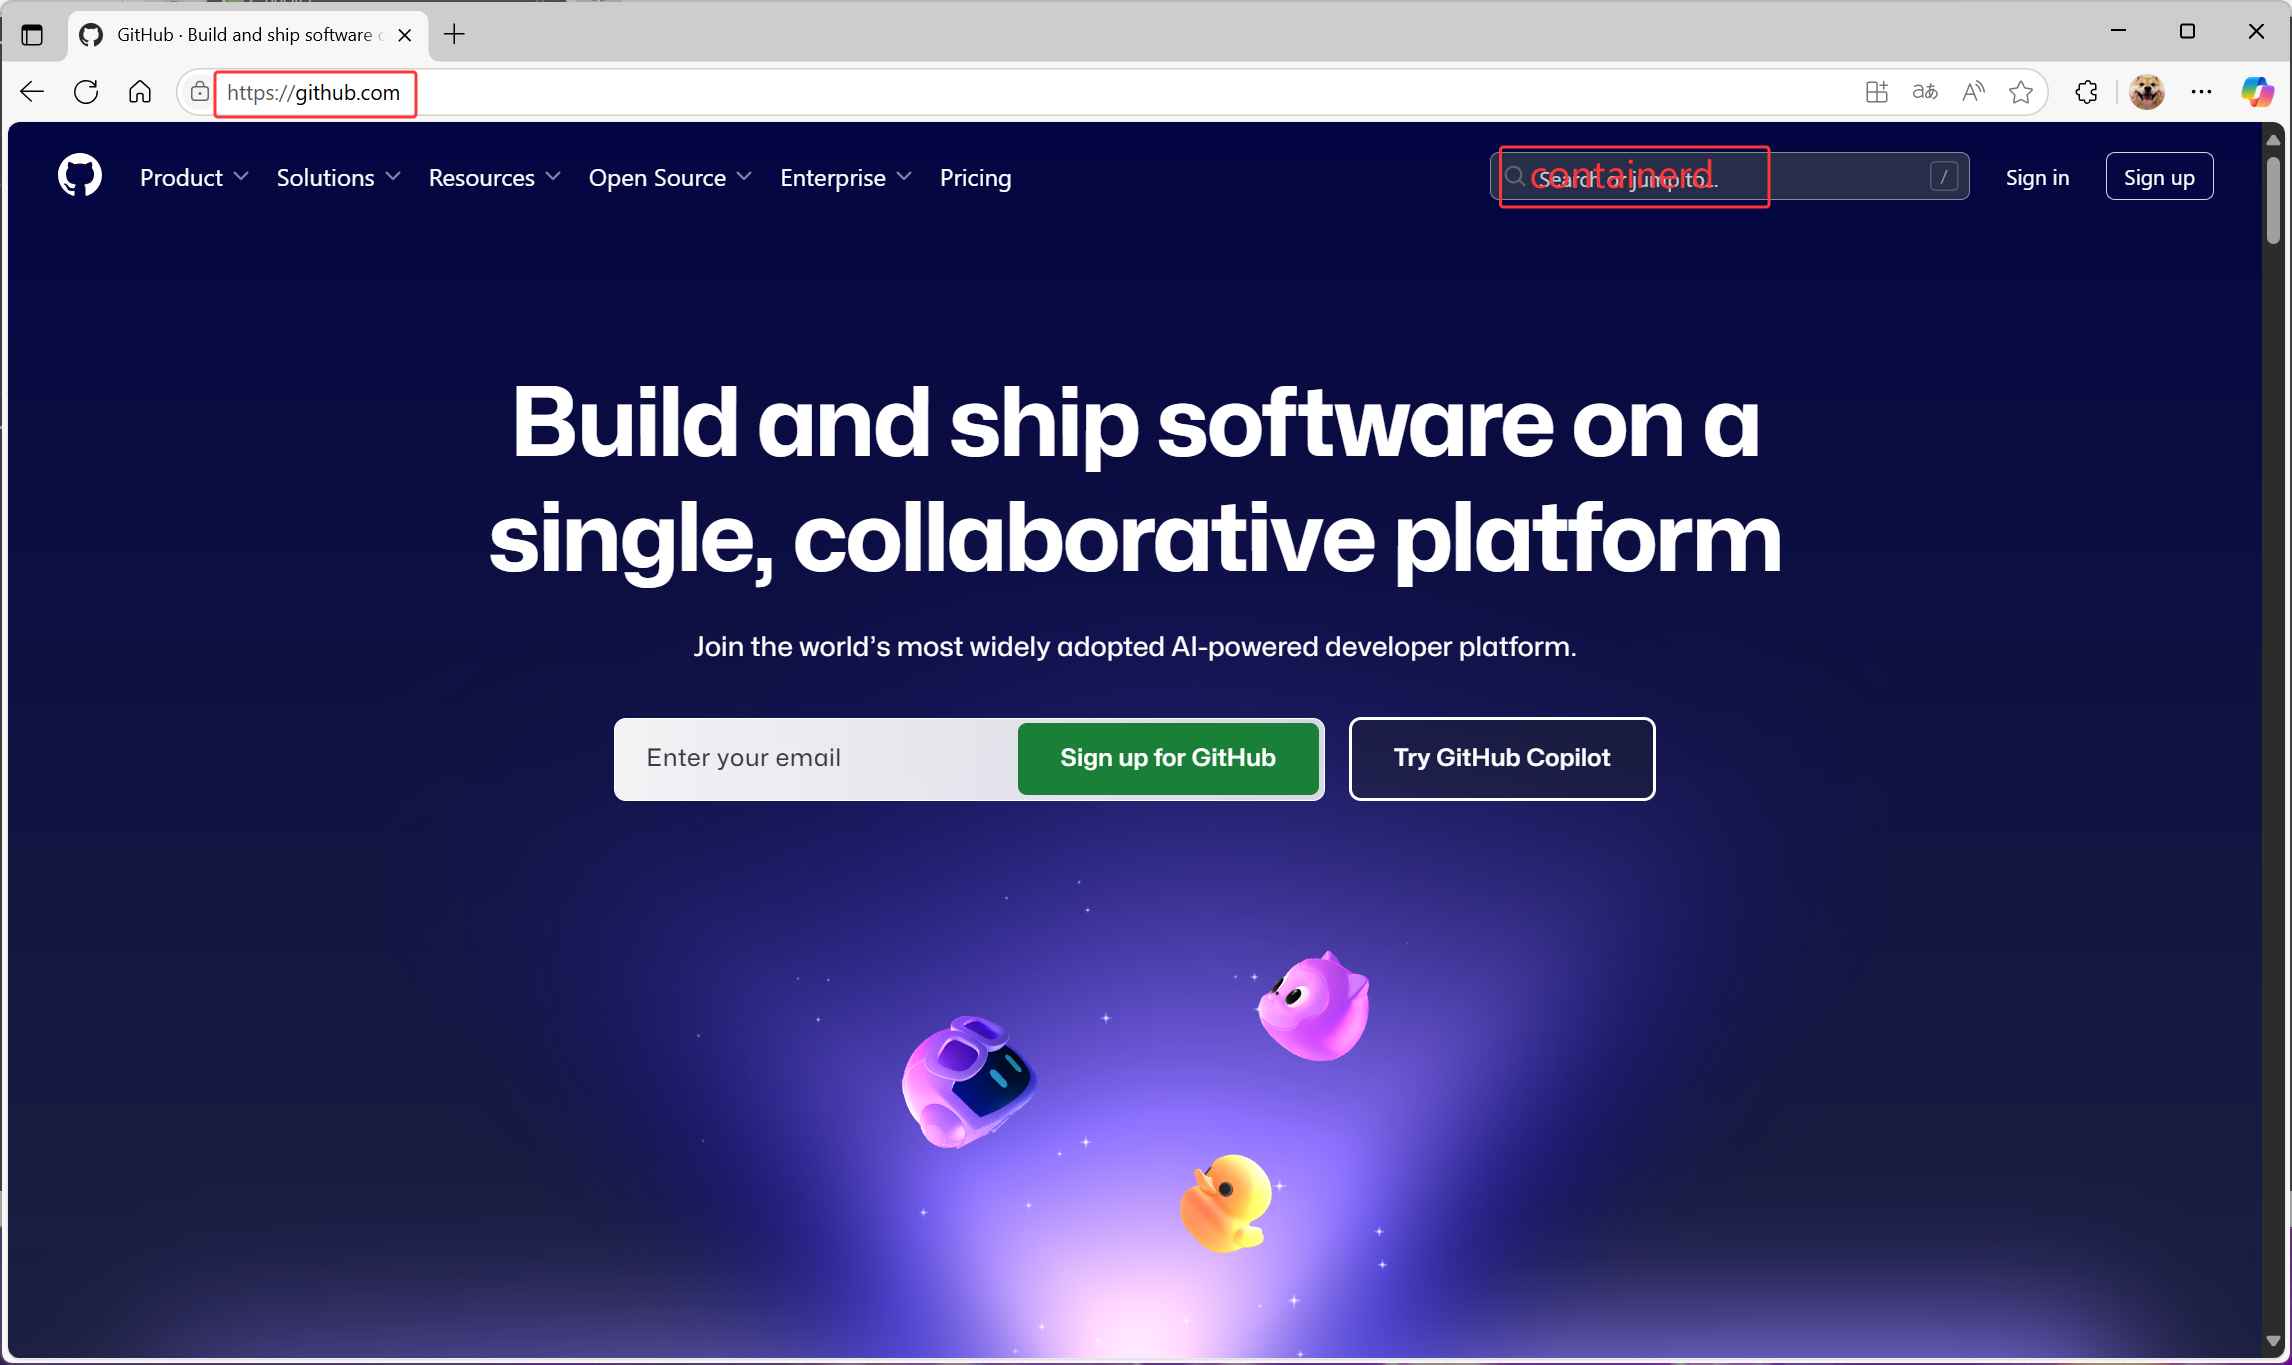
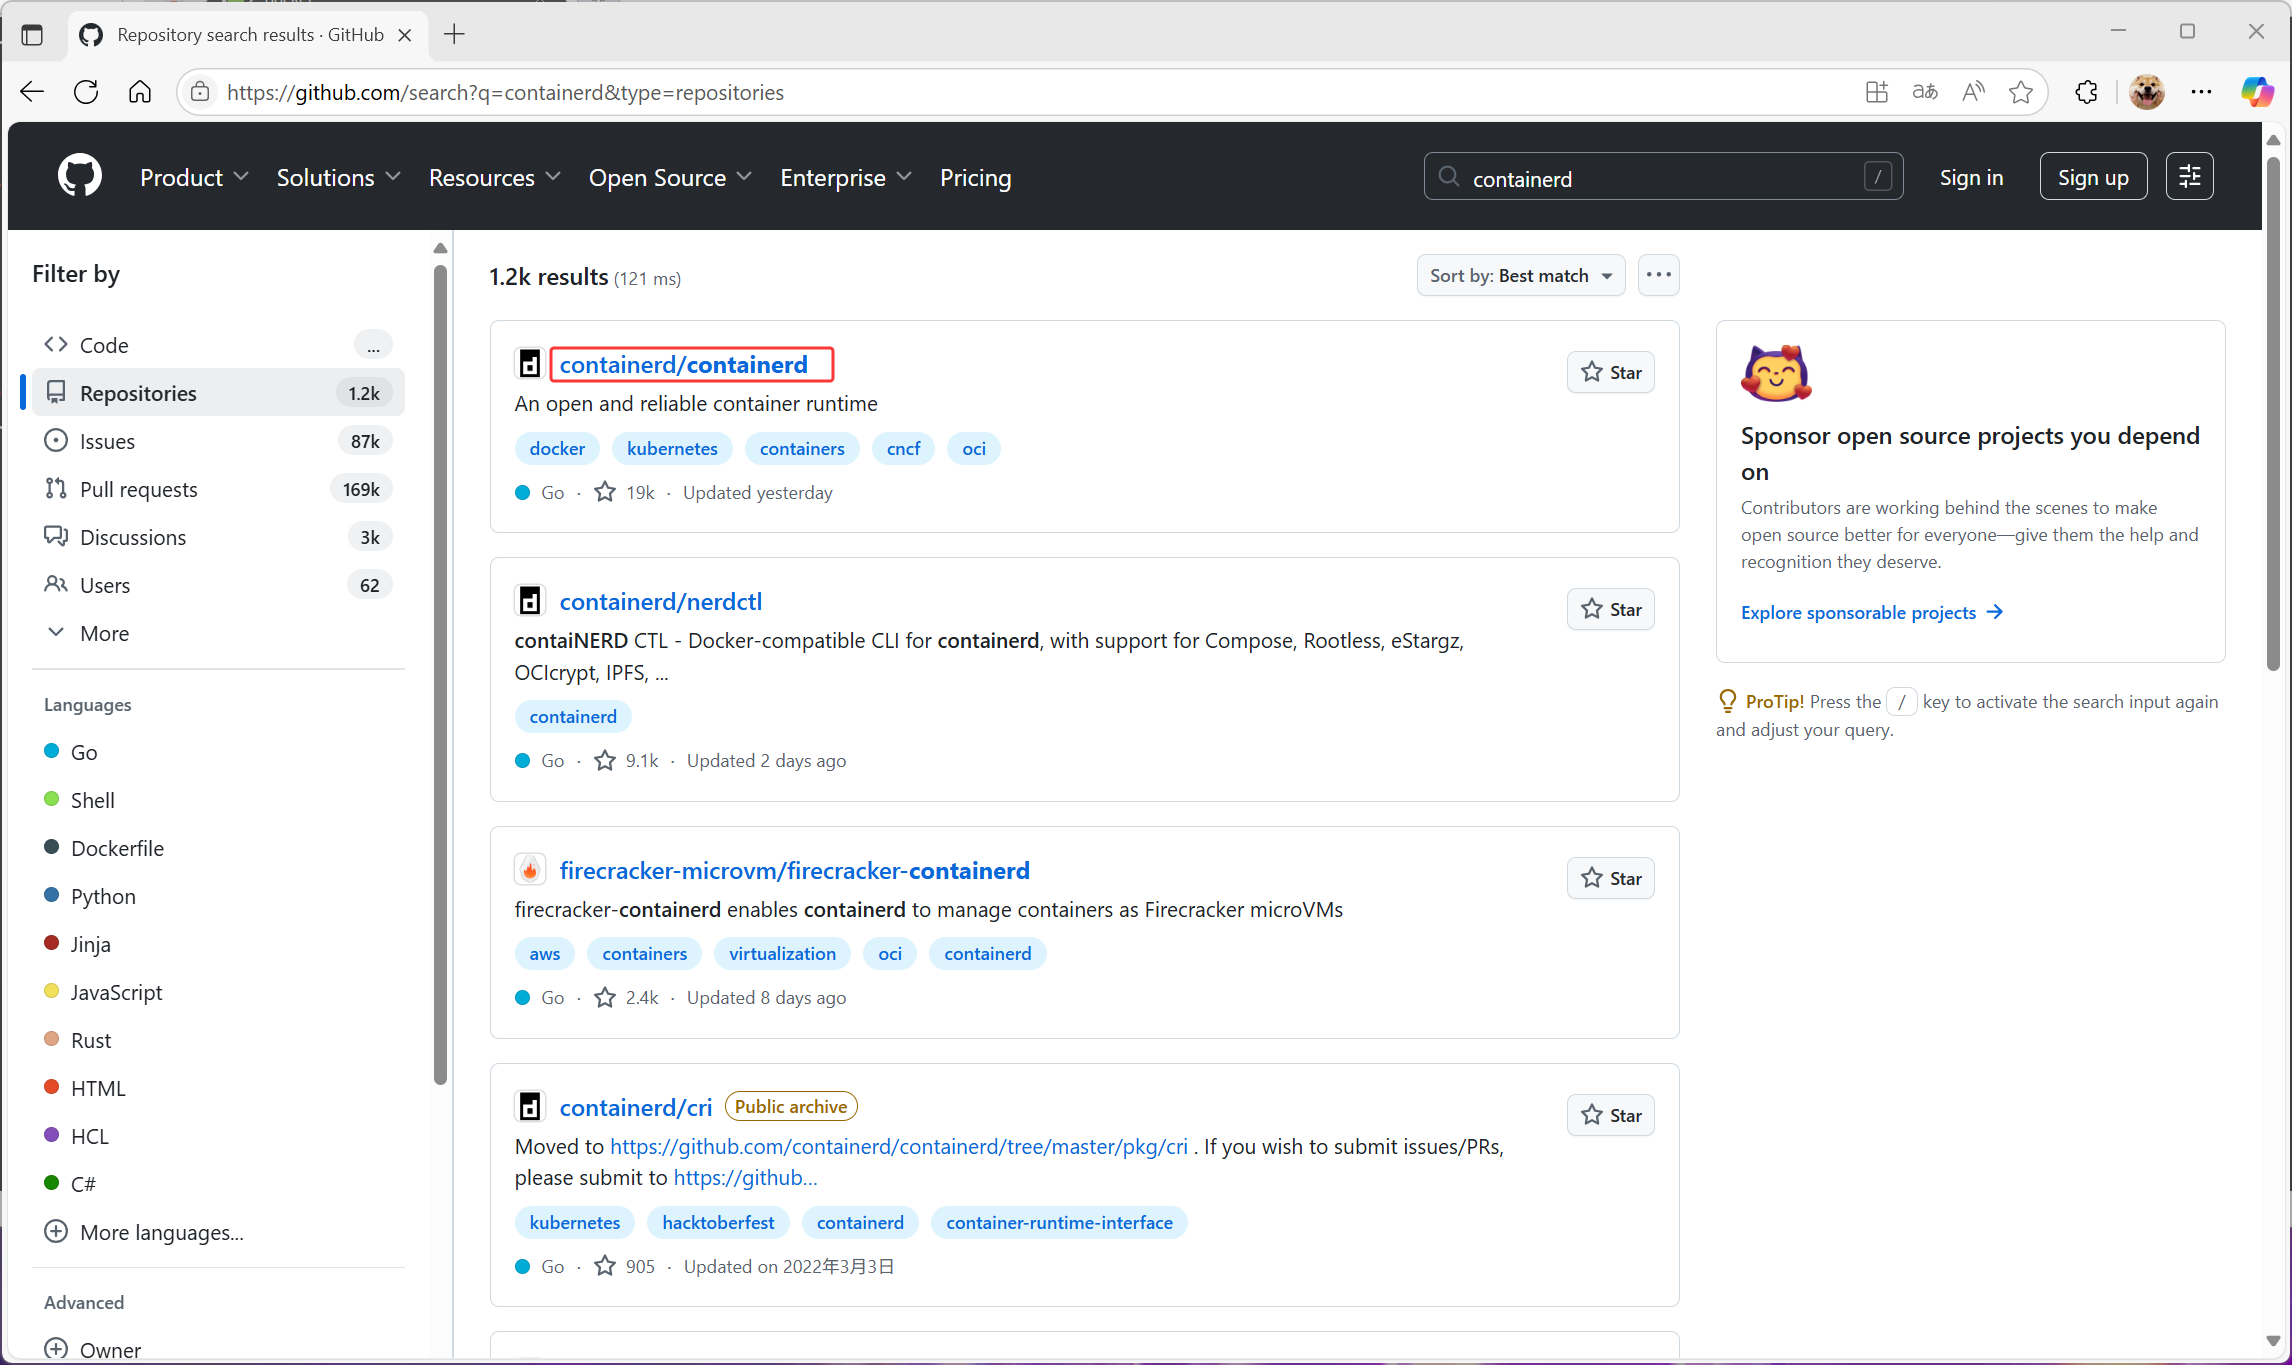
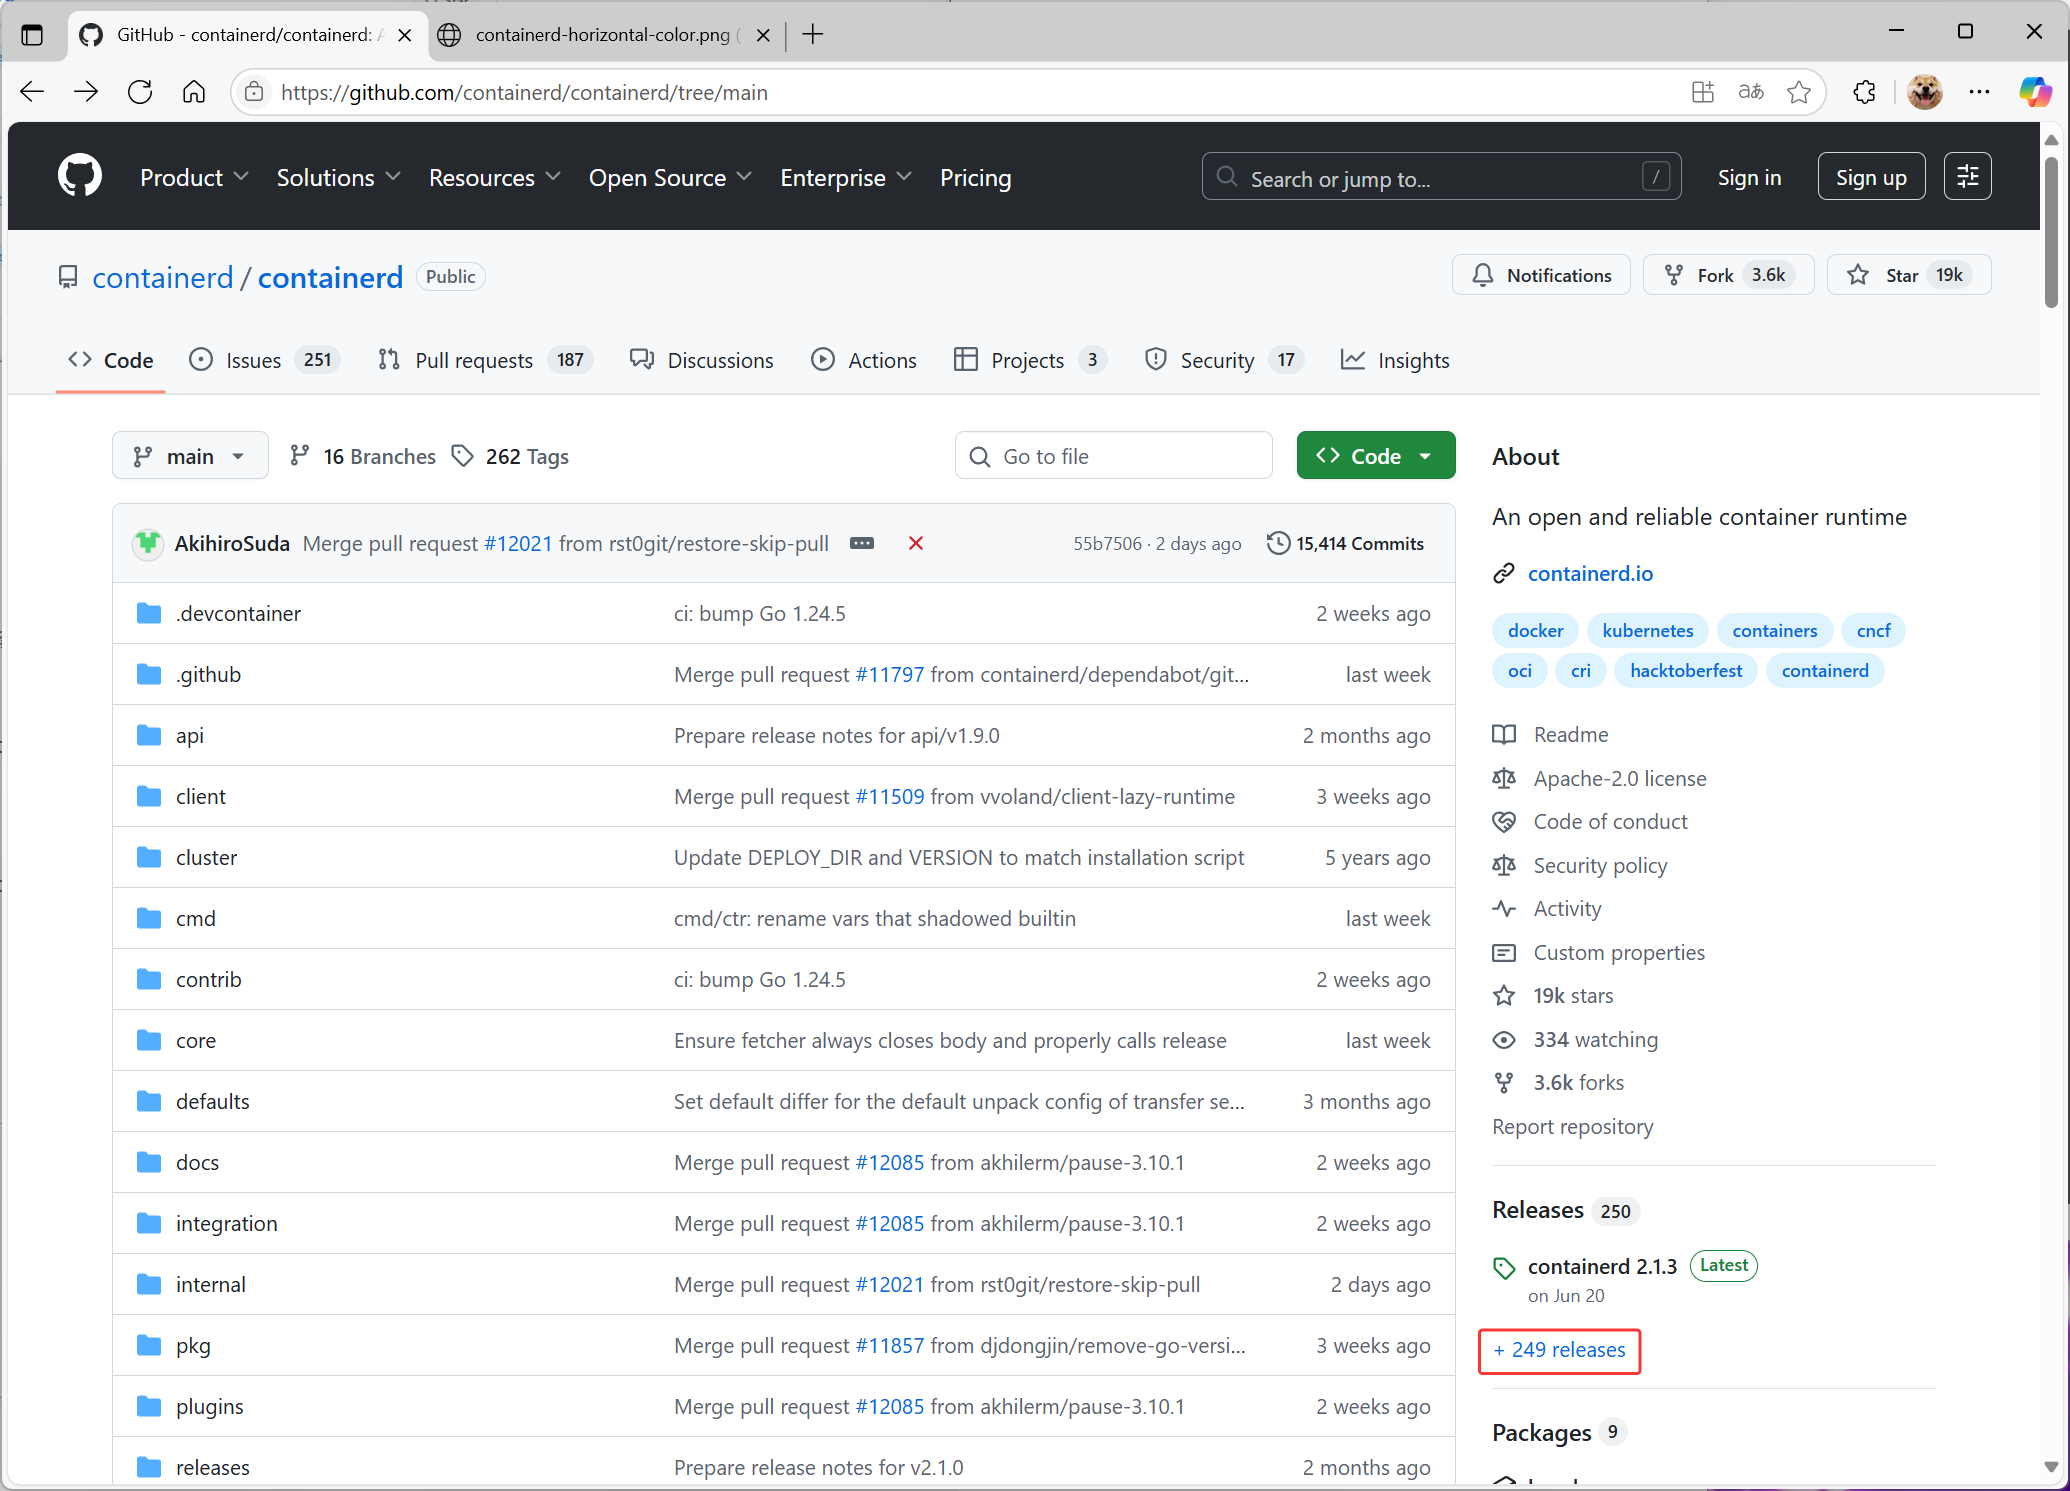
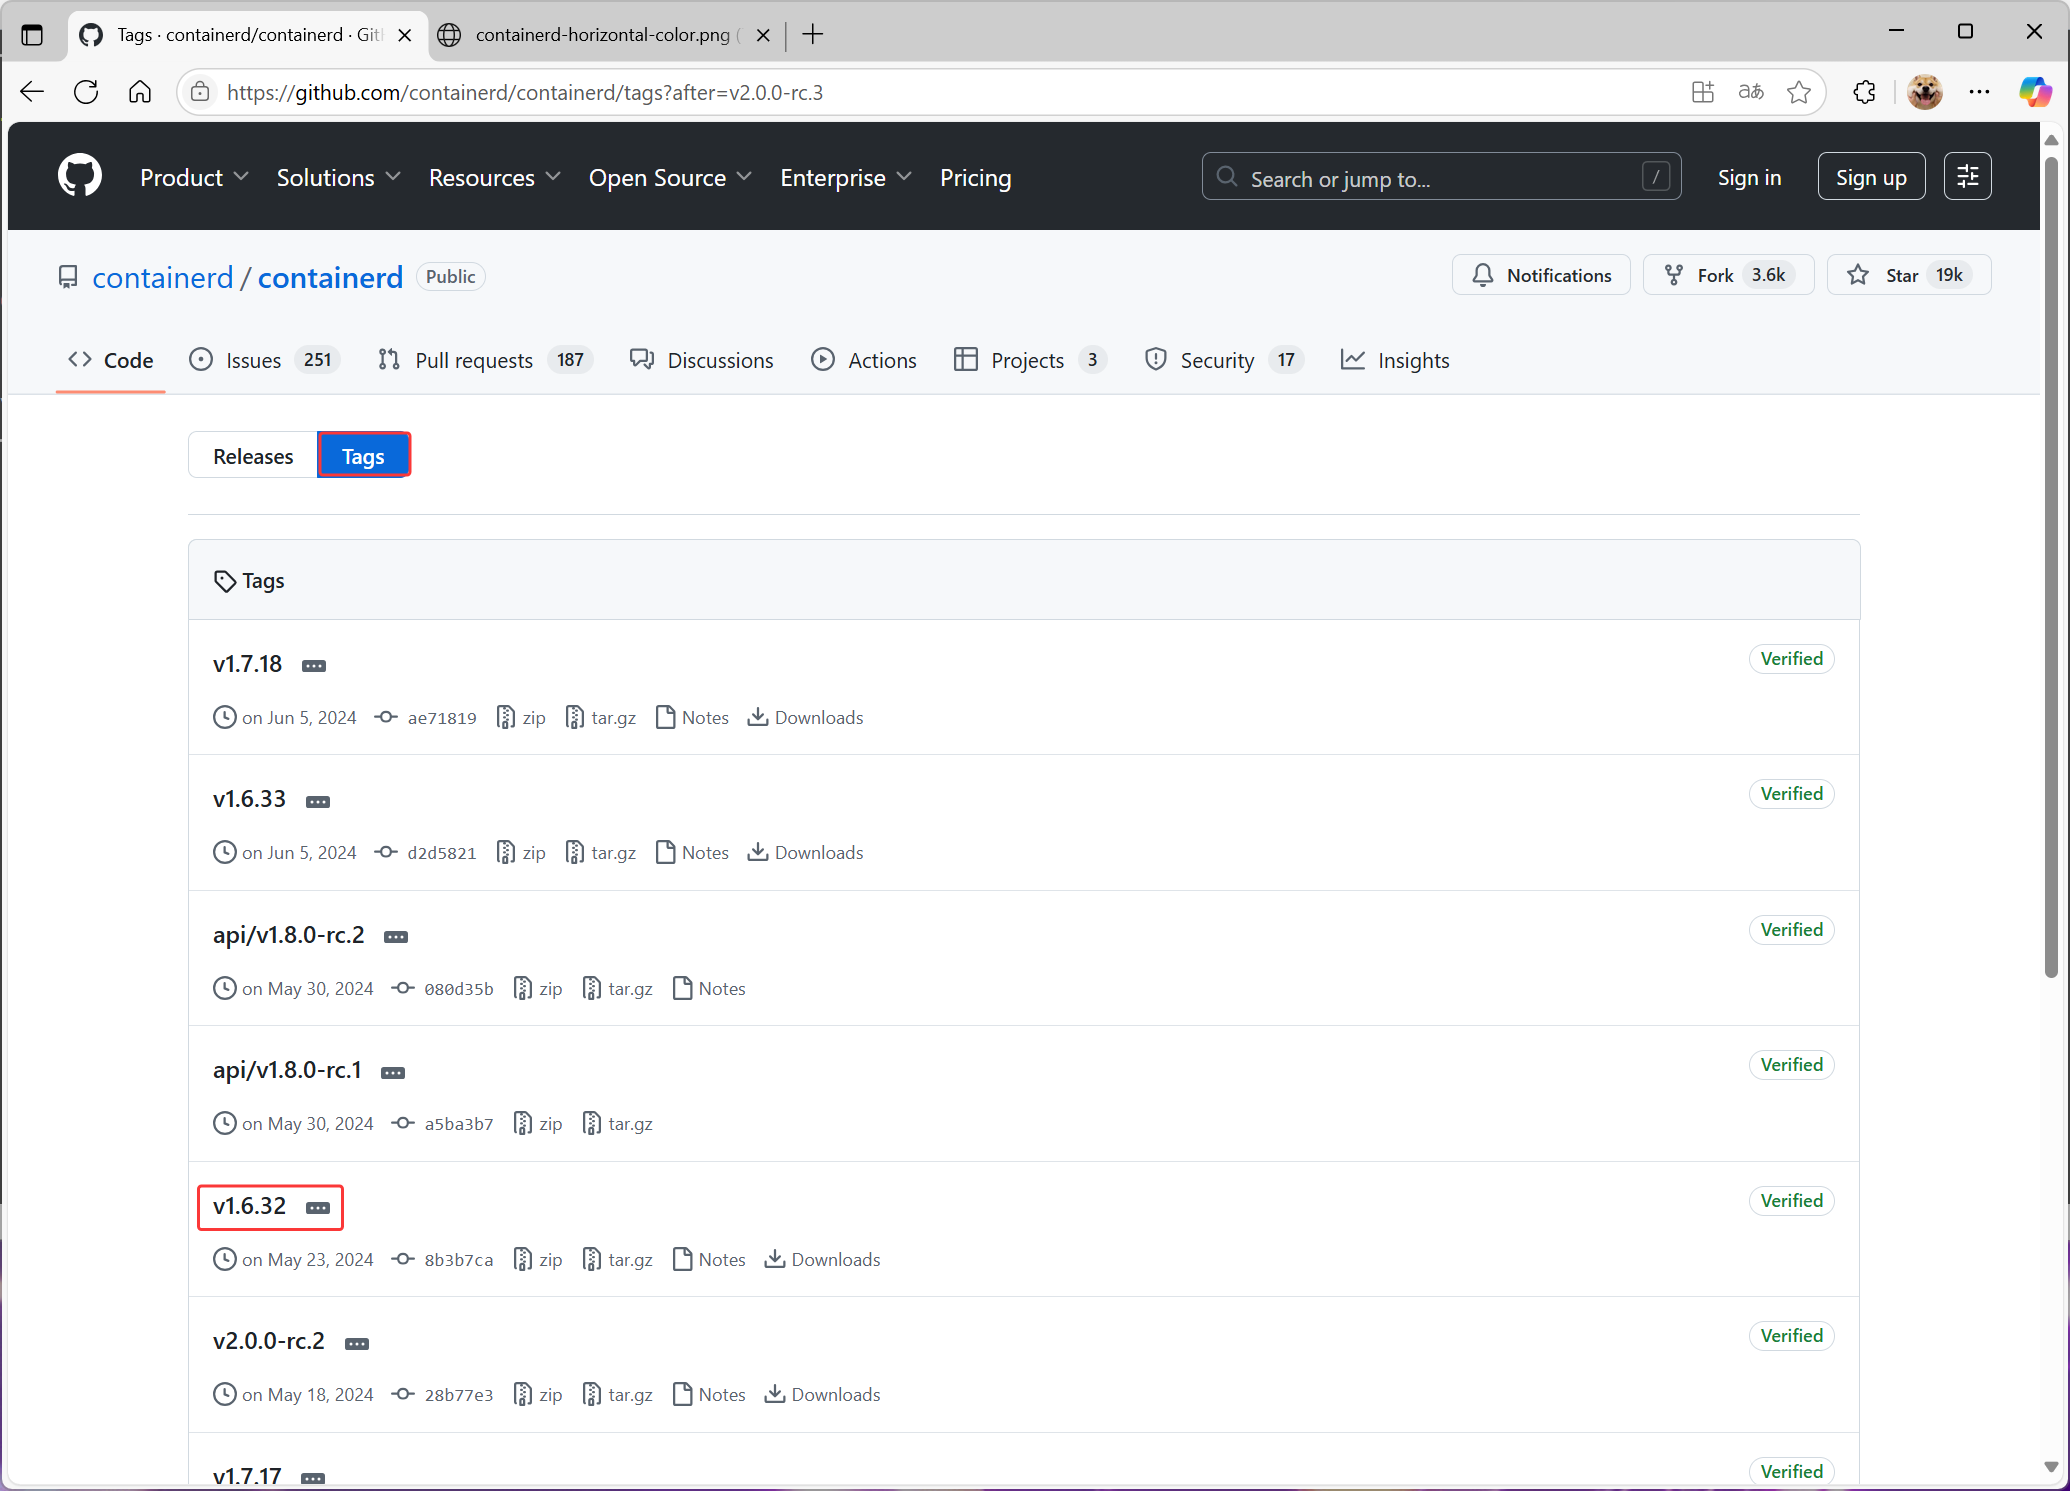
找到1.6.32
往下翻,找到软件包下载,然后上传到centos
也可以右击,复制链接,wget下载
bash
# 1.下载Containerd安装包

# 此处是下载的第二种
# 使用wget下载containerd二进制安装包(cri-containerd-cni包含runc及K8s所需文件)
[root@localhost ~]# wget https://github.com/containerd/containerd/releases/download/v1.6.32/cri-containerd-cni-1.6.32-linux-amd64.tar.gz

# 2.安装containerd

# 创建containerd目录,用于解压安装包
[root@localhost ~]# mkdir containerd
# 解压安装包到containerd目录,-xf解压文件,-C指定目标目录
[root@localhost ~]# tar xf cri-containerd-cni-1.6.32-linux-amd64.tar.gz -C containerd/

# 进入解压后的containerd目录
[root@localhost ~]# cd containerd/
# 查看当前目录下的文件
[root@localhost containerd]# ls
cri-containerd.DEPRECATED.txt  etc  opt  usr

# 以树状结构查看目录及文件层级
[root@localhost containerd]# tree
.
├── cri-containerd.DEPRECATED.txt
├── etc             #etc目录主要为containerd服务管理配置文件及cni虚拟网卡配置文件
│   ├── cni
│   │   └── net.d
│   │       └── 10-containerd-net.conflist             #网络插件配置文件
│   ├── crictl.yaml
│   └── systemd
│       └── system
│           └── containerd.service           #服务配置文件
├── opt                                  #opt目录主要为gce环境中使用containerd配置文件
及cni插件
│   ├── cni                              #网络插件
│   │   └── bin
│   │       ├── bandwidth
│   │       ├── bridge
│   │       ├── dhcp
│   │       ├── firewall
│   │       ├── host-device
│   │       ├── host-local
│   │       ├── ipvlan
│   │       ├── loopback
│   │       ├── macvlan
│   │       ├── portmap
│   │       ├── ptp
│   │       ├── sbr
│   │       ├── static
│   │       ├── tuning
│   │       ├── vlan
│   │       └── vrf
│   └── containerd
│       └── cluster
│           ├── gce
│           │   ├── cloud-init
│           │   │   ├── master.yaml
│           │   │   └── node.yaml
│           │   ├── cni.template
│           │   ├── configure.sh
│           │   └── env
│           └── version
└── usr                 #usr目录主要为containerd运行时文件,包含runc
└── local           # bin,sbin命令
├── bin
│   ├── containerd
│   ├── containerd-shim
│   ├── containerd-shim-runc-v1
│   ├── containerd-shim-runc-v2
│   ├── containerd-stress
│   ├── crictl
│   ├── critest
│   ├── ctd-decoder
│   └── ctr
└── sbin
└── runc
16 directories, 36 files

#查看containerd.service文件,了解containerd文件安装位置
[root@localhost containerd]# cat etc/systemd/system/containerd.service
# Copyright The containerd Authors.
#
# Licensed under the Apache License, Version 2.0 (the "License");
# you may not use this file except in compliance with the License.
# You may obtain a copy of the License at
#
#     http://www.apache.org/licenses/LICENSE-2.0
#
# Unless required by applicable law or agreed to in writing, software
# distributed under the License is distributed on an "AS IS" BASIS,
# WITHOUT WARRANTIES OR CONDITIONS OF ANY KIND, either express or implied.
# See the License for the specific language governing permissions and
# limitations under the License.
[Unit]
Description=containerd container runtime
Documentation=https://containerd.io
After=network.target local-fs.target
[Service]
ExecStartPre=-/sbin/modprobe overlay
ExecStart=/usr/local/bin/containerd      #查看此位置,把containerd二进制文件放置于此处即可完成安装。
Type=notify
Delegate=yes
KillMode=process
Restart=always
RestartSec=5
# Having non-zero Limit*s causes performance problems due to accounting overhead
# in the kernel. We recommend using cgroups to do container-local accounting.
LimitNPROC=infinity
LimitCORE=infinity
LimitNOFILE=infinity
# Comment TasksMax if your systemd version does not supports it.
# Only systemd 226 and above support this version.
TasksMax=infinity
OOMScoreAdjust=-999
[Install]
WantedBy=multi-user.target

#复制containerd运行时文件至系统

# 将解压目录usr/local/bin下的所有containerd运行时文件复制到系统/usr/local/bin目录
[root@localhost containerd]# cp usr/local/bin/* /usr/local/bin

#添加containerd.service文件至系统

# 将containerd.service服务配置文件复制到系统的systemd服务目录
[root@localhost containerd]# cp etc/systemd/system/containerd.service /usr/lib/systemd/system/containerd.service

# 生成containerd模块配置文件,可以自定义一下配置,如有私有镜像仓库等,按需配置

# 创建containerd的配置目录/etc/containerd
[root@localhost containerd]# mkdir /etc/containerd
# 生成containerd默认配置文件,重定向输出到/etc/containerd/config.toml
[root@localhost containerd]# containerd config default > /etc/containerd/config.toml
# 查看生成的containerd配置文件内容
[root@localhost containerd]# cat /etc/containerd/config.toml
disabled_plugins = []
imports = []
oom_score = 0
plugin_dir = ""
required_plugins = []
root = "/var/lib/containerd"
state = "/run/containerd"
temp = ""
version = 2
[cgroup]
  path = ""
[debug]
  address = ""
  format = ""
  gid = 0
  level = ""
  uid = 0
[grpc]
  address = "/run/containerd/containerd.sock"
  gid = 0
  max_recv_message_size = 16777216
  max_send_message_size = 16777216
  tcp_address = ""
  tcp_tls_ca = ""
  tcp_tls_cert = ""
  tcp_tls_key = ""
  uid = 0
[metrics]
  address = ""
  grpc_histogram = false
[plugins]
  [plugins."io.containerd.gc.v1.scheduler"]
    deletion_threshold = 0
    mutation_threshold = 100
    pause_threshold = 0.02
    schedule_delay = "0s"
    startup_delay = "100ms"
  [plugins."io.containerd.grpc.v1.cri"]
    device_ownership_from_security_context = false
    disable_apparmor = false
    disable_cgroup = false
    disable_hugetlb_controller = true
    disable_proc_mount = false
    disable_tcp_service = true
    drain_exec_sync_io_timeout = "0s"
    enable_selinux = false
    enable_tls_streaming = false
    enable_unprivileged_icmp = false
    enable_unprivileged_ports = false
    ignore_deprecation_warnings = []
    ignore_image_defined_volumes = false
    max_concurrent_downloads = 3
    max_container_log_line_size = 16384
    netns_mounts_under_state_dir = false
    restrict_oom_score_adj = false
    sandbox_image = "registry.k8s.io/pause:3.6"
    selinux_category_range = 1024
    stats_collect_period = 10
    stream_idle_timeout = "4h0m0s"
    stream_server_address = "127.0.0.1"
    stream_server_port = "0"
    systemd_cgroup = false
    tolerate_missing_hugetlb_controller = true
    unset_seccomp_profile = ""
    [plugins."io.containerd.grpc.v1.cri".cni]
      bin_dir = "/opt/cni/bin"
      conf_dir = "/etc/cni/net.d"
      conf_template = ""
      ip_pref = ""
      max_conf_num = 1
    [plugins."io.containerd.grpc.v1.cri".containerd]
      default_runtime_name = "runc"
      disable_snapshot_annotations = true
      discard_unpacked_layers = false
      ignore_rdt_not_enabled_errors = false
      no_pivot = false
      snapshotter = "overlayfs"
      [plugins."io.containerd.grpc.v1.cri".containerd.default_runtime]
        base_runtime_spec = ""
        cni_conf_dir = ""
        cni_max_conf_num = 0
        container_annotations = []
        pod_annotations = []
        privileged_without_host_devices = false
        runtime_engine = ""
        runtime_path = ""
        runtime_root = ""
        runtime_type = ""
        [plugins."io.containerd.grpc.v1.cri".containerd.default_runtime.options]
      [plugins."io.containerd.grpc.v1.cri".containerd.runtimes]
        [plugins."io.containerd.grpc.v1.cri".containerd.runtimes.runc]
          base_runtime_spec = ""
          cni_conf_dir = ""
          cni_max_conf_num = 0
          container_annotations = []
          pod_annotations = []
          privileged_without_host_devices = false
          runtime_engine = ""
          runtime_path = ""
          runtime_root = ""
          runtime_type = "io.containerd.runc.v2"
          [plugins."io.containerd.grpc.v1.cri".containerd.runtimes.runc.options]
            BinaryName = ""
            CriuImagePath = ""
            CriuPath = ""
            CriuWorkPath = ""
            IoGid = 0
            IoUid = 0
            NoNewKeyring = false
            NoPivotRoot = false
            Root = ""
            ShimCgroup = ""
            SystemdCgroup = false
      [plugins."io.containerd.grpc.v1.cri".containerd.untrusted_workload_runtime]
        base_runtime_spec = ""
        cni_conf_dir = ""
        cni_max_conf_num = 0
        container_annotations = []
        pod_annotations = []
        privileged_without_host_devices = false
        runtime_engine = ""
        runtime_path = ""
        runtime_root = ""
        runtime_type = ""
[plugins."io.containerd.grpc.v1.cri".containerd.untrusted_workload_runtime.options]
    [plugins."io.containerd.grpc.v1.cri".image_decryption]
      key_model = "node"
    [plugins."io.containerd.grpc.v1.cri".registry]
      config_path = ""
      [plugins."io.containerd.grpc.v1.cri".registry.auths]
      [plugins."io.containerd.grpc.v1.cri".registry.configs]
      [plugins."io.containerd.grpc.v1.cri".registry.headers]
      [plugins."io.containerd.grpc.v1.cri".registry.mirrors]
    [plugins."io.containerd.grpc.v1.cri".x509_key_pair_streaming]
      tls_cert_file = ""
      tls_key_file = ""
  [plugins."io.containerd.internal.v1.opt"]
    path = "/opt/containerd"
  [plugins."io.containerd.internal.v1.restart"]
    interval = "10s"
  [plugins."io.containerd.internal.v1.tracing"]
  [plugins."io.containerd.metadata.v1.bolt"]
    content_sharing_policy = "shared"
  [plugins."io.containerd.monitor.v1.cgroups"]
    no_prometheus = false
  [plugins."io.containerd.runtime.v1.linux"]
    no_shim = false
    runtime = "runc"
    runtime_root = ""
    shim = "containerd-shim"
    shim_debug = false
  [plugins."io.containerd.runtime.v2.task"]
    platforms = ["linux/amd64"]
    sched_core = false
  [plugins."io.containerd.service.v1.diff-service"]
    default = ["walking"]
  [plugins."io.containerd.service.v1.tasks-service"]
    rdt_config_file = ""
  [plugins."io.containerd.snapshotter.v1.aufs"]
    root_path = ""
  [plugins."io.containerd.snapshotter.v1.btrfs"]
    root_path = ""
  [plugins."io.containerd.snapshotter.v1.devmapper"]
    async_remove = false
    base_image_size = ""
    discard_blocks = false
    fs_options = ""
    fs_type = ""
    pool_name = ""
    root_path = ""
  [plugins."io.containerd.snapshotter.v1.native"]
    root_path = ""
  [plugins."io.containerd.snapshotter.v1.overlayfs"]
    mount_options = []
    root_path = ""
    sync_remove = false
    upperdir_label = false
  [plugins."io.containerd.snapshotter.v1.zfs"]
    root_path = ""
  [plugins."io.containerd.tracing.processor.v1.otlp"]
[proxy_plugins]
[stream_processors]
  [stream_processors."io.containerd.ocicrypt.decoder.v1.tar"]
    accepts = ["application/vnd.oci.image.layer.v1.tar+encrypted"]
    args = ["--decryption-keys-path", "/etc/containerd/ocicrypt/keys"]
    env =
    ["OCICRYPT_KEYPROVIDER_CONFIG=/etc/containerd/ocicrypt/ocicrypt_keyprovider.conf"]
    ]
    path = "ctd-decoder"
    returns = "application/vnd.oci.image.layer.v1.tar"
  [stream_processors."io.containerd.ocicrypt.decoder.v1.tar.gzip"]
    accepts = ["application/vnd.oci.image.layer.v1.tar+gzip+encrypted"]
    args = ["--decryption-keys-path", "/etc/containerd/ocicrypt/keys"]
    env =
    ["OCICRYPT_KEYPROVIDER_CONFIG=/etc/containerd/ocicrypt/ocicrypt_keyprovider.conf"]
    ]
    path = "ctd-decoder"
    returns = "application/vnd.oci.image.layer.v1.tar+gzip"
[timeouts]
  "io.containerd.timeout.bolt.open" = "0s"
  "io.containerd.timeout.shim.cleanup" = "5s"
  "io.containerd.timeout.shim.load" = "5s"
  "io.containerd.timeout.shim.shutdown" = "3s"
  "io.containerd.timeout.task.state" = "2s"
[ttrpc]
  address = ""
  gid = 0
  uid = 0

#启动containerd并验证

# 设置containerd开机自启并立即启动,--now表示同时立即启动服务
[root@localhost ~]# systemctl enable containerd --now
# 查看containerd服务的运行状态
[root@localhost ~]# systemctl status containerd
# 查看containerd客户端(Client)与服务端(Server)的版本信息
[root@localhost ~]# ctr version
Client:
  Version:  v1.6.32
  Revision: 8b3b7ca2e5ce38e8f31a34f35b2b68ceb8470d89
  Go version: go1.21.10
Server:
  Version:  v1.6.32
  Revision: 8b3b7ca2e5ce38e8f31a34f35b2b68ceb8470d89
  UUID: 3ece67b1-4d8e-4059-afae-b837672ede83
安装runC
由于二进制包中提供的runC默认需要系统中安装seccomp支持,需要单独安装,且不同版本runC对seccomp版本要求一致,所以建议单独下载runC 二进制包进行安装,里面包含了seccomp模块支持
下载地址:https://github.com/opencontainers/runc/releases
bash
# 使用wget下载runc
[root@localhost ~]# wget https://github.com/opencontainers/runc/releases/download/v1.3.0/runc.amd64
# 安装runc
[root@localhost ~]# mv runc.amd64 /usr/sbin/runc

# 为runc添加可执行权限
[root@localhost ~]# chmod +x /usr/sbin/runc

# 使用runc命令验证是否安装成功
[root@localhost ~]# runc -v
runc version 1.3.0
commit: v1.3.0-0-g4ca628d1
spec: 1.2.1
go: go1.23.8
libseccomp: 2.5.6