CAAnimation
动画类的继承关系。
- CAAnimation
- CAAnimationGroup
- CATransition
- CAPropertyAnimtion
- CABasicAnimation
- CAKeyFrameAnimation
UIView和CALayer的关系
CALayer只负责渲染,手势等其它内容由UIView负责。
那么,在实际动画的过程中,CALayer的frame是怎么变化的。
objectivec
- (void)viewDidLoad {
    [super viewDidLoad];
    // Do any additional setup after loading the view.
    UIView *view = [[UIView alloc] initWithFrame:CGRectMake(0, 0, 100, 100)];
    view.backgroundColor = [UIColor redColor];
    [self.view addSubview:view];

    dispatch_after(dispatch_time(DISPATCH_TIME_NOW, (int64_t)(2 * NSEC_PER_SEC)), dispatch_get_main_queue(), ^{
        [UIView animateWithDuration:5 animations:^{
            view.frame = CGRectMake(500, 200, 100, 100);
            view.backgroundColor = [UIColor greenColor];
        }];

        [NSTimer scheduledTimerWithTimeInterval:1 repeats:YES block:^(NSTimer * _Nonnull timer) {

            NSLog(@"layerframe1 %@", NSStringFromCGRect(view.layer.frame));
            NSLog(@"layerframe2 %@", NSStringFromCGRect(view.layer.presentationLayer.frame));
        }];
    });

}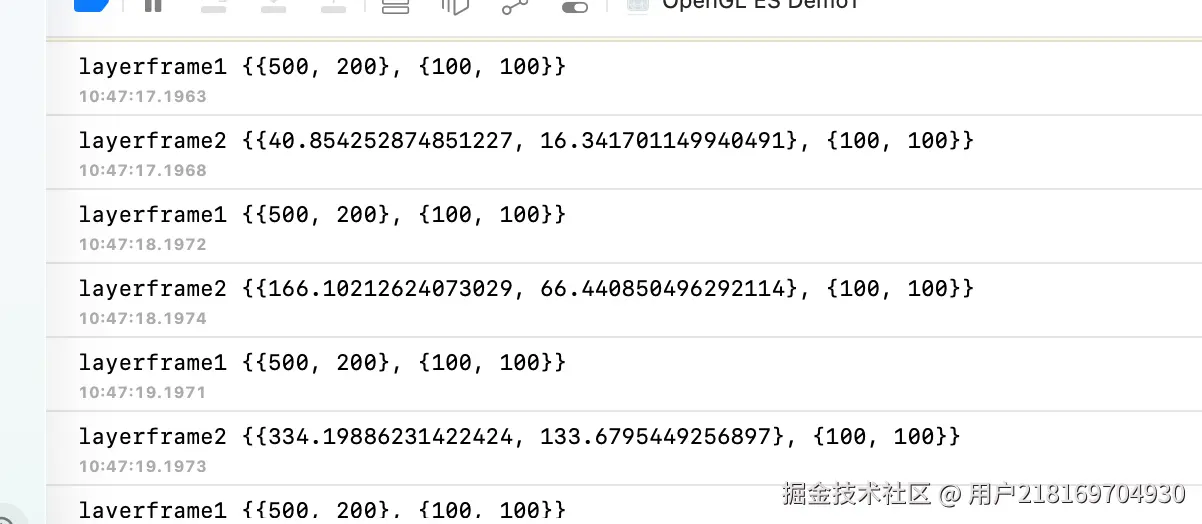
可以看到。View的Layer保留的是最终状态,动画过程是有一个叫做presentationLayer的在改变。
在 iOS 中,Core Animation 的渲染架构与 Mac OS X 高度一致,同样由三棵树 构成:模型树(Layer Tree) 、呈现树(Presentation Tree) 和 渲染树(Render Tree) 。这三者协同工作,确保动画流畅、高效且与 UI 逻辑解耦。
模型树(Layer Tree)
- 这是开发者直接操作的图层结构,存储所有图层的"目标值"。
- 例如,当你设置
layer.position = CGPoint(x: 100, y: 200)时,这个值就存储在模型树中。 - 模型树的结构与 UIView 的层级结构完全对应,是 UI 布局和内容管理的核心。
呈现树(Presentation Tree)
- 这是动画执行时的"实时状态"树,存储的是当前帧的"显示值"。
- 例如,当一个图层从位置 A 动画到位置 B 时,呈现树会记录每一帧的中间位置,而模型树仍保留最终目标值 B。
- 呈现树是只读的,可通过
layer.presentationLayer访问,常用于获取动画过程中的实时状态(如拖拽跟随、碰撞检测等)。
渲染树(Render Tree)
- 这是 Core Animation 的私有内部结构,负责实际的 GPU 渲染和合成。
- 它不对外暴露,由系统自动管理,根据呈现树的值生成最终的像素输出。
- 渲染过程在独立的渲染服务进程(Render Server)中完成,与 App 主线程分离,确保 UI 响应不被阻塞。
iOS 特有的优化机制
- 双进程架构:App 进程只负责构建和更新图层树,真正的渲染由独立的 Render Server 进程完成,通过 IPC(进程间通信)传递数据,极大提升了性能和稳定性。
- 事务提交机制 :所有对图层属性的修改都会被包装进
CATransaction,并在 RunLoop 即将休眠时统一提交,避免频繁触发渲染。 - 硬件加速:Core Animation 默认使用 GPU 进行图层合成和动画插值,只有在特定情况下(如自定义绘制、阴影、圆角等)才会触发 CPU 离屏渲染。
这种三树分离的设计,使得 iOS 能够在保持高帧率动画的同时,让开发者专注于 UI 逻辑,而无需关心底层渲染细节。
动画和触摸事件
在iOS动画过程中,手势是根据当前动画的视图区域确定的。
如果添加了动画,且设置了animation.removedOnCompletion = NO;,则还是动画的视图区域能相应事件,这个情况下,只有删除动画,才能让之前的视图区域接收触摸响应事件。
ini
- (void)viewDidLoad {
    [super viewDidLoad];
    // Do any additional setup after loading the view.
    UIView *view = [[UIView alloc] initWithFrame:CGRectMake(0, 100, 100, 100)];
    view.backgroundColor = [UIColor redColor];
    view.tag = 100;
    [self.view addSubview:view];
}

- (void)touchesBegan:(NSSet<UITouch *> *)touches withEvent:(UIEvent *)event{
    UIView *redView = [self.view viewWithTag:100];

    CABasicAnimation *animation = [CABasicAnimation animation];
    animation.keyPath = @"position.y";
    animation.fromValue = @0;
    animation.toValue = @300;
    animation.duration = 5;
    animation.beginTime = CACurrentMediaTime() + 2;// 延迟2秒看到效果

    animation.removedOnCompletion = NO;
    // 设置fillMode必须搭配removedOnCompletion使用
    // kCAFillModeRemoved 默认值,直接根据元素的layer属性显示
    // kCAFillModeForwards 保留最后一帧的画面
    // kCAFillModeBackwards 动画开始之前,先显示第一帧的动画。动画结束后,恢复原来的状态。需要配合延时动画才有效果
    // kCAFillModeBoth 开始动画之前,先显示第一帧,结束后,显示最后一帧
    animation.fillMode = kCAFillModeBoth;

    [redView.layer addAnimation:animation forKey:@"animation1"];

    dispatch_after(dispatch_time(DISPATCH_TIME_NOW, (int64_t)(10 * NSEC_PER_SEC)), dispatch_get_main_queue(), ^{
        NSLog(@"begin test touch");
        [redView.layer removeAnimationForKey:@"animation1"];
    });
}
CALayer的隐式动画
修改CALayer的属性,会有一个默认的动画。UIView的layer没有这个动画。
ini
    // self.view.layer不会有隐式动画。
    // 只有添加的Layer才会有隐式动画

    CALayer *layer1 = [CALayer layer];
    layer1.frame = CGRectMake(100, 100, 200, 200);
    layer1.backgroundColor = [UIColor greenColor].CGColor;
    [self.view.layer addSublayer:layer1];

    dispatch_after(dispatch_time(DISPATCH_TIME_NOW, (int64_t)(2 * NSEC_PER_SEC)), dispatch_get_main_queue(), ^{
        layer1.backgroundColor = [UIColor purpleColor].CGColor;
        layer1.frame = CGRectMake(0, 300, 300, 300);
    });
CAKeyFrameAnimation
CAPropertyAnimation有CABasicAnimation和CAKeyFrameAnimation这2个子类。
- 通过values修改动画路径。
- 通过path修改动画路径。
ini
- (void)viewDidLoad {
    [super viewDidLoad];
    // Do any additional setup after loading the view.


    CALayer *layer = [CALayer layer];
    layer.backgroundColor = [UIColor redColor].CGColor;
    layer.frame = CGRectMake(100, 100, 100, 100);
    [self.view.layer addSublayer:layer];

    CAKeyframeAnimation *animation = [CAKeyframeAnimation animation];
    animation.keyPath =  @"transform.rotation";

    [CATransaction begin];
    [CATransaction setCompletionBlock:^{
        // 当前事务(addSublayer)执行完成,layer已经渲染到屏幕
        CAKeyframeAnimation *animation = [CAKeyframeAnimation animation];
        animation.keyPath = @"transform.rotation";
        CGFloat p3 = 3.0 / 180.0 * M_PI;
        animation.values = @[@0,@(p3),@0,@(-p3),@0];
        animation.repeatCount = MAXFLOAT;
        animation.duration = 0.3;
        [layer addAnimation:animation forKey:@"animation1"];
    }];
    [CATransaction commit];
    //    dispatch_after(dispatch_time(DISPATCH_TIME_NOW, (int64_t)(3 * NSEC_PER_SEC)), dispatch_get_main_queue(), ^{
    //        // 这里的单位是弧度。3.14就是180度。
    //        animation.values = @[@0,@(3 / 180.0 * M_PI),@"0",@(-3/180.0 * M_PI),@0];
    ////        animation.autoreverses = YES;
    //        animation.repeatCount = MAXFLOAT;
    //        animation.duration = 0.3;
    //        [layer addAnimation:animation forKey:@"animation1"];
    //    });

}
path动画
ini
- (void)viewDidLoad {
    [super viewDidLoad];
    // Do any additional setup after loading the view.


    self.view.backgroundColor = [UIColor whiteColor];
    dispatch_async(dispatch_get_global_queue(0, 0), ^{
        UIImage *image =  [UIImage imageWithData:[NSData dataWithContentsOfURL:[NSURL URLWithString:@"https://img14.360buyimg.com/pop/jfs/t1/65536/18/25365/187701/66b48584F7e4e95b8/283d6ab2b046244f.png?x-oss-process=image%2Fformat%2Cjpg%2Fresize%2Cw_500%2Fquality%2Cq_80"]]];
        dispatch_async(dispatch_get_main_queue(), ^{
            UIBezierPath *path = [UIBezierPath bezierPath];
            [path moveToPoint:CGPointMake(20, 300)];
            [path addCurveToPoint:CGPointMake(300, 300) controlPoint1:CGPointMake(100, 100) controlPoint2:CGPointMake(200, 400)];


            CAShapeLayer *layer1 = [CAShapeLayer layer];
            layer1.path = path.CGPath;
            layer1.fillColor = nil;
            layer1.strokeColor = [UIColor blueColor].CGColor;
            [self.view.layer addSublayer:layer1];


            CALayer *animationLayer = [CALayer layer];
            animationLayer.contents = (id )image.CGImage;
            animationLayer.frame = CGRectMake(20-30, 300-60, 60, 60);
            animationLayer.anchorPoint = CGPointMake(0.5, 0.9);
            [self.view.layer addSublayer:animationLayer];

            CAKeyframeAnimation *animation = [CAKeyframeAnimation animation];
            animation.keyPath = @"position";
            animation.path = path.CGPath;
            animation.duration = 3;
            animation.rotationMode = kCAAnimationRotateAuto;
            animation.repeatCount = MAXFLOAT;

            [animationLayer addAnimation:animation forKey:nil];;
        });
    });
}
CAAnimationGroup
就是可以将各种动画进行组合。
核心属性
-
animations:这是CAAnimationGroup唯一的专属属性,类型是一个数组(NSArray或[CAAnimation])。你需要将所有要并发执行的动画对象放入这个数组中。 -
时间控制属性:动画组会统一控制其内部动画的时间空间。常用的属性包括:
duration:动画组的总持续时间。repeatCount:重复播放的次数。autoreverses:动画结束后是否反向播放回初始状态。timingFunction:设置动画的缓动效果(如加速、减速)。
⚠️ 关键注意事项(极易踩坑)
- 动画会被裁剪(Clipped) :动画组中的动画不会 被自动压缩或拉伸以适应动画组的时长。如果组内某个动画的时长超过了
CAAnimationGroup的duration,超出的部分将被直接剪掉(只显示前段动画)。 - 忽略子动画的特定属性 :动画组中子动画的
delegate(代理)和isRemovedOnCompletion(完成后是否移除)属性会被忽略。你需要在CAAnimationGroup本身上设置这些属性,由动画组的代理来接收动画开始和结束的消息。 - 保持最终状态 :默认情况下,动画结束后图层会恢复到动画前的状态。为了让动画停留在结束时的状态,需要在动画组 上设置
removedOnCompletion = NO以及fillMode = kCAFillModeForwards。
ini
// 创建动画组
CAAnimationGroup *group = [CAAnimationGroup animation];

// 创建平移和缩放动画
CABasicAnimation *anim = [CABasicAnimation animation];
anim.keyPath = @"position.y";
anim.toValue = @400;

CABasicAnimation *scaleAnim = [CABasicAnimation animation];
scaleAnim.keyPath = @"transform.scale";
scaleAnim.toValue = @0.5;

// 将动画加入组中
group.animations = @[anim, scaleAnim];
group.duration = 1.0;

// 【关键】在动画组上设置填充模式,防止回弹
group.removedOnCompletion = NO;
group.fillMode = kCAFillModeForwards;

// 添加到图层
[self.redView.layer addAnimation:group forKey:nil];
通过 CAAnimationGroup,你可以极大地简化代码逻辑,不需要为每个动画单独设置时长和完成回调,只需统一管理动画组即可实现复杂的协同动画效果。
CATransition
CATransition 是 Core Animation 中专门用于处理视图/图层内容切换(如换图、切换子控制器)的过渡动画类。
基础用法
CATransition 通常添加到容器视图 (如 UIImageView 或父 UIView)的 layer 上。当容器内的内容发生变化时,系统会自动执行过渡动画。
ini
- (void)viewDidLoad {
    [super viewDidLoad];
    // Do any additional setup after loading the view.
    self.view.backgroundColor = [UIColor redColor];


    dispatch_group_t group = dispatch_group_create();
    dispatch_queue_t queue = dispatch_queue_create(0,
                                                   DISPATCH_QUEUE_CONCURRENT);

    __block NSData *image1;
    __block NSData *image2;
    dispatch_group_async(group,
 queue,
                         ^{
        image1 = [NSData dataWithContentsOfURL:[NSURL URLWithString:@"https://img1.baidu.com/it/u=786478812,1495962150&fm=253&app=120&f=JPEG?w=800&h=1422"]];
    });
    dispatch_group_async(group,
 queue,
                         ^{
        image2 = [NSData dataWithContentsOfURL:[NSURL URLWithString:@"https://b0.bdstatic.com/ugc/nZYH1k449ZTPOGj4-Mkb_we832996869186f05c0af4661f2cf074c.jpg"]];;
    });
    dispatch_group_notify(group,
 dispatch_get_main_queue(),
 ^{
        // 1. 创建动画对象
        CATransition *transition = [CATransition animation];

        // 2. 设置动画类型 (核心)
        // 公开类型: kCATransitionFade, kCATransitionMoveIn, kCATransitionPush, kCATransitionReveal
        // 私有类型(截图中的用法): @"pageCurl", @"pageUnCurl", @"rippleEffect", @"suckEffect"
        transition.type = kCATransitionMoveIn;

        // 3. 设置动画方向 (可选)
        // kCATransitionFromLeft, kCATransitionFromRight, kCATransitionFromTop, kCATransitionFromBottom
        transition.subtype = kCATransitionFromRight;

        // 4. 设置时长
        transition.duration = 3;
        transition.delegate = self;

        // 5. 设置进度范围 (高级用法,截图重点)
        // startProgress: 动画开始的进度 (0.0 - 1.0)
        // endProgress:   动画结束的进度 (0.0 - 1.0)
        // 截图代码中 start=0.2, end=0.5 意味着只显示翻页动作的中间一段
        transition.startProgress = 0.2;
        transition.endProgress = 0.5;

        // 6. 添加到图层并立即改变内容,和先后顺序无关。下面集中方式都会动画效果。
        //
        //        UIImageView *imageView = [[UIImageView alloc] initWithFrame:CGRectMake(100, 100, 100, 100)];
        //        [imageView.layer addAnimation:transition forKey:@"myTransition"];
        //        imageView.image = [UIImage imageWithData:image1];
        //        [self.view addSubview:imageView];

        //
        //        UIImageView *imageView = [[UIImageView alloc] initWithFrame:CGRectMake(100, 100, 100, 100)];
        //        [self.view addSubview:imageView];
        //        [imageView.layer addAnimation:transition forKey:@"myTransition"];
        //        imageView.image = [UIImage imageWithData:image1]; // 必须在 addAnimation 之后或同时执行

        UIImageView *imageView = [[UIImageView alloc] initWithFrame:CGRectMake(100,
                                                                               100,
                                                                               100,
                                                                               100)];
        imageView.image = [UIImage imageWithData:image1]; // 必须在 addAnimation 之后或同时执行
        [self.view addSubview:imageView];

        [imageView.layer addAnimation:transition forKey:@"myTransition"];


        dispatch_after(dispatch_time(DISPATCH_TIME_NOW, (int64_t)(5 * NSEC_PER_SEC)), dispatch_get_main_queue(), ^{
            // 这样没有动画效果。
            imageView.image = [UIImage imageWithData:image2];
        });
    });
}

- (void)animationDidStart:(CAAnimation *)anim{
    NSLog(@"start");
}
- (void)animationDidStop:(CAAnimation *)anim finished:(BOOL)flag{
    NSLog(@"stop");
}
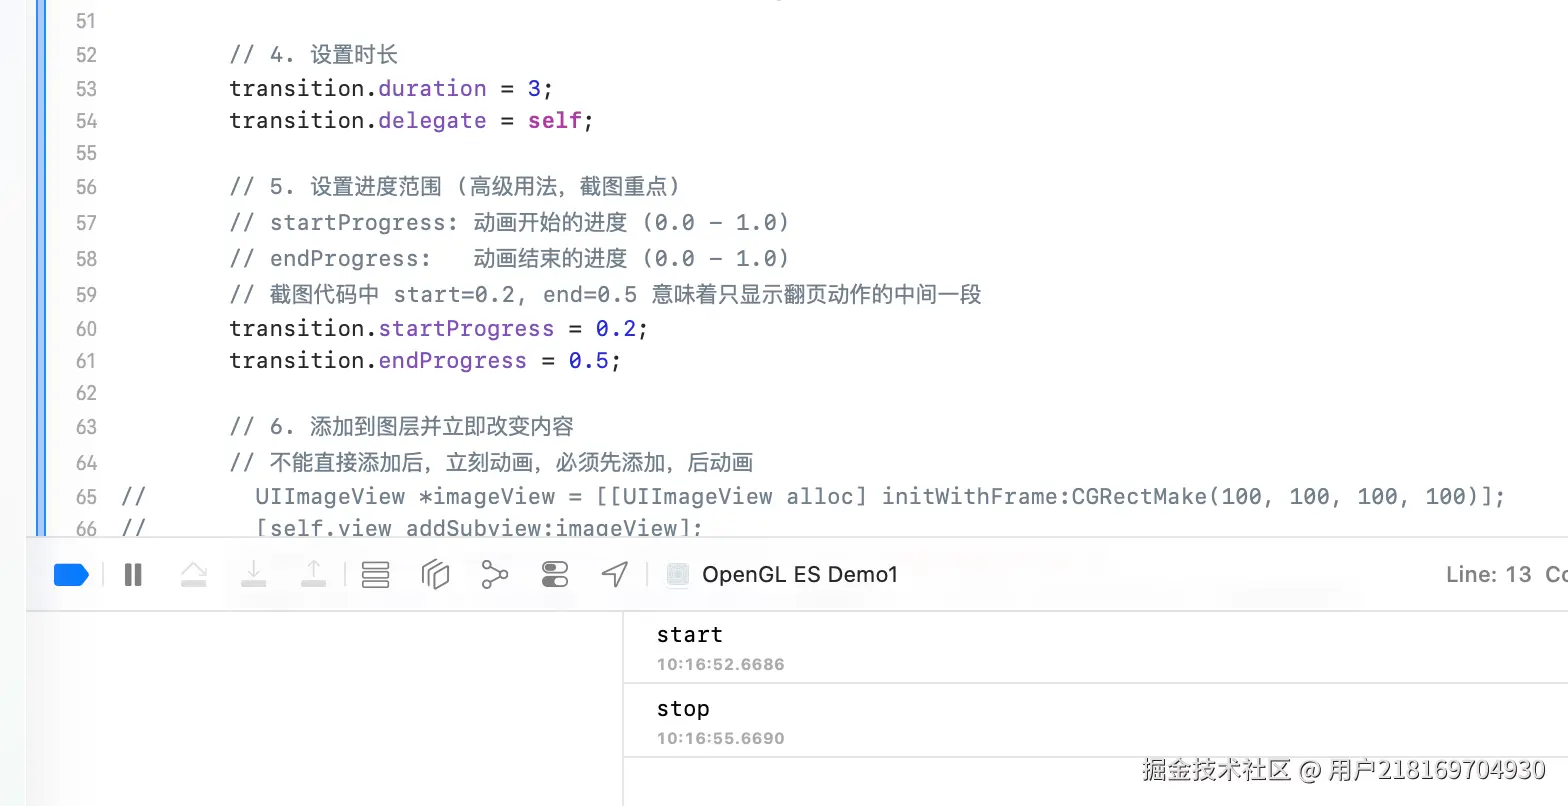
动画设置了3秒,从start到结束就是3秒。不会因为从0.2到0.5就减少动画时间。
上面代码会阻塞至少2个线程。只是为了演示用。实际要用异步的方式。
ini
    dispatch_group_t group = dispatch_group_create();
    dispatch_queue_t queue = dispatch_queue_create(0,
                                                   DISPATCH_QUEUE_CONCURRENT);

    __block NSData *image1;
    __block NSData *image2;

    dispatch_group_enter(group);
    dispatch_async(queue,
 ^{
        NSString *imageURL = @"https://img1.baidu.com/it/u=786478812,1495962150&fm=253&app=120&f=JPEG?w=800&h=1422";
        [[NSURLSession sharedSession] dataTaskWithURL:[NSURL URLWithString:imageURL] completionHandler:^(NSData * _Nullable data,
                                                                                                         NSURLResponse * _Nullable response,
                                                                                                         NSError * _Nullable error) {
            image1 = data          ;
            dispatch_group_leave(group);
        }];
    });
    dispatch_group_enter(group);
    dispatch_async(queue,
 ^{
        NSString *imageURL = @"https://b0.bdstatic.com/ugc/nZYH1k449ZTPOGj4-Mkb_we832996869186f05c0af4661f2cf074c.jpg";
        [[NSURLSession sharedSession] dataTaskWithURL:[NSURL URLWithString:imageURL] completionHandler:^(NSData * _Nullable data,
                                                                                                         NSURLResponse * _Nullable response,
                                                                                                         NSError * _Nullable error) {
            image1 = data          ;
            dispatch_group_leave(group);
        }];
    });

    dispatch_group_notify(group,
                          dispatch_get_main_queue(),
                          ^{
2. 关键属性解析
| 属性 | 类型 | 说明 |
|---|---|---|
type |
NSString | 动画效果名称。常用公开常量有 kCATransitionFade (淡入淡出)、kCATransitionPush (推挤)。 |
subtype |
NSString | 动画方向。仅对部分 type 有效(如 Push, MoveIn)。 |
duration |
CFTimeInterval | 动画持续时间。 |
startProgress |
float | 起始进度。默认为 0.0。设为 0.2 表示跳过前 20% 的动画过程。 |
endProgress |
float | 结束进度。默认为 1.0。设为 0.5 表示只播放到一半就强制结束。 |
timingFunction |
CAMediaTimingFunction | 节奏曲线,如 kCAMediaTimingFunctionEaseInEaseOut。 |
3. 避坑指南 (重要)
- 内容变更时机 :
addAnimation只是告诉图层"准备做个动画",真正的视觉变化依赖于你随后修改的属性(如image、subviews)。如果只加动画不改内容,什么都不会发生。 - 私有 API 风险 :截图中使用的
@"pageCurl"等字符串属于 Apple 未公开的私有 API。虽然在很多 App 中能用且能过审,但理论上存在被拒风险。如果是上架应用,建议优先使用公开的kCATransitionFade或自定义转场。 - start/endProgress 的妙用 :这两个属性非常适合做交互式转场(Interactive Transition)。比如配合手势滑动,根据滑动的百分比动态修改这两个值,就能实现"跟手"的翻页效果。
常用动画类型速查表
-
公开 (安全)
kCATransitionFade: 交叉淡入淡出。kCATransitionPush: 新视图推入,旧视图移出。kCATransitionMoveIn: 新视图覆盖在旧视图之上移入。kCATransitionReveal: 旧视图移走,露出下方的新视图。
-
私有 (炫酷但有风险)
@"pageCurl"/@"pageUnCurl": 翻页/合页。@"rippleEffect": 水滴波纹。@"suckEffect": 像被吸尘器吸走一样缩小消失。@"oglFlip": 垂直翻转。