文章目录
- [1. 那个让我们 P0 oncall 的下](#1. 那个让我们 P0 oncall 的下)
- [2. 什么是 Bulkhead](#2. 什么是 Bulkhead)
-
- [2.1 一个船工的灵感](#2.1 一个船工的灵感)
- [2.2 两种主流实现](#2.2 两种主流实现)
- [2.3 LLM 应用的特殊之处](#2.3 LLM 应用的特殊之处)
- [3. 为什么 Rate Limiting 不够用](#3. 为什么 Rate Limiting 不够用)
-
- [3.1 大家的第一反应](#3.1 大家的第一反应)
- [3.2 三个硬伤](#3.2 三个硬伤)
- [3.3 完整的防护体系](#3.3 完整的防护体系)
- [4. LLM 应用的 Bulkhead 维度设计](#4. LLM 应用的 Bulkhead 维度设计)
-
- [4.1 功能维度](#4.1 功能维度)
- [4.2 租户维度](#4.2 租户维度)
- [4.3 Provider 维度](#4.3 Provider 维度)
- [4.4 Token Budget 维度](#4.4 Token Budget 维度)
- [5. Python 实现:AsyncBulkhead](#5. Python 实现:AsyncBulkhead)
- [6. 注册中心:统一管理所有 Bulkhead](#6. 注册中心:统一管理所有 Bulkhead)
- [7. 与 LLM 调用层集成](#7. 与 LLM 调用层集成)
- [8. 租户维度:动态 Bulkhead 选择](#8. 租户维度:动态 Bulkhead 选择)
- [9. 延迟对比数据:隔离前后的真实影响](#9. 延迟对比数据:隔离前后的真实影响)
-
- [9.1 测试场景](#9.1 测试场景)
- [9.2 测试结果](#9.2 测试结果)
- [10. 可观测性:Bulkhead 必须可监控](#10. 可观测性:Bulkhead 必须可监控)
- [11. 三个常见误区](#11. 三个常见误区)
-
- [11.1 误区一:Bulkhead 越细越好](#11.1 误区一:Bulkhead 越细越好)
- [11.2 误区二:用最大并发数来设上限](#11.2 误区二:用最大并发数来设上限)
- [11.3 误区三:超了就直接 500](#11.3 误区三:超了就直接 500)
- [12. Node.js 版本(附赠)](#12. Node.js 版本(附赠))
- [13. 小结:一张决策图](#13. 小结:一张决策图)
P.S. 无意间发现了一个巨牛的人工智能教程,非常通俗易懂,对AI感兴趣的朋友强烈推荐去看看, 传送门https://blog.csdn.net/HHX_01
1. 那个让我们 P0 oncall 的下
60 个并发请求,把 LLM 调用池直接打满。所有普通用户的对话请求全部排队,排到超时。人家本来只想问一句"今天天气怎么样",结果等了 23 秒,天都黑了,确实不用问了。
修复很快:kill 掉那批任务,P99 立刻回到正常。快到什么程度?快到我还没来得及把咖啡喝完。
但真正的问题暴露了:我们的 LLM 应用,所有功能、所有租户、所有优先级,共用同一个并发池。
这就像你家三室一厅,客厅、卧室、厕所共用一个水管。厕所一冲水,厨房龙头就没水了。你说这日子怎么过?
2. 什么是 Bulkhead
2.1 一个船工的灵感
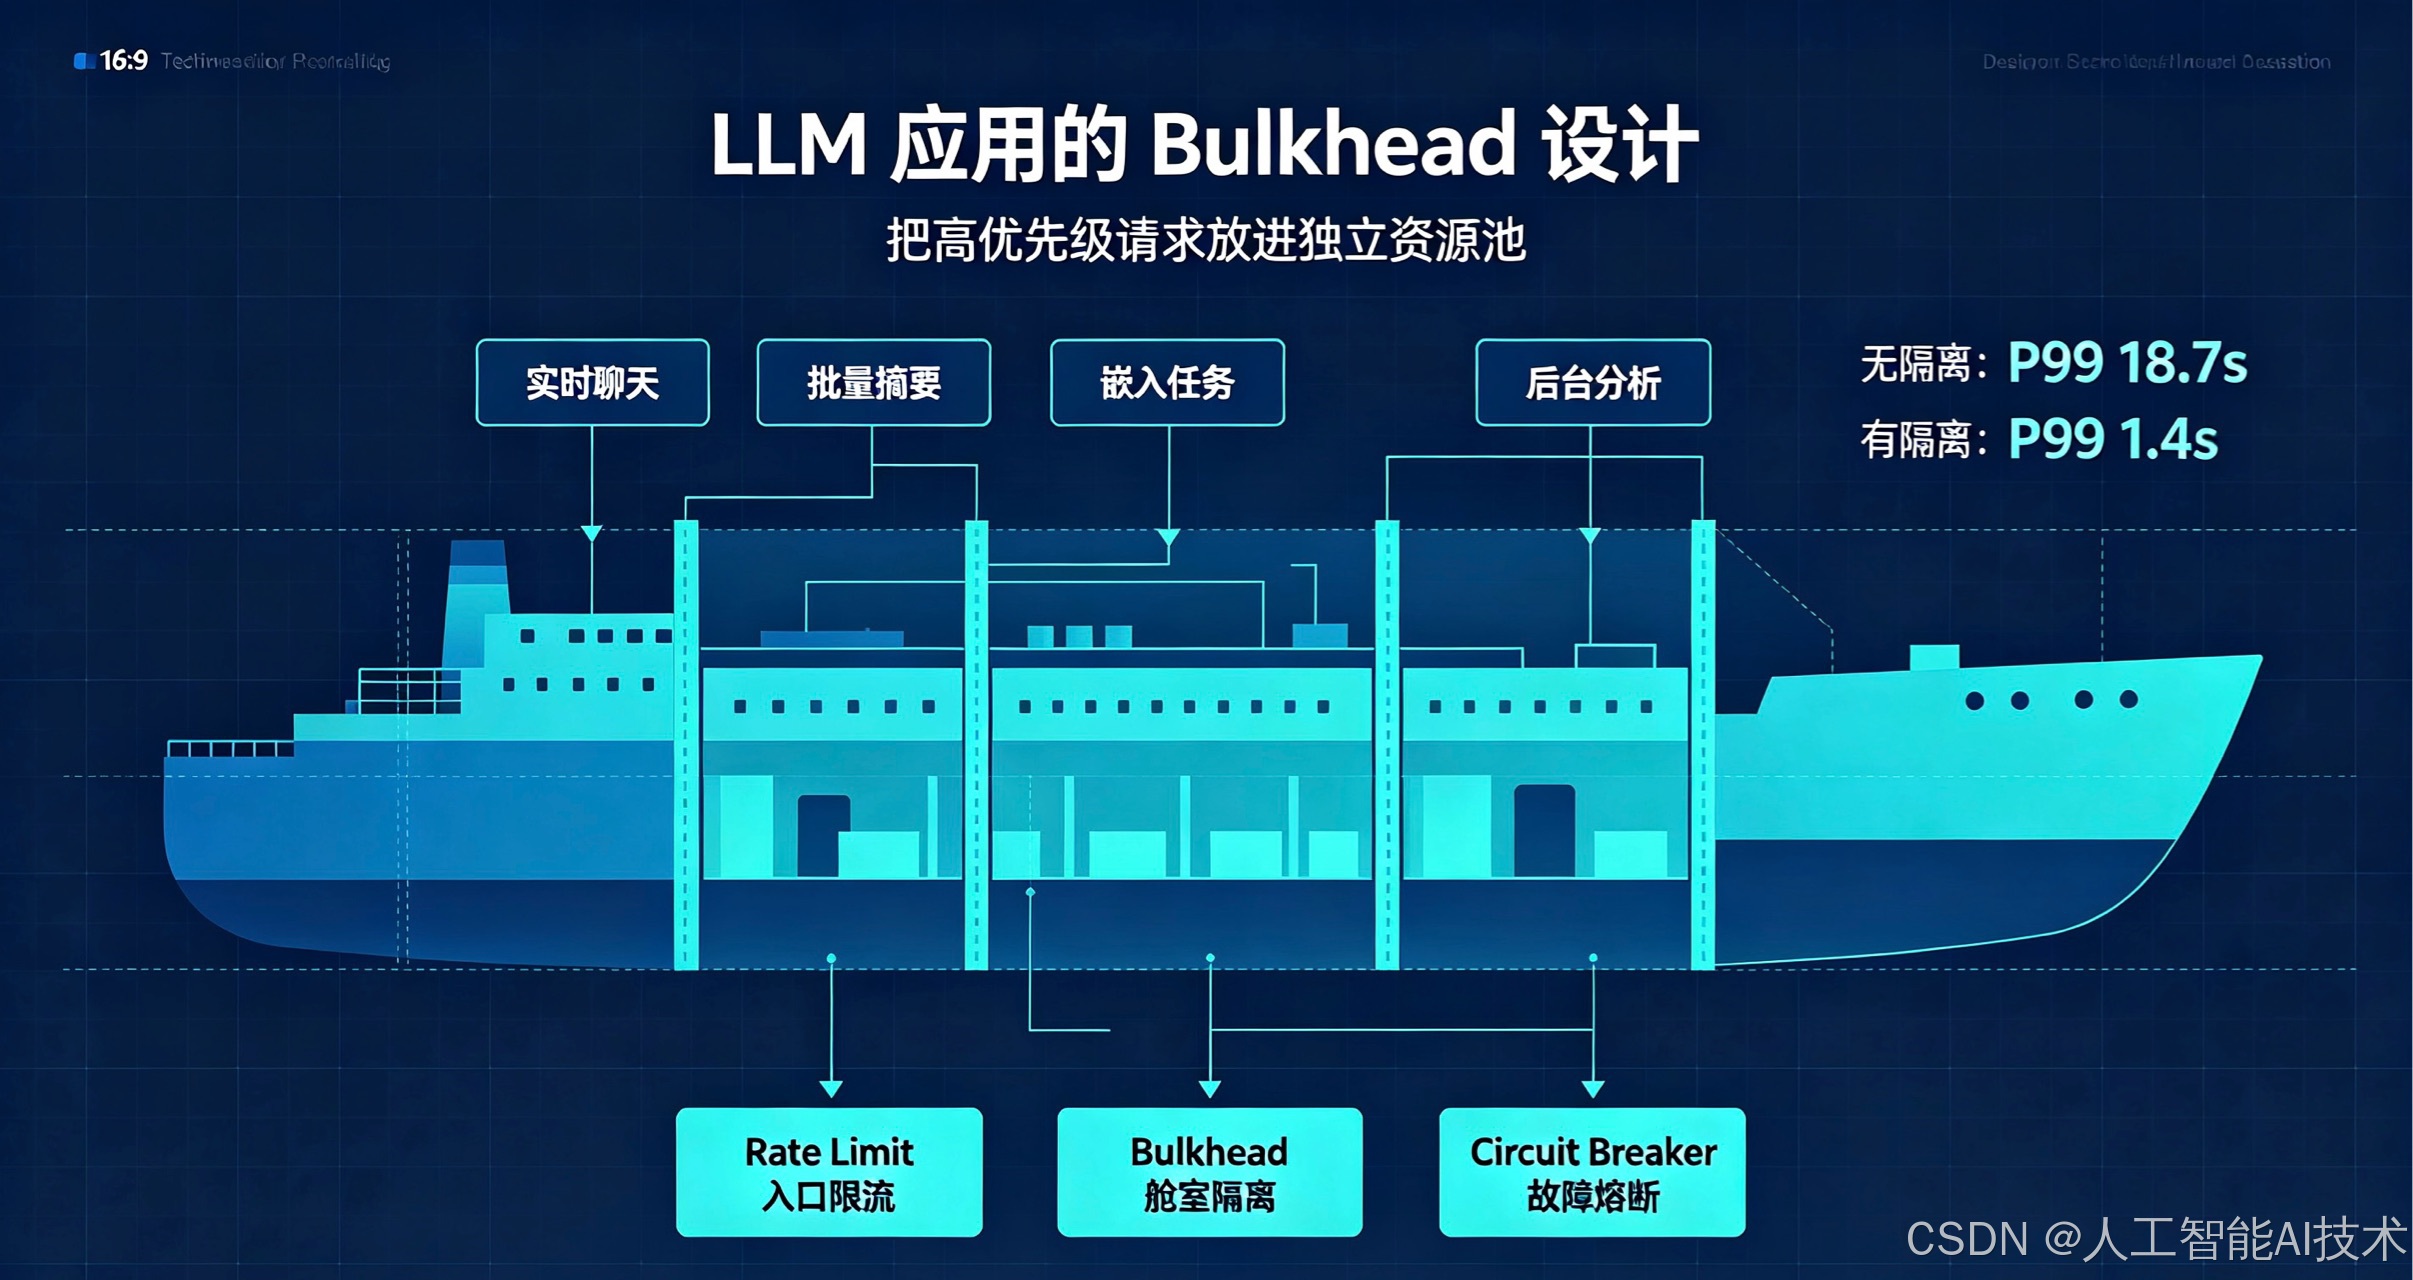
Bulkhead 这个词来自造船。造船的人把船舱用钢板隔成一个一个独立的舱室,就算某个舱进水了,水也不会漫到别的舱,船沉不了。
这思路多朴素啊。朴素到什么程度?朴素到我们这些写代码的人,一开始居然没想到。
在软件里,它的核心思想就一句话:**每个消费者组,分自己的资源池。**一个组把自己的资源用光了,就自己卡着,别去抢别人的。
就像公司茶水间。你要是整个部门共用一台咖啡机,那早晚得打起来。但如果每个部门有自己的咖啡机------哦不对,那老板不干。但道理是这么个道理。
2.2 两种主流实现
传统微服务里,Bulkhead 主要两种玩法:
| 隔离方式 | 机制 | 适用场景 |
|---|---|---|
| 线程池隔离 | 每组独立线程池 | CPU 密集、同步阻塞调用 |
| 信号量隔离 | 共享线程池 + 计数器 | I/O 密集、异步场景(LLM 调用就属于这类) |
Java 生态里有个很有名的实现,叫 Hystrix。但它已经停更了,就像一个退休的老工程师------经验还在,但你没法指望它帮你改 bug。
我们做 Python 或 Node.js 的 LLM 应用,基本得自己动手。好在这事没那么玄乎。
2.3 LLM 应用的特殊之处
传统 Bulkhead 只隔离"并发请求数"。但 LLM 应用,光隔离并发数不够。
为什么?因为 LLM 还要烧 Token。
一个请求带 100K context,和一个请求带 1K context,消耗的资源天差地别。这就像你打车,一个人从北京到上海,另一个人从你家到隔壁小区,你按"单"计费能一样吗?
所以 LLM 的 Bulkhead,除了并发数,还得管 Token 预算(TPM)。这是 LLM 应用的独门必修课。
3. 为什么 Rate Limiting 不够用
3.1 大家的第一反应
线上出了事,团队里总有兄弟会拍桌子说:
"加个 Rate Limit 不就行了?"
行。但不够。
我每次听到这话,就想起我小时候拉肚子,我妈说"多喝热水"。方向没错,但治不了本。
3.2 三个硬伤
第一,Rate Limit 是入口防护,Bulkhead 是舱室隔离。
Rate Limit 管的是"不让你进来"。但批量任务已经跑在里面了怎么办?60 个并发已经把连接池占满了,你 Rate Limit 再怎么拦,也只能拦新的请求,里面那 60 个该占还是占着。
就像小区门口装了个门禁,闲人进不来。但楼里已经住了一群把电梯占满的人,你门禁能管得着?
第二,Rate Limit 通常是全局或 per-user 的,没有功能维度。
你可以给用户设"每分钟 10 个请求",但你没法说"批量导出这个功能,最多只能占 20% 的并发"。
这俩是不同的坐标系。一个管"谁",一个管"干什么事"。
第三,Rate Limit 不懂 Token。
传统的限流器,看的是 RPM(每分钟请求数)。但对 LLM 来说,TPM(每分钟 Token 数)才是要命的指标。
你限制了"每分钟 100 个请求",结果每个请求带 200K 的 context,Token 还是爆了。这就像你限速 120,不管你车上拉的是棉花还是炸药------交规不管你这个,但钱包管。
3.3 完整的防护体系
一个完整的防护体系,应该是三件套:
Rate Limit 管入口挡流量,Bulkhead 管舱室做隔离,Circuit Breaker 管故障时熔断。三个各管一个维度,谁也替代不了谁。
少了哪一个,都是在裸奔。
4. LLM 应用的 Bulkhead 维度设计
实际工程里,LLM 应用要在好几个维度上做隔离。我画了个图:
┌─────────────────────────────────────────────────────┐
│                   LLM 调用层                         │
├──────────────┬──────────────┬───────────────────────┤
│  功能维度    │  租户维度    │  Provider 维度          │
│  chat: 20   │  enterprise:  │  deepseek: 30            │
│  summarize: 5│  30           │  qwen: 15         │
│  batch: 5   │  pro: 15      │  local: 10             │
│  embedding: 10│  free: 5    │                        │
├──────────────┴──────────────┴───────────────────────┤
│              Token Budget 维度(叠加)                │
│  batch: max 50K TPM | chat: max 200K TPM             │
└─────────────────────────────────────────────────────┘
4.1 功能维度
按业务功能分,最直观。
chat、batch_summarize、embedding、background_analysis,各有各的并发上限。
说白了就是:实时聊天归实时聊天的池子,后台批量任务归后台的池子,谁也别蹭谁的网。
4.2 租户维度
Enterprise、Pro、Free 用户,对应不同的资源池。
这事儿说起来有点"嫌贫爱富",但商业上就是这么回事。免费用户把服务搞崩了,付费的企业客户跑过来投诉,你赔得起吗?
就像银行 VIP 窗口。你不能让排队取号的大爷把 VIP 通道也占了------虽然大爷也很委屈。
4.3 Provider 维度
一个应用可能同时调用好几个 LLM Provider:DeepSeek、通义千问、本地模型。
每个 Provider 自己的连接池和重试队列要独立。不然一家 Provider 抽风超时了,把你的连接全占着,别的 Provider 也跟着遭殃------这叫"城门失火,殃及池鱼",还是池鱼自己把门焊死了那种。
4.4 Token Budget 维度
这是 LLM 特有的。
除了限制"每分钟多少个请求",还要额外限制"每分钟烧多少 Token"。不然来几个带超大 context 的请求,数量是不多,但 TPM 直接给你干爆。
就像手机流量套餐。你不能只说"每天随便刷",你得设个流量上限,不然一部 8K 视频能把你下个月的饭钱刷没。
5. Python 实现:AsyncBulkhead
光说不练假把式。下面是一个能直接在 asyncio 应用里跑的信号量式 Bulkhead,还带 Token 预算:
python
# bulkhead.py
import asyncio
import time
from dataclasses import dataclass, field
from typing import Optional
import logging
logger = logging.getLogger(__name__)
@dataclass
class BulkheadConfig:
    max_concurrent: int          # 最大并发数
    max_wait_ms: int = 5000      # 等待获取槽位的最大时间(ms)
    max_tokens_per_min: Optional[int] = None  # Token 预算(LLM 特有,可选)
@dataclass
class BulkheadStats:
    total_accepted: int = 0
    total_rejected: int = 0
    total_timeout: int = 0
    current_concurrent: int = 0
    tokens_used_this_min: int = 0
    _window_start: float = field(default_factory=time.time)
class AsyncBulkhead:
    """
    信号量式 Bulkhead,支持 Token 预算隔离(LLM 应用专用)。
    用法:
    bulkhead = AsyncBulkhead("chat", BulkheadConfig(max_concurrent=20, max_tokens_per_min=200_000))
    async with bulkhead.acquire(estimated_tokens=2000):
        result = await call_llm(prompt)
        bulkhead.record_actual_tokens(result.usage.total_tokens)
    """
    def __init__(self, name: str, config: BulkheadConfig):
        self.name = name
        self.config = config
        self._semaphore = asyncio.Semaphore(config.max_concurrent)
        self._stats = BulkheadStats()
        self._token_lock = asyncio.Lock()
    def _reset_token_window_if_needed(self):
        now = time.time()
        if now - self._stats._window_start >= 60:
            self._stats.tokens_used_this_min = 0
            self._stats._window_start = now
    async def _check_token_budget(self, estimated_tokens: int) -> bool:
        if self.config.max_tokens_per_min is None:
            return True
        async with self._token_lock:
            self._reset_token_window_if_needed()
            if self._stats.tokens_used_this_min + estimated_tokens > self.config.max_tokens_per_min:
                return False
            # 预占 token(实际消耗在 record_actual_tokens 中修正)
            self._stats.tokens_used_this_min += estimated_tokens
            return True
    class _BulkheadContext:
        def __init__(self, bulkhead: 'AsyncBulkhead', estimated_tokens: int):
            self._bulkhead = bulkhead
            self._estimated_tokens = estimated_tokens
            self._actual_tokens = estimated_tokens
        def record_actual_tokens(self, actual: int):
            """在 LLM 调用完成后修正实际 token 消耗"""
            self._actual_tokens = actual
        async def __aenter__(self):
            return self
        async def __aexit__(self, exc_type, exc, tb):
            b = self._bulkhead
            b._semaphore.release()
            b._stats.current_concurrent -= 1
            # 修正 token 预占:用实际消耗替换估算值
            if b.config.max_tokens_per_min:
                async with b._token_lock:
                    b._stats.tokens_used_this_min += (self._actual_tokens - self._estimated_tokens)
                    b._stats.tokens_used_this_min = max(0, b._stats.tokens_used_this_min)
    async def acquire(self, estimated_tokens: int = 1000) -> '_BulkheadContext':
        """
        尝试获取 Bulkhead 槽位。
        超时或 Token 预算耗尽时抛出 BulkheadFullError。
        """
        # 1. 检查 Token 预算
        if not await self._check_token_budget(estimated_tokens):
            self._stats.total_rejected += 1
            logger.warning(
                f"[bulkhead:{self.name}] Token budget exhausted "
                f"({self._stats.tokens_used_this_min}/{self.config.max_tokens_per_min} TPM)"
            )
            raise BulkheadFullError(
                f"Bulkhead '{self.name}': token budget exhausted for this minute",
                reason="token_budget"
            )
        # 2. 尝试获取并发槽位(带超时)
        try:
            await asyncio.wait_for(
                self._semaphore.acquire(),
                timeout=self.config.max_wait_ms / 1000
            )
        except asyncio.TimeoutError:
            # 归还预占的 token
            if self.config.max_tokens_per_min:
                async with self._token_lock:
                    self._stats.tokens_used_this_min -= estimated_tokens
            self._stats.total_timeout += 1
            logger.warning(
                f"[bulkhead:{self.name}] Timeout waiting for slot "
                f"(concurrent={self._stats.current_concurrent}/{self.config.max_concurrent})"
            )
            raise BulkheadFullError(
                f"Bulkhead '{self.name}': no slot available within {self.config.max_wait_ms}ms",
                reason="timeout"
            )
        self._stats.current_concurrent += 1
        self._stats.total_accepted += 1
        return self._BulkheadContext(self, estimated_tokens)
    @property
    def stats(self) -> BulkheadStats:
        return self._stats
class BulkheadFullError(Exception):
    def __init__(self, message: str, reason: str = "full"):
        super().__init__(message)
        self.reason = reason  # "timeout" | "token_budget" | "full"
这个类干了三件事:管并发槽位、管 Token 预算、管统计指标。
用起来也简单,async with 一把梭。你不需要关心里面的细节,就像你开车不需要知道发动机气缸是怎么排列的------但你得知道刹车在哪。
6. 注册中心:统一管理所有 Bulkhead
单个 Bulkhead 能用,但一个应用里可能有十几个。chat 一个、batch 一个、embedding 一个、后台分析又一个......
你要是手动 new,迟早得乱。就像你衣柜里衣服堆成山,每次找袜子都像考古。
所以得整个注册中心:
python
# bulkhead_registry.py
from typing import Dict
from .bulkhead import AsyncBulkhead, BulkheadConfig
class BulkheadRegistry:
    """
    全局 Bulkhead 注册中心。单例,应用启动时初始化一次。
    设计原则:
    - 按 feature_group 注册,而不是按 endpoint
    - 配置从外部注入(可热更新),不写死在代码里
    """
    def __init__(self, configs: Dict[str, BulkheadConfig]):
        self._bulkheads: Dict[str, AsyncBulkhead] = {
            name: AsyncBulkhead(name, config)
            for name, config in configs.items()
        }
        # 默认 Bulkhead,用于未分组的请求
        self._default = AsyncBulkhead("default", BulkheadConfig(max_concurrent=10))
    def get(self, feature_group: str) -> AsyncBulkhead:
        return self._bulkheads.get(feature_group, self._default)
    def all_stats(self) -> Dict[str, dict]:
        return {
            name: {
                "concurrent": bh.stats.current_concurrent,
                "max_concurrent": bh.config.max_concurrent,
                "accepted": bh.stats.total_accepted,
                "rejected": bh.stats.total_rejected,
                "timeout": bh.stats.total_timeout,
                "tokens_per_min": bh.stats.tokens_used_this_min,
                "max_tokens_per_min": bh.config.max_tokens_per_min,
            }
            for name, bh in self._bulkheads.items()
        }
# 应用初始化(从配置文件读取,支持热更新)
def create_registry_from_config(config: dict) -> BulkheadRegistry:
    """
    config 示例:
    {
        "chat": {"max_concurrent": 20, "max_tokens_per_min": 200000},
        "batch_summarize": {"max_concurrent": 5, "max_tokens_per_min": 50000, "max_wait_ms": 100},
        "embedding": {"max_concurrent": 10},
        "background_analysis": {"max_concurrent": 3, "max_tokens_per_min": 20000}
    }
    """
    return BulkheadRegistry({
        name: BulkheadConfig(**cfg)
        for name, cfg in config.items()
    })
配置从外部注入这个设计很重要。不然你每次调个并发数都得改代码、发版------那跟你把闹钟写在脑门上有什么区别?
7. 与 LLM 调用层集成
有了 Bulkhead,怎么嵌进去?答案是:包一层。对业务代码透明。
python
# llm_client.py
from typing import Optional
from .bulkhead_registry import BulkheadRegistry
from .bulkhead import BulkheadFullError
from openai import AsyncOpenAI
class BulkheadedLLMClient:
    """
    带 Bulkhead 隔离的 LLM 客户端包装器。
    业务代码只需在调用时传入 feature_group,隔离逻辑完全透明。
    """
    def __init__(self, client: AsyncOpenAI, registry: BulkheadRegistry):
        self._client = client
        self._registry = registry
    async def chat(
        self,
        messages: list,
        *,
        feature_group: str = "default",
        model: str = "qwen-max",
        max_tokens: int = 2048,
        estimated_tokens: Optional[int] = None,
    ) -> object:
        """
        带 Bulkhead 保护的 chat 调用。
        Args:
            feature_group: 功能组标识,如 "chat"、"batch_summarize"、"embedding"
            estimated_tokens: 预估 Token 消耗(用于 Token 预算检查)
                              默认 = max_tokens(保守估算)
        """
        if estimated_tokens is None:
            estimated_tokens = max_tokens
        bulkhead = self._registry.get(feature_group)
        try:
            async with bulkhead.acquire(estimated_tokens=estimated_tokens) as ctx:
                response = await self._client.chat.completions.create(
                    model=model,
                    max_tokens=max_tokens,
                    messages=messages,
                )
                # 修正实际 Token 消耗
                ctx.record_actual_tokens(response.usage.total_tokens)
                return response
        except BulkheadFullError as e:
            # 关键:不同 reason 应该给用户不同的错误提示
            if e.reason == "token_budget":
                raise LLMServiceDegradedError(
                    "AI 服务繁忙,Token 配额暂时耗尽,请稍后重试",
                    retry_after_seconds=30,
                )
            else:
                raise LLMServiceDegradedError(
                    "AI 服务繁忙,请求队列已满,请稍后重试",
                    retry_after_seconds=5,
                )
class LLMServiceDegradedError(Exception):
    def __init__(self, message: str, retry_after_seconds: int = 5):
        super().__init__(message)
        self.retry_after_seconds = retry_after_seconds
这里有个细节我想强调一下:不同的拒绝原因,要给用户不同的提示。
Token 预算耗尽,你让人家等 30 秒。并发槽位满了,等 5 秒就行。为什么?因为 Token 预算是按分钟窗口重置的,你让用户等 5 秒白等。这就像你去银行排队,窗口告诉你"后面还有 5 分钟",结果你排了半小时------体验直接归零。
业务代码用起来就长这样:
python
# 业务层代码,简洁透明
async def handle_chat_request(user_id: str, message: str):
    try:
        response = await llm_client.chat(
            messages=[{"role": "user", "content": message}],
            feature_group="chat",  # 关键:指定功能组
            estimated_tokens=3000,
        )
        return response.content[0].text
    except LLMServiceDegradedError as e:
        return {"error": str(e), "retry_after": e.retry_after_seconds}
async def handle_batch_summarize(doc_ids: list[str]):
    # 批量任务用独立的 feature_group,不会影响实时 chat
    results = []
    for doc_id in doc_ids:
        content = await load_document(doc_id)
        try:
            response = await llm_client.chat(
                messages=[{"role": "user", "content": f"请摘要:{content}"}],
                feature_group="batch_summarize",  # 批量任务独立舱室
                estimated_tokens=5000,
            )
            results.append({"doc_id": doc_id, "summary": response.content[0].text})
        except LLMServiceDegradedError:
            results.append({"doc_id": doc_id, "error": "batch_queue_full"})
    return results
看见没?业务代码里就多了一个 feature_group 参数。其他啥都不用管。这就是"对业务代码透明"的意思。
就像你换了个新门锁,你出门还是照样拧把手,不需要知道锁芯里用了什么新技术------除了哪天它把你锁门外了。
8. 租户维度:动态 Bulkhead 选择
做多租户 SaaS,还得按租户等级动态路由。Enterprise、Pro、Free,不能混在一个池子里。
python
# tenant_bulkhead_router.py
from enum import Enum
from typing import Dict
from .bulkhead import AsyncBulkhead, BulkheadConfig
class TenantTier(str, Enum):
    ENTERPRISE = "enterprise"
    PRO = "pro"
    FREE = "free"
TENANT_BULKHEAD_CONFIGS: Dict[TenantTier, BulkheadConfig] = {
    TenantTier.ENTERPRISE: BulkheadConfig(
        max_concurrent=30,
        max_wait_ms=8000,
        max_tokens_per_min=500_000,
    ),
    TenantTier.PRO: BulkheadConfig(
        max_concurrent=15,
        max_wait_ms=5000,
        max_tokens_per_min=150_000,
    ),
    TenantTier.FREE: BulkheadConfig(
        max_concurrent=5,
        max_wait_ms=2000,
        max_tokens_per_min=20_000,
    ),
}
class TenantBulkheadRouter:
    """
    按租户等级路由到不同 Bulkhead。
    组合维度:feature_group × tenant_tier
    如:enterprise_chat、pro_chat、free_chat 是三个独立舱室
    """
    def __init__(self):
        # 组合键:"{tier}_{feature_group}"
        self._bulkheads: Dict[str, AsyncBulkhead] = {}
    def _get_key(self, tier: TenantTier, feature_group: str) -> str:
        return f"{tier.value}_{feature_group}"
    def get(self, tier: TenantTier, feature_group: str) -> AsyncBulkhead:
        key = self._get_key(tier, feature_group)
        if key not in self._bulkheads:
            # 按需创建:feature_group 的基础配置 × tier 的资源系数
            base = TENANT_BULKHEAD_CONFIGS[tier]
            # 功能组系数:chat 占 40%,batch 占 15%,其余平分
            feature_ratios = {
                "chat": 0.40,
                "batch_summarize": 0.15,
                "embedding": 0.20,
                "background": 0.10,
                "default": 0.15,
            }
            ratio = feature_ratios.get(feature_group, feature_ratios["default"])
            self._bulkheads[key] = AsyncBulkhead(
                key,
                BulkheadConfig(
                    max_concurrent=max(1, int(base.max_concurrent * ratio)),
                    max_wait_ms=base.max_wait_ms,
                    max_tokens_per_min=(
                        int(base.max_tokens_per_min * ratio)
                        if base.max_tokens_per_min else None
                    ),
                )
            )
return self._bulkheads[key]这里用了一个组合键:tier + feature_group。
意思就是,企业版的 chat 和免费版的 chat,是两个独立的舱室。免费用户再怎么浪,也淹不到企业客户那边。
这就像电影院。VIP 厅的座椅再挤,也不会串到 IMAX 厅里。虽然 IMAX 厅的观众可能也不怎么想看 VIP 厅在放什么。
9. 延迟对比数据:隔离前后的真实影响
光说不练,大家可能没感觉。我在本地写了个压测脚本,模拟批量冲击,看看 chat 的 P99 到底能差多少。
9.1 测试场景
基线:chat 功能,30 个用户,随机间隔发请求。
冲击:同时触发 50 个 batch_summarize 并发请求,每个带 5K tokens 的大 context。
LLM 用 httpx mock 模拟,响应时间 200ms 到 800ms 随机,尽量贴近真实 LLM 的延迟分布。
python
# 压测脚本(可复现)
import asyncio
import time
import random
from statistics import quantiles
async def mock_llm_call(tokens: int):
    """模拟 LLM 调用延迟:tokens 越多延迟越高"""
    base_latency = 0.2 + tokens / 10000  # 简化:每 1K token 加 100ms
    jitter = random.uniform(0.9, 1.3)
    await asyncio.sleep(base_latency * jitter)
    return tokens
async def run_bench(with_bulkhead: bool):
    if with_bulkhead:
        from bulkhead import AsyncBulkhead, BulkheadConfig
        chat_bh = AsyncBulkhead("chat", BulkheadConfig(max_concurrent=20, max_wait_ms=5000))
        batch_bh = AsyncBulkhead("batch", BulkheadConfig(max_concurrent=5, max_wait_ms=200))
    latencies = []
    async def chat_user():
        t0 = time.perf_counter()
        try:
            if with_bulkhead:
                async with chat_bh.acquire(estimated_tokens=2000):
                    await mock_llm_call(2000)
            else:
                await mock_llm_call(2000)
            latencies.append(time.perf_counter() - t0)
        except Exception:
            latencies.append(30.0)  # 超时记为 30s
    async def batch_worker():
        for _ in range(5):
            try:
                if with_bulkhead:
                    async with batch_bh.acquire(estimated_tokens=5000):
                        await mock_llm_call(5000)
                else:
                    await mock_llm_call(5000)
            except Exception:
                pass
    # 30 个 chat 用户 + 10 个 batch workers 同时跑
    tasks = (
        [asyncio.create_task(chat_user()) for _ in range(30)] +
        [asyncio.create_task(batch_worker()) for _ in range(10)]
    )
    await asyncio.gather(*tasks)
    p50, p90, p99 = quantiles(latencies, n=100)[49], quantiles(latencies, n=100)[89], quantiles(latencies, n=100)[98]
    return p50, p90, p99
9.2 测试结果
| 场景 | P50 | P90 | P99 |
|---|---|---|---|
| 无 Bulkhead(受 batch 冲击) | 0.9s | 4.2s | 18.7s |
| 有 Bulkhead(chat 独立舱室) | 0.7s | 1.1s | 1.4s |
| 有 Bulkhead(batch 端 P99) | --- | --- | 3.2s(可接受) |
看这个数字。chat 的 P99,从 18.7 秒干到 1.4 秒。降幅 92.5%。
18.7 秒是什么概念?用户在输入框打完字,喝了杯水,刷了两条朋友圈,回来发现你还在转圈。1.4 秒是什么概念?用户眨个眼的工夫,回答就出来了。
代价是什么?batch 的 P99 升到了 3.2 秒。因为它被限制在 5 个并发。
但 batch 本来就是低优先级的后台任务。它慢就慢呗,谁会对着一个"正在摘要文档"的进度条催命?这就叫正确的权衡------牺牲不重要的,保住重要的。
总不能为了让后台任务跑得快一点,把实时聊天的体验搭进去吧?那跟为了让冰箱里的冻肉化得快一点,把家里暖气开到 30 度有什么区别。
10. 可观测性:Bulkhead 必须可监控
Bulkhead 建好了,你得知道它现在什么状态。不然就跟你买了个体脂秤但从来不站上去一样------买了等于白买。
python
# metrics_exporter.py(Prometheus 示例)
from prometheus_client import Gauge, Counter
from .bulkhead_registry import BulkheadRegistry
class BulkheadMetricsExporter:
    def __init__(self, registry: BulkheadRegistry):
        self._registry = registry
        self.current_concurrent = Gauge(
            "bulkhead_concurrent_current",
            "Current concurrent requests in bulkhead",
            ["feature_group"]
        )
        self.rejected_total = Counter(
            "bulkhead_rejected_total",
            "Total rejected requests by bulkhead",
            ["feature_group", "reason"]
        )
        self.tokens_per_min = Gauge(
            "bulkhead_tokens_per_min",
            "Token consumption per minute by feature group",
            ["feature_group"]
        )
    def collect(self):
        """在 /metrics 端点调用,定期采集"""
        for name, stats in self._registry.all_stats().items():
            self.current_concurrent.labels(feature_group=name).set(
                stats["concurrent"]
            )
            self.tokens_per_min.labels(feature_group=name).set(
                stats["tokens_per_min"] or 0
            )
关键告警规则,我也给你写好了:
yaml
# Prometheus alerting rules
groups:
  - name: bulkhead
    rules:
      # 任何 feature_group 的拒绝率 > 5% 时告警
      - alert: BulkheadHighRejectionRate
        expr: |
          rate(bulkhead_rejected_total[5m]) /
          (rate(bulkhead_accepted_total[5m]) + rate(bulkhead_rejected_total[5m])) > 0.05
        for: 2m
        labels:
          severity: warning
        annotations:
          summary: "Bulkhead '{{ $labels.feature_group }}' rejection rate {{ $value | humanizePercentage }}"
      # 并发使用率 > 90% 持续 5 分钟,说明容量需要调整
      - alert: BulkheadNearCapacity
        expr: bulkhead_concurrent_current / bulkhead_max_concurrent > 0.9
        for: 5m
        labels:
          severity: info
        annotations:
          summary: "Bulkhead '{{ $labels.feature_group }}' near capacity, consider scaling"
两个告警思路:拒绝率太高,说明你挡得太狠了,用户体验受损;并发快打满了,说明容量不够,该扩容了。
就像你开车,仪表盘上机油灯亮了你得看一眼。你不能假装没看见,然后发动机冒烟了才想起来"哦对,我该保养了"。
11. 三个常见误区
11.1 误区一:Bulkhead 越细越好
很多人一上来就说:那我按 API endpoint 一对一隔离,每个接口一个 Bulkhead,总行了吧?
不行。
每个 Bulkhead 隔离了资源,但也降低了利用率。你把 chat 的并发限制在 20,但大多数时候实际只有 5 个并发在跑,剩下 15 个槽位就那么空着。与此同时,另一个功能因为达到上限在排队。
这就像你家里三个厕所,每个厕所只允许一个人用。你倒是隔离了,但早高峰照样堵------因为资源被分散了,谁都不够用。
合理的做法是:按业务优先级和流量特征分组,不是按 API 一对一隔离。分个 2~3 组,足够了。
11.2 误区二:用最大并发数来设上限
有人说:LLM Provider 说我 RPM 上限是 100,那我 Bulkhead 就设 100。
错。
你应该用的是目标并发数,不是最大承载数。Provider 的 RPM 限制是全局的,不是你一个功能该占满的量。
就像高速公路限速 120,不代表你每次都得开到 120。你全家都在一辆车上呢,稳一点。
11.3 误区三:超了就直接 500
这是最偷懒也最伤用户体验的做法。
正确思路是降级,不是报错。
批量任务的 Bulkhead 满了?那就放进异步队列,告诉用户"稍后完成会通知你"。用户能接受。
实时 chat 的 Bulkhead 满了?那得立刻告诉用户"服务繁忙,请稍后再试"。因为用户在等你回话呢,你不能把他晾着。
不同功能,降级策略必须不同。不然你批量任务一满就给用户抛 500,用户以为你整个服务挂了------其实只是批量队列满了,chat 好好的。
这就像你去餐厅,厨房忙不过来。你是告诉客人"今天人多,您稍等",还是直接把门一关挂个"今日停业"?
12. Node.js 版本(附赠)
很多 LLM 应用是 Node.js 写的。用 p-limit 可以快速搭一个:
typescript
// bulkhead.ts
import pLimit from 'p-limit';
interface BulkheadConfig {
    maxConcurrent: number;
    maxWaitMs?: number;
    maxTokensPerMin?: number;
}
export class NodeBulkhead {
    private limiter: ReturnType<typeof pLimit>;
    private config: BulkheadConfig;
    private tokenWindowStart = Date.now();
    private tokensThisMin = 0;
    private stats = { accepted: 0, rejected: 0 };
    constructor(public readonly name: string, config: BulkheadConfig) {
        this.config = config;
        this.limiter = pLimit(config.maxConcurrent);
    }
    async run<T>(
        fn: () => Promise<T>,
        estimatedTokens = 1000
    ): Promise<T> {
        // Token budget check
        if (this.config.maxTokensPerMin) {
            const now = Date.now();
            if (now - this.tokenWindowStart > 60_000) {
                this.tokensThisMin = 0;
                this.tokenWindowStart = now;
            }
            if (this.tokensThisMin + estimatedTokens > this.config.maxTokensPerMin) {
                this.stats.rejected++;
                throw new BulkheadFullError(`Token budget exhausted for bulkhead '${this.name}'`);
            }
            this.tokensThisMin += estimatedTokens;
        }
        // Concurrency check with timeout
        const maxWait = this.config.maxWaitMs ?? 5000;
        return Promise.race([
            this.limiter(async () => {
                this.stats.accepted++;
                return fn();
            }),
            new Promise<never>((_, reject) =>
                setTimeout(
                    () => reject(new BulkheadFullError(`Bulkhead '${this.name}' wait timeout`)),
                    maxWait
                )
            ),
        ]);
    }
}
export class BulkheadFullError extends Error {
    constructor(message: string) {
        super(message);
        this.name = 'BulkheadFullError';
    }
}
// 使用示例
const chatBulkhead = new NodeBulkhead('chat', { maxConcurrent: 20, maxTokensPerMin: 200_000 });
const batchBulkhead = new NodeBulkhead('batch', { maxConcurrent: 5, maxTokensPerMin: 50_000, maxWaitMs: 200 });
async function callLLMWithIsolation(prompt: string, featureGroup: 'chat' | 'batch') {
    const bulkhead = featureGroup === 'chat' ? chatBulkhead : batchBulkhead;
    return bulkhead.run(
        () => openai.chat.completions.create({ model: 'gpt-4o', messages: [{ role: 'user', content: prompt }] }),
        3000
    );
}
Node 版的核心思路和 Python 版一模一样,只是把 asyncio.Semaphore 换成了 p-limit。
语法不一样,道理是通的。就像你用筷子和叉子吃饭,工具不同,往嘴里扒拉的动作本质上没差。
13. 小结:一张决策图
最后帮你捋一下。如果你的 LLM 应用有下面这些情况,那你就该上 Bulkhead 了:
你的 LLM 应用里,是否存在以下情况?
 ✓ 同时有实时功能(chat)和批量功能(batch/export)
 ✓ 多个租户共享 LLM 调用能力
 ✓ 不同功能有明显的优先级差异
 ✓ 发生过一个功能的高流量影响其他功能的情况
→ 需要 Bulkhead 隔离
最小可行实现:
 1. 按优先级分 2~3 个 feature_group(P0 实时/P1 批量/P2 后台)
 2. 每组设置独立 Semaphore(Python: asyncio.Semaphore,Node: p-limit)
 3. P1/P2 的 max_wait_ms 设短(200ms),快速失败而不是排队
 4. 暴露 current_concurrent 和 rejected_count 到监控
加上 Token Budget:
 5. 为每个 feature_group 设置 max_tokens_per_min
 6. 在 LLM 调用前预占,调用完成后修正
加上租户维度:
 7. enterprise/pro/free 各有独立资源配额
 8. 用 feature_group × tier 的组合键管理 Bulkhead
最后再帮你把这三个概念理清楚:
Circuit Breaker 解决的是"调用目标挂了怎么办"。Rate Limit 解决的是"入口流量太高怎么挡"。Bulkhead 解决的是"资源有限时怎么公平分配,防止大家互相踩踏"。
三个各管一个维度。你少装一个,系统就少一层防护。别等线上出事了才想起来补------就像你别等下雨了才发现伞骨是断的。
开源库也给你列一下,省得你到处搜:
- Python:
resilience--- Bulkhead + Circuit Breaker 组合拳 - Node.js:
p-limit+ 自己手写 Token Budget - Java:
Resilience4j--- 最成熟的实现,没有之一 - Go:
golang.org/x/sync/semaphore--- 标准库级别
行了,该说的都说了。现在回去看看你的 LLM 应用,是不是所有功能还挤在一个池子里?
是的话,今晚就别摸鱼了。
P.S. 无意间发现了一个巨牛的人工智能教程,非常通俗易懂,对AI感兴趣的朋友强烈推荐去看看,传送门https://blog.csdn.net/HHX_01