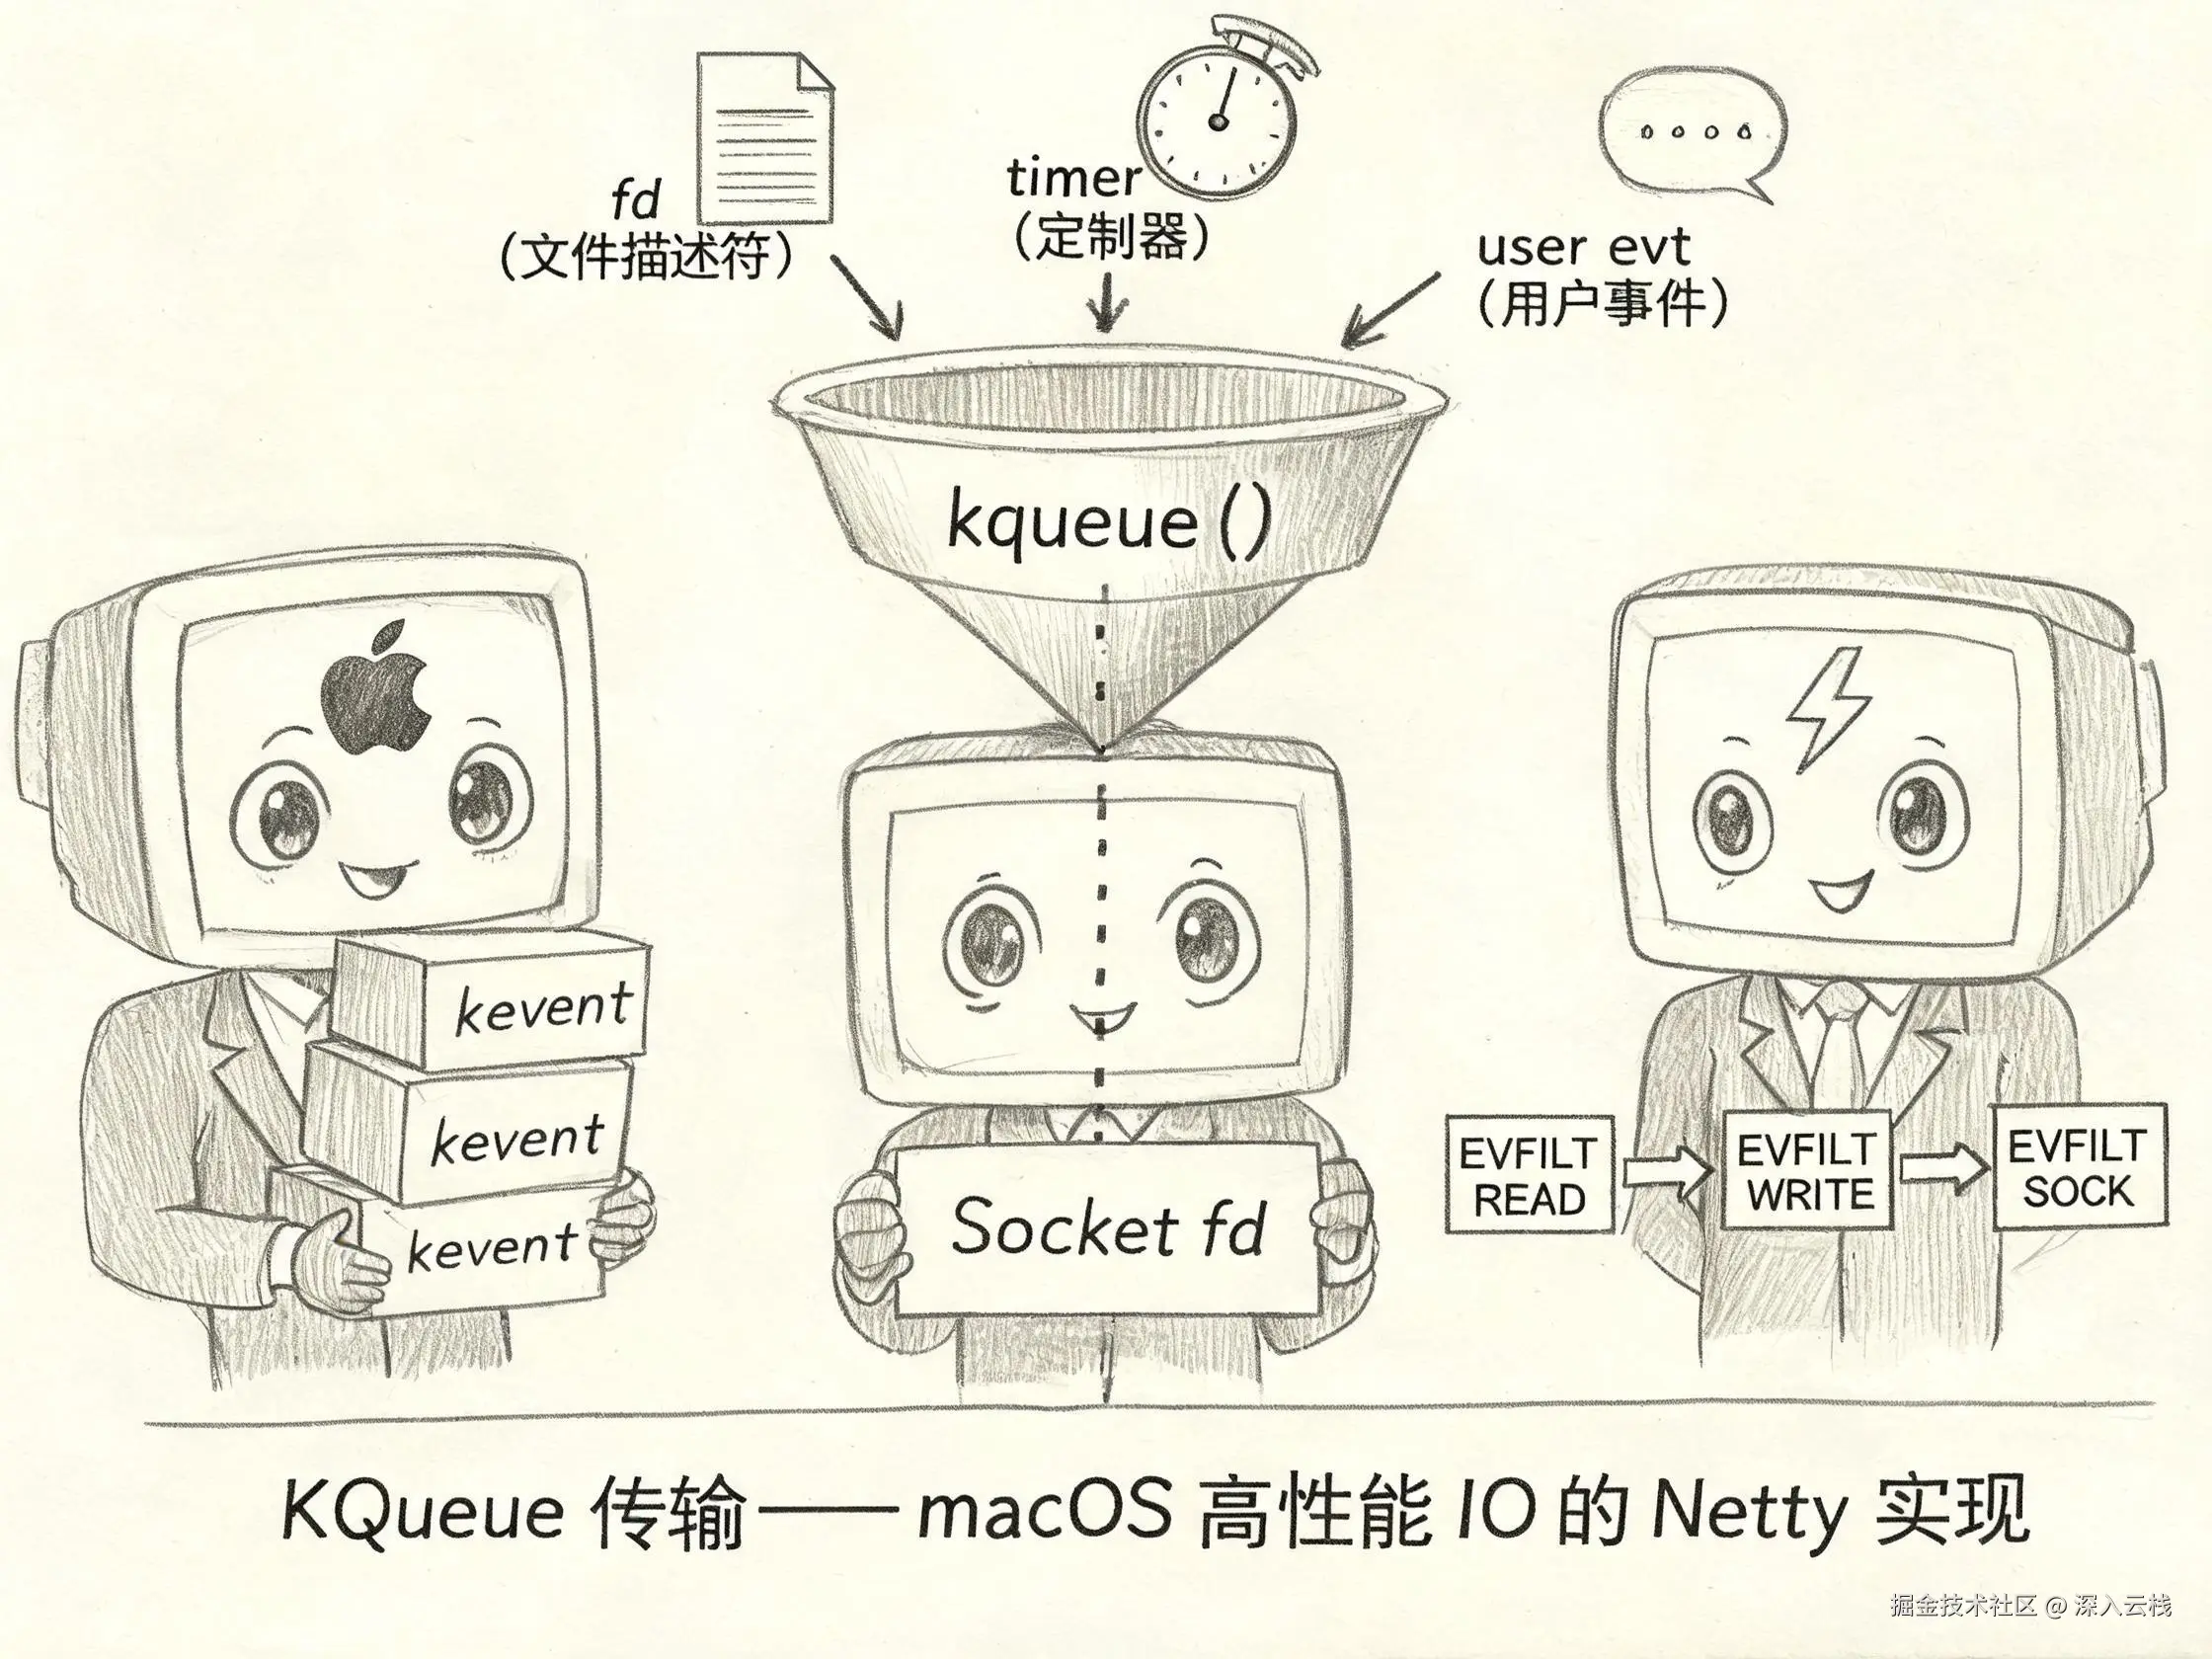
在 macOS 和 BSD 系统中,kqueue + kevent 是内核级事件通知机制的标准实现。与 Linux 的 epoll 不同,kqueue 采用 Filter 模型 ------通过 EVFILT_READ、EVFILT_WRITE、EVFILT_TIMER、EVFILT_USER 等一系列过滤器,将文件描述符状态变化、定时器到期、用户事件等多种类型的事件统一纳入同一个事件队列。Netty 的 transport-native-kqueue 模块通过 JNI 直接调用 kqueue()/kevent() 系统调用,绕过了 JDK NIO 的 Selector 抽象层,在 macOS 上实现了比 JDK NIO 更低的延迟和更高的吞吐量。理解 KQueue 传输的实现,不仅是掌握 Netty 可插拔传输层设计的关键一环,也是在 macOS 环境下进行高性能网络编程的必修课。
-
kqueue 的 Filter 模型与 epoll 的 epoll_ctl + epoll_wait 模式在架构上有哪些本质差异?
-
kevent()如何实现"一次系统调用同时完成事件注册和事件获取"? -
KQueueIoHandler 如何通过
kqueueWait()→processReady()的事件循环,将内核返回的 kevent 结构体数组分发给对应的 KQueueIoHandle? -
KQueueEventArray 如何利用堆外内存(DirectBuffer)模拟 kevent 结构体数组,并通过 JNI 的
evSet()和keventWait()与内核交互? -
AbstractKQueueChannel.AbstractKQueueUnsafe 作为 KQueueIoHandle 的实现者,其
handle()方法内部如何根据EVFILT_READ、EVFILT_WRITE、EVFILT_SOCK三类 filter 分发readReady()、writeReady()和readEOF()事件? -
KQueueServerSocketChannelConfig 中的 AcceptFilter(
SO_ACCEPTFILTER)如何利用 BSD 内核的 httpready / dataready 过滤器,在连接数据到达前不通知应用层?本文将沿着"系统调用 → JNI 层 → Netty 抽象层"的递进逻辑,从 kqueue/kevent 的系统调用机制和 Filter 模型出发,逐一分析 KQueueIoHandler 的事件循环实现、KQueueEventArray 的堆外内存管理、KQueueIoHandle/KQueueIoEvent/KQueueIoOps 的事件抽象层,以及 KQueueSocketChannel 和 KQueueServerSocketChannel 的完整 IO 读写链路。
一、KQueue 背景知识:kqueue/kevent 系统调用与 Filter 模型
在深入 Netty 的 KQueue 传输实现之前,我们需要先理解底层系统调用的工作原理。kqueue 是 BSD 内核提供的事件通知机制,其核心由两个系统调用组成:kqueue() 和 kevent()。
kqueue() 的作用是创建一个内核事件队列,返回一个文件描述符(kqueue fd)。这个 fd 是后续所有事件操作的入口------所有的事件注册、修改、删除和获取,都通过这个 fd 与内核交互。可以把它理解为内核维护的一个"事件订阅表",每个被关注的 fd 都会在这个表中注册对应的过滤器。
kevent() 则是 kqueue 的核心,它承担了双重角色。通过 changelist 参数来注册、修改或删除事件,通过 eventlist 参数来获取已就绪的事件。这一点与 epoll 有本质区别:epoll 使用 epoll_ctl(ADD/MOD/DEL) 三个独立操作管理事件,epoll_wait 单独获取事件,总计至少两次系统调用;而 kevent() 一次调用同时完成"事件订阅"和"事件获取",当 changelist 为空时退化为纯等待模式。这种设计减少了系统调用次数,特别适合高并发场景下频繁切换关注事件的需求。
kqueue 最核心的设计是 Filter 模型 。每个被关注的 fd 上可以注册一个或多个"过滤器"(filter),每个过滤器定义了一种事件的触发条件。常用过滤器包括 EVFILT_READ(读就绪)、EVFILT_WRITE(写就绪)、EVFILT_TIMER(定时器到期)、EVFILT_USER(用户事件,用于唤醒)、EVFILT_SOCK(socket 事件,携带 NOTE_RDHUP 半关闭等标志位)。每个 filter 有独立的 fflags(过滤器特定标志)和 data(过滤器特定数据)语义------例如 EVFILT_READ 触发时 data 字段表示可读字节数,EVFILT_WRITE 触发时 data 表示可写字节数。
kqueue 的标志体系分为通用标志和过滤器特定标志。通用标志包括 EV_ADD(添加事件)、EV_DELETE(删除事件)、EV_ENABLE(启用事件)、EV_DISABLE(禁用事件)、EV_CLEAR(边缘触发模式)、EV_ERROR(错误通知)、EV_EOF(流结束通知)。其中 EV_CLEAR 与 epoll 的 EPOLLET 语义等价------状态变化时触发一次,之后不再重复通知,直到状态再次变化。Netty 的 KQueue 传输默认使用 EV_CLEAR 模式,因为边缘触发可以与 read() 循环配合,实现精确的读取量控制。
kevent 结构体在内核与用户空间之间传递,包含六个字段:
arduino
struct kevent {
    uintptr_t ident;   // 标识符,通常是文件描述符 fd
    int16_t  filter;   // 过滤器类型(EVFILT_READ / EVFILT_WRITE ...)
    uint16_t flags;    // 通用标志(EV_ADD / EV_CLEAR / EV_EOF ...)
    uint32_t fflags;   // 过滤器特定标志(NOTE_RDHUP / NOTE_LOWAT ...)
    intptr_t data;     // 过滤器特定数据(可读/可写字节数等)
    void    *udata;    // 用户自定义数据,Netty 中用于存储 IoRegistration 的 id
};
与 Epoll 的架构差异可以用一张图直观对比:
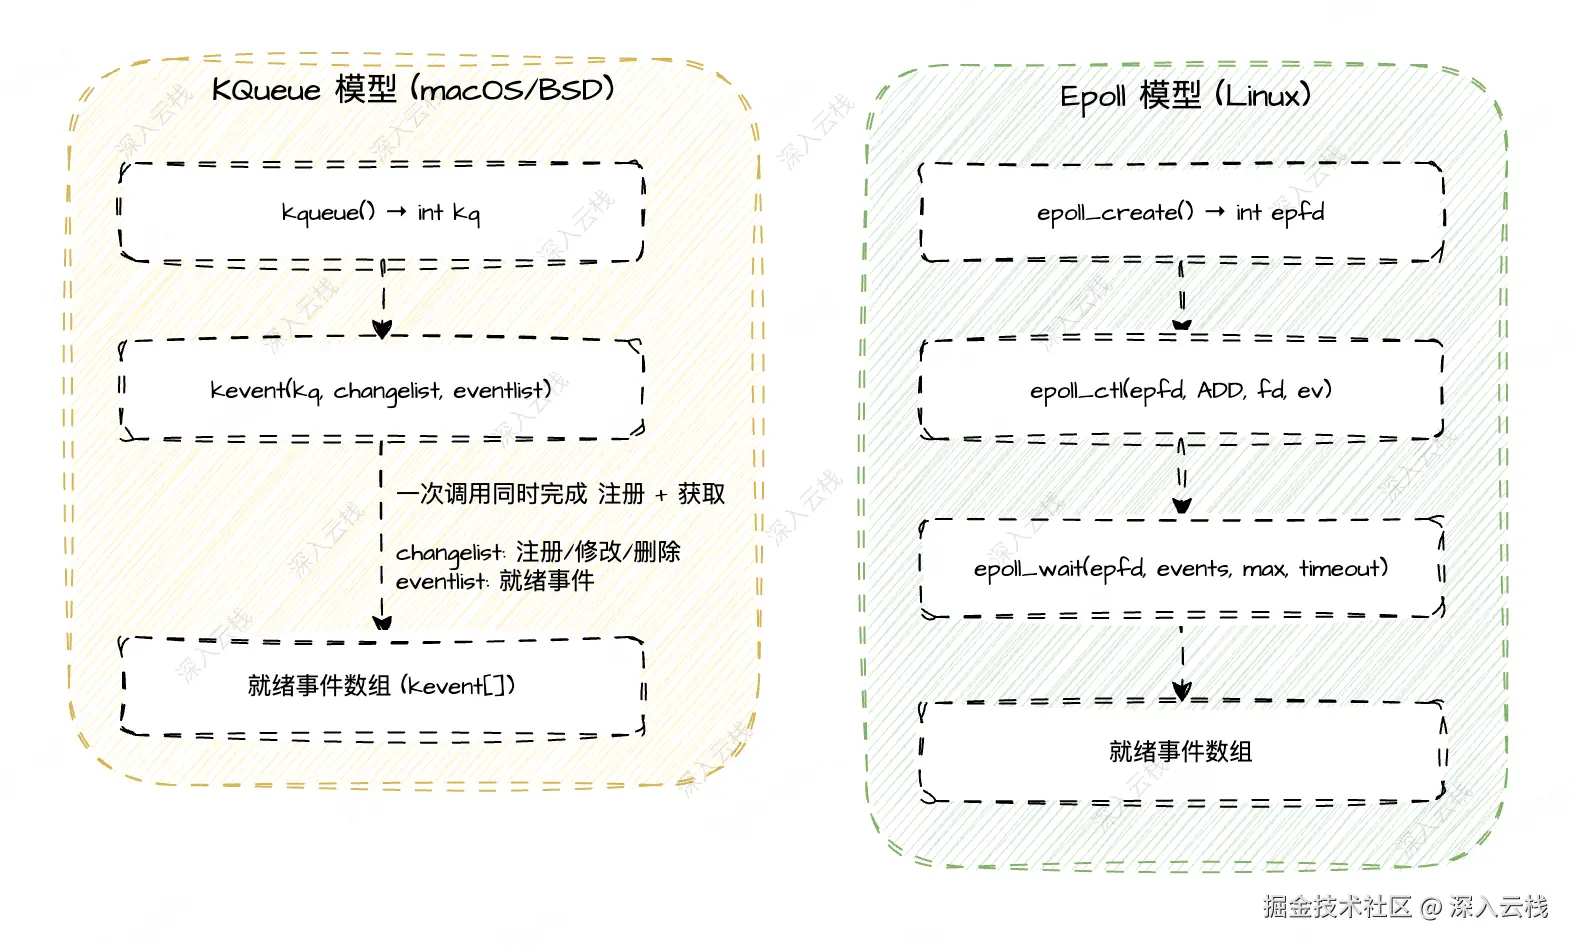
KQueue 对比 Epoll 有几个核心优势。一是 EVFILT_TIMER 内置定时器,无需额外创建 timerfd 再注册到 epoll,简化了定时器管理。二是 EVFILT_USER 用户事件,无需 eventfd 即可实现跨线程唤醒------Netty 正是利用这一点,用 ident=0 的 EVFILT_USER 过滤器实现 IoHandler 的 wakeup()。三是 EVFILT_SOCK + NOTE_RDHUP 半关闭检测,可以精确感知对端关闭写端的事件。四是 NOTE_LOWAT 低水位读取,可以控制 socket 读到指定字节数后才触发事件。
二、KQueue 可用性检测:JNI 入口与 Native 常量
理解了系统调用层之后,我们进入 Netty 的 JNI 层。KQueue 类是 kqueue 传输的可用性探测入口,它的静态初始化块是整个 KQueue 模块的"第一道关卡"。
php
io.netty.channel.kqueue.KQueue#static

// 静态初始化块:类加载时即尝试创建 kqueue fd,探测系统支持
public final class KQueue {
    private static final Throwable UNAVAILABILITY_CAUSE;

    static {
        Throwable cause = null;
        // 检查系统属性,允许用户显式禁用原生传输
        if (SystemPropertyUtil.getBoolean("io.netty.transport.noNative", false)) {
            cause = new UnsupportedOperationException(
                    "Native transport was explicit disabled with -Dio.netty.transport.noNative=true");
        } else {
            FileDescriptor kqueueFd = null;
            try {
                // 核心探测:调用 JNI 创建 kqueue fd
                kqueueFd = Native.newKQueue();
            } catch (Throwable t) {
                cause = t;
            } finally {
                if (kqueueFd != null) {
                    try {
                        kqueueFd.close();
                    } catch (Exception ignore) {
                        // ignore
                    }
                }
            }
        }
        // 不可用时记录日志,但不影响 JVM 启动
        if (cause != null) {
            InternalLogger logger = InternalLoggerFactory.getInstance(KQueue.class);
            if (logger.isTraceEnabled()) {
                logger.debug("KQueue support is not available", cause);
            } else if (logger.isDebugEnabled()) {
                logger.debug("KQueue support is not available: {}", cause.getMessage());
            }
        }
        UNAVAILABILITY_CAUSE = cause;
    }
}
这段静态初始化逻辑有三个关键点。首先,它检查 io.netty.transport.noNative 系统属性------如果用户通过 -Dio.netty.transport.noNative=true 显式禁用原生传输,UNAVAILABILITY_CAUSE 被设为 UnsupportedOperationException,后续所有 isAvailable() 调用返回 false。其次,它调用 Native.newKQueue() 尝试创建真正的 kqueue fd------这个 JNI 调用会直接调用操作系统的 kqueue() 系统调用,成功则说明 kqueue 子系统可用,失败则捕获异常。最后,探测成功后立即关闭临时 fd,不会泄露资源。
在不可用的情况下,KQueue 类不会抛异常,而是通过日志记录原因,让 JVM 正常启动。这种"优雅降级"的设计是 Netty 可插拔传输层的基础------应用程序可以在运行时通过 KQueue.isAvailable() 判断是否可用,选择合适的传输实现。
KQueue 类还提供了三个对外方法:
csharp
io.netty.channel.kqueue.KQueue#isAvailable

// 返回布尔值,适合在 if 判断中使用
public static boolean isAvailable() {
    return UNAVAILABILITY_CAUSE == null;
}
csharp
io.netty.channel.kqueue.KQueue#ensureAvailability

// 不可用时直接抛 UnsatisfiedLinkError,适合在构造器中强制要求 kqueue 可用
public static void ensureAvailability() {
    if (UNAVAILABILITY_CAUSE != null) {
        throw (Error) new UnsatisfiedLinkError(
                "failed to load the required native library").initCause(UNAVAILABILITY_CAUSE);
    }
}
isAvailable() 返回布尔值,适合在条件判断中使用;ensureAvailability() 不可用时抛出 UnsatisfiedLinkError,适合在构造器中强制要求 kqueue 可用。KQueueIoHandler 的实例初始化块中就调用了 KQueue.ensureAvailability(),确保不能在非 BSD 系统上创建 KQueueIoHandler 实例。
除了 KQueue 类,JNI 层还有两个关键角色。第一个是 KQueueStaticallyReferencedJniMethods,它专门存放静态 Native 常量。这些常量在 JNI 层编译时确定,直接映射 <sys/event.h> 中的宏定义:
csharp
io.netty.channel.kqueue.KQueueStaticallyReferencedJniMethods

// 将 JNI 常量与 JNI 方法分离,避免循环依赖
final class KQueueStaticallyReferencedJniMethods {
    private KQueueStaticallyReferencedJniMethods() { }

    // 通用标志常量
    static native short evAdd();
    static native short evEnable();
    static native short evDisable();
    static native short evDelete();
    static native short evClear();
    static native short evEOF();
    static native short evError();

    // EVFILT_SOCK 的 fflags 常量
    static native short noteReadClosed();
    static native short noteConnReset();
    static native short noteDisconnected();

    // Filter 类型常量
    static native short evfiltRead();
    static native short evfiltWrite();
    static native short evfiltUser();
    static native short evfiltSock();

    // connectx(2) 标志
    static native int connectResumeOnReadWrite();
    static native int connectDataIdempotent();

    // Sysctl 值
    static native int fastOpenClient();
    static native int fastOpenServer();
}
之所以将常量与 Native.java 中的 JNI 方法分离,是因为 JNI 存在一个经典的循环依赖问题:JNI_OnLoad 需要调用 FindClass 加载 Java 类,但 Java 类的静态成员初始化又可能调用尚未注册的 JNI 方法。KQueueStaticallyReferencedJniMethods 的 javadoc 明确解释了这一点------"Static members which call JNI methods must not be declared in this class!"。Netty 将常量放在这个独立类中,确保 JNI_OnLoad 先注册方法,再加载使用这些方法的类。
第二个是 Native.java 中的关键 JNI 方法签名,包括 newKQueue()(创建 kqueue fd)、keventWait()(执行 kevent 等待)、keventAddUserEvent()(添加 user event 用于唤醒)、keventTriggerUserEvent()(触发 user event 唤醒)、sizeofKEvent()(kevent 结构体大小)、offsetofKEventIdent() 等偏移量方法。这些方法构成了 Netty 与内核之间的桥梁。
三、KQueueIoHandler:kqueue 事件循环的调度中枢
在 KQueue 可用性检测通过之后,KQueueIoHandler 作为 IoHandler 接口的 KQueue 实现,接管了事件循环的调度工作。它负责管理 KQueueIoHandle 的注册/注销,通过 run() 方法轮询就绪事件并分发给对应的 KQueueIoHandle.handle()。
KQueueIoHandler 的构造器链路通过工厂模式创建,这也是 Netty 4.2 可插拔传输层设计的标准做法:
typescript
io.netty.channel.kqueue.KQueueIoHandler#newFactory

// 返回 IoHandlerFactory,由 SingleThreadIoEventLoop 在构造时调用 newHandler()
public static IoHandlerFactory newFactory() {
    return newFactory(0, DefaultSelectStrategyFactory.INSTANCE);
}

public static IoHandlerFactory newFactory(final int maxEvents,
                                          final SelectStrategyFactory selectStrategyFactory) {
    KQueue.ensureAvailability();
    ObjectUtil.checkPositiveOrZero(maxEvents, "maxEvents");
    ObjectUtil.checkNotNull(selectStrategyFactory, "selectStrategyFactory");
    return new IoHandlerFactory() {
        @Override
        public IoHandler newHandler(ThreadAwareExecutor executor) {
            return new KQueueIoHandler(executor, maxEvents, selectStrategyFactory.newSelectStrategy());
        }

        @Override
        public boolean isChangingThreadSupported() {
            return true;
        }
    };
}
newFactory() 返回一个 IoHandlerFactory,它会被 SingleThreadIoEventLoop 在构造时调用 newHandler(),完成 IoHandler 的创建与线程绑定。isChangingThreadSupported() 返回 true 表示 KQueue 传输支持线程切换------这意味着一个 KQueueIoHandler 可以在不同 EventLoop 线程之间迁移,这是 kqueue 的 fd 是线程安全的特性决定的。
maxEvents 参数控制 KQueueEventArray 的初始容量。当 maxEvents == 0 时(默认值),allowGrowing = true 且初始容量设为 4096,支持动态扩容;当 maxEvents > 0 时,allowGrowing = false 且使用固定容量。生产环境中推荐使用默认值,让 KQueueEventArray 按需扩容。
构造器内部做了三件关键初始化:
ini
io.netty.channel.kqueue.KQueueIoHandler#constructor

private KQueueIoHandler(ThreadAwareExecutor executor, int maxEvents, SelectStrategy strategy) {
    this.executor = ObjectUtil.checkNotNull(executor, "executor");
    this.selectStrategy = ObjectUtil.checkNotNull(strategy, "strategy");
    // 第一步:创建 kqueue fd
    this.kqueueFd = Native.newKQueue();
    if (maxEvents == 0) {
        allowGrowing = true;
        maxEvents = 4096;
    } else {
        allowGrowing = false;
    }
    // 第二步:初始化 changeList 和 eventList 两个 KQueueEventArray
    this.changeList = new KQueueEventArray(maxEvents);
    this.eventList = new KQueueEventArray(maxEvents);
    nativeArrays = new NativeArrays();
    // 第三步:注册 ident=0 的 EVFILT_USER 事件,用于跨线程唤醒
    int result = Native.keventAddUserEvent(kqueueFd.intValue(), KQUEUE_WAKE_UP_IDENT);
    if (result < 0) {
        destroy();
        throw new IllegalStateException("kevent failed to add user event with errno: " + (-result));
    }
}
第一步通过 JNI 调用 Native.newKQueue() 创建 kqueue fd,这是整个事件循环的"心脏"。第二步初始化 changeList 和 eventList 两个 KQueueEventArray,前者用于向内核提交事件变更,后者用于接收内核返回的就绪事件。第三步注册 ident=0 的 EVFILT_USER 事件------这是 kqueue 唤醒机制的核心:KQUEUE_WAKE_UP_IDENT = 0 是内部唤醒事件专用的 ident,generateNextId() 从 1 开始分配,保证与唤醒 ident 不冲突。
wakeup() 方法实现了线程安全的唤醒机制:
csharp
io.netty.channel.kqueue.KQueueIoHandler#wakeup

// 外部线程提交任务后,通过此方法唤醒阻塞在 keventWait() 中的 EventLoop 线程
public void wakeup() {
    if (!executor.isExecutorThread(Thread.currentThread())
            && WAKEN_UP_UPDATER.compareAndSet(this, 0, 1)) {
        wakeup0();
    }
}

private void wakeup0() {
    Native.keventTriggerUserEvent(kqueueFd.intValue(), KQUEUE_WAKE_UP_IDENT);
}这里有两个关键防护。第一,!executor.isExecutorThread() 判断当前线程是否为 EventLoop 线程------如果是同线程,keventWait() 本来就不会阻塞(因为 kqueueWait() 前会检查 canBlock()),无需唤醒。第二,WAKEN_UP_UPDATER.compareAndSet(this, 0, 1) 使用 CAS 保证多个外部线程同时调用 wakeup() 时,只有第一个调用者触发真正的 keventTriggerUserEvent(),避免多余的 JNI 调用。
run() 方法是 KQueueIoHandler 的核心,由 SingleThreadIoEventLoop 在事件循环中调用。下面用时序图展示完整的执行链路:
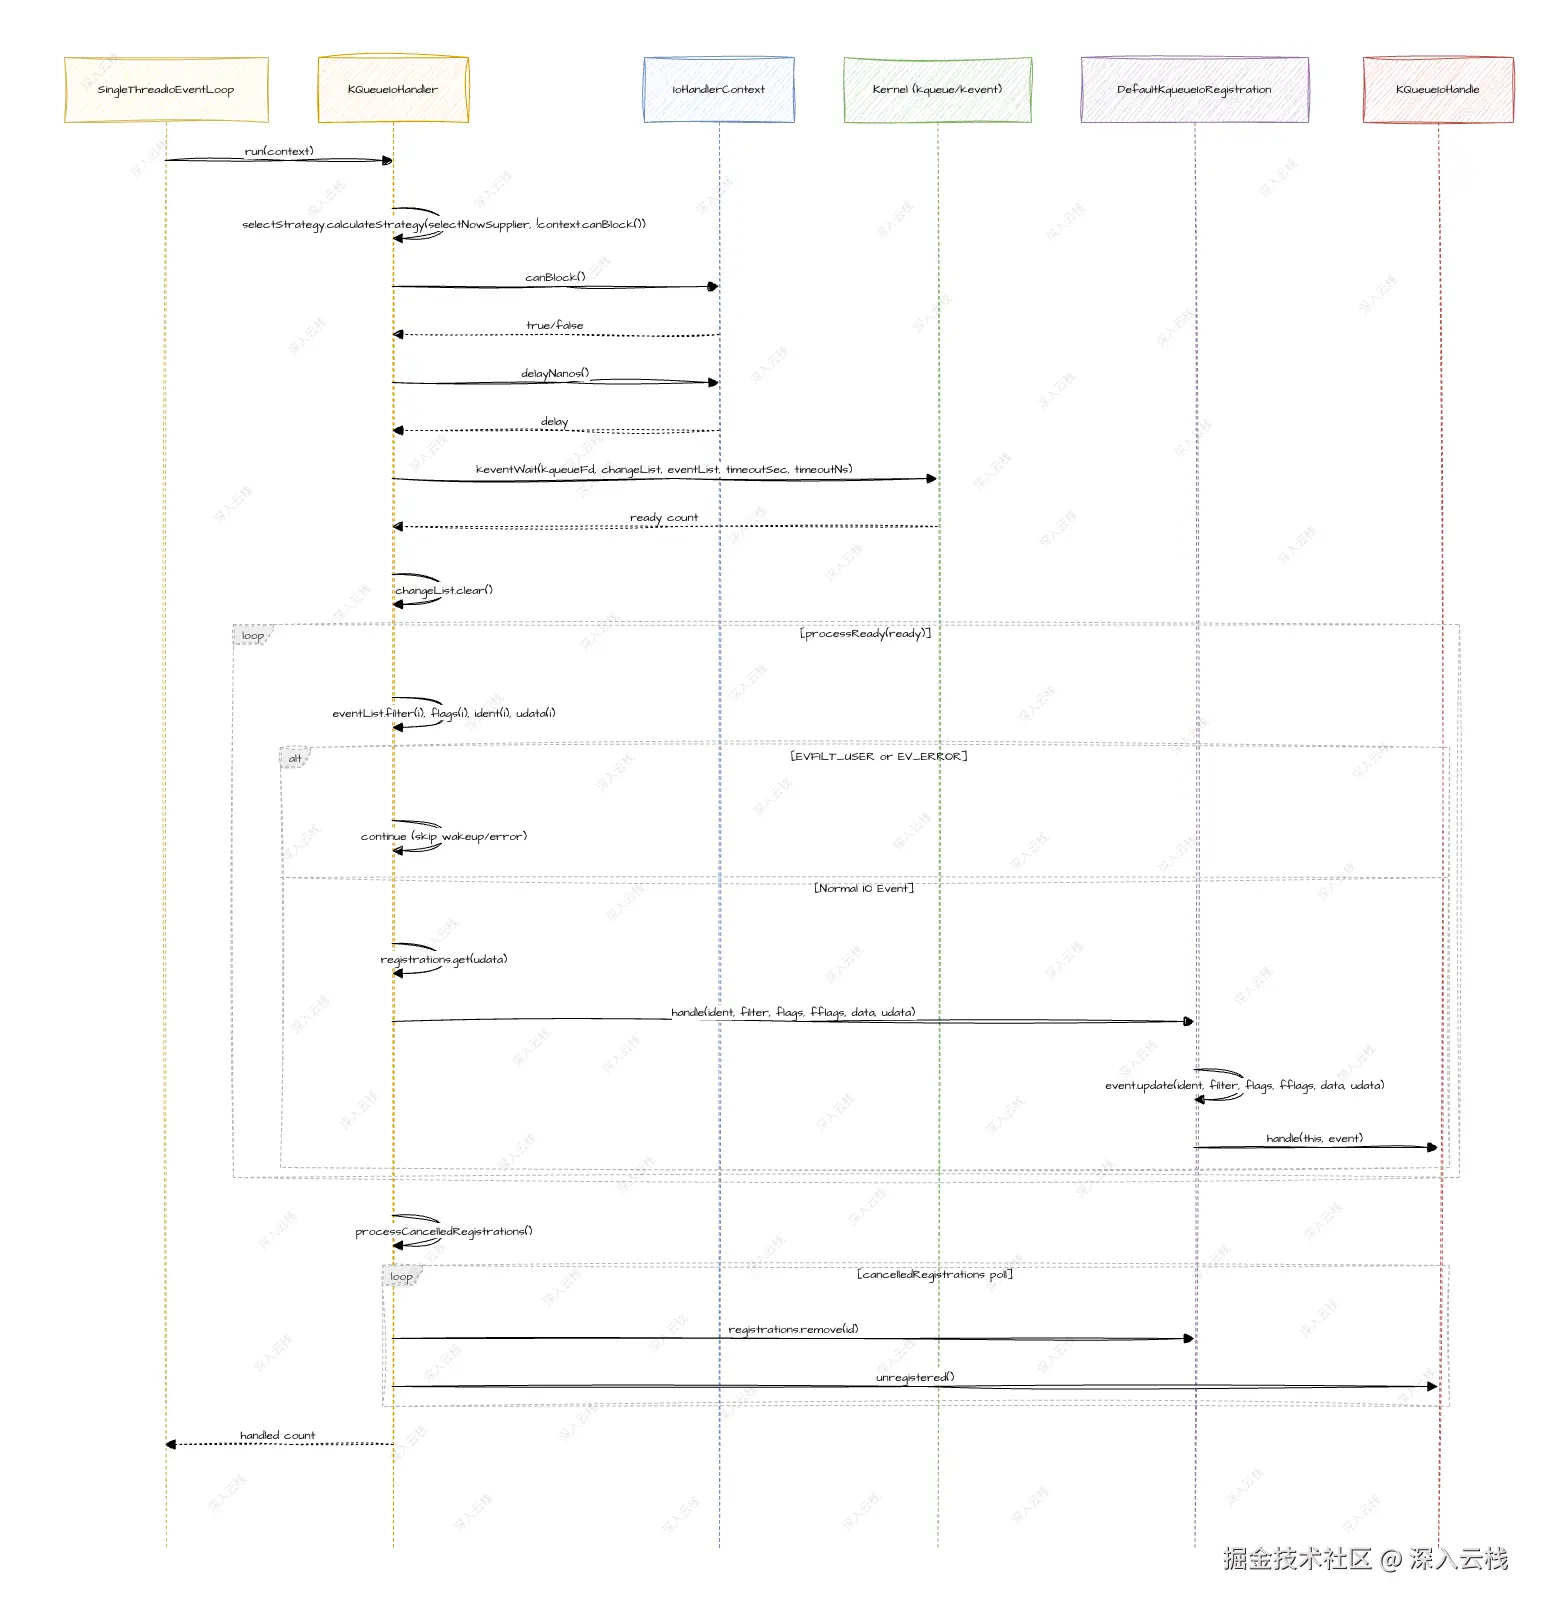
上面的时序图清晰地展示了 run() 方法的四个阶段。第一阶段是策略计算:selectStrategy.calculateStrategy(selectNowSupplier, !context.canBlock()) 决定是否执行 select。selectNowSupplier 是一个 IntSupplier,内部调用 kqueueWaitNow()(即 keventWait(0, 0) 非阻塞等待),返回当前就绪事件数。如果有就绪事件,CONTINUE 策略会跳过阻塞直接处理;如果有待执行任务,SELECT 策略会进入阻塞等待。
第二阶段是阻塞等待。kqueueWait() 方法计算最长阻塞时间,然后调用 Native.keventWait() 执行真正的系统调用:
scss
io.netty.channel.kqueue.KQueueIoHandler#kqueueWait

// 根据 IoHandlerContext 提供的延时信息,计算 kevent 的阻塞超时
private int kqueueWait(IoHandlerContext context, boolean oldWakeup) throws IOException {
    // 如果 taskQueue 中有任务,且之前已被唤醒过,直接非阻塞探测
    if (oldWakeup && !context.canBlock()) {
        return kqueueWaitNow();
    }

    long totalDelay = context.delayNanos(System.nanoTime());
    // 将纳秒延时拆分为秒 + 纳秒,秒部分限制在 KQUEUE_MAX_TIMEOUT_SECONDS 内
    int delaySeconds = (int) min(totalDelay / 1000000000L, KQUEUE_MAX_TIMEOUT_SECONDS);
    int delayNanos = (int) (totalDelay % 1000000000L);
    return kqueueWait(delaySeconds, delayNanos);
}这里有一个值得注意的常量:KQUEUE_MAX_TIMEOUT_SECONDS = 86399(24 小时 - 1 秒)。源码注释指出,向 kqueue() 传入 Integer.MAX_VALUE 作为超时可能返回 EINVAL,因此 Netty 将超时限制在 24 小时以内。这是针对 FreeBSD 6.1 的行为兼容性处理------在现代 macOS 上这个限制可能已经不存在了,但 Netty 保留了这一保守策略。
kqueueWait() 返回后,还有一个重要的竞态条件处理:wakenUp 的补偿唤醒。源码中的注释详细解释了这个问题:WAKEN_UP_UPDATER.getAndSet(this, 0) == 1 获取旧值并清零,如果 keventWait() 返回后 wakenUp == 1,说明在 wakenUp 清零和 keventWait() 之间发生了唤醒,需要再次调用 wakeup0() 补偿唤醒。这防止了"wakenUp 设为 true 太早"导致的无限阻塞。
第三阶段是事件处理。processReady() 方法遍历 eventList 中的就绪事件,逐一处理:
ini
io.netty.channel.kqueue.KQueueIoHandler#processReady

// 遍历 eventList 中的就绪 kevent,过滤内部事件,分发给对应的 IoHandle
private int processReady(int ready) {
    int ioCount = 0;
    for (int i = 0; i < ready; ++i) {
        final short filter = eventList.filter(i);
        final short flags = eventList.flags(i);
        final int ident = eventList.ident(i);
        // 过滤 EVFILT_USER 唤醒事件和 EV_ERROR 错误事件
        if (filter == Native.EVFILT_USER || (flags & Native.EV_ERROR) != 0) {
            assert filter != Native.EVFILT_USER ||
                    (filter == Native.EVFILT_USER && ident == KQUEUE_WAKE_UP_IDENT);
            continue;
        }

        ioCount++;
        long id = eventList.udata(i);
        // 通过 udata 查找对应的 IoRegistration
        DefaultKqueueIoRegistration registration = registrations.get(id);
        if (registration == null) {
            // Channel 可能已关闭,忽略事件
            logger.warn("events[{}]=[{}, {}, {}] had no registration!", i, ident, id, filter);
            continue;
        }
        // 将事件分发给对应的 IoHandle
        registration.handle(ident, filter, flags, eventList.fflags(i), eventList.data(i), id);
    }
    return ioCount;
}
processReady() 的核心逻辑是:遍历 eventList → 提取 filter、flags、ident、udata → 过滤 EVFILT_USER 和 EV_ERROR → 通过 udata(即注册时分配的 id)从 registrations 查找 DefaultKqueueIoRegistration → 调用 registration.handle() 分发事件。注意 udata 在这里扮演了"注册 ID"的角色------它并非内核使用的字段,而是 Netty 在注册时通过 evSet() 写入的自定义数据,用于在事件回调时定位对应的 IoRegistration。
第四阶段是清理已取消的注册。processCancelledRegistrations() 方法从 cancelledRegistrations 队列中取出所有已取消的注册,从 registrations 中删除,并调用 handle.unregistered() 回调。这个过程必须在事件处理之后执行,因为在事件处理过程中,evSet() 或 handle() 内部可能触发 cancel()。
register() 方法实现了 IoHandle 的注册:
scss
io.netty.channel.kqueue.KQueueIoHandler#register

// 将 IoHandle 注册到 kqueue,返回 IoRegistration 作为注册凭证
public IoRegistration register(IoHandle handle) {
    final KQueueIoHandle kqueueHandle = cast(handle);
    // 校验 ident 不能与唤醒专用的 KQUEUE_WAKE_UP_IDENT 冲突
    if (kqueueHandle.ident() == KQUEUE_WAKE_UP_IDENT) {
        throw new IllegalArgumentException("ident " + KQUEUE_WAKE_UP_IDENT
                + " is reserved for internal usage");
    }
    // 生成唯一 id 并创建 DefaultKqueueIoRegistration
    DefaultKqueueIoRegistration registration = new DefaultKqueueIoRegistration(
            executor, kqueueHandle);
    DefaultKqueueIoRegistration old = registrations.put(registration.id, registration);
    if (old != null) {
        registrations.put(old.id, old);
        throw new IllegalStateException();
    }
    if (registration.isHandleForChannel()) {
        numChannels++;
    }
    // 通知 IoHandle 注册成功
    handle.registered();
    return registration;
}
register() 的关键步骤是:类型校验 → ident 冲突检查 → 生成唯一 id → 创建 DefaultKqueueIoRegistration → 放入 registrations → 调用 handle.registered() 回调。ident 冲突检查确保注册的 fd 不会与唤醒专用的 KQUEUE_WAKE_UP_IDENT(0) 冲突。
DefaultKqueueIoRegistration 是 KQueueIoHandler 的私有内部类,实现了 IoRegistration 接口。它的 submit() 方法将 KQueueIoOps 转换为 changeList 中的 kevent 条目:
ini
io.netty.channel.kqueue.KQueueIoHandler$DefaultKqueueIoRegistration#submit

// 提交感兴趣的操作。同线程直接写入 changeList,异线程投递到 executor 执行
public long submit(IoOps ops) {
    KQueueIoOps kQueueIoOps = cast(ops);
    if (!isValid()) {
        return -1;
    }
    short filter = kQueueIoOps.filter();
    short flags = kQueueIoOps.flags();
    int fflags = kQueueIoOps.fflags();
    long data = kQueueIoOps.data();
    if (executor.isExecutorThread(Thread.currentThread())) {
        // 同线程:直接写入 changeList
        evSet(filter, flags, fflags, data);
    } else {
        // 异线程:投递到 EventLoop 线程执行
        executor.execute(() -> evSet(filter, flags, fflags, data));
    }
    return 0;
}
submit() 的线程安全策略是:同线程直接调用 evSet() 写入 changeList;异线程通过 executor.execute() 投递到 EventLoop 线程执行。这是因为 changeList 不是线程安全的,只有 EventLoop 线程才能操作它。
cancel() 方法采用原子操作加延迟清理的策略:
csharp
io.netty.channel.kqueue.KQueueIoHandler$DefaultKqueueIoRegistration#cancel

// 取消注册。原子操作保证幂等性,cancel0 将自身加入 cancelledRegistrations 队列
public boolean cancel() {
    if (!canceled.compareAndSet(false, true)) {
        return false;
    }
    if (executor.isExecutorThread(Thread.currentThread())) {
        cancel0();
    } else {
        executor.execute(this::cancel0);
    }
    return true;
}

private void cancel0() {
    // 标记为取消待处理,加入延迟清理队列
    cancellationPending = true;
    cancelledRegistrations.offer(this);
}
cancel0() 将自身加入 cancelledRegistrations 队列,而不是立即从 registrations 中删除。这是因为在事件循环中,processReady() 遍历 eventList 时可能还在使用这个注册------延迟到 processCancelledRegistrations() 中清理,避免了并发修改问题。
最后,prepareToDestroy() 和 destroy() 实现了两阶段销毁:
scss
io.netty.channel.kqueue.KQueueIoHandler#prepareToDestroy

// 第一阶段:排空就绪事件,关闭所有注册的 IoHandle
public void prepareToDestroy() {
    try {
        kqueueWaitNow();  // 非阻塞排空
    } catch (IOException e) {
        // ignore on close
    }
    // 遍历所有注册,执行 close()
    DefaultKqueueIoRegistration[] copy = registrations.values()
            .toArray(new DefaultKqueueIoRegistration[0]);
    for (DefaultKqueueIoRegistration reg: copy) {
        reg.close();
    }
    processCancelledRegistrations();
}

public void destroy() {
    try {
        try {
            kqueueFd.close();
        } catch (IOException e) {
            logger.warn("Failed to close the kqueue fd.", e);
        }
    } finally {
        // 释放所有堆外内存
        nativeArrays.free();
        changeList.free();
        eventList.free();
    }
}
prepareToDestroy() 先执行 kqueueWaitNow() 排空就绪事件,再遍历所有注册执行 close(),确保所有 IoHandle 得到清理。destroy() 关闭 kqueue fd 并释放 nativeArrays、changeList、eventList 的堆外内存,防止内存泄漏。
四、KQueueEventArray:堆外内存中的 kevent 结构体数组
在 KQueueIoHandler 的事件循环中,changeList 和 eventList 是两个 KQueueEventArray 实例。这个类是 Netty 对 kevent 结构体数组的堆外内存封装,同时承担"变更列表"和"就绪事件列表"两种角色。
kevent 结构体在 macOS 64-bit 上的内存布局如下:
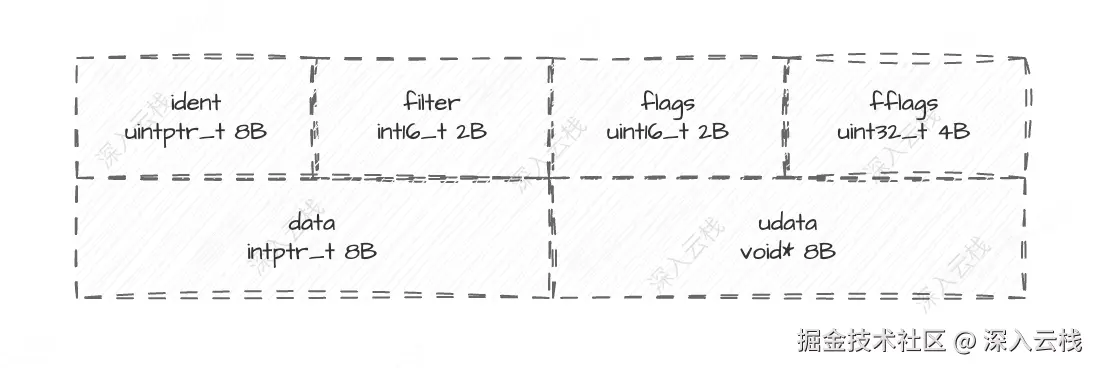
ident 占 8 字节(uintptr_t),filter 和 flags 各占 2 字节,fflags 占 4 字节,data 和 udata 各占 8 字节,总计 32 字节。KQueueEventArray 通过 Buffer.allocateDirectBufferWithNativeOrder() 在堆外分配一块连续内存,然后通过 JNI 的 evSet() 方法将 Java 对象的字段值直接写入这块内存,模拟 C 语言的 kevent 结构体数组。
构造器初始化堆外内存:
ini
io.netty.channel.kqueue.KQueueEventArray#constructor

KQueueEventArray(int capacity) {
    if (capacity < 1) {
        throw new IllegalArgumentException("capacity must be >= 1 but was " + capacity);
    }
    // 分配堆外直接内存,容量为 capacity * sizeof(kevent)
    memoryCleanable = Buffer.allocateDirectBufferWithNativeOrder(calculateBufferCapacity(capacity));
    memory = memoryCleanable.buffer();
    // 缓存内存起始地址,供 JNI 使用
    memoryAddress = Buffer.memoryAddress(memory);
    this.capacity = capacity;
}
calculateBufferCapacity(capacity) 计算 capacity * KQUEUE_EVENT_SIZE,其中 KQUEUE_EVENT_SIZE = Native.sizeofKEvent()。这个值在 JNI 层通过 sizeof(struct kevent) 编译时确定,在 macOS 64-bit 上为 32。CleanableDirectBuffer 管理堆外内存的生命周期,支持显式释放和 GC 兜底。
evSet() 方法将事件写入 changeList 的末尾:
arduino
io.netty.channel.kqueue.KQueueEventArray#evSet

void evSet(int ident, short filter, short flags, int fflags, long data, long udata) {
    reallocIfNeeded();
    // 通过 JNI 直接写入 size 位置的 kevent 结构体
    evSet(getKEventOffset(size++) + memoryAddress, ident, filter, flags, fflags, data, udata);
}
evSet() 调用 JNI 的 native 方法,根据 sizeofKEvent() 和 offsetofKEventIdent() 等偏移量,直接将 Java 参数写入堆外内存的对应字段。size 自增,记录当前已写入的 kevent 数量。reallocIfNeeded() 在 size == capacity 时触发扩容。
读取方法族通过 PlatformDependent 直接读取堆外内存,避免 JNI 调用开销:
perl
io.netty.channel.kqueue.KQueueEventArray#ident

// 直接通过 Unsafe 读取堆外内存的 ident 字段,避免 JNI 调用
int ident(int index) {
    if (PlatformDependent.hasUnsafe()) {
        return PlatformDependent.getInt(getKEventOffsetAddress(index) + KQUEUE_IDENT_OFFSET);
    }
    return memory.getInt(getKEventOffset(index) + KQUEUE_IDENT_OFFSET);
}这里有一个关键的性能优化:processReady() 中遍历 eventList 时,每次循环都要读取 filter()、flags()、ident()、fflags()、data()、udata() 六个字段。如果每次都走 JNI 调用,每个字段都是一次 JNI 边界跨越,开销很大。Netty 通过 PlatformDependent.getInt()/getShort()/getLong() 直接操作堆外内存------在有 Unsafe 的环境下,这是一次内存读取;在没有 Unsafe 的环境下,回退到 ByteBuffer.getInt(),同样避免了 JNI 调用。
动态扩容的逻辑在 realloc() 方法中:
ini
io.netty.channel.kqueue.KQueueEventArray#realloc

void realloc(boolean throwIfFail) {
    // 容量 <= 65536 时翻倍,否则增加 50%
    int newLength = capacity <= 65536 ? capacity << 1 : capacity + (capacity >> 1);

    try {
        int newCapacity = calculateBufferCapacity(newLength);
        CleanableDirectBuffer buffer = Buffer.allocateDirectBufferWithNativeOrder(newCapacity);
        // 将旧内容拷贝到新堆外内存
        memory.position(0).limit(size);
        buffer.buffer().put(memory);
        buffer.buffer().position(0);

        memoryCleanable.clean();
        memoryCleanable = buffer;
        memory = buffer.buffer();
        memoryAddress = Buffer.memoryAddress(memory);
    } catch (OutOfMemoryError e) {
        if (throwIfFail) {
            OutOfMemoryError error = new OutOfMemoryError(
                    "unable to allocate " + newLength + " new bytes! Existing capacity is: " + capacity);
            error.initCause(e);
            throw error;
        }
    }
}
扩容策略是"小于 65536 时翻倍,否则增加 50%",这是经典的几何增长策略,摊销后每次插入的复杂度为 O(1)。扩容时分配新堆外内存,通过 ByteBuffer.put() 拷贝旧内容,然后释放旧内存。throwIfFail 参数控制 OOM 时的行为------evSet() 中的 reallocIfNeeded() 调用 realloc(true),内存不足时抛异常;run() 中 allowGrowing 路径的扩容调用 realloc(false),内存不足时静默保持旧容量,不会导致事件循环崩溃。
KQueueEventArray 的双重角色是其设计的精妙之处。changeList 在 evSet() 写入后,keventWait() 会将其作为 changelist 参数提交给内核,内核处理后返回,然后 changeList.clear() 清空(size = 0)。eventList 在 keventWait() 中作为 eventlist 参数接收就绪事件,内核用就绪的 kevent 填充它,然后 processReady() 遍历读取。这种设计使得两个 KQueueEventArray 实例一进一出,形成了事件循环的完整数据流闭环。
堆外内存的显式释放由 free() 方法负责:
ini
io.netty.channel.kqueue.KQueueEventArray#free

void free() {
    memoryCleanable.clean();
    memoryAddress = size = capacity = 0;
}
memoryCleanable.clean() 释放堆外内存,然后将 memoryAddress、size、capacity 全部归零,防止 use-after-free。这个操作是最终释放,不可逆------注释中明确警告:"Any usage after calling this method may segfault the JVM!"。
五、事件抽象层:KQueueIoHandle / KQueueIoEvent / KQueueIoOps
在 KQueueIoHandler 和 KQueueEventArray 之间,还有三个关键的抽象层,它们构成了 kqueue 传输的"事件类型系统"。
KQueueIoHandle 是 IoHandle 的 KQueue 扩展,仅增加了一个方法:
csharp
io.netty.channel.kqueue.KQueueIoHandle

// 返回与内核 kevent.ident 对应的标识符,即文件描述符 fd
public interface KQueueIoHandle extends IoHandle {
    int ident();
}
ident() 返回的值就是 kevent.ident------在 KQueue Channel 实现中为 fd().intValue(),即文件描述符。KQueueIoHandler 通过 ident() 获取这个值,在 evSet() 中将其写入 kevent 结构体的 ident 字段,内核据此识别事件来源。KQueueIoHandler.register() 中的 cast(handle) 校验确保只有 KQueueIoHandle 可以注册到 KQueueIoHandler。
KQueueIoEvent 是 IoEvent 的 KQueue 实现,封装了 kevent 就绪事件的六元组:
java
io.netty.channel.kqueue.KQueueIoEvent

// 封装 kevent 就绪事件的六元组字段
public final class KQueueIoEvent implements IoEvent {
    private int ident;
    private short filter;
    private short flags;
    private int fflags;
    private long data;
    private long udata;

    KQueueIoEvent() {
        this(0, (short) 0, (short) 0, 0, 0, 0);
    }

    // 对象复用:更新字段值而非创建新对象,降低 GC 压力
    void update(int ident, short filter, short flags, int fflags, long data, long udata) {
        this.ident = ident;
        this.filter = filter;
        this.flags = flags;
        this.fflags = fflags;
        this.data = data;
        this.udata = udata;
    }
}
KQueueIoEvent 的对象复用机制是关键的 GC 优化。DefaultKqueueIoRegistration 持有 private final KQueueIoEvent event = new KQueueIoEvent(),每次 handle() 调用时通过 event.update() 修改字段值,而非创建新对象。在高并发场景下,每秒钟可能有数万次 handle() 调用,如果每次创建新 KQueueIoEvent 对象,GC 压力会非常可观。复用同一对象,配合 Netty 的无垃圾设计理念,将事件分发的 GC 开销降至最低。
KQueueIoOps 是 IoOps 的 KQueue 实现,封装了 kevent 变更事件的四元组:
java
io.netty.channel.kqueue.KQueueIoOps

// 封装 kevent 变更事件的四元组,用于 submit() 中提交感兴趣的操作
public final class KQueueIoOps implements IoOps {
    private final short filter;
    private final short flags;
    private final int fflags;
    private final long data;

    public static KQueueIoOps newOps(short filter, short flags, int fflags) {
        return new KQueueIoOps(filter, flags, fflags, 0);
    }
}
KQueueIoOps 的典型使用场景是在 AbstractKQueueChannel 中注册事件订阅。例如,注册 RDHUP 半关闭检测:submit(KQueueIoOps.newOps(Native.EVFILT_SOCK, Native.EV_ADD, Native.NOTE_RDHUP));启用读事件:submit(Native.READ_ENABLED_OPS);禁用读事件:submit(Native.READ_DISABLED_OPS)。这些预定义的 KQueueIoOps 常量在 Native 类中静态初始化,避免了每次 submit 时创建新对象。
下图展示了 KQueueIoHandle、KQueueIoEvent、KQueueIoOps 三者在事件循环中的协作关系:
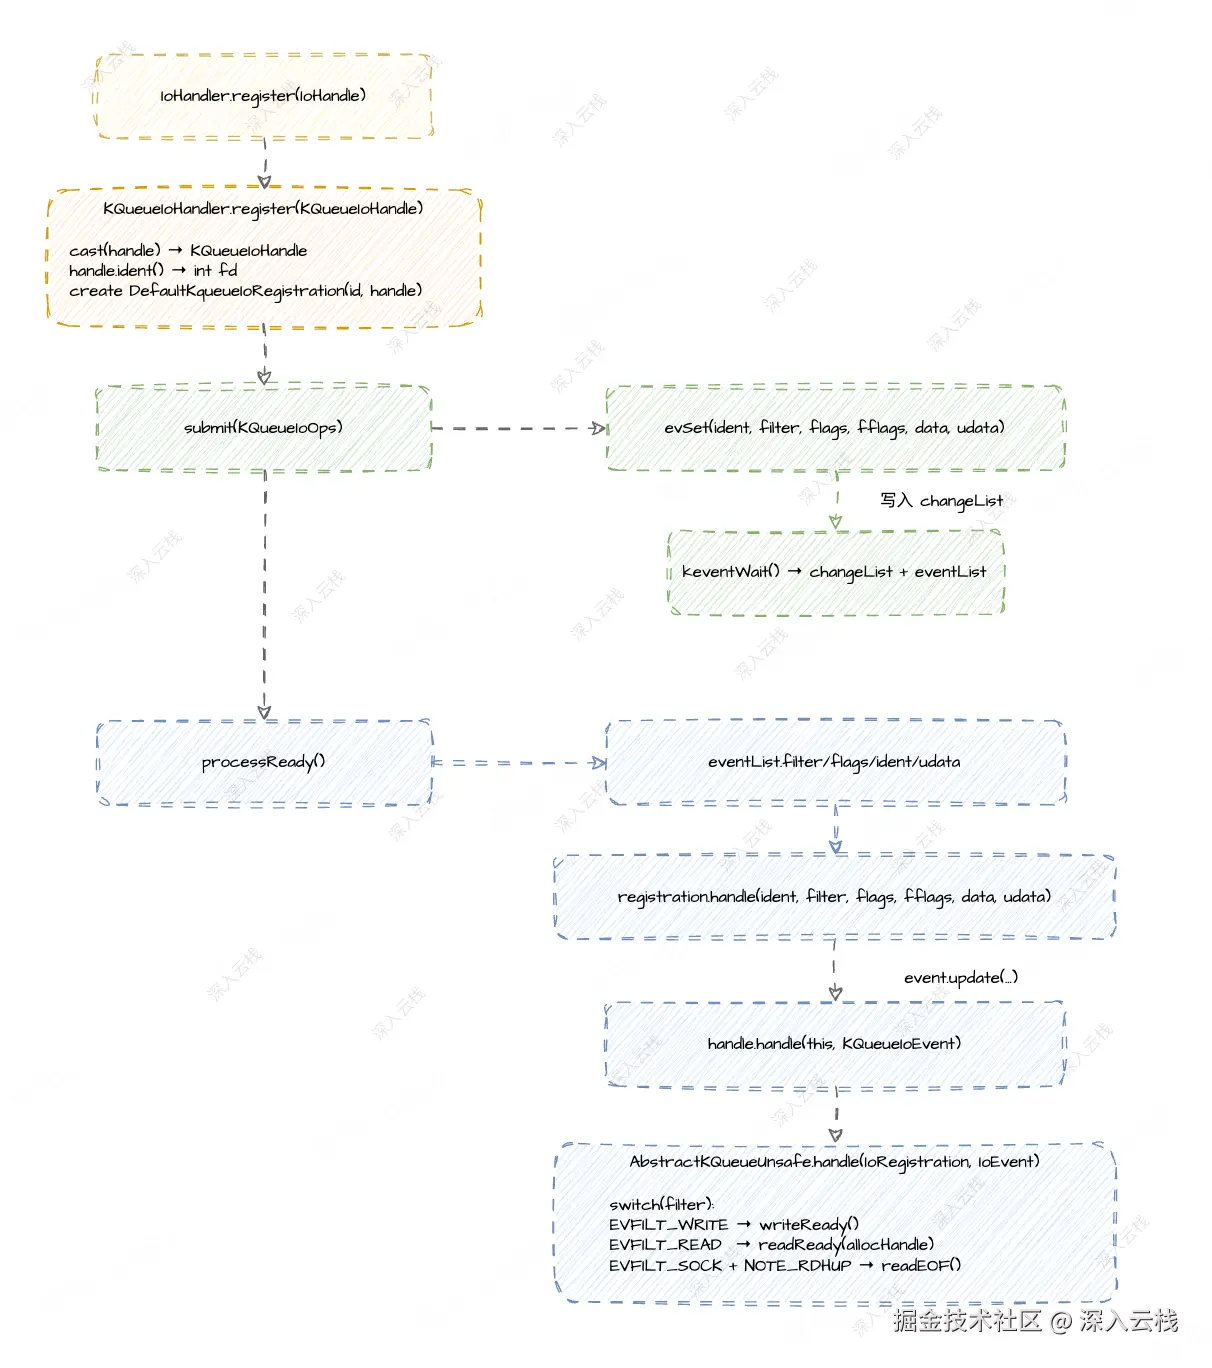
这张图清晰地展示了事件数据的流向:KQueueIoOps(操作四元组)通过 submit() → evSet() 写入 changeList,经 keventWait() 提交给内核;内核返回的就绪事件填充到 eventList,processReady() 遍历读取,通过 KQueueIoEvent(事件六元组)传递给 KQueueIoHandle.handle()。三个抽象层各司其职:KQueueIoOps 负责"我要关注什么",KQueueIoEvent 负责"发生了什么",KQueueIoHandle 负责"如何处理"。
六、AbstractKQueueChannel:Channel 的 KQueue 实现基类
在事件抽象层之下,AbstractKQueueChannel 是 KQueue 传输的 Channel 基类。它继承 AbstractChannel,持有 BsdSocket socket 和 IoRegistration registration 两个核心字段,并定义了内部类 AbstractKQueueUnsafe。
AbstractKQueueUnsafe 具有双重角色:既是 AbstractUnsafe(提供 connect()、flush0() 等 Channel 操作),又实现 KQueueIoHandle(提供 ident() 和 handle() 方法)。这种双重继承使得 AbstractKQueueUnsafe 成为 IO 事件从内核到 ChannelPipeline 的关键桥梁。
handle() 方法是事件分发的核心入口。下面用时序图展示完整的事件分发流程:
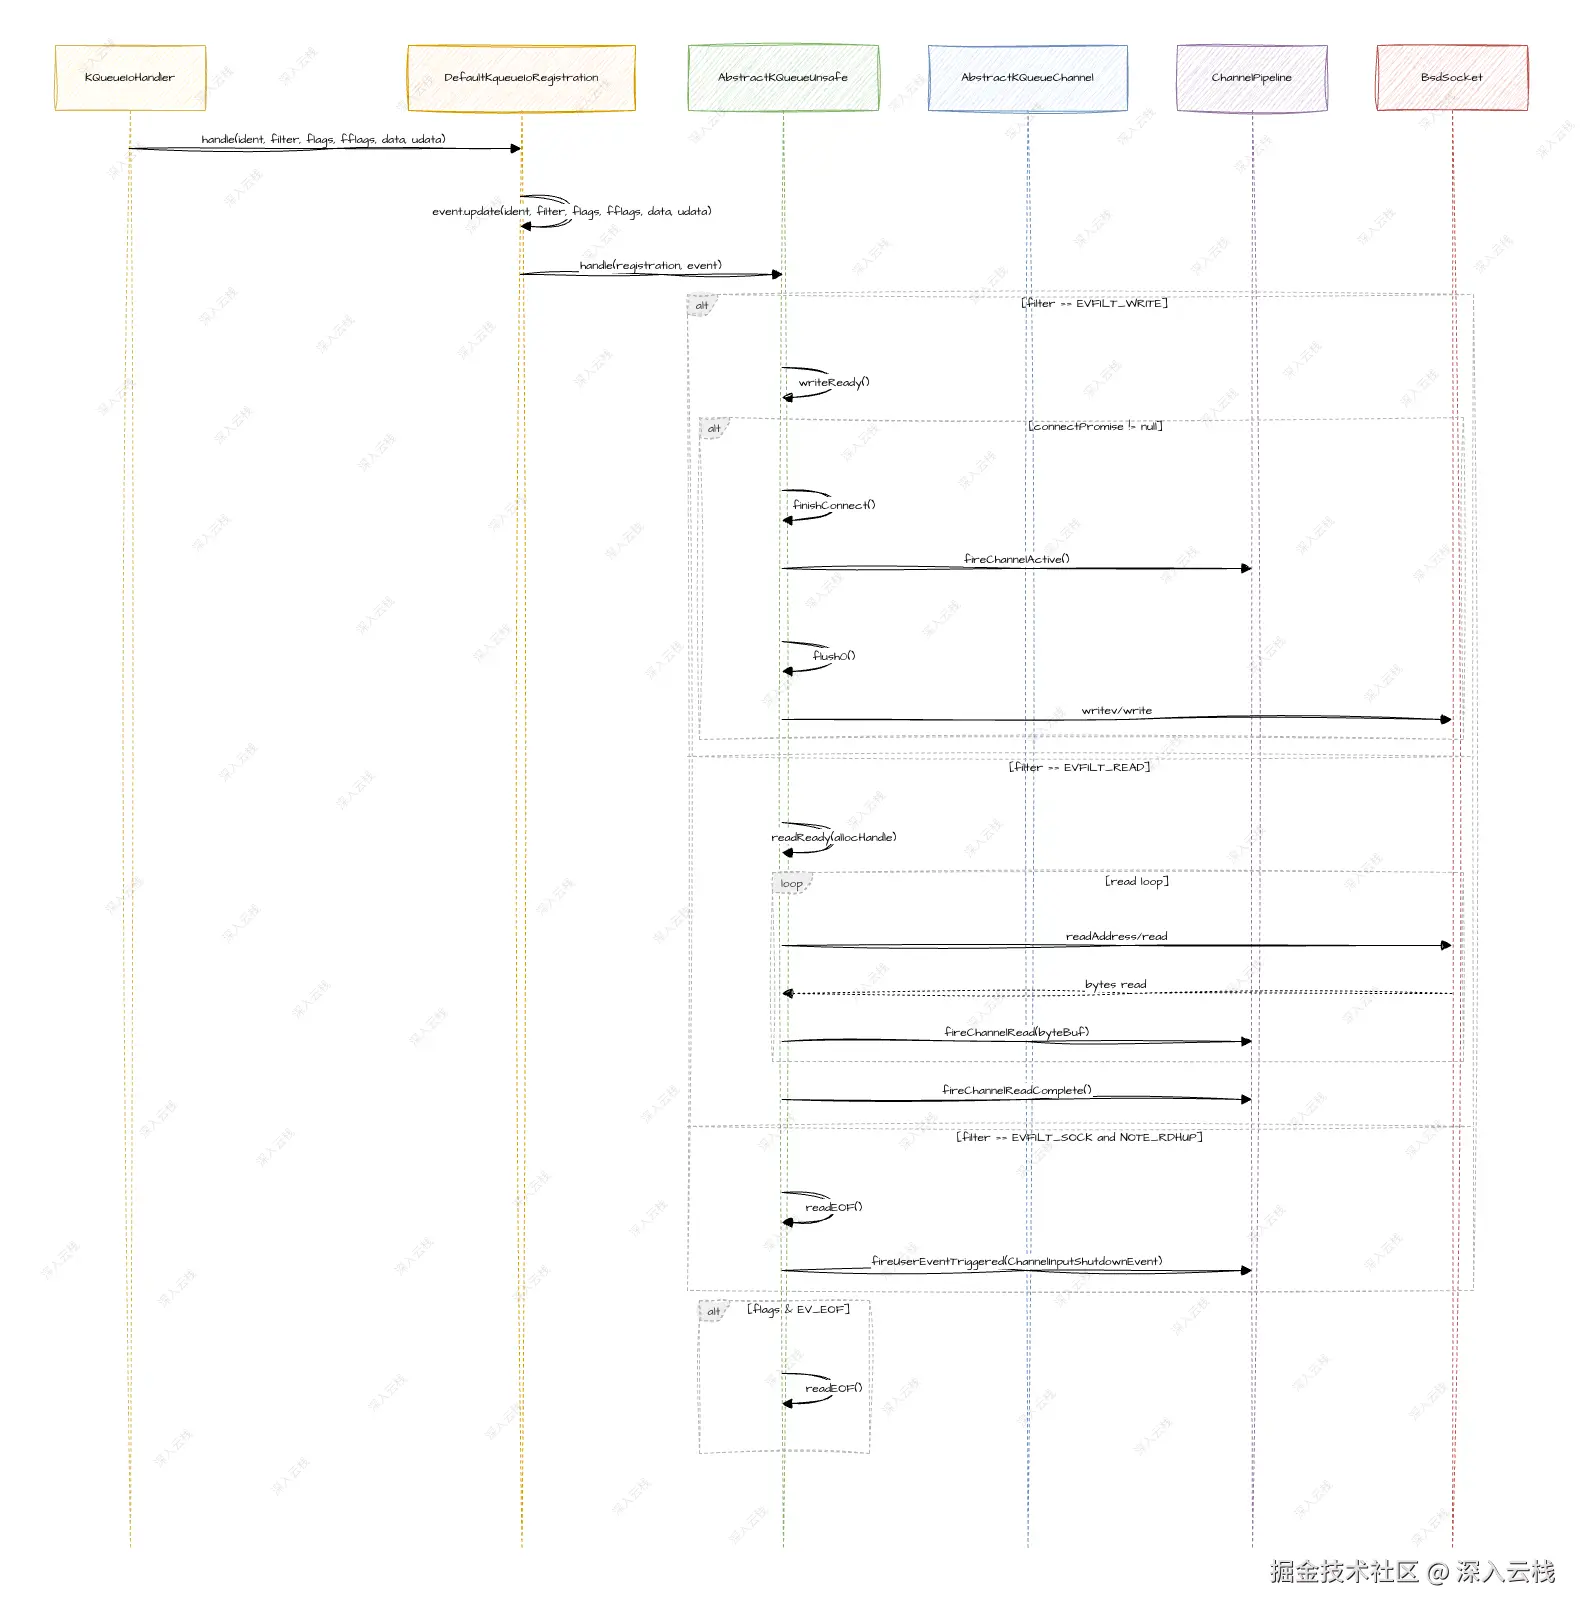
上面的时序图展示了 handle() 方法的三路分发逻辑。首先将 IoEvent 转为 KQueueIoEvent,然后根据 filter 字段分发到三条路径:
ini
io.netty.channel.kqueue.AbstractKQueueChannel$AbstractKQueueUnsafe#handle

// 根据 kevent 的 filter 类型,分发到 writeReady / readReady / readEOF 三条路径
public void handle(IoRegistration registration, IoEvent event) {
    KQueueIoEvent kqueueEvent = (KQueueIoEvent) event;
    final short filter = kqueueEvent.filter();
    final short flags = kqueueEvent.flags();
    final int fflags = kqueueEvent.fflags();
    final long data = kqueueEvent.data();

    // 路径1:EVFILT_WRITE → 完成连接或执行 flush
    if (filter == Native.EVFILT_WRITE) {
        writeReady();
    } else if (filter == Native.EVFILT_READ) {
        // 路径2:EVFILT_READ → 读取数据并 fire channelRead
        KQueueRecvByteAllocatorHandle allocHandle = recvBufAllocHandle();
        readReady(allocHandle);
    } else if (filter == Native.EVFILT_SOCK && (fflags & Native.NOTE_RDHUP) != 0) {
        // 路径3:EVFILT_SOCK + NOTE_RDHUP → 半关闭通知
        readEOF();
        return;
    }

    // 额外检查:EV_EOF 标志表示连接重置,即使 filter 是 EVFILT_READ 也可能携带
    if ((flags & Native.EV_EOF) != 0) {
        readEOF();
    }
}
writeReady() 的分支逻辑是:如果 connectPromise != null,说明正在等待连接完成,调用 finishConnect() 完成连接并触发 fireChannelActive();否则,如果输出未关闭,直接调用 super.flush0() 执行 flush。这里注意 flush0() 在 AbstractKQueueUnsafe 中被重写------如果 writeFilterEnabled 为 true,说明写事件已经注册,flush0() 直接返回,因为 kqueue 会在可写时通知我们,不需要立即 flush。
readReady() 的实现由 KQueueStreamUnsafe(AbstractKQueueStreamChannel 的内部类)覆盖:
ini
io.netty.channel.kqueue.AbstractKQueueStreamChannel$KQueueStreamUnsafe#readReady

// 循环读取数据,直到 readEOF 或 shouldStopReading
void readReady(final KQueueRecvByteAllocatorHandle allocHandle) {
    final ChannelConfig config = config();
    if (shouldBreakReadReady(config)) {
        clearReadFilter0();
        return;
    }
    final ChannelPipeline pipeline = pipeline();
    final ByteBufAllocator allocator = config.getAllocator();
    allocHandle.reset(config);

    ByteBuf byteBuf = null;
    boolean close = false;
    try {
        do {
            // 分配 DirectBuffer(JNI 需要直接内存)
            byteBuf = allocHandle.allocate(allocator);
            // 执行实际的 socket 读取
            allocHandle.lastBytesRead(doReadBytes(byteBuf));
            if (allocHandle.lastBytesRead() <= 0) {
                byteBuf.release();
                byteBuf = null;
                close = allocHandle.lastBytesRead() < 0;
                if (close) {
                    readPending = false;
                }
                break;
            }
            allocHandle.incMessagesRead(1);
            readPending = false;
            // 将数据传递给 Pipeline
            pipeline.fireChannelRead(byteBuf);
            byteBuf = null;

            if (shouldBreakReadReady(config)) {
                break;
            }
        } while (allocHandle.continueReading());

        allocHandle.readComplete();
        pipeline.fireChannelReadComplete();

        if (close || allocHandle.isReadEOF()) {
            shutdownInput(false);
        }
    } catch (Throwable t) {
        handleReadException(pipeline, byteBuf, t, close, allocHandle);
    } finally {
        if (shouldStopReading(config)) {
            clearReadFilter0();
        }
    }
}
readReady() 的核心循环是:allocHandle.reset(config) 重置读取状态 → 循环 doReadBytes(byteBuf) 读取数据 → pipeline.fireChannelRead(byteBuf) 传递数据给业务 Handler → allocHandle.continueReading() 判断是否继续 → allocHandle.readComplete() 完成读取 → pipeline.fireChannelReadComplete() 触发读取完成事件 → 检测 EOF 或 shouldStopReading() 决定是否清除读 filter。
doReadBytes() 方法优先走 JNI 直接内存路径:
scss
io.netty.channel.kqueue.AbstractKQueueChannel#doReadBytes

// 优先走 JNI 直接内存读取(socket.readAddress),否则回退 NIO 路径
protected final int doReadBytes(ByteBuf byteBuf) throws Exception {
    int writerIndex = byteBuf.writerIndex();
    int localReadAmount;
    unsafe().recvBufAllocHandle().attemptedBytesRead(byteBuf.writableBytes());
    if (byteBuf.hasMemoryAddress()) {
        // JNI 直接内存路径:避免 JNI → Java 的数据拷贝
        localReadAmount = socket.readAddress(byteBuf.memoryAddress(), writerIndex, byteBuf.capacity());
    } else {
        // NIO 回退路径
        ByteBuffer buf = byteBuf.internalNioBuffer(writerIndex, byteBuf.writableBytes());
        localReadAmount = socket.read(buf, buf.position(), buf.limit());
    }
    if (localReadAmount > 0) {
        byteBuf.writerIndex(writerIndex + localReadAmount);
    }
    return localReadAmount;
}
doReadBytes() 的性能优化在于:如果 ByteBuf 有堆外内存地址(hasMemoryAddress()),直接通过 JNI 的 readAddress() 将数据读到堆外内存,避免了 JNI → Java 堆的数据拷贝。只有在 ByteBuf 是堆内存时,才回退到 ByteBuffer 的 NIO 路径。
doWrite() 方法在 AbstractKQueueStreamChannel 中实现,采用 writeSpinCount 循环:
scss
io.netty.channel.kqueue.AbstractKQueueStreamChannel#doWrite

// writeSpinCount 循环:批量写入 vs 单次写入,按需启用/禁用 writeFilter
protected void doWrite(ChannelOutboundBuffer in) throws Exception {
    int writeSpinCount = config().getWriteSpinCount();
    do {
        final int msgCount = in.size();
        if (msgCount > 1 && in.current() instanceof ByteBuf) {
            // 多条消息:走批量写入(writev)
            writeSpinCount -= doWriteMultiple(in);
        } else if (msgCount == 0) {
            // 全部写出:清除写 filter
            writeFilter(false);
            return;
        } else {
            // 单条消息:走单次写入
            writeSpinCount -= doWriteSingle(in);
        }
    } while (writeSpinCount > 0);

    if (writeSpinCount == 0) {
        // 写配额用完:清除写 filter,投递 flushTask 稍后重试
        writeFilter(false);
        eventLoop().execute(flushTask);
    } else {
        // 发送缓冲区满:注册写 filter,等待可写通知
        writeFilter(true);
    }
}
doWrite() 的智慧在于写 filter 的按需开关。当 msgCount == 0 时,所有数据已写出,writeFilter(false) 清除写事件,避免不必要的 EVFILT_WRITE 通知。当 writeSpinCount == 0 时,写配额用完但数据未写完,同样清除写 filter 并投递 flushTask 稍后重试。当 writeSpinCount > 0 但数据未写完时,说明发送缓冲区已满,writeFilter(true) 注册写 filter,等待内核的可写通知。
doWriteMultiple() 实现批量写入:
scss
io.netty.channel.kqueue.AbstractKQueueStreamChannel#doWriteMultiple

// 利用 IovArray 收集多个 ByteBuf,通过 writev() 系统调用批量写入
private int doWriteMultiple(ChannelOutboundBuffer in) throws Exception {
    final long maxBytesPerGatheringWrite = config().getMaxBytesPerGatheringWrite();
    // 从 NativeArrays 获取可复用的 IovArray
    IovArray array = ((NativeArrays) registration().attachment()).cleanIovArray();
    array.maxBytes(maxBytesPerGatheringWrite);
    in.forEachFlushedMessage(array);

    if (array.count() >= 1) {
        return writeBytesMultiple(in, array);
    }
    in.removeBytes(0);
    return 0;
}
doWriteMultiple() 利用 IovArray 收集 ChannelOutboundBuffer 中的多个 ByteBuf,然后调用 socket.writevAddresses(array.memoryAddress(0), cnt) 执行 writev() 系统调用,一次系统调用发送多个 buffer。adjustMaxBytesPerGatheringWrite() 根据实际写入量自适应调整 maxBytesPerGatheringWrite------如果本次写入量等于尝试写入量,翻倍;如果写入量远小于尝试写入量,减半。
readFilter(boolean) 和 writeFilter(boolean) 是 Filter 的开关控制:
java
io.netty.channel.kqueue.AbstractKQueueChannel#readFilter

// 通过 submit 启用/禁用 kqueue 中的读/写过滤器,实现按需接收事件
void readFilter(boolean readFilterEnabled) throws IOException {
    if (this.readFilterEnabled != readFilterEnabled) {
        this.readFilterEnabled = readFilterEnabled;
        submit(readFilterEnabled ? Native.READ_ENABLED_OPS : Native.READ_DISABLED_OPS);
    }
}

void writeFilter(boolean writeFilterEnabled) throws IOException {
    if (this.writeFilterEnabled != writeFilterEnabled) {
        this.writeFilterEnabled = writeFilterEnabled;
        submit(writeFilterEnabled ? Native.WRITE_ENABLED_OPS : Native.WRITE_DISABLED_OPS);
    }
}
这两个方法通过 submit() 将 Native.READ_ENABLED_OPS / Native.READ_DISABLED_OPS 等预定义常量提交给 KQueueIoHandler,在 kqueue 中启用或禁用对应的 filter。这种按需接收事件的设计避免了不必要的 IO 事件通知,减少了事件循环的空转。
最后,doRegister() 和 doDeregister() 实现了 Channel 的注册与注销:
scss
io.netty.channel.kqueue.AbstractKQueueChannel#doRegister

// 将 Channel 注册到 EventLoop 的 IoHandler,成功后依次注册 RDHUP、写、读 filter
protected void doRegister(ChannelPromise promise) {
    ((IoEventLoop) eventLoop()).register((AbstractKQueueUnsafe) unsafe()).addListener(f -> {
        if (f.isSuccess()) {
            this.registration = (IoRegistration) f.getNow();
            readReadyRunnablePending = false;

            // 注册 RDHUP 检测,用于半关闭感知
            submit(KQueueIoOps.newOps(Native.EVFILT_SOCK, Native.EV_ADD, Native.NOTE_RDHUP));

            // 如果之前已启用(如 connect 时注册了写 filter),恢复注册
            if (writeFilterEnabled) {
                submit(Native.WRITE_ENABLED_OPS);
            }
            if (readFilterEnabled) {
                submit(Native.READ_ENABLED_OPS);
            }
            promise.setSuccess();
        } else {
            promise.setFailure(f.cause());
        }
    });
}
csharp
io.netty.channel.kqueue.AbstractKQueueChannel#doDeregister

// 先解绑内核事件,再取消 JDK 层注册,防止 fd 复用后的事件串扰
protected void doDeregister() throws Exception {
    IoRegistration registration = this.registration;
    if (registration != null) {
        // 从 kqueue 移除所有 filter
        readFilter(false);
        writeFilter(false);
        clearRdHup0();

        // 取消 IoRegistration
        registration.cancel();
        this.registration = null;
    }
}
doDeregister() 的顺序至关重要:先 readFilter(false) / writeFilter(false) 从 kqueue 移除 filter,再 clearRdHup0() 清除 RDHUP 检测,最后 registration.cancel() 取消注册。这个顺序保证了先解绑内核事件再取消 JDK 层注册,防止 fd 被操作系统复用后,新 socket 的 fd 与旧 socket 相同,导致 kqueue 中的残留事件被误发给新 socket。
七、KQueueSocketChannel 与 KQueueServerSocketChannel:服务端与客户端的完整 IO 链路
在 AbstractKQueueChannel 提供的基础设施之上,KQueueSocketChannel 和 KQueueServerSocketChannel 分别实现了客户端和服务端的完整 IO 链路。它们是 KQueue 传输的"最终产品"------应用程序直接创建和使用的 Channel 实例。
KQueueSocketChannel 的类层次为:KQueueSocketChannel → AbstractKQueueStreamChannel → AbstractKQueueChannel → AbstractChannel,同时实现了 SocketChannel 接口。它提供了五个构造器(含一个已废弃的)以覆盖不同的创建场景:
java
io.netty.channel.kqueue.KQueueSocketChannel#constructors

// 默认构造器:创建 IPv4 socket,用于客户端主动连接
public KQueueSocketChannel() {
    super(null, BsdSocket.newSocketStream(), false);
    config = new KQueueSocketChannelConfig(this);
}

// 已废弃的协议族构造器:已由 SocketProtocolFamily 版本替代
@Deprecated
public KQueueSocketChannel(InternetProtocolFamily protocol) {
    this(protocol == InternetProtocolFamily.IPv4 ? SocketProtocolFamily.INET : SocketProtocolFamily.INET6);
}

// 指定协议族构造器:支持 IPv4/IPv6
public KQueueSocketChannel(SocketProtocolFamily protocol) {
    super(null, BsdSocket.newSocketStream(protocol), false);
    config = new KQueueSocketChannelConfig(this);
}

// 从已有 fd 构造:用于服务端 accept 新连接时创建子 Channel
public KQueueSocketChannel(int fd) {
    super(new BsdSocket(fd));
    config = new KQueueSocketChannelConfig(this);
}

// 包级私有构造器:由 newChildChannel() 调用,携带 parent 和 remoteAddress
KQueueSocketChannel(Channel parent, BsdSocket fd, InetSocketAddress remoteAddress) {
    super(parent, fd, remoteAddress);
    config = new KQueueSocketChannelConfig(this);
}
前两个构造器用于客户端主动创建连接,parent 为 null 且 active 为 false。第三个构造器 KQueueSocketChannel(int fd) 公开但少用,通过 isSoErrorZero(fd) 检测 SO_ERROR 确定 active 状态。第四个包级私有构造器由 KQueueServerSocketChannel.newChildChannel() 在 accept 新连接时调用,携带 parent(即 ServerSocketChannel)和 remoteAddress,此时 active 直接设为 true------因为 accept 返回的连接已经是就绪状态。
KQueueSocketChannelConfig 在构造器中完成两项关键初始化:calculateMaxBytesPerGatheringWrite() 将 maxBytesPerGatheringWrite 设为 getSendBufferSize() << 1(发送缓冲区大小的两倍),预留额外空间以应对 OS 写数据速度快于应用提供数据的情况;若平台支持(PlatformDependent.canEnableTcpNoDelayByDefault()),默认启用 TCP_NODELAY,禁用 Nagle 算法。
doConnect0() 方法是 KQueue 客户端连接的核心,支持 TCP FastOpen(TFO):
scss
io.netty.channel.kqueue.KQueueSocketChannel#doConnect0

// 若启用 TCP FastOpen 且有初始数据,在 connectx() 中同时发送数据,减少一次 RTT
protected boolean doConnect0(SocketAddress remoteAddress, SocketAddress localAddress) throws Exception {
    if (config.isTcpFastOpenConnect()) {
        ChannelOutboundBuffer outbound = unsafe().outboundBuffer();
        outbound.addFlush();
        Object curr;
        if ((curr = outbound.current()) instanceof ByteBuf) {
            ByteBuf initialData = (ByteBuf) curr;
            if (initialData.isReadable()) {
                // 将初始数据收集到 IovArray
                IovArray iov = new IovArray(config.getAllocator().directBuffer());
                try {
                    iov.add(initialData, initialData.readerIndex(), initialData.readableBytes());
                    // 调用 connectx() 在三次握手的同时发送数据
                    int bytesSent = socket.connectx(
                            (InetSocketAddress) localAddress,
                            (InetSocketAddress) remoteAddress, iov, true);
                    writeFilter(true);
                    outbound.removeBytes(Math.abs(bytesSent));
                    // 返回值正数表示连接已完成,负数表示连接进行中
                    return bytesSent > 0;
                } finally {
                    iov.release();
                }
            }
        }
    }
    return super.doConnect0(remoteAddress, localAddress);
}
TFO 的核心价值在于:在 TCP 三次握手的同时发送应用数据,将"连接建立 + 数据发送"从 2RTT 缩减为 1RTT。connectx() 是 macOS 特有的系统调用,支持在连接时携带数据。返回值正数表示连接已完成(TFO Cookie 已缓存),负数表示连接进行中(TFO Cookie 未缓存或首次连接)。writeFilter(true) 确保在连接完成后 kqueue 通过 EVFILT_WRITE 通知写入就绪。
KQueueServerSocketChannel 的类层次为:KQueueServerSocketChannel → AbstractKQueueServerChannel → AbstractKQueueChannel,同时实现 ServerSocketChannel 接口。它提供了四个构造器:默认构造器 newSocketStream() 创建 IPv4 socket;KQueueServerSocketChannel(int fd) 从已有 fd 创建;包级私有 KQueueServerSocketChannel(BsdSocket fd) 和 KQueueServerSocketChannel(BsdSocket fd, boolean active) 带 active 参数。
doBind() 方法完成端口绑定和监听:
ini
io.netty.channel.kqueue.KQueueServerSocketChannel#doBind

// 依次执行 bind → listen → 可选 TFO,最后标记 active = true
protected void doBind(SocketAddress localAddress) throws Exception {
    super.doBind(localAddress);  // socket.bind(localAddress)
    socket.listen(config.getBacklog());
    if (config.isTcpFastOpen()) {
        socket.setTcpFastOpen(true);  // 启用服务端 TCP FastOpen
    }
    active = true;
}
doBind() 调用了三个关键步骤:super.doBind(localAddress) 调用 AbstractKQueueChannel.doBind() 执行 socket.bind();socket.listen(config.getBacklog()) 将 socket 转为监听状态,backlog 由 KQueueServerSocketChannelConfig 配置;若启用了服务端 TFO(macOS 10.14+ 支持),socket.setTcpFastOpen(true) 设置 TCP_FASTOPEN 选项。
newChildChannel() 是 accept 新连接时的工厂方法:
csharp
io.netty.channel.kqueue.KQueueServerSocketChannel#newChildChannel

// 为 accept 到的新连接创建 KQueueSocketChannel,以当前 Channel 为 parent
protected Channel newChildChannel(int fd, byte[] address, int offset, int len) throws Exception {
    return new KQueueSocketChannel(this, new BsdSocket(fd), address(address, offset, len));
}
它创建 new KQueueSocketChannel(this, new BsdSocket(fd), remoteAddress),以当前 KQueueServerSocketChannel 为 parent,新 socket fd 和远程地址为参数。这个 Channel 随后通过 pipeline.fireChannelRead(childChannel) 传递给业务 Handler。
KQueueServerSocketUnsafe 是 AbstractKQueueServerChannel 的内部类,其 readReady() 方法实现了 accept 循环:
ini
io.netty.channel.kqueue.AbstractKQueueServerChannel$KQueueServerSocketUnsafe#readReady

// accept 循环:不断 accept 直到返回 -1,每个新连接通过 newChildChannel() 创建 Channel
void readReady(KQueueRecvByteAllocatorHandle allocHandle) {
    assert eventLoop().inEventLoop();
    final ChannelConfig config = config();
    if (shouldBreakReadReady(config)) {
        clearReadFilter0();
        return;
    }
    final ChannelPipeline pipeline = pipeline();
    allocHandle.reset(config);
    allocHandle.attemptedBytesRead(1);

    Throwable exception = null;
    try {
        try {
            do {
                // 调用 socket.accept() 接收新连接
                int acceptFd = socket.accept(acceptedAddress);
                if (acceptFd == -1) {
                    allocHandle.lastBytesRead(-1);
                    break;
                }
                allocHandle.lastBytesRead(1);
                allocHandle.incMessagesRead(1);
                readPending = false;
                // 创建子 Channel 并通过 Pipeline 传播
                pipeline.fireChannelRead(newChildChannel(acceptFd, acceptedAddress, 1,
                                                         acceptedAddress[0]));
            } while (allocHandle.continueReading());
        } catch (Throwable t) {
            exception = t;
        }
        allocHandle.readComplete();
        pipeline.fireChannelReadComplete();
        if (exception != null) {
            pipeline.fireExceptionCaught(exception);
        }
    } finally {
        if (shouldStopReading(config)) {
            clearReadFilter0();
        }
    }
}
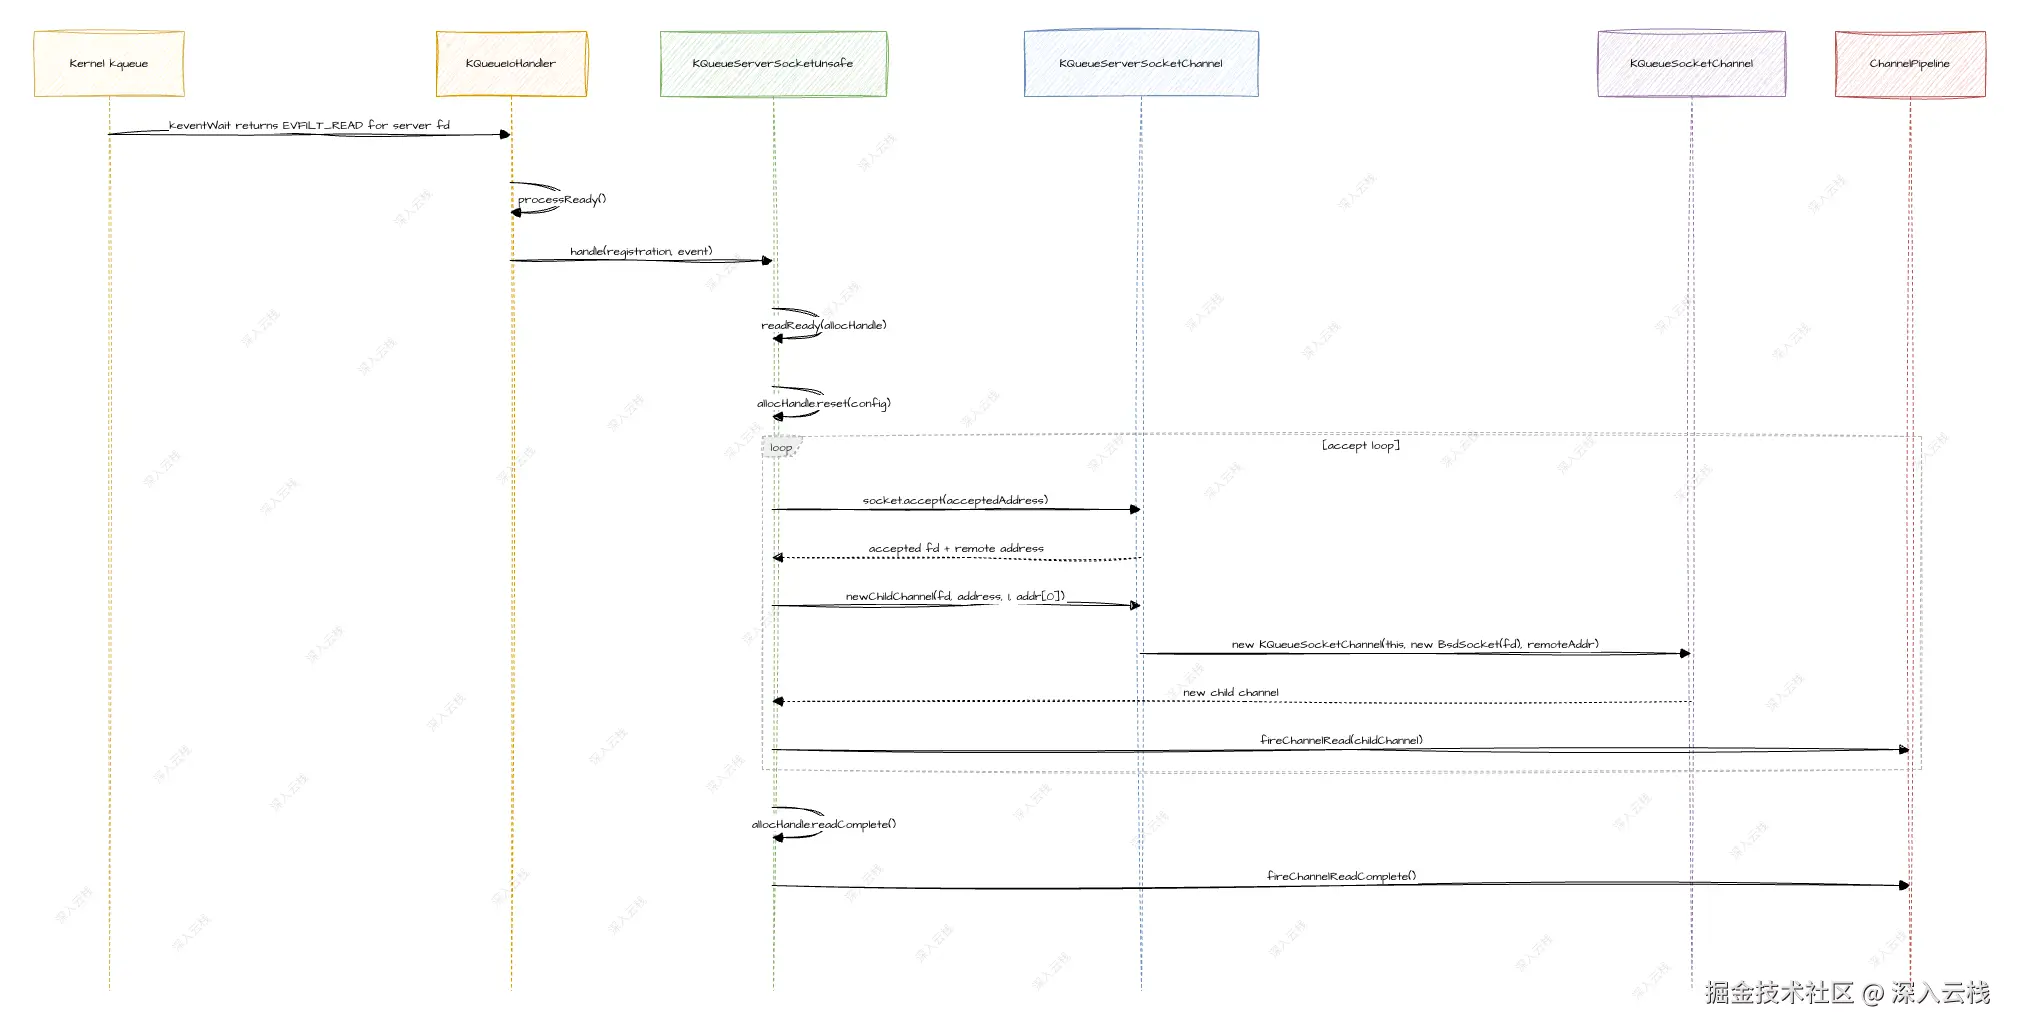
readReady() 的关键设计是 acceptedAddress 字节数组的复用。它声明为 private final byte[] acceptedAddress = new byte[25],每次 accept 时复用同一个数组:24 字节存储地址 + 1 字节存储地址长度。socket.accept(acceptedAddress) 是 JNI 方法,将远程地址写入 acceptedAddress,返回新的 fd。acceptedAddress[0] 存储了地址的实际长度,address(acceptedAddress, 1, acceptedAddress[0]) 从偏移 1 处解析地址。这种复用避免了每次 accept 创建新字节数组的 GC 开销。
下面是 KQueueServerSocketChannel accept 新连接的完整时序图:
KQueueRecvByteAllocatorHandle 是 KQueue 传输中读取控制的最后一块拼图。它的核心是 maybeMoreDataToRead() 方法,解决了 EV_CLEAR 边缘触发模式下的读取停止问题:
vbnet
io.netty.channel.kqueue.KQueueRecvByteAllocatorHandle#maybeMoreDataToRead

// EV_CLEAR 模式下,判断是否还有更多数据可读
private boolean maybeMoreDataToRead() {
    /*
     * kqueue with EV_CLEAR flag set requires that we read until we consume "data" bytes
     * (see kqueue man page). However in order to respect auto read we supporting reading
     * to stop if auto read is off. If auto read is on we force reading to continue to
     * avoid a StackOverflowError between channelReadComplete and reading from the channel.
     */
    return lastBytesRead() == attemptedBytesRead();
}
在 EV_CLEAR 模式下,kqueue 的 kevent.data 字段指示了可读字节数,要求应用层读取直到消耗完这些字节。maybeMoreDataToRead() 的判断逻辑是:如果本次实际读取量(lastBytesRead())等于尝试读取量(attemptedBytesRead()),说明可能还有更多数据------因为 allocate() 分配了足够的空间,读满了说明缓冲区已被填满,底层可能还有剩余数据。allocate() 方法强制使用 PreferredDirectByteBufAllocator 分配 DirectBuffer,因为 JNI 的 readAddress() 只能操作直接内存。
八、KQueueChannelOption 与 BSD 特有配置
KQueue 传输的一个差异化优势在于它可以利用 BSD 内核特有的 socket 选项。KQueueChannelOption 类定义了三个 BSD 特有的 ChannelOption:
scala
io.netty.channel.kqueue.KQueueChannelOption

// 定义 BSD 特有的 ChannelOption,继承 UnixChannelOption
public final class KQueueChannelOption<T> extends UnixChannelOption<T> {
    // 发送低水位:控制 socket 发送缓冲区的最低水位
    public static final ChannelOption<Integer> SO_SNDLOWAT =
            valueOf(KQueueChannelOption.class, "SO_SNDLOWAT");
    // BSD 的 TCP_CORK 等价物:延迟发送直到缓冲区满或选项关闭
    public static final ChannelOption<Boolean> TCP_NOPUSH =
            valueOf(KQueueChannelOption.class, "TCP_NOPUSH");
    // AcceptFilter:在连接数据到达前不通知应用层
    public static final ChannelOption<AcceptFilter> SO_ACCEPTFILTER =
            valueOf(KQueueChannelOption.class, "SO_ACCEPTFILTER");
}SO_SNDLOWAT(发送低水位)控制 socket 发送缓冲区的最低水位------只有当缓冲区中有至少 SO_SNDLOWAT 字节的数据时,EVFILT_WRITE 才会触发。这对于需要批量发送数据的场景非常有用,可以避免每次只发送少量数据导致的频繁系统调用。KQueueSocketChannelConfig 通过 setSndLowAt(int) 和 getSndLowAt() 方法暴露这个选项。
TCP_NOPUSH 是 BSD 特有的选项,与 Linux 的 TCP_CORK 语义相似。启用后,TCP 栈会延迟发送数据,直到缓冲区填满或选项关闭,这可以减少小包数量,提高网络利用率。KQueueSocketChannelConfig 通过 setTcpNoPush(boolean) 和 isTcpNoPush() 方法控制。
AcceptFilter 是最具 BSD 特色的选项。它利用内核的 SO_ACCEPTFILTER 选项,在连接数据到达前不通知应用层 accept。需要注意的是,SO_ACCEPTFILTER 是 FreeBSD 特有功能,macOS 上不可用------当平台不支持时,getAcceptFilter() 返回 PLATFORM_UNSUPPORTED 哨兵值。AcceptFilter 类本身非常简单:
arduino
io.netty.channel.kqueue.AcceptFilter

// 封装 BSD accept filter 的名称和参数
public final class AcceptFilter {
    static final AcceptFilter PLATFORM_UNSUPPORTED = new AcceptFilter("", "");
    private final String filterName;
    private final String filterArgs;

    public AcceptFilter(String filterName, String filterArgs) {
        this.filterName = ObjectUtil.checkNotNull(filterName, "filterName");
        this.filterArgs = ObjectUtil.checkNotNull(filterArgs, "filterArgs");
    }
}
AcceptFilter 有两种典型配置。"httpready" 过滤器会在 HTTP 请求完整到达后才通知应用层 accept------这意味着 accept() 返回的 socket 立即可读,避免了 accept 空连接后再等待数据到达的浪费。"dataready" 过滤器在首个数据字节到达后通知。这两种过滤器本质上都是在内核层面做了"延迟 accept"------在真正有数据可读之前,不浪费应用层的线程资源去 accept 一个暂时无数据的连接。KQueueServerSocketChannelConfig 通过 setAcceptFilter(AcceptFilter) 和 getAcceptFilter() 方法设置。
KQueueServerSocketChannelConfig 还支持 SO_REUSEPORT 端口复用。setReusePort(true) 允许多个 socket 绑定同一端口,内核负责在多个 socket 之间进行负载均衡------这在多进程/多线程 accept 同一端口时避免了"惊群"问题。构造器中默认启用 SO_REUSEADDR(setReuseAddress(true)),与 JDK NIO 的行为保持一致。
KQueueChannelConfig 作为配置基类,还提供了 maxBytesPerGatheringWrite 的上限控制。setMaxBytesPerGatheringWrite(long) 通过 min(SSIZE_MAX, maxBytesPerGatheringWrite) 限制上限,SSIZE_MAX 为 Long.MAX_VALUE。setRecvByteBufAllocator() 要求 allocator.newHandle() 返回 ExtendedHandle 类型------这是 KQueue 传输的硬性要求,因为 KQueueRecvByteAllocatorHandle 的 maybeMoreDataToRead() 依赖 ExtendedHandle 的扩展方法。
九、全文链路串联
将前文分析的各个组件串联起来,一条完整的 KQueue 传输链路是这样的:
服务端启动链路 :KQueueServerSocketChannel 构造 → doBind() 执行 bind() + listen() + 可选 TFO → doRegister() 将 Channel 注册到 KQueueIoHandler → 注册 EVFILT_SOCK 的 NOTE_RDHUP 检测 → 注册 EVFILT_READ 监听 accept 事件。
事件循环链路 :KQueueIoHandler.run() 被 SingleThreadIoEventLoop 调用 → selectStrategy.calculateStrategy() 计算策略 → kqueueWait() 阻塞等待(keventWait() 一次调用同时提交 changeList 并接收 eventList)→ changeList.clear() 清空 → processReady() 遍历 eventList 分发事件 → processCancelledRegistrations() 清理已取消注册。
事件分发链路 :processReady() 遍历 eventList → 过滤 EVFILT_USER 和 EV_ERROR → 通过 udata 查找 DefaultKqueueIoRegistration → registration.handle() 调用 event.update() 更新 KQueueIoEvent → handle.handle(this, event) 分发给 AbstractKQueueUnsafe.handle() → 根据 filter 路由到 writeReady() / readReady() / readEOF()。
读事件链路 :EVFILT_READ 就绪 → KQueueStreamUnsafe.readReady() → allocHandle.reset(config) → 循环 doReadBytes(byteBuf)(优先 JNI readAddress())→ pipeline.fireChannelRead(byteBuf) → allocHandle.continueReading() 调用 maybeMoreDataToRead() 判断是否继续 → allocHandle.readComplete() → pipeline.fireChannelReadComplete()。
写事件链路 :EVFILT_WRITE 就绪 → writeReady() → 若 connectPromise != null 则 finishConnect() + fireChannelActive() → 否则 flush0() → doWrite() 进入 writeSpinCount 循环 → doWriteMultiple() 收集 IovArray → socket.writevAddresses() 批量写入 → 按需 writeFilter(true/false) 控制写事件订阅。
Accept 链路 :服务端 EVFILT_READ 就绪 → KQueueServerSocketUnsafe.readReady() → 循环 socket.accept(acceptedAddress) → newChildChannel(fd, address) 创建 KQueueSocketChannel → pipeline.fireChannelRead(childChannel) → pipeline.fireChannelReadComplete()。
KQueue 传输的核心设计思想可以凝练为三个关键词。 "一次调用,双重语义" :kevent() 一次系统调用同时完成事件注册和事件获取,changelist 和 eventlist 在同一个 kevent() 调用中传递,减少了系统调用次数。 "堆外内存,零拷贝" :KQueueEventArray 通过 PlatformDependent 直接操作堆外内存中的 kevent 结构体数组,避免 JNI 数据拷贝;doReadBytes() 和 doWriteBytes() 优先走 JNI 直接内存路径。 "Filter 模型,按需订阅" :readFilter(true/false) 和 writeFilter(true/false) 按需启用/禁用 filter,EV_CLEAR 边缘触发 + maybeMoreDataToRead() 精确控制读取停止时机,AcceptFilter 在内核层面延迟 accept 直到数据到达。
全文小结
本文聚焦 Netty 4.2 的 KQueue 原生传输实现,从系统调用层、JNI 层、Netty 抽象层三个维度,深入分析了 kqueue/kevent 的 Filter 模型如何通过 KQueueIoHandler、KQueueEventArray、KQueueIoHandle 等组件,在 macOS/BSD 系统上实现高性能事件驱动 IO。
在系统调用层,kqueue 的 Filter 模型通过 EVFILT_READ、EVFILT_WRITE、EVFILT_SOCK、EVFILT_USER 等过滤器统一管理多种事件源,kevent() 一次系统调用同时完成事件注册和获取,EV_CLEAR 边缘触发模式与 maybeMoreDataToRead() 配合实现精确的读取控制。在 JNI 层,KQueue 类通过静态初始化块中的 Native.newKQueue() 探测系统支持,KQueueStaticallyReferencedJniMethods 提供编译时确定的常量映射,KQueueEventArray 利用堆外 DirectBuffer 存储 kevent 结构体数组并通过 PlatformDependent 直接读取字段。在 Netty 抽象层,KQueueIoHandler 是事件循环的核心调度器,KQueueIoHandle/KQueueIoEvent/KQueueIoOps 三层抽象封装了 ident 标识、事件六元组和操作四元组,AbstractKQueueUnsafe.handle() 根据 filter 类型分发到 writeReady()、readReady()、readEOF() 三条路径。KQueueSocketChannel 和 KQueueServerSocketChannel 提供了完整的客户端和服务端 IO 链路,支持 doWriteMultiple() 批量写入、TCP FastOpen 连接优化、AcceptFilter 延迟 accept 等 BSD 特有特性。
原创不易,如果本文对您有帮助,带来了些许灵感或启发,烦请动动小手点赞、关注、转发、收藏。这是作者持续更新的动力源泉,衷心感谢您的支持。我会尽量在工作之余,为大家带来更高品质的内容,努力保持周更。