一、项目介绍
源码下载 https://download.csdn.net/download/lucky_fang/93523305
项目使用vue3+vite+element-plus+pinia+router+axios+echarts等搭建,每个页面已经完成了对后端api请求的编码,各种交互已经写好,同时通过pinia实现数据同步与通讯,数据采用mock方式模拟后端进行api请求动态查询数据,同时也支持通过真实后端api请求获取真实数据,在后面会详细介绍如何使用。
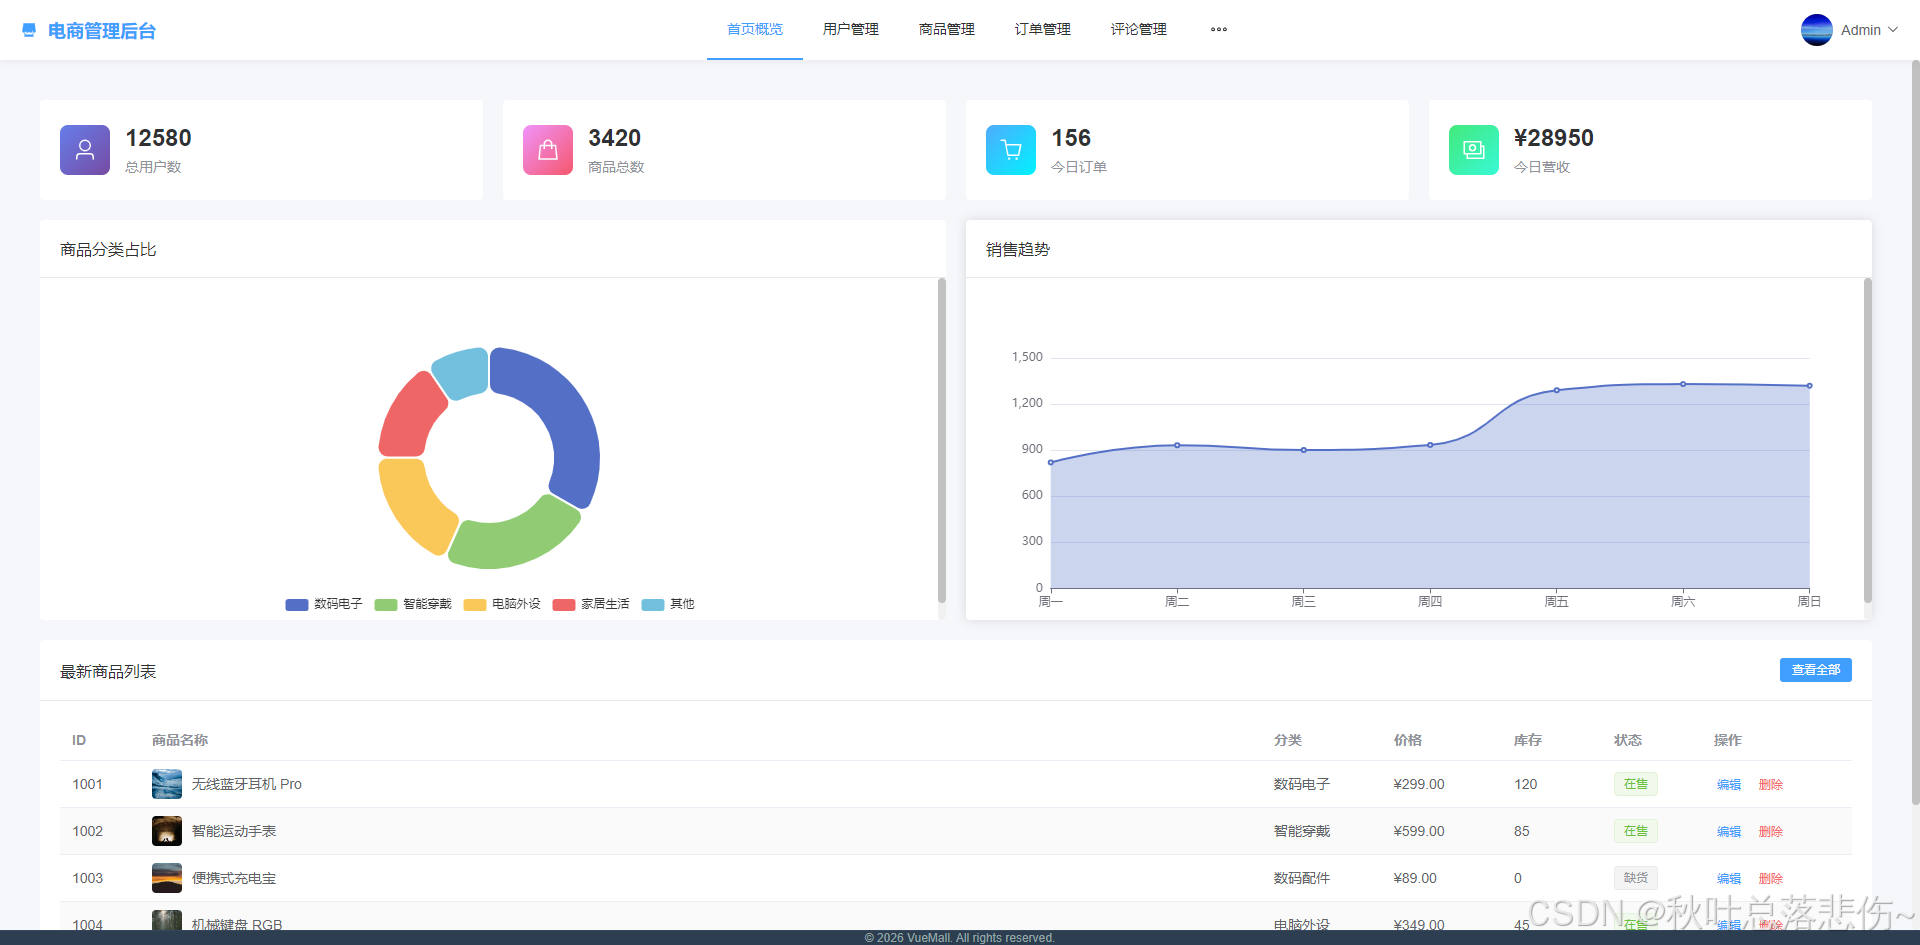
其中首页作为数据统计页面,其他页面包含登录页、用户管理、商品管理、订单管理、评论管理、轮播图管理和个人中心等页面。
项目同时采用组件来布局整个框架,顶部菜单栏+具体页面功能展示容器+底部,每个页面是独立,菜单布局作为共用的结构来设计。
element-plus官方文档:Overview 组件总览 | Element Plus
二、项目实现
1.项目截图
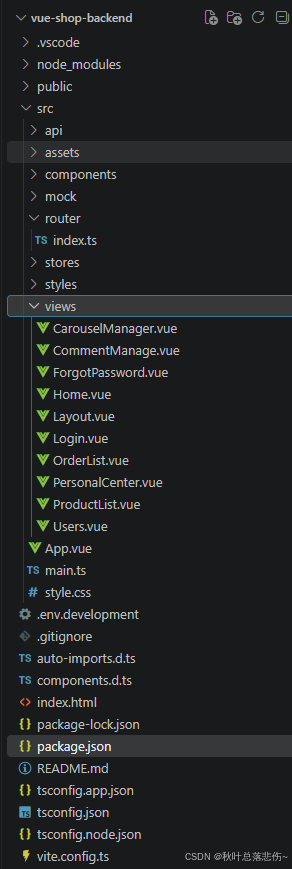
项目目录主要分为api、components、mock、router、stores、views,其中api存放是各个页面的请求文件;components是组件文件存放目录,比如页面共用底部文件;mock存放的是各个页面模拟后端api请求后查询获取的返回数据;router是项目各个路由配置,在这里可以控制指定哪些页面需要登录获取到token后才能访问,否则跳到登录页面;stores是对登录信息进行整理的文件,比如当前登录用户信息、token管理、退出登录等;views是各个功能具体页面。
vscode截图:
2.api+mock模拟实现数据
通过前缀/api来指定mock请求,统一转发请求到mock。
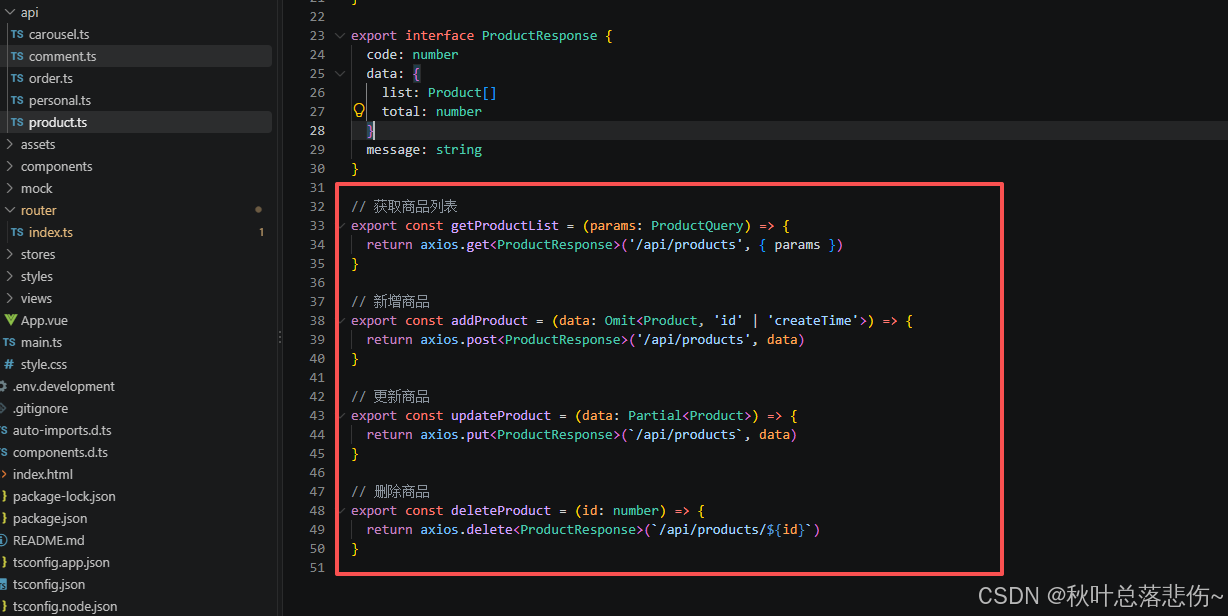
商品的api:
javascript
// 获取商品列表
export const getProductList = (params: ProductQuery) => {
  return axios.get<ProductResponse>('/api/products', { params })
}

// 新增商品
export const addProduct = (data: Omit<Product, 'id' | 'createTime'>) => {
  return axios.post<ProductResponse>('/api/products', data)
}

// 更新商品
export const updateProduct = (data: Partial<Product>) => {
  return axios.put<ProductResponse>(`/api/products`, data)
}

// 删除商品
export const deleteProduct = (id: number) => {
  return axios.delete<ProductResponse>(`/api/products/${id}`)
}
商品的mock:
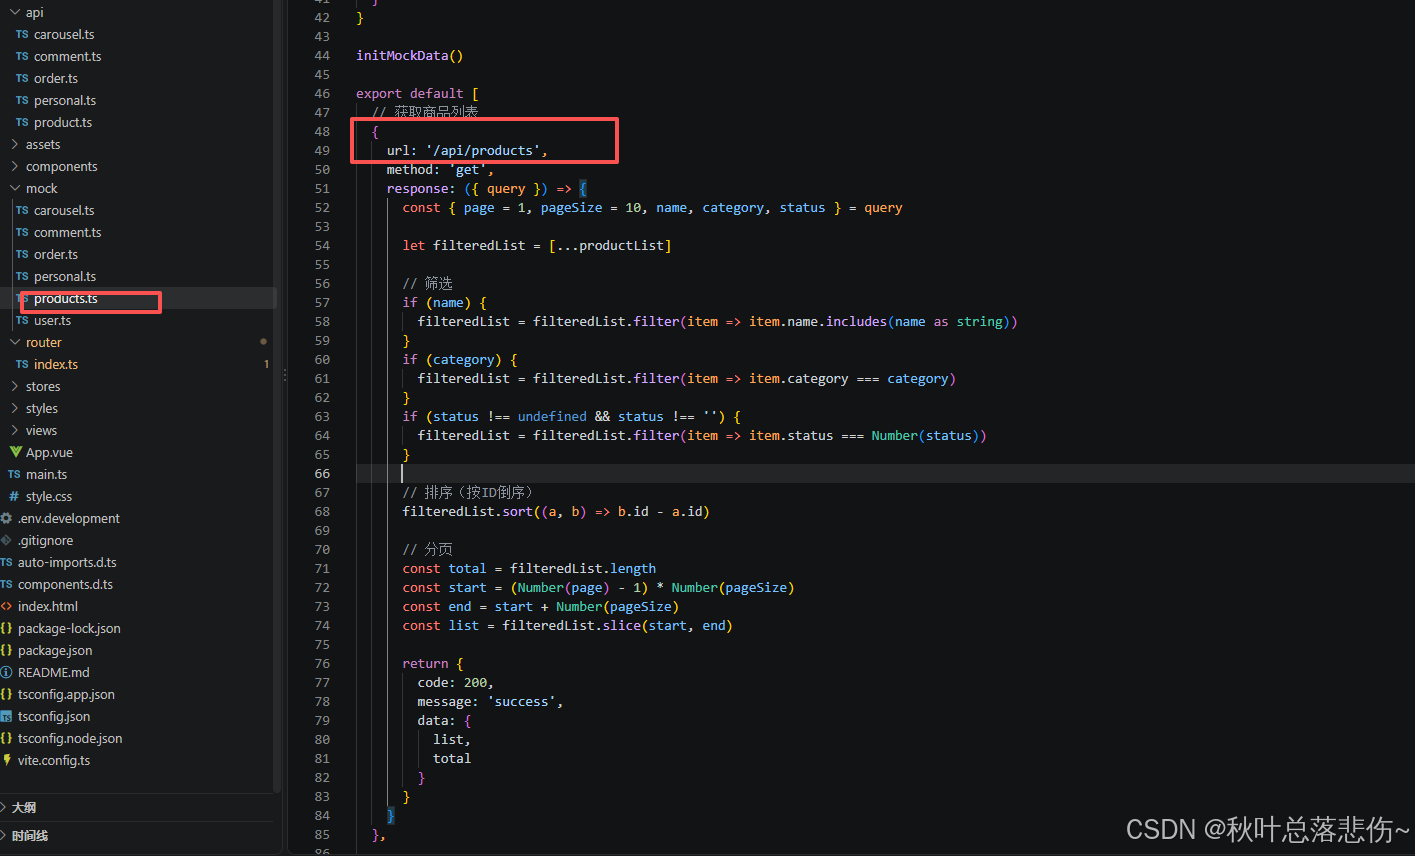
javascript
export default [
  // 获取商品列表
  {
    url: '/api/products',
    method: 'get',
    response: ({ query }) => {
      const { page = 1, pageSize = 10, name, category, status } = query

      let filteredList = [...productList]

      // 筛选
      if (name) {
        filteredList = filteredList.filter(item => item.name.includes(name as string))
      }
      if (category) {
        filteredList = filteredList.filter(item => item.category === category)
      }
      if (status !== undefined && status !== '') {
        filteredList = filteredList.filter(item => item.status === Number(status))
      }

      // 排序(按ID倒序)
      filteredList.sort((a, b) => b.id - a.id)

      // 分页
      const total = filteredList.length
      const start = (Number(page) - 1) * Number(pageSize)
      const end = start + Number(pageSize)
      const list = filteredList.slice(start, end)

      return {
        code: 200,
        message: 'success',
        data: {
          list,
          total
        }
      }
    }
  },

  // 新增商品
  {
    url: '/api/products',
    method: 'post',
    response: ({ body }) => {
      const newProduct: Product = {
        id: productList.length > 0 ? Math.max(...productList.map(p => p.id)) + 1 : 1,
        name: body.name,
        category: body.category,
        price: body.price,
        stock: body.stock,
        status: body.status || 1,
        createTime: Mock.Random.datetime('yyyy-MM-dd HH:mm:ss'),
        description: body.description || ''
      }
      productList.unshift(newProduct)
      return {
        code: 200,
        message: '新增成功',
        data: null
      }
    }
  },

  // 更新商品
  {
    url: '/api/products',
    method: 'put',
    response: ({ body }) => {
      const id = Number(body.id)
      const index = productList.findIndex(p => p.id === id)
      if (index !== -1) {
        productList[index] = { ...productList[index], ...body }
        return {
          code: 200,
          message: '更新成功',
          data: null
        }
      }
      return {
        code: 404,
        message: '商品不存在',
        data: null
      }
    }
  },

  // 删除商品
  {
    url: '/api/products/(\\d+)',
    method: 'delete',
    response: (req) => {
      const id = Number(req.query[0])
      const index = productList.findIndex(p => p.id === id)
      if (index !== -1) {
        productList.splice(index, 1)
        return {
          code: 200,
          message: '删除成功',
          data: null
        }
      }
      return {
        code: 404,
        message: '商品不存在',
        data: null
      }
    }
  }
] as MockMethod[]
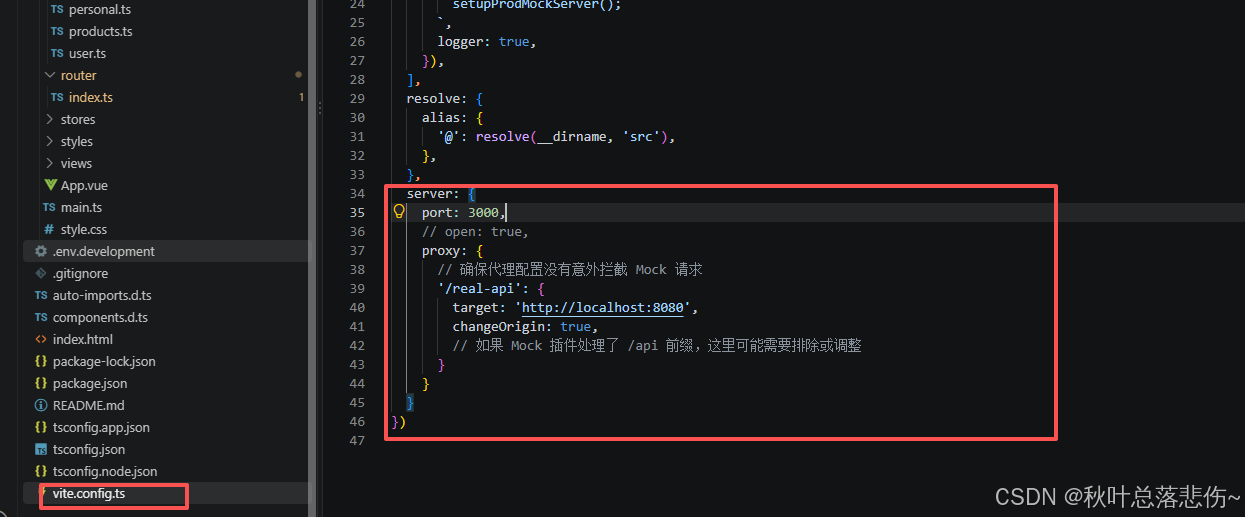
特别注意的是,为了避免mock与真实请求到后端的api冲突,最好用不同的前缀区分mock与真实api请求,比如我这里是/api代表mock的请求,/real-api代表测试真实后端api,如下图配置。
3.按需导入插件
项目使用按需加载依赖的方式,采用插件unplugin-auto-import,比如页面不用每次import,可以直接使用ElMessage、ElMessageBox等。
unplugin-auto-import 是一款强大的前端构建插件,旨在解决现代开发中频繁手动编写 import 语句的痛点。它能在编译时自动分析代码,按需插入导入语句,让你直接使用如 ref、computed、useState 等 API 而无需显式引入。
该插件基于 unplugin 架构,支持 Vite 、Webpack 、Rollup 、esbuild 、Rspack 等多种构建工具,并完美兼容 Vue 、React 、Svelte 等主流框架以及 TypeScript。
以下是核心功能、配置方法及常见问题的完整指南:
1. 核心优势
- 简化代码 :移除文件顶部冗长的
import { ref, reactive, onMounted } from 'vue'语句。 - 按需导入:仅在代码中实际使用到某个 API 时才生成导入语句,保持 bundle 体积最小化(Tree-shakable)。
- 类型安全 :自动生成 TypeScript 类型声明文件(
.d.ts),确保 IDE 智能提示和类型检查正常工作。 - 多框架支持:内置 Vue、Vue Router、Pinia、React、React Router、VueUse 等常用库的预设配置。
javascript
import { ElMessage, ElMessageBox} from 'element-plus'4.项目依赖package.json
javascript
{
  "name": "my-shop-vue",
  "private": true,
  "version": "0.0.0",
  "type": "module",
  "scripts": {
    "dev": "vite",
    "build": "vue-tsc -b && vite build",
    "preview": "vite preview"
  },
  "dependencies": {
    "@element-plus/icons-vue": "^2.3.2",
    "element-plus": "^2.14.6",
    "vue": "^3.5.42",
    "axios": "^1.6.0",
    "pinia": "^2.1.0",
    "vue-router": "^4.3.0",
    "echarts": "^5.4.3"
  },
  "devDependencies": {
    "@types/node": "^24.13.3",
    "@vitejs/plugin-vue": "^6.0.8",
    "@vue/tsconfig": "^0.9.1",
    "typescript": "~6.0.2",
    "unplugin-auto-import": "^21.1.0",
    "unplugin-vue-components": "^32.1.0",
    "vite": "^8.3.0",
    "vue-tsc": "^3.3.11",
    "sass": "^1.70.0",
    "mockjs": "^1.1.0",
    "vite-plugin-mock": "^2.9.6",
    "@types/mockjs": "^1.0.10"
  }
}
三、项目概述
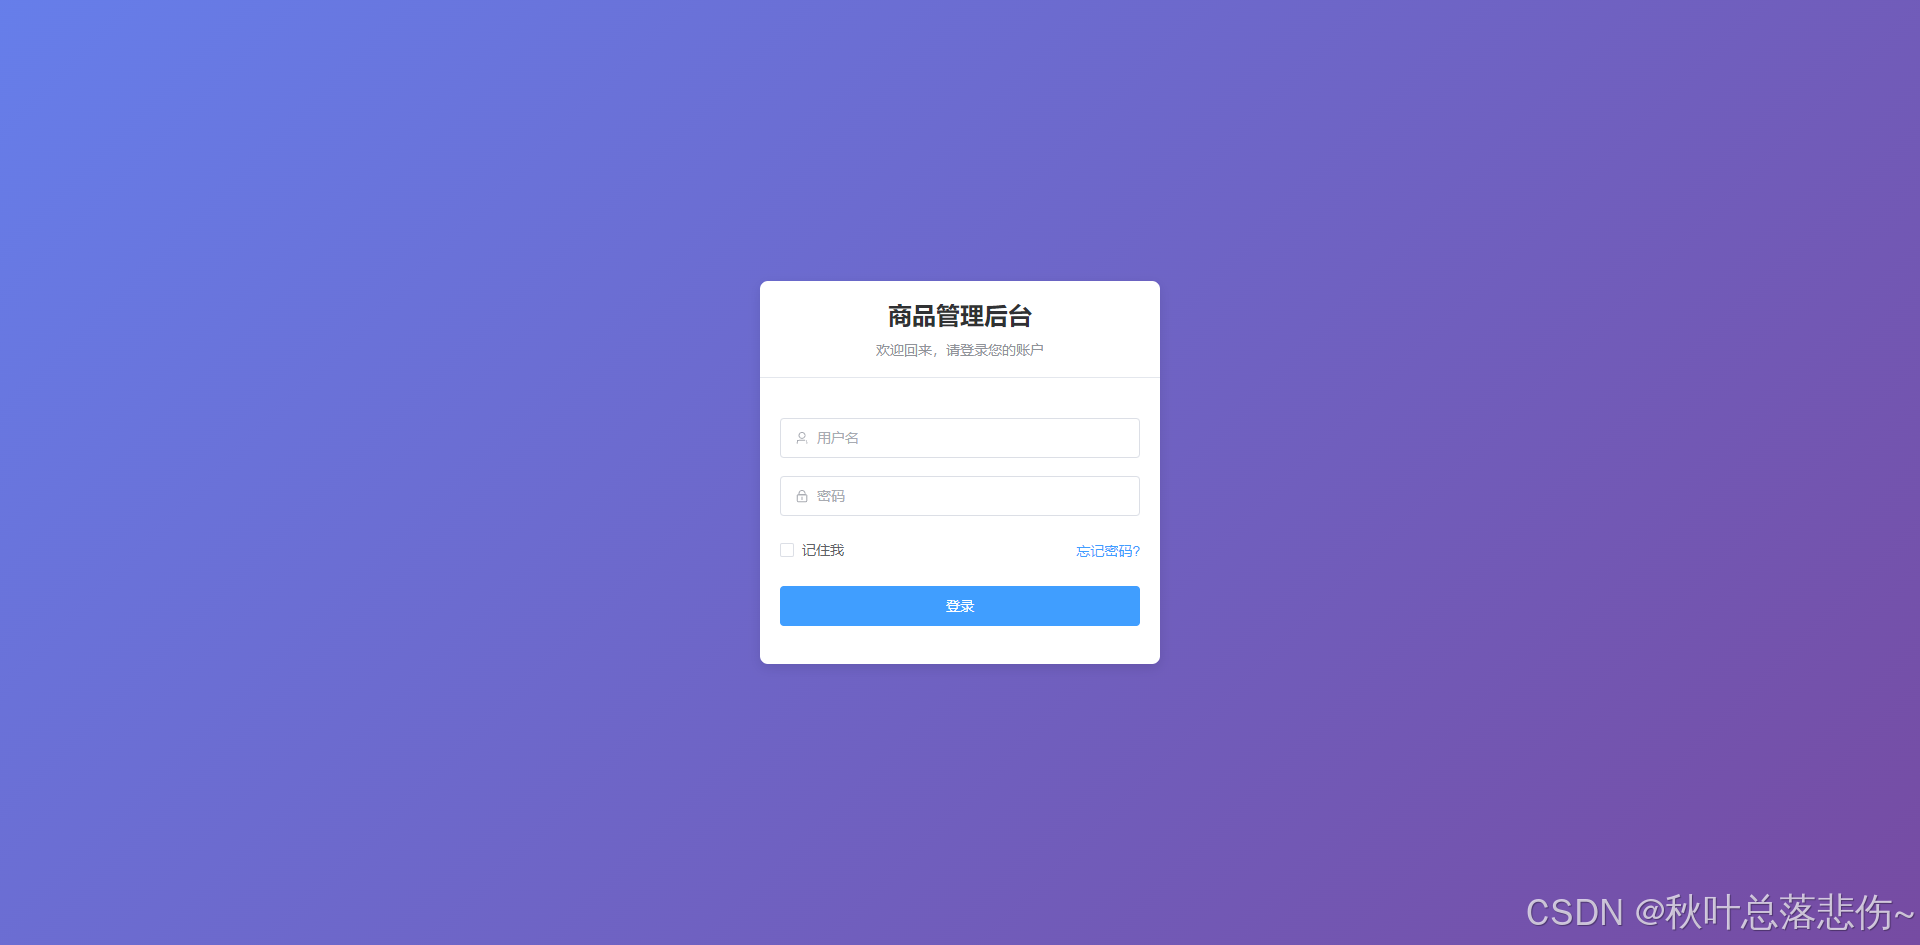
1、登录页
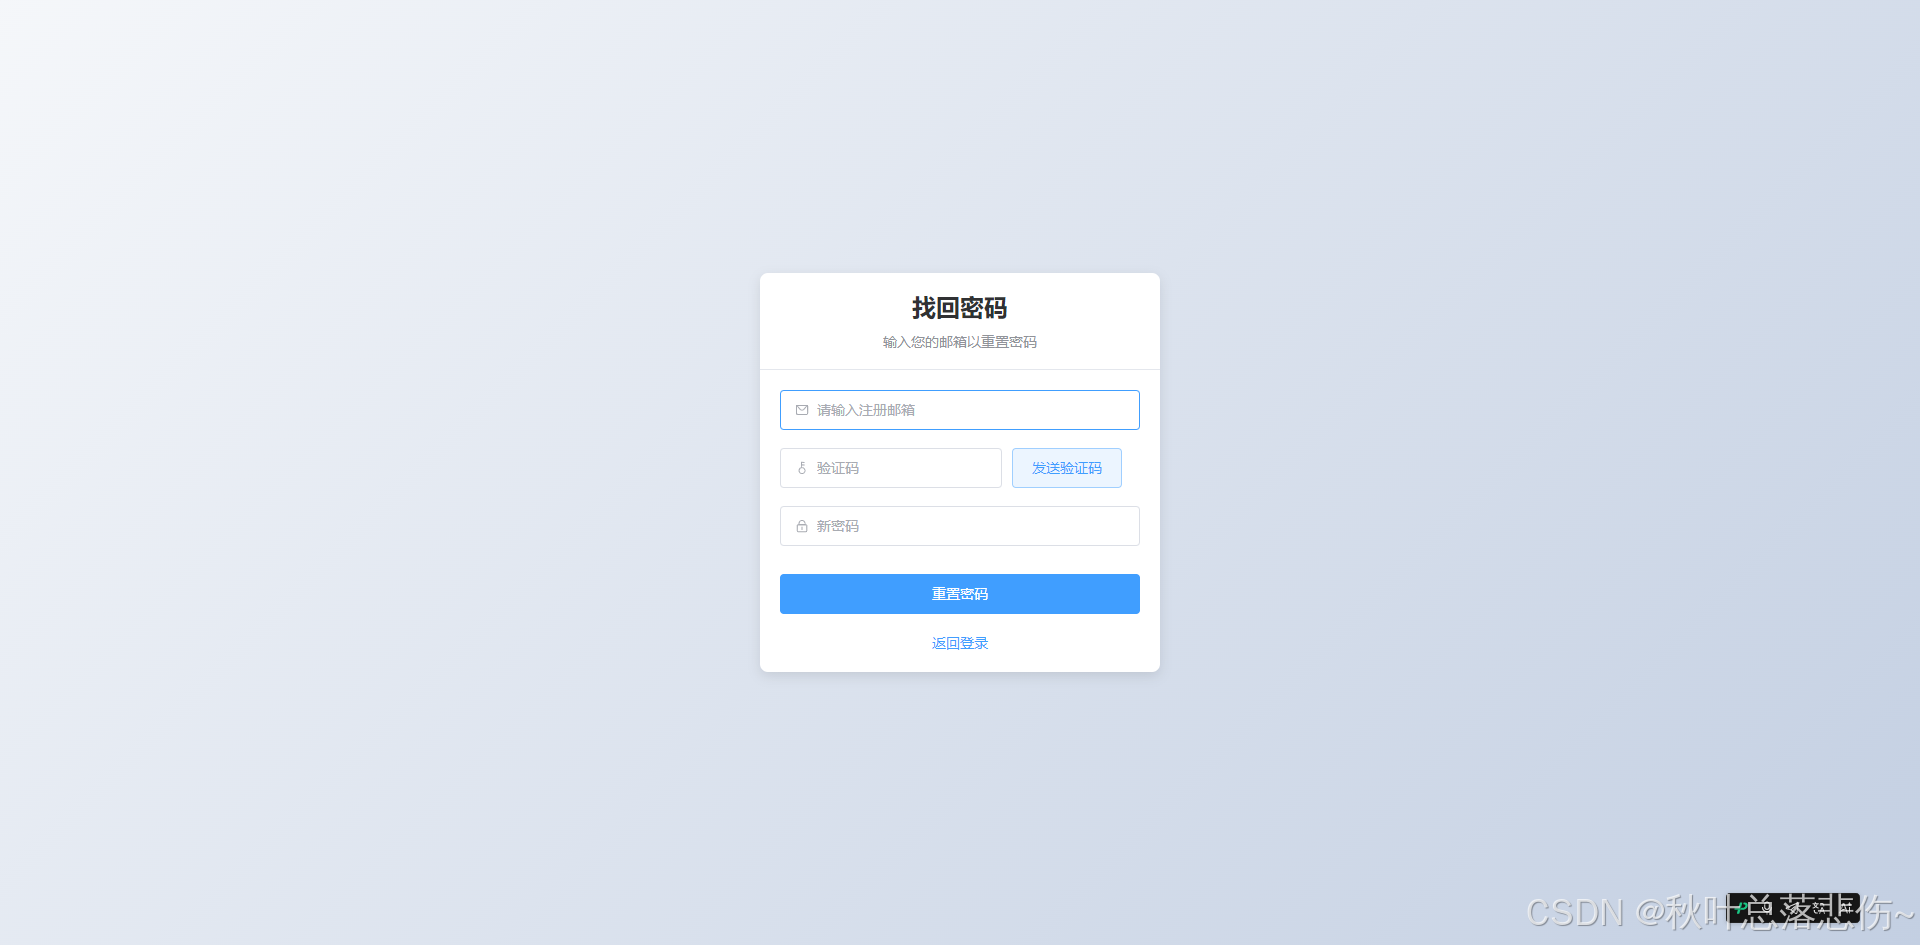
2.忘记密码页
3.首页
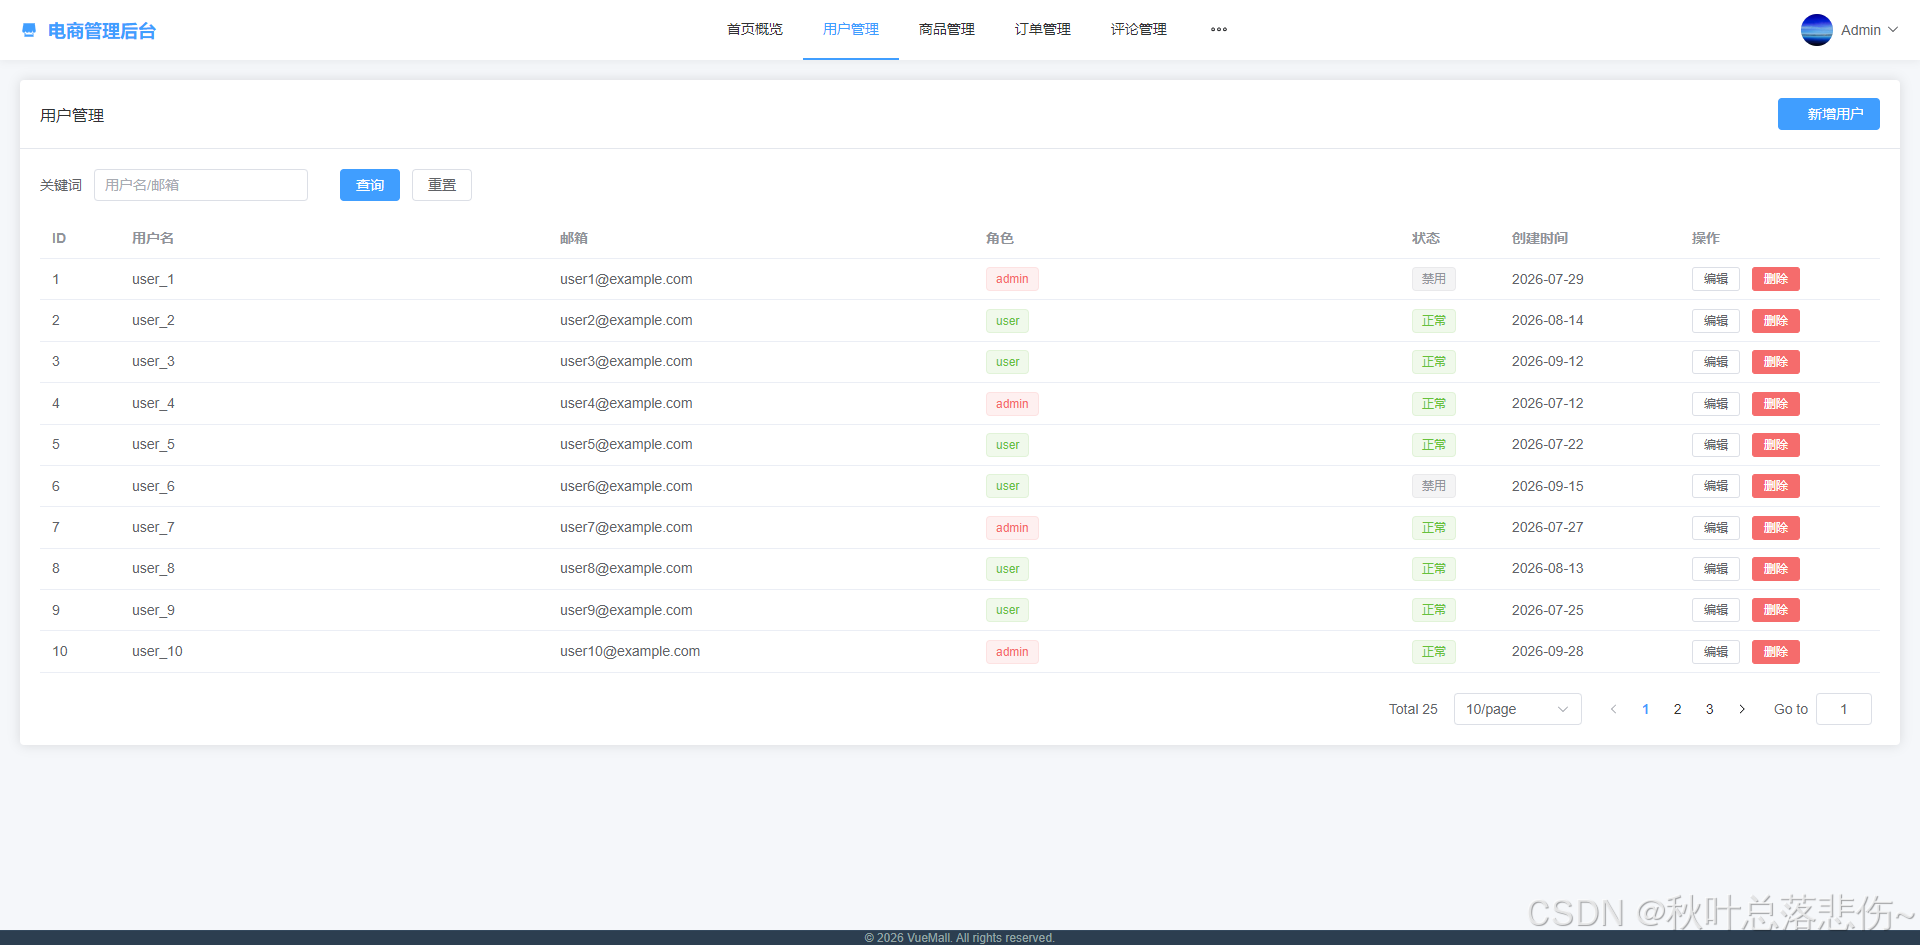
4.用户管理
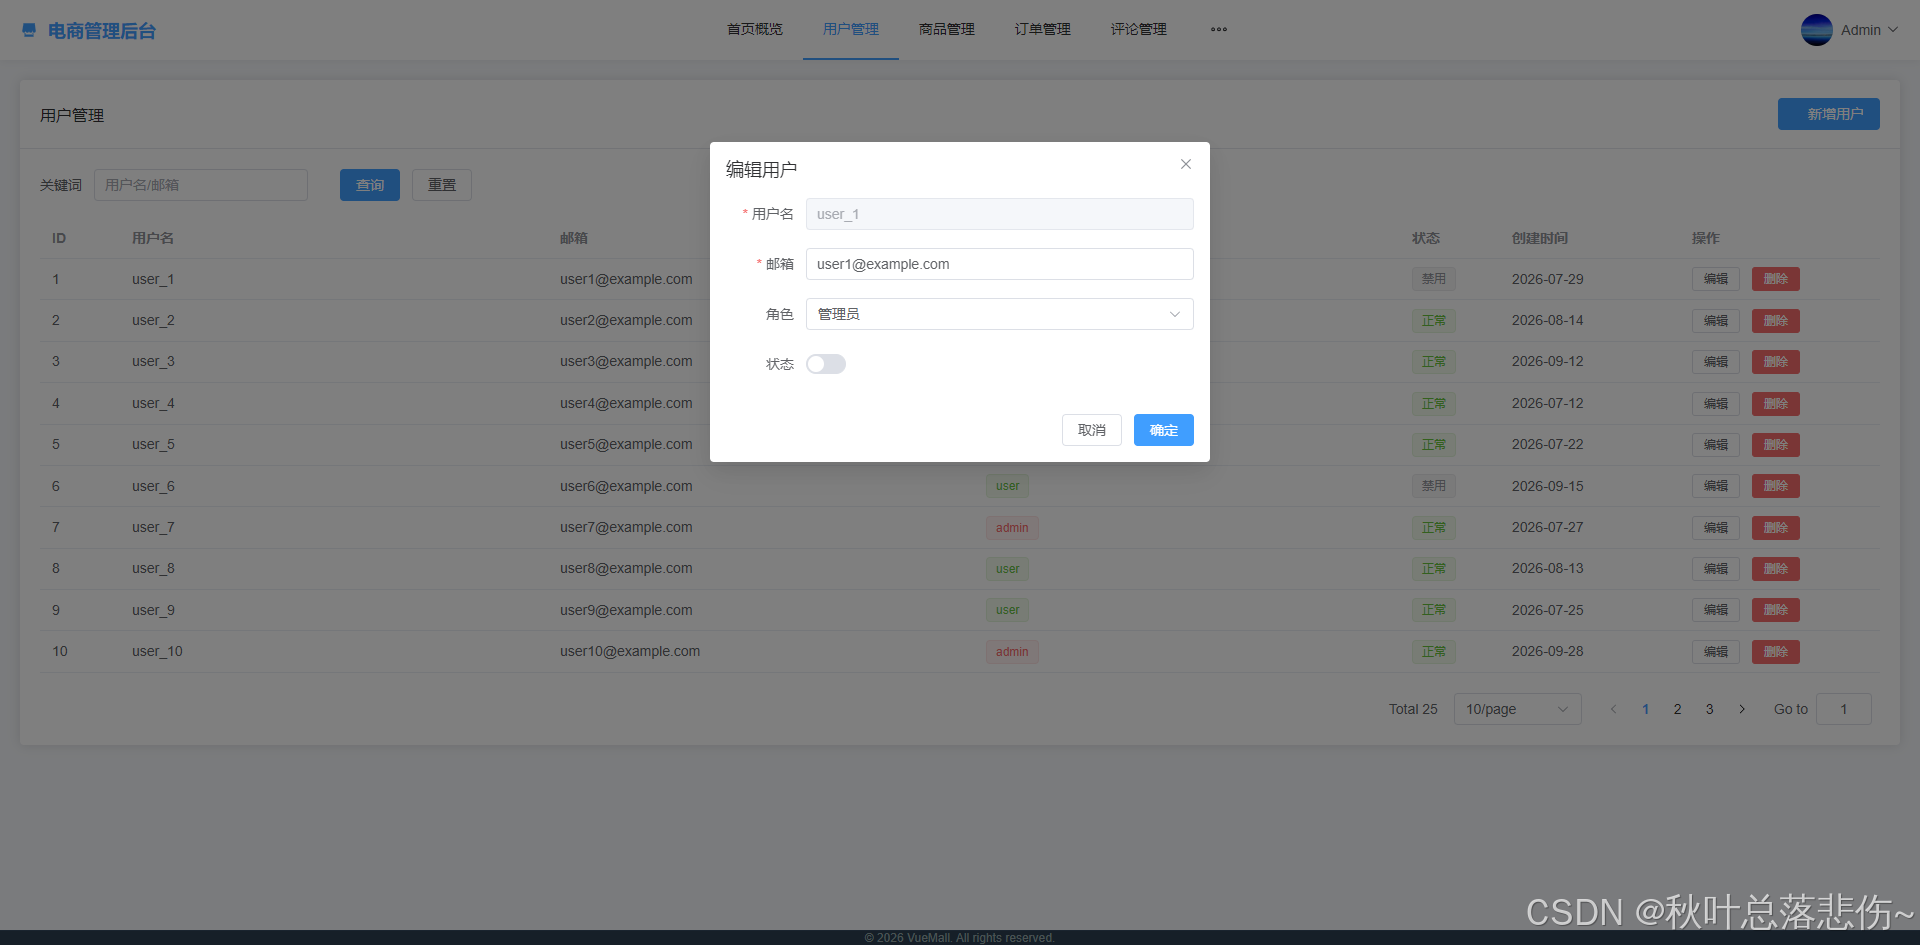
5.商品管理
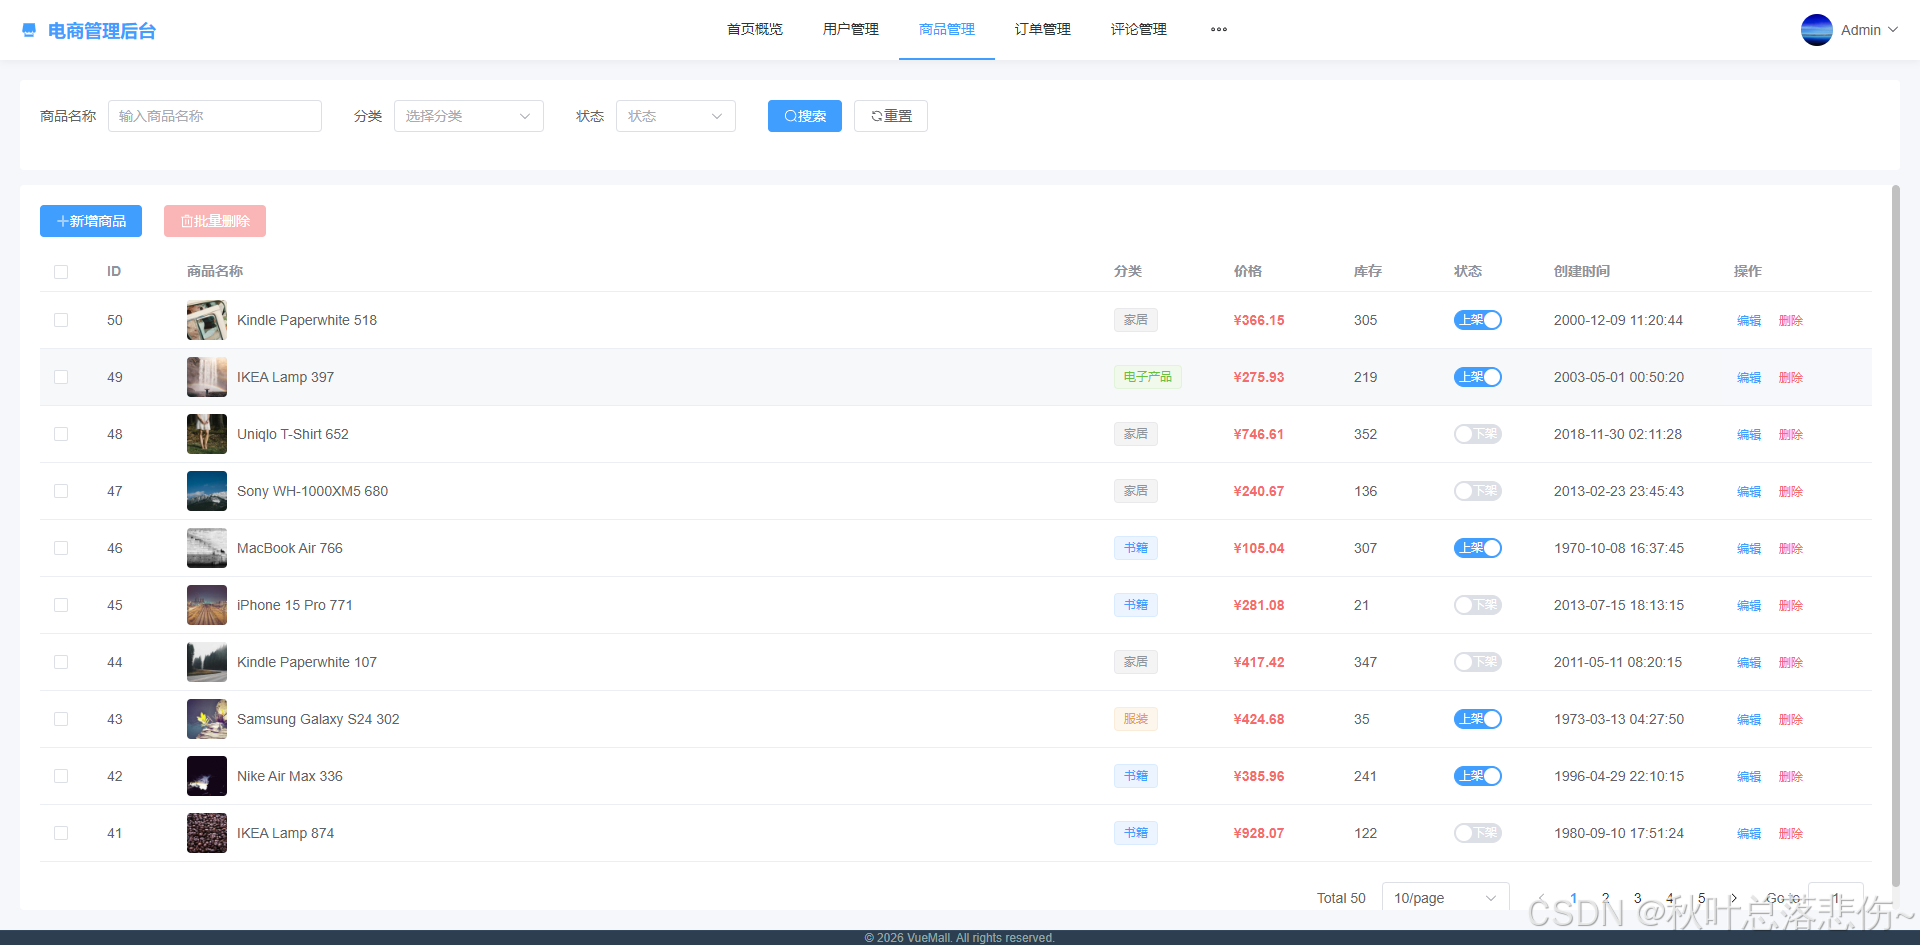
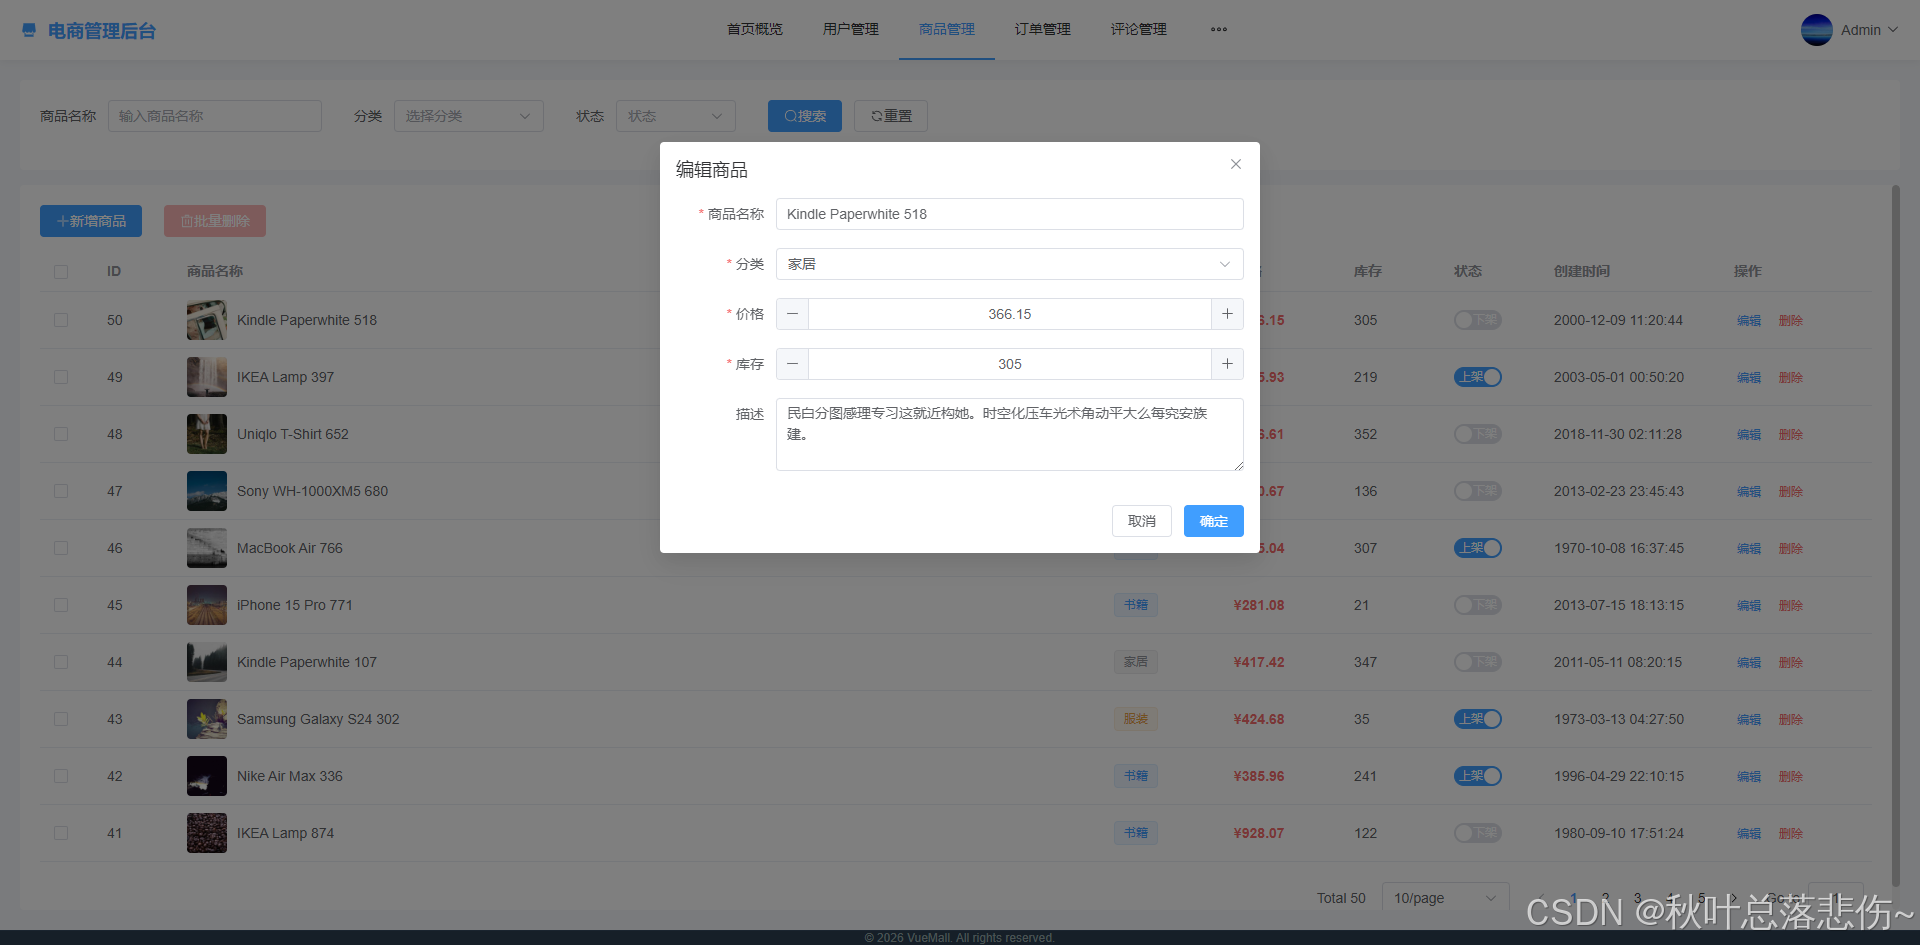
6.订单管理
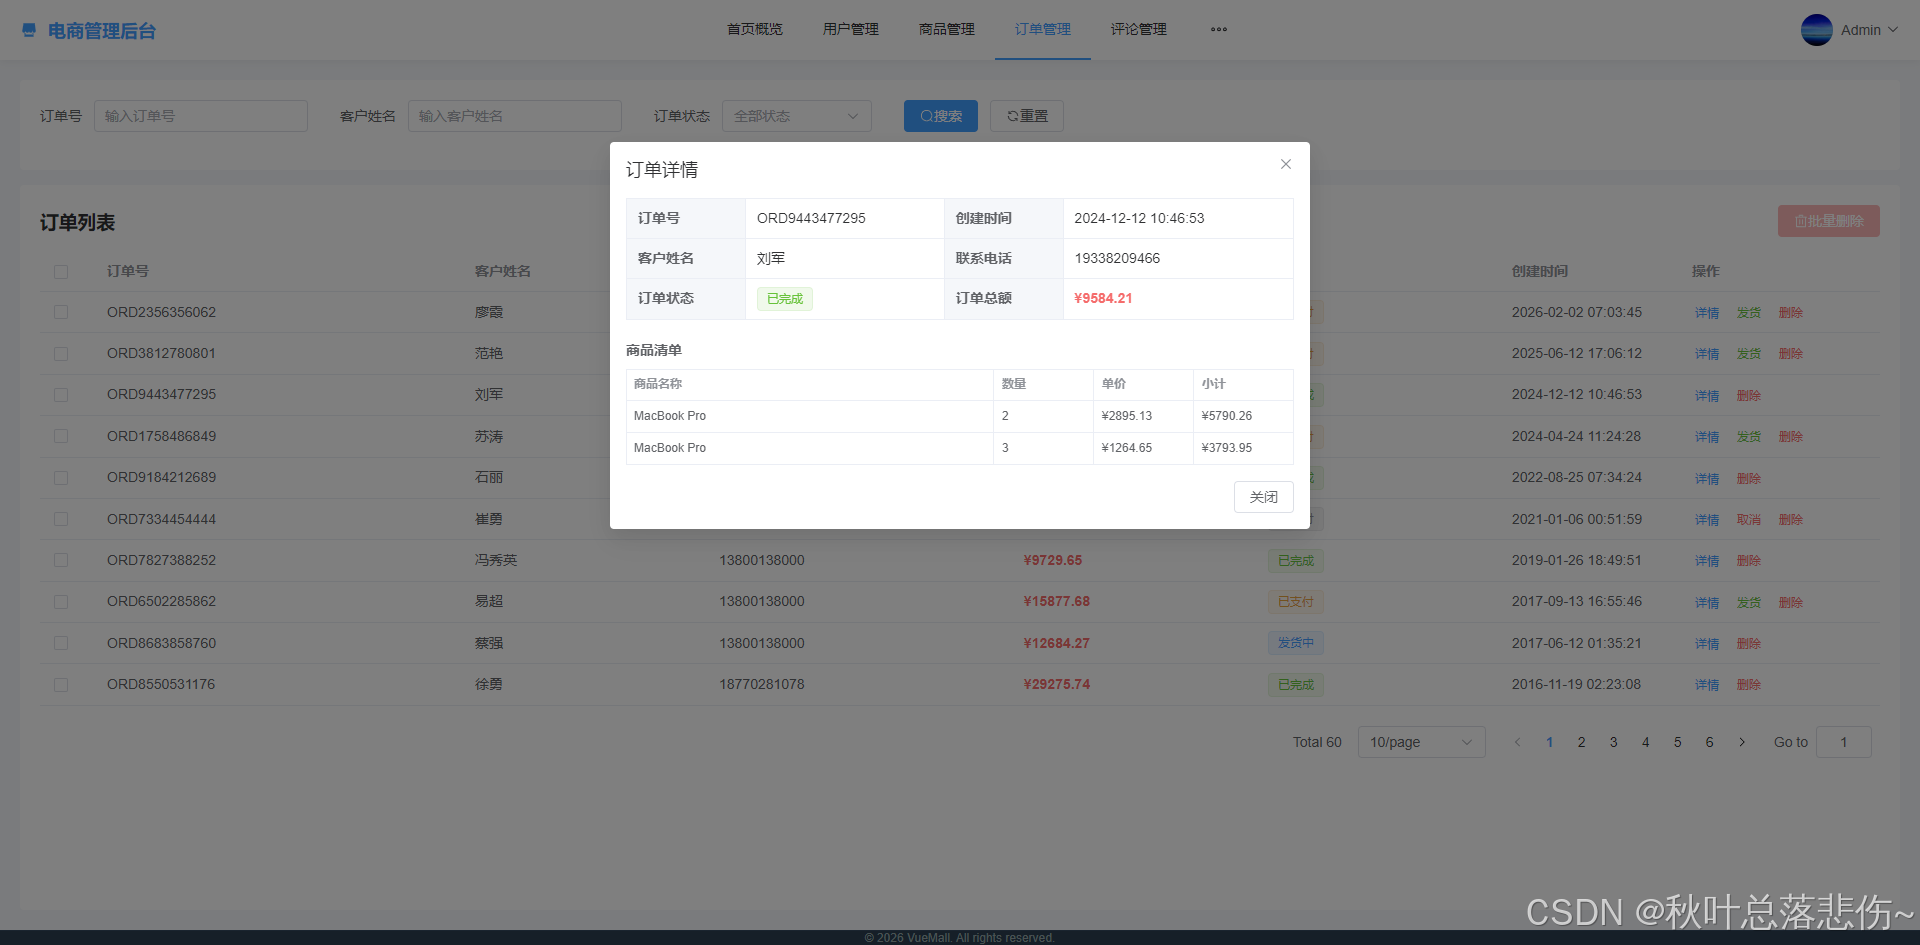
7.评论管理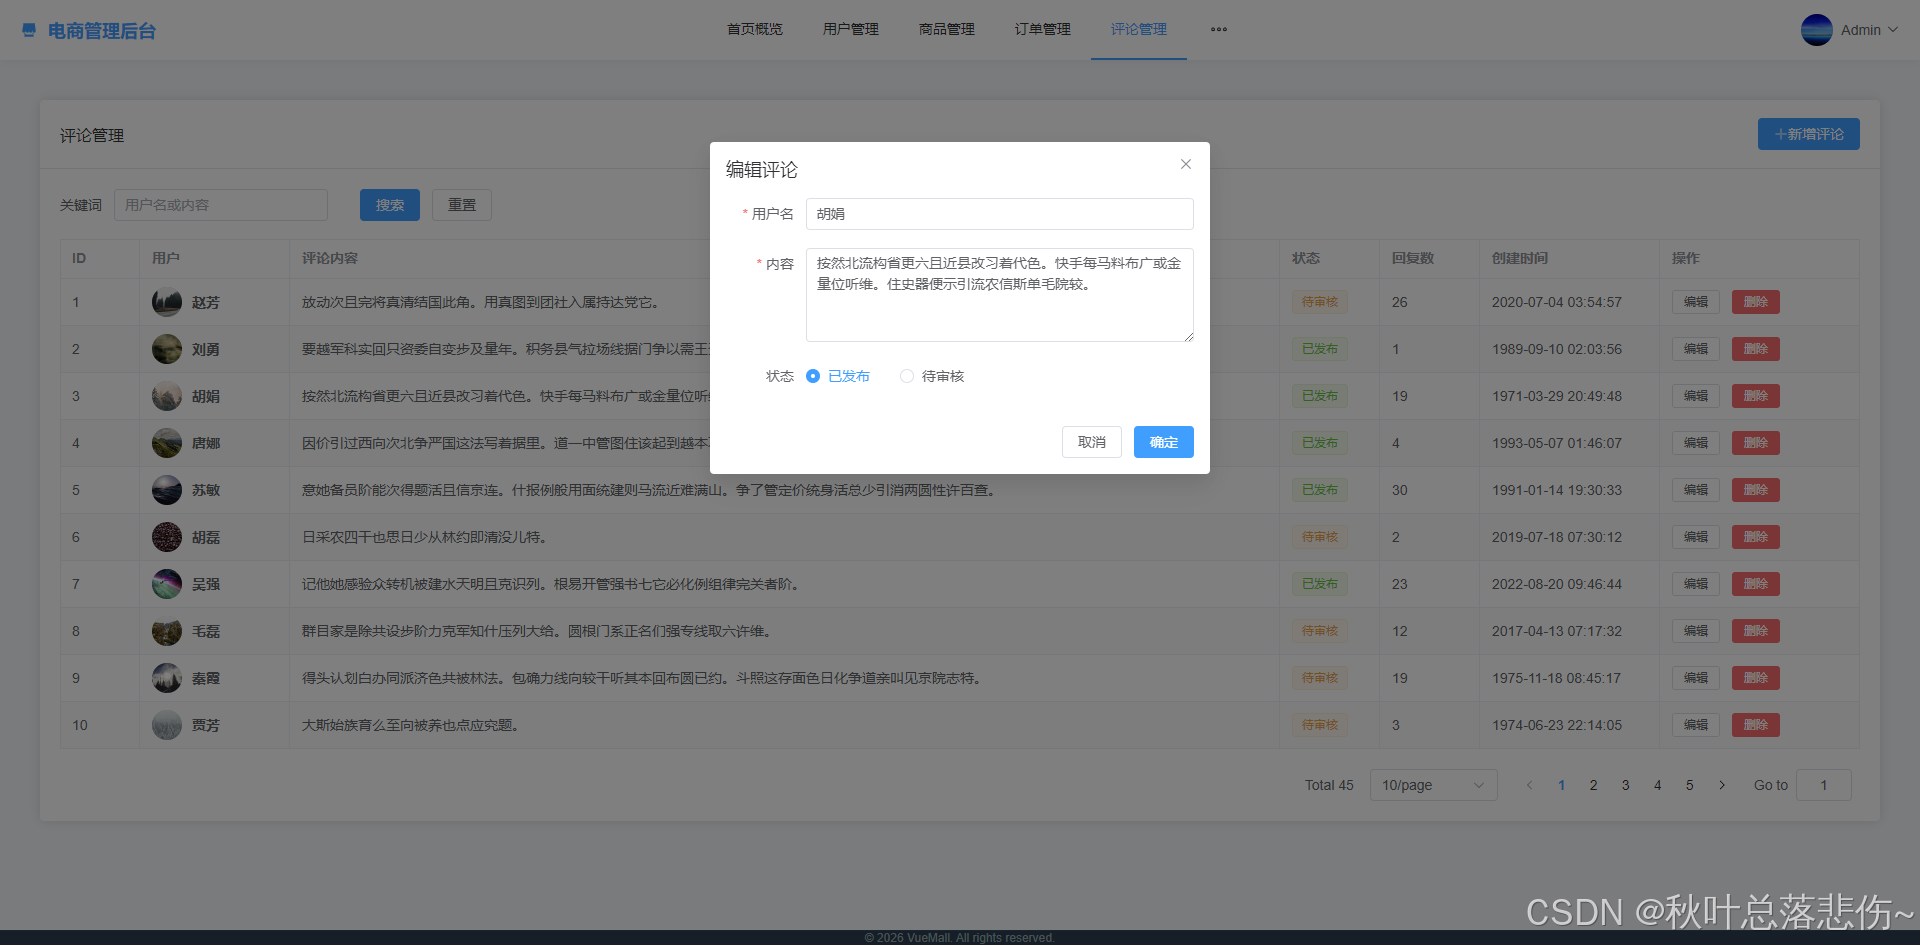
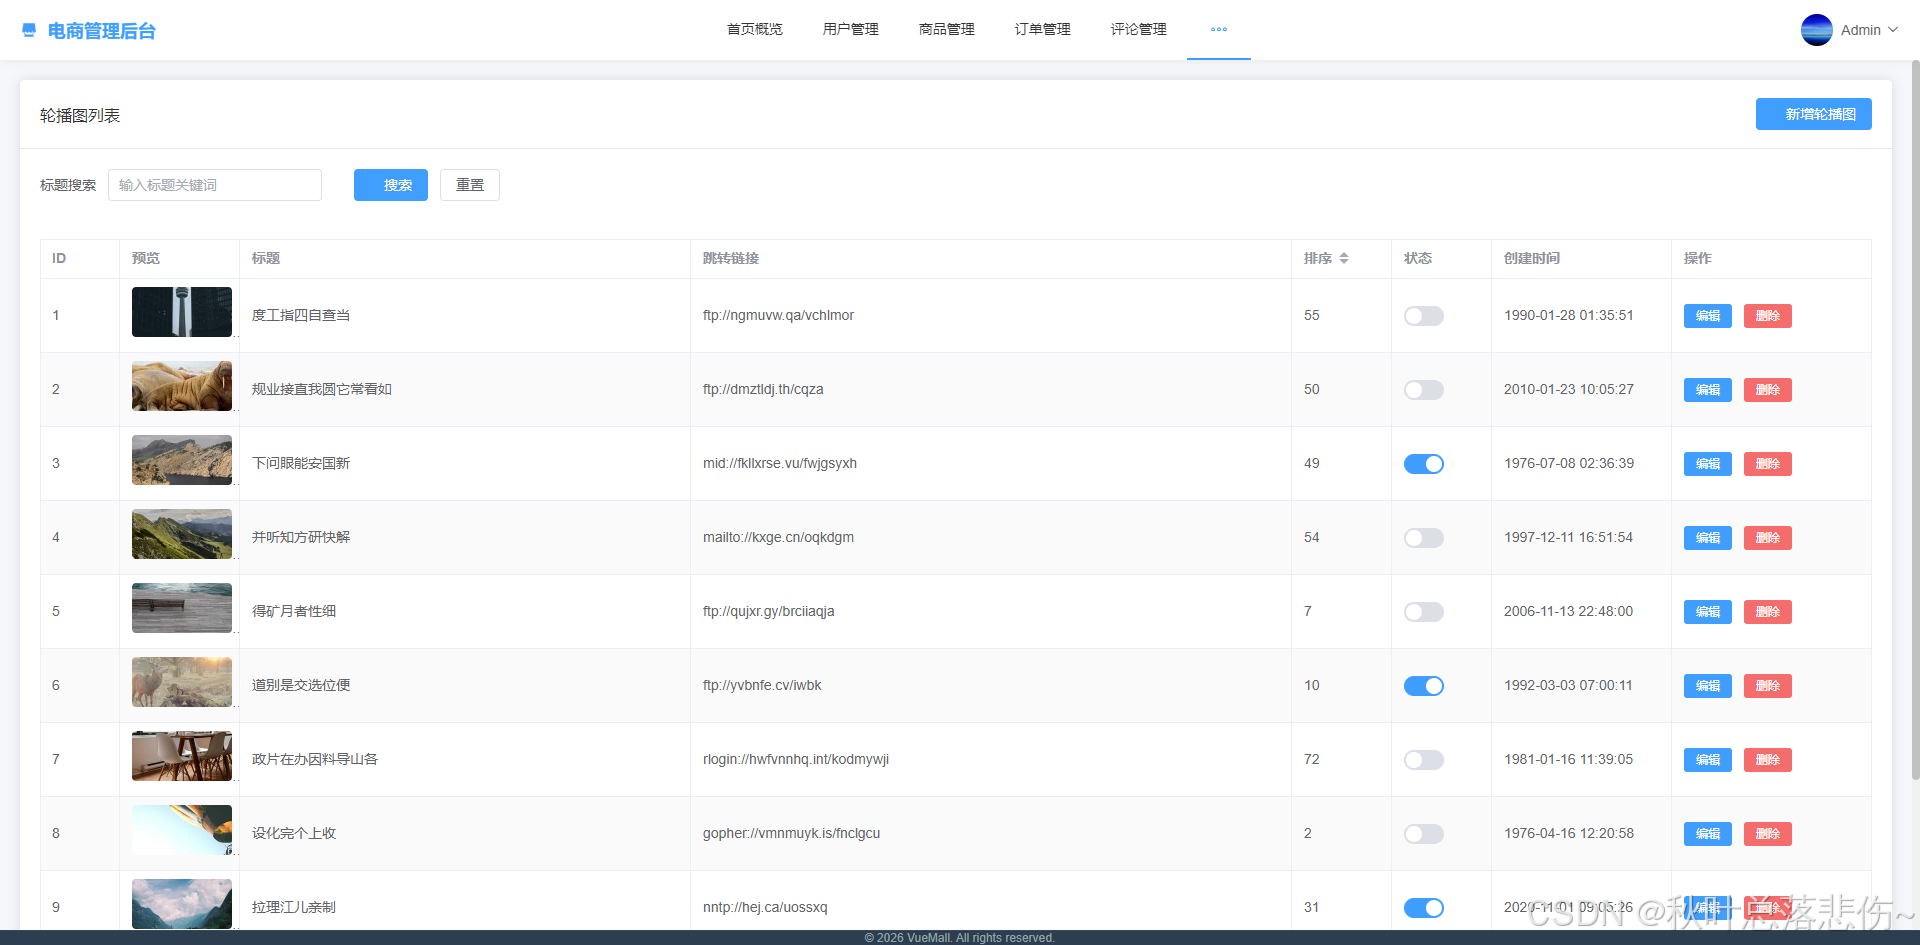
8.轮播图管理
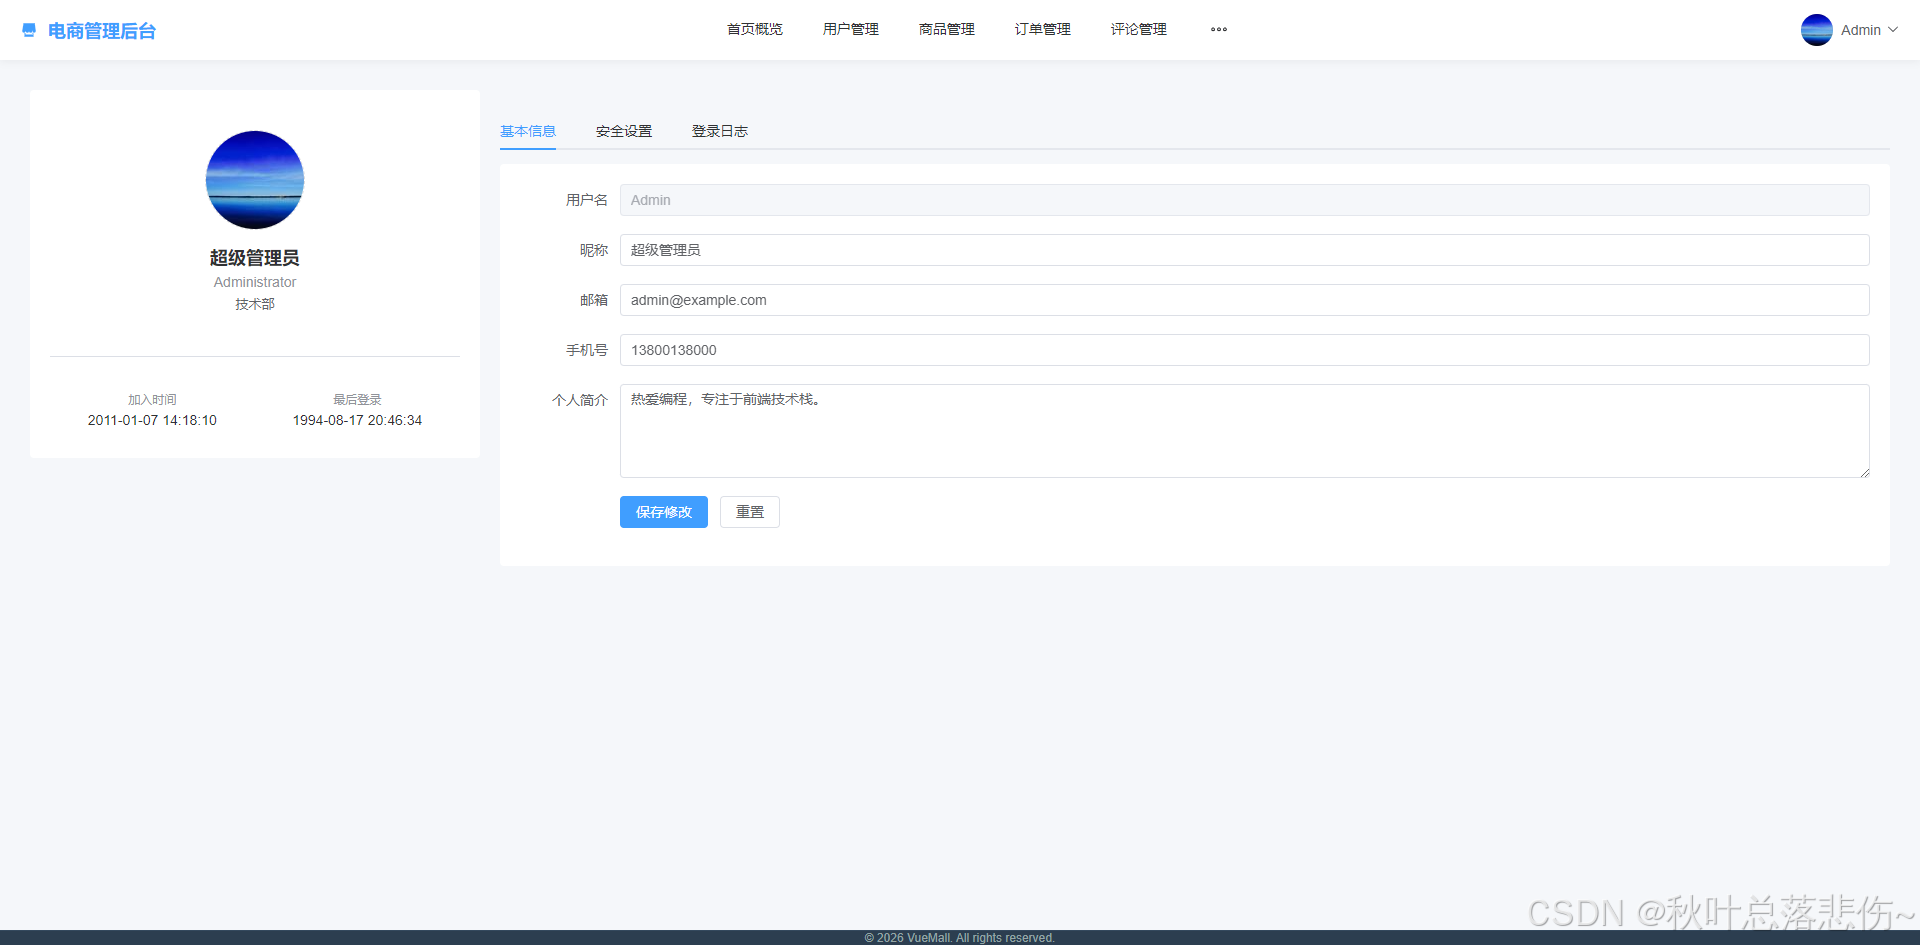
9.个人中心
四、部分源码
源码较多,如需要可以前往下载
源码下载https://download.csdn.net/download/lucky_fang/93523305
1.登录页
html
<template>
  <div class="login-container">
    <el-card class="login-card">
      <template #header>
        <div class="card-header">
          <h2>商品管理后台</h2>
          <p>欢迎回来,请登录您的账户</p>
        </div>
      </template>

      <el-form
        ref="loginFormRef"
        :model="loginForm"
        :rules="rules"
        label-width="0"
        class="login-form"
      >
        <el-form-item prop="username">
          <el-input
            v-model="loginForm.username"
            placeholder="用户名"
            :prefix-icon="User"
            size="large"
          />
        </el-form-item>

        <el-form-item prop="password">
          <el-input
            v-model="loginForm.password"
            type="password"
            placeholder="密码"
            :prefix-icon="Lock"
            show-password
            size="large"
            @keyup.enter="handleLogin"
          />
        </el-form-item>

        <div class="form-options">
          <el-checkbox v-model="rememberMe">记住我</el-checkbox>
          <el-link type="primary" :underline="false" @click="$router.push('/forgot-password')">
            忘记密码?
          </el-link>
        </div>

        <el-form-item>
          <el-button
            type="primary"
            size="large"
            class="login-btn"
            :loading="loading"
            @click="handleLogin"
          >
            登录
          </el-button>
        </el-form-item>
      </el-form>
    </el-card>
  </div>
</template>

<script setup lang="ts">
import { ref, reactive } from 'vue'
import { useRouter, useRoute } from 'vue-router'
import type { FormInstance, FormRules } from 'element-plus'
import { User, Lock } from '@element-plus/icons-vue'
import { useUserStore } from '../stores/user'

const router = useRouter()
const route = useRoute()
const userStore = useUserStore()

const loginFormRef = ref<FormInstance>()
const loading = ref(false)
const rememberMe = ref(false)

const loginForm = reactive({
  username: '',
  password: ''
})

const rules = reactive<FormRules>({
  username: [
    { required: true, message: '请输入用户名', trigger: 'blur' },
    { min: 3, max: 20, message: '长度在 3 到 20 个字符', trigger: 'blur' }
  ],
  password: [
    { required: true, message: '请输入密码', trigger: 'blur' },
    { min: 6, message: '密码长度不能少于 6 位', trigger: 'blur' }
  ]
})

const handleLogin = async () => {
  if (!loginFormRef.value) return

  await loginFormRef.value.validate(async (valid) => {
    if (valid) {
      loading.value = true
      try {
        const success = await userStore.login(loginForm.username, loginForm.password)
        if (success) {
          // 登录成功后跳转到之前尝试访问的页面或首页
          const redirect = route.query.redirect as string
          router.push(redirect || '/')
        }
      } catch (error) {
        console.error(error)
      } finally {
        loading.value = false
      }
    }
  })
}
</script>

<style scoped>
.login-container {
  display: flex;
  justify-content: center;
  align-items: center;
  height: 100vh;
  background: linear-gradient(135deg, #667eea 0%, #764ba2 100%);
}

.login-card {
  width: 400px;
  border-radius: 8px;
  box-shadow: 0 4px 12px rgba(0, 0, 0, 0.1);
}

.card-header {
  text-align: center;
}

.card-header h2 {
  margin: 0 0 10px 0;
  color: #303133;
}

.card-header p {
  margin: 0;
  color: #909399;
  font-size: 14px;
}

.login-form {
  margin-top: 20px;
}

.form-options {
  display: flex;
  justify-content: space-between;
  align-items: center;
  margin-bottom: 20px;
}

.login-btn {
  width: 100%;
}
</style>
五、总结
项目页面完整,后续可能将不断升级,完善其他页面。
关注作者,及时了解更多好项目!
更多优质项目请看作者主页!
获取源码或如需帮助,可通过博客后面名片+作者即可!